Folks who know me also know that I am always tinkering with something – cars, trucks, tractors, firearms, you name it. A few years ago a guy showed me how he could change fluids in his car using a vacuum siphon and I was intrigued but let it slide.
I recently went through all our old Toyotas and changed the transmission fluid to Valvoline Max Life and it dawned on me that it would be real nice to have a way to more precisely get the fluid right where I wanted it in the transmissions because I had slightly overfilled one car. Then I remembered the vacuum siphon and hopped on Amazon.
At any rate, thanks to Amazon prime, I ordered it and the unit arrived two days later. I must say that I was impressed. The plastics are all well done and it worked like a charm.
In this next photo you can see the little adapter and hose extension that comes with the unit. They say three in the ad and the first hose is attached to the cap with a strain relief. The hose is about .39/.31 (OD/ID) and 39.3″ long. The other two hoses are basically extensions via a soft rubber connector. I am using the medium extension that is .26/.21 OD/ID) and also 39.3″ long. That diameter has worked fine for Toyota T-IV ATF, Valvoline Max Life ATF and also 10W30 engine oil. When I say it can suck, that is a compliment in this case 🙂
The next photo shows the pump handle and also the venturi vacuum generator. I have that air line on my dryer system and is running 90PSI off a 60 gallon IR two stage compressor. It really didn’t use too much air. No vacuum generator will win awards for air use but you don’t need to run it for very long – just while you are pumping the fluid out and that will probably be about 2-3 minutes for most engines and transmissions.
The first time I used it, I did so with an air line (it can use compressed air to create a venturi vacuum) . It actually pumped way faster than I realized and I had over a quart out of the car before I realized it. You can definitely reduce the air flow to reduce the vacuum – it was just faster than I thought it would be, which is good news.
I was so impressed that I used the extractor to remove all the ATF from a 94 Corolla in very short order. I let it pump until nothing else came out — no problem.
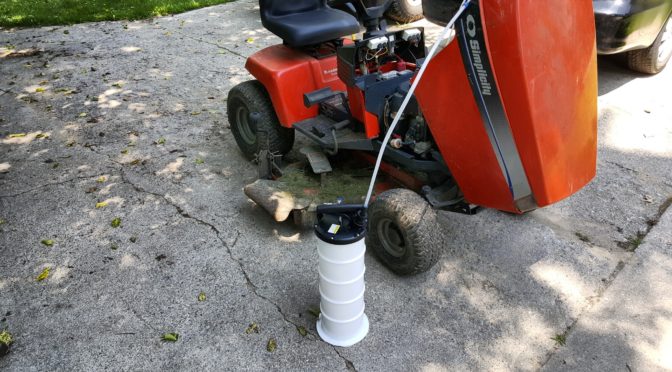
I recently needed to change the oil in my tractor – again, used the siphon and it drained it very quickly. This is noteworthy as I used the hand pump to create the vacuum and it really was effortless. This was also when it dawned on me I better take some photos 🙂 You can see it pulling out the 10W30 no problem at all.
In this next photo, you can see the unit with the hose cap off – it just twists off – and this is the pour spout to empty the unit also.
I’m still on my first set of hoses but they do have a variety of replacement hoses on Amazon in case you want just one hose or a set.
In summary, it’s a great unit. I’ve not had any problems at all and recommend it. Here’s the link one more time:
7/18/2023 Update: Still working just fine – it’s a lot dirtier from use but is still doing the job. A fellow did ask me if they have other sizes and the answer is “Yes”. Click here for the EWK store on Amazon.
6/28/2022 Update: Still working great. I’ve used this on cars, trucks, tractors and even to suck the hydraulic fluid completely out of my snow plow’s hydraulic fluid reservoir.
If you find this post useful, please share the link on Facebook, with your friends, etc. Your support is much appreciated and if you have any feedback, please email me at in**@*********ps.com. Please note that for links to other websites, we are only paid if there is an affiliate program such as Avantlink, Impact, Amazon and eBay and only if you purchase something. If you’d like to directly contribute towards our continued reporting, please visit our funding page.
This past winter I had the fun of changing the starter motor twice in 15 degree weather in my Landcruiser. It was a bear getting to the starter bolts with my full size Ingersoll Rand 1/2 Thunder Gun. It’s an awesome impact wrench and I had trashed a few cheap Harbor Freight ones before taking the advice of my friends and buying it. To make a long story short, with a long extension and a universal joint, I was able to get the two bolts out.
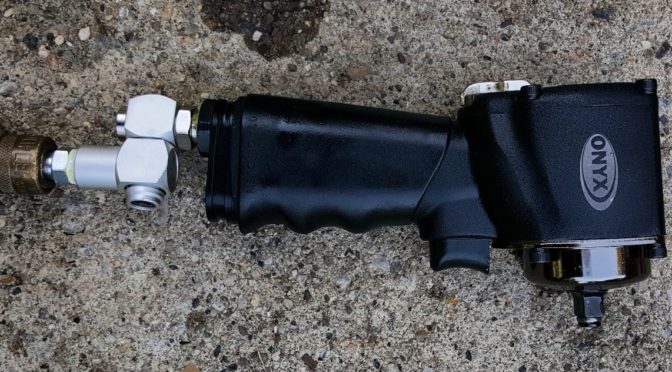
While working on the truck, it struck me that I really needed a compact impact wrench to get into tight spaces. I did some digging and found the Astro 1828 Onyx for 3/8″ impact sockets. I figured I wanted small and probably would not need 1/2″ most of the time.
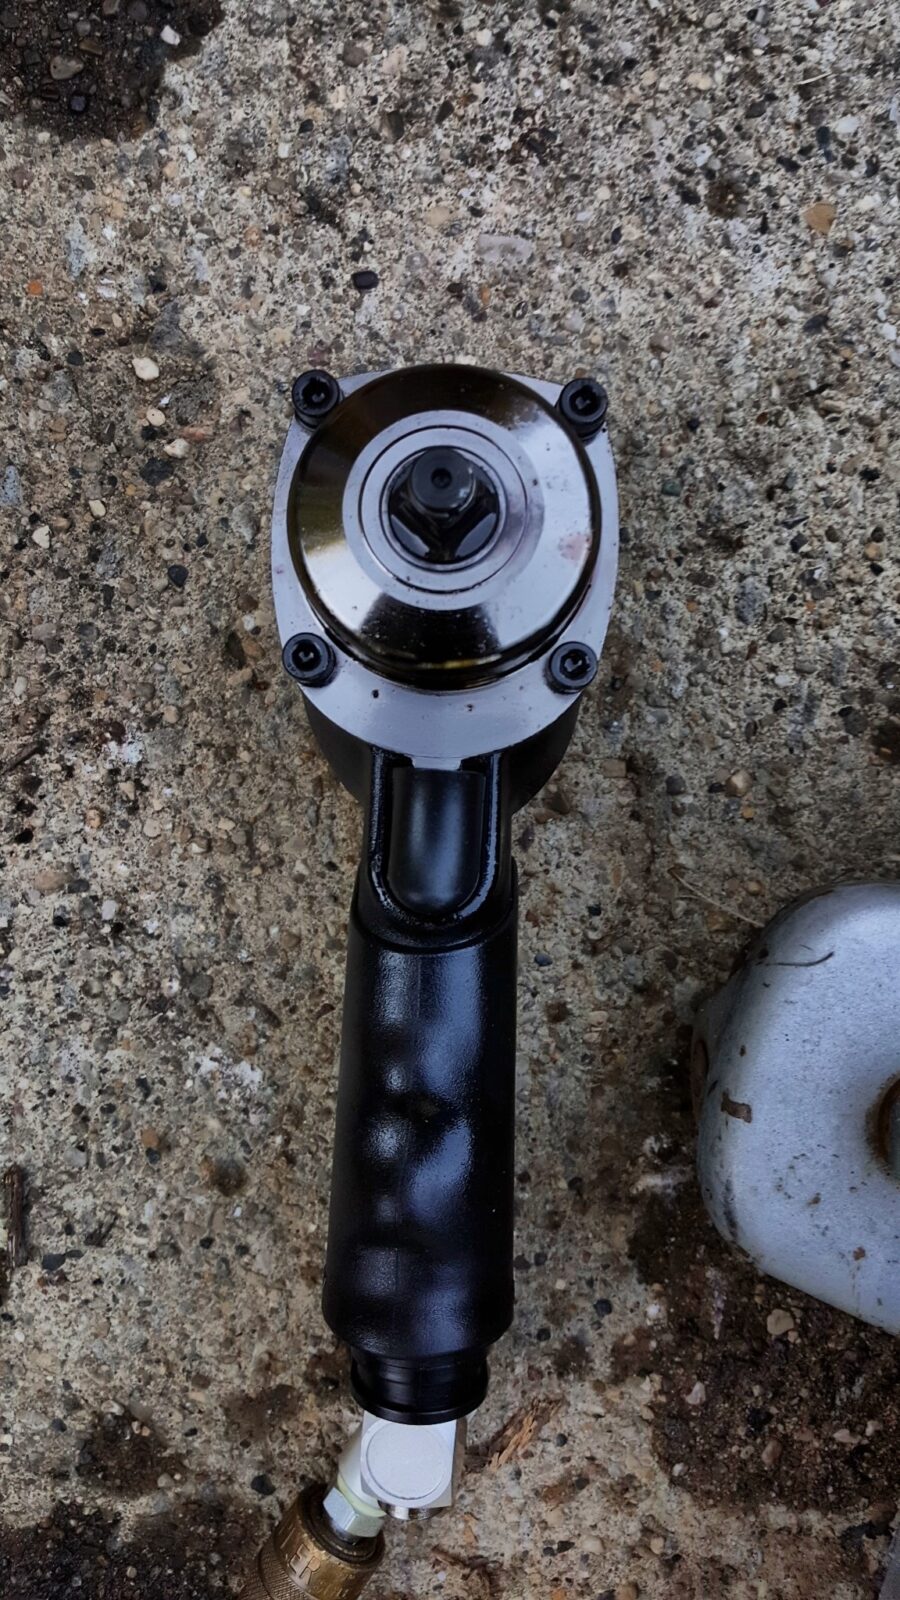
These next photos show how much more compact the Onyx is compared to the big Thunder Gun:
The little Onyx gets great reviews – currently 4.6 out of 5 stars on Amazon with 148 reviews. I bought it and a Hot Max 28083 Swivel adapter at the same time. It arrived in a nice little cardboard box from Amazon and I promptly put good Teflon tape on the swivel’s fittings, installed it and then a Milton M-style plug.
So far, both are holding up great in my home garage use (I’m not a pro mechanic – more like a shade tree one with ADD and sleep deprivation).
What I find interesting is that it is a torquy little beast. They claim 450 ft/lbs. I have not bothered checking using a calibrated torque wrench but I can tell you it’s done a great job so far. For big stuff / tight stuff, I still go to the Thundergun with its 625 ft/lbs of torque. The Onyx is more of a special purpose tool for me. By the way, if you notice it is shiny above, I had just used it to remove the drain plug off a 2002 Camry’s transmission. They are about 18mm and use a 10mm Allen bit to come off. My 10mm Allen bit is for a 3/8″ drive so I just stuck it on the Onyx and it whipped it right off. Reinstalling, I set torque at 1 out of 3 and then checked it with a 3/8″ drive ratchet wrench after — it was in there solid.
In short, I am happy with the little Nano and Hot Max swivel combination. I definitely still use my Thunder Gun for wheel lugs and big fasteners but the Nano is now my go to for tight spaces.
October 2018 Update: I had a problem with the hog ring clip at the end of the nose. It bent and would no longer hold sockets properly. It took a while for the maker to get me the clips but they did take care of me and gave me a few spare. Click here for the whole story.
If you find this post useful, please share the link on Facebook, with your friends, etc. Your support is much appreciated and if you have any feedback, please email me at in**@*********ps.com. Please note that for links to other websites, we are only paid if there is an affiliate program such as Avantlink, Impact, Amazon and eBay and only if you purchase something. If you’d like to directly contribute towards our continued reporting, please visit our funding page.
I’m a gear head and am always working on a car or tractor it would seem. Like many, I have a concrete drive way and it seems like no matter how hard I try, I get engine oil, grease, gas or whatever other crud on the cement.
I’ve seen guys post asking about how to get oil and what not out of a cement drive way and I have a simple answer – I use a degreaser called “Purple Power”. I know it is a crazy name but it works. I’ve been using it for probably 10 or more years and buy it by the gallon jug at Autozone. I can’t recall who recommended to me or just when – but I’ve used it for a long time and vouch for it.
My approach is simple:
If you have standing oil, pour clay cat litter or oil absorbing pellets and let it sit for a few hours to a day and then brush it up and save it to be used again. We don’t have cats so I usually just keep a big bag of the oil absorbent stuff from Autozone and use it over and over until it gets real oily. I just keep it in an old pail.
Pour on the Purple Power full strength and let it sit 15-30 minutes. I would recommend doing it in the morning or evening because you do not want it to dry out.
Use a hose with a pressure nozzle (just something to focus the spray coming out of the hose) and rinse the stuff off.
Let it dry and see how it looks. If there is still some dark spots in the cement, you may need to do it a couple more times. For me, it usually does the job in two passes but sometimes I need a third.
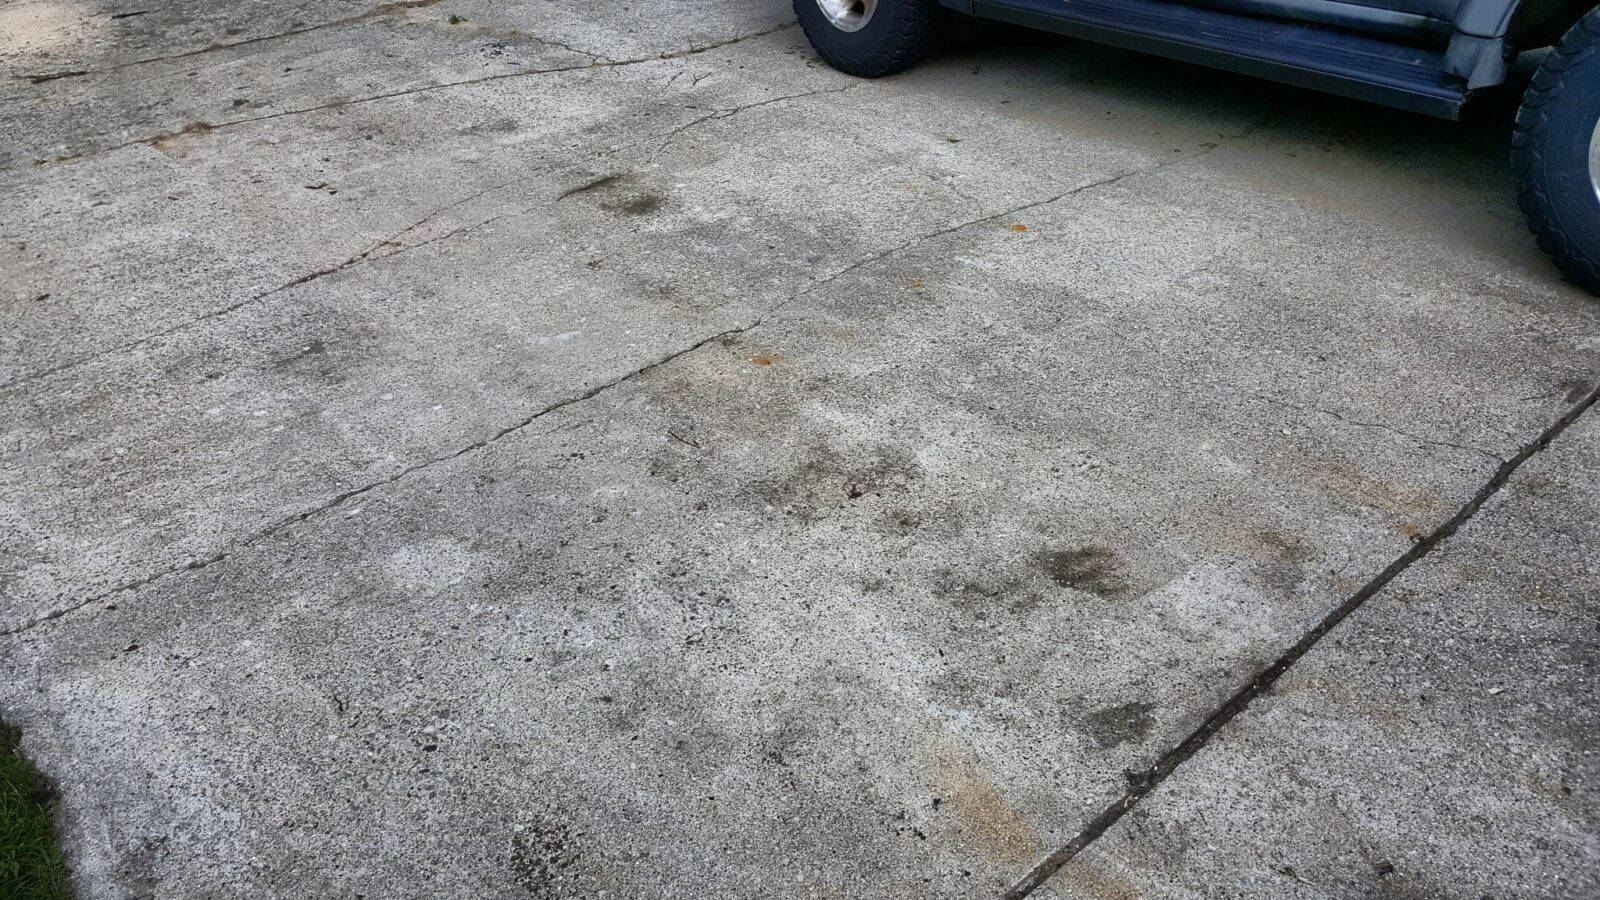
Okay, here’s a photo of my drive way after working on a car and a tractor. The big “blotch” is a combination of gas and oil. I changed the fuel pump on my tractor and then cleaned the engine up with brake cleaner and it went on the drive way. The four smaller blotches to the right of the Purple Power jug are soaked in oil from working on the car.
This photo is after three passes with Purple Power and letting it sit 15-30 minutes each time. If I had done it a fourth time it would be even brighter but I literally ran out of cleaner. You can see the big blotch is entirely gone. Really, just a bit is left. At some point this weekend, I’ll run up to Autozone and get another gallon and finish the job.
If I didn’t use Purple Power, my driveway would be an absolute mess. I go through about a gallon per year sometimes two – it just depends on what all I am working on and how often I clean up my driveway.
I hope this helps you out!
If you find this post useful, please share the link on Facebook, with your friends, etc. Your support is much appreciated and if you have any feedback, please email me at in**@*********ps.com. Please note that for links to other websites, we are only paid if there is an affiliate program such as Avantlink, Impact, Amazon and eBay and only if you purchase something. If you’d like to directly contribute towards our continued reporting, please visit our funding page.
I’m to the point with rifles that when I want to maintain accuracy, I know I need an accurate torquing driver. For years I used the Wheeler Firearms Accurizing Torque (FAT) Wrench and it was good enough. For about $40 I got the base unit that included a few bits and a case. The FAT wrench had a range from 10-65 in/lbs and good enough accuracy (+/- 2 in/lbs up to 40 pounds and +/- 5% over 40 in/lbs). My only beef with it was that the mechanical scale that shows you the torque settings was in 5 pound increments. To get close to 18 in/lbs, for example, required going close to the middle between 15 and 20 in/lbs and calling it even.
I used the FAT wrench pretty much exclusively from October 2014 to May 2018. It was good enough at the time – way better than going for ballpark feel “farmer tight” settings but in the back of my head though, I wanted better.
By the way, in case you are wondering why a person would get one of these torque wrenches or drivers, it’s because many torque wrenches aren’t calibrated in inch/pounds (they are often foot pounds in the US) and they may not go down as low as 10 inch/pounds (in/lbs).
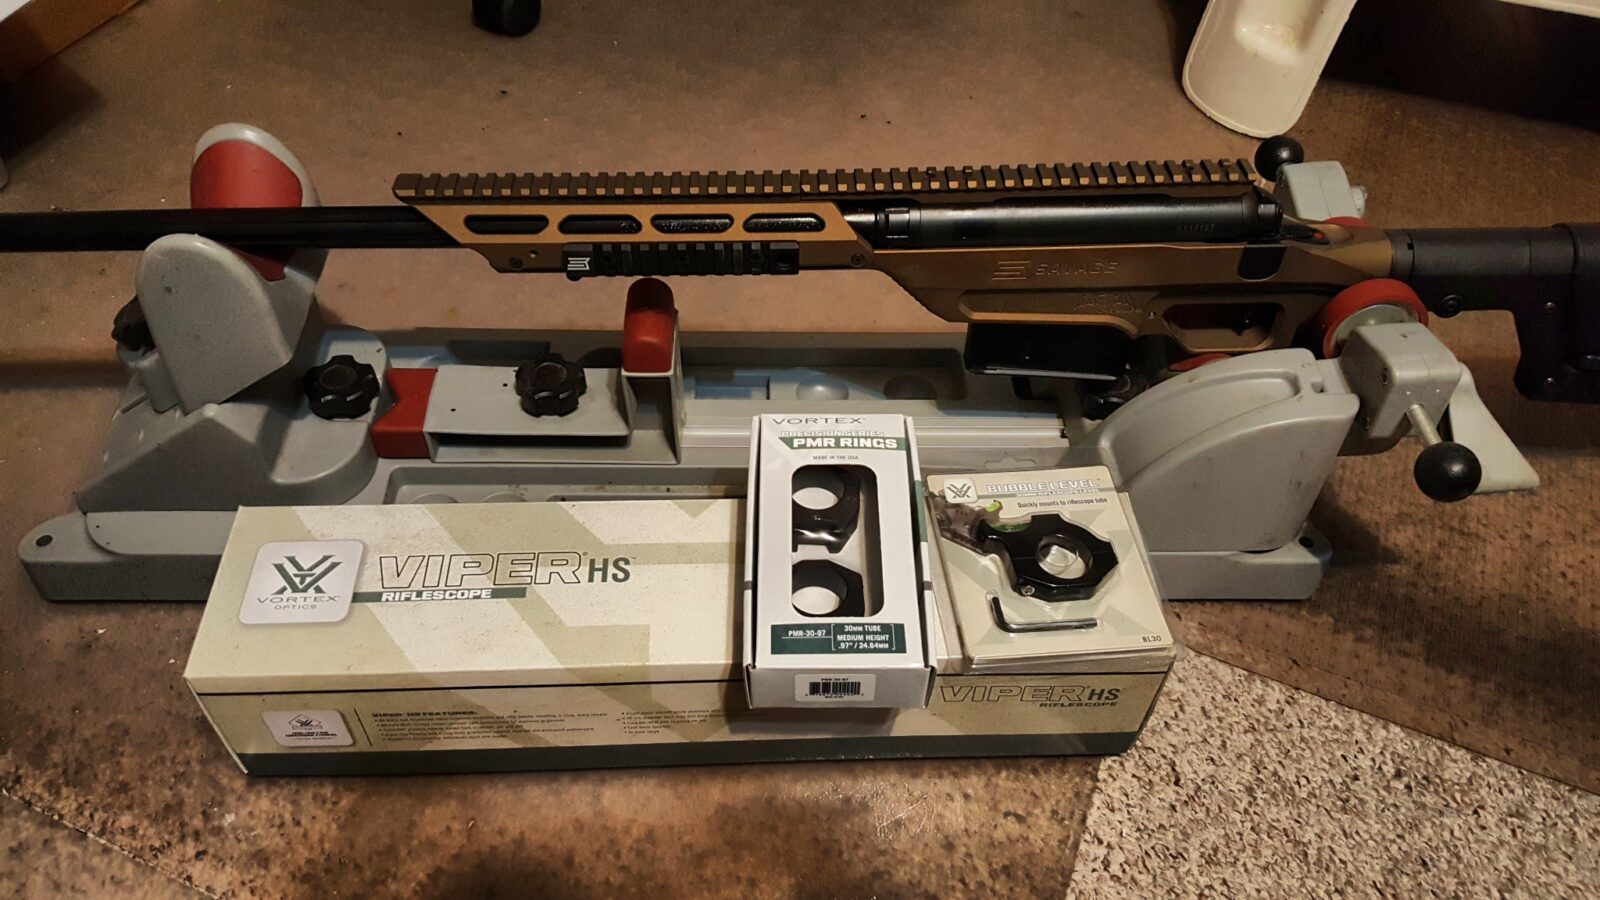
My interests span many types of firearms from AKs to precision rifles. With the latter, I own a number of sub-MOA rifles and they demand precision tools if you want repeatability and reliability. These rifles also have very good Vortex scopes and rings as well. If you want consistency and the rings to not shoot loose, the value of a torque wrench becomes apparent fast.
I’m a Vortex fan – there’s no two ways about. Their optics are superb and they have an absolute “we will stand behind it no matter what with no nonsense” warranty. Once in a while I will see guys troll the brand on Facebook but I honestly question whether they have ever actually even owned one.
Folks, I’ve owned probably 7-8 superb Vortex scopes and a ton of red dots. I really don’t know how many red dots of various types – probably approaching a dozen. The glass is good, the scopes are durable and do you know how many times I have used the warranty? — None. In talking with guys that have, Vortex took care of them.
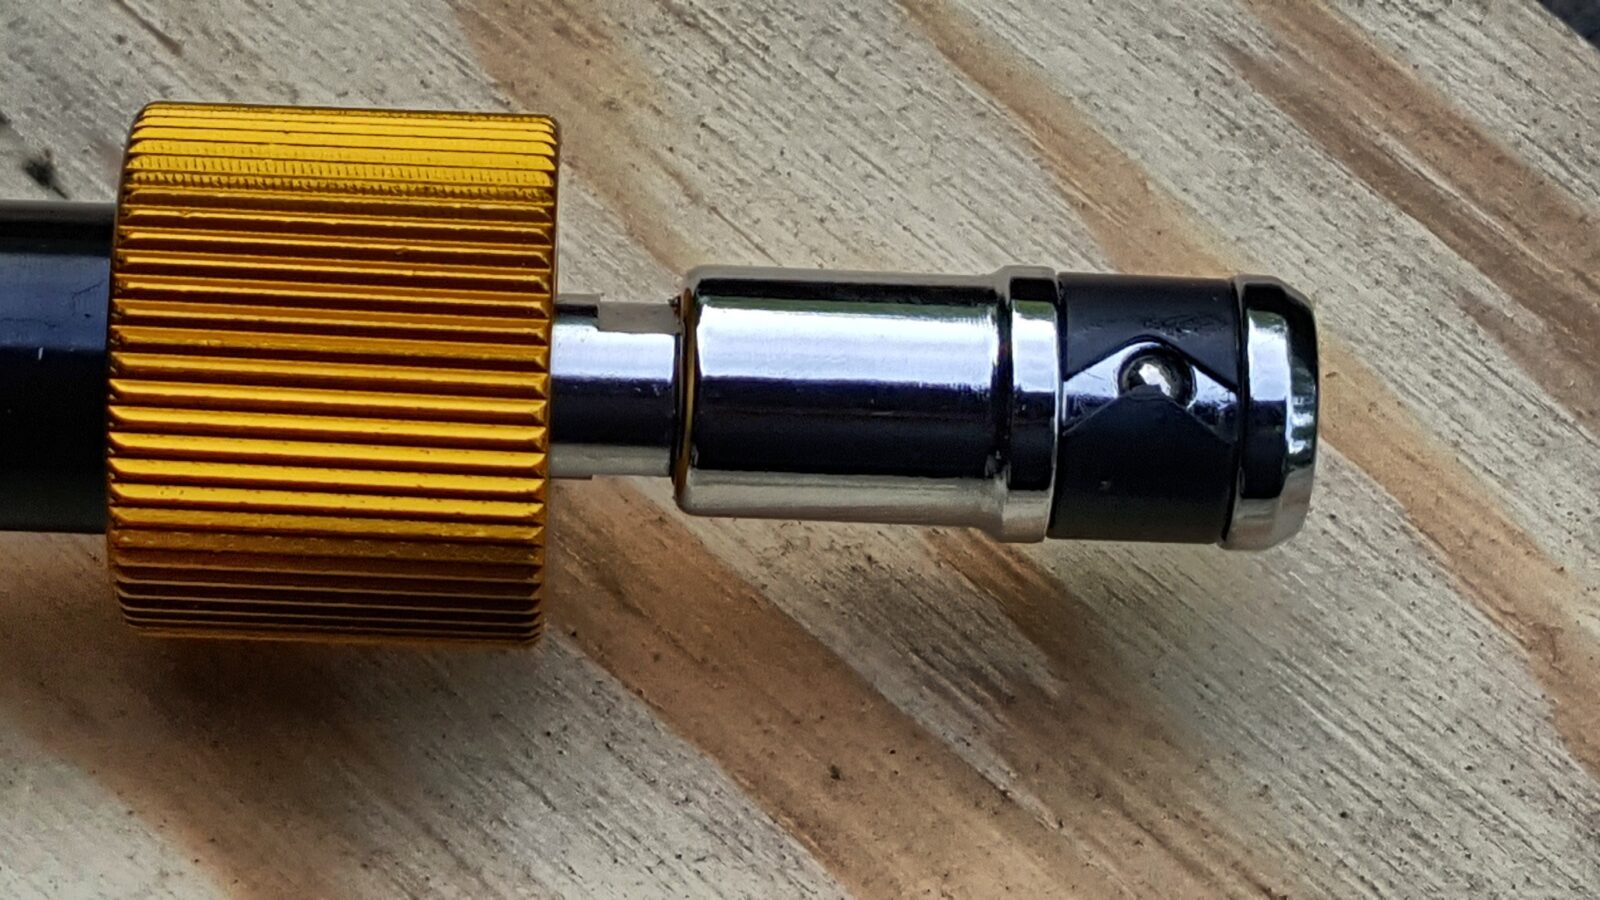
When it arrived, the first thing I noticed was the heft. This is a solidly built metal tool that screams quality. It comes with a few bits. You pull the copper colored locking ring down and turn the handle to get the torque you want. I did find that you have to push the bits in very firmly. There is a detent ball that holds the driver bits in and it is surprisingly stout.
A nice touch is that the end of the handle has a 1/4″ socket if you want to use a ratchet wrench for higher torque applications. For example, Vortex precision rings can go up to 50 in/lbs. I can do that by hand most of the time but a ratchet makes it much easier.
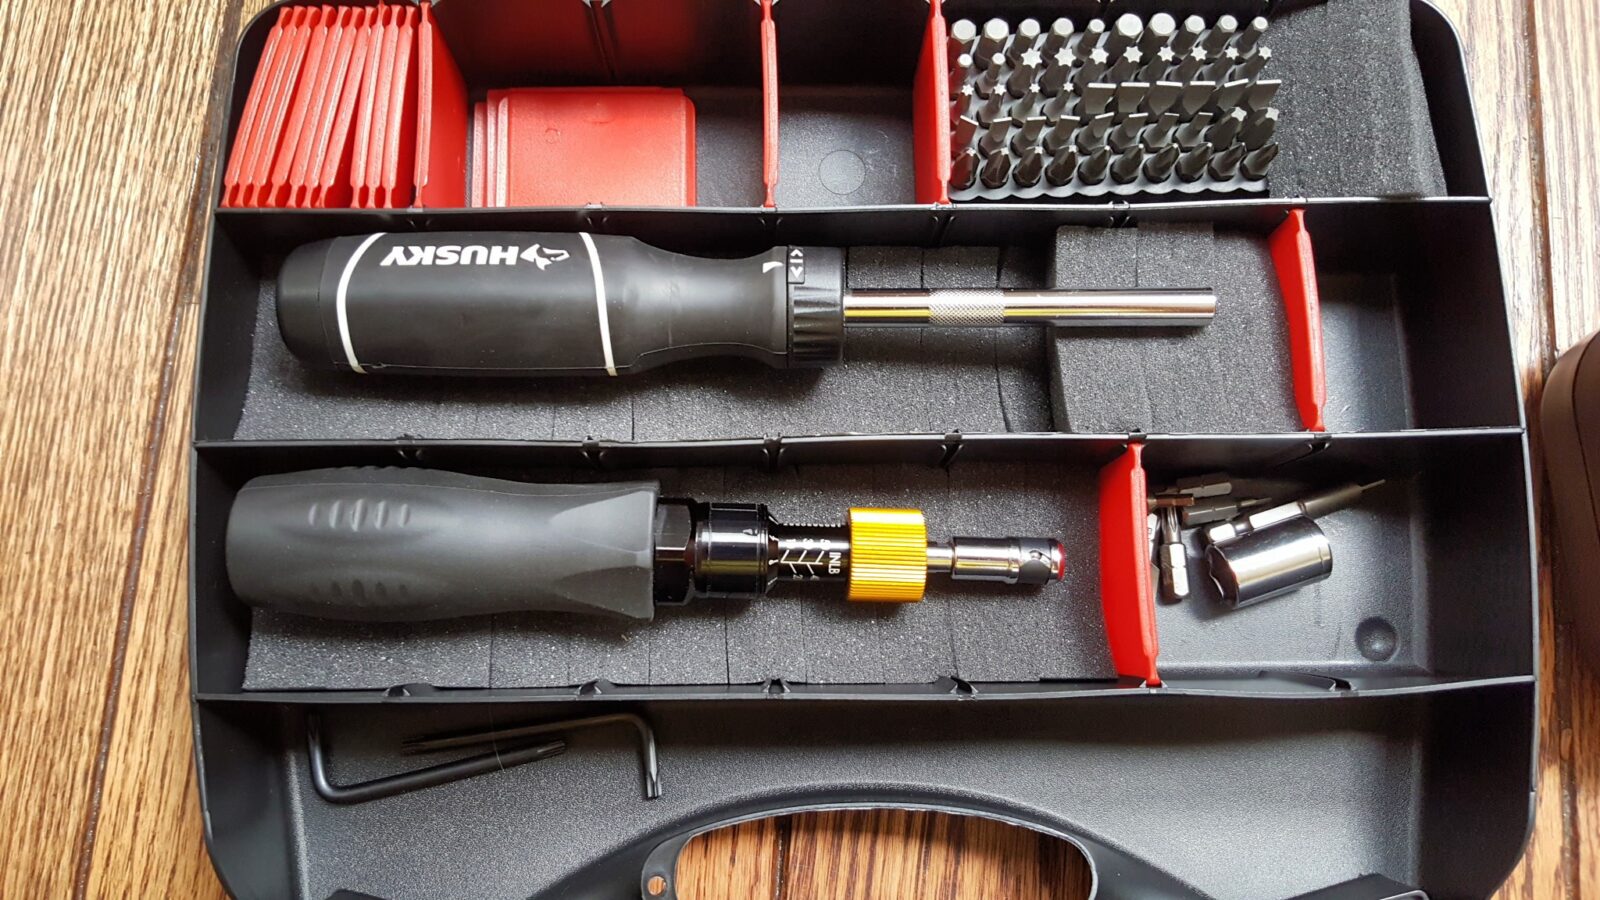
On the topic of bits, it is a standard 1/4″ drive so you can get a large collection of bits and pair it up with this unit. For example, I had a Home Depot Husky brand driver with a ton of bits that I picked up on sale at some point and just had sitting on the shelf. I put it with the Vortex and its few included driver bits. Additionally, when I am working on a firearm, I typically have my Weaver deluxe toolkit open as well. It contains a great selection of bits that you tend to find on firearms.
There is one thing I changed though – the Vortex unit comes in a round plastic case that is nice and strong but I don’t have the patience to try and put it all back together for storage. So, I hopped down to Ace hardware and bought a case to hold the Vortex torque driver, the Husky driver and all the bits plus I have room for more storage. I also used some of my spare pluckable foam left over from cases to pad the bottom of the case.
In case you are wondering, here are photos of my FAT and Vortex torque drivers side by side:
In this next photo, you can see what I mean about precisely setting the torque on the wrenches. My Vortex Precision Scope Rings specify a torque of 18 in/lbs. With the Vortex wrench, you can precisely set it for 18 pounds. With the FAT, it’s somewhere around 17-19 pounds plus we already know the wrench’s accuracy is limited to +/- 2 in/lbs as well.
On the topic of accuracy, the Vortex driver comes with a certificate of calibration to testing standard DIN-ISO-6789 by a gentleman named Tom on Feb 27, 2018. You can see my specific wrench nails the accuracy – no more guesswork and no more ballpark torque setting.
3/28/24 Update: I use this for any small screw or nut with a torque spec in its range. I use it for rings, handguards, you name it and always reset it to zero afterwards to keep it accurate. Beware of knock-offs that look like it – you’ll get what you pay for.
9/21/23 Update: This is still my go-to tool for scope rings. It’s still working great – just remember to reset it to zero before you put it away.
If you find this post useful, please share the link on Facebook, with your friends, etc. Your support is much appreciated and if you have any feedback, please email me at in**@*********ps.com. Please note that for links to other websites, we are only paid if there is an affiliate program such as Avantlink, Impact, Amazon and eBay and only if you purchase something. If you’d like to directly contribute towards our continued reporting, please visit our funding page.
In short, Harbor Freight quick couplers look like a cheap way to go. The problem is that they are really soft. I can’t even guess how many female fittings I have thrown away as they deformed and started to leak air.
The same goes for the soft male fittings. You will find they abrade easily and leak air plus they bend and break easily. The latest example is this male plug on my IR 117 air hammer where the smaller nipple is tearing away from the relatively thicker base:
My solution is simple – I only use Milton air fittings now and you can get them from Amazon at an affordable price. Every time one of my many Harbor Freight units fails, I replace it. By the way, I’m to the point that I don’t recommend any of the cheap import fittings regardless of maker. Milton isn’t much more and they will last.
By the way, when you look purely at the purchase cost that doesn’t tell the whole story. This fitting failed right at the start of the job and set me back about 10-15 minutes while I was rummaging around for my Milton spares, my teflon tape, the wrench, setting the tool in the vise to do the work, etc. All of a sudden the supposed purchase savings doesn’t seem like a big deal. By the way, I was swearing the whole time too 🙂
If you find this post useful, please share the link on Facebook, with your friends, etc. Your support is much appreciated and if you have any feedback, please email me at in**@*********ps.com. Please note that for links to other websites, we are only paid if there is an affiliate program such as Avantlink, Impact, Amazon and eBay and only if you purchase something. If you’d like to directly contribute towards our continued reporting, please visit our funding page.
Recently I got out my Ingersoll Rand model 117 air hammer to use and found out its action had gotten all gummed up. It’s been probably a year since I last used it even then probably didn’t use it a ton. I always drip air tool oil into a tool before use because my air lines run driers and particulate filters for my plastics work. Thus, I have to manually apply the oil before I use a tool.
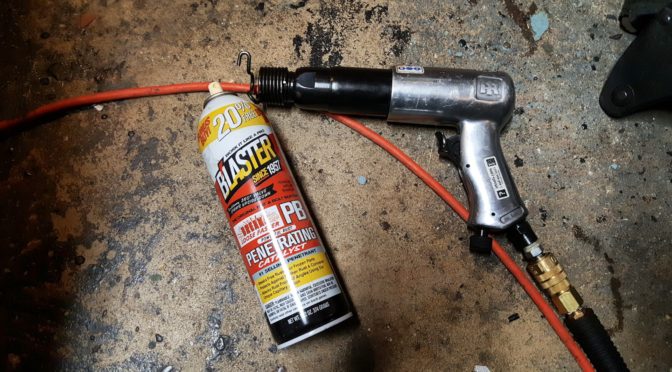
When I went to use 117 the piston would not actuate and when I shook the tool, it didn’t sound like it normally did. My first thought was to check the air pressure and it was at 90 PSI and the regulator was wide open so my next guess was lubrication. Adding more air tool oil didn’t make any difference. I then remembered a tip a guy told me years ago with gummy air tools – spray a ton of PB Blaster down the quick connect fitting and let it sit with the quick connect fitting up in the air trapping the penetrating oil in the tool for 5 minutes and try again.
So, I did that, reconnected the air line and it worked! The tool worked like a champ and it blew PB Blaster everywhere! I did it one more time just to make sure stuff was clear and ran the tool for a maybe 30 seconds to blow the PB Blaster out, wiped it down with a rag and then put in four drops of air tool oil. Problem solved.
This was a huge win because I was in the middle of working on AK and wanted to use this tool plus I didn’t have time to take it all apart, I’m writing this post a few weeks later after completing the AK build and the IR 117 is still working like a champ.
By the way, PB Blaster can be found at tons of automotive stores. The packing looks gimmicky but it is actually one of the best penetraing oils that is out there along with Kroil. If I didn’t have access to either of those, I would have made up some Ed’s Red or at least used some form of transmission fluid. Tranny fluid works great but take a while to penetrate gunk.
If you find this post useful, please share the link on Facebook, with your friends, etc. Your support is much appreciated and if you have any feedback, please email me at in**@*********ps.com. Please note that for links to other websites, we are only paid if there is an affiliate program such as Avantlink, Impact, Amazon and eBay and only if you purchase something. If you’d like to directly contribute towards our continued reporting, please visit our funding page.
For years I used my 20 ton press to remove and install barrels on AK rifles and then somone, Gunplumber maybe, told me to try using an air riveter instead. You know what, it surprisingly works well and now I only use my press on the removal of really stubborn barrels.
I am going to throw two terms around in this post that I need to explain. Air hammers and air riveters are remarkably similar – a pneumatic (air powered) pistol is going down a bore and slamming into the end of the unit where a tool is attached. Thus they are delivered from the hundreds to almost three thousand blows per minute (BPM). What usually, but not always, differentiates the two is the degree of control you have with the trigger and an integral air regulator to adjust the BPM and how hard the blows are. If you see a tool with virtually no controls, it is likely an air hammer. However, as you will read here, there are air hammers that do overlap with air riveters.
With air riveters, the main thing you get is a variable flow trigger, sometimes called a “tickle trigger” and usually a built in air regulator. This allows you to really dial in the speed and strength of the blows. When guys gush about how well they can control a big riveter, pay close attention because they aren’t kidding. When you are building an airplane you need precision and you sure don’t want the riveter to slip and mar the aluminum. Traditionally with air hammers we think about driving apart exhaust pipes, cutting open barrels and what not. With air riveters, think of airplanes,
Okay – enough background – let’s talk about how to size these things – riveters are are sized based on the stroke length of the piston and an arcane naming scheme like “2X”, “3X” and “4X”. Each has a piston about one inch longer than the previous model and the longer the piston, the harder it hits and the bigger rivet you can drive. Think of the piston in a car – diameter and stroke set the stage for more power.
For example Aircraft Tool Supply sells all kinds of tools for folks who build airplanes and have decent riveters – I have one of their ATS-3X units and it has held up great. At any rate, here are their tool ratings for example:
Note how the stroke is increasing from their base 200B unit through the 4x. When you get to the 5x and 7x, both the stroke and bore size increase. The capacity stated is for aluminum rivets so for steel rivets go two sizes up was a rule I was once told.
Most rivets you encounter around firearms will be steel and between 5/32″ to 3/16″. I was told not to go smaller than 3X and have no regret with doing AK trigger guards but I did wind up with two units because I wanted to more powerful unit for barrels and barrel pins. By the way, I was told not to go too small or all the hammer blows would risk work hardening the rivets.
Historically, I have mainly used this riveter for the trigger guard and an occasional barrel pin. For most of my heavy work such as barrel pins and barrels, I use an Ingersoll-Rand (IR) model 117 air hammer. Now here’s the interesting thing – most air hammers, especially cheap imports, do not have variable triggers – they tend to be on or off. Like riveters, the IR 117 has a variable trigger and a built in regulator. With piston stroke of 3.5″, and an 22/26″ bore it makes the 117 a tad bigger than the 4X riveter from ATS so all things being equal, the IR 117 will hit harder.
I know Harbor Freight has an air riveter now (they didn’t when I bought mine) but have zero experience with it and also not so good experiences with their air hammers not lasting.
Even Amazon now has a wide selection of 3x and 4x riveters. Click here to see them in a new tab. Amazon’s searches return pop riveters and all kinds of stuff – you want the solid rivet guns to be clear.
A big requirement for this work is control – you need a variable trigger so you can get just a few blows all the way up to continuous. A regulatory allows you to adjust how hard the unit hits. Some past import air hammers I have used seemed to have triggers that were either wide open, or completely unpredictable. If you have one that is this way, don’t try working on a firearm that you care about.
Both the ATS and IR units were recommended to me and I both do a great job. Note, there are bigger riveters and air hammers out there but you will notice that the tool shank goes from the very common 0.401″ to a larger diameter such as 0.498.
At any rate, let’s get back to barrels. Modern AK barrels are what is known as an interference fit with the barrel being pressed into the front trunnion and locked in place by a cross pin. In general a 12 ton press will do the job reliably but it takes a while to get the jigs set up and parts ready to go. A 4X riveter will usually do the job also but with way less set up time. I say usually because once in a while you run into pins or barrels that just do not want to come out and that’s when a big press is the way to go.
Practice First
Let me give you one piece of honest advice – if you go this route, practice before you beat the snot out of your parts. Air riveters and hammers want to move around on you and you need to know how to control them.
Removing the Barrel Pin
Now you may wonder why I went the pneumatic route vs. sticking with my press. The answer is real simple – when I am taking stuff apart, I don’t want to take a ton of time. I can use the 117 to pop out the barrel pin with either a drift pin or a tapered pin in seconds with very little set up. I usually just put the trunnion and barrel assembly on bench block with a hole for the pin to enter as I drive it out from the other side – I drive from the operating side (right when viewed from the top) towards the non-operating side (the left side).
If you are using a tapered pin driver, get the pin started and stop before the tool will hurt the trunnion. You can drive it out the rest of the way fairly easily with a drift punch and a big hammer. If you have drift punches for your air tool, just pick one slightly smaller than the hole and drive the pin out.
These days I keep parts in a magnetic tray to avoid losing them and that’s where I stick the barrel pin. If you ever lose or damage the pin, get a 7mm drill bit and cut off the shank to create the length you need. I used to keep 7mm drill rod somewhere – I’m not really sure where it is now.
Backing Out the Barrel
Driving the barrel off the trunnion is pretty easy but you do need to make a tool that fits in the trunnion and has a brass “head” to drive the barrel out without damaging the chamber end – DO NOT USE STEEL – it needs to be a softer metal and brass does a good job.
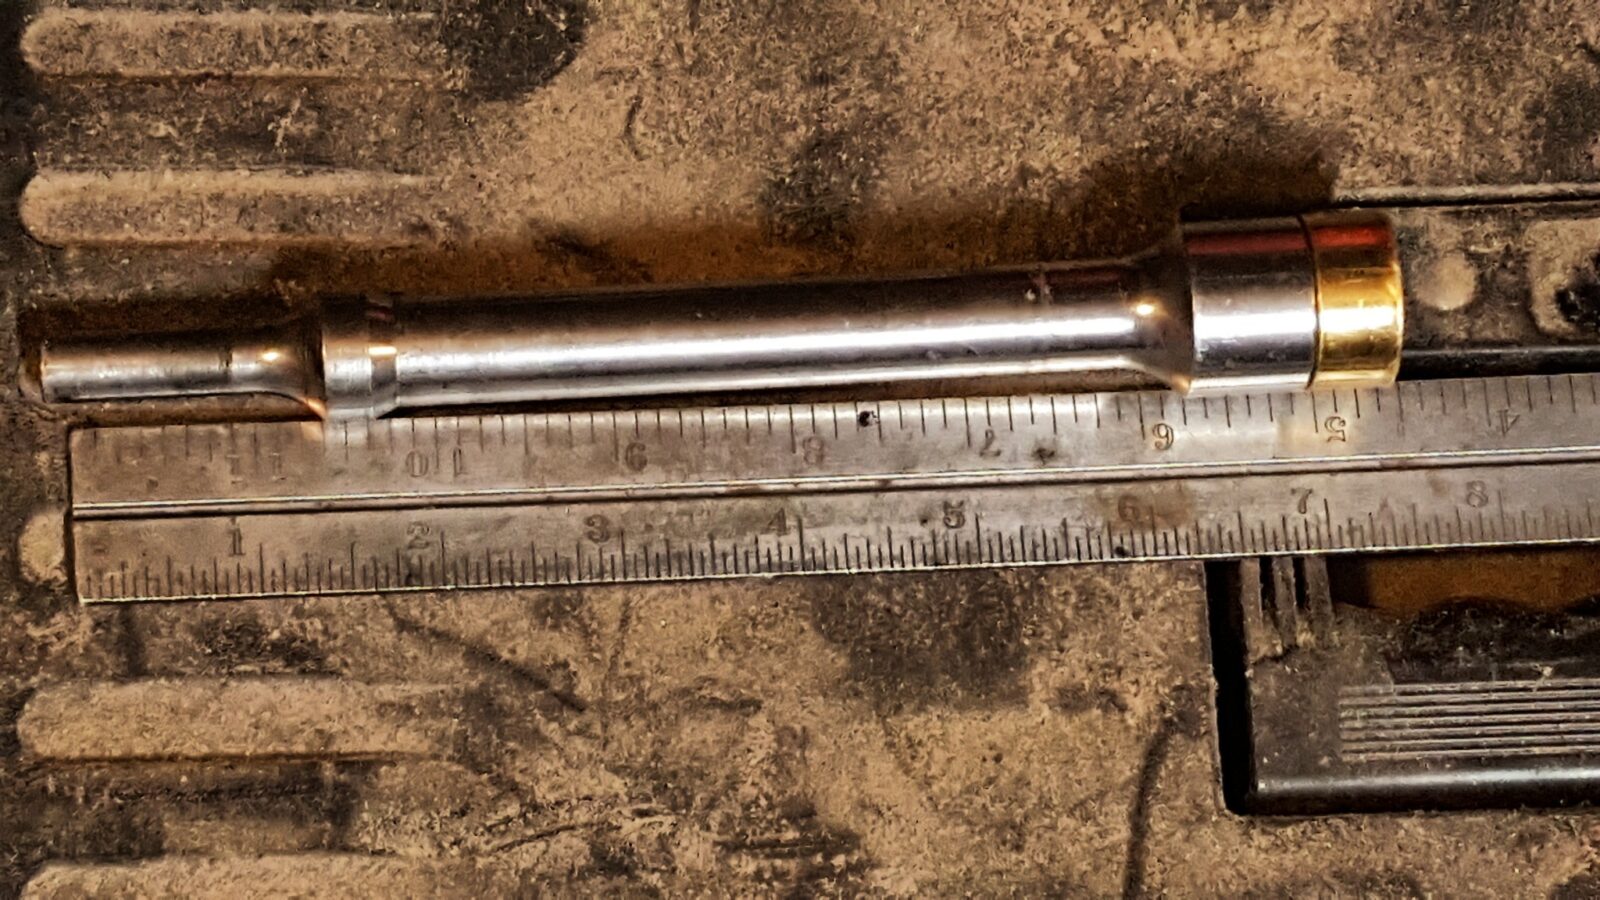
My backout tool is a 6″ long 1/2″ bolt with a brass nut on the end with a ground down steel backing nut behind it:
Why 6″ long? Because that is what I had in my box. Shorter would be more controllable. I actually have a long 12″ unit I use if I need to back a barrel out of a trunnion that is in the receiver.
Here’s a photo of the ground down steel backing nut and the brass nut that sits on the chamber end and applies the actual blows to drive it out.
You definitely need the steel backing but or the brass will deform and come off the threads. You can also see how the brass extends in front of the bolt – I always check to make sure I have about an 1/8th inch or so of brass before I use it. This is basically a shorter version of my barrel back out tool (click here for the post about that from way back when).
Now to deliver the blows on the business end of my IR 117 is a 7″ brass peening tool that ATS sells directly. I bought a 3″ unit but it will not fit in the wire retainer of my 117. They also have a 5″ model that I bet would work fine.
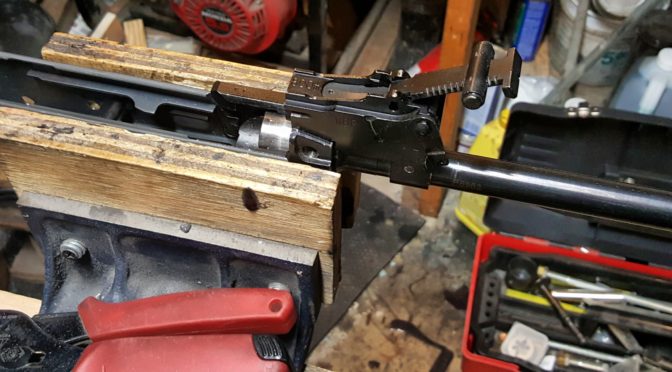
So, I mount the trunnion in my wood jawed vise to not tear it up, insert the backout tool and then use the 117 to apply the blows. I will hold the bolt with one hand and use the 117 with the other. Do NOT put your hand where the bolt and peening hammer come together or you will pinch the hell out of it. I did that once years ago and it taught me a lesson complete with a blood blister as a reminder.
So I do a bit and check – I do not try to do it all at once. By looking int he barrel pin hole, you should see it slowly backing out. In general, the last bit of removing the barrel I do with a big ball pein hammer to make sure the barrel assembly either is pulled out the last bit by me or land in some form of box or cushion vs. the hard floor.
That’s it! The barrel is out.
Installing the Barrel
To install a barrel, I first install an old slant brake that I ground flat to protect the threads. I have not used a muzzle nut because they do not seem to offer much protection to the front of the muzzle – they are mainly designed to protect the threads. With the ground down slant brake, there is a plenty of material in front of the muzzle to protect it.
You can see how it has mushroomed over time but that’s fine. I’ve used it a ton and if I ever have a problem, I’ll chuck it and make another.
My best guess is that it came out of a Romanian G kit years ago. I have a bunch of oddball parts like this that got replaced by US parts for the sake of 922r compliance.
I thread the converted brake / muzzle protector all the way back on the barrel to engage all the threads possible and back it right against the front sight block (FSB). The idea is that you want the threads to take the impact and not the muzzle.
To start the installation, I push the barrel assembly into the trunnion and tap it with a big ball pein hammer. I keep sighting down the rear sight block (RSB) making sure it is true. At the point, you can use a rubber mallet or other non-marring mallet to tap the RSB and angle the barrel slightly one way or the other to course correct. It is really, really important to get the alignment right at the start. You will not be able to adjust it once you get very far in. If it turns out you have alignment problem later, I would recommend driving the barrel assembly out and starting over.
To do the actual driving, I use the IR 117 with the brass peening hammer attachment. I put the brass hammer face right on the converted slant brake and drive it in. I keep checking the barrel pin hole to make sure I stop just short of the final location and that it is aligned. If the surfaces are not aligned, I would drive the barrel back out and start over. In this next photo, you can see I stopped just short of where I need to be.
Now this particular kit was a headspaced Polish WBP kit and I had checked headspace before I removed the barrel. If I needed to set the headspace, I would start checking it somewhere around here.
At this point, I drive the barrel in the rest of the way by tapping the end with a big ballpein hammer – or any BFH will do 🙂 It really doesn’t take a ton of energy. You want to tap and test over and over. Don’t get impatient and try and drive it in all at once or you risk overshooting where you want to be. If you do overshoot, it’s going to take some time and you need to make that longer barrel backout tool and either use your press or your air tool (I’d use my IR 117) and push it back out just enough to then fine tune the location.
Do not use headspace gauges as barrel stops. You may know this but just in case you don’t – gauges are precision instruments and you only install them to test the headspace and *not* as a way to stop travel. I’ve heard of guys doing that and, for a change, I wasn’t one of them 🙂
Once the channel is clear and you have one nice continous path from one side of the trunnion to the other it is time to reinstall the pin.
Installing the barrel pin
With I do is start the pin with a big ball pein hammer and then drive it in the rest of the way with an old rivet set that I use just for this purpose. Years ago I bought a ton of used 0.401 shank rivet sets and rivet tools off eBay for a very reasonable price. I use one that covers the pin nicely and drive it right in and let me tell you, it goes in fast. You can stop short and drive it in the test of the way by hand if you want. I tend to just drive it right into place with the air tool.
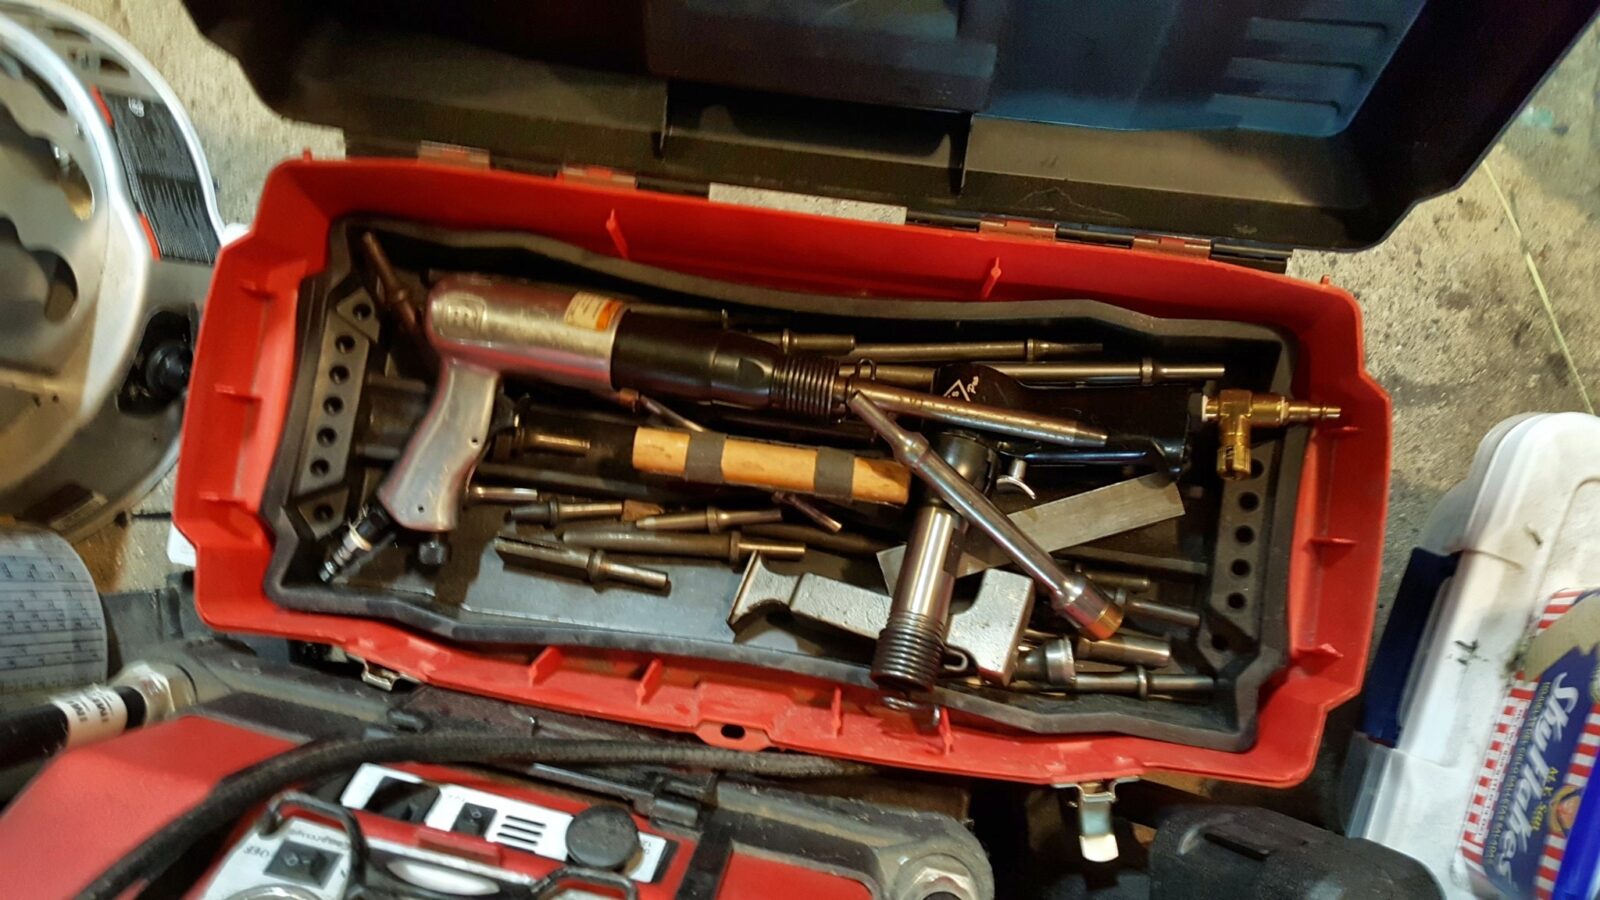
By the way, I’ve accumulated a number of rivet tools and bucking bars over the years. Here’s a quicksnap shot of my toolbox:
I’ve bought a number of rivet tool lots from eBay over the years.
That’s it – done. I hope this helps you out!
By the way, here are used rivet tools currently on eBay. Be sure the shank size matches your air hammer or air riveter (all of mine are 0.401″ for example).
Palmetto State Armory (PSA) has a stunning array of Kalashnikov firearms now. AK-47s, AK74s, 100 series, rifles, pistols … it’s impressive. Click here to go to their main AK menu.
If you find this post useful, please share the link on Facebook, with your friends, etc. Your support is much appreciated and if you have any feedback, please email me at in**@*********ps.com. Please note that for links to other websites, we are only paid if there is an affiliate program such as Avantlink, Impact, Amazon and eBay and only if you purchase something. If you’d like to directly contribute towards our continued reporting, please visit our funding page.
I’ve been experimenting with different lubricants for a year now because a lot of the firearm “oils” are 99% marketing and 1% oil at a premium price. You’ll notice that how to lube a firearm is a religious argument for many and I’m not going to get into that.
After doing a lot of digging, I bought two different types of automatic transmission fluid (ATF) (Dexron III and ATF+4) and Mobile 1 Full Synthetic 5W-30 engine oil. I then loaded up a bunch of squeeze bottles that have needle dispensers on them, labeled each and proceeded to try them out.
Here’s the big secret – they all work. Of the three, I like the Mobil 1 mainly because it doesn’t have a red color or the smell of transmission fluid.
I’ve now used it to lubricate my AKs, RPK, Uzi, POF-5/MP5 and PTR PDW and am very happy with the results. It works just fine and a quart will last you forever.
I still prefer Tetra Grease where sliding parts are involved. As the old saying goes, “if it rotates then oil it. If it slides, then grease it” has always worked for me though I do admit to reading armorer manuals to see their recommended lube points.
The Right Dispensers Make a Huge Difference!
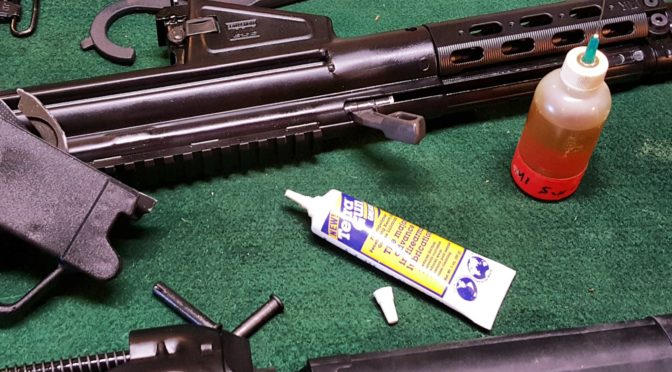
Regardless of the oil you use, having the right dispenser really helps. Growing up, we used engine oil out of the tried and true cans with the finger squeeze pumps. I really don’t use that type of dispenser on firearms but do when I work on cars and what not where a large volume is needed.
With firearms, you’ll notice that you often need to get the right lube to the right place. In the shop, I use the squeeze bottles. The dispenser pens are something I take in the field as they don’t leak and will not make a huge mess if crushed — let me assure you the bottles will do just that so that is why they stay in the shop.
You can get both of these dispensers very easily off Amazon. Be sure to read reviews as some brands leak and others don’t. The ones I am listing next are what I currently use. I use the 25 gauge needle especially for reaching down into fire control groups and lubricating pins and their attached parts such as triggers, hammers, selectors, etc.
The refillable precision oiler pens are Titan 15200 units – click here for them.
There are a number of brands of oiler pens – some come filled with oil already and are not refillable but also ones that are – on Amazon if you are interested click here.
I hope this helps you out.
Note, I have to buy all of my parts – nothing here was paid for by sponsors, etc. I do make a small amount if you click on an ad and buy something but that is it. You’re getting my real opinion on stuff.
If you find this post useful, please share the link on Facebook, with your friends, etc. Your support is much appreciated and if you have any feedback, please email me at in**@*********ps.com. Please note that for links to other websites, we are only paid if there is an affiliate program such as Avantlink, Impact, Amazon and eBay and only if you purchase something. If you’d like to directly contribute towards our continued reporting, please visit our funding page.