Category Archives: Self and Home Defense

Do you really have backup iron sights (BUIS) that you can count on? A lot of shooters do not and it’s not just the fault of the hardware

I’m sure there are a lot of shooters like me who buy and install back up iron sites on their weapons just in case the optic fails. Except for pure range toys that will never see use beyond having fun, I do think BUIS are a really good idea – optics fail for any number of reasons with batteries being dead quite possibly being the #1 issue – especially given how folks love their red dot, green dot and holographic sights. You need a backup for aiming your firearm.
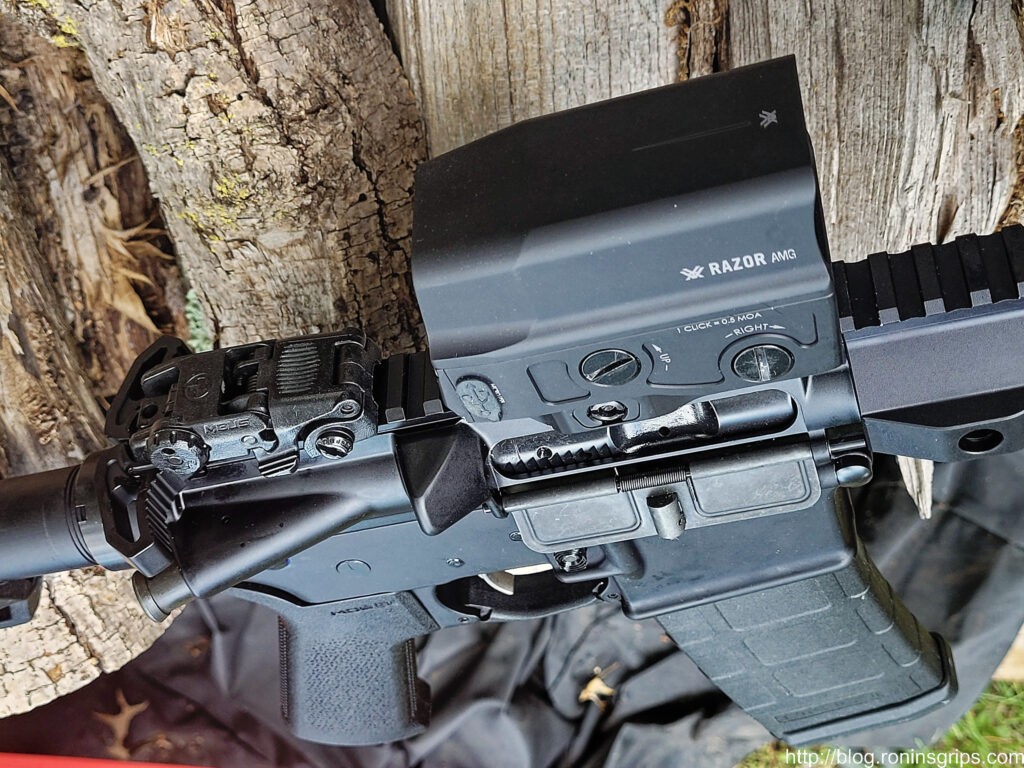
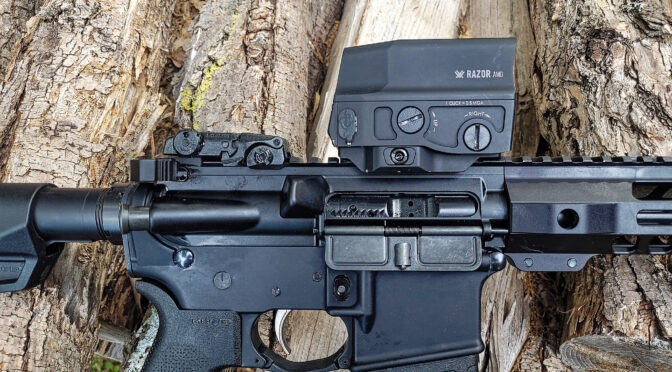
What happens if the battery in the Vortex dies? Well, I do have the backup Magpul sights … right?

A quick comment about “BUIS” – it stands for Back Up Iron Sights. I’m a creature of habit and that’s how they were first introduced to me but not everyone uses that term. For example, Magpul calls their units MBUS – Magpul Back-Up Sights. Other’s just say “back up sights” or even just “attachable” or “folding” sights. So, if you are wanting to search and see what your options are, it will take some searching.

Four Camps of BUIS Users

In talking with shooters, regardless of their firearm platform (AR, AK, Stribog, HK, etc.) about their BUIS, I usually find they fit in one of four camps:

  1. Installed the BUIS and run them full time with their optic in a co-witness manner
  2. Installed the BUIS and periodically use them in a co-witness model but fold them down when not in use
  3. Installed the BUIS and only use them when needed but did sight them in. For example, if they need to remove the optic to deploy the sights or are using offset sights and tilt the weapon 45 degrees to use them.
  4. Attached the units to the Picatinny rail, did not sight them in and have never actually practiced using them to hit targets at the range … “but have them just in case”.

With scenario #1, you know those sights will work – it doesn’t matter if the scope is powered off as long as you can see through the glass.

With #2 & #3 – the sights will probably work as long as you can see through the glass or otherwise see them. Hopefully the shooter has practiced enough how to use the units.

The last one is the most concerning – camp #4 – to be honest, a person in this camp doesn’t really have a backup. Yeah, they have the sights but they aren’t dialed in and lack experience with them. This is a gamble you do not want to take. If this describes you – please don’t take it personally and read the next section – I want to help.
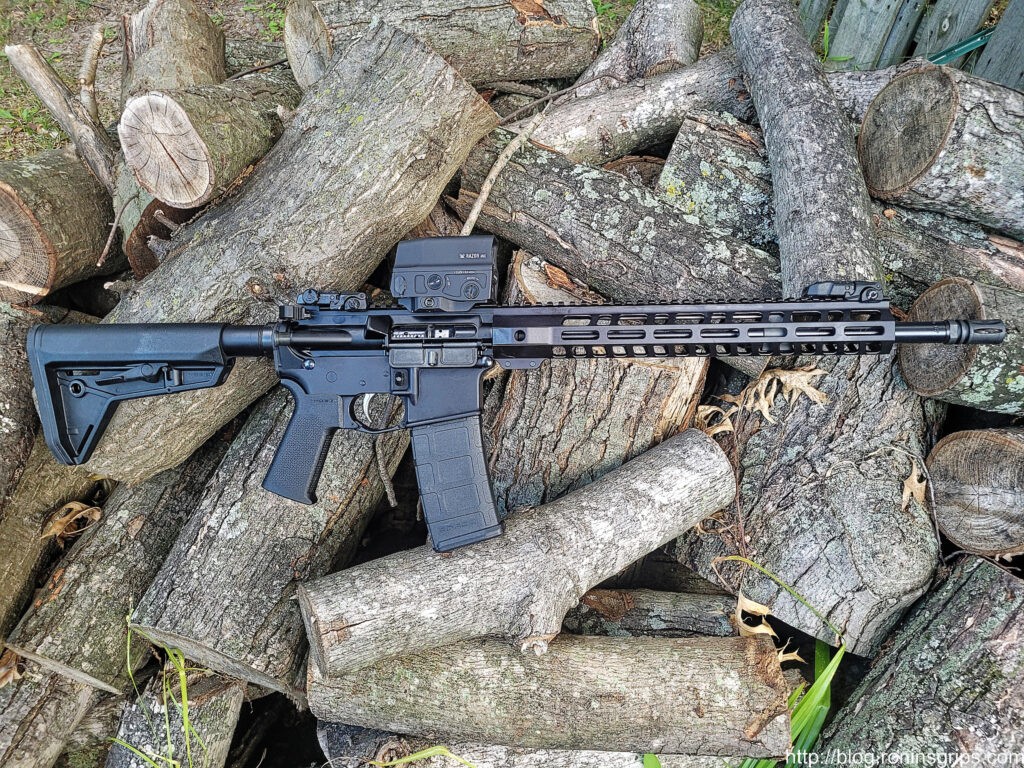
As far as I know, all BUIS are two parts – a front sight and a back sight. In the above photo – I am using Magpul polymer MBUS folding units and are on each far end of the top rail. They fold down until needed and then spring p when you push a lever on each.

If You Are In Camp #4…

First off, I am glad you invested in BUIS – if you are reading this and you haven’t yet, then do so. With that said, do you have quality units or did you buy something dirt cheap off Amazon or eBay. I’d recommend going with a brand name and not cheap airsoft import stuff – I like Magpul (they have a ton of models so click here to see them) plus, in all fairness, there are other quality BUIS sets from the likes of ARMS, Bobro, DiamondHead, Troy and others. Cheap stuff may not hold their zero or break easily. Buy quality to have true BUIS that you can count on.

Second, make sure they are mounted properly. Did you follow the instructions from the vendor who made them? Sometimes there is more to do than slap them on the Picatinny Rail.
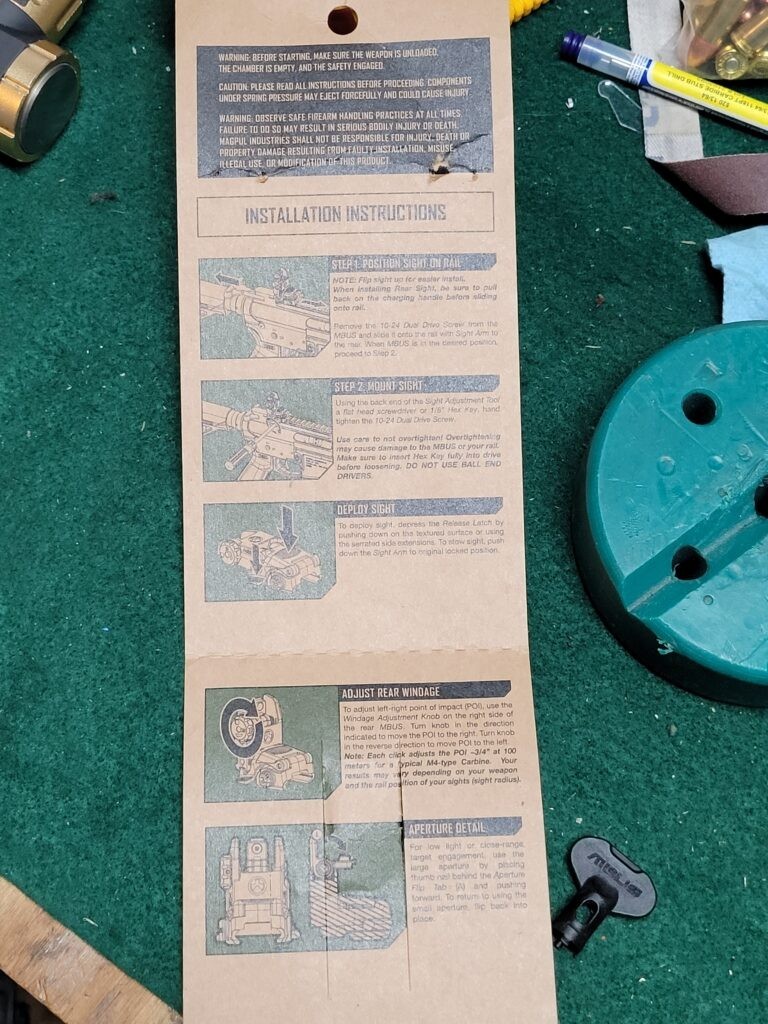
Your backup sights should have come with instructions and any specialized tools – be sure to read and follow them. The little black key you see is used for adjusting a Magpul front sight.

Second, you need to sight in the BUIS. I use a laser to help get in the ballpark in the shop and then I do the final tuning at the range. Read up on the recommended range for your firearm and type of optic. For rifles, I go for 50 yards because then you are then zeroed for 50 yards and at 200. The BUIS are just that – emergency backups. I look to be in the ballpark with them and am not looking for perfection but some guys are amazingly proficient with them.

Third, absolutely take them to the range and practice with them!!! Buying, installing and zeroing the BUIS are only part of the game – you must also know how to use them. If they fold, practice on opening and closing them while shooting. If they are offset, practice transitioning to them. Bottom line, you need to practice hitting targets with them and adjust the sights and what you are doing accordingly. The more you practice the greater the odds that things will work when you need them. If you don’t practice then you are taking a huge gamble both on the BUIS and your ability to use them – so don’t gamble.
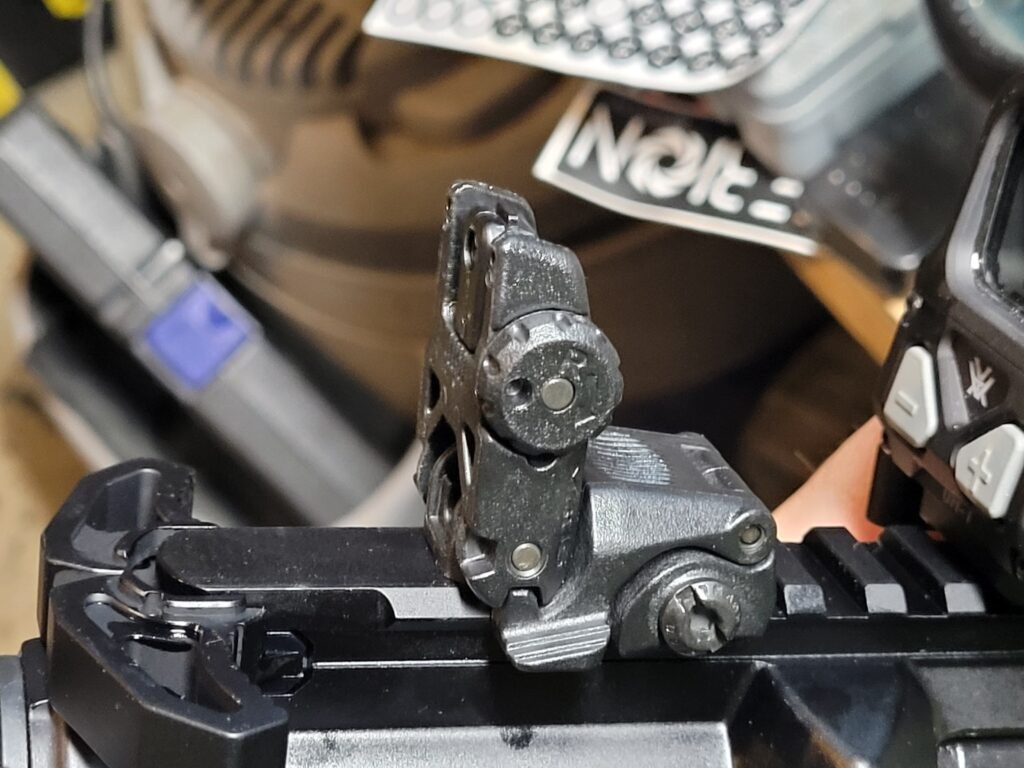
Magpul sells both basic polymer and pro steel versions of their MBUS. Above is a polymer rear unit on one of my ARs. I fold both the rear and front sights flat until needed – the small lever you see to the left of the mounting screw both releases the sight so it flips open via a spring and then locks up up right. I can count on them because they are zeroed and I practice with them.

Summary

The whole reason I wrote this is that it seems like I have encountered a lot of shooters this past year that had BUIS and fell square in camp 4 – they had never sighted them in or practiced with them. This is very concerning to me – they are gambling on something that shouldn’t be left to chance. So, yes, I think BUIS are a great idea but you need to sight them in and regularly practice using them also. If you don’t, then your backup probably isn’t a backup.

I hope this gives you some food for thought.


Note, I have to buy all of my parts – nothing here was paid for by sponsors, etc. I do make a small amount if you click on an ad and buy something but that is it. You’re getting my real opinion on stuff.

If you find this post useful, please share the link on Facebook, with your friends, etc. Your support is much appreciated and if you have any feedback, please email me at in**@ro*********.com . Please note that for links to other websites, I may be paid via an affiliate program such as Avantlink, Impact, Amazon and eBay.


PSA Has a Good Deal on the SIG P365 Tac Pac With 3 12-rnd Mags and a Holster

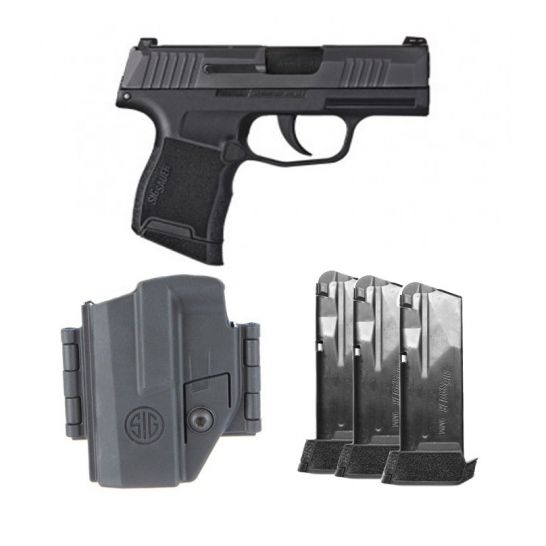
Folks, Palmetto State Armory has a deal going on where you can get one the excellent SIG P365 pistols in what they call a “Tac Pac”. Normally the Tac Pac just has a couple of mags but this deal includes three real SIG 12-round mags that often go for $35-45 each and a combination Inside the waist band (IWB) or outside the waist band (OWB) holster.

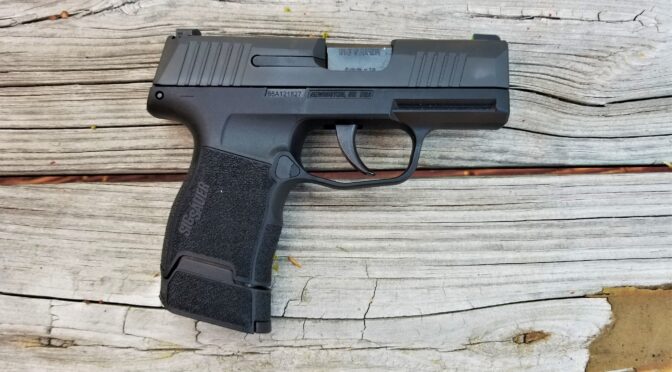
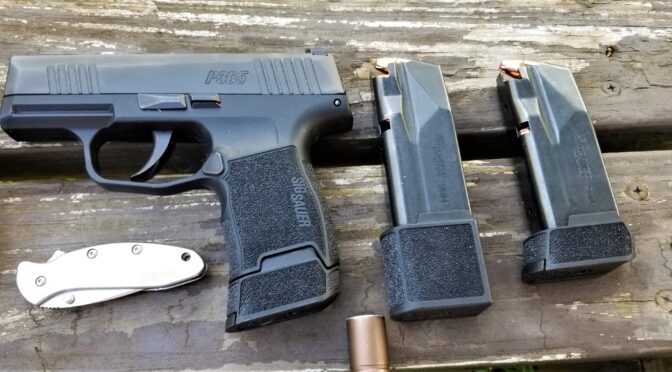
This is the PSA deal. Note, the photo in the ad shows a 10-round magazine loaded and the three 12-round magazines but to be clear, the deal is for three magazines and not three plus one. The photo at the top of the post is my personal P365 with a 12 round magazine inserted.

The Sig P365 is rated for +P 9mm ammo and is my every day carry. I can tell you that I have never had a failure to feed or extract with the pistol and have fired Hornady Critical Duty +P, Federal HST +P, all kinds of 115gr and 124gr FMJ ball ammo, etc. It just east whatever I give it and is reliable – that’s why I rely on it to protect my family when we are out and about and discretion is required – it’s an ideal concealed carry pistol.

I really like the 12-round magazines. The small plastic fitting on the bottom is ideal for my to put my pinky finger on and I wear size XL gloves. The 10 round magazines are even shorter. Most of the time I am carrying using a 12 round magazine. They do make a 15 round magazine but that sticks out a tad more than I care for.

Note, go for real SIG magazines. Some of the aftermarket ones, such as Promags, don’t get as good of reviews.

I can’t speak first hand to the holster they are including though – I use a soft Desantis 106 IWB holster and a High Noon shoulder rig. Given the holster is from SIG, I would expect it to be good enough to get started with.

At any rate, it’s a very good deal so click here to learn more.


Note, I have to buy all of my parts – nothing here was paid for by sponsors, etc. I do make a small amount if you click on an ad and buy something but that is it. You’re getting my real opinion on stuff.

If you find this post useful, please share the link on Facebook, with your friends, etc. Your support is much appreciated and if you have any feedback, please email me at in**@ro*********.com . Please note that for links to other websites, I may be paid via an affiliate program such as Avantlink, Impact, Amazon and eBay.


The following are various listings for SIG P365 pistols and accessories so you can scroll through and look at prices.


How to Move Streamlight TLR Weapon Light To Another Pistol If you Lost Your Keys

Years ago, I found out that cheap lights are not something to put on a firearm for self-defense. They simply are not reliable enough. I’ve also found that Streamlight weapons lights hold up plus are backed by top notch support. For pistols, I have a number of the TLR series weapons lights and found them to be solid. With that said, we do need to address the topic of the post – if you install the light on one pistol, how do you move it to another?

How do the TLR lights secure to a weapon?

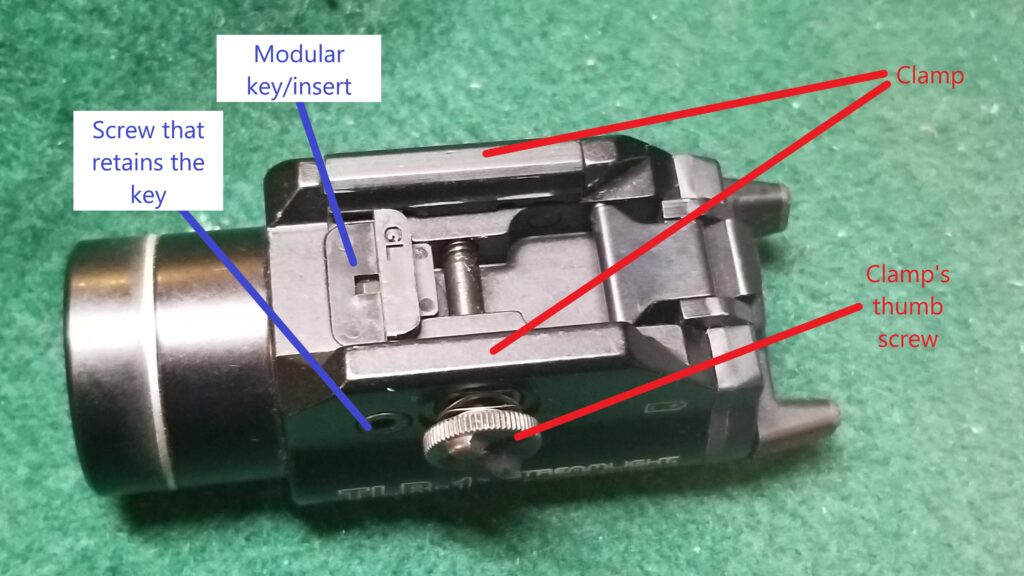
First off, the TLR design is modular built around an adjustable clamp and then different “key” inserts that allow the TLR to fit a variety of weapons. When you purchase a TLR, it comes with keys to fit:

  • “1913” – Mil-Std-1913 Picatinny rails
  • “GL” – Glock rails as well as Tuger KP345 and SR-9
  • “TSW/99” – Smith & Wesson and TSW/99, Post 2004 Walther 99 Full size
  • “90two – Beretta 92

There are some other keys and adapters depending on the TLR model you buy – click here for Streamlight’s brief compatibility list.

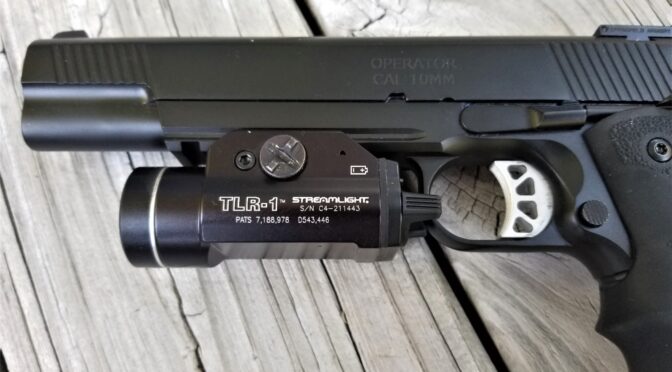
When you buy a TLR, you must insert the proper key to get it to fit the rail on your weapon. While they were intended for pistols, I’ve used them on a variety of rifles and shotguns over the years as I move lights from weapon to weapon. The key shown above has the “GL” code which means it the one for interfacing with the rail on Glock pistols assuming the pistol model both has a rail and is large enough to hold the particular model of light. For example, you can run the above TLR-1 on a full size Glock 34 but will stick out past the end on a 17. Some people don’t care but I prefer a TLR-4 for a 17 as the TLR-4 is shorter and ends flush with the bottom of the receiver.

Ok, but what if I want to move the light to another weapon?

So, this brings us to the main point – can you move a TLR from one platform to another? The short answer is absolutely – you remove the retaining screw and replace the key with the appropriate one for the new pistol.

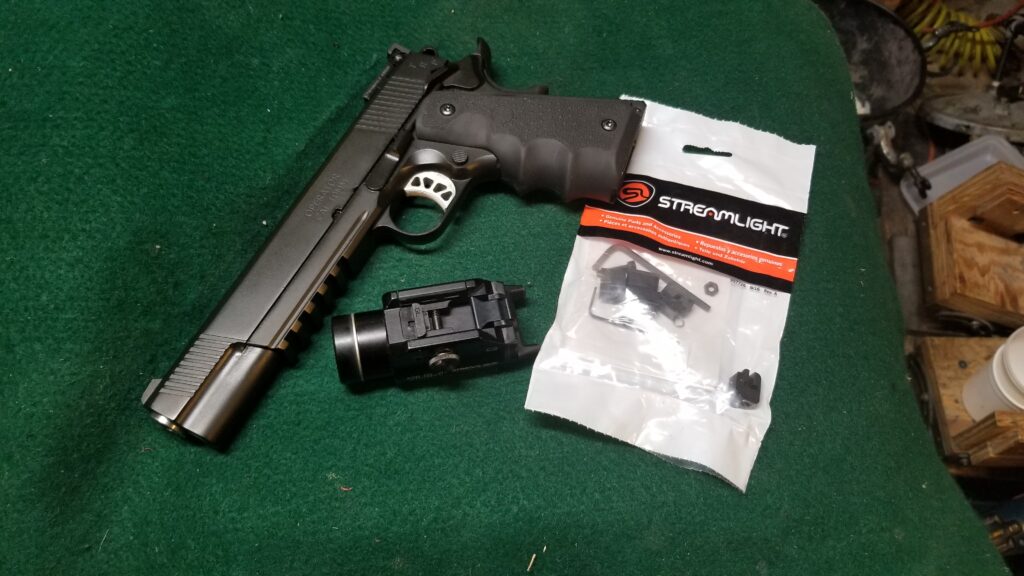
And there’s the rub – what if you’ve lost or “temporarily misplaced” your bag of keys? Folks, that is what happened to me. I could not find any of my keys and needed to change the TLR-1 from Glock to 1913 to fit my new TRP Operator. Here’s the good news – you can buy just the keys. Streamlight realized there would be people like us and sell kits that have the keys, the screw, small nut and even a the hex key needed to do the job. The kit does depend on the model of TLR you have so make sure they match the light and the weapon you want to move to.

Streamlight Kit 69175 fits the TLR-1 and TLR-2. The 69176 kit is specifically for TLR-3 and TLR-4 models.

Here’s my 6″ TRP Operator, the TLR-1 and the replacement key set 69175.

You can find the two key kits very readily both on Amazon and on eBay:

Conclusion

I really like the TLR lights and hope this post helps you out if you need to move your TLR but can’t find your keys.


Note, I have to buy all of my parts – nothing here was paid for by sponsors, etc. I do make a small amount if you click on an ad and buy something but that is it. You’re getting my real opinion on stuff.

If you find this post useful, please share the link on Facebook, with your friends, etc. Your support is much appreciated and if you have any feedback, please email me at in**@ro*********.com . Please note that for links to other websites, I may be paid via an affiliate program such as Avantlink, Impact, Amazon and eBay.


SIG P365 Video Reviews Of This Excellent Concealed Carry Pistol

In the last post I told you that the SIG P365 is my concealed carry pistol of choice. I thought you might like to see some videos to see what others have to say as well.


And here’s one from SIG directly giving you an overview:


So you get the idea. It’s a pretty cool little pistol for concealed carry! If you are thinking about picking one of the models up and some magazines, the below links can take you to various seller’s web pages:


If you find this post useful, please share the link on Facebook, with your friends, etc. Your support is much appreciated and if you have any feedback, please email me at in**@ro*********.com . Please note that for links to other websites, I may be paid via an affiliate program such as Avantlink, Impact, Amazon and eBay.


The SIG P365 Is My Concealed Carry Pistol

Given my work with tactical weapons I guess folks expect me to carry some exotic pistol. My every day carry (EDC) is a SIG P365 that I picked up some time in the early Summer of 2019 from my friend and FFL, Scott Igert who owns Michigan Gun Exchange. I don’t claim to be a concealed carry expert but Scott is. As a retired police officer and trainer, Scott knows his way around firearms.

He and I have known each other for years and he knows what I like. After I got my Michigan Concealed Pistol License (CPL), I asked him what pistol he would recommend given my preferences. He thought about it for a few seconds and then recommended that I take a look at the SIG P365.

The P365 trail blazed the category of micro-compact 9mm semi-auto pistols that was rated for +P ammo. The designers intended it to be very small, reliable and pack a punch. I’d say they succeeded. Yeah, there have been small pistols in the past but they had some very anemic chamberings and/or were low capacity such as the single or double-barrel derringers that could larger calibers.

The P365 has received a ton of rave reviews including Handgun of the Year from Guns & Ammo in 2018, NRA Golden Bullseye Award 2019, Ballistics Best Winnter 2018, 2018 Industry Choice Award and more. The reason is simple – it small, light, reliable and can deliver a hell of a punch.

The Magazines

The P365 has a novel way of stacking the rounds inside the magazine wherein the can fit 10 rounds in a very short magazine. The pistol comes with this 10 round magazine but you can also get 12 and 15 round magazines as well.

My P365 with the three magazine sizes – From left to right: the 15, 12 and 10 round models plus you can see the Desantis #106 Sof-Tuck holster that I have been using for a few months now. I like it more than Kydex because it doesn’t poke me.
Here’s a close up of the three sizes of magazines. I own two of each so I have a lot of flexibility in terms of what I am going to carry. That’s Hornady Critical Duty 135gr +P ammo peaking out.

I wear XL-size gloves and the pistol with the 10 round magazine has a very short grip. It’s not comfortable for me and I wouldn’t target shoot with it but it makes for a very concealable pistol. I was told once that the best pistol in the world will not save you if aren’t carrying it for whatever reason – it’s too heavy, it’s too long, it sticks out, etc. My point is that there do need to be trade-offs at times. There are definitely times I carry with the 10 round magazine due to the weight and size reduction.

Here’s the P365 with the 10 round magazine installed.

For me, the 12 round magazine is ideal. It’s just a tad longer and they’ve added a small grip extension to the bottom. This is what I use most of the time because it adds just a bit more weight and size plus I find it far more comfortable to hold.

They do offer a 15 round model and while I may have it as a backup somewhere, it is longer and heavier than what I really want to carry around. I have carried with it but rarely. The nice thing besides the higher capacity is that you basically have a full-sized grip.

Here’s the P365 with the 15-round magazine inserted. Plenty of grip space but it is heavier and longer.

The Holster

I’ve experimented with a few holsters and the most comfortable one I have is the Desantis Sof-Tuck model 106NA8JZ0 – this is the right handed model at it first the P365 and P365 SAS (the model with recessed sights and a ported barrel).

What I like is the softness – it doesn’t poke me when I sit down, bend over, etc. It keeps the pistol secure in my pants and really meets my needs for a basic holster.

Here’s a closer view of the Desantis #106 Sof-Tuck holster and the belt clip.
Here’s what I had with me the other day – you see the P365 in the holster with the 12 round magazine, one of the Streamlight 66608 350 Lumen USB rechargeable lights and a Kershaw 1600 Chive pocket knife. In the back are spare mags that were in the car.

Ammunition

What I am using is Hornady Critical Duty 135 grain +p ammo. Yes, it is rated for +P ammo but I wouldn’t shoot it all the time at the range. Critical Duty is not for everyone as it is designed with a degree of barrier penetration in mind. (Hornady has a nice summary on their website if you are interested click here.) I have run a number of types through the P365 including Federal HST 124gr and a variety of 115gr FMJ loads and the little pistol handled them all just fine.

I really want to put one thing out there for you to bear in mind though – always, always, always test your pistol with the ammo and magazines you plan to use. I can’t tell you how many times I have seen a pistol not function correctly due to some combination of magazine and ammo but work perfectly fine with others. Sometimes folks new to shooting don’t realize this and it would be devastatingly bad in a self-defense situation to have your pistol jam when it tries to cycle.

How many rounds should you try? You’ll get a ton of answers on this. Statistics would tell you that at least 30 rounds is a fair sample and going past that is better in my opinion. Some guys will tell you 100 rounds, some will say 200 … they are all right in my honest opinion – shoot as much as you need to in order to become familiar with your pistol and that a given combination of magazines and ammo is going to work.

Also, to put it bluntly, shit happens. Practice clearing your pistol plus slapping in a new mag and continue firing. You just never know and if you’ve not practiced enough you are liable to fumble around under stress.

If you’d like to check out some video reviews, click here.

Summary

Again, this is my concealed carry that I entrust my family’s safety to. My Glock stays at home now because the little SIG is easy to carry, reliable and packs a punch. The P365 has proven to be so wildly successful that SIG released a larger XL model plus the SAS that has integral sights and barrel porting. While I don’t have first hand experience with them what I hear is very favorable and I definitely recommend the P365 to folks looking for solid concealed carry pistol.


If you find this post useful, please share the link on Facebook, with your friends, etc. Your support is much appreciated and if you have any feedback, please email me at in**@ro*********.com . Please note that for links to other websites, I may be paid via an affiliate program such as Avantlink, Impact, Amazon and eBay.


Research On Home Made Pepper Spray – Tread Carefully. Something Reliable and Effective Is Not As Easy As You May Think.

Up front, please let me stress that this post if for informational purposes only. The author will not be liable if you decide to attempt to make or use pepper spray. You assume all liability going forward.

Please abide by all laws and regulations in your area – it is illegal to possess pepper spray in some places let alone use it.

Last but not least, please follow safe practices if you choose to attempt making pepper spray.

Pepper spray irritates the eyes, lungs and skin. The intent is to cause extreme temporary discomfort and allow the defender a chance to get away or the police officer to more easily restrain a subject. The reason I researched and wrote this post is that a number of people are worried about personal and family safety and how to ward off attackers given the craziness with people panicking over COVID-19.

For one reason or another, not everyone can buy a firearm and. thanks to government regulation, many law abiding citizens can’t even purchase pepper spray. Now, machining a firearm and its costs are beyond many but making pepper spray is something people might want to consider but there are a whole lot of potential issues I want you to think through before you make some home brew and pour it in a spray bottle.

What is pepper spray anyways?

As you can guess from the name, the main ingredient is technically known as oleresin capsicum (OC) is derived from peppers. OC is an oily organic resin obtained from finely ground chili powder where the capsaicin of the pepper is removed using an alcohol – typically ispropyl or ethanol. The capsaicin is most concentrated in the parts of the pepper that hold the seeds and the rest of the pepper to a lesser extent.

The following video does a great job explaining how pepper spray affects the human body and how it is made:

How do you make a pepper spray?

Do not rub your eyes and be careful breathing any airborne powders or liquids. I’d recommend wearing nitrile gloves, eye protection and a dust mask – even a basic nuisance dust one.

Please abide by all laws and regulations in your area and follow safe practices if you choose to attempt making pepper spray.

Let me tell you up front that I am not incredibly impressed by anything I have read or watched. Do you research and be very, very careful.

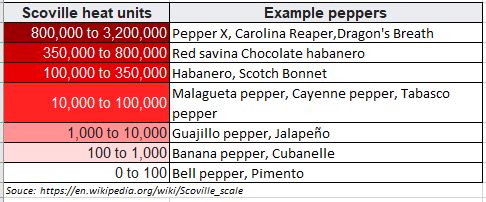
The “heat” of pepper varieties is measured by the Scoville Heat Units (SHU). The SHU value of a given pepper is measuring the concentration of capsaicinoids, which is premoninantly capsaicin – the part of the pepper we need. So, the higher the Scoville rating, the hotter the pepper is and the stronger the pepper spray will be.

The above is a Scoville Scale with popular peppers rated. You can see that Cayenne is in the middle with some god awful hot ones at the top.

Note – Focus on the peppers not some of the weird home brews folks are making where they are adding in other ingredients because they seem to be irritants based on their own past experience – for example, people adding salt, black pepper and even curry.

Going back to peppers, bear in mind that commercial pepper sprays range from 2-5.3 million SHU. Just because you think Cayenne pepper (30-50,000 SHU) or a Jalapeno (2,500-8,000 SHU) is hot does not mean it is adequate. You need to be thinking about the hottest peppers you can find and using them. Let me give you specifics of the 10 hottest peppers

Safety comment – you do need to realize pepper sprays made by the hot peppers over 80,000 SHU are dangerous and may cause permanent damage to eyes, etc. You better not spray this hot stuff on anyone without real good cause and be extra careful working with them!

With the god awful hot peppers, I have no idea how you can safely test your concoction. Honestly, at some point of capsaicin concentration, you are going to cause chemical burns. If you are trying to make liquid hell, you have some very dangerous stuff going on. Please don’t test it on other people, pets, animals, etc.

First extraction video

This gentleman does a good job showing you how to extract the the capsaicin that we need. Note, he uses acetone but I’d recommend an alcohol as it is less volatile and doesn’t dissolve anywhere near as many varieties of plastics as acetone does. There’s solid guidance other than that.

Video Two – The author makes and tests his pepper spray

This fellow both made his own pepper spray and then tests it while reporting the results. Notice how he points out the delay — keep that in mind.

Some mistakes I noticed during my research

When you look around on Youtube and reading blog posts, there are a lot of fundamental mistakes that people make that I want you to be aware of:

  • Your goal is to make a concentrate – start with the hottest pepper you can find
  • You need to extract the capsaicin so grind up the pepper – don’t just add flakes.
  • Focus on the pepper!! Folks adding in other stuff may sound cool but I am not convinced curry powder, salt, black pepper, etc. will help. One fellow even added in a pain killer (lidocain) for reasons I can’t begin to fathom.
  • Use a ton of powder/ground pepper. You want to make a concentrate and not something really diluted. Now is not the time to go cheap.
  • Use alcohol and not acetone unless you know your plastic can handle it – many household/cheap plastics can’t.
  • Allow the alcohol time to dissolve the capsaicins from the peppers. Use a sealed container and give it at least 12 hours to a day while shaking or stirring periodically. A sealed container makes the most sense to me unless you want the solvent to evaporate off and make a concentrate, which is a legitimate consideration.
  • You definitely need to strain the resulting mixture. Any type of sprayer will be at risk of clogging if there are solids in the liquid. The folks with a stew of materials floating around in their dispensers are at risk of a clog just when they need the spray the most. I was really surprised at the number of authors who had dispensers with solid remnants floating around.
  • Nobody seems to know how long this stuff will last – 3 months might be a starting assumption. It’s not indefinite.

Delivery mechanism considerations

I’ve seen everything from squeeze bottles, to squirt guns to home made single shot stream sprayers. Consider the following:

  • whatever you select needs to be leak proof or you will have an awful mess.
  • You don’t want it accidentally going off in your purse or pocket … or you will have an awful mess.
  • If you do a charged can of some type – ensure the propellant doesn’t slowly leak out and/or have a means to recharge it. Even commercial units will slowly lose their propellant charge.
  • Remember to strain the liquid you’re going to use or floating solids will likely clog up your device — and probably when you need the spray the most. Seriously, it blew my mind how few did this.
  • You need to test to see how far the liquid can travel. In general you want a stream and not a fog both to concentrate delivery plus you do not want the person near you! Also, bear in mind that a mist will float around and land on others – potentially even yourself.

More resources

How to treat pepper spray / how to decontaminate

Okay folks, the following is so you know what to do if you get this stuff on you. The short answer is saline, non-mint antacid in distilled water in a 50/50 mix placed in a squeeze bottle to neutralize the chemical or some form of water and mild soap.

This is not magic or the movies – Beware

Reality is not like the movies – especially with home grown pepper sprays. Expect attackers to respond differently to pepper spray.. Some will immediately lose visibility and the will to fight, some may have a delay before the react and some will keep fighting no matter what due to drugs or whatever. Do not expect an attacker to magically drop to the ground.

The best way to win a fight is avoid the situation – don’t walk alone, avoid dark allies, stay alert, and so forth. View this stuff as a last resort or part of a layered defense that you have thought about.

Conclusion

Someone casually making pepper spray without a lot of thought put into it will likely have very mixed unsafe unreliable results. I didn’t find one video or blog post that I felt addressed my concerns for reliability so I collected the above for you to consider. If you can buy commercial pepper spray, I would highly recommend you do so.

The information presented here is for people who need protection and home-made pepper spray might be their last option. Do your research, plan and build with safety in mind. Last comment, don’t rely solely on pepper spray – consider other things like loud personal alarms, clubs, saps, fake money clips, take a self-defense class, etc.

Again, please, please be safe if you make anything discussed here. Also, be aware of any laws and regulations that are applicable. In some locales, pepper spray is treated virtually the same as a firearm and civilian use is strictly prohibited.

If you find this post useful, please share the link on Facebook, with your friends, etc. Your support is much appreciated and if you have any feedback, please email me at in**@ro*********.com . Please note that for links to other websites, I may be paid via an affiliate program such as Avantlink, Impact, Amazon and eBay.


Use Wired and Solar Lights To Improve Home Security

Defending your home and family takes some thought. In general. the more layers of defense you add, the lower your risk is. For example, lights, security alarm, security cameras, dogs, radio running, etc. You can’t eliminate risk but you can certainly lower it to a level you judge as acceptable. An easy deterrent for you to add or improve is outdoor lighting and the reason is simple – people with malicious intents prefer the shadows and don’t want to be lit up for everyone to see.

Hard Wired Lights

When I say “hard wired”, I am talking about lights that are connected to the premises electrical power, such as 120 volts AC in the US. Most folks have at least porch lights and perhaps garage lights. Run them. These are deterrents – if people up to no good see a well lit home, it reduces their interest. Note that I did not say it makes 100% of them skip your home but the cost is trivial these days. If you are worried about cost, install LED bulbs – they seriously cut down power use. It used to be that LED bulbs cost a fortune but you can now routinely find them on sales for $1-2/ea.

Don’t want to run your lights all the time – 24×7? Granted you are wasting money and the lights running may signal “nobody is home”. We do not run out lights around the clock for both reasons – just dusk to dawn.

There are light sensors that simply screw in between the light and the lamp receptacle. Want timers? You can go with timers that flip the switch, timers that replace the switch and even smart programmable switches that connect to your WiFi and you can load schedules, etc. There are even programmable lights that have speakers in them to extend smart home sound systems — remember that an LED light element is going to last a long, long time all things being equal so it’s not as weird as it may sound.

Solar Lights

If you look at your property, odds are there are a lot of dark spots at night – we do. Running power to these areas wasn’t realistic but at the same time I wondered what I could do to light some of them up strategically. The short answer is solar security lights – not just the very dim walkway lights you see in garden centers. These lights range from dim to incredibly bright.

It turns out there are a ton of different model lights that can turn on dusk to dawn (or until the battery drains) or have a motion sensor that trips for some period of time (say 10-30 seconds) and then reset. You have options in terms of the brightness, how broad of an area is lit up, and so forth. I have a variety now.

You know what, these are pretty cool. The lights on the house are on all the time but these motion activated security lights not only give you light when you move around at night but they also serve like tripwires – a person (or deer) goes by and the light comes on startling them and they take off.

Here are some of the lights that I use. They all have motion sensors and have survived at least one Michigan winter including the -20F cold spell we had.

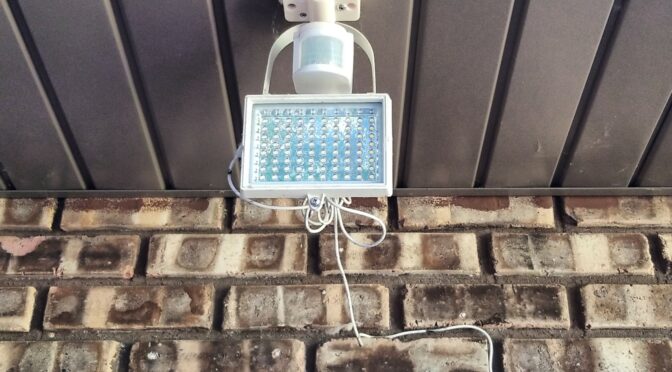
To the left you see a real bright solar security light with the motion sensor up top. A nice thing about this model is that long charging cord from the solar panel to the light. The side of the house where the light is located is in the shade. The side of the house where the panel is gets afternoon sun and recharges. This unit is about 3-4 years old and works great. You can see the garage light above and to the right of the solar panel. It is a dusk-to-dawn model. It has compact fluorescent bulbs currently but when they fail, I will replace them with LEDs.
You can see the small solar light just above the split in the doors. It’s small but does a great job – the solar panel is in the top of the unit. This Baxia BL-SL-101 light has a motion sensor, 28 LEDs, 400 lumen and comes in a four pack. This is one of my go-to lights when I just need a medium amount of light.
This is a Lemontek unit with 62 LEDs and the thing kicks out 2,000 lumen. It has a number of settings including dusk to dawn and motion sensor. We have a number of these and they do a great job. It is one of the models I use when I want a lot of light. You’ll notice a Baxia light back in the recessed area. The Lemontek covers a very broad area and the little one is just for the gate.
Here’s an example of one of our Baxia lights set up in a dark area of our yard. It has started a ton of deer when it has turned on unexpectedly at night due to its motion sensor.
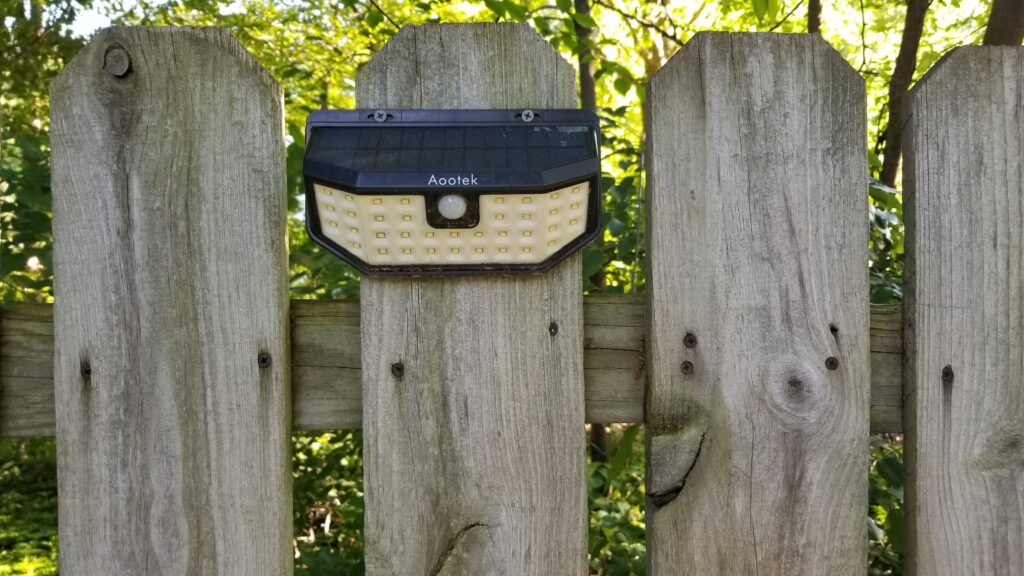
This is an Aootek solar light with 48 LEDs, broad 180 degree illumination thanks to the angled panels, and while they don’t advertise the lumen (brightness), I can tell you it kicks out a lot of light.
This is a 4 year old Hallomall light. They stopped selling these when they introduced a new design so I switched to the Baxia brand. These came in a three pack and all still work. They sell other models that I have not tried.

The cheapest place I have found to buy these is Amazon and I read the reviews. Some have a ton of legitimate reviews and others have none at all – go with the model with more good reviews as opposed to fewer and taking a gamble. If you get a piece of junk, Amazon does have really good customer service but treat that as your safety net and try to buy the best you can. Note, some lights are sold individually and others come in 2, 4 or even larger quantity packages and it pays to do the math and see what is cheaper given the lights you need.

Solar lights do need sunlight to recharge so factor that into your plans. Also, they use batteries. I haven’t needed to open one up yet to replace them but I suspect some of them I will be able to replace the battery and others I will just need to replace the light due to age and oxidation of the solar panel and lens over the LEDs.

Smart Home Systems

Another category of lighting is taking off and those are the ones that are linked to smart home systems such as the Amazon Alexa. You can use voice control to turn on and off lights, set timers and much more through connected switches, outlets and other accessories. We use an Alexa in the kitchen and have a few Dots in other rooms. They are really handy once you get used to them.

Summary

Light up your property to deter vandals, burglars and trespassers. You have so many options using lights running off AC power to the tons and tons of options using solar. I use the AC light so people can see the area around the house is lit up and then I use solar lights to trip as needed and light up dark areas. Look at your property and consider how you might combine them with other security elements to reduce your risks.


If you find this post useful, please share the link on Facebook, with your friends, etc. Your support is much appreciated and if you have any feedback, please email me at in**@ro*********.com . Please note that for links to other websites, I may be paid via an affiliate program such as Avantlink, Impact, Amazon and eBay.