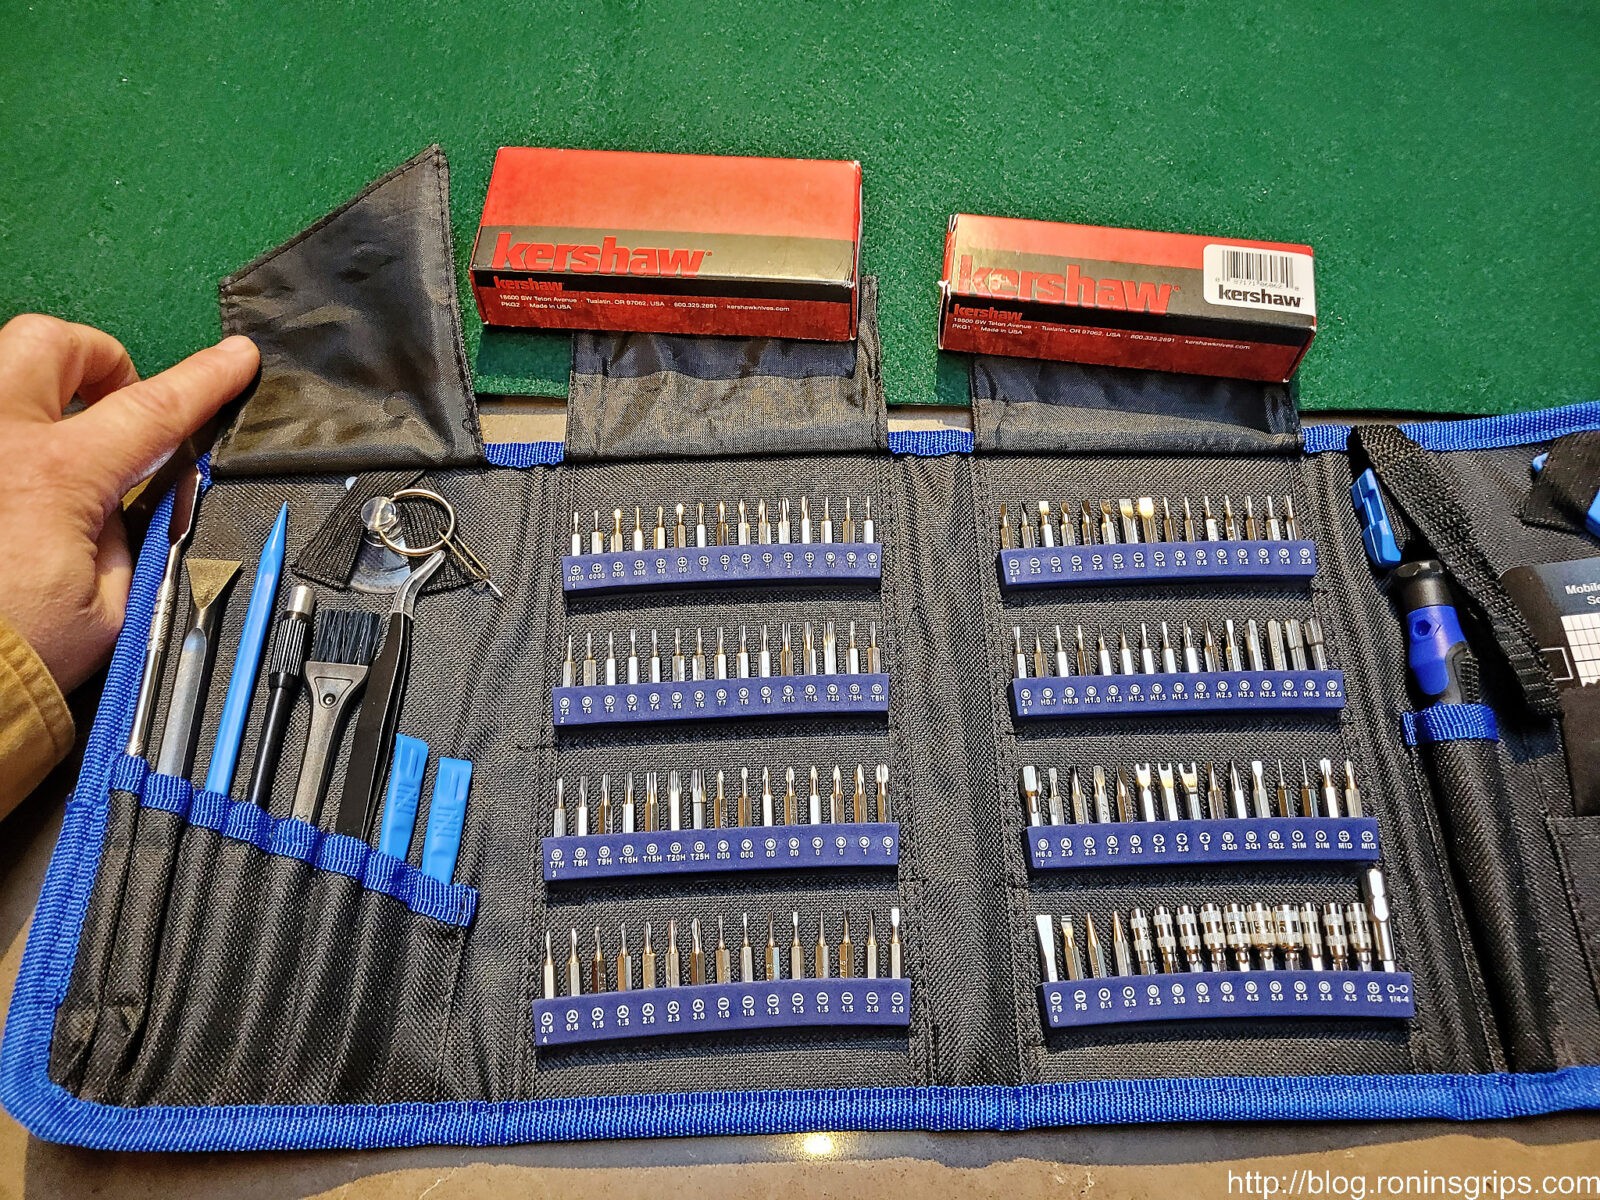
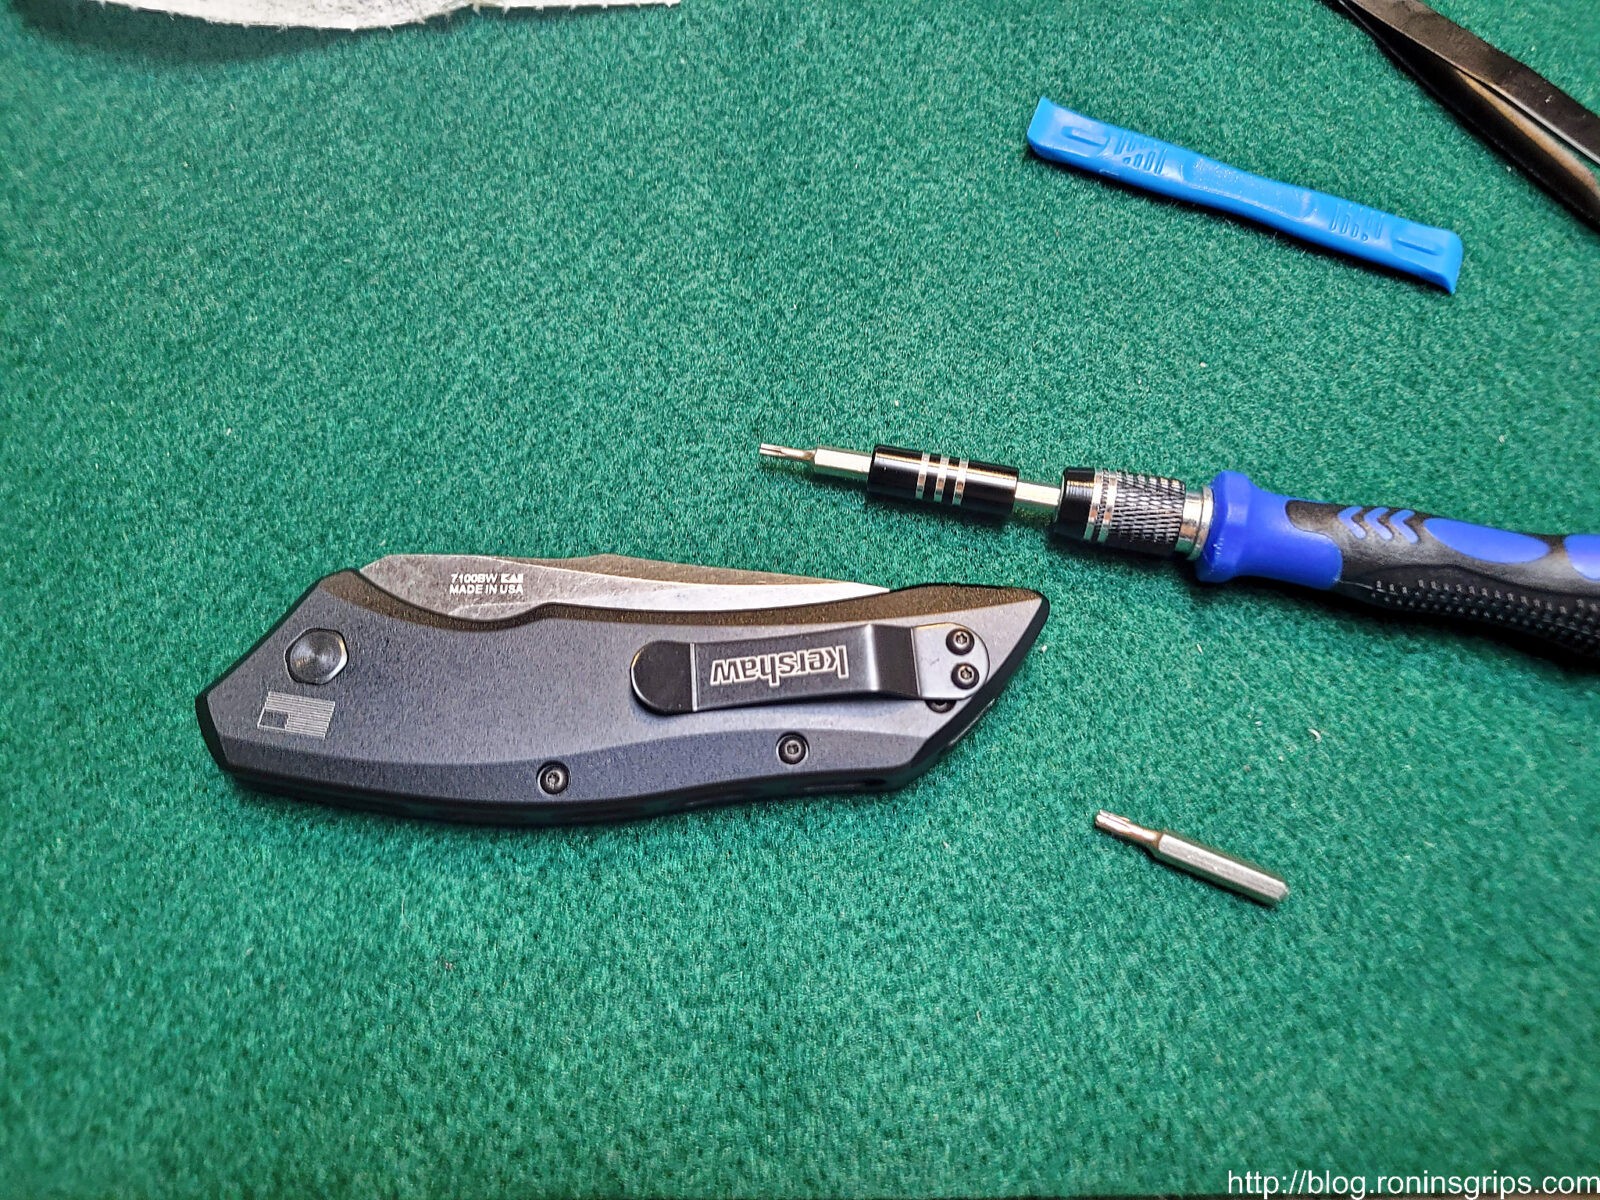
You will need #6 and #8 Torx bits. Something to pry the blade up and tweezers might help. For me, I have a large Strebito tool kit with a ton of precision bits, handles, tweezers and pry bars designed for electronics that has worked amazingly well for me when working on stuff with small fasteners.
Disassembling the Launch 1
Safety brief: Just remember, you are working with a very sharp spring loaded knife blade. It wants to open. Handle it accordingly and play it safe.
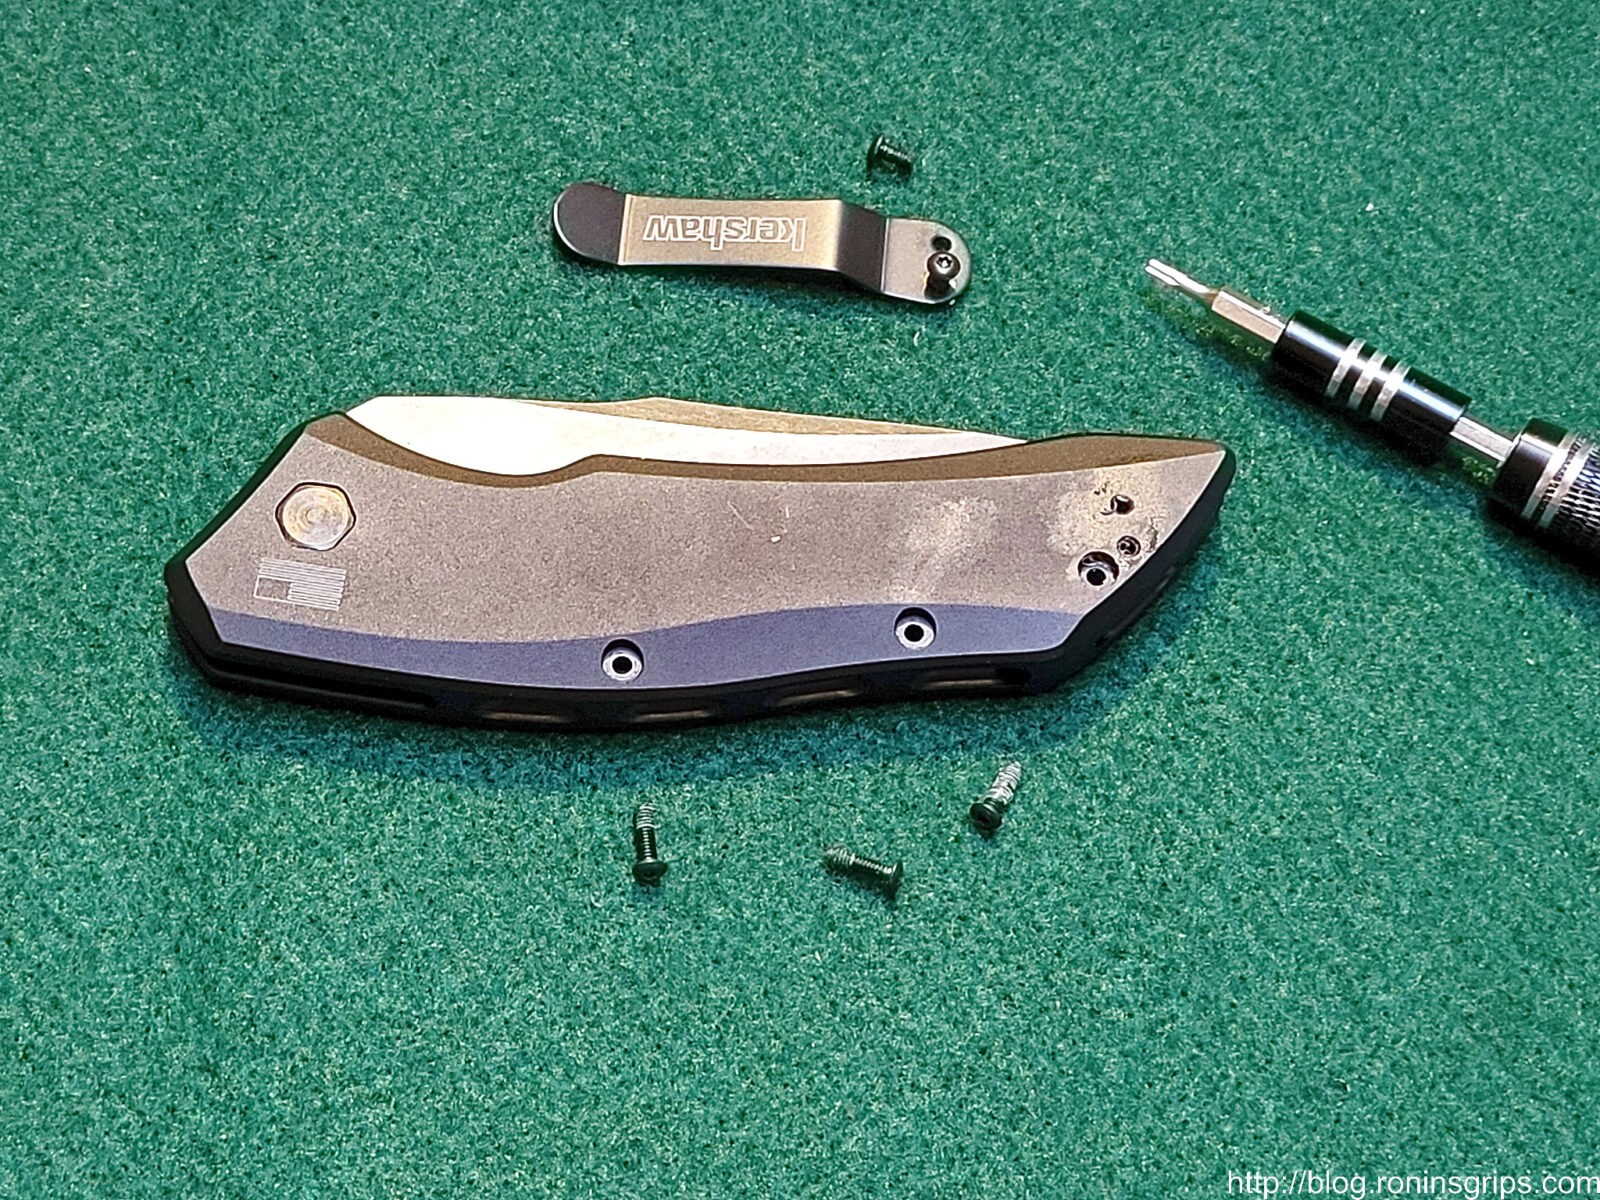
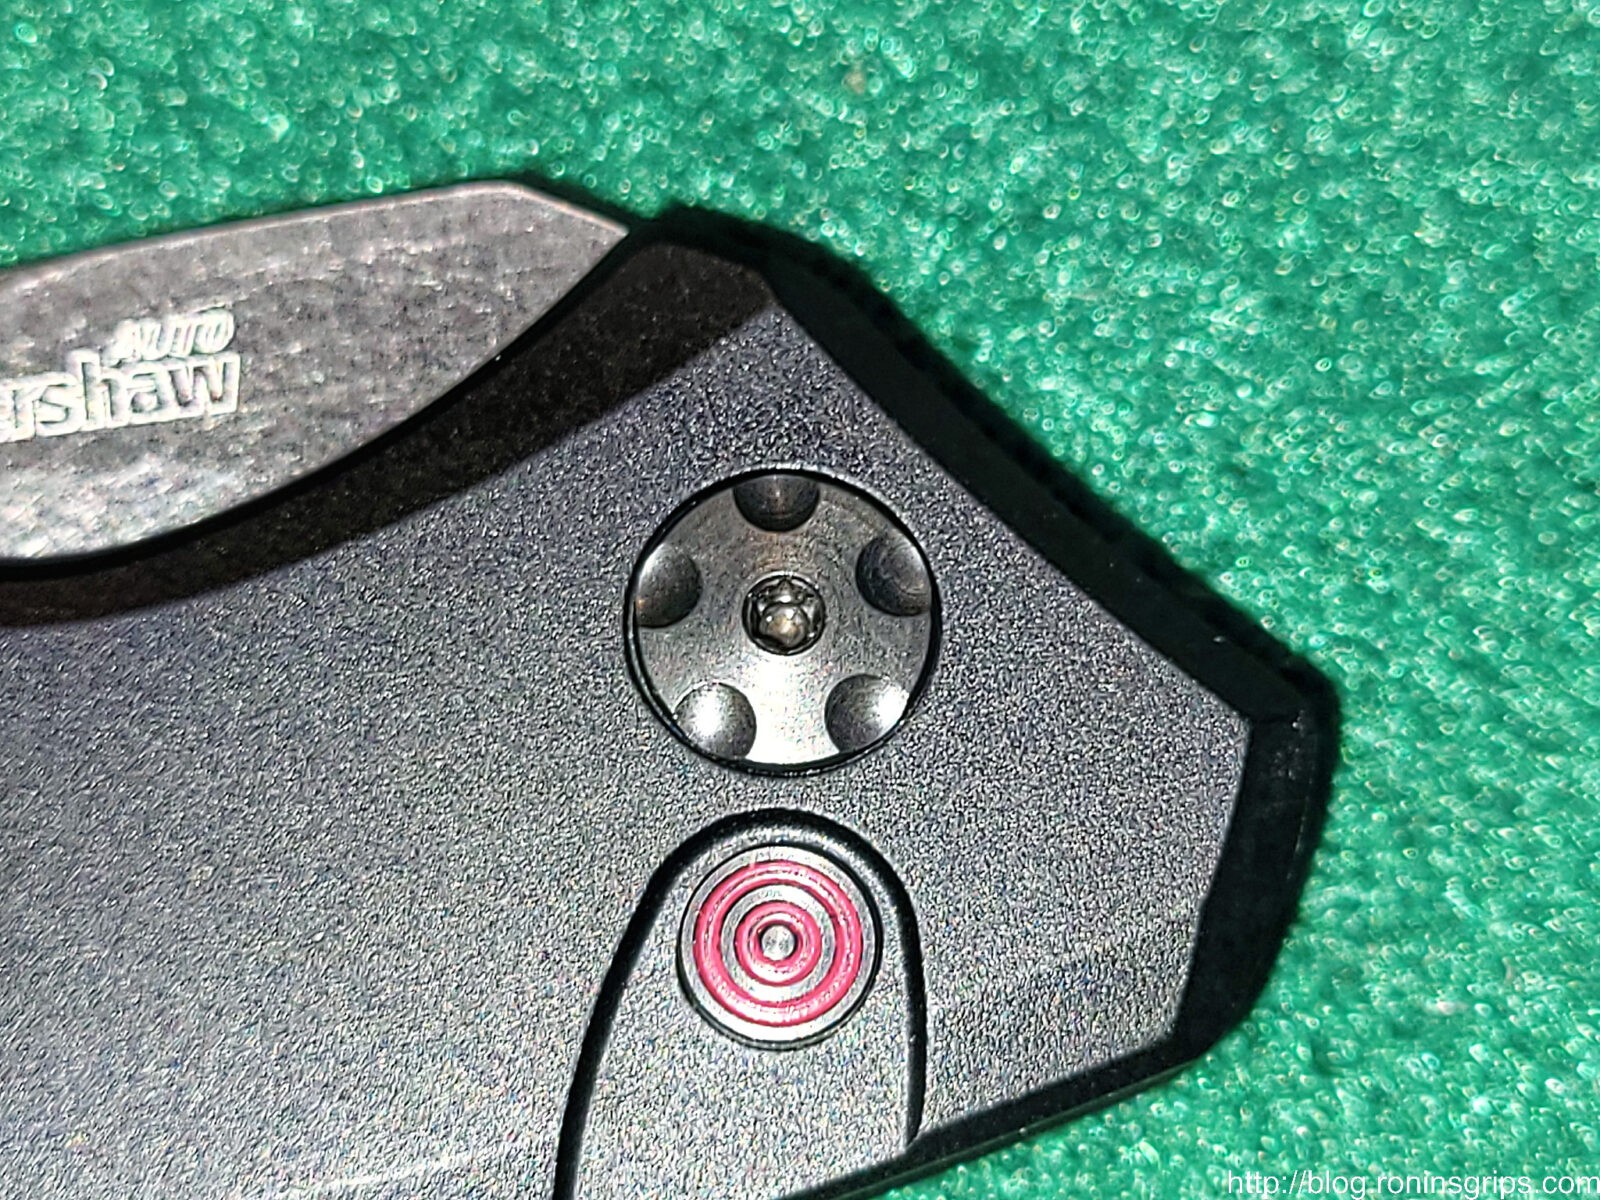
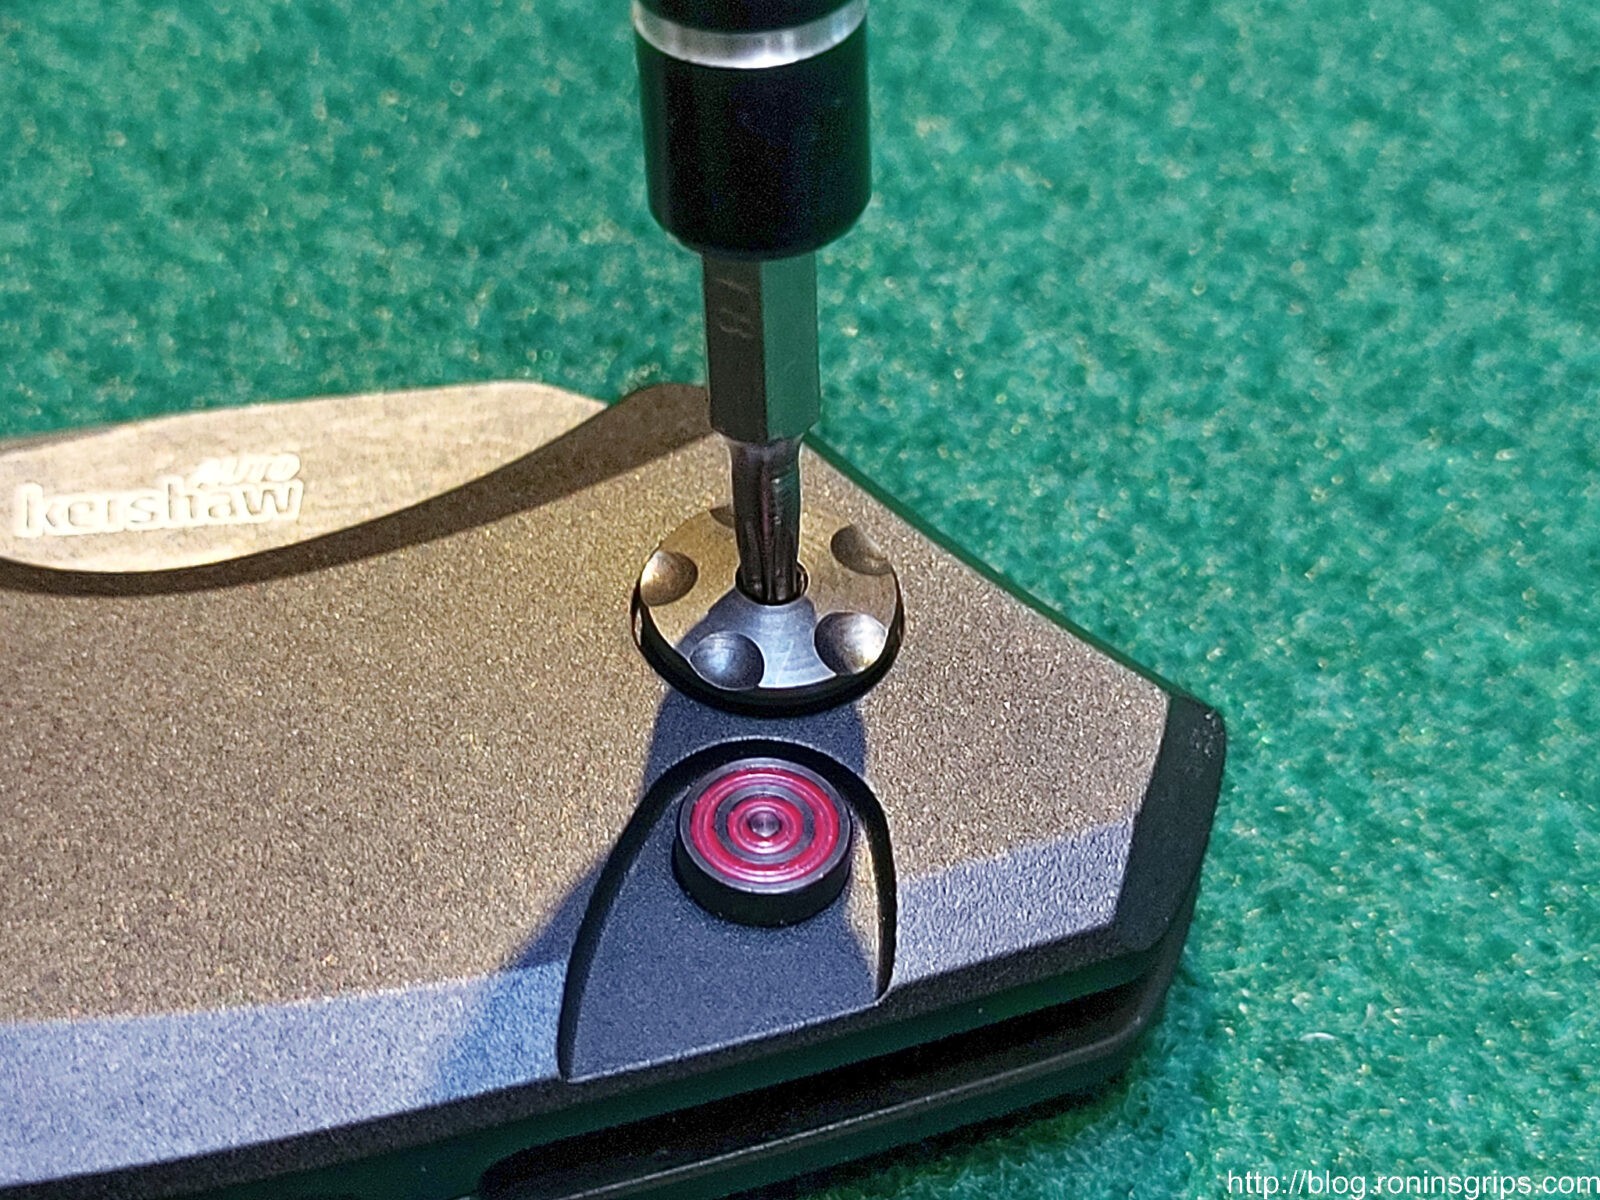
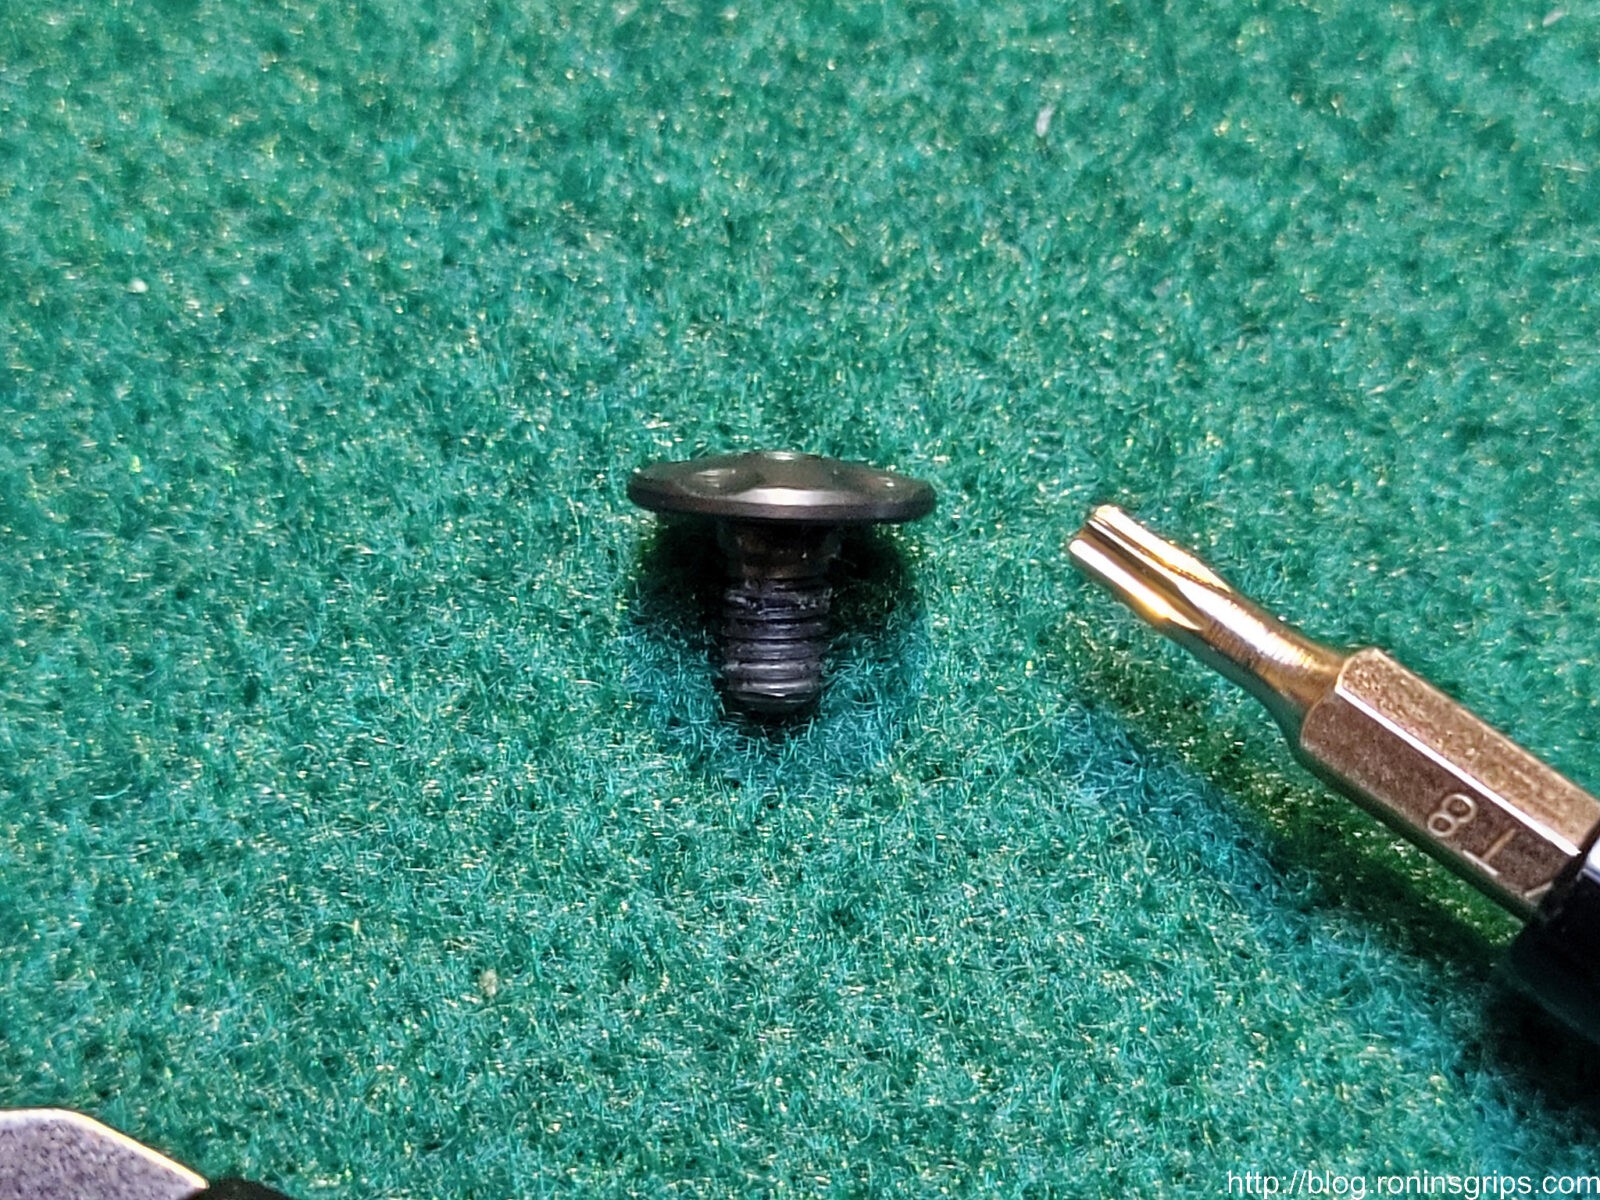
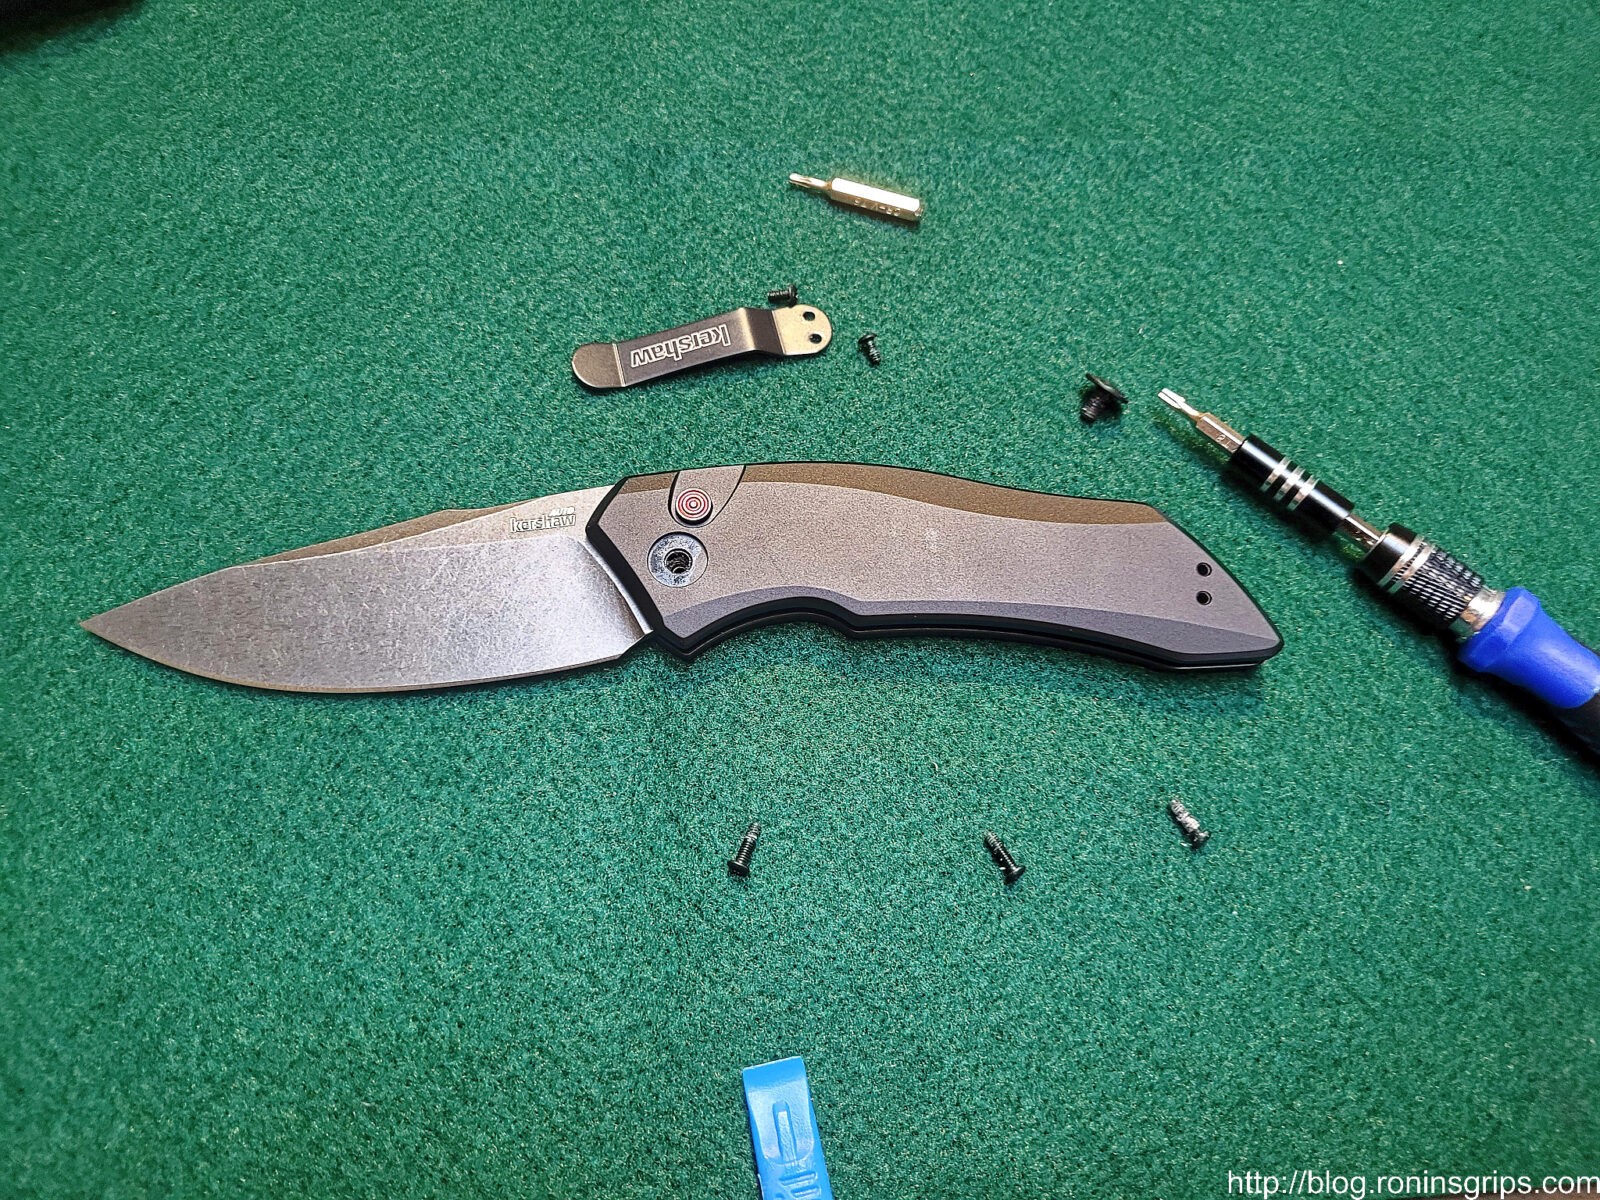
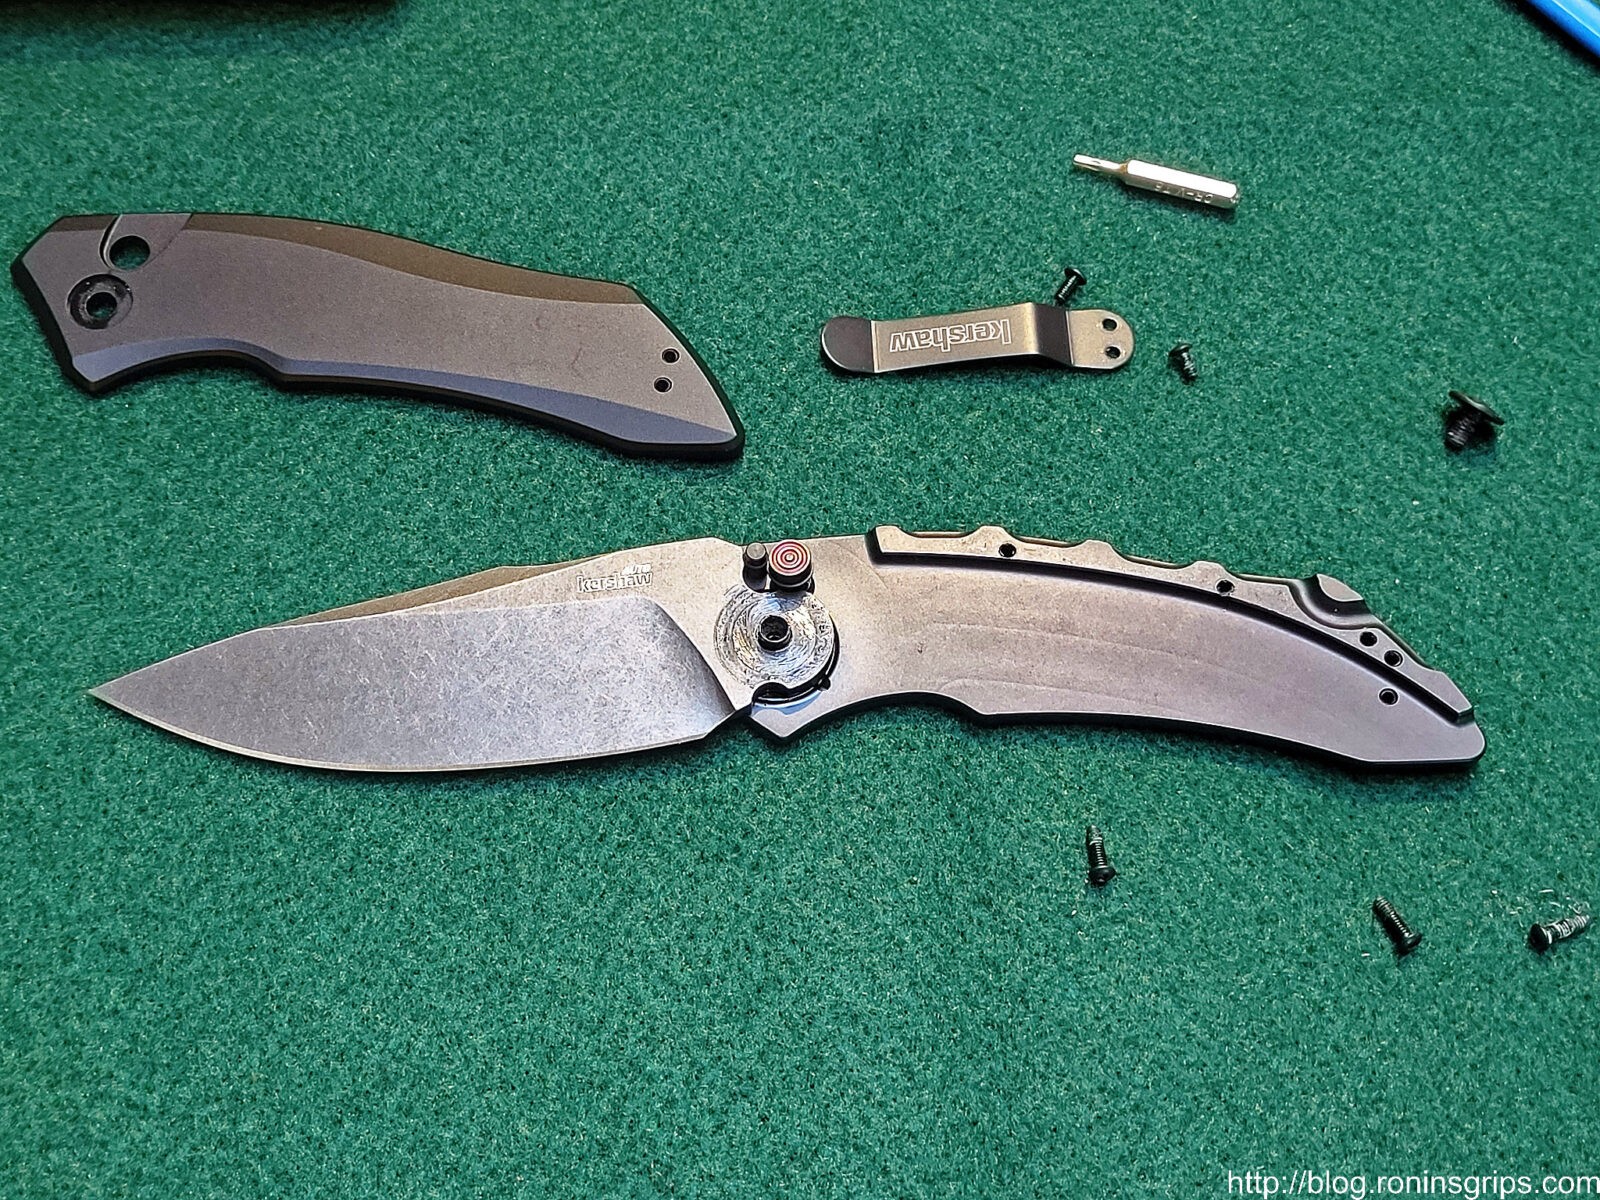
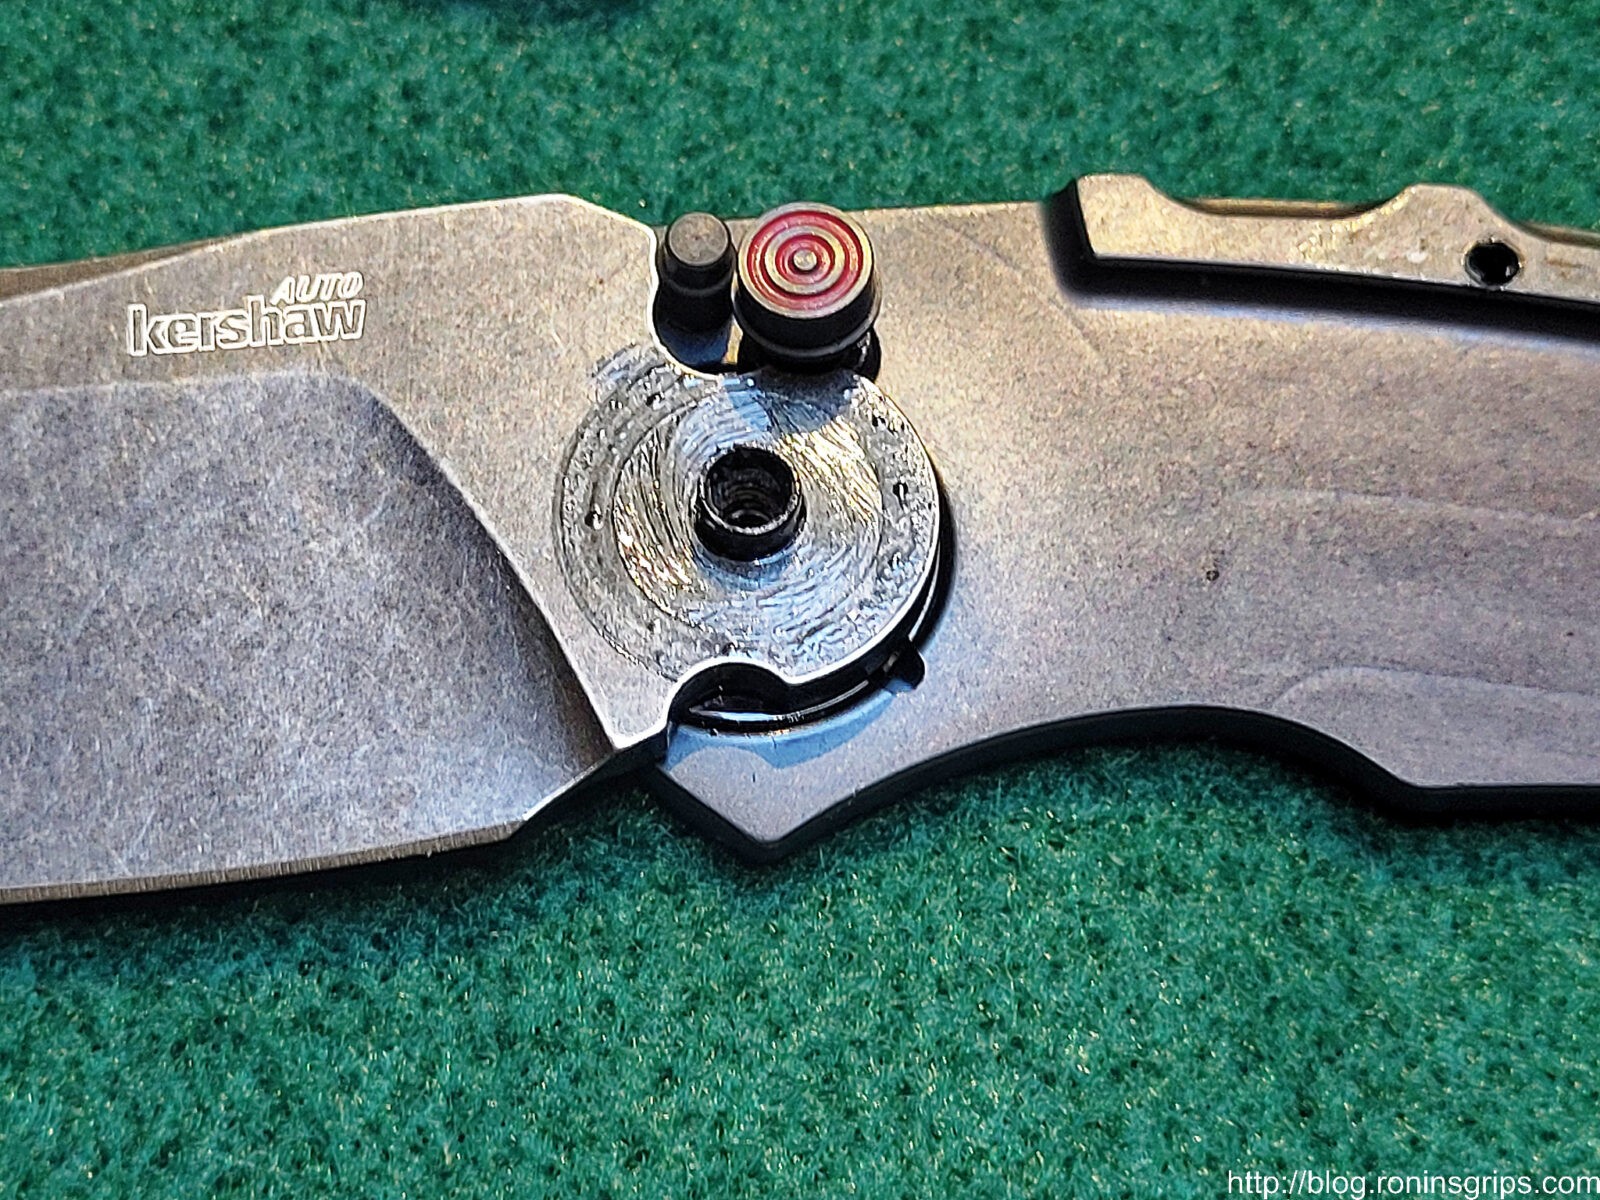
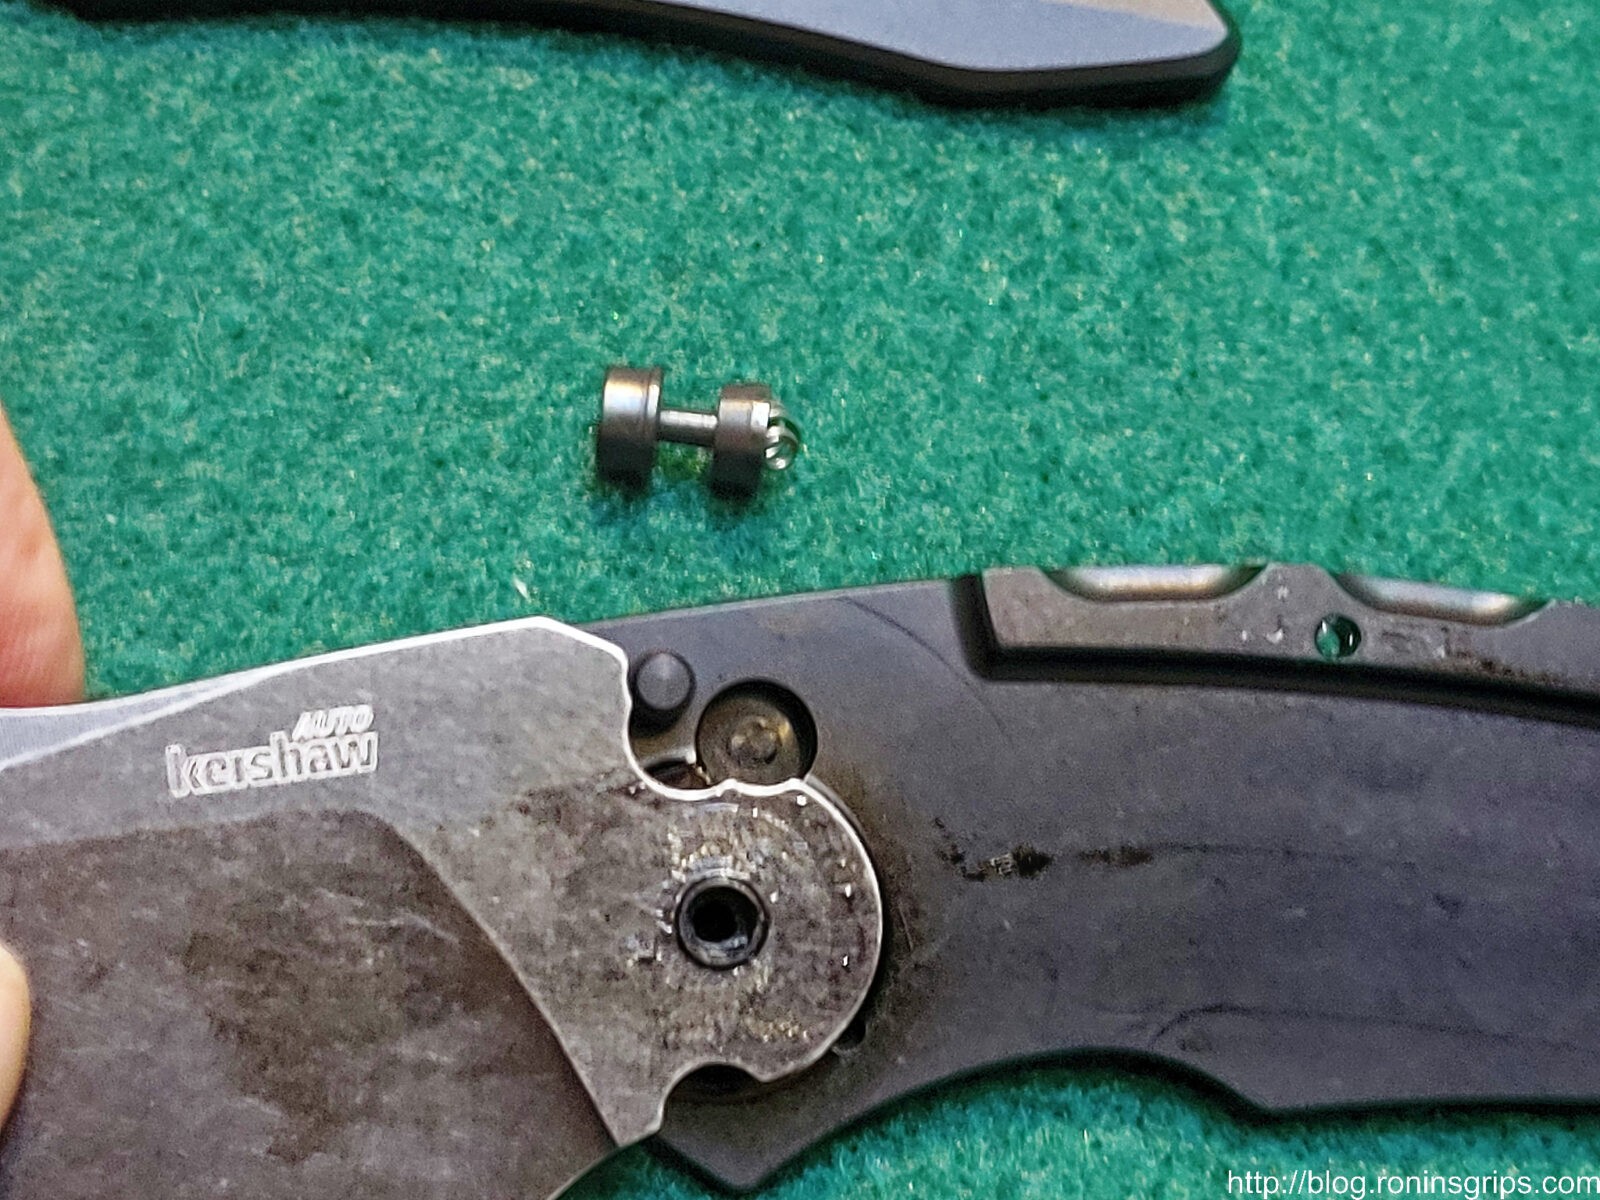
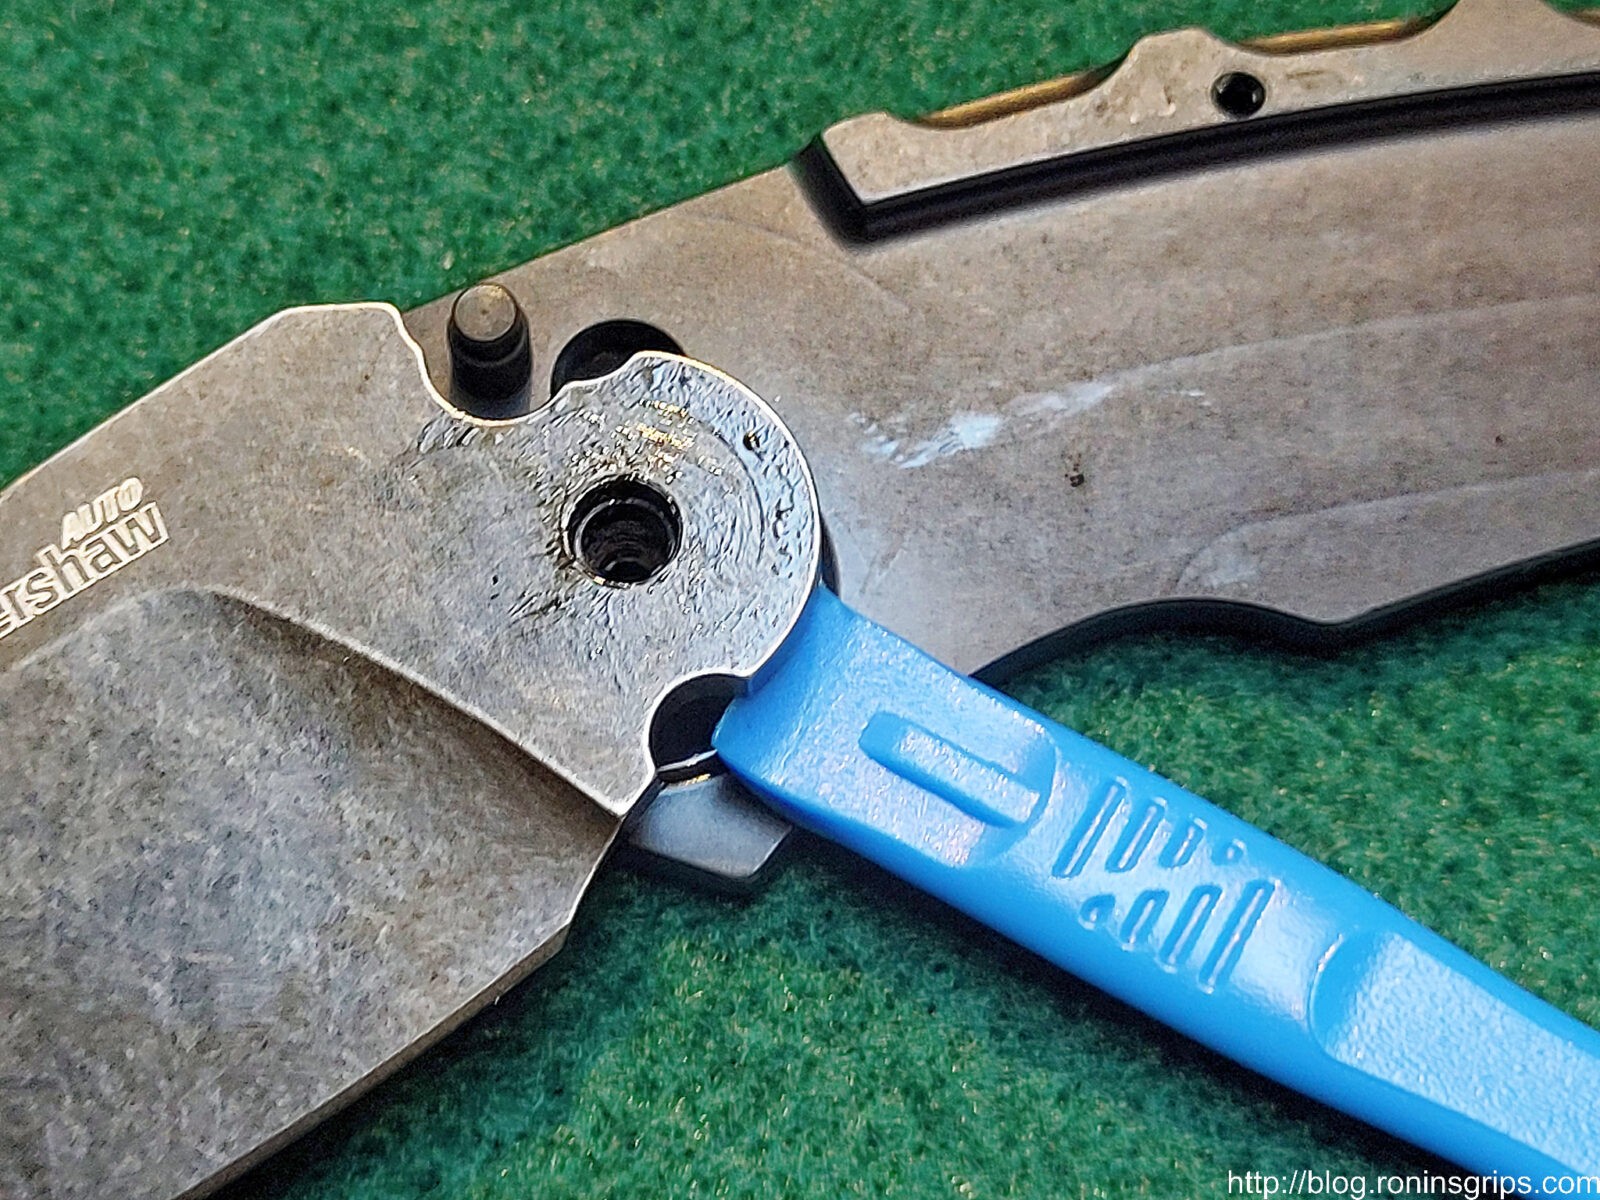
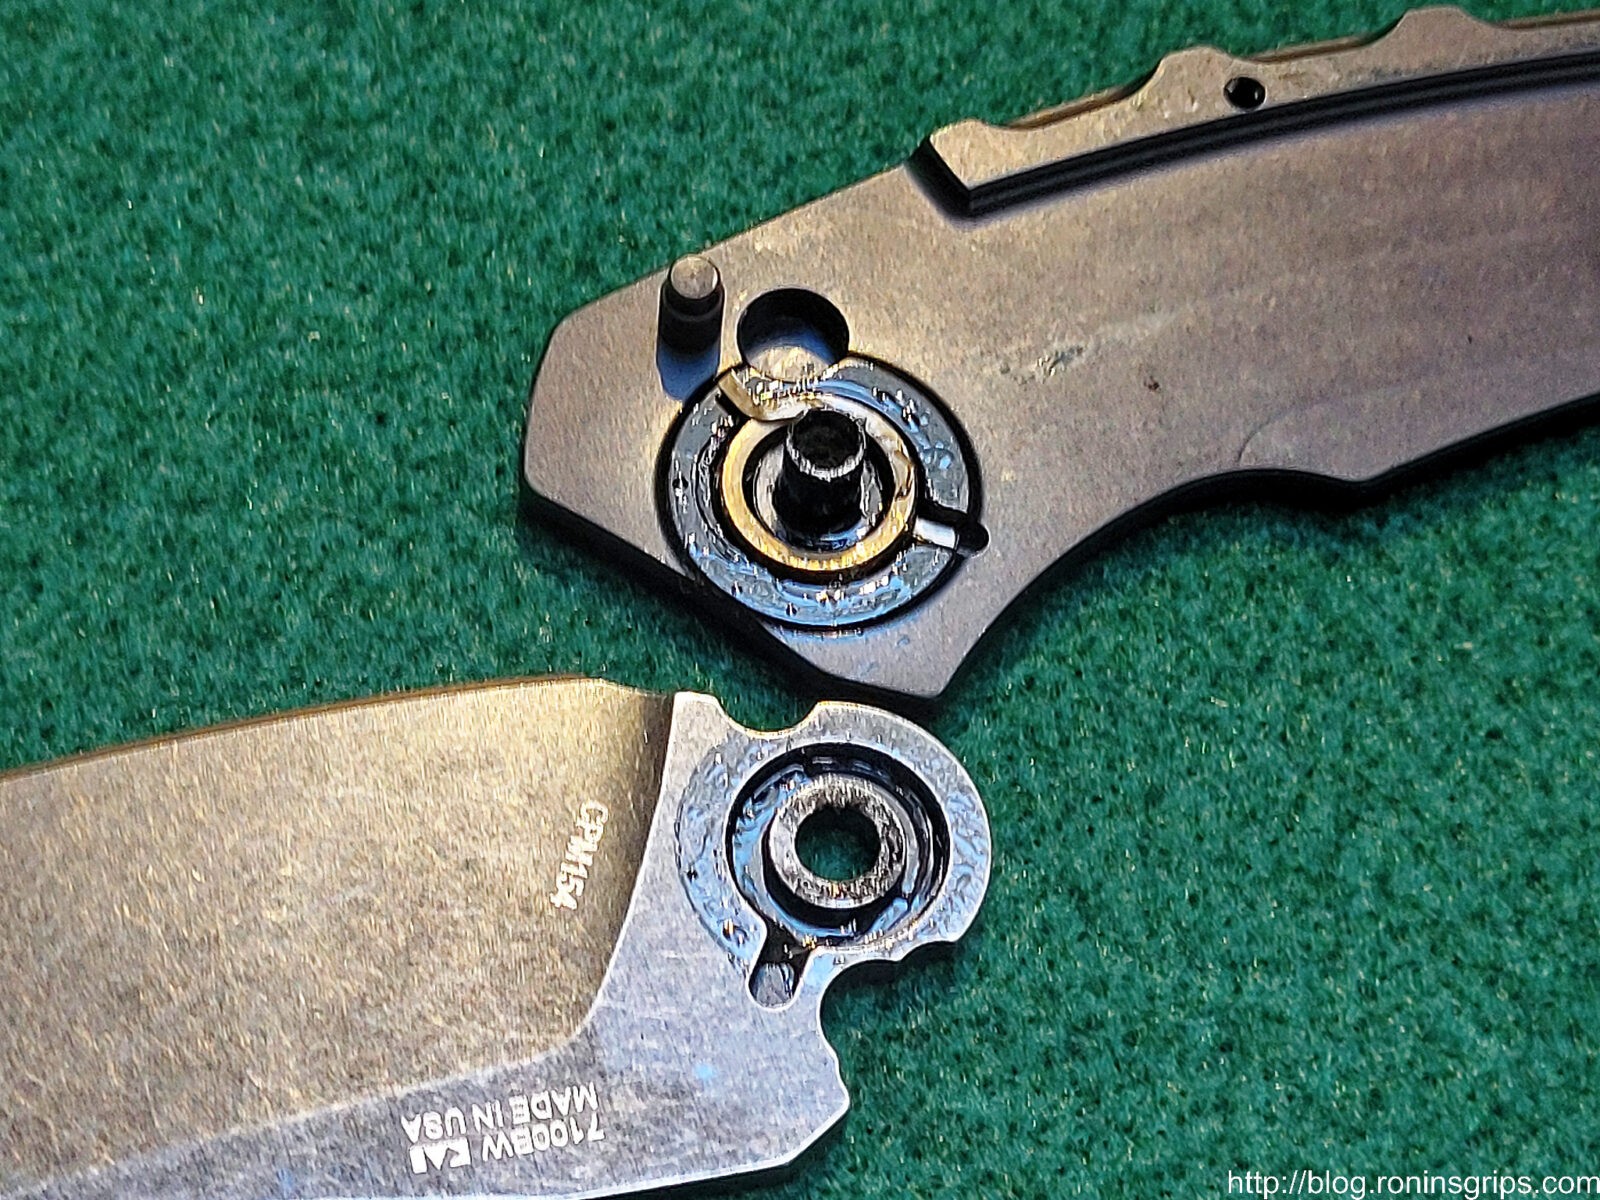
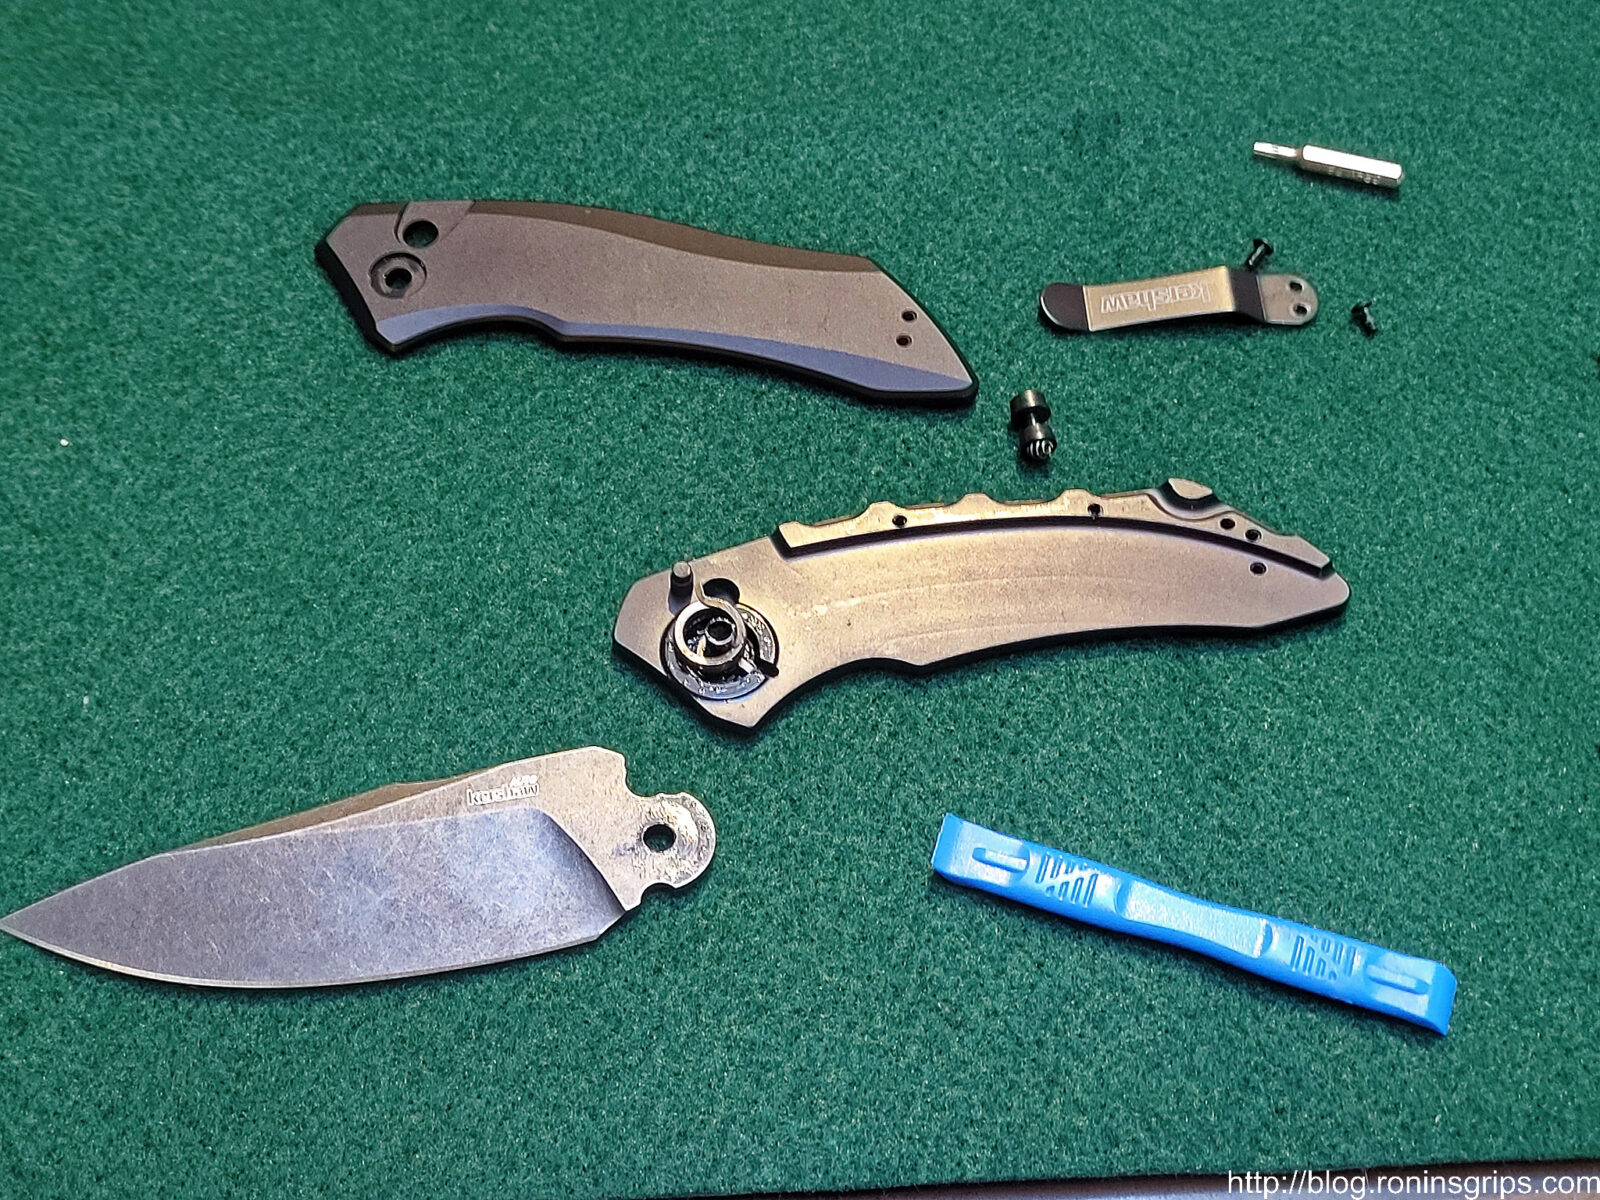
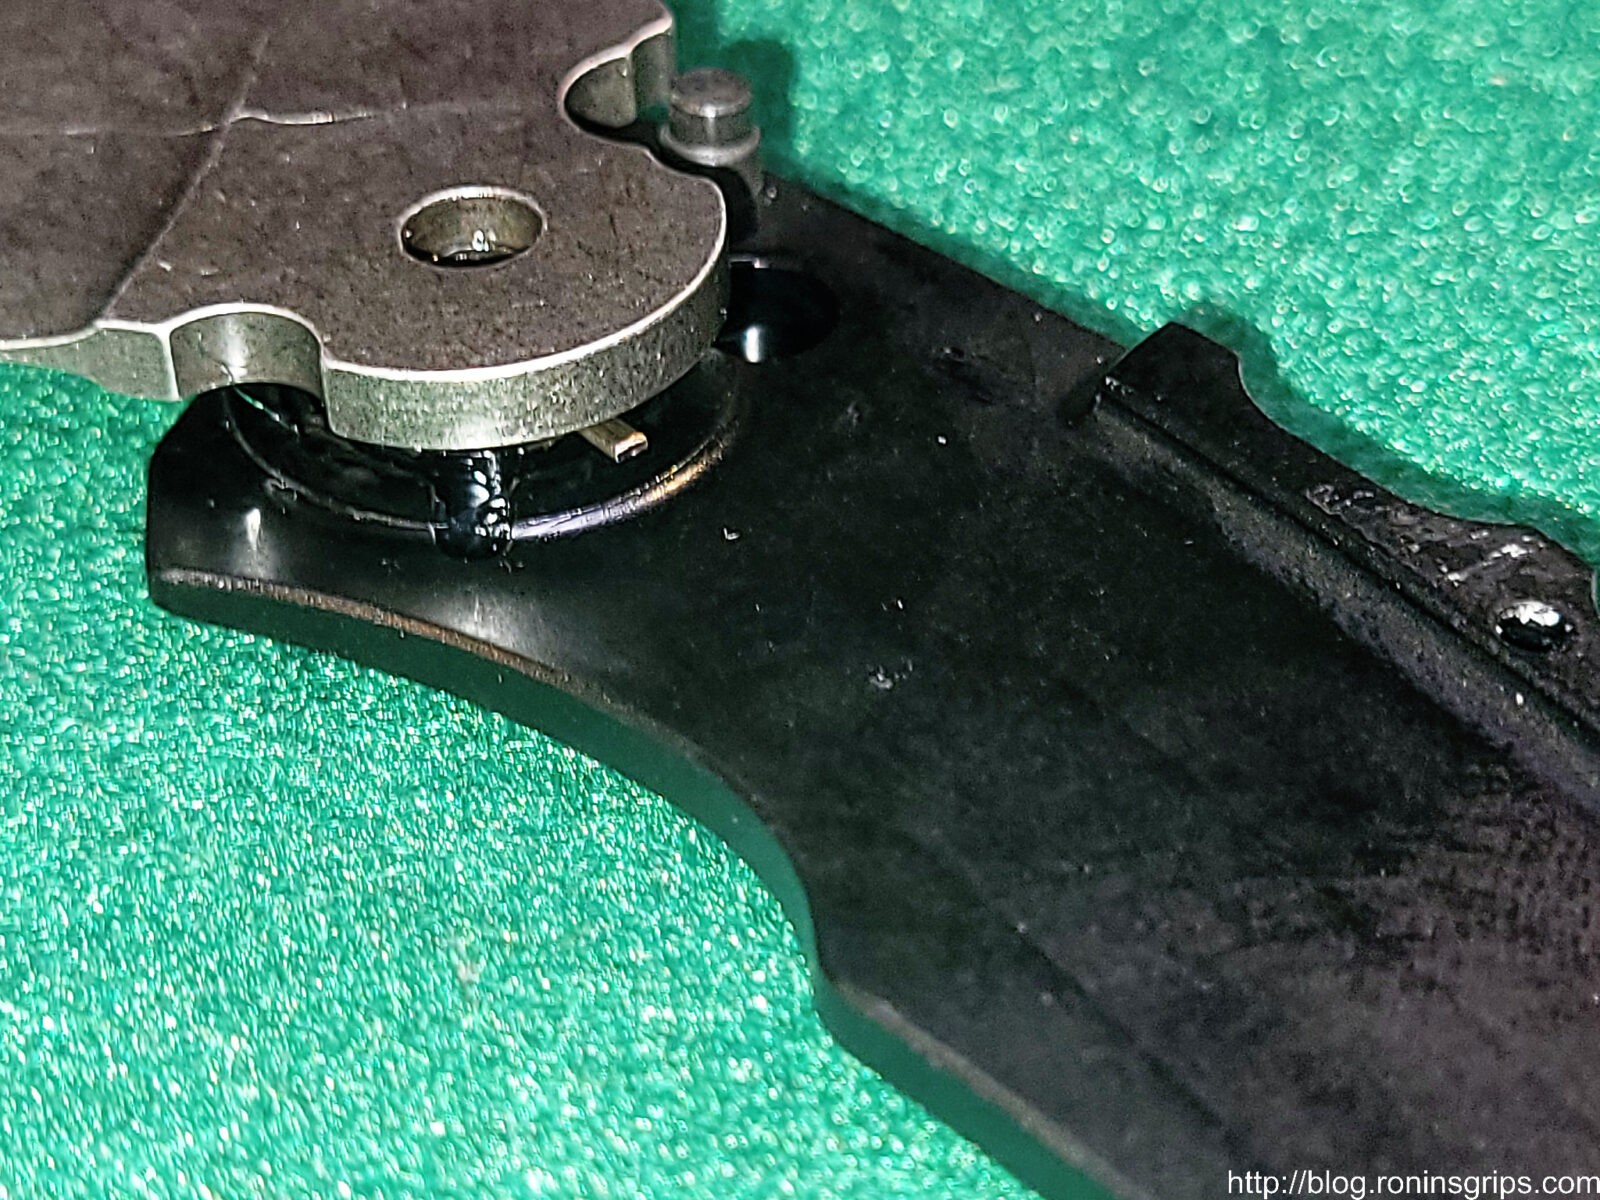
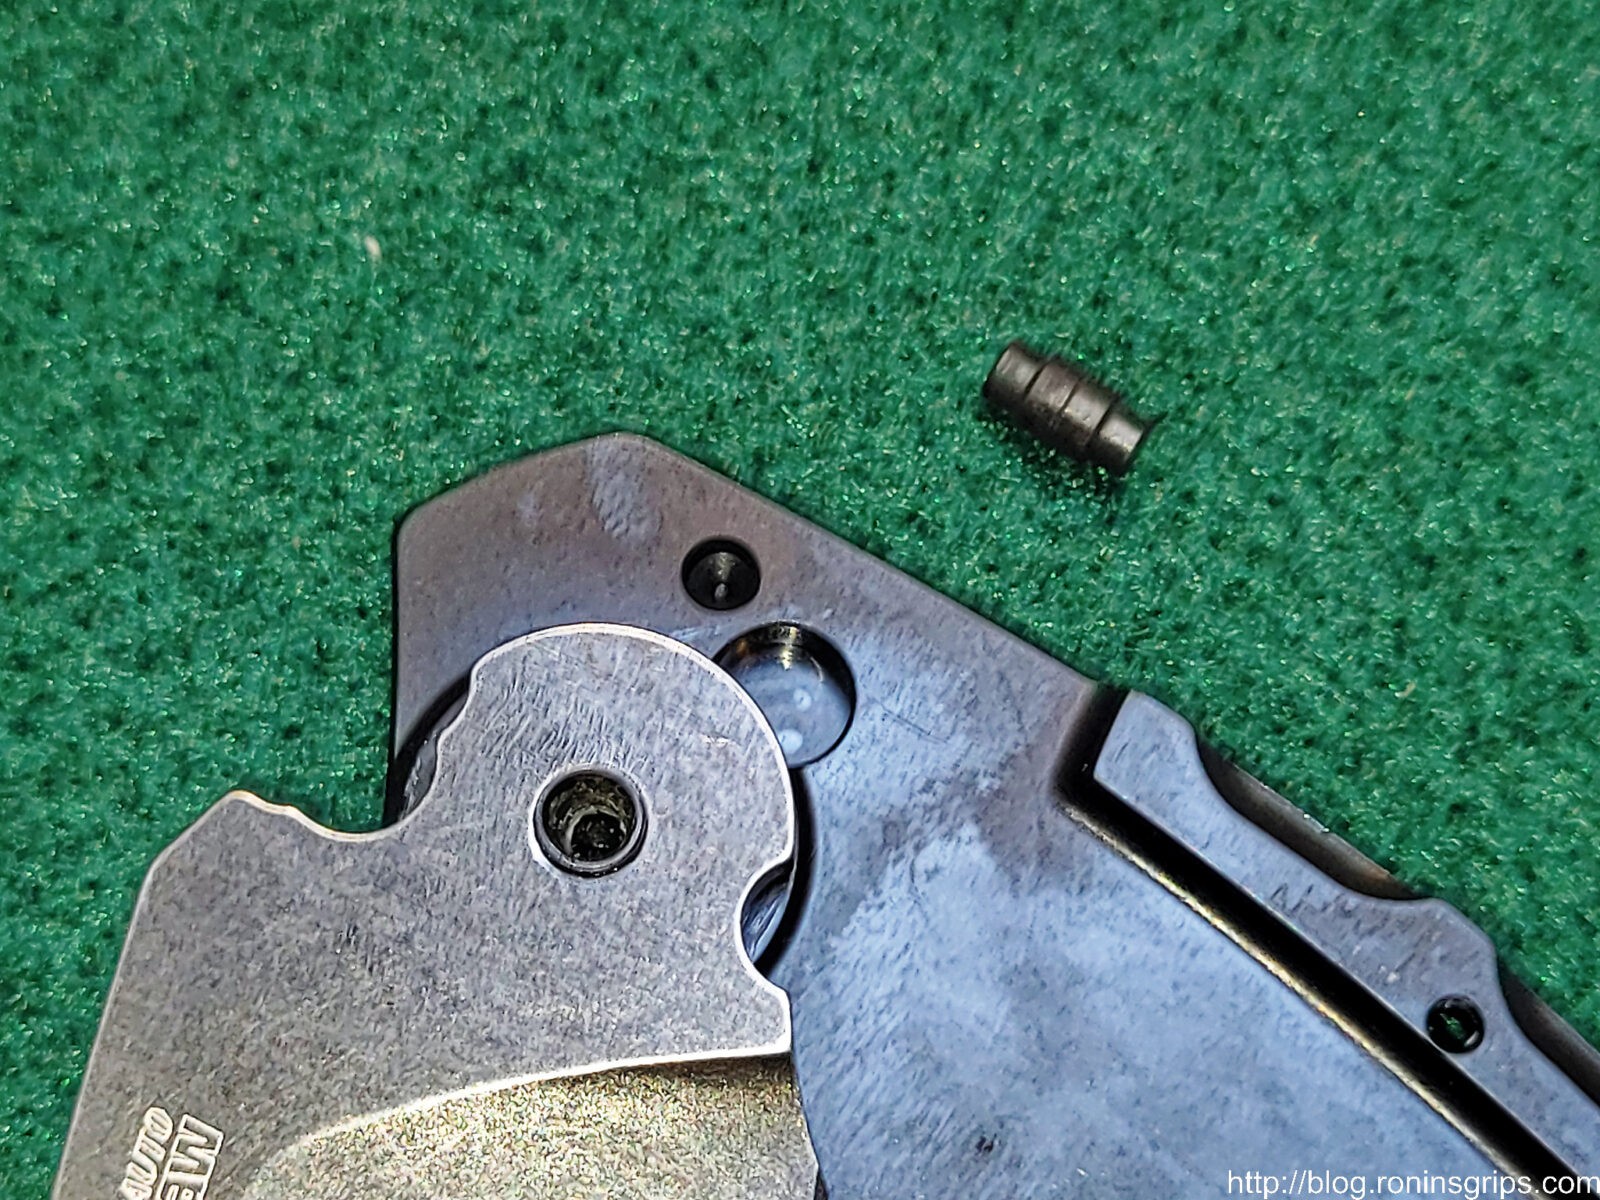
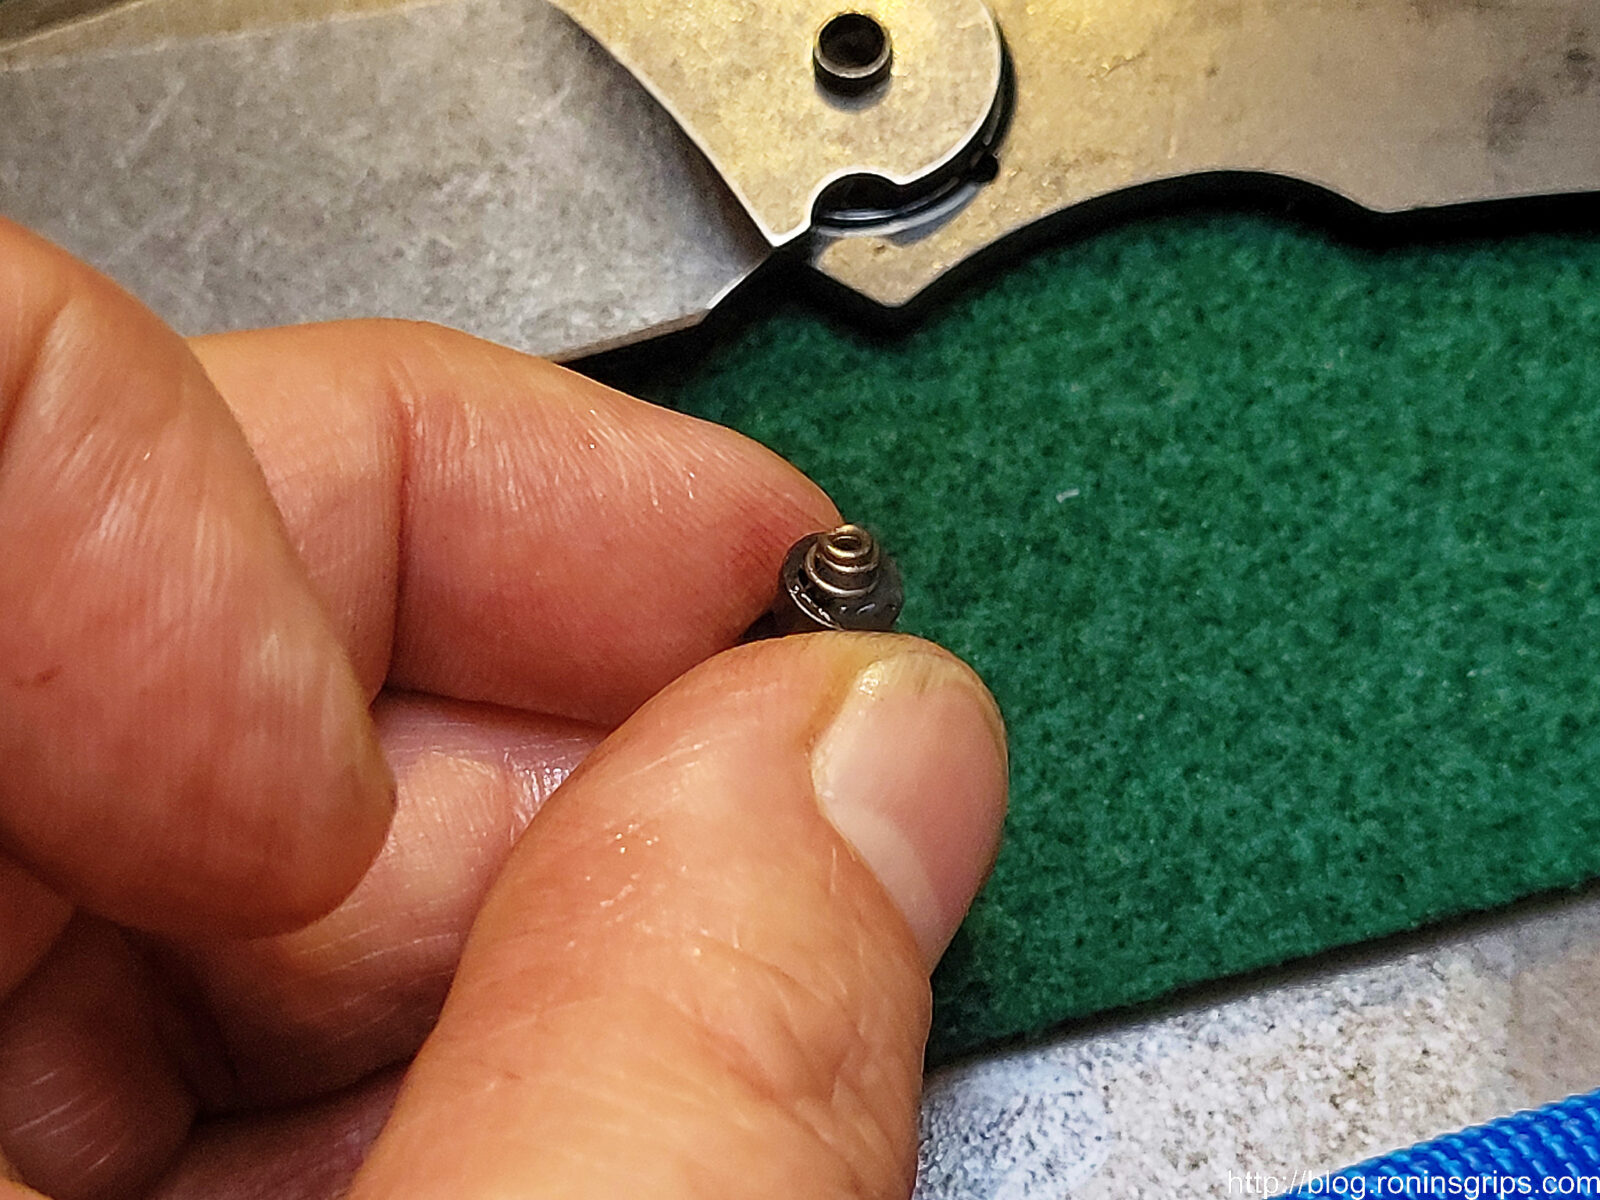
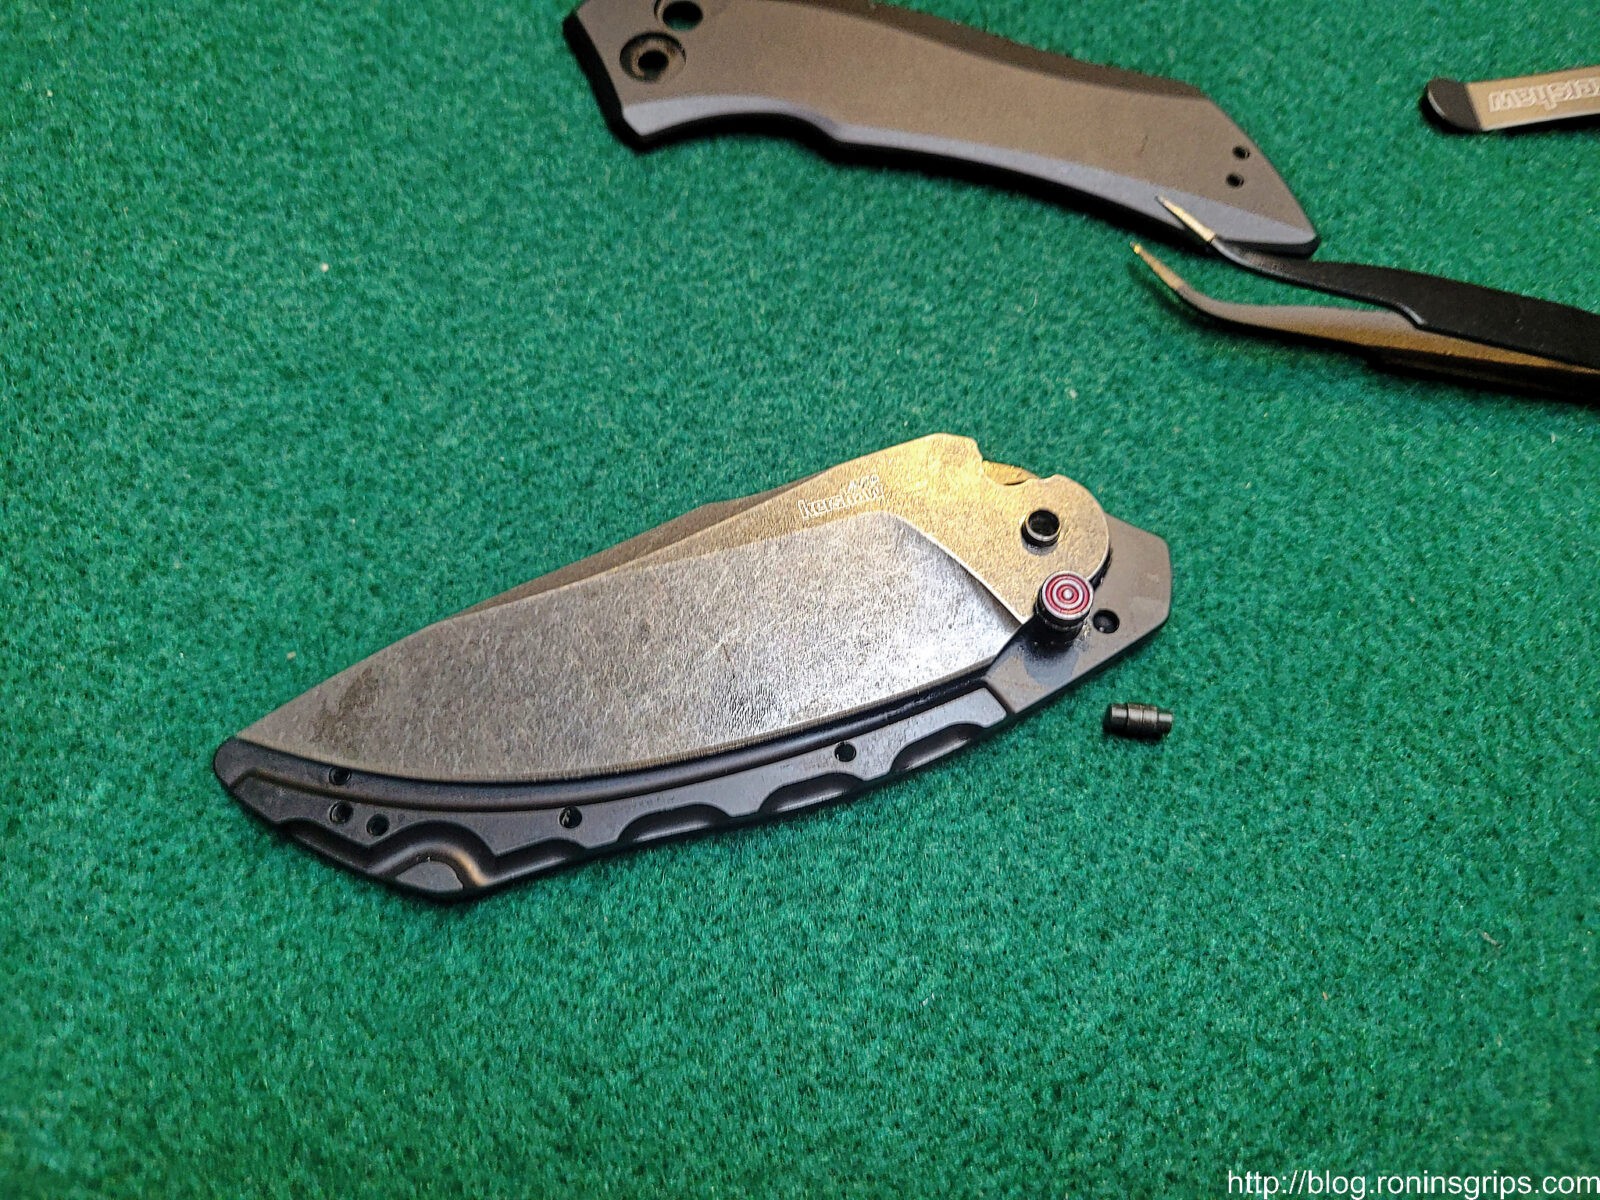
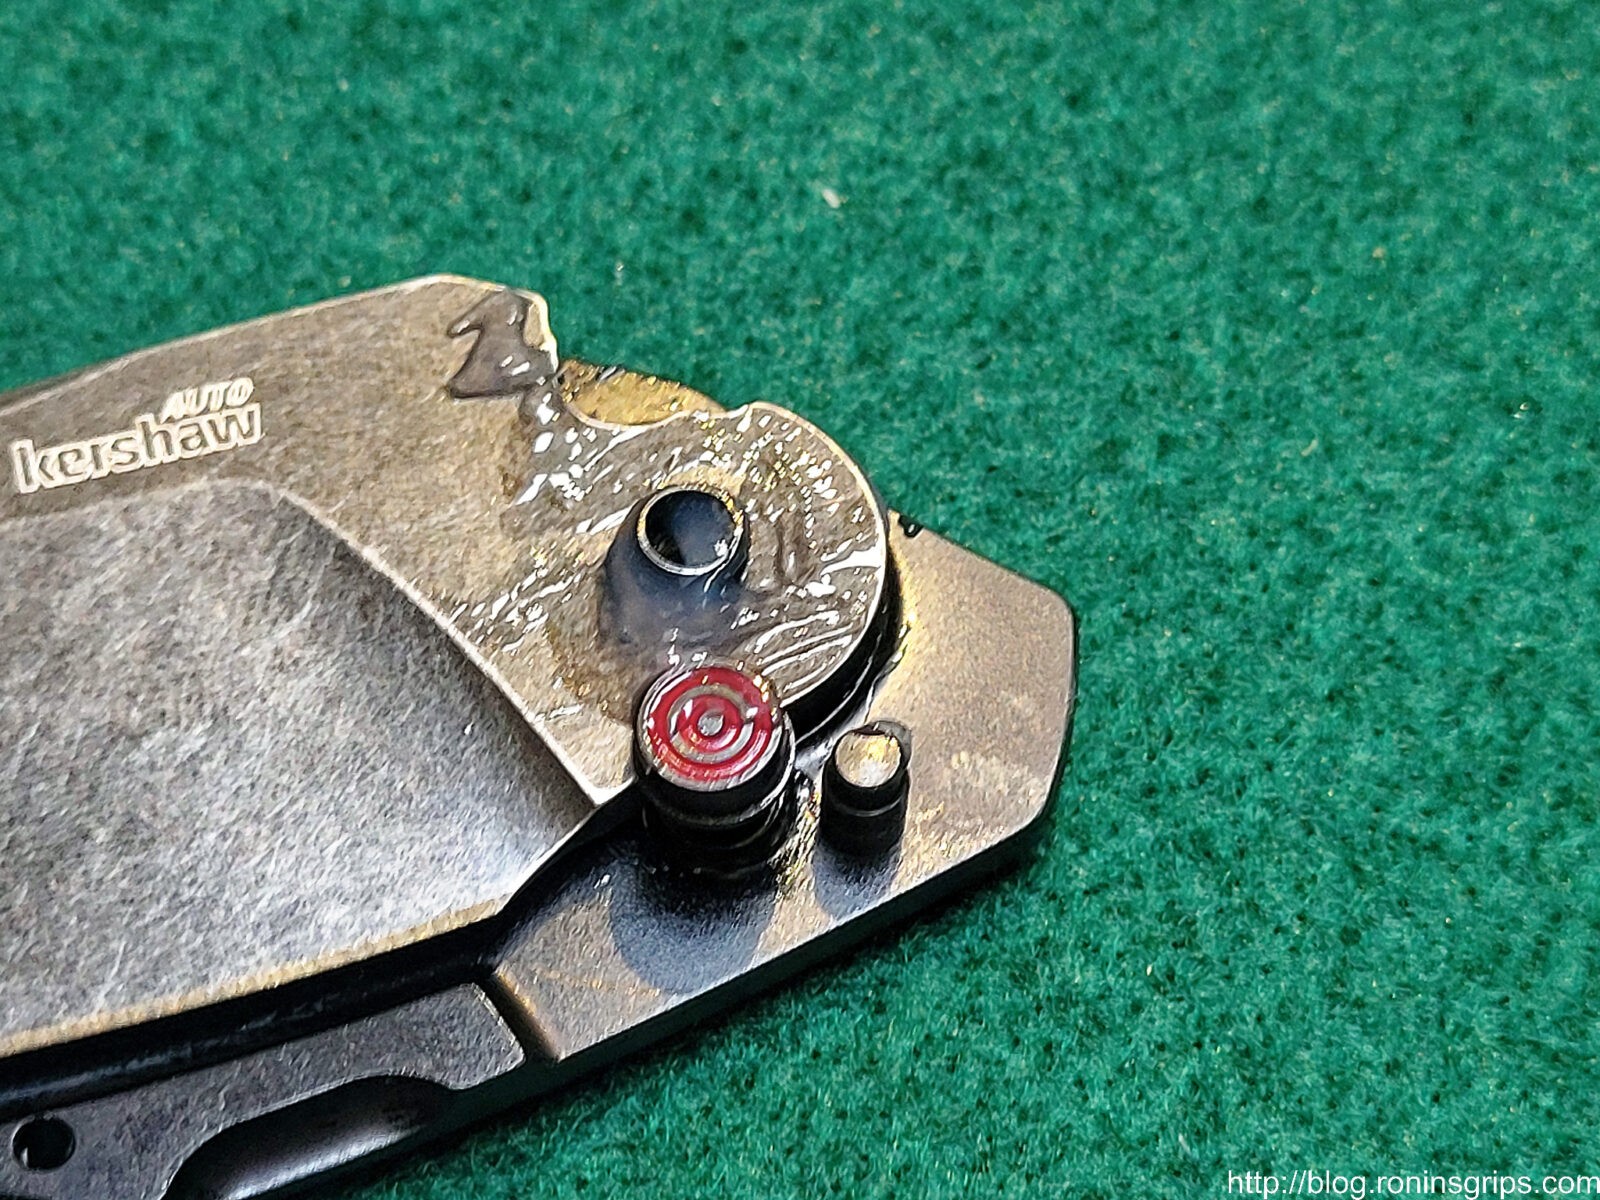
All of these screws use a #6 Torx bit. I removed the clip first and then the three screws holding the handle halves together. Note how the axle bolt is held in place by a hex head on the left. You don’t need to do anything from the side with that bolt – I’m just pointing out it is nice and secure. If you look at the screws at the bottom – especially the one to the right, it looks like some medium strength thread locker was on them.I missed it on first glance – this is the other half of the axle bolt – kind of like a Chicago-screw or post-screw. I saw the decorative half circles and wondered how they removed it and then I noticed the hole in the center and looked more closely with a flashlight – hidden down in there is a #8 Torx screw.There must be some thread locker on this as it took some torque to break it free. I didn’t need to use a wrench or heat – I just had to turn more firmly and it came loose.Looking at the white/grey stuff in the threads – there probably was just a bit of threadlocker to keep it from coming lose but I am not certain. I would tend to think there is because you can’t crank that screw down or the pressure will keep the blade from opening.At this point, all fasteners have been removed. Notice how I have it turned over so the push button is up – you will want to do the same.So the scale lifts straight up and off. It is a snug fit on the axle bolt so it may take some wiggling to get it off. Now I need to point something out – look how clean the machining is and the finish is consistent. So many tools and knives look like crap inside due to an “out of sight out of mind” mindset that it is refreshing to see how well this is done. Kudos to the folks in the Oregon Kershaw plant!The top pin to the left of the push button is hand press fit in place. Pull it out first and the blade will want to rotate clockwise and then the big hole will present itself to the push button and the push button will lift out. Yes, in the photo above I said remove the pin and then the push button. In my case I was taking pictures and wiggling the blade round – the push button came out on its own. At this point the spring tension is being taken up by the pin. It’s not a crazy amount of spring tension the blade open but it is trying to go a bit further so be careful. This photo also lets us see the removed push button assembly. Normally, the fat bottom portion is engaging one of the cut outs in the bade. Either the one at the top that is keep it closed or the one at the bottom that locks it open. When you push the button the fat piece slides out the way and the blade is released to either open or close. Note, the spring is not sitting properly in the base of the push button in this photo.I would not have needed the little blue pry bar if I knew the stop pin simply pulls out. If I had slightly closed the blade to take the pressure off the pin, I could have easily lifted the pin out, then controlled the few more degrees of rotation the spring had left in it and the blade would have lifted right off.The torsion spring is what provides the power to flip the blade into position. The act of the user closing the blade rotates the spring’s coils and store the energy waiting for the button to be pushed spring back into the relaxed position. One leg of the torsion spring sits in the channel of the handle and the other sits in the blade. In this photo I have laid the blade 180 degrees opposite of how it normally sits in the handle so you can see how the torsion spring sits in the two parts. It’s elegant. Notice the ample grease – I think it might be silicone grease. Anything that causes the blade to bind will slow or even stop deployment.Here are the parts and you can see the nicely done flat torsion spring. Again, I should have removed the stop pin, then the push button and the blade would have lifted right off the axle bolt. This is it other than removing the stop pin which plays into re-assembly.
Re-Assembling the Launch 1
Putting it back together is pretty straight forward. In hindsight I would tell you if something seems complicated, you missed something. That was exactly my thoughts as I was trying to the the torsion spring oriented with one leg in the handle and the other in the blade.
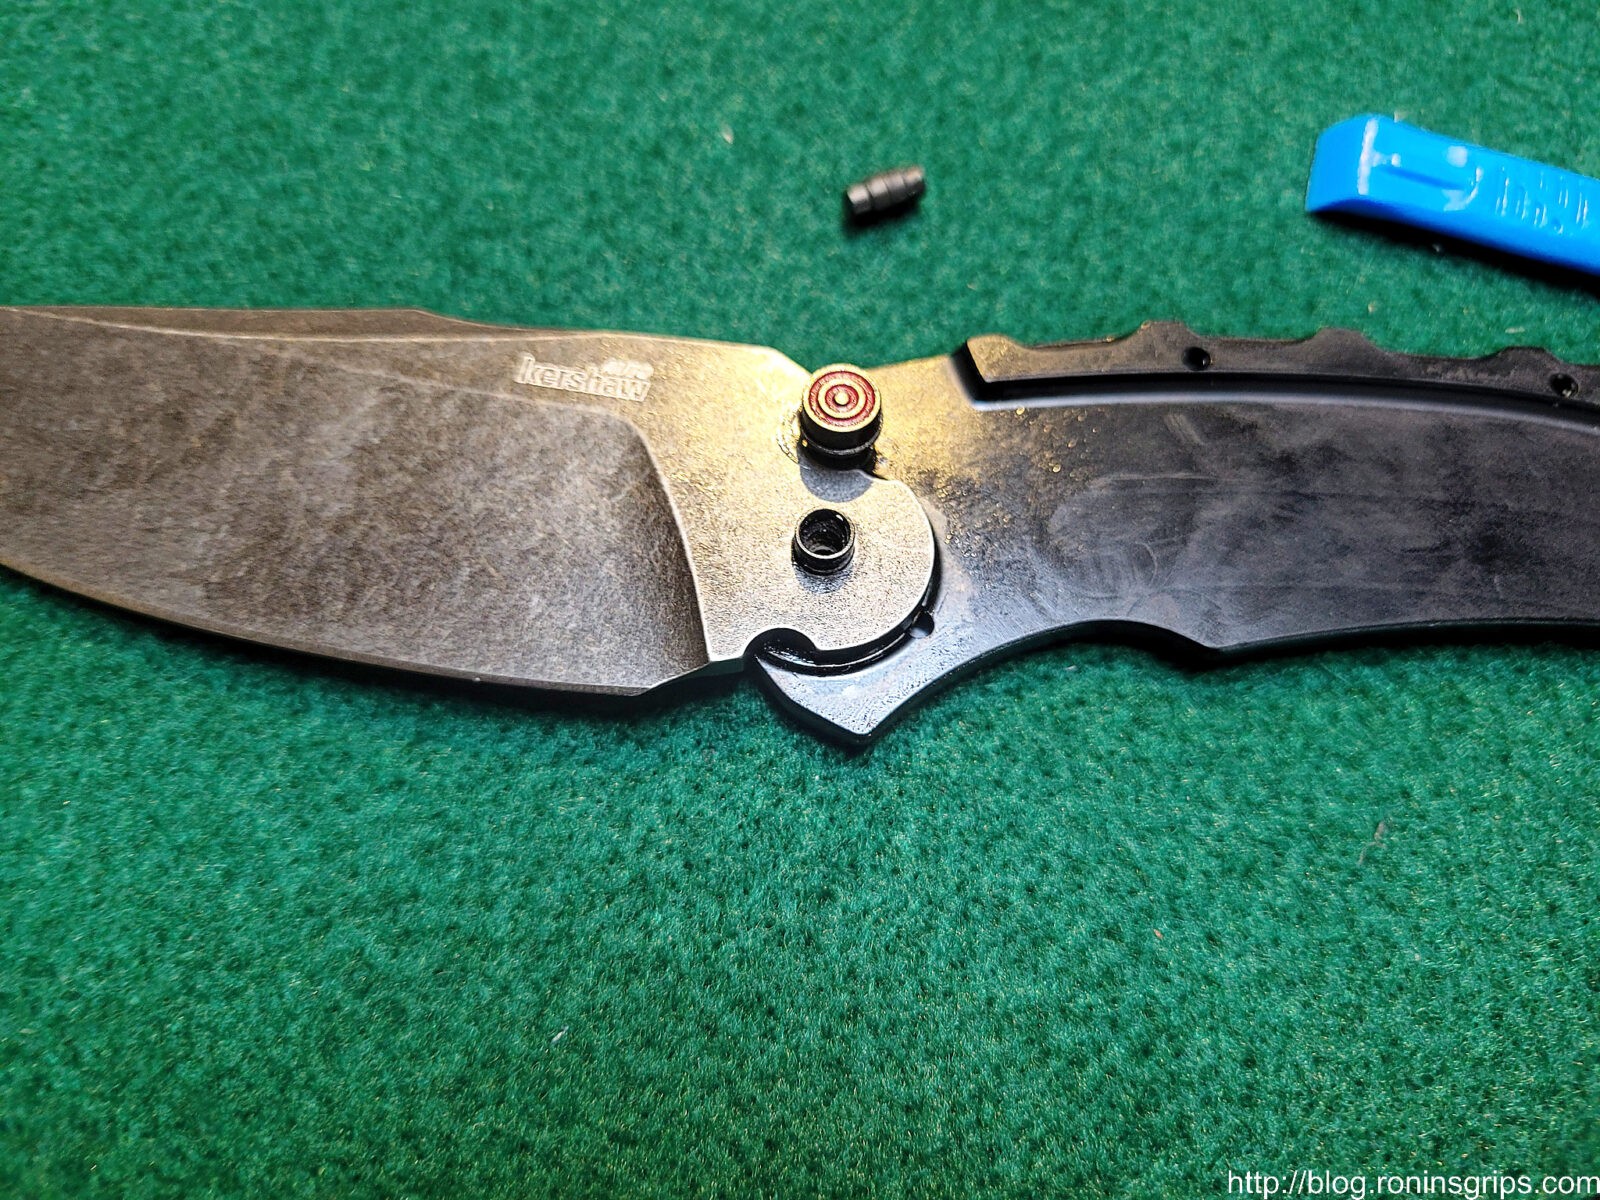
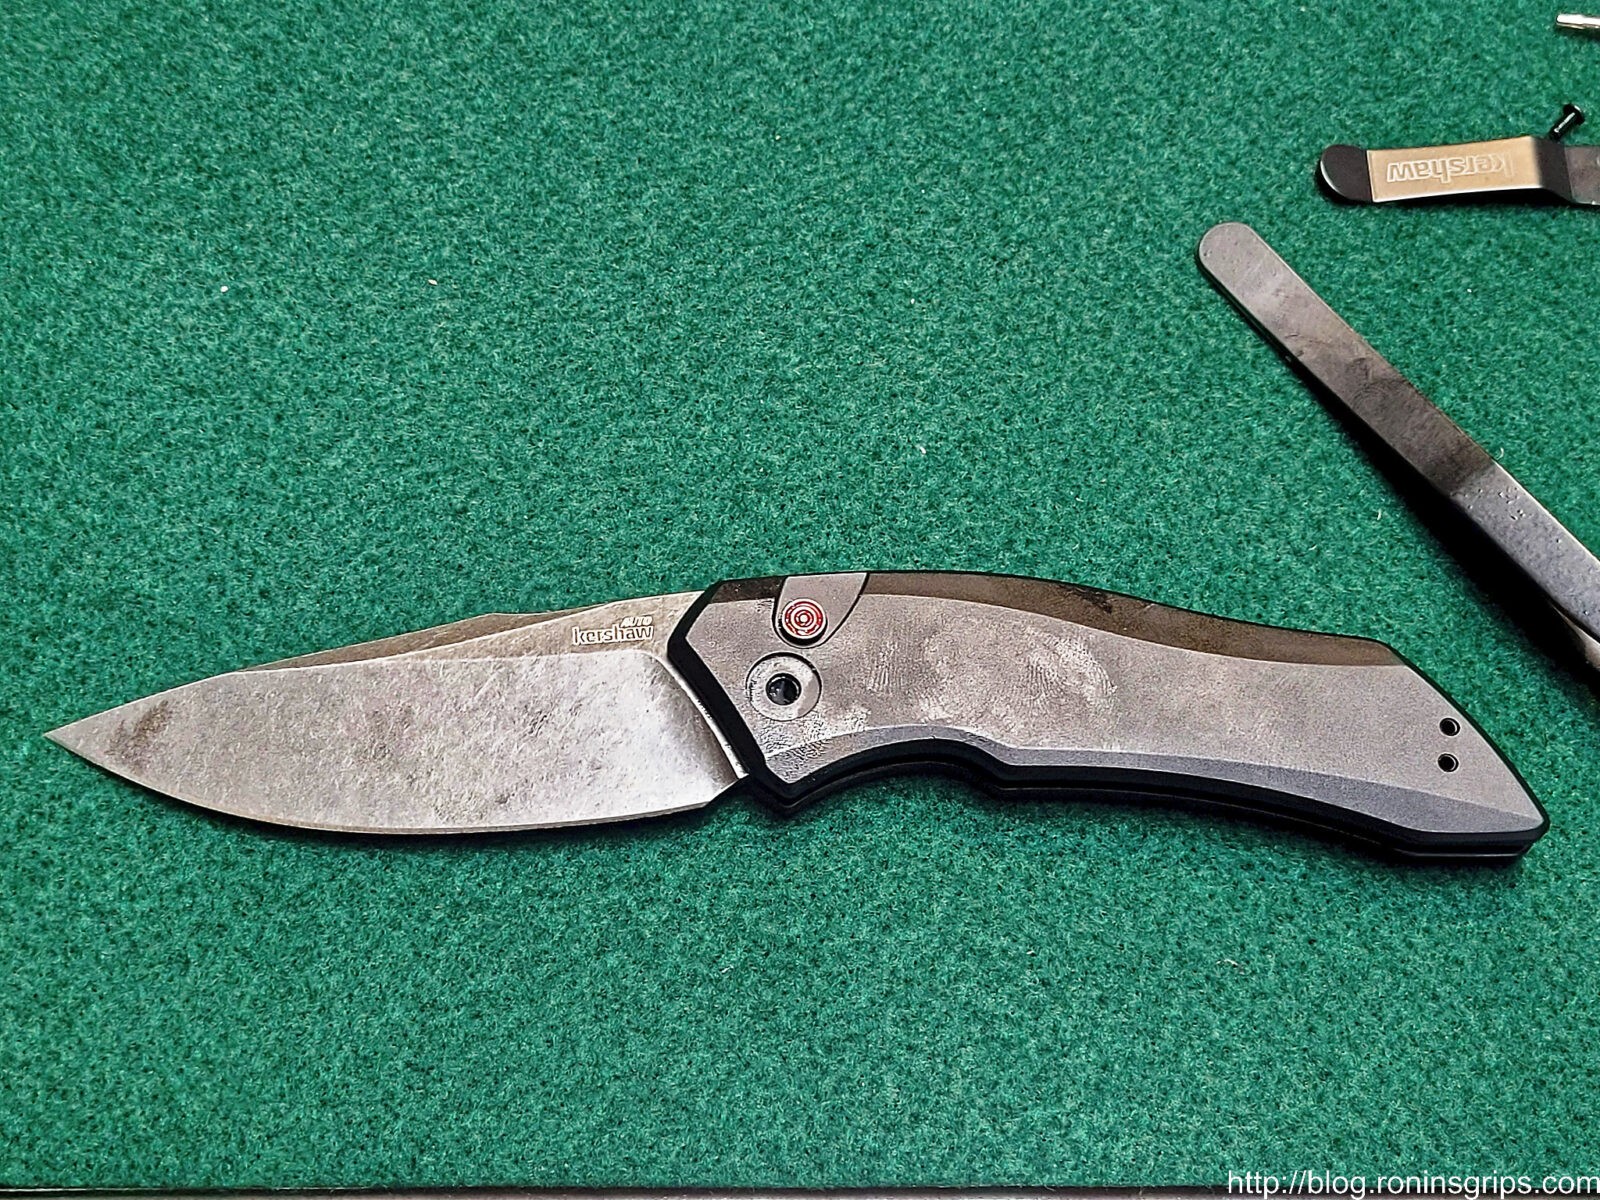
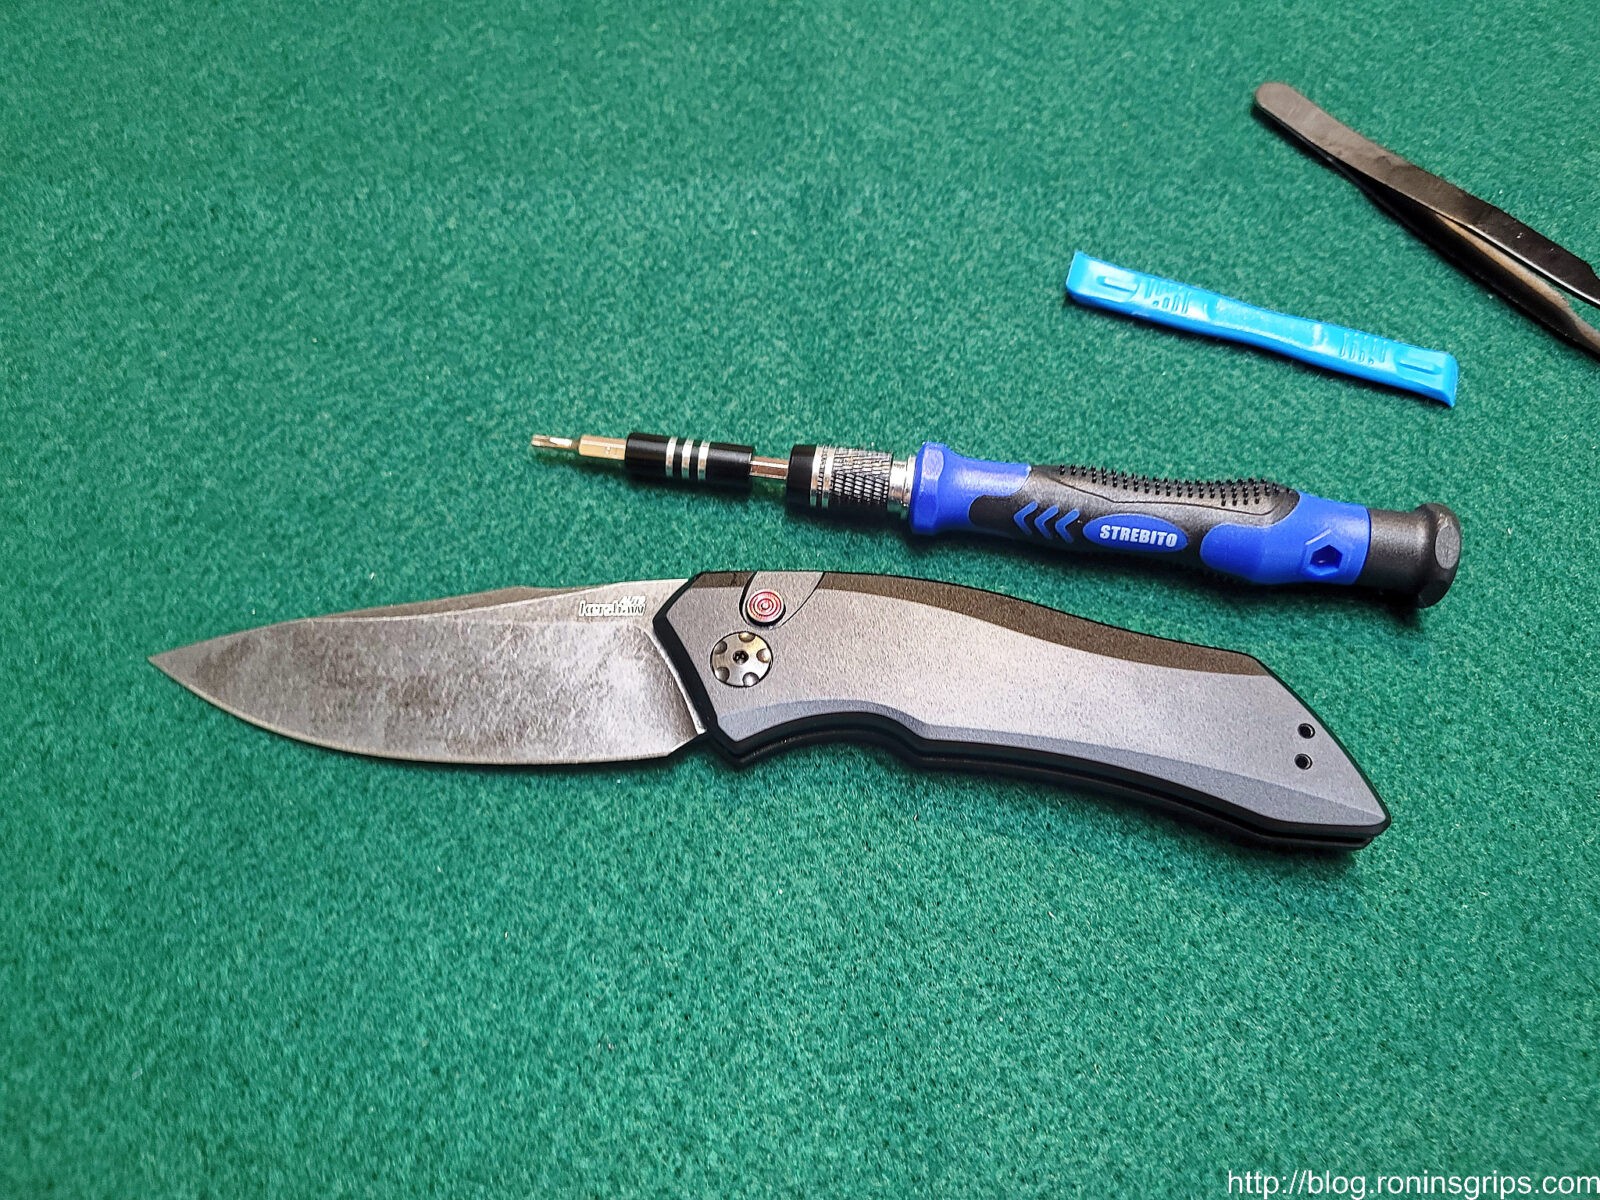
I spent about 5-10 minutes trying to get spring in and had my “duh” moment. Given how the spring sits, no tool so going to fit in there. I thought to myself “I wonder if that that stop pin can pull out?” And it did.Wow!! Removing that stop pin made it sooooo simple. Rotate the blade such that the torsion spring legs are seated and you will feel the spring working. Then put in the push button and its spring followed by the stop pin.I wish they designed the spring to snap into the button but they didn’t. An old trick that I used here was to fill the cup of the push button with silicone grease. The grease in turn holds the spring while you install the assembly.Rotate the blade just enough so you can install the push button in that first large semi-circular opening. You can then push the button down and rotate the blade into the next notch which is the normal lock open moment. In this photo the blade is at a funny angle because the stop pin has not been installed yet.Notice the blade is pushed all the way down on the axle bolt. To install the stop pin, push the button, carefully close the bade and release the push button. It should engage and hold the blade in the closed position. This presents the hole for the stop pin wonderfully as you can see in the photo and you aren’t fighting the spring. Literally, the pin goes right in.I put a light coat on silicone grease on this side of the blade as I had wiped most of it off fumbling around. I did clear the silicone out of the bolt if you are wondering. You can also see the stop pin is in its hole.The handle half is reinstalled. I carefully held it in place and tested to make sure the blade still pivoted and the push button worked.When you reinstall the end of the axle bolt, you will need to see how much to snug down the screw. I found that if I made it too tight that the blade would not fully deploy. After experimenting, you may want to put just a bit of medium thread locker on the screw to keep it from working loose. Re-installed these too and with that am done.
Summary
Kershaw did an excellent job on this knife. I thought about doing the same with the Launch 13 and it looks to be the same mechanism so I didn’t bother.
If you are looking for an automatic knife, I am very impressed by the Launch 1 and 13. I suspect the whole line has similar workmanship. I’ll post links further below.
Note, I have to buy all of my parts – nothing here was paid for by sponsors, etc. I do make a small amount if you click on an ad and buy something but that is it. You’re getting my real opinion on stuff.
Growing up as a kid in the 70s and 80s you’d see some guy in a move whipe out a switchblade and you’d know a world of hurt was coming. For years, I wanted one but couldn’t own one. Now that I own two, I’m trying to figure out how they factor into my collection to be quite honest.
I’m not handicapped so I can’t speak to how they would use one but other than the “coolness” factor, I don’t see the point compared to the tons of flippers / assisted opening knives that I already own. To be clear, I am not bashing them but I won’t be buying any more either – my curiosity is satisfied. Please note – I am impressed by the design and the manufacturing but have decided they just aren’t my cup of tea.
With that said you are going to get my honest opinion.
Some Background
I like Kershaw knives in general so an ad for their Launch series of automatic openers caught my eye. I’ve always wanted to try a “switchblade”, or more appropriately termed an “automatic”, so I shelled out $114 for a Kershaw Launch 1 and $125 for a Kershaw Launch 13. I figured that would let me try a couple of different designs and they have a number of Launch models for you to choose from.
One thing that appealed to me with both of them is that they are made in the USA. Kershaw has a production facility in Tualatin, Oregon, that makes these models as well as a number of their higher end Kershaw and Zero Tolerance blades. Part of the premium pricing reflects being built in Oregon vs. China.
Note: You need to know the laws and regulations governing automatic knives in your area before you buy one. The American Knife & Tool Institute (AKTI) maintains a page that can help at a state level but you still need to confirm about your county and city just to play it safe.
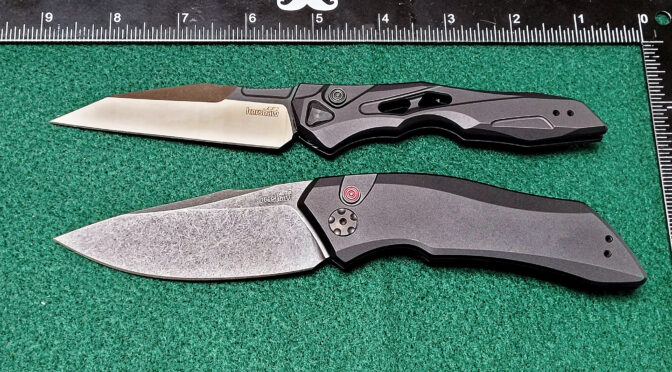
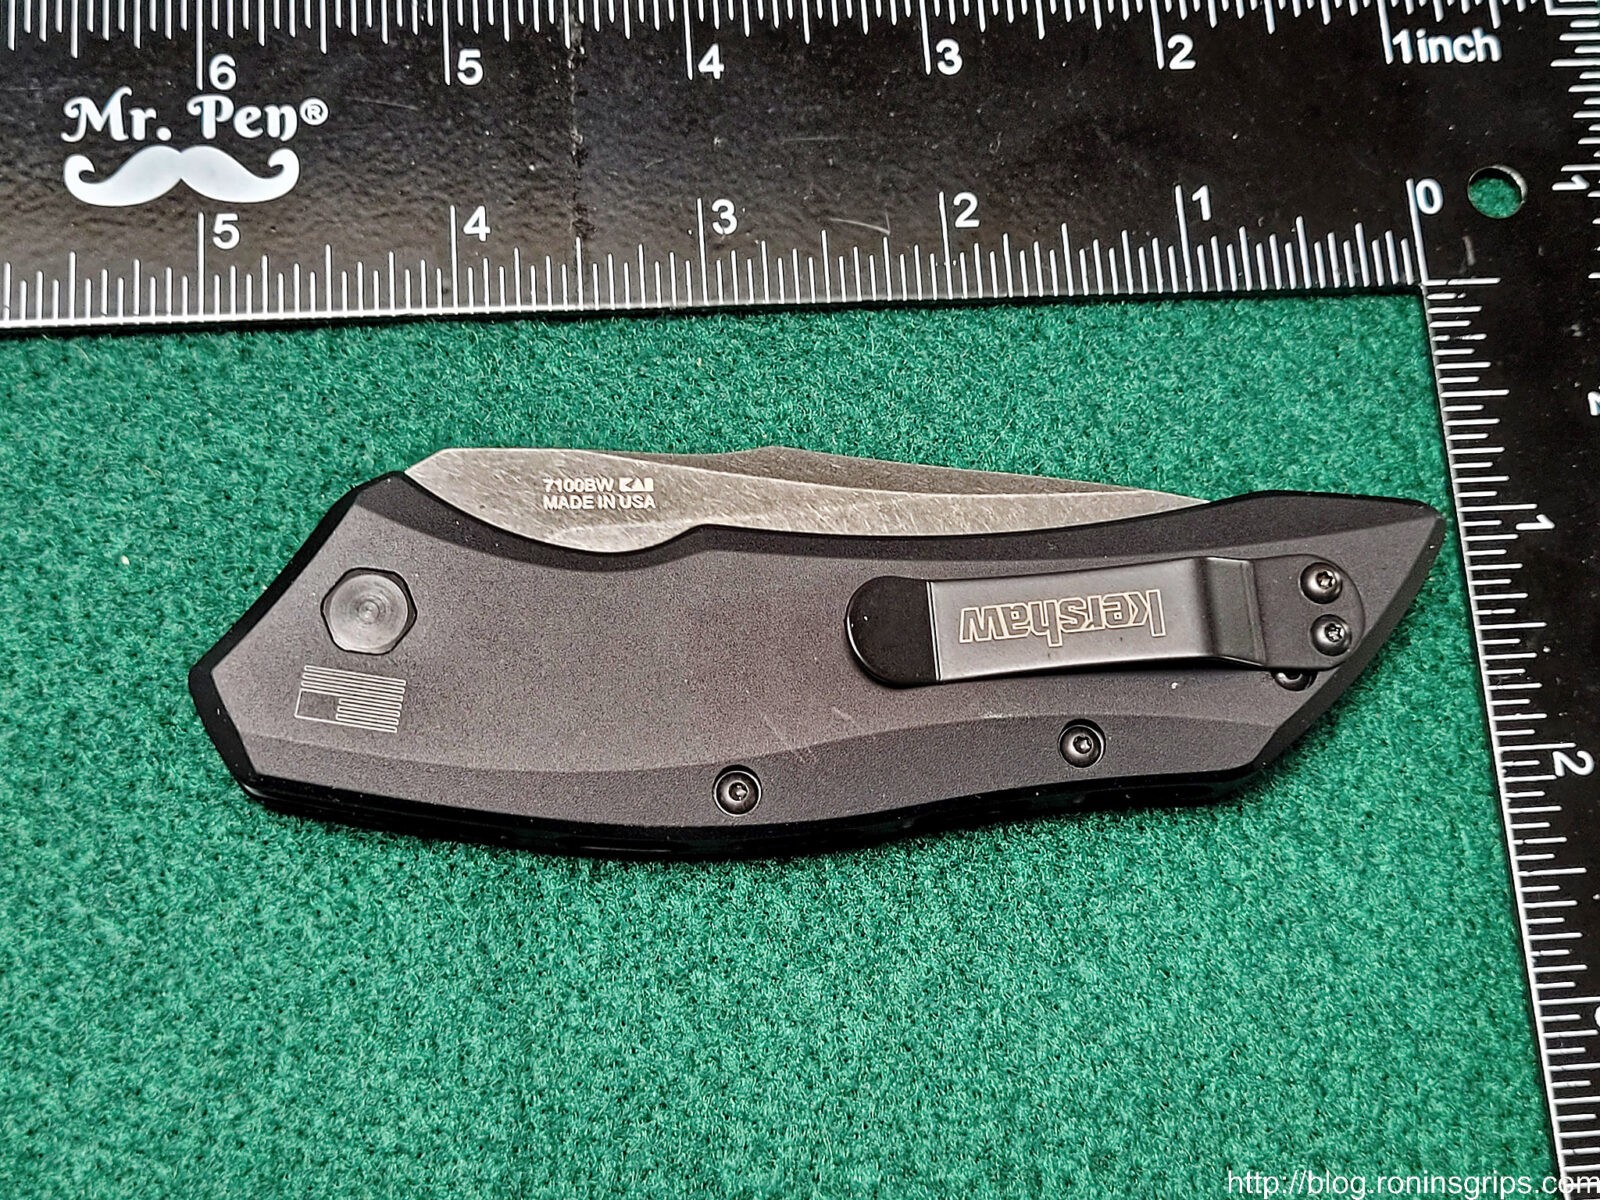
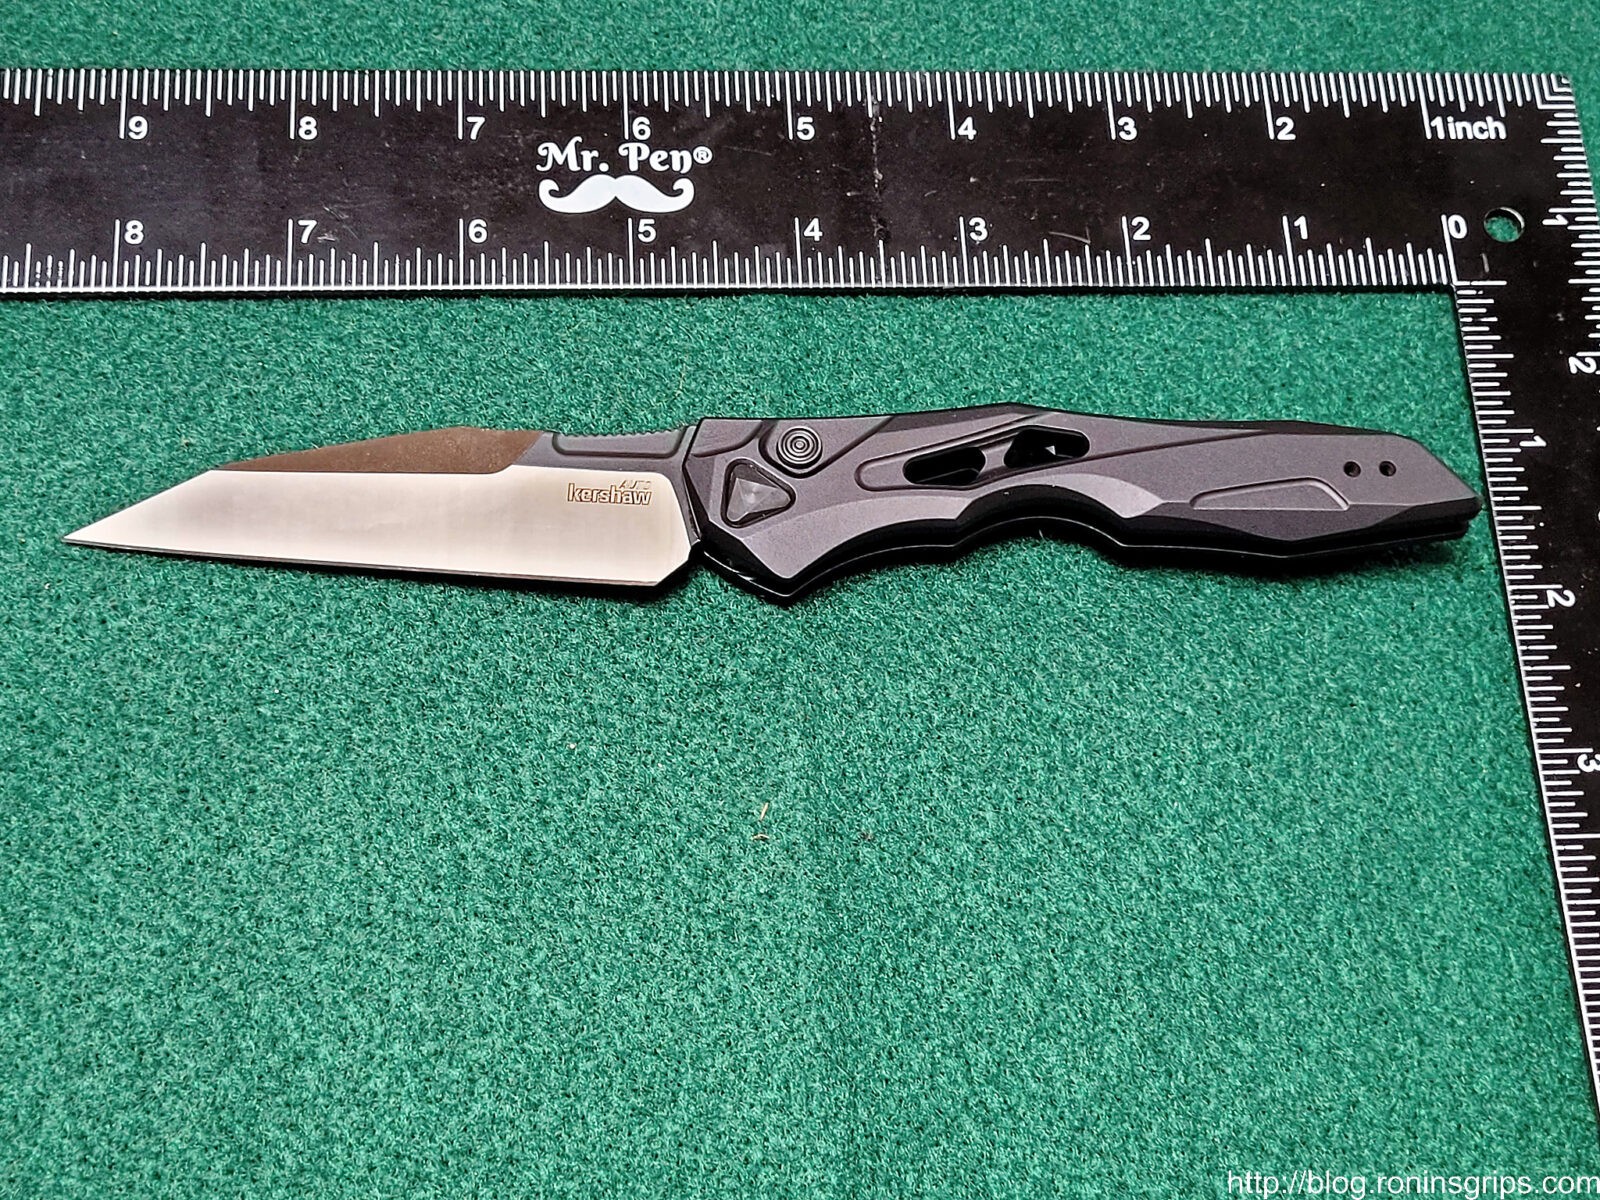
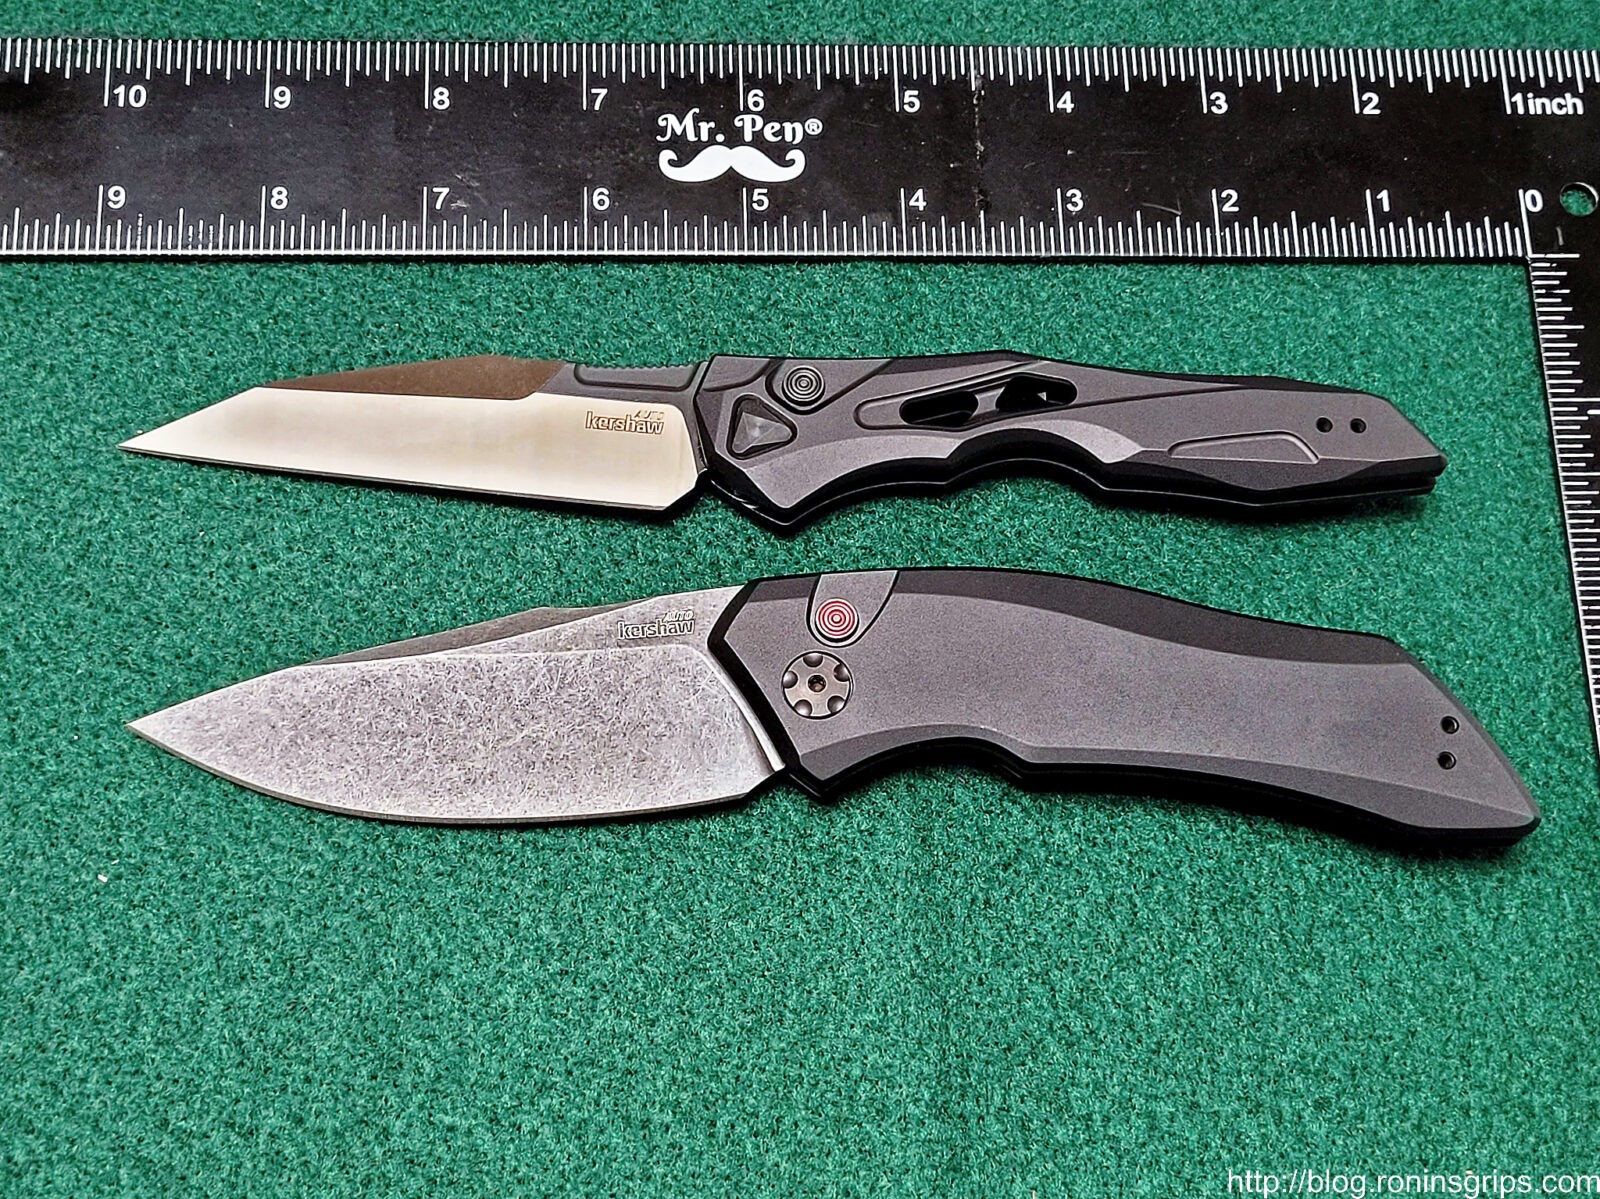
The Launch 1
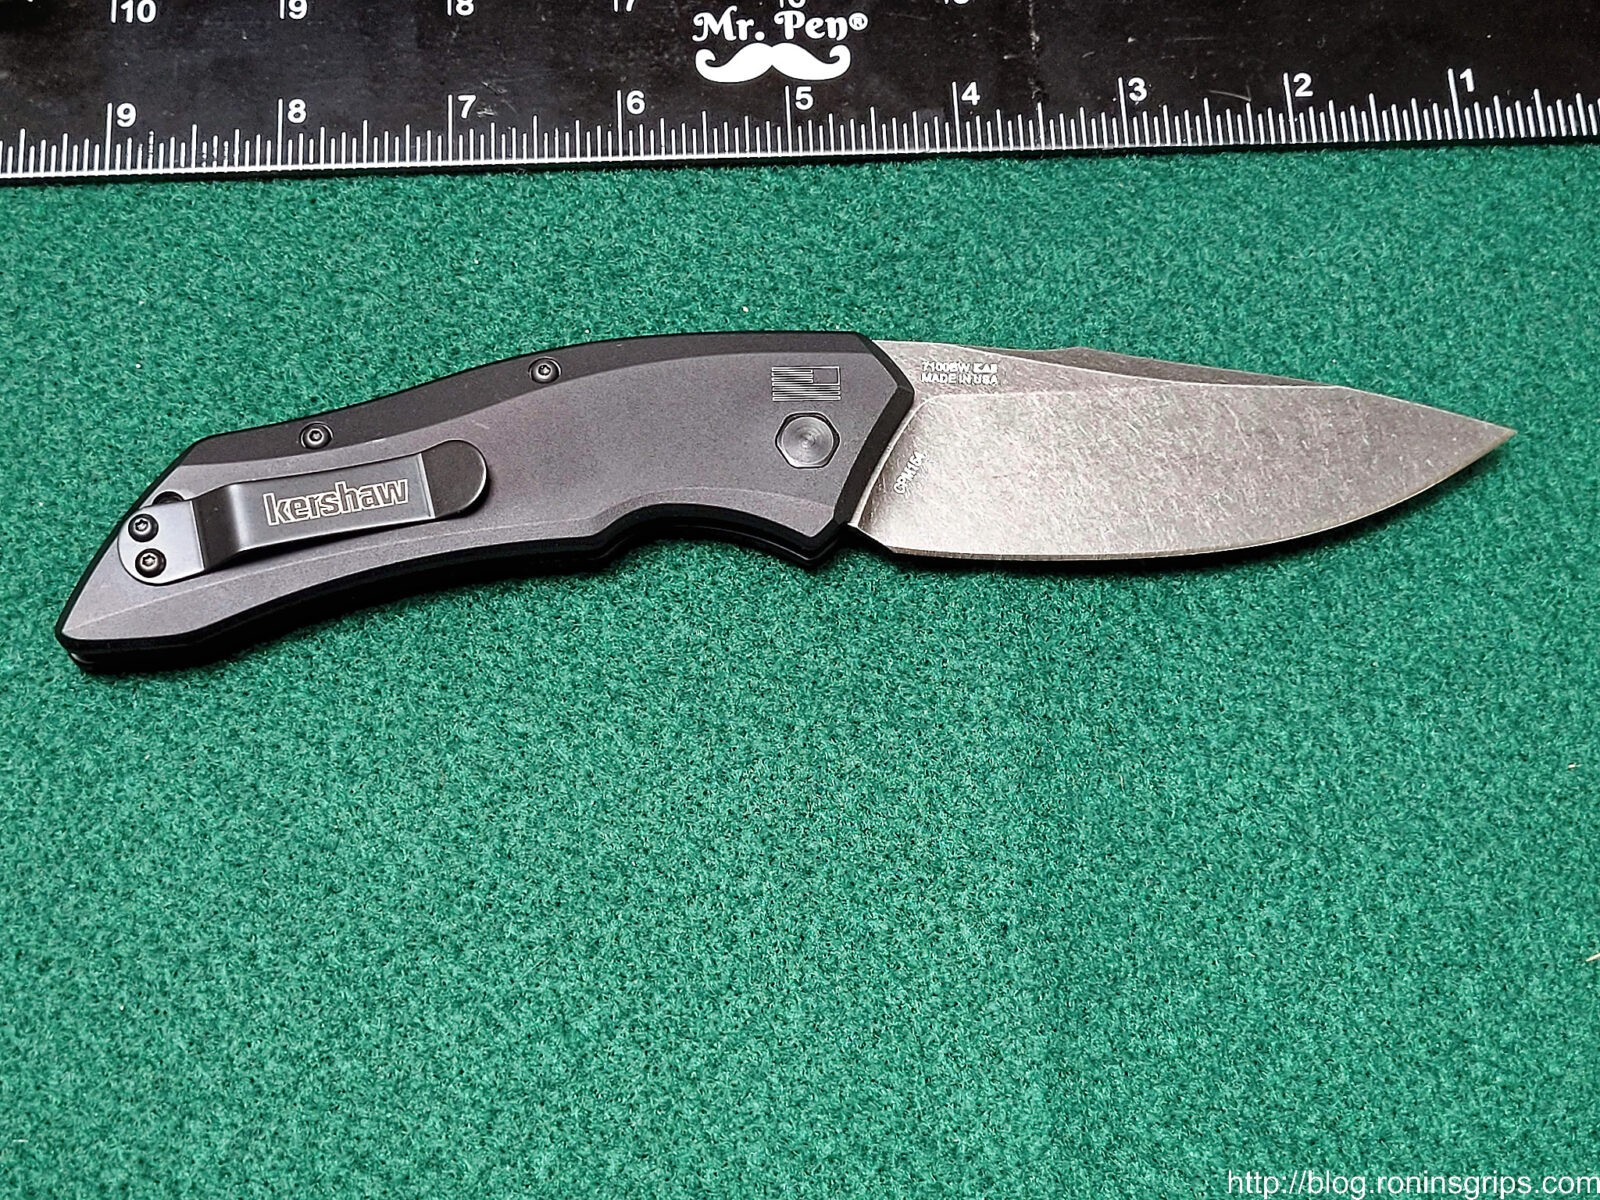
This is a good size knife. The slightly “humped” design enables it to fill your hand and be held very nicely. Let’s talk specifications:
Blade length: 3.4″
Blade profile: Drop-point
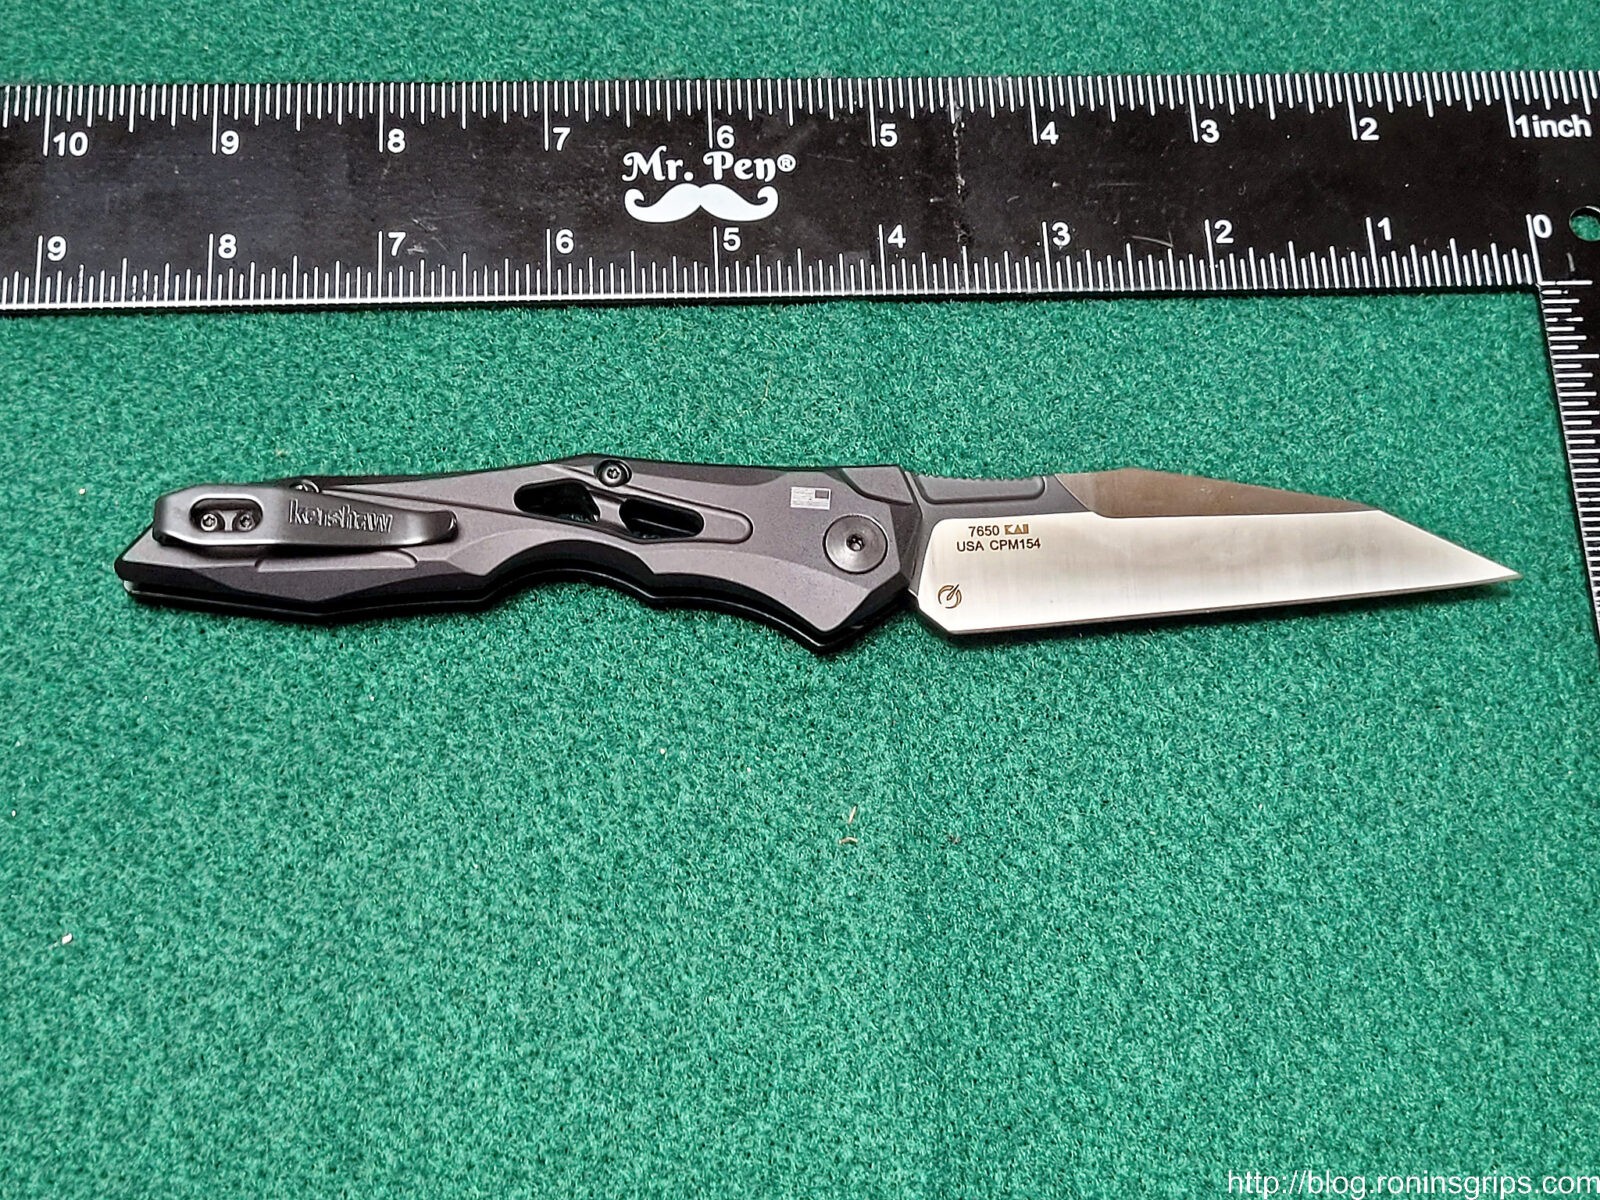
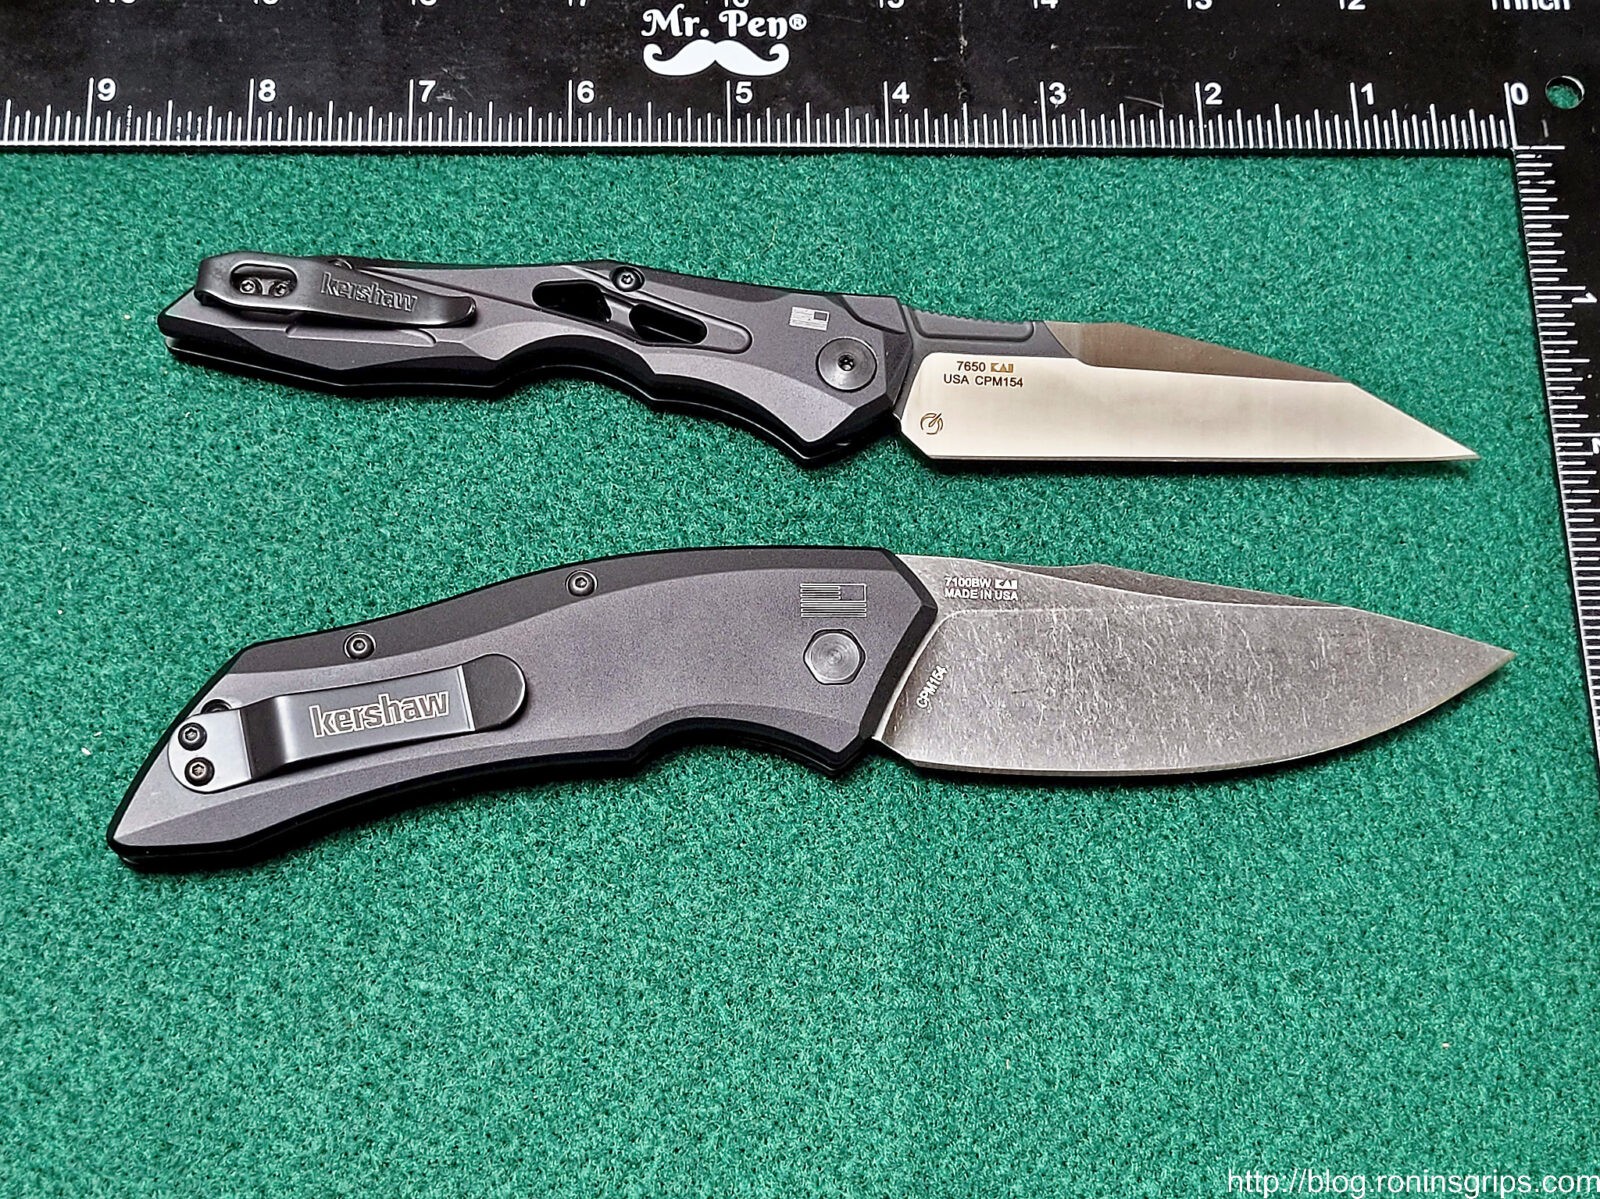
Blade steel: CPM 154 – it is a tough stainless alloy that also holds an edge fairly well while being moderately easy to sharpen
Blade finish: Black Wash
Blade thickness 0.121″
Closed length: 4.6″
Handle material: 6061-T6 aluminum
Handle finish: Black anodized
Handle thickness: 0.47″
Overall length when open: 8″
Weight: 4oz
Pros: Weight and size are good, blade flips open with a snap when you push the button, very nicely made.
Cons: I honestly wish there was a safety. This thing opening in a pants pocket is going to really suck fast. Kershaw says it is “low-profile” to make it harder to trigger but even so – you push that button and it will open fast.
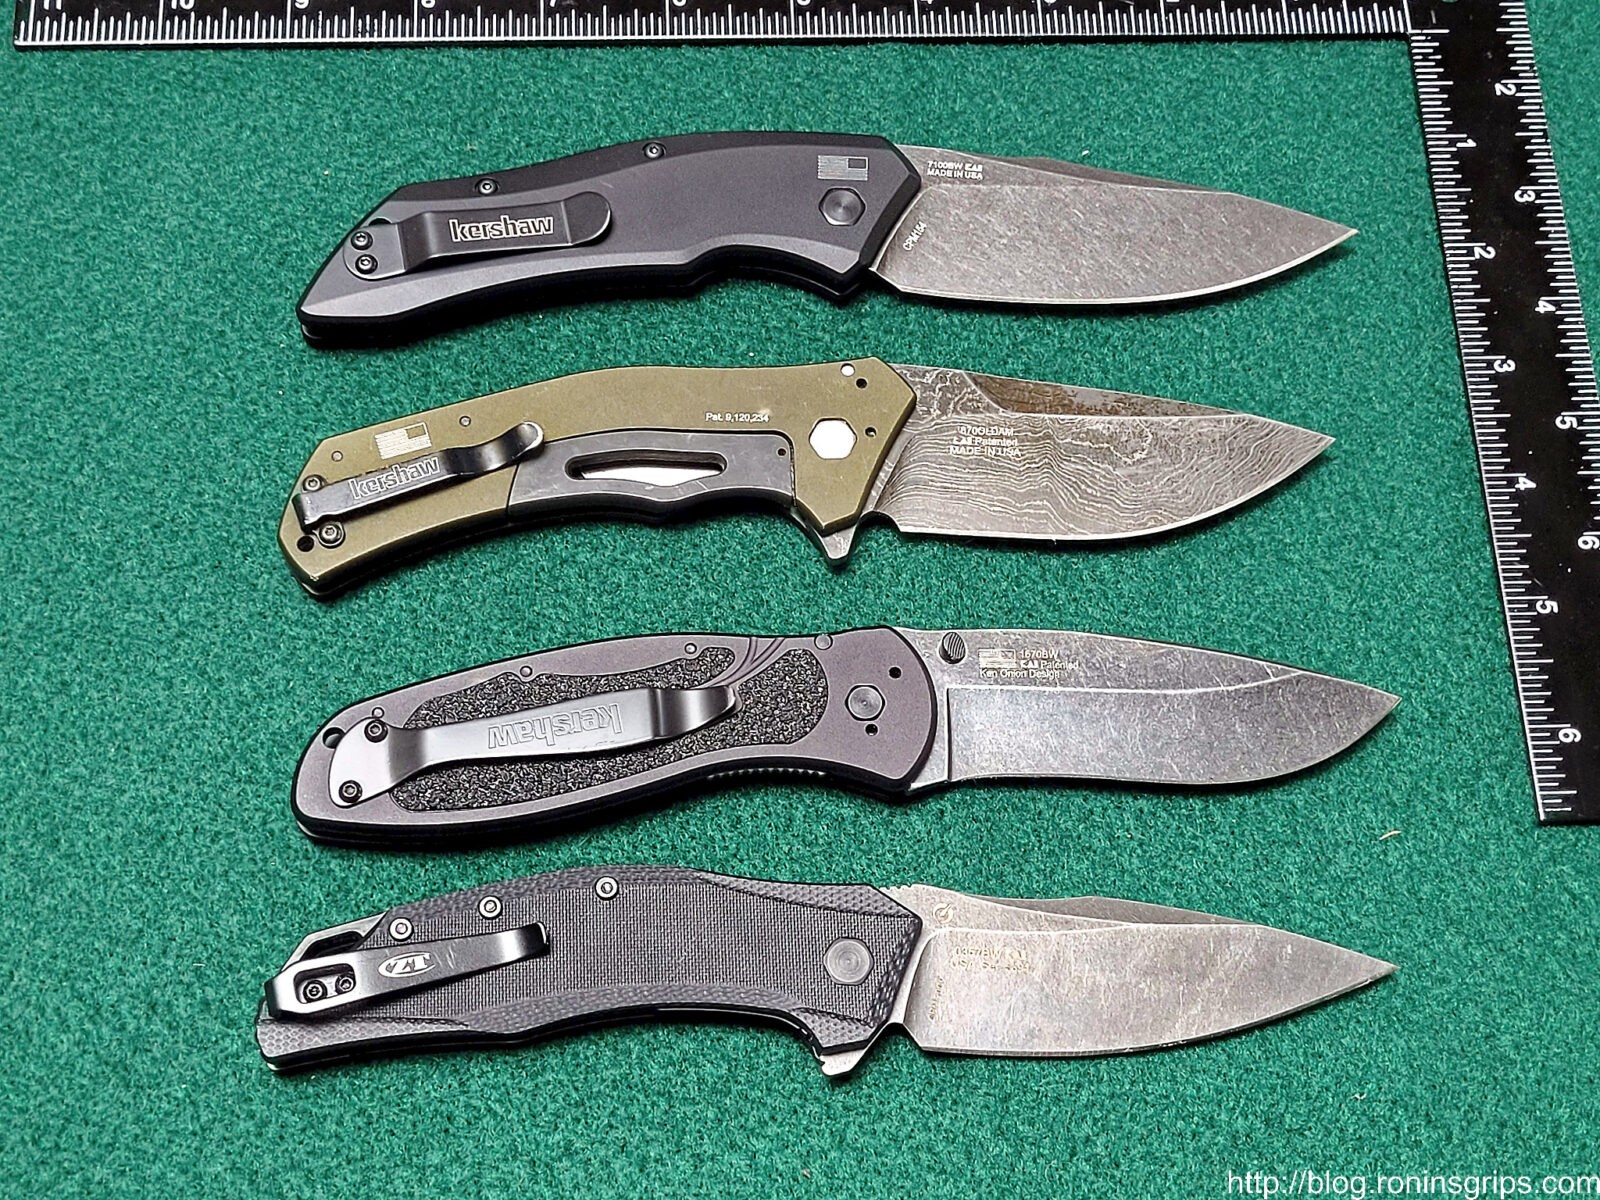
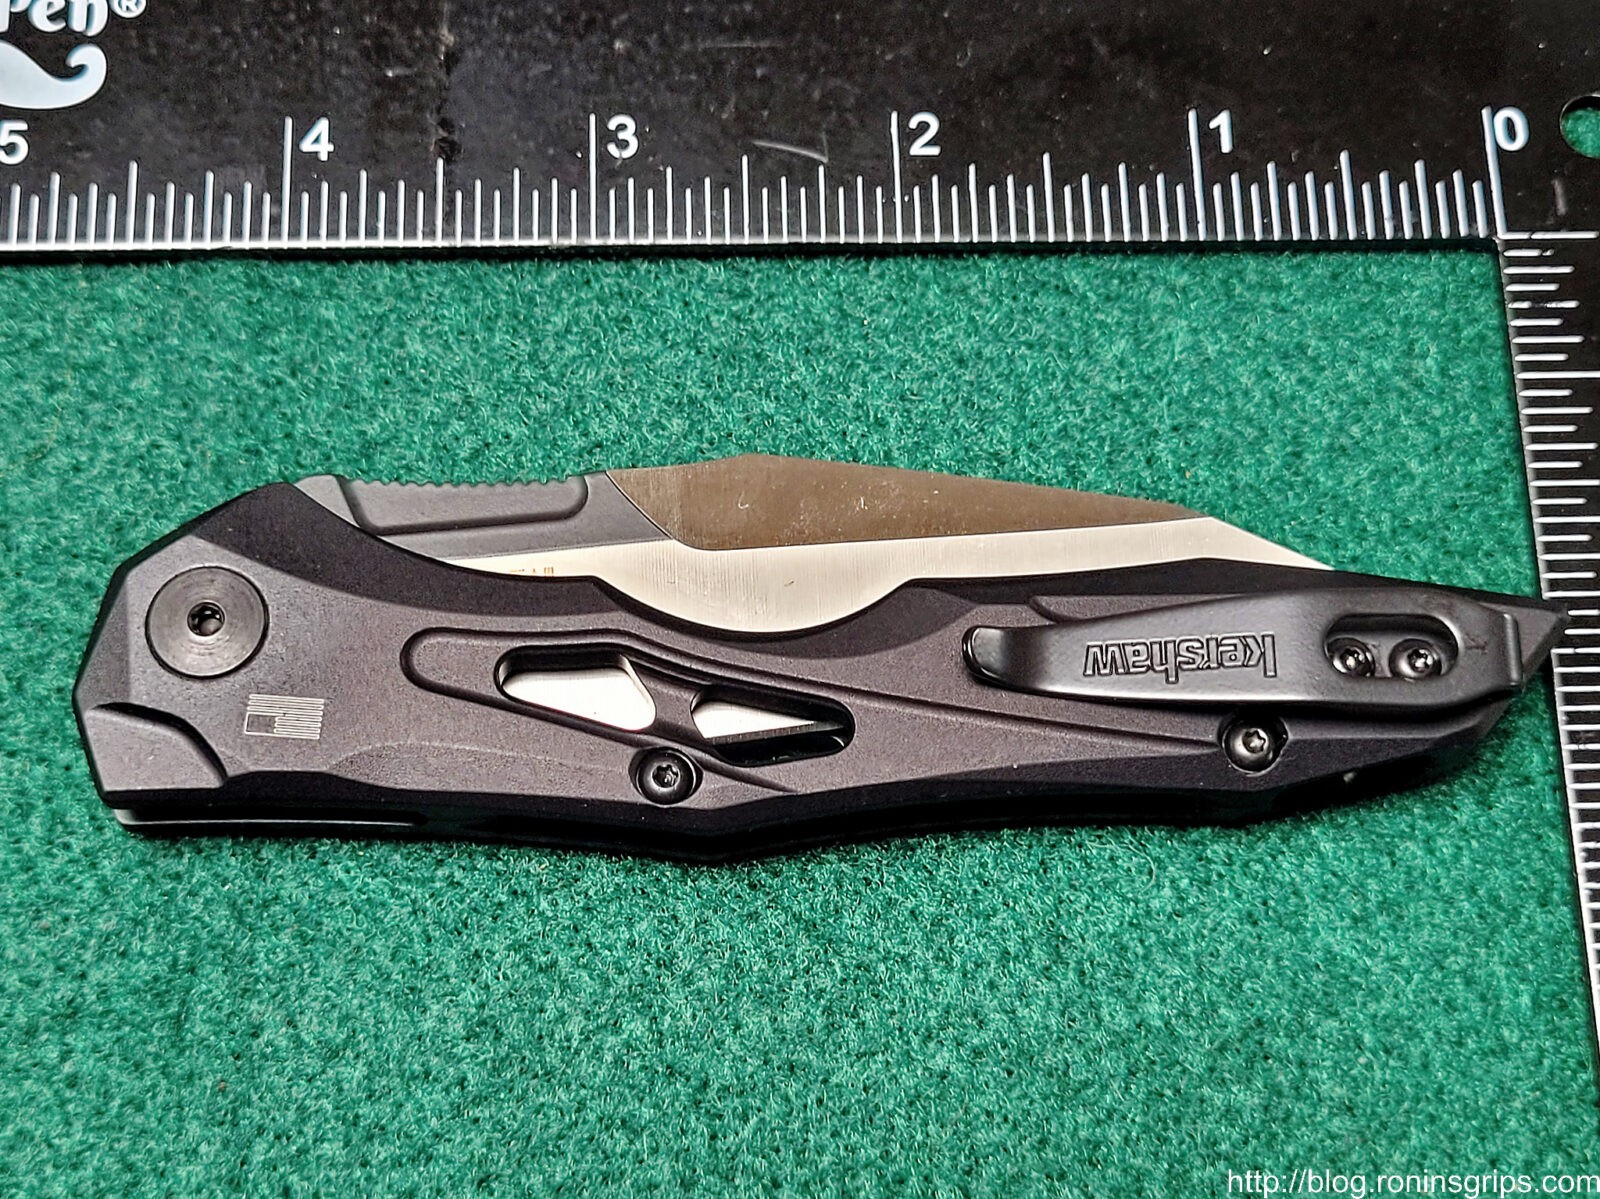
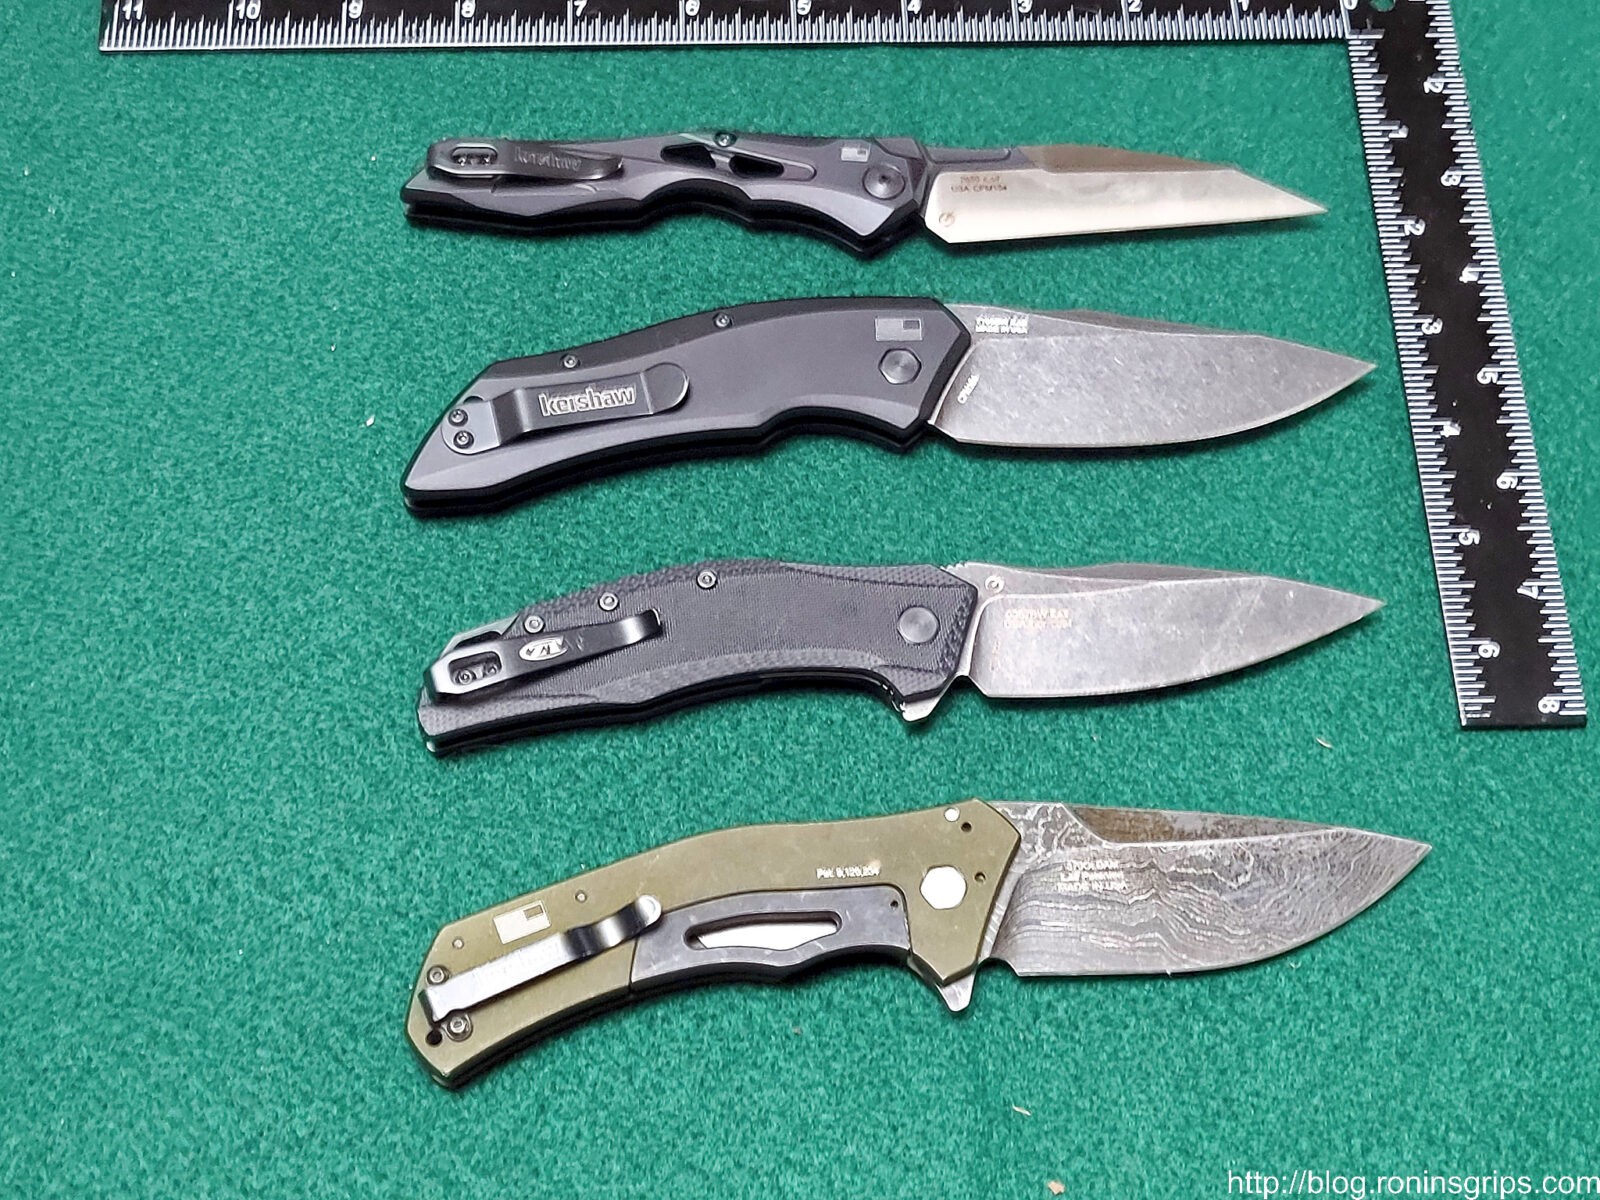
Launch 1 closed. Like the US flag. Lines are nice, clean and flowing. All of the screws on this side are T6 Torx. The handle is 4.6″ long, 0.47″ thick, 6061-T6 black anodized aluminum.At the left are the two screws if you want to move the ciip to this side. The axle pin the blade rotates on is held in place by a T8 Torx. You can see the recessed push button that does dual duty both to allow the blade to flick open and also to unlock the blade once it is locked open.Good view of 3.4″ CP154 blade with a blackwash finish. The blade is 0.121″ thick so just under and 1/8th inch that would be 0.125″.Here’s a view of the other side. Note how the axle bolt uses the handle scale to elegantly hold the hex head in place so you can tighten the axle pin from the other side.From top to bottom: 1. Kershaw Launch 1. 2. Kershaw Knockout with a Damascus steel blade.. 3. Kershaw Blur and 4. ZT 0357. These are all excellent blades. My favorite is the ZT0357 and the Knockout. All are made in Kershaw’s Oregon plant with excellent machining, fitment and finish.
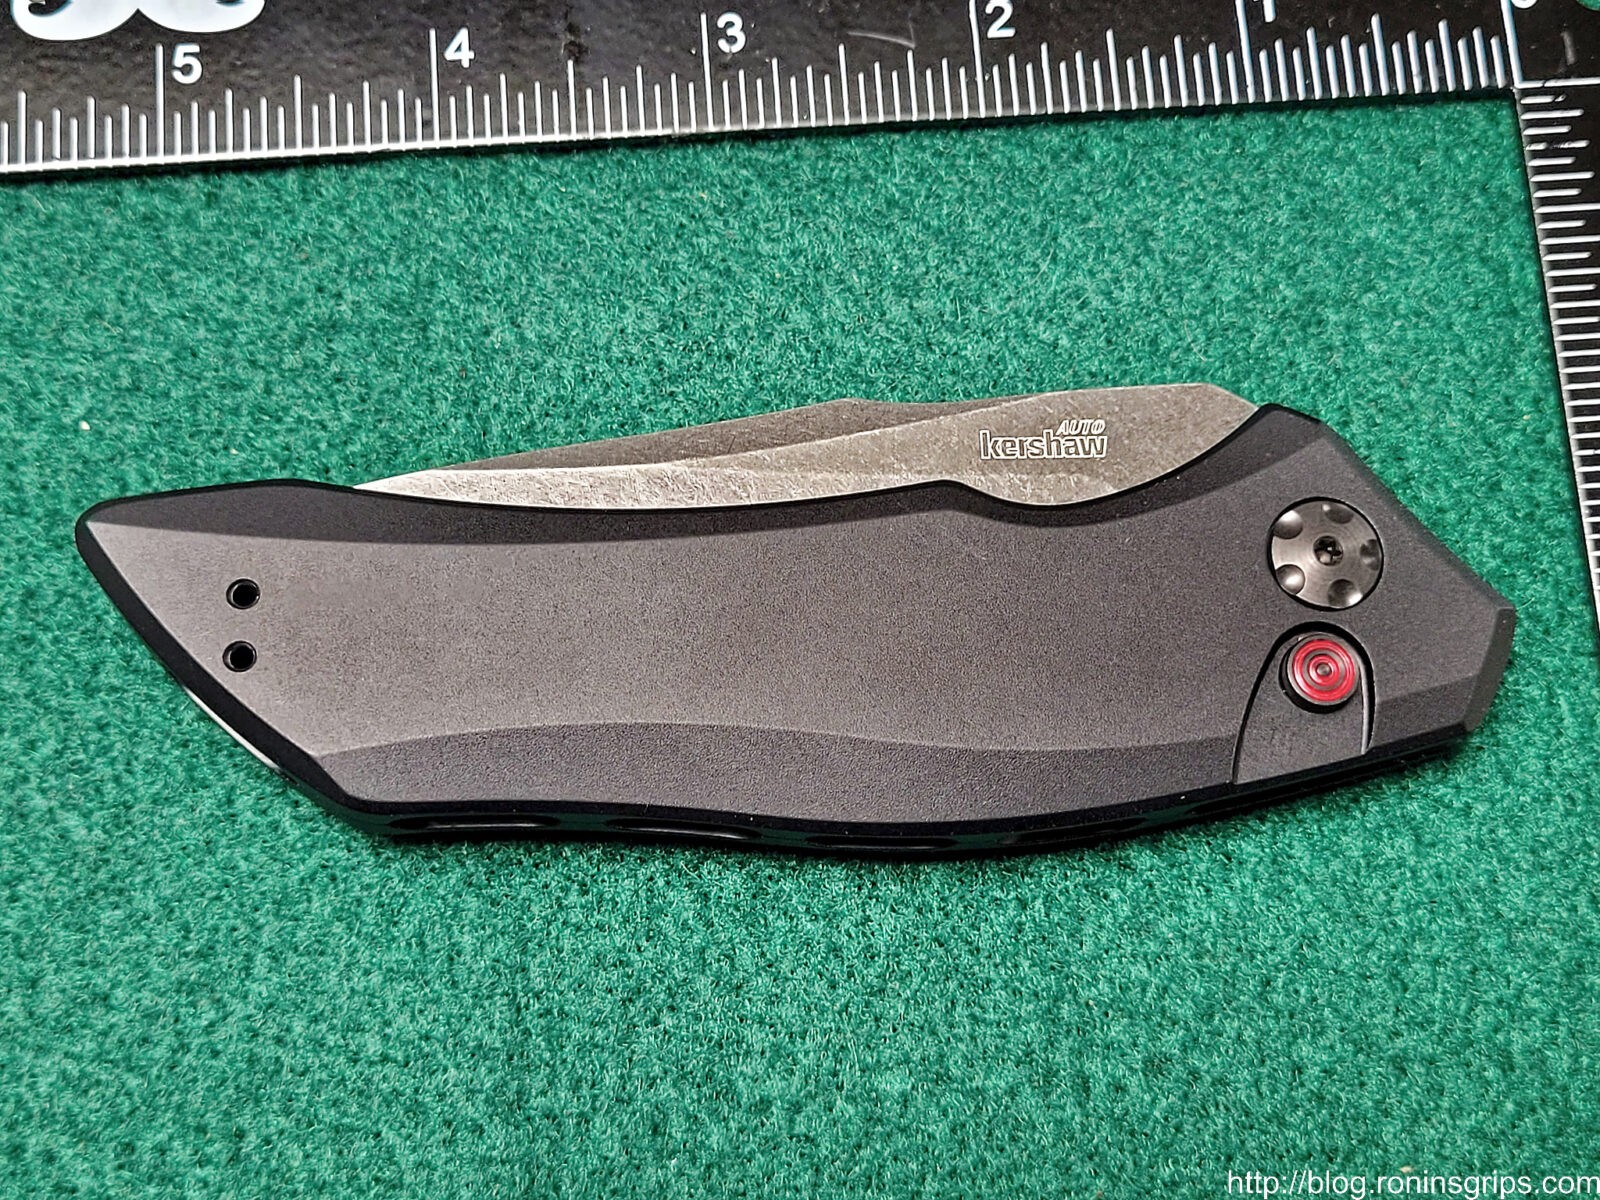
The Launch 13
I like unique looking designs and the Launch 13 immediately caught my eye due to the futuristic look and wicked Wharncliffe style blade. It looks odd but it actually fits my hand very surprisingly – better than I thought it would actually. Let’s look at the specifications:
Blade length: 3.5″
Blade profile: Wharncliffe
Blade steel: CPM 154 – same as the Launch 1
Blade finish: Black Cerkote
Blade thickness 0.121″
Closed length: 4.5″
Handle material: 6061-T6 aluminum
Handle finish: Black anodized
Handle thickness: 0.471″
Overall length when open: 8″
Weight: 2.4oz
So, it is just a tad shorter but quite a bit lighter than the Launch 1. With all of the angles and skeletonized scales, I didn’t think it would be as comfortable as it is.
Pros: Light, A Wharncliffe style blade
Cons: Even though the push button is recessed, I am fearful of it opening in my pocket.
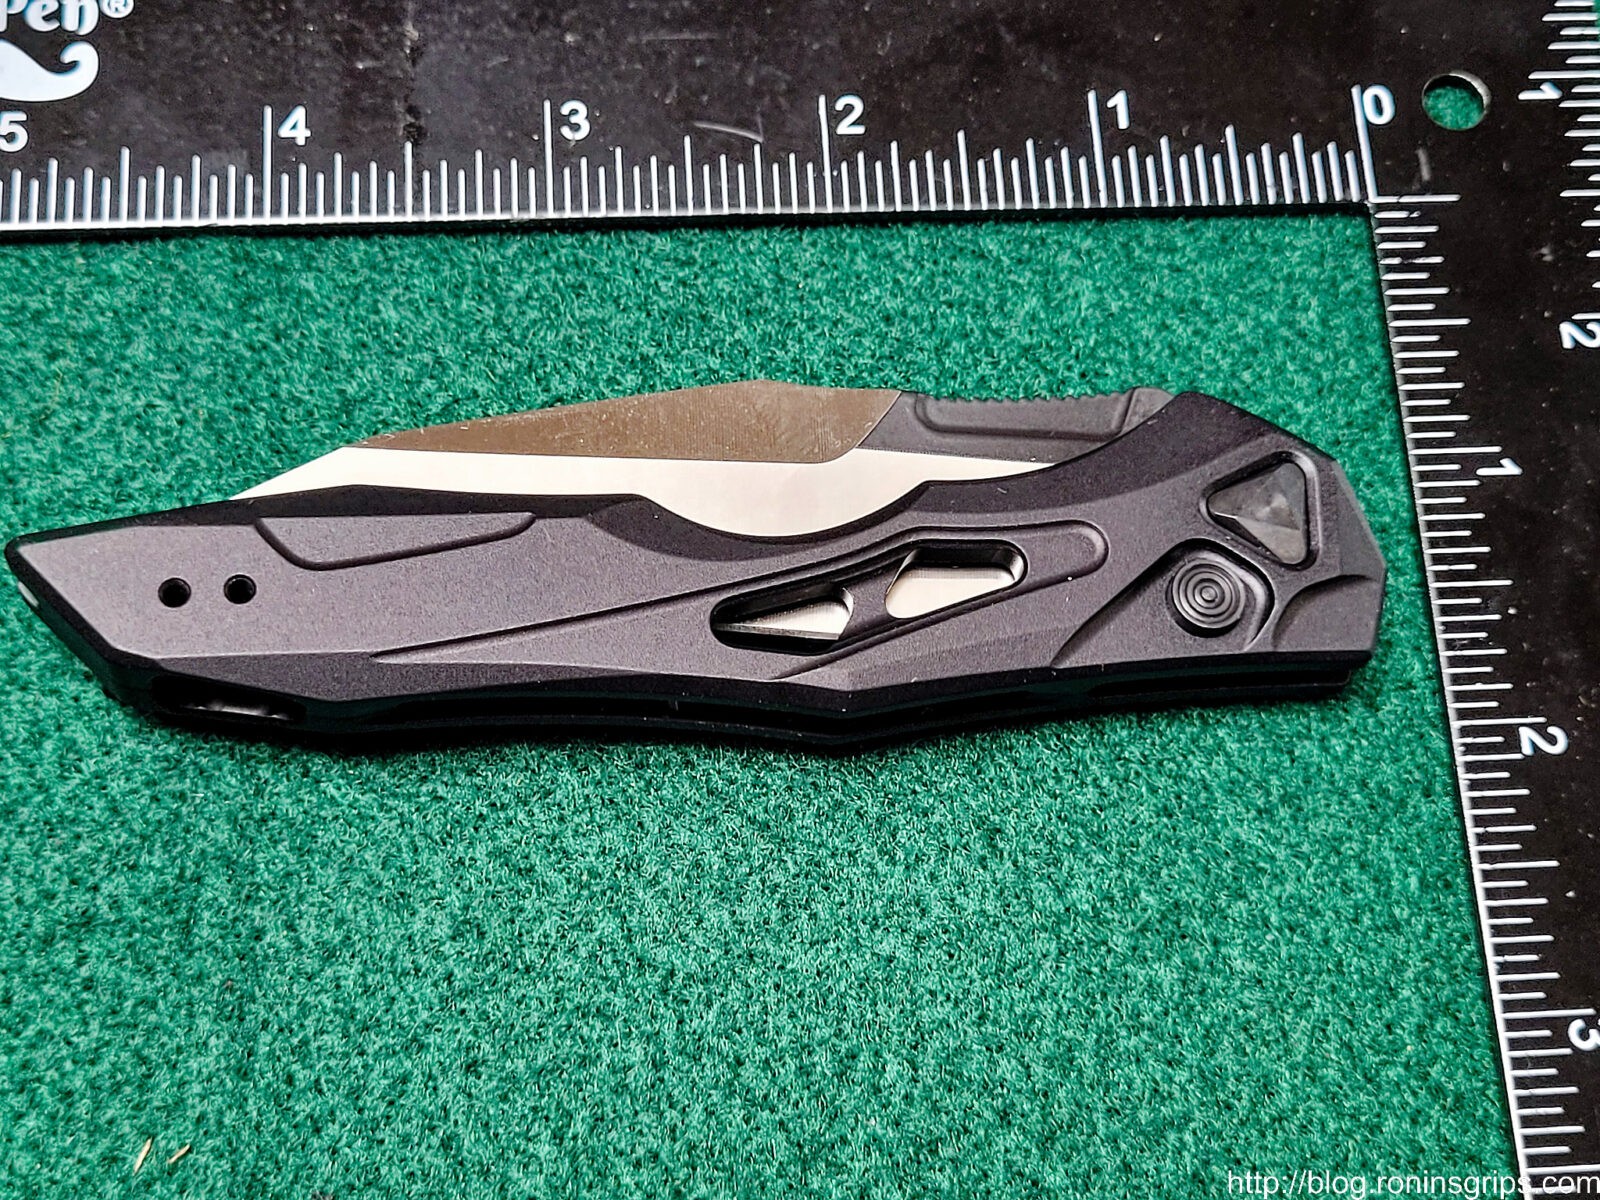
The scales are nicely done and are machined from 6061-T6 aluminum with a black anodized finish. The small screws are all T6 Torx and the nut on the axle bolt is a T8.You can see the push button that both allows the blade to spring open and to unlock the blade once it is open. Interestingly, the axle bolt’s head is triangular instead of a hex head like the Launch 1 uses.The Wharncliffe-profiled blade is very sharp. Yes the grind is simple but it’s a Wharncliffe 🙂Here’s a view of the Launch 13 open from the other side.The Launch 13 at the top and the larger Launch 1 at the bottom.Notice the different handle angles when you get the blades in about the same plane.From the top: Kershaw Launch 13, Launch 1, ZT 0357 and Kershaw Knockout with a Damascus blade (they also make one that is not Damascus wo that’s why I am pointing it out)And the other side from the top: Launch 13, Launch 1, ZT 0357, Knockout with a Damascus blade.
Summary
The Launch blades are very well made. Of the two, I am partial to the Launch 13 because it is lighter and has a Wharncliffe profile blade – again, I like Wharncliffes. I can cross having an automatic knife off the bucket list but plan to stick with assisted opening flippers like the ZT 0357.
Note, I have to buy all of my parts – nothing here was paid for by sponsors, etc. I do make a small amount if you click on an ad and buy something but that is it. You’re getting my real opinion on stuff.