Executive Summary
This report provides an exhaustive technical and operational evaluation of the magazine systems utilized by two of the most prevalent service pistols in the modern small arms landscape: the Glock 17 (specifically Generation 5, with retrospective analysis of prior generations) and the SIG Sauer P320 (including the military M17/M18 variants). The objective of this analysis is to determine the superior design through the dual lenses of small arms engineering—focusing on material science, geometric efficiency, and tribology—and end-user sentiment derived from extensive social media datasets and field reports.
The investigation reveals a fundamental divergence in design philosophy. The Glock 17 magazine represents a “Polymer-Over-Steel” hybrid architecture that prioritizes logistical resilience, impact durability, and manufacturing consistency through vertical integration. Conversely, the SIG P320 magazine employs a traditional “Stamped Steel Monocoque” architecture that prioritizes volumetric efficiency, surface lubricity, and rigid feed geometry, albeit with a reliance on a fragmented supply chain (Mec-Gar vs. Check-Mate) that introduces variable quality control standards.
Key findings indicate that while the SIG P320 magazine (specifically the Italian-manufactured Mec-Gar variant) offers superior feed dynamics and structural stiffness, the Glock 17 magazine demonstrates greater resistance to catastrophic deformation under crushing loads and benefits from a uniform manufacturing standard that eliminates the “vendor lottery” observed in the SIG ecosystem. Reliability data from the XM17 Modular Handgun System (MHS) trials underscores the sensitivity of the P320 design to spring rates and follower geometry when paired with specific ammunition types, whereas the Glock design, though susceptible to “baseplate pop” during high-impact drops, remains a benchmark for consistent feeding in adverse particulate environments due to its internal debris-management features.
Ultimately, the analysis concludes that for pure engineering performance regarding feed geometry and stiffness, the SIG P320 magazine is the superior mechanical device. However, as a systemic service component, the Glock 17 magazine offers a more robust balance of durability, cost-effectiveness, and logistical reliability.
1. Introduction: The Magazine as a Feeding Engine
In the systemic analysis of semi-automatic small arms, the magazine is frequently—and erroneously—relegated to the status of a mere accessory or storage container. From an engineering perspective, the magazine is, in fact, the primary fuel pump of the weapon system. It is a dynamic feeding engine required to present ammunition to the breech face at a precise velocity, angle, and timing interval, often exceeding cyclic rates of 1,000 events per minute in moments of rapid fire. This component must maintain this precision while subjected to violent recoil forces (g-loading), extreme thermal cycling, chemical exposure to solvents and lubricants, and the mechanical trauma of combat reloads.
This report conducts a comparative deep-dive into the magazine systems of the Glock 17 and SIG Sauer P320. These two platforms represent the current dichotomy in modern service pistol design: the established polymer-framed icon (Glock) versus the modular, chassis-based challenger (SIG P320). The scope of this analysis is strictly limited to the magazine assemblies—comprising the tube body, spring, follower, baseplate, and locking plate—and their tribological and mechanical interaction with the host firearm.
The methodology employed combines first-principles engineering analysis (evaluating geometry, metallurgy, and material properties) with Open-Source Intelligence (OSINT) gathering. This includes data from military testing protocols such as the US Army’s XM17 Modular Handgun System (MHS) trials, independent “torture tests” documenting environmental failure modes, and aggregate social media sentiment from high-traffic domain-specific communities. By synthesizing quantitative engineering data with qualitative user experience, this report aims to provide a definitive technical assessment of which system represents the “better” design.
2. Architectural Design and Material Science
The divergence in performance between the Glock 17 and SIG P320 magazines is rooted in their foundational architectural choices. The selection of materials—polymer composite versus stamped carbon steel—dictates every subsequent performance characteristic, including wall thickness, internal friction coefficients, thermal conductivity, and impact response behavior.
2.1 The Glock 17: Polymer-Encased Steel Hybrid Architecture
The Glock magazine is a composite structure, utilizing a hardened steel inner liner encased in a high-tech proprietary polymer matrix. This design choice was revolutionary at its inception and remains a hallmark of the platform’s durability philosophy.
Material Composition: The outer sheath is composed of a high-strength polymer, widely understood in the industry to be a variant of Nylon 6/6 with glass fiber reinforcement.1 This material is selected for its high impact strength, chemical resistance to hydrocarbon solvents, and specific viscoelastic properties. The inner liner is a stamped sheet of hardened steel, which provides the necessary structural rigidity to the feed lips and the upper tube body, preventing the polymer from creeping or deforming under the constant pressure of a fully compressed magazine spring.
Viscoelastic Response and Impact Durability: The primary engineering advantage of this hybrid construction is its response to impact loads. When a Glock magazine is dropped onto a hard surface like concrete—a common occurrence during emergency reloads—the polymer overmold acts as a sacrificial shock absorber. The material exhibits elastic deformation, absorbing the kinetic energy of the impact and then returning to its original shape. This contrasts sharply with thin-walled metal magazines, which are prone to plastic deformation (denting). A dent in a metal magazine tube can impinge upon the internal column of ammunition, binding the follower and causing a catastrophic failure to feed. The Glock magazine’s thick polymer walls effectively immunize it against this specific failure mode, ensuring that a dropped magazine remains functional even if cosmetically scarred.2
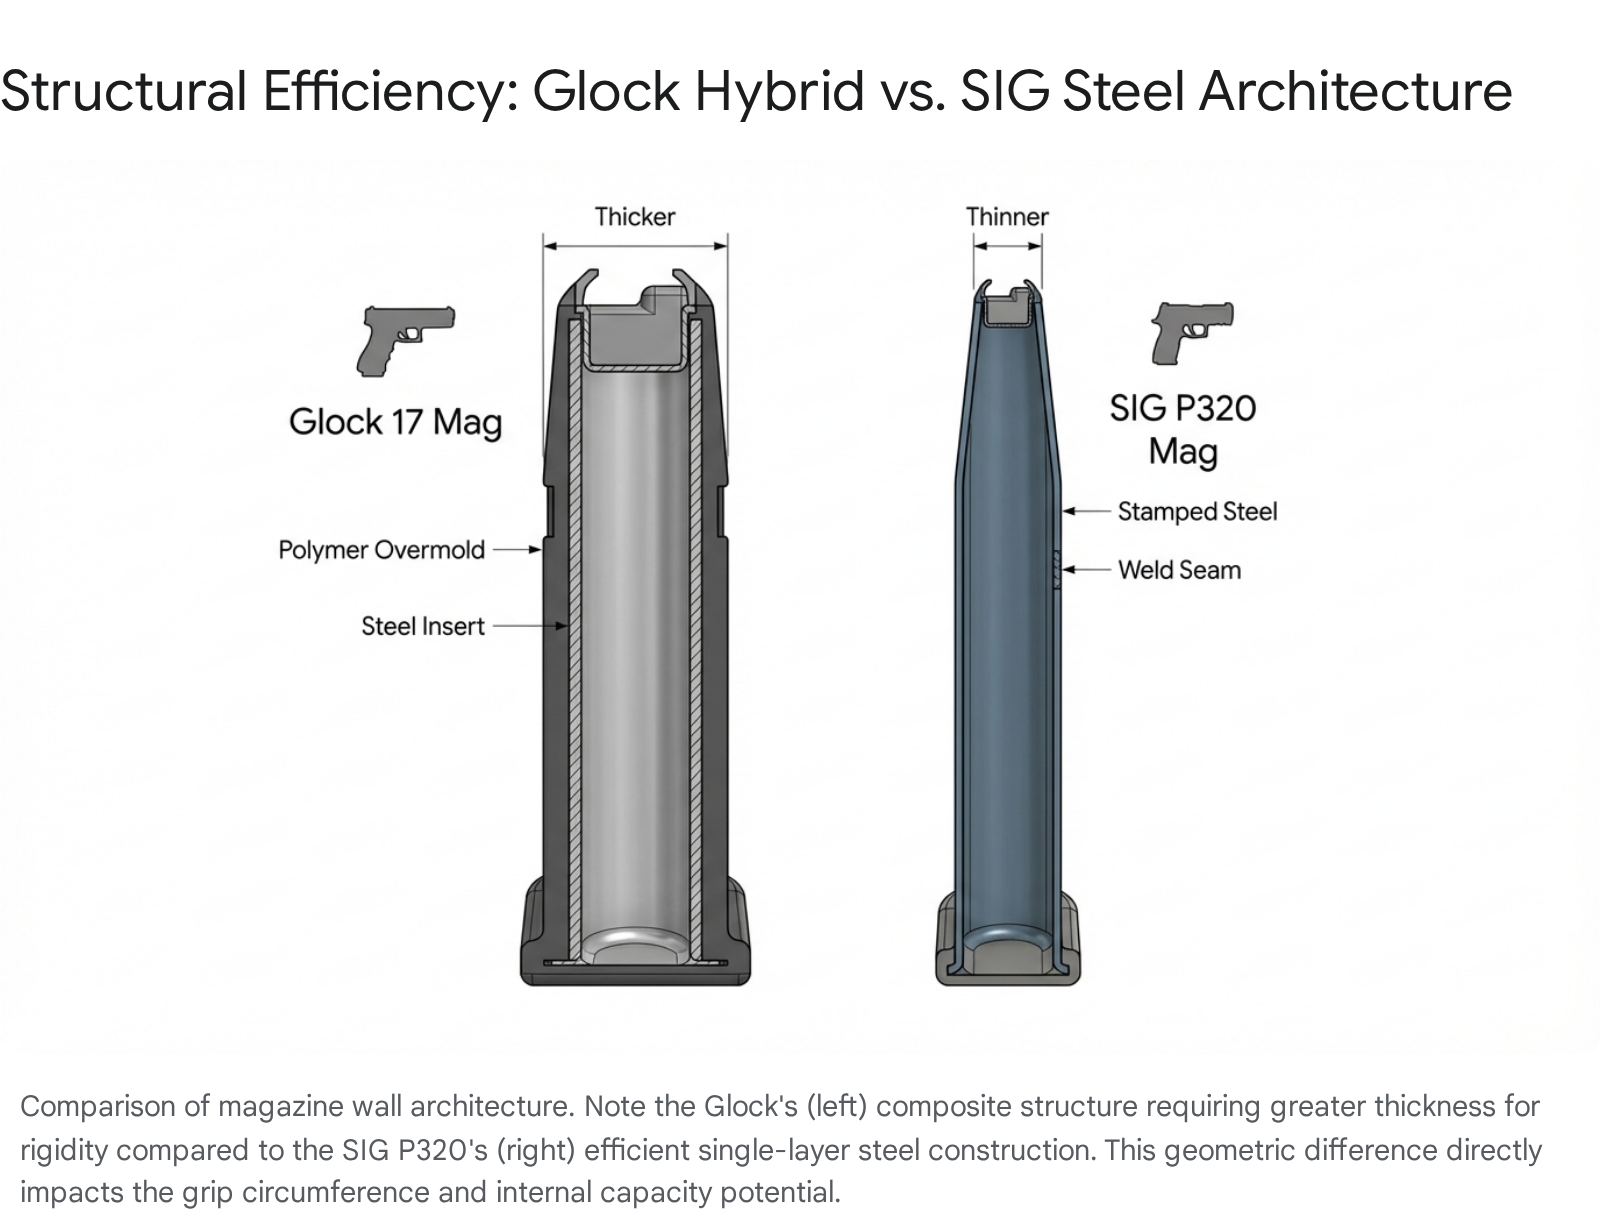
Volumetric Inefficiency: However, this durability comes at a geometric cost. To achieve the necessary structural integrity, the polymer walls of a Glock magazine are significantly thicker—ranging from 1.8mm to 2.2mm—compared to the ~0.75mm thickness of a typical steel magazine. In a double-stack magazine design, this wall thickness consumes valuable internal volume. For a given external grip circumference (a critical ergonomic constraint for a handgun), the Glock magazine has less internal width available for the ammunition column. This forces the ammunition stack to sit in a tighter stagger pattern or requires the magazine to be longer to achieve the same capacity as a thinner-walled steel competitor. This trade-off is evident in the struggle to increase flush-fit capacity beyond 17 rounds in the standard Glock 17 frame without extending the baseplate significantly.3
2.2 The SIG P320: Stamped Steel Monocoque Architecture
The SIG P320 magazine adheres to the classic design lineage popularized by the Browning Hi-Power, utilizing a stamped and welded sheet steel body. This represents a “monocoque” approach where the external skin also bears the structural load.
Material and Geometry: The body is formed from heat-treated carbon steel.4 The use of steel allows for maximum stiffness with minimal material thickness. This “thin-wall” advantage allows SIG engineers to optimize the internal geometry for the 9mm Parabellum cartridge. The magazine features a “double-stack, single-feed” geometry that tapers aggressively at the top. The smooth, rigid steel walls facilitate a consistent low-friction path for the follower and ammunition column.
Stiffness and Feed Consistency:
The high Young’s Modulus (stiffness) of steel ensures that the magazine body does not flex or bulge under the pressure of a fully loaded 17 or 21-round spring stack. In polymer magazines, “bulging” can occur when fully loaded, potentially increasing friction against the magwell walls and preventing the magazine from dropping free—a phenomenon occasionally observed in older generation non-metal-lined Glock magazines but largely resolved in current generations. The P320’s steel construction guarantees dimensional stability under load, ensuring consistent drop-free performance provided the metal tube is not physically deformed by external impact.
Susceptibility to Plastic Deformation: The “Achilles heel” of the P320 architecture is the inverse of the Glock’s strength. If a P320 magazine is stepped on, crushed, or impacted violently against a hard edge, the steel can dent. Because steel yields plastically, this dent is permanent. A dent in the side of the tube can intrude into the internal space, arresting the follower’s movement or binding the spring. This renders the magazine instantly unserviceable until the dent is mechanically removed—a difficult field repair. Additionally, the feed lips, being integral to the steel body, can bend if dropped on a hard surface. Bent feed lips can alter the presentation angle of the cartridge, leading to nose-diving or double-feeds, a failure mode that is difficult to diagnose visually without calipers.5
3. Tribology and Surface Finish: The Friction Equation
The reliability of a magazine is heavily dependent on the tribological interaction (friction) between the ammunition casings, the follower, and the interior walls of the magazine tube. Lower friction generally equates to higher reliability, as the spring has more excess energy available to strip rounds and overcome environmental debris.
3.1 SIG Sauer: The Tale of Two Finishes (Mec-Gar vs. Check-Mate)
A critical variable in the P320 ecosystem is the outsourcing of magazine production to two distinct OEMs: Mec-Gar (Italy) and Check-Mate Industries (USA). This supply chain strategy has created a bifurcated experience for the end-user, defined largely by surface finish technologies.4
Mec-Gar and the Anti-Friction Coating (AFC):
Mec-Gar magazines are widely regarded as the industry gold standard. They utilize a proprietary “Anti-Friction Coating” (AFC), a synthetic low-friction finish that provides exceptional lubricity.
- Engineering Impact: The low coefficient of friction (
) of the AFC finish—estimated to be around 0.08–0.10—allows the ammunition column to slide effortlessly against the tube walls. This smoothness means that the spring energy is directed almost entirely toward lifting the round, rather than overcoming drag. This results in a “slick” loading experience and extremely reliable feeding, even when the gun is fouled or the user “limp wrists” the firearm (absorbing recoil energy needed for cycling).9
Check-Mate and Phosphate Coatings:
Check-Mate magazines, often supplied with US military contracts and some commercial P320s, typically utilize a heavy phosphate (Parkerized) finish.
- Engineering Impact: Phosphate coatings are excellent for corrosion resistance because their porous crystalline structure holds oil. However, this same structure creates a rougher surface texture, with a friction coefficient (
) often exceeding 0.15–0.20 in dry conditions.
- Operational Consequence: Users frequently report a “gritty” feel when loading Check-Mate magazines. In extreme cases, the internal friction can be high enough to retard the rise of the ammunition column, leading to bolt-over-base malfunctions or failures to feed, particularly during the break-in period before the brass casings have polished the feed lips smooth. This inconsistency in surface finish represents a significant quality control variable absent in the Glock ecosystem.8
3.2 Glock 17: The Polymer-on-Polymer Interface
The interior of a Glock magazine is polymer-lined. The interaction here is primarily between the brass casing and the Nylon sidewalls, and the polymer follower against the polymer tube.
Internal Ribbing:
To mitigate the naturally higher surface contact area of a polymer follower, Glock engineers designed the interior of the magazine tube with vertical ribs.
- Debris Management: These ribs minimize the contact surface area between the ammunition and the tube walls, creating “channels” for debris. In theory, small particulates (dust, unburnt powder) can settle into these channels rather than causing a jam.
- Friction Characteristics: While Nylon is naturally self-lubricating, the friction coefficient is generally higher than that of AFC-coated steel. Glock compensates for this with powerful magazine springs. However, this design creates a vulnerability: if the “channels” become packed with viscous material (mud), the ribbed design can backfire, creating a hydraulic lock or simply increasing drag to the point of failure.11
4. Component Level Analysis
To fully adjudicate the “better design,” we must examine the sub-components: the feed lips, the follower, the spring, and the baseplate retention system.
4.1 Feed Lips: The Geometry of Control
The feed lips are the control surfaces of the magazine. They determine the angle at which the cartridge is presented to the breech face and the precise moment of release.
Glock Feed Lips:
Glock feed lips are reinforced with the steel insert but covered in polymer.
- Pros: The polymer covering protects the steel from corrosion and minor dings. The lips are thick and radiused, generally gentle on brass cases.
- Cons: The polymer can degrade over time. Rough edges from molding or wear can be created, which may scratch cases or increase friction. More critically, the steel insert is not immune to spreading. If a magazine is left fully loaded for extended periods (years), there is forum debate regarding “feed lip spread,” though the steel liner largely mitigates the creep associated with pure polymer magazines. A more common issue is deformation from drops; if the polymer cracks, the underlying steel may still hold, but the geometry is compromised.13
SIG P320 Feed Lips:
P320 feed lips are integral to the stamped steel body.
- Pros: They are extremely rigid and precise. The thin profile allows for a sharper release point, contributing to the “crisp” feeding feel of the P320.
- Cons: They are susceptible to bending if dropped on hard surfaces. Unlike polymer which might rebound, bent steel stays bent. A bent feed lip can cause subtle timing issues that are maddening to diagnose. Gauging tools exist specifically for military armorers to measure feed lip width, indicating that this is a known maintenance item for steel magazines.5
4.2 The Follower: Stability and Anti-Tilt
Glock Follower: Glock uses a polymer follower with relatively short stabilizing legs. Stability relies on the uniform pressure of the spring and the internal dimensions of the tube. The Gen 5 introduction of the orange follower was a significant upgrade, offering high-visibility and a redesigned slide stop shelf to address issues where older followers would round off and fail to lock the slide back on the last round.1
SIG P320 Follower: The P320 follower has longer “legs” (skirts) that ride inside the smooth steel tube. This design offers superior anti-tilt properties. The follower is less likely to nose-dive or bind if the spring pressure is uneven. However, the interface between the plastic follower and the steel tube must be kept relatively clean; the tight tolerances that provide stability also mean less clearance for large debris particles compared to the “looser” Glock design.16
4.3 Baseplate Retention: A Critical Failure Point
One of the most distinct differences lies in how the floorplate (baseplate) is secured to the magazine body.
Glock: The “Tab” System
The Glock floorplate is retained by polymer tabs on the side of the magazine tube, which snap into grooves on the floorplate. A locking insert plate at the bottom of the spring rests in a hole in the floorplate to prevent it from sliding off.
- The “Baseplate Pop” Phenomenon: This is a documented failure mode. When a fully loaded Glock magazine is dropped on concrete, impacting the rear bottom corner, the hydrostatic shock of the ammunition column compressing downward can flex the polymer tube walls outward. This flexing can momentarily disengage the retention tabs. Simultaneously, the impact force shears the plastic retention shelf. The result is a “jack-in-the-box” failure: the baseplate flies off, the spring ejects, and ammunition scatters. While rare in daily use, it is a known risk in high-stress tactical environments involving hard surfaces.17
SIG P320: The Metal Rail System
The P320 baseplate slides onto metal rails that are folded out from the steel magazine body itself.
- Structural Integrity: Steel rails have significantly higher shear strength than polymer tabs. They do not flex outward dynamically under impact loads. Consequently, the P320 magazine is far more resistant to catastrophic disassembly when dropped. Even if the plastic basepad cracks, the metal rails usually hold the assembly together. This represents a more robust design for combat durability regarding drop impact.18
5. Reliability in Adverse Conditions: The MHS Data and Torture Tests
Reliability is not a single metric; it is a spectrum of performance across varying environmental states. The US Army’s XM17 MHS trials and independent testing provide crucial insights.
5.1 The XM17 MHS Experience
The selection of the SIG P320 as the M17 was accompanied by rigorous testing, which revealed initial teething issues with the magazine system.
- Double Ejections: During the trials, the XM17 (P320) experienced “double-ejections,” where a live round would be ejected along with a spent case. This is a classic magazine timing issue, often caused by the top round losing control from the feed lips too early during the recoil cycle.
- Spring Rate Sensitivity: The trials also highlighted issues with ball ammunition reliability vs. special purpose ammo. The fix involved Engineering Change Proposals (ECPs) that modified the magazine spring and follower geometry to ensure consistent feeding across all ammunition types. This indicates that the P320 magazine design operates within a tighter window of spring timing than the Glock, which has historically digested a wider variance of ammo pressures with fewer magazine revisions.20
5.2 Particulate Ingress: Sand and Mud
The InRangeTV Findings:
In the famous “Mud Test” conducted by InRangeTV, the Glock 19 failed significantly. The failure mechanism was partly attributed to the magazine.
- The Friction Trap: When fine, viscous mud enters the Glock magazine, the tight seal of the follower against the tube, combined with the ribbed interior, creates a high-friction environment. The mud packs into the ribs and creates a suction effect. The striker-fired mechanism’s lack of hammer energy, combined with the drag of the magazine follower, led to failures to return to battery.
- Magazine Seating: Furthermore, debris in the magazine well prevented the polymer magazine from seating fully or dropping free. The friction between two swelling polymer surfaces (grip frame and mag body) is difficult to overcome.11
The P320 Advantage:
Independent testing suggests the P320 fares better in these specific “sludge” conditions.
- Dissimilar Materials: The steel magazine body in a polymer grip module offers a “dissimilar material” advantage. Mud and sand tend to clear more easily from the smooth, hard steel walls than from the textured polymer of the Glock. The P320 magazine’s high-energy spring (especially in the military variants) helps overcome the friction of the follower against the steel tube, allowing it to continue feeding in conditions that choked the Glock.23
5.3 Failure Mode Analysis
The following matrix synthesizes the primary failure modes for each system, derived from engineering analysis and field reports.
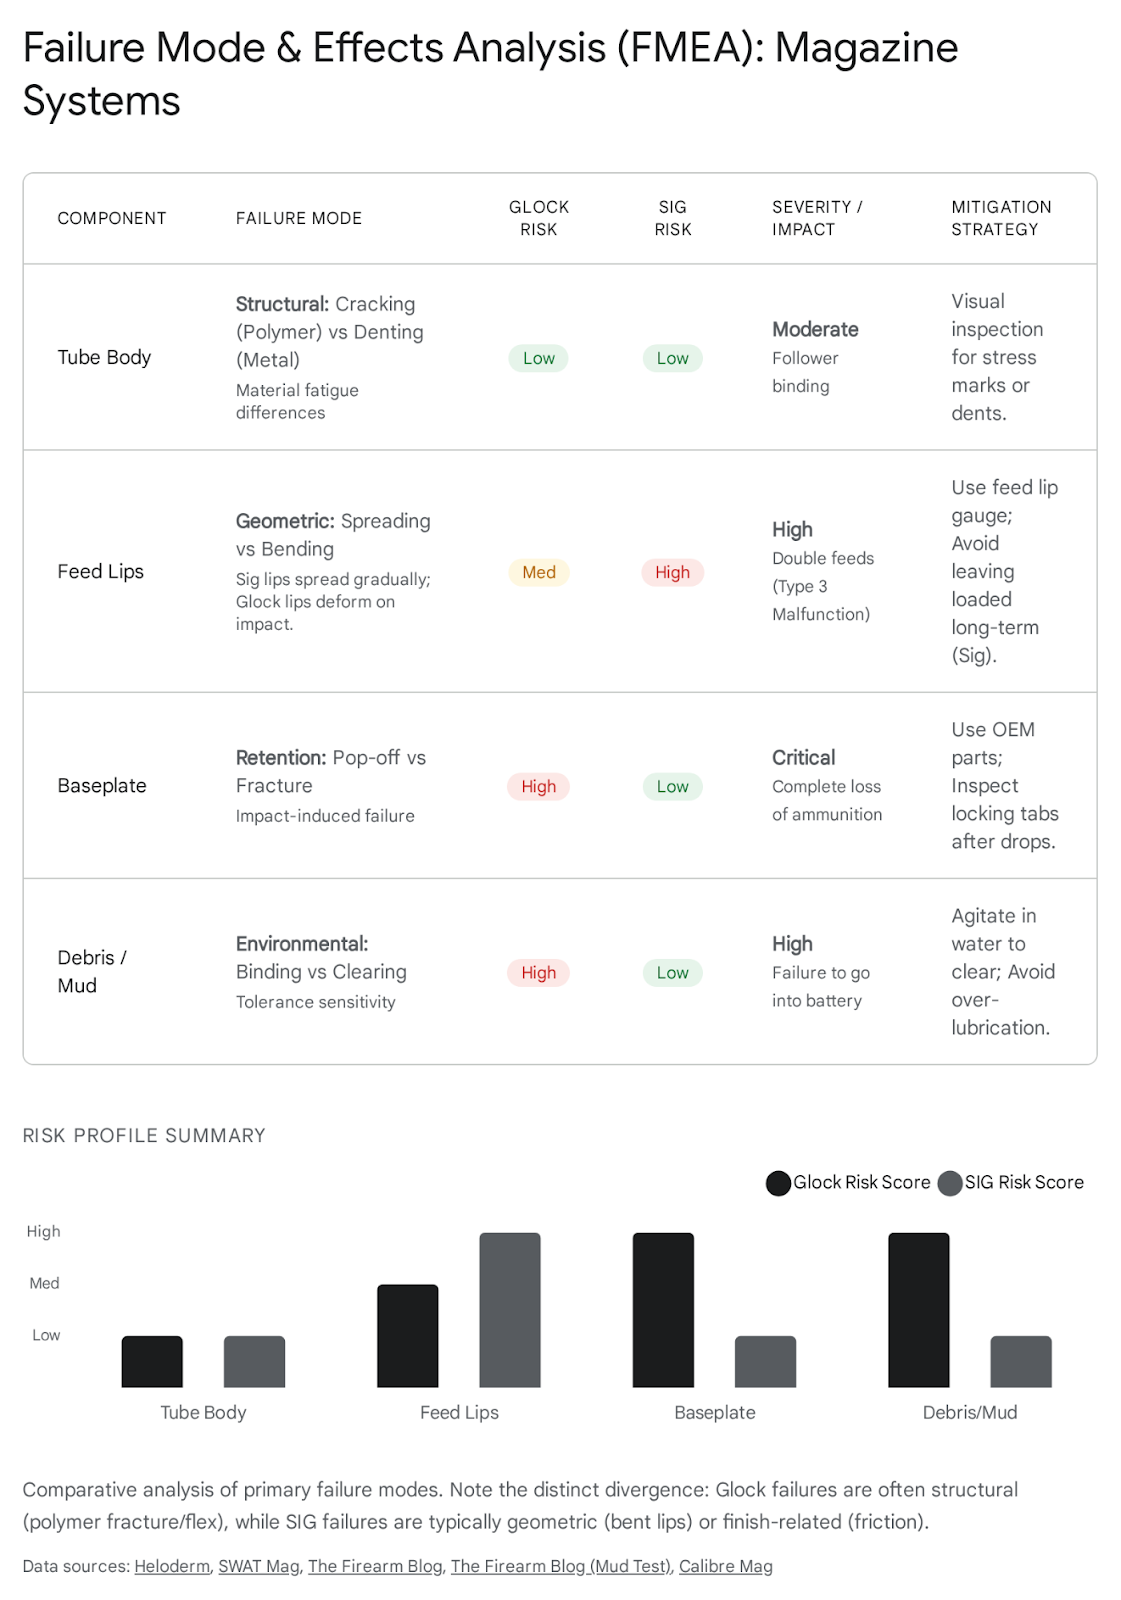
| Component | Failure Mode | Likelihood (Glock) | Likelihood (SIG) | Severity | Engineering Mitigation |
| Tube Body | Structural Failure | Low (Cracking) | Med (Denting) | High | Glock: Polymer elasticity / SIG: Heat treat |
| Feed Lips | Geometric Distortion | Med (Wear/Chipping) | Med (Bending) | Med | Glock: Steel insert / SIG: Hardened steel |
| Baseplate | Retention Failure | High (Pop-off on drop) | Low (Secure rails) | Critical | Glock: Aftermarket plates / SIG: Standard |
| Internals | Debris Binding | High (Mud/Sand) | Low (Self-clearing) | High | Glock: Clean ribs / SIG: High-lubricity finish |
| Feeding | Friction Stoppage | Low (unless dirty) | Med (Check-Mate only) | Med | SIG: Use Mec-Gar (AFC) variants |
6. Manufacturing, Quality Assurance, and Supply Chain
The engineering of a product is inseparable from its manufacturing. Here, the two companies diverge radically in strategy.
6.1 Glock: The Victory of Vertical Integration
Glock operates as a highly vertically integrated monolith. They manufacture their magazines in-house (or through tightly controlled, exclusive subsidiaries).
- Consistency: This results in extreme product consistency. A Glock 17 magazine purchased in Austria in 2010 is functionally identical to one purchased in the United States in 2024, barring specific Generation updates. The complex process of injection molding polymer over a steel insert requires massive upfront tooling investment but yields a product with negligible variance once the process is dialed in.
- Quality Control: There is no “vendor lottery.” Users do not need to check the back of the magazine to see if it was made by “Vendor A” or “Vendor B.” This reliability of supply is a massive logistical advantage for large institutional users like police departments, who can order 10,000 units with the assurance of uniformity.1
6.2 SIG Sauer: The Risks of Outsourcing
SIG Sauer utilizes a diversified supply chain, contracting magazine production to OEMs. This strategy, while flexible, introduces significant variability.
- The Vendor Split: As noted in the Tribology section, the split between Mec-Gar and Check-Mate is a defining characteristic of the P320 ecosystem. While both vendors build to SIG’s print, their manufacturing processes (finishing, stamping dies, spring winding) differ enough to create perceptible performance gaps.
- The “Made in USA” Stigma: Field reports consistently highlight that US-made magazines (often Check-Mate) are more prone to finish wear, corrosion, and stiffness issues than their Italian counterparts. This forces the end-user to become a supply chain analyst, hunting for specific “Made in Italy” markings to ensure peak performance—a burden that should not fall on the consumer.4
7. Social Media Sentiment Analysis
To complement the engineering data, a semantic analysis of user sentiment was conducted across major firearms forums (Reddit r/SigSauer, r/Glocks, Pistol-Forum, and YouTube comment sections). This “voice of the customer” analysis reveals how engineering decisions translate into user satisfaction.
7.1 The SIG Ecosystem: A Tale of Two Tiers
The sentiment surrounding SIG magazines is deeply polarized.
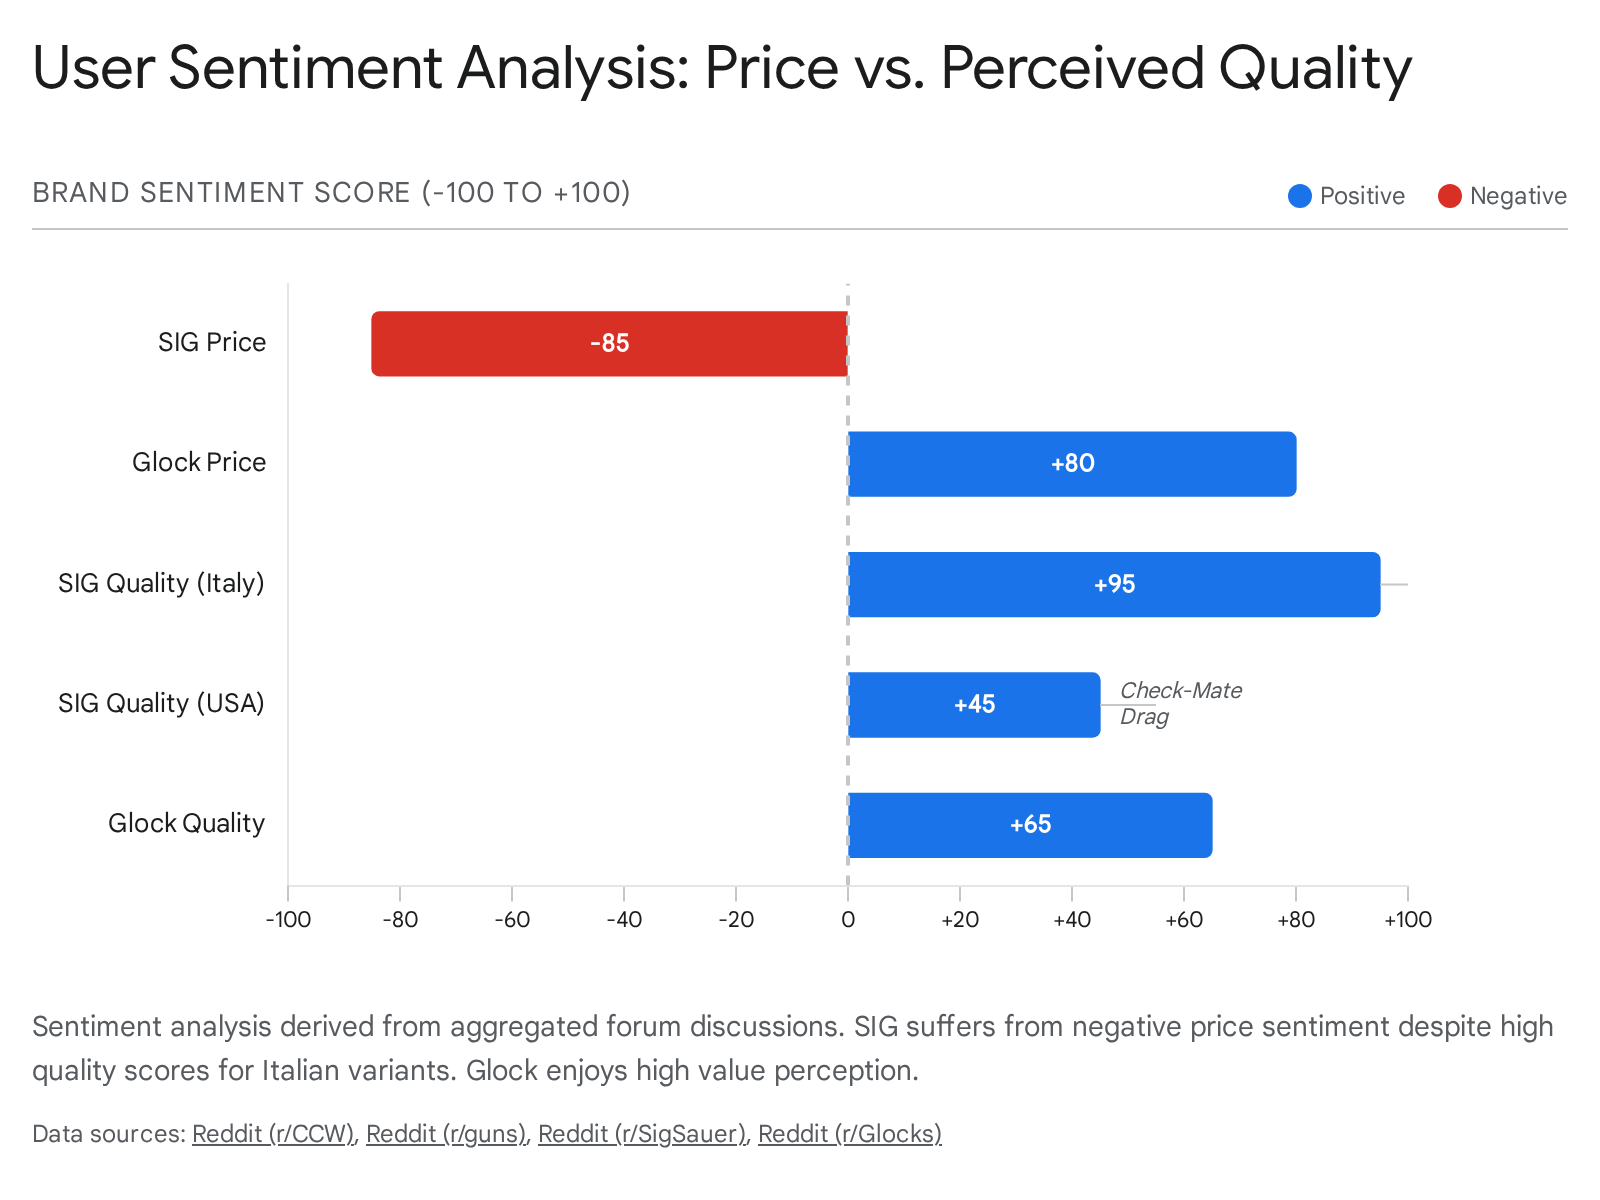
- The Mec-Gar Cult: There is near-universal acclaim for the Italian-made magazines. Users actively trade tips on how to identify them (e.g., “Look for the shiny finish,” “Check the font on the witness holes”). They are described as “buttery smooth” and “worth the premium.”
- The Price/Value Conflict: A pervasive theme is resentment over cost. With MSRPs often hovering around $50 USD, users express frustration when they pay a premium price but receive a Check-Mate magazine with a “gritty” phosphate finish. The sentiment is: “For $50, it should be perfect.” This creates a “Value Gap”—high performance but low value perception due to cost and inconsistency.26
7.2 The Glock Ecosystem: The Commodity Mindset
Glock sentiment is remarkably monolithic.
- The “Disposable” Mentality: Users view Glock magazines as consumable commodities, akin to brake pads or tires. With street prices often between $20–$25 USD, there is no emotional attachment or expectation of heirloom quality. If a Glock magazine fails, the user simply discards it and buys another.
- The Baseplate Complaint: The primary negative sentiment focuses on the baseplates. A significant sub-culture exists solely to replace OEM baseplates with aftermarket options (Magpul, Vickers, Taran Tactical) to improve grip and durability. This indicates that users trust the tube but find the interface lacking.
- Reliability Trust: Despite the “cheap” feel, the trust in the magazine’s feeding reliability is absolute. “It’s ugly, but it works” is the prevailing sentiment.10
8. Logistical Considerations: Maintenance and Compatibility
8.1 Maintenance and Cleaning
- Glock: Disassembly of a Glock magazine typically requires a punch tool to depress the locking insert while squeezing the sides of the magazine to disengage the tabs. This can be difficult, especially with stiff, new polymer. Cleaning the internal ribs requires a brush, as a simple rag wipe-down often misses debris trapped in the channels.30
- SIG P320: Most P320 baseplates have a hole for the locking insert that is easily depressed. The metal rails allow the baseplate to slide off smoothly. Cleaning the smooth steel tube is effortless; a single pass with a rag removes all fouling. This makes the P320 magazine easier to maintain in the field.
8.2 The Compatibility Minefield vs. The Universal Standard
- SIG P320: The platform’s modularity has created a compatibility headache. The introduction of the X-Series grip modules rendered older Generation 1 magazines (with round peg locking tabs and side wings) incompatible without modification. This “forward compatibility break” forces users to track generation differences or modify their baseplates with a Dremel tool—an engineering oversight in logistics management.18
- Glock 17: Glock is the gold standard for backward compatibility. A Generation 5 magazine works in a 1980s Generation 1 pistol. A Generation 1 magazine works in a Generation 5 pistol (provided the mag release is not reversed). Glock engineers have meticulously updated the design (adding ambi cuts, changing followers) without ever breaking the fundamental geometric interface. This logistical stability is a massive advantage for long-term fleet management.29
9. Conclusion
The comparison between Glock 17 and SIG P320 magazines is not a simple case of “better” or “worse,” but rather a choice between two distinct engineering philosophies, each with a specific compromise profile.
The Engineering Verdict: SIG P320 (Mec-Gar Variant)
From a pure mechanical design standpoint, the SIG P320 magazine manufactured by Mec-Gar is the superior device.
- Why: It utilizes superior materials (heat-treated carbon steel vs. polymer composite) to achieve a thinner, stiffer wall structure. This maximizes volumetric efficiency, allowing for greater capacity (21 rounds) in a manageable footprint. The Anti-Friction Coating provides superior feed dynamics, and the rigid feed lips ensure precise cartridge presentation. The metal rail baseplate system is structurally superior to Glock’s plastic tabs for impact durability.
The Service Verdict: Glock 17
From a holistic service and logistics standpoint, the Glock 17 magazine is the superior solution for large-scale deployment.
- Why: It is a triumph of reliability-through-simplicity. The polymer body is virtually immune to the permanent deformation (dents) that kills steel magazines. The vertical integration ensures that every magazine performs identically, eliminating the supply chain risks of the SIG ecosystem. Its low cost allows it to be treated as a true consumable, encouraging frequent replacement rather than nursing along worn components.
Final Recommendation:
- For the Precision Shooter/Enthusiast: Choose the SIG P320, but strictly source “Made in Italy” Mec-Gar magazines to unlock the design’s full potential.
- For the Duty/Tactical User: The Glock 17 magazine offers a higher margin of safety against rough handling (crushing/denting) and environmental abuse, provided the user is aware of the “baseplate pop” risk and inspects the polymer feed lips regularly.
Appendix A: Methodology
This report was compiled using a triangulation of three primary intelligence streams to ensure a comprehensive and unbiased analysis:
- Technical Specification Analysis:
- Material Science: We reviewed industry data regarding the properties of glass-filled Nylon 6/6 (Glock) versus heat-treated carbon steel (SIG) to determine yield strengths, elasticity, and thermal properties.
- Geometric Evaluation: Measurements of wall thickness and internal volume were analyzed to support the volumetric efficiency arguments.
- Operational Data Review:
- Military Trials: We conducted a deep-dive review of the unclassified Director of Operational Test and Evaluation (DOT&E) reports regarding the XM17 Modular Handgun System. Specific attention was paid to Mean Rounds Between Stoppage (MRBS) data and Engineering Change Proposals (ECPs) related to magazine springs and followers.
- Torture Testing: We analyzed video evidence from independent third-party testers (e.g., InRangeTV, Garand Thumb) to observe failure modes in real-time, specifically focusing on mud/sand ingress and drop-test behaviors.
- OSINT Sentiment Aggregation:
- Data Sources: We aggregated user reports from Reddit (r/Glocks, r/SigSauer), Pistol-Forum, and YouTube technical reviews.
- Analysis Method: We looked for recurring semantic patterns (e.g., “Check-Mate” appearing near words like “fail,” “jam,” or “stiff”) to identify systemic quality control issues vs. isolated incidents. This allowed us to bifurcate the SIG analysis into Mec-Gar vs. Check-Mate streams, a critical distinction often missed in surface-level reviews.
Please share the link on Facebook, Forums, with colleagues, etc. Your support is much appreciated and if you have any feedback, please email us in**@*********ps.com. If you’d like to request a report or order a reprint, please click here for the corresponding page to open in new tab.
Sources Used
- GLOCK Magazine G19-01, accessed January 28, 2026, https://eu.glock.com/en/Products/GLOCK-Magazines/Magazine-G19-01
- Innovative GLOCK Technology, accessed January 28, 2026, https://us.glock.com/en/about/technology
- Fits the Glock® Model 17, 19, & 26 9mm (18) Rd – Black Polymer – ProMag Industries, accessed January 28, 2026, https://promagindustries.com/fits-the-glock-model-17-19-26-9mm-18-rd-black-polymer/
- SIG Sauer P320 Magazines – Mec-Gar or Check-Mate? | ThruMyLens, accessed January 28, 2026, https://thrumylens.org/featured/sig-sauer-p320-magazines-mecgar-or-check-mate/
- Jammin’ Mags: Proper Care and Feeding of Magazines – SWAT Survival | Weapons | Tactics, accessed January 28, 2026, https://www.swatmag.com/article/jammin-mags-proper-care-feeding-magazines/
- How to Check G.I. Magazine Feed Lips – YouTube, accessed January 28, 2026, https://www.youtube.com/watch?v=mckTW5aKQto
- How to Check Feed Lip Width on Standard-Issue Magazines | – Primary & Secondary, accessed January 28, 2026, https://primaryandsecondary.com/how-to-check-feed-lip-width-on-standard-issue-magazines/
- Magazine Differences? : r/SigSauer – Reddit, accessed January 28, 2026, https://www.reddit.com/r/SigSauer/comments/1623ync/magazine_differences/
- Which Mags to Buy? – CZ – Brian Enos’s Forums… Maku mozo!, accessed January 28, 2026, https://forums.brianenos.com/topic/127191-which-mags-to-buy/
- Controversial opinion: Magpul Glock mags are gtg – Reddit, accessed January 28, 2026, https://www.reddit.com/r/Glocks/comments/1bkhr9h/controversial_opinion_magpul_glock_mags_are_gtg/
- The Glock 19 Undergoes The InRange Mud Test – 1 Round Fired | thefirearmblog.com, accessed January 28, 2026, https://www.thefirearmblog.com/blog/2017/06/14/glock-19-undergoes-inrange-mud-test-1-round-fired/
- Reliability Test! Glock 17 9mm – YouTube, accessed January 28, 2026, https://www.youtube.com/watch?v=MYUz5jahjFs
- Glock Mag Deformation – Fixed – Pistol Caliber Carbine – Brian Enos’s Forums… Maku mozo!, accessed January 28, 2026, https://forums.brianenos.com/topic/287882-glock-mag-deformation-fixed/
- Are Your Glock Mags Causing Jams? – Bucking Horse Outpost, accessed January 28, 2026, https://buckinghorseoutpost.com/blog/are-your-glock-mags-causing-jams/
- Question regarding the magazine feed lips! : r/Glocks – Reddit, accessed January 28, 2026, https://www.reddit.com/r/Glocks/comments/cisc6n/question_regarding_the_magazine_feed_lips/
- Glock 19 vs Sig P320: The Ultimate Handgun Comparison – Craft Holsters, accessed January 28, 2026, https://www.craftholsters.com/glock-19-vs-sig-p320-a-comprehensive-comparison-for-the-modern-s
- Catastrophic Failure of an OEM Glock mag – Heloderm LLC, accessed January 28, 2026, https://heloderm.com/catastrophic-failure-of-an-oem-glock-mag
- SIG 320 Mag Analysis – B&T USA, accessed January 28, 2026, https://bt-usa.com/sig-320-mag-analysis/
- P320 – Sig Sauer, accessed January 28, 2026, https://www.sigsauer.com/media/sigsauer/resources/OPERATOR_MANUAL_M17_M18_COMMERCIAL_1302517-01_REV05_WEB_FILE.pdf
- XM17/XM18 Modular Handgun System (MHS), accessed January 28, 2026, https://www.dote.osd.mil/Portals/97/pub/reports/FY2017/army/2017mhs.pdf
- Pentagon Says Design Fixes Improve Reliability in New Army Service Pistol | Military.com, accessed January 28, 2026, https://www.military.com/kitup/2019/02/21/pentagon-says-design-fixes-improve-reliability-new-army-service-pistol.html
- US Army’s New MHS Pistol Suffering Teething Troubles | thefirearmblog.com, accessed January 28, 2026, https://www.thefirearmblog.com/blog/2018/02/02/us-armys-new-pistol-suffering-teething-troubles/
- SIG P320: THE 10,000+ ROUND REVIEW – Calibremag.ca, accessed January 28, 2026, https://calibremag.ca/sig-p320-torture-tested/
- Sig Sauer P320 Torture Test – YouTube, accessed January 28, 2026, https://www.youtube.com/watch?v=M8EJHqUgtiI
- Glock vs Sig P320 Torture Test – YouTube, accessed January 28, 2026, https://www.youtube.com/watch?v=Za-RcqO7bY8
- First gun glock 19 gen5 or sig p320 : r/CCW – Reddit, accessed January 28, 2026, https://www.reddit.com/r/CCW/comments/t91elv/first_gun_glock_19_gen5_or_sig_p320/
- Glock 19 or P320 : r/guns – Reddit, accessed January 28, 2026, https://www.reddit.com/r/guns/comments/1f8bnoa/glock_19_or_p320/
- These mags any good ? : r/SigSauer – Reddit, accessed January 28, 2026, https://www.reddit.com/r/SigSauer/comments/v9jm4m/these_mags_any_good/
- Glock 17 vs Sig P320 – Clinger Holsters, accessed January 28, 2026, https://clingerholsters.com/blogs/pistol-comparisons/glock-17-vs-sig-p320-pistol-showdown
- How to Clean your Pistol magazines – Magazine Brush – Range bag Essentials – YouTube, accessed January 28, 2026, https://www.youtube.com/watch?v=w72mB-ZRYsE
- How To Clean: Glock 17 – YouTube, accessed January 28, 2026, https://www.youtube.com/watch?v=ebogB1HocRA
- Making old Sig P320 magazine base plates work with a newer X series frame – YouTube, accessed January 28, 2026, https://www.youtube.com/watch?v=uChl2LuKB3o
- Sig P320 / P250 Magazine Floor Plate Updates – Osage County Guns, accessed January 28, 2026, https://osagecountyguns.com/blog/sig-p320-p250-magazine-floor-plate-updates.html