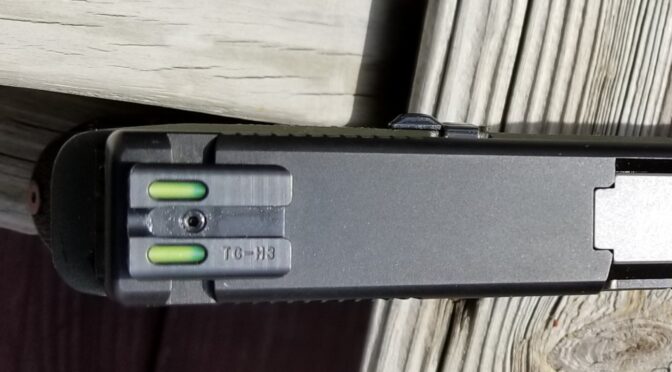
The factory sights on Glocks leave a lot to be desired in my opinion. I like fiber optic sights but also want sights that generate their own light at night. Fortunitely, TruGlo has upgrade sights for Glocks that can do just that. They are the TFX Pro model sights.
The fiber optics use daylight and are very nicely visible. I know there is a trend for red dot optics on pistols but I would rather opt for simplicity. The other really nice thing about these sights is that they use tritium to generate their own light at night – some sights make you charge them with a flashlight but not these. The only issue to bear in mind is that the Tritium isotopes with flouresce for about 10 years and then be dead. My thinking is that is a loooonnnngggg time from now plus it just would affect the night use at that time.
So, let’s get to it, Installation has two discrete steps – replacing the back sight and then the front sight. Both of these can be done by most home gunsmiths because the Glock design is pretty forgiving. Some pistols require a top notch MGW sight pusher to be removed but not the Glocks. The below is based on my experience installing these sights both on my Polymer 80 based Glock 17 and 34 Gen 3 compatible pistols.
Tools & Supplies
I’m kind of like Tim The Toolman Taylor, if you remember the show Home Improvement. I like tools and don”t need much an excuse to buy one in order to try and do the job the right way. When it comes to the rear sight, some guys use a 3/9″ piece of Delrin or wood dowel to tap the old sight out. Because of my hand tremor, that’s risky for me so I looked into sight pushers and decided to go with the Wheeler Engineering Armorer’s Handgun Sight Tool.
For the front sight, a dedicated Glock front sight tool can make the job a ton easier because they are shallow and have a magnet that will hold the tiny screw in position while you get it started. A regular nut driver is too deep and the tiny screw will fall into it vs. being held nicely in position.
You will need some medium Loc-Tite to secure the front sight screw.
Tape to wrap the slide and protect it is a recommended. I use painter’s tape.
Getting Started
- Make sure the weapon is unloaded and clear – no magazine and nothing in the chamber.
- Remove the slide
- Remove the spring and the barrel to get them out of the way – you don’t need to remove anything else.
- Wrap slide with painters tape to protect it from scratches leaving the two sights exposed.
- I did my back sight first and then my front sight.
Procedure – Back Sight

- To remove the back sight. I followed the instructions with the Wheeler unit and flipped the pusher over to use the angled face. Mine was set for straight-edged sights from the factory.
- I also oiled all of the threads on the Wheeler.
- I secured the slide in the Wheeler unit taking care to make sure the slide was the right height so the pusher would engage the sight and not bind on the slide.
- The factory Glock rear sight pushed out incredibly easily. I can see why some guys just drive them out. However, I really liked the control the Wheeler gave me.
- I then lined up the replacement sight and pushed it into place – checking over and over and making minor adjustments to ensure it was in the center.
- The Truglo has secured by a set screw that I backed out, put a dab of blue/medium Loc-Tite on and then tightened down.
- That was it for the back now on to the front.
Procedure – Front Sight

- Turn the slide upside down and you will see a small hex head screw that must be removed. I used my Glock Front Sight tool for that.
- Push or tap out the original sight.
- The replacement TruGlo unit is a tight fit I had to firmly press it into position. It is an interference fit so don’t remove a ton of material so it just falls into the slot cut in the slide. It needs to be pressed in as this helps with alignment and retention.
- Put blue/medium Loc-Tite on the screw before reassembly. This is mandatory. If you do not, it will shoot loose over time and you will lose your front sight.
- Use the Front Sight tool to reinstall the screw with the Loc-tite and tighten it down.
- Done.
Conclusion
I really like the TruGlo TFX Pro sights. They are very visible both during the day due to the fiber optics and at night due to the Tritium. They were well worth the investment. I hope this helps you out.
Please share the link on Facebook, Forums, with colleagues, etc. Your support is much appreciated and if you have any feedback, please email us in**@*********ps.com. If you’d like to request a report or order a reprint, please click here for the corresponding page to open in new tab.