Tag Archives: G34

Three Simple and Inexpensive Must Have Upgrades on Glock 17 Gen 1-3 Type Pistols To Improve Handling

I am learning a great deal about Glocks via the Polymer80 frame based Gen 3 model 17 and 34 pistols I built. In working with the pistols, I found there are three upgrades that were required immediately for me to more readily operate the pistols. Anybody can do these three – replace the slide stop, slide release lever and the magazine release. Fortunately they are relatively inexpensive so let’s step through each in this post.

Slide Lock Lever

Okay, when I started the Glock 34 compatible pistol using the Polymer80 PF940v2 frame, I had never really stripped a Glock before. As soon as I was working with the slide I absolutely hated the barely protruding OEM Glock slide lock lever. Because of my carpal tunnel and years of abusing my hands, I could barely feel the blasted thing let along get enough grip to easily pull it down. Seriously – I hate that little part. It turns out that I’m not alone. A ton of groups make a replacement unit and they just make the slide stop a hair longer and it makes all the difference in the world.

This will take about five minutes. Procedure:

  1. Ensure the weapon is clear, meaning unloaded and no cartridge in the chamber.
  2. Remove the slide
  3. Before you remove the slide stop, note which way the depression is oriented at the top of the slide stop – the new one will need to face the same way.  The hooked face should face rearward.
  4. Use a Glock takedown tool or a small screw driver to reach in and depress the spring that pushes the slide stop up.
  5. When you push the spring down, the existing slide stop can slide right out
  6. While continuing to press the spring down, slide the new one in.
  7. Confirm the orientation is correct – the hooked surface should face rearward.
  8. Test by pressing down on the release – it should spring back up. If not, look to see if the spring fell out or there is debris in the spring channel preventing it from pushing the release back up.
  9. Re-assemble and test your pistol.

Slide Release Lever

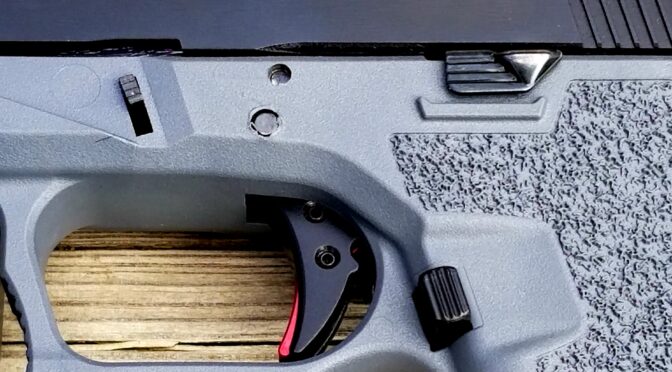
The Glock 17 has one of the worst slide releases I have ever felt. It’s a vertical tab that gives you virtually no surface to really push down on. Now, the 34 came with an extended release and that’s where I learned that it is a way better design than what the 17 has. A ton of vendors make and sell their versions. I just bought and installed a Glock 34 slide release on my 17. If you’re keeping count, this means the 34 really on has two upgrades I would recommend as it already has the improved slide release.

The first slide release I tried to do was a pain and took probably 15-30 minutes as I tried to figure things out I’d not seen a Glock’s insides before first hand. The second one took about 10-15 minutes and the third time (when I actually replaced the 17’s slide release lever with the 34 model), it probably took me about 5-10 minutes. In short, there is a learning curve.

Procedure:

  1. Ensure the weapon is clear, meaning unloaded and no cartridge in the chamber.
  2. Remove the slide.
  3. Use the first punch to push the trigger pin almost all the way out from right to left when you are looking down at the pistol with the front facing away from you. This should not take a ton of force. I find some light taps with a small hammer help me but some guys do it entirely by hand.
  4. I said stop short of pushing the pin all the way out because you just need to get it out of the slide release. You thin pull your pin punch back out of the release also but still capturing the trigger.
  5. The slide release lever will lift right out.
  6. Put the new slide release lever in its place.
  7. Push the pin punch back into the release lever to orient it. This worked for me vs. trying to get the pin itself back in. Keeping it all aligned was the trickiest part when I first started.
  8. Push or lightly tap the trigger pin back into place while driving the old pin punch out. Again, the punch is there keeping everything aligned so it’s acting like a slave pin. As you tap the real trigger pin in, the punch backs out.
  9. Re-assemble and test your pistol.

Magazine Release

The other issue I found was that the OEM Glock magazine release was too short for me to easily reach forward with my thumb and drop the mag. Again, found I was in good company because a ton of other people feel the same way. Now, I opted for the Tango Down Vickers extended magazine release because it just sticks out maybe an extra millimeter or so and it makes a huge difference. Some other magazine releases are really only suited for competition because they are easily bumped and the mag released.

This is another quick and easy one. I did it one with a screw driver, once with needle nosed pliers and once with curved hemostats. All three work but I think the curved hemostat is easiest.

This will take about five minutes. Procedure:

  1. Ensure the weapon is clear, meaning unloaded and no cartridge in the chamber.
  2. Remove the slide so you have a clear view down into the magwell
  3. Remove the spring wire from the magazine release by working it out of the groove cut in the side of the mag catch. Look at the replacement unit and you will see the slot I am referring to in the middle of the magazine release that is just big enough for the wire to slide into.
  4. Remove the old unit and slide in the new unit
  5. Move the wire back into the slot and test – it should spring back out when you depress it,

Conclusion

I hope this helps you out. I find my two pistols a lot more manageable with the above upgrades and well worth it.


If you find this post useful, please share the link on Facebook, with your friends, etc. Your support is much appreciated and if you have any feedback, please email me at in**@ro*********.com. Please note that for links to other websites, I may be paid via an affiliate program such as Avantlink, Impact, Amazon and eBay.


SLR Rifleworks Mag Wells for Polymer80 PF940v2 Frames Are Great

When I first looked at the Polymer80 PF940V2 Frames, these are the full sized frames you’d use to make a Glock 17 or 34 compatible pistol for example, I noticed the magazine opening was narrow, had a minimal bevel and there wasn’t a ton of supporting material either. Cosmetically, to me anyways, it just looks unfinished.

I’ve had a number of pistols over the years and found aftermarket magwells very beneficial for two reasons – first, they help guide the magazine into position when you are in a rush and this is the biggest reason. Second, they can protect a polymer frame from a ton of abuse.

What I found out after doing some digging was that Glock mag wells will not fit the PF940v2 frame, which isn’t surprising. The one thing you also need to know is that the PF940v2 full size frame and the PF940C compact frame also use different magwells. A vendor accidentally sent me a C-series magwell and it absolutely would not fit my full size frame.

So, I did some digging and you’ll notice there are magwells of differing sizes with some having a very wide flare and some have more moderate flares. What I did find surprising is that a cottage industry has popped up on eBay sellding 3D printed magwells. On one hand, they are really cheap. On the other, I question how long they will hold up to real world abuse. I definitely knew I wanted an aluminum magwell.

I settled on a unit from SLR rifleworks. It is nicely made and fits the PF940v2 grip really well. I was so impressed that I bought a second and now have them on both my G17 and G34 pistols. My G17 is the grey pistol in the photos and the G34 is the olive drab pistol. Both are based on receivers built from PF940v2 frames.

This is the GL-MW-P80 Magwell adapter from SLR Rifleworks.
Here’s the view from the bottom.

Installation is simple. Insert the front of the grip into the front of the magwell at an angle and then push the back down to fully seat the unit. Put a bit of blue medium strength Loc-tite on the screw and screw it into the hole that is drilled in the back of the frame and you are done. Even though the used a flat head screw for presumably an even more secure hold, you can’t feel it when you are gripping the pistol.

Note that you tip in nose first and then push down the back to seat it properly.
Here is a view from the back with the screw installed.
Here’s the bottom. No, this is not a paid review. I just really like the mag well.
I’ve not had problems with any magazine fitting or dropping free. This is an OEM glock 17 round magazine and it’s also worked well with 33 round Glock mags, plus both 22 and 31 round ETS mags.
Glock 34 compatible pistol with a Streamlight TLR02 HL G light and laser plus a Tyrant Designs brake.

So, I’m very happy with the results and have no hesitation recommending them.


Note, I have to buy all of my parts – nothing here was paid for by sponsors, etc. I do make a small amount if you click on an ad and buy something but that is it. You’re getting my real opinion on stuff.

If you find this post useful, please share the link on Facebook, with your friends, etc. Your support is much appreciated and if you have any feedback, please email me at in**@ro*********.com. Please note that for links to other websites, I may be paid via an affiliate program such as Avantlink, Impact, Amazon and eBay.


Polymer80 First Take – How I Got Excited About Glock Compatible Pistols

Folks, I am not a huge Glock fan as a shooter. I appreciate all the engineering that went into it and it is a genuinely brilliant design but I don’t like the looks or the feel of the grip angle. With those words said, have probably pissed off at least half of you and let me explain.

Gaston Glock designed his pistols with functional reliability and safety in mind. When I look at a Glock, I can see a lot of similar design concepts to the Kalashnikov – good enough accuract, relatively loose tolerances and a polymer receiver that holds all the parts in alignment but doesn’t need a ton of strength itself. I’m sorry, but to me, the OEM Glocks are bland looking utilitarian workhorses – blocky, blackish things.

Over the past year, I have become aware of the exploding aftermarkets part market for Glock pistols. You can replace every part now it seems with flashy slides, triggers, brakes and more. There are even groups making receivers that use Glock parts but with their own twists.

This brings me to the one reason I have never personally owned a Glock even though I have shot friends’ pistols a number of times – they feel wrong in my hand. Gaston designed his pistols with a grip angle of 22 degrees relative to the centerline of the bore. He had really good reasons to do this and it works for many shooters but not me.

Scott Igert gave me some wise advice years ago – pick a pistol that feels right when you hold it – that when you bring your hand up the aim is natural and comfortable. This is sage advice because there is no magical perfect grip angle that works for everyone – I known this after making AK rifle grips with differing angles for years!

So what pistol do I tend to like in terms of feel? I like 1911s and doublestack 1911s the most. John Browning designed his pistol with an 18 degree grip handle based on his analysis of the hand and shooters at the time. Both these guys did their homework but the 1911 just feels better to me. Thus, while I have shot Glock 17s a number of times, I’ve never wanted one but I do like my 1911s.

This bring us to the part of the story I really want to convey. I’d seen ads from Midway USA and others about Polymer80’s 80% receivers (frames) that can use Glock parts. I never really was interested due to my dislike of Glocks plus the resulting costs of the builds weren’t competitive with commercial pistols.

As it turns out, I was lacking some important information that when I found them out, caused me to move ahead with building two Polymer80-based pistols.

  1. The grip angle is 18 degrees and since it is a doublestack design, it feels really good to me.
  2. The trigger guard is sculpted to allow the remaining fingers to fit under the trigger guard in a more natural manner.
  3. It has an integral Picatinny rail under the barrel.
  4. The Polymer80 frames have a great reputation for quality
  5. The Glock aftermarket parts scene was several orders of magnitued bigger than I could ever have imagined. You can pretty much create a custom pistol that looks substantially different from its Austrian ancestor.

Polymer80 makes a number of frames including ones for the G19-style compacts. My challenge is that I wear XL-sized gloves and my pinky finger does not fit onto a G19 comfortably plus I had a bunch of G17 magazines from a project I did some years back. I decided to build a full size pistol. [Click here for a list of Polymer80’s pistol frames]

So, figured it was time to give it a shot. It was Winter, I had time and I figured why not? It also helped that Midway USA was having a sale and I bought two of the PF940v2 full size frames for $110/ea to get the ball rolling. To be honest, I bought two figuring I might well trash one of the two. In other words,I had a spare just in case 🙂

I ordered a grey frame and an olive drab colored frame. I’m bored with all black weapons and I have to admit, I really like the olive drab. I do plan on doing another and may do it in black but the cool thing is that you have options.


Legal Note: In case you are wondering about the legality of building this type of pistol in your area, you will need to do some research. In the case of Michigan where I live, you need to go to your local Sheriff and get a pistol purchase permit and then fill it out with the maker as “Self-Assembled”, model as “NONE” and serial number as “NONE”. My local Sheriff’s department was very helpful and recommended that I wait until I was done with the build because the purchase permit was only valid for 30 days. I confirmed this with the Michigan State Police Firearms Records division and they too were very helpful. (Their number is 517-241-1917 so you can confirm the details . To be safe, I would urge someone from Michigan to do their homework and confirm my findings so you can legally enjoy your resulting pistols. I’m not a lawyer and this is not legal advice – just me trying to pass along what I learned so double-check.) I believe it is even easier for CPL holders in Michigan but can’t speak to that process.


What was in the box?

Just a few days after I ordered the two frames from Midway, they arrived. Each was packed in a stylish black box from Polymer80 and when you opened it, the basic parts are there:

  • The two halves of the red drilling jig
  • The receiver frame itself that you will need to complete
  • A 3mm drill bit for drilling the locking block pin holes
  • Two 3mmx25mm steel pins to hold the locking block
  • The front locking block, which is a substantial machined part
  • The rear locking block, that looks like a stamping
  • A 4mm drill bit for drilling out the trigger pin holes
  • A 9mm end mill for cleaning out the barrel block area
Here’s the unfinished frame sitting in the one-time use plastic jig.

Here’s the PF940v2 frame with the two halves of the jig. It is a very nicely engineered kit. You can do this!

Guys, being a 1911 fan immediately liked the feel of the grip angle and the girth due to it being a 9mm doublestack. I went from cautious to excited in a split second.

So what do you need once you have the frames?

Okay, I jumped the gun a bit when I bought the frames as I knew I needed other parts but really hadn’t sorted out the details. That’s all that was there – you still need the other parts for the lower receiver and slide – the trigger, magazine release, slide catch, slide, barrel and so forth. There was a lot easier route I could have taken but buying the frames.

The Polymer80 pistols are genuinely fun and easy builds to do. The key is just not to rush. My first one took a lot more time as I tried to verify my understanding of every step before I did it. I’ve made a ton of costly mistakes over the years so I now try to be a bit more cautious.

As I wrap up this post, let me leave you with three big tips I have learned and want to pass on to you.

  • A must-do is to read the instructions on Polymer80’s How-to page and also watch their assembly video. They step you through pretty much everything you need to know. While researching, I did a couple of blog posts about videos I liked that give you additional perspectives – click here or here.
  • I would recommend either printing out the Polymer80 instructions so you ca follow them or if you want a second printed reference to follow albeit with slightly different steps, there is a good book that you can either buy the printed or Kindly copy of “Build Your Own Semi-Auto Handgun” by X-Ring Precision. I had both during the first build and just the Polymer80 printed guide out for the second build.
  • Lastly, I found out about 80P Builder after I bought the Polymer80 units from Midway USA. They sell parts as well as entire kits that can make this both easier and more affordable. I bought completion kits from 80P Builder. I ordered a Glock 34 slide, threaded match barrel and an upgraded internals kit that included a billet extractor. Because I didn’t know my way around a Glock at all, I paid them $25 to assemble the slide and they did a great job. Once I saw how easy the slide goes together, I assembled the second unit myself once I saw the quality of the parts in the first order but I am jumping ahead. Bottom line, I’d recommend 80PBuilder.com’s kits and parts. They are nicely machined and finished plus their pricing is very good and they ship quickly.

I’ll do one more post with tips and tricks. There is some great build guidance out there (see above). The Polymer80 frames are good-to-go. They are meant to create pistols that will see real use and there are tons of posts showing guys’ pistols still going strong after thousands of rounds.

I’d recommend a Polymer80 build to anyone who wants to build a “Not-A-Glock” pistol to their own specs. Sure you can build a bargain basement Glock 17-style pistol for under $500 but where’s the fun in that. When I tell Scott that I am going to buy something and leave it alone or build something basic, he just rolls his eyes and smirks. Yeah, I can’t do that 🙂


If you find this post useful, please share the link on Facebook, with your friends, etc. Your support is much appreciated and if you have any feedback, please email me at in**@ro*********.com. Please note that for links to other websites, I may be paid via an affiliate program such as Avantlink, Impact, Amazon and eBay.