Category Archives: General

Replacing the Pressure Switch on an Ingersoll Rand 2340L5-V Air Compressor

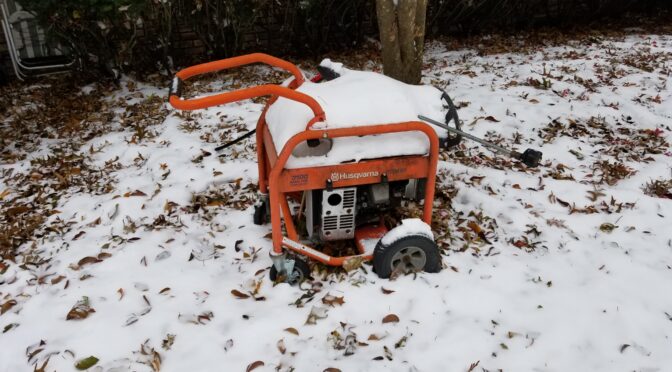
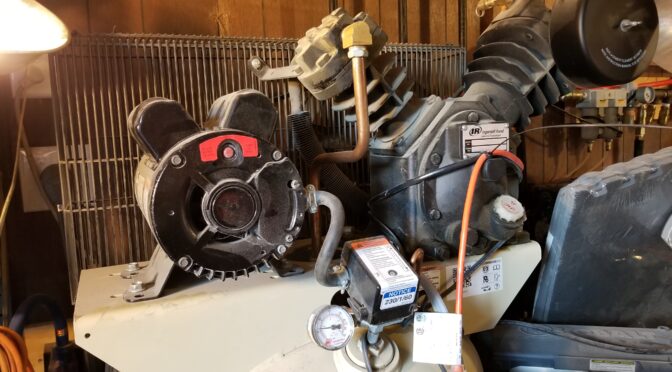
I live in a rural area and wind up doing a lot of my own repairs. About 2-3 years ago I invested in a 60 gallon Ingersoll Rand (IR) 2340L5-V air compressor which is their entry-level “Value Line” of industrial compressors. In hindsight, had I known more about “value” meaning “we made it cheaper”, I would not have made the purchase. Yes, it’s held up way better than my consumer air compressors but a buddy’s big Quincy compressor rocks and that is another story.

At any rate, I use a ton of compressed air for pressurizing my casting tanks and running all kinds of air tools. One of the reasons I went with the 2340L5-V was that I kept burning out the little 30 gallon consumer compressors. Failure is a big deal for me because when a compressor goes down in my shop, almost all work stops.

At any rate, I knew something was going on with my compressor before it stopped running completely. At the end of the air fill cycle that brings the tank back up to pressure, the switch would shut off but then there wasn’t any bleed down to relieve the pressure on the pump. This meant that the compressor may or may not restart without tripping the 30A breaker and it got worse with time. After this got really annoying, I decided it was time to fix it.

I did some reading and it turned out there were two likely culprits – either the check valve was leaking air back or the pressure switch was failing. I had problems with the check valve on other compressors so I jumped to conclusions and replaced that first. It didn’t fix the problem. Argh.

This is the 23474653-R pressure switch. It is just the switch and does not include the gauge, blow off valve or bleed off line (unloader) that you see.

So that left the pressure switch and this is where things just went sideways and I got frustrated. In searching online and calling the parts department, IR’s own parts department sold me the wrong switch and I was down for almost a week. So you don’t go nuts, you must make sure people know if you have the 2340L5 or the 2340L5-V because their pressure switches are different. You can make the better switch from the 2340L5 work but it will take a bit of re-plumbing the lines to do so. I may actually try that some day.

Next comment, do not go with the model number on the pump housing itself. The model number you need is printed on the big silver decal on the tank – not on the pump. The pump will say “2340” but that is not your specific model.

Right there outlined in yellow is the model number you must go by. 2340L5-V in my case.

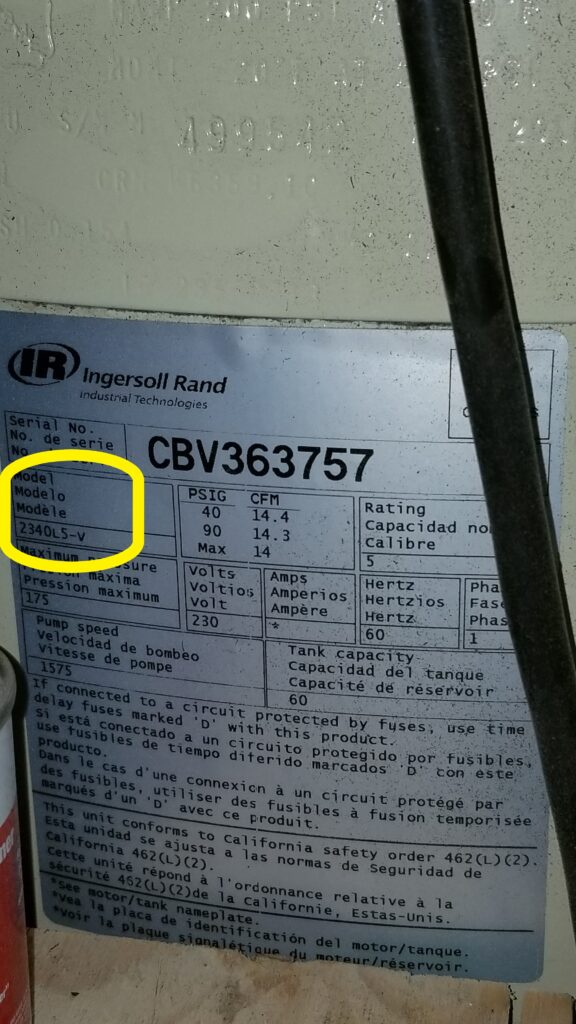
For whatever reason, IR parts sold me the wrong part even though I asked the fellow to confirm it was right. So, frustrated and with my compressor down, more discussions were held and web searches done and the correct part for the 2340L5-V’s pressure switch is a 23474653-R. Interestingly enough, Tractor and Supply Company (TSC) is an IR dealer and the local store had one of these switches on the retail shelf. This gives you an idea that they are viewed as a wear item if a retailer is going to tie up the money and shelf space to stock one. It was $79.99 and they only had one so I called and confirmed with the clerk that they had one before I drove over. I’ve had way too many situations where a website said “X” was in inventory and when I went to the store, it was not so I try and confirm now. Thankfully, I drove to the store and picked it up.

I removed the cover already but this is what comes in the box. You will need to move your gauge, blow off valve, bleed down line, rear pipe plug and electrical lines over from the old switch to the new one.

Comments On The Swap

So, when it comes to the repair, it’s a fairly easy swap. I took a few photos from different angles to make sure I didn’t forget anything plus I labeled anything that might get turned around. Gone are the days when I try to keep it all in my head. Between my age and interruptions, I find it way too easy to forget things.

Two real important safety comments. Fully drain the compressor – in other words let all of the air out and open the floor drain. Why open the floor drain? Because it’s your double check that it is empty.

Second, please make sure the power is cut. I use a heavy stove/appliance cord going to a wall outlet. I both cut the breaker and unplug the cord. Why do both? It’s your double-check. If you are in a multiperson environment, follow lock out procedures.

Note the top two poles are the hot legs coming from the wall.
Folks when you go to remove the blead-off / unloader line, it is held on by a compression nut fitting. Let me give you a piece of hard won advice – use a flare nut wrench if you can to support as many sides of the nut as you can or worst case use a proper fitting box end wrench. Don’t ever use an adjustable wrench or you will likely round the corners off the nut as the jaws of the wrench give. Now IT does give you a new nut and that is plain 1/4″ copper tube if you screw up bad but you can re-use that whole piece if you are careful with removal and re-installation.
Okay so the top two terminals are the hot legs from the wall. The middle set of terminals are the hot legs going to motor. Down on the bottom you have the neutral from the extension cord and the green/neutral going to the motor. These are thick wires in a tight space so be careful working things into position.
Here’s an odd little thing I encountered. The pipe plug that goes in one unused position of the switch is actually 10mm. Why? I have no idea. The 10mm fit best so I ran with it. Everything else was SAE. For example, the housing itself that you see just above the wrench uses a 3/4″ wrench.
Use pipe thread tape on all fittings and properly support the pipes and what not so the right things you care about are moving in the right direction. For example, I used a pipe wrench on this nipple to keep it from turning while I both removed the old pressure switch and installed a new one.
Lesson learned, stay organized. That is a small magnetic tray. I cleaned all fittings and installed new pipe thread tape before reinstalling them.

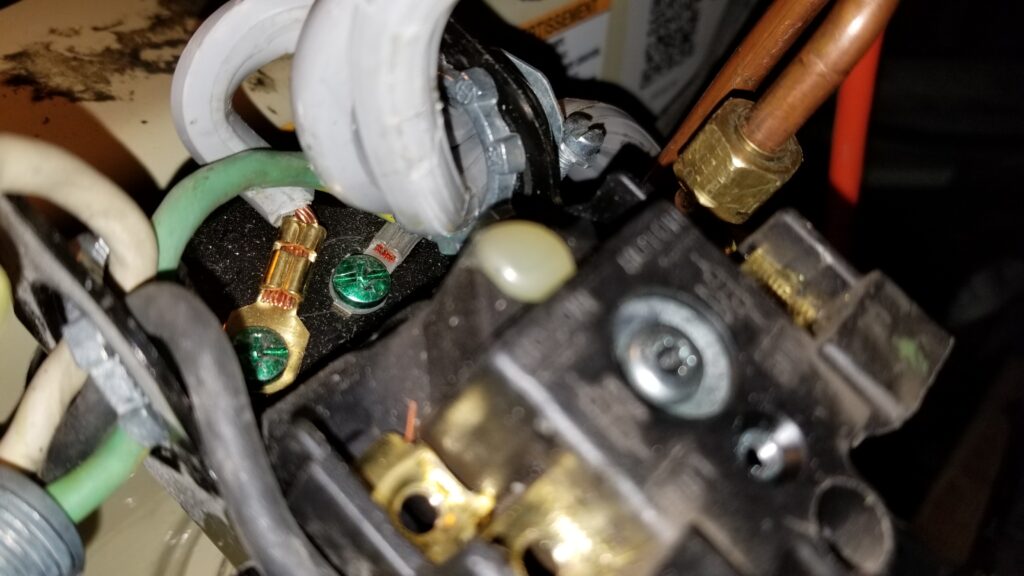
Bottom line is that I installed the new pressure switch and the compressor proper bled off the pressure from the pump after cycling. In talking to IR parts they mentioned to me that this is the most common reason for the bleed down not to happen in my series of compressor – not the check valve. I believe that now. The pressure switch seems cheep and really strikes me as a consumable part now. Lesson learned.

By the way, I found out during the actual swap that IR printed the part number on the inside of the switch cover. Why hidden inside? If they had it on the outside, then this would have all been way simpler.

Also, next time my compressor stops unloading, I am going to order one of these switches vs. waiting for failure and having to scramble. It’s my fault for putting it off but I had a ton of other things going on and eventually it bit me.

I hope this helps you out as well. Bottom line, if you have a 2340L5-V then the correct pressure switch you need to order is the 23474653-R. That way you can avoid the drama I ran into.

One last shot of the right pressure switch box with the part number on the top right 🙂

If you find this post useful, please share the link on Facebook, with your friends, etc. Your support is much appreciated and if you have any feedback, please email me at in**@ro*********.com. Please note that for links to other websites, I may be paid via an affiliate program such as Avantlink, Impact, Amazon and eBay.


Here are switch listings on eBay. Be careful that it is a real IR part or a quality replacement vs. an inferior knock off that will not hold up.


The Absolute Best Shoe and Boot Glue That I have Found!

Folks, I’ve found what I think is the best glue for shoe and boot repair. Yeah, I really mean it. It’s called “Shoe-Fix Glue” and is marketed by a small firm called NJoy Distributors and only sold direct or via Amazon. Let me give you a bit of background first.

I’ve tried to fix tons of shoes and boots over the years with varying success using Goop and Shoe Goo amongst others. The two challenges were trying to clamp the shoe or boot while trying without making the profile change once dried and also not using so much glue that it altered the feeling of the shoe. Nothing happened fast either – you had to wait overnight while the stuff set up.

So, I did some digging on Amazon a few weeks back and found this stuff. What really caught my eye were the amazingly high number of positive reviews:

At the time of my writing this blog, there are 845 reviews with a score of 4.5 out of 5. 86% of reviewers give it either 4 or 5 stars. That’s pretty good and I figured I could afford to give it a shot.

I had both the sneakers I wear around home that had the bottom tread coming off and my daughter’s favorite boots had the sole separating from the upper that I could experiment with.

NJoy does have a nice tips page with some videos that I checked out [click here for that] and it largely comes down to making sure the surfaces are clean, dry and then holding them together for 30-45 seconds while the rubberized / flexible cyanoacrylate adhesive cures.

What they are using is the interesting part – they came up with a flexible cyanoacrylate adhesive – a flexible “super glue”. This surprised me more than anything else. Normally I find that the “super glue” class of adhesives as rigid and intolerant of shocks and flexing. This stuff smells as you’d expect when applying it with a medium viscosity meaning it appears to be a little thicker than water and this helps it attempt to balance the need to soak in and establish a bond with the need to not run everywhere.

On their website, they report that their Grandfather Ed started the shoe business after WWII and ran it for 20 years. He then had two sons Dean and John. John is the one who came up with the formula and started bottling the current formula in March 2015 [click here if you want to read more]. By the way, you’ll notice they sell stuff for boots and shoes and this is just marketing so that people searching for boot glue or shoe glue will find the item – it’s the same formula and they are very upfront in telling people this.

If you are wondering about how my tennis shoes and daughter’s boot turned out – the results were amazing. The stuff really is easy to apply and has held up now for two weeks with heavy use. My daughter is a college student and walks a ton every day in those boots in the Michigan winter.

This is her boot with the sole reattached – it was literally more than half the way off the upper. I ran a bead of Shoe-Fix glue around the perimeter of the rubber sole and held the two together with my hands. I let go after about a minute and the repair seemed solid. They’ve held up for her even with a ton of walking as a college student.
On my “work around the house” shoes, the dark tread was separating from the middle foam wedge in a number of places. I’d apply some glue in each spot and hold them for 45-60 seconds – done. All the discolored stuff is remnants of Shoe Goo that I did need to clear away in a few places. Shoe-Fix is clear.

I was so impressed by Shoe-Fix Glue that I figured I really needed to write a post and share the info. It really does what it claims and I am intrigued enough to want to try it on other projects that aren’t footwear related where I need a fast flexible bond. In the mean time, I will always have 1-2 tubes of this stuff available for impromptu shoe and boot repair.

2/17/2020 Update: I wrote the original post on 2/7/20 and probably started using this glue maybe 2-3 weeks prior. I’m very pleased to report that all the shoes and boots fixed thus far are still standing up to everyday use. None of the bonds have let go thus far.


If you find this post useful, please share the link on Facebook, with your friends, etc. Your support is much appreciated and if you have any feedback, please email me at in**@ro*********.com. Please note that for links to other websites, I may be paid via an affiliate program such as Avantlink, Impact, Amazon and eBay.


Preparing a Pressure Washer For The Winter

Whether you call it them pressure washers or power washers, these are darned handy machines to have around. For portability, we use models with a gasoline engine and are on our second one. The first lasted for a few years until one wither the water in the pump turned to ice and finally cracked the housing. As they say “and that was that”. I thought about just buying a pump but for a little bit more we bought a whole new unit. My friends also cautioned me to always winterize the unit to make it last through Michigan winters. That was 6-8 years ago and I have learned a few tips to share.

By the way, the photo above really is of our pressure washer. I don’t have space to store it indoors so I really do need to Winterize it. Regardless of the brand you buy, there are three things I would tell you to do.

Drain the gas and/or use a mix with Stabil

Assuming you have a gasoline pressure washer, you might want to drain the gas from the tank and run the unit until it stalls. There are two reasons for this – gas can spoil if left untreated and also, when it evaporates out of the carb it will leave a gummy residue that may need to be cleaned out. In my case, my washer only sits idle a few months so I don’t always drain it. I’ve not had a problem so far. I always drain my chain saws because they may sit an unpredictable amount of time.

The second recommentation that you can do along with the first is to always add Stabil, a gasoline conditioner, that keeps it from breaking down for at least 12 months. I always add it to all of my gas cans when I fill them.

Blow out the system and disconnect the gun/wand and hose

What did in my first pressure washer was not draining the water out of the pump. I made a small air fitting by taking an old piece of hose and a 1/4″ air fitting that I can screw into the pressure washer and blow all of the water out of the pump, lines and wand. It works great.

I just use junk hose to make the adapter. You just need a male hose fitting on one end and a way to connect your compressor on the other.

If you really want, you can buy pre-made winterizer fittings for $12-20. The above fittings were all made with old stuff I had laying around.

Drain The Soap Tank

Don’t forget to drain the soap tank also. You don’t want it to freeze and crack anything. I did forget this one year and had to rebuild the fitting that cracked with epoxy.

Don’t forget to drain the soap from the plastic soap tank.

Add a Winterizing fluid

I then use an aerosol based pump winterizer. It can blow the water out by itself technically but I’m paranoid. I use my compressor to blow out everything and then I disconnect the air lines and wand/gun. I then connect the Briggs & Stratton 6151 Pressure Washer Pump Saver Anti-Freeze and Lubricant to further protect against freezing and to lubricate the pump and prevent the O-rings and seals from drying out. This works great for me and one can will last me 2-3 years at least.

This is what I use and have never had a problem.
All you do is connect the hose assembly to the hose inlet and push the trigger. The foam will come out pretty quick – it doesn’t take a lot. Note, stand to the side or you will wear the foam. I kid you not that it took me two years of wearing foam until I remembered to stand to the side when filling the unit with foam. Also, remove the hose and wand/gun before doing this or you will use a lot of material to purge them also. You can blow them out or even hang and drain them vs. using this stuff unnecessarily.

Now a ton of reputable companies sell some form of pump protector / winterizer. I suspect one or two companies actually make it and then applies different labels – Generac, Briggs & Straton, Stabil, etc. Just go with a name brand and I bet you will be fine.


Summary

I hope this helps you out. My current pump is still going strong even though it is out in the winter weather every year. The paint is fading but it is mechanically solid.


If you find this post useful, please share the link on Facebook, with your friends, etc. Your support is much appreciated and if you have any feedback, please email me at in**@ro*********.com. Please note that for links to other websites, I may be paid via an affiliate program such as Avantlink, Impact, Amazon and eBay.


How To Find Out Torque Specifications for Screws and Bolts: An Outstanding NASA Reference Guide

We’ve all been there – you’re working on a project and wondering how much to torque something so either we don’t bother or just take a guess. What I only found out recently was that in 2017, NASA published a really cool guide called “Installation Torque Tables for Noncritical Applications” – with the document ID as NASA/TM—2017-219475.

The document provides the torque specifications for a ton of general purpose fasteners that do not have an exact specification assigned – hence the term non-critical. As you can imagine, they get very specific in critical/risky situations.

At any rate, given the size of the bolt or screw, the thread pitch, the material and the depth, they provide a reference torque specification you can follow for both metric (M6, M8, M10, etc.) and SAE (#8, #10, 1/8, 1/4, 3/8, etc.) fasteners. Note, they provide an assembly torque (which is a 65% load from failure) and 100% torque. I use the assembly torque spec.

They also recommend that the depth of thread engagement be 1.5x the diameter of the fastener. So a 1/4″ (0.25″) fastener should have at least 0.25″ x 1.5 = .375″ (3/8″).

Here’s an example table. This is for fasteners going into 6061-T6 aluminum with a thread depth of 3/16″. If we go down for a 10-32 UNF screw, the assembly torque is 22.2 inch pounds. I’d use that lacking any other detailed information. I could go up to 34.2 inch pounds but I have stripped so many fasteners I don’t risk it. I’m a huge fan of Loctite so I go with that and the assembly spec.

Kudos to the two authors and to NASA for making it available. The PDF is a cool reference document and one I use whenever I can’t find a specific torque value for a given application. All you machinists and engineers – you know way more than me so please let me know if you have other resources you recommend.

To access this cool guide, click here for the NASA link or click here for the copy on our server.

Looking for torque wrenches?

Looking for a torque screwdriver / 1/4″ driver – click here.


If you find this post useful, please share the link on Facebook, with your friends, etc. Your support is much appreciated and if you have any feedback, please email me at in**@ro*********.com. Please note that for links to other websites, I may be paid via an affiliate program such as Avantlink, Impact, Amazon and eBay.


Furnace Filter Change Log

As I get older, I remember less and less just to be candid. An old rule of thumb I was told once was to change your furnace filters when the time changes – the whole fall back, spring forward thing. The problem is two fold – #1, I eventually change them around that date and #2, the more modern filters with finer and finer filtration capabilities need to be changed more frequently – maybe every 60 days with a 1″ filter.

So, I created a small “change log” sheet that I taped on the side of the furnace to help me remember when I last changed them. It’s a simple thing – I just made a four column table where I could record the date I changed the filter. Done.

Here’s the PDF that you can print if you are interested.

Click on the above to open or right click to save in your browser.

If you find this post useful, please share the link on Facebook, with your friends, etc. Your support is much appreciated and if you have any feedback, please email me at in**@ro*********.com. Please note that for links to other websites, I may be paid via an affiliate program such as Avantlink, Impact, Amazon and eBay.


Do It Yourself Cold Weather Mechanic Work Gloves That Are Insulated But Still Allow You To Work

Here’s a quick tip for you when you need to turn a wrench outside except it is really cold but you still need to feel what you are doing or can’t wear bulky insulated work gloves.

What you need to do is real simple – put on nitrile gloves first. This layer next to your skin insulates and protects you from both the wind and your hands getting wet. This is a big deal when there is snow. The second layer is your regular thin mechanics gloves. I have several brands of work gloves but Mechanix is probably the brand I use most followed by Ace.

I meant to write about this last year but forgot. Yesterday I had to work on my plow and it was +9F. The above worked great. Of course there is a limit and I don’t want anybody getting frostbite so use your common sense and play it is safe it is super cold.

At 9 degrees Farenheit, holding steel tools and moving metal parts around is a recipe for frostbite. It was this kind of work last year that led me to experimenting with putting Nitrile gloves under my thin Mechanics gloves.

I buy boxes of 5 mil Nitrile gloves whenever they go on sale at Harbor Freight. I think the sale prices tend to be around $5.99 and there are 100 in each box. I use a ton of them with my plastics work but also when working on cars. Any brand ought to work but I think the Harbor Freight gloves are a great deal when on sale.

I settled on 5 mil thick gloves because thinner ones fall apart very easily and thicker ones start to be bulky and mess with your sense of touch. I tried both 7 and 9 mil gloves before going back to 5.

I like 5 mil. It’s neither too thin nor too thick in my opinion. Note, they are meant to be disposable so you may or may not get more than one use from them.

The outer gloves are just basic Mechanix brand gloves.

I literally snapped this photo on my way out to work on the plow in 9 degree snowy weather.

I hope this little trick helps you out! I set up some Amazon product links for you below this post in case you would like to buy gloves.


If you find this post useful, please share the link on Facebook, with your friends, etc. Your support is much appreciated and if you have any feedback, please email me at in**@ro*********.com. Please note that for links to other websites, I may be paid via an affiliate program such as Avantlink, Impact, Amazon and eBay.


The Rise of Useless Reviews on Amazon – Read Before You Buy

Amazon is really cool. I can get good deals on stuff and have it delivered to where I live. The problem is that I used to historically look at the number of reviews and the average score to determine if something was worthwhile or not. A pure math approach of looking at the numbers is not working any more and let me tell you why.

I’m noticing a lot of reviews where people give 4 to 5 stars without really using the product. I don’t know if they feel they need to report right away or just what but you will read stuff like “it looks good” or “it feels good” and nothing about the actual use. I suppose it’s better than nothing but not by much.

Also, some merchants reach out and correct problems then ask the buyer to revise the score. You know, I’m cool with that. A friend of mine recounted the story of being hounded – email after email – from the seller to change the score. So, you need to be aware of this too – I’m not a huge fan of wasting time troubleshooting stuff – I want it to hit the ground working.

Recommendations

Again, the basics are true. Products with no reviews are very risky and less than 30 are still risky but you are starting to get a safety margin. However, you must dive deeper to learn what folks are saying.

What I am finding is that you need to read the reviews and:

  • Look for people who actually used the product and are reporting back.
  • Look for trends – was the product great and having more and more problems or vise versa?
  • Look out for tons of edits where people post that they have revised the score after the vendor sent a replacement. Why was this necessary? I could understand a few but not a lot and definitely not a trend.
  • Be sure to click on the number of reviews right under the product name so you can see the breakdown of scores and even click on the number of stars to read the reviews. So, if you click on “1 star” you can read those reviews.

Fortunately with Amazon, they give great customer service and I can’t guess how many times they have made things right over the years. I think a lot of folks have a level of comfort with Amazon now and I also think you need to use the tools they gave us to make a better purchase decision.


If you find this post useful, please share the link on Facebook, with your friends, etc. Your support is much appreciated and if you have any feedback, please email me at in**@ro*********.com. Please note that for links to other websites, I may be paid via an affiliate program such as Avantlink, Impact, Amazon and eBay.


Hoover Carpet Shampooers are Totally Worth It!!

I bet you did not expect to see me do a post about carpet shampooers or as some call them “carpet cleaners” or “carpet cleaning machines”.  We’ve owned dogs and had kids for years plus we have light colored carpets.  Keeping them clean is no easy matter and maybe 4-6 times per year we shampoo them – plus occasional touch ups if something gets spilled, etc.  It makes a HUGE difference.

We used to rent Rug Doctor carpet cleaners and while they do the job you have the expense and hassle of having to rent one.  Back in the early 2000s we bought our first Hoover.  We went with one from Sam’s Club if I recall right.   One of the big selling points over the competition at the time was that the clean water reservoir was built right into the unit whereas some models make you run a hose way back to a bathroom, utility or kitchen sink.  That just would not work the way our house was laid out.

We wore out our first unit in probably 5-6 years — it last quite a while and did a ton of cleaning with it.  We then bought a newer model that we are still using and just got a brand new model to do my mother-in-law’s home after it flooded.  It is a FH50258 “Hoover Professional Series Power Scrub Elite Pet Plus Upright Carpet Cleaner”.  That is a mile long model name but it really did a fantastic job.

Why Did We Get It?

Thus summer we had a crazy storm that just parked over our town and dumped a ton of rain for two days,  Pretty much everybody had problems with water coming into their basements including my mother-in-law.  We were super busy and other than helping move stuff out of the way and putting a dehumidifier down there, we had to wait a bit to do the cleaning and restoration.

One of the reasons we bought a cleaner for her house was to leave it there in case of future problems plus we can use it for shampooing.  Something we found out many years ago is that a shampooer can suck up water from a carpet like there’s no tomorrow.  If you have water come in and get  carpet wet, a heavy shampooer will suck a ton of water our compared to a light Ship-Vac wand and hose.

This new unit is lighter than our old one plus the tank appears much more ruggedly made.  We busted the tank on both previous units – the “ears” that would clamp the lid to the tank would bust off way too easily – they fixed that design flaw with this model.  They also say the unit is blowing heated air to help with cleaning and drying – I can’t speak to that.  We use hot water from the tap to begin with.

Here are some photos of the new unit:

In the next photo, you can see the reservoirs pretty clearly.  The main reservoir on the top is for the clean water – again, we always use hot water to help clean and dry faster.  The smaller top right reservoir holds the soap.  The big tank under the black bar with “ELITE” on it holds the waste water.  It is easily detached and you can pour the filthy waste water down the toilet.

Our Approach

At any rate, mama had lived there for about 10 years and it had never shampooed her basement so it was worn to begin with.  Add in the water and she had stains all over the place.  My wife used hot water and plenty of carpet shampoo to clean the carpet.

In the above photos, you can see where she already cleaned and what was still dirty pretty clearly.  We tend to use either Rug Doctor or Bissell shampoo.  For the above we were using Rug Doctor shampoo.  My wife has worked out a method that works well – she shampoos the carpet twice and then does a third pass just rinsing.  We’ve found that carpets seem to attract dirt less if we rinse them and make sure no sticky/gummy residue remains.

Look at the example area below.  We had shampooed the lighter areas already but you can see the dirty carpet pretty clearly:

This is during shampooing:

And this is the end result

After we shampooed the carpets, we ran fans a dehumidifier to dry things out.  The shampooer did a great job and I figured it would be worth it to pass along the word.  We bought the exact model above at Home Depot for $149.  We did mama’s house and were so impressed that we bought a unit for ourselves.  I’d say we get at least five years from our older models so you can do the math as whether you want to continue to rent or buy a shampooer.

For us, the shampooers have been very worthwhile.  We have always liked the quality of the results and we don’t have to rush and rent a unit if family is coming over, we need to clean up an accident or even clean in general – we can just do it whenever we want.

As mentioned, this is the third Hoover we have owned/used and were very impressed.  If you are interested, check the various Hoover models and see what is getting good review on Amazon, Home Depot, etc. and also falls in your budget.

I hope this helps you out.


If you find this post useful, please share the link on Facebook, with your friends, etc. Your support is much appreciated and if you have any feedback, please email me at in**@ro*********.com. Please note that for links to other websites, I may be paid via an affiliate program such as Avantlink, Impact, Amazon and eBay.