Check out Aaron’s sweet M92 SBR with our Handguards

Aaron built this SBR by starting with a Zastava M92 PAP pistol kit and then took it from there.  The results are very clean!


If you find this post useful, please share the link on Facebook, with your friends, etc. Your support is much appreciated and if you have any feedback, please email me at in**@*********ps.com. Please note that for links to other websites, I may be paid via an affiliate program such as Avantlink, Impact, Amazon and eBay.


Check out Jason’s M92 with our Handguard Set

Jason sent me this photo of his Zastava M92 PAP pistol with our handguards – it looks great Jason!!


If you find this post useful, please share the link on Facebook, with your friends, etc. Your support is much appreciated and if you have any feedback, please email me at in**@*********ps.com. Please note that for links to other websites, I may be paid via an affiliate program such as Avantlink, Impact, Amazon and eBay.


John’s Bulgarian AK-74 is Looking Great With Our Molot Grip

John’s Bulgarian AK-74 is Looking Great With Our Second Generation Molot grip!

Folks, this really makes my day when I see what you have built!!

Click here for our Molot Gen II grip.


If you find this post useful, please share the link on Facebook, with your friends, etc. Your support is much appreciated and if you have any feedback, please email me at in**@*********ps.com. Please note that for links to other websites, I may be paid via an affiliate program such as Avantlink, Impact, Amazon and eBay.


Check Out Art’s Wild M92 SBR with our Plum M76 Grip and Handguards

Art shared this photo of his custom M92.  I think the plum furniture really complements his SBR.

Click here for our Yugo/Zastava M92 handguard set

Click here for our Yugo/Zastava M76 Fat Cap Grip

Check out Chris’ Khyber Pass-Style AK with our Tula 6-2 grip

Chris put together this rifle and intentionally wanted it to look something assembled from parts in the Khyber Pass.  I think he pulled it off!

The rifle has one of our Tula 6-2 grips on  it in Dark Russian Plum.  Because the think wax we apply oxidizes, the grip looks lighter than what it actually is and Chris wanted that mix-and-match look.

I definitely like the way the rifle turned out!!

(By the way – Click here if you want to know the wax I recommend for bringing out the color in our furniture.)

Ryobi 18-Volt ONE+ AirStrike 18-Gauge Cordless Brad Nailer

Well folks, I recently needed to install some molding at my mother in law’s and realized I no longer have a small compressor to run my air nailers at a remote site.  So, I recalled an article I had read that spoke well of the Ryobi Airstrike 18ga brad nailer.

The interesting twist on this nailer is that it uses an 18 volt One+ battery to operate and you don’t need a compressor or air lines.  I have a ton of Ryobi tools and decided to pick up just the tool for $129.99.

I read the manual and the tool has both an air pressure adjustment and a depth adjustment.  In the next photo, the silver dial on the top adjusts the air pressure and depth is down towards the nose.   You’ll notice I have one of the slim low-profile lithium batteries on it.

It came with 200 1-1/4″ brads and they look just like the ones I use in my air brad nailer so I have plenty for the future.  They load in the magazine just like other nailers.

Now, I definitely would recommend practicing some with this.  The balance is fairly good but what is really different is the way it cycles when you pull the trigger.  There is a split second delay as it builds up pressure and then it fires the hammer driving the brad forward.  For me, the delay took some getting used to.  We’re not talking very long at all but I’m used to bang-bang-bang-bang with an air nailer as fast as you can pull the trigger.  Here there is just enough pause to throw you off.  I found myself pulling the trigger and lifting to fast so I needed to make my self slow down, pull the trigger, let it cycle and then pull.

What I was installing was some of that cheap paper/fiber molding so it was very easy for the nailer to drive the brads in.  I really should have dialed the pressure back a bit and/or reduced the depth.  That will take further experimenting for me to learn the right combo.

All in all after driving about 30 brads, I am happy and would recommend the unit to someone who is interested in going cordless.

Note, I would consider a bigger nailer if I needed it down the road but most of the time I am close enough to my shop that I can run an airline to my big compressor.  The reviews are mixed on the big nailer as it uses a relatively oddball sized nail and I’m hoping they change that.

If you are thinking of buying one of the brad nailers, they are on Amazon but you will pay a premium.  Either get them at your local Home Depot store or buy them online:

Just the tool – click here.

The tool, battery and charger – click here.

Update 10/4/2018:  I used this while remodeling my mother-in-law’s house and did not have one problem.  I was driving between 1″ to 1-1/4″ 18ga nails through paneling, baseboards and door moldings.  Not one jam, misfire, light strike, etc.  I’m very pleased with the tool.  Like many things, I just had to get used to it.

2/27/20 Update:  Used this to tack up some wood.  This thing is so handy when you don’t have a compressor handy.


If you find this post useful, please share the link on Facebook, with your friends, etc. Your support is much appreciated and if you have any feedback, please email me at in**@*********ps.com. Please note that for links to other websites, I may be paid via an affiliate program such as Avantlink, Impact, Amazon and eBay.


Getting Unstuck With Traction Mats

Well, I parked our full size Ford Transit van at the end of the driveway on the grass to get it out of the way.  Of course, given the recent snow melt the ground turned out to be too muddy and soft to support the van’s weight – but I didn’t notice that because it took a while to slowly sink.  Yeah, I didn’t notice anything – my wife did we she went to use it!  Oh crud.  So she called my cell phone and was none too happy.  I didn’t really worry about it because my truck could pull it out – or so I thought.

I drove to the house, cockily pulled my trusty old 96 Landcruiser up in front of the van and got out one of my big tow straps and walked up to the van.   Should have been easy, right?  Wrong.  Nothing, nada to hook on to.  Ford, in their infinite wisdom does not put a tow hook, eye or anything up near the bumper!  Crap, crap, crap.  [Note, near the bottom of this blog post I added in what I found after researching how to recover a full size Transit.  I’m still irked at Ford.]

Did I mention my wife was standing their fuming?  Yeah, she was.  I should have known better than to park the heavy full size van on soft ground.  Point taken – I didn’t realize it was that soft.

At any rate, I went back and looked at the 5″ deep rut the driver’s side rear tire had dug for itself.  By the way, these photos are after removal.

I needed something long to fill the ruts and give traction.  Luckily, back in 2010 and then in 2014 I bought these things called “traction mats” from a company called OTW Enterprises who touted them as portable tow trucks.  In 2010 I bought the black ones after getting my truck stuck on ice with the plow blade buried in a snow mound.  In 2014. I bought an orange set to put in my wife’s car in case she got stuck.  Here they are after I hosed all the mud off.

Well, they bounced around in the trunks for a while and did bail me out a couple of times over the years but were actually leaning on the outside wall of my shop.  They don’t fold and while they fit in the trunk you have the little plastic spikes catching stuff so I tool them out at some point and leaned them against the wall of the shop.  At any rate,  I walked over and they were exactly what I needed.  Each mat measures 36″ long and 8″ wide.  Since I had four, I butted on up against the front of each tire and placed a second one in front of it to help the tire get up and out of the rut.  The sides are labeled by the way – the relative few long spikes go down and the side with many spikes goes up.

I got in and rolled the the van back a bit and then forward to get up on the mats.  I then slowly gave it more gas (not much) and the van up and forward onto the mat and got out of ditch and I kept moving forward onto the pavement.  I don’t have any action photos – things were stressful at the time and I really wasn’t thinking about a blog post 🙂

Well, I was pretty pleased with the outcome.  Wreckers charge at least $65 to come out to our house so avoiding that charge is always a good thing.  My wife was relatively happy but gave me a hard time for causing the problem in the first place.

Are these mats perfect?  No.  They will fly out from under your car if you don’t go slow and make sure you have the correct side down.  Even then they sometimes do so I would never have someone stand behind the car.  My recommendation is to go slow – avoid your spinning tires and rock the vehicle onto the mat if need be – don’t spin your tires onto them.

My wife is so impressed she wants them back in the cars.  I just wish they had a carry case but I do recommend them as another tool to keep in your bag of tricks.

I hope this helps you out.


Comment about Ford and Their Oversight on Towing

By the way, I looked up the tow/winch location up for future reference  so if you are surfing the web trying to figure out how to tow a full size 2016 Ford Transit, here is the reference link at Ford – click here.

Look just behind the tires at the frame and you’ll see the eye rings that are part of the frame.  You can’t make this stuff up — Thanks Ford.  It drives me nuts when you look at decisions made in ivory engineering towers vs. real world needs.  Sure, let’s bury it under the van, make it hard to get to and pretty much ensure damage will occur if you actually use this to pull the van for whatever reason.

Now look how their factory winch attachment point lines right up with hitting the front radiator.  If you pull this at just about any angle where the recovery vehicle is higher than the van then the cable/strap is going to cut right into the aluminum radiator at the front.   In the next photo, you can see the silver aluminum radiator just above the lip of the bumper molding.

If you wanted to protect that radiator, you’d actually need a harness with something to push the attached cable lower to the ground – or fabricate another attachment method.   Maybe my 4″ drop hitch in my rear class IV receiver would be low enough to tie onto vs. my truck’s winch or front recovery hooks.  … Something for another day.  I didn’t buy a new van to have to worry about something people in rural areas need regularly in the winter.   They should have been in the front.


2/11/2018 Update:  The traction mats bailed me out again when I got the van stuck on ice in our yard while turning around.  I’ve come to realize the van does a fair job on the road but the tires are damn near useless on uneven icy surface,  With this van, it’s really handy to have four.  With only two handy, I could move the van forward and then get stuck, move the mats, move forward again, get stuck, etc.  I had to do the cycle about three times.  I think if I had all four handy it would have done the trick in one shot because I could have built up some forward momentum.  I now have all four stored together,  We’re nearing the end of Winter finally and I think I will keep all four in the van next year and need to find some kind of carrier bag to store them in.

Has Shooting Messed Up Your Hearing? Cost Effective Hearing Aids Definitely Do Exist and You Have Choices!

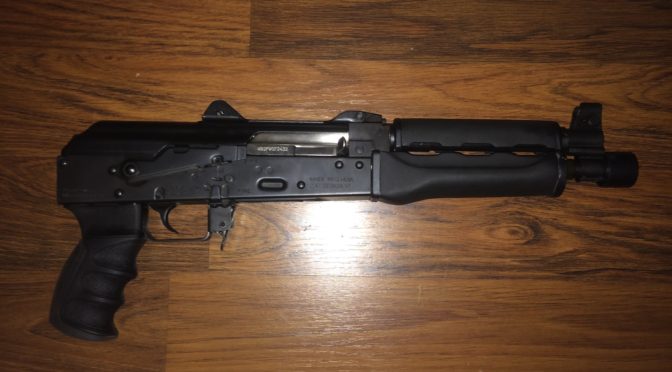
Folks, I have shot firearms almost my whole life.  My dad would hold the .22 rifle up and let me pull the trigger when I was too little. Over the years I progressed to bigger and bigger firearms of course.  My buddies and I would give each other a hard time about ringing ears after shooting.  I didn’t even know about hearing protection until I got a Desert Eagle .44 Magnum and the dealer said I better get some good ear muffs.  After going shooting, I was sold.  Fast forward about 30 years and I always wear hearing protection and make anyone shooting with me do the same.  Now you may wonder why I feel so strongly about this plus my support of making suppressors as easy to purchase as any firearm.

Plain and simple, let me tell you that my hearing is shot.  I can’t hear my wife half the time – all joking aside.  I can watch people talk in a noisy room and not hear a thing they say.  I need to ask folks to repeat stuff – it’s very, very frustrating.

I have seen several hearing doctors over the years and they all point the finger to my years and years of shooting as the culprit.  It’s known as noise-induced hearing loss (NIHL).  The sudden pressure of a firearm round going off can do a world of hurt to your ears.  I’m not going to go into details in this post but if you want to read more about the damage shooting can do to unprotected ears, click here, here, or here.

So now we are at the heart of this blog post -the current doctor identified my hearing loss in both ears, the right more than the left and in the upper frequencies.   I needed hearing aids —  he told me  that surgery would not help me.   Now please note I did have a professional exam by an ear-nose-throat specialist.  Hearing loss can happen for many reasons including impacted wax in the ear canal, viruses, etc.  It pays to know what you are dealing with and what your options are.

After the exam, I had a follow up appointment and talked to a lady in the doctor’s office about the hearing aid models they carried and they started around $1,500.  She was recommending a pair to me for $5,000.  Holy crap!!! The good news, she said, was that if I lost one, they would charge me $100 to replace the unit.  Wow…

All the models she showed me had pros and cons but what struck me was that the technology was totally unimpressive for the price.  Why can I get a quality Plantronics Voyager ear bud for my phone that supports Bluetooth for $59 from Amazon???  Their hearing aids required a giant clunky box to be worn around your neck just to do Bluetooth.  Seriously, my stinkometer started going off the more I thought about the pricing.  Needless to say, we didn’t buy anything and returned home after scheduling a follow up visit to decide on whether to buy the $3,300 or $5,000 models.  By the way, I needed a pair so I’d assume single units would be half what they quoted me.  It was a fortune regardless.

I was at home thinking about this problem and it dawned on me that a doctor’s office was likely to be higher than a kite and that the power of market demand must mean there are others offering lower cost solutions so I did a quick search on Amazon and jackpot.  There are tons and tons of hearing aid / hearing amplification products on Amazon and the prices start under $100.

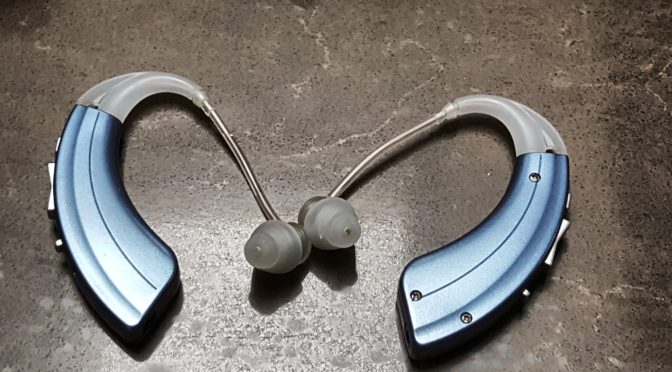
I did my research and opted for the Britzgo BHA-1222 because it used rechargeable batteries and got good reviews plus the cost was very low.  It seemed like there wasn’t an exact match for what I wanted – more frequency modes to try which sounds best, digital noise cancelling, adjustable tube for behind the ear and rechargeable.  The last part – rechargeable – matters to me because I have a hard time with small parts due to my tremor.

The BHA-1222 is not perfect but it fit my criteria for good enough — Interestingly it is listed on Amazon.com in multiple places and the reviewer scores vary a great deal.  In the end, I had a very simple theory – my hearing was shot and just about anything would be an improvement so pick something good enough and learn.

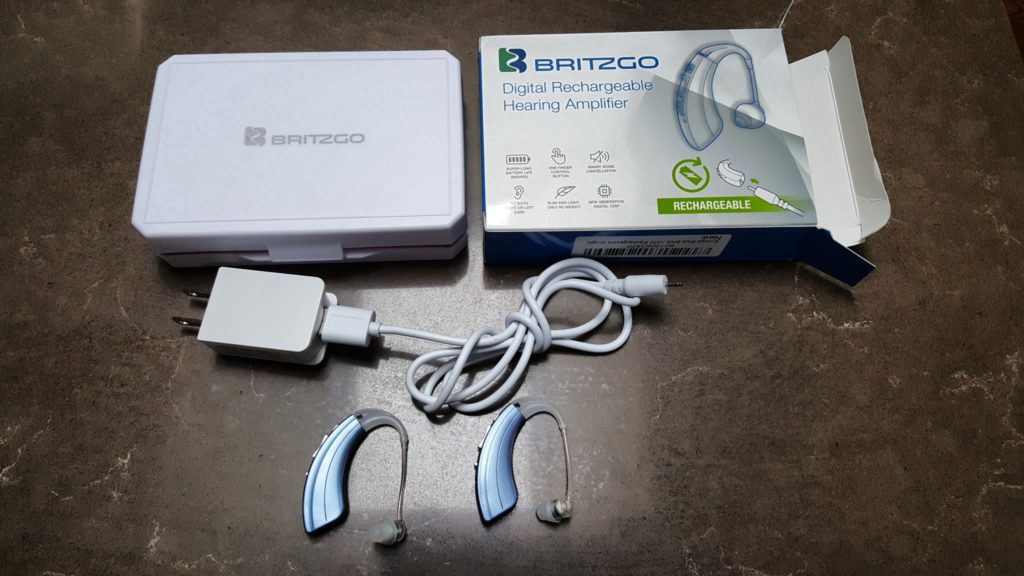
Each hearing aid arrived in its own case with its own charger, ear pieces, etc.  The below only shows one white package but I really got two sets of everything.

The hearing aids are not ear specific out of the box.  In other words, there is only one model you order regardless of ear.  You can twist the flexible tubes around to fit your ear.

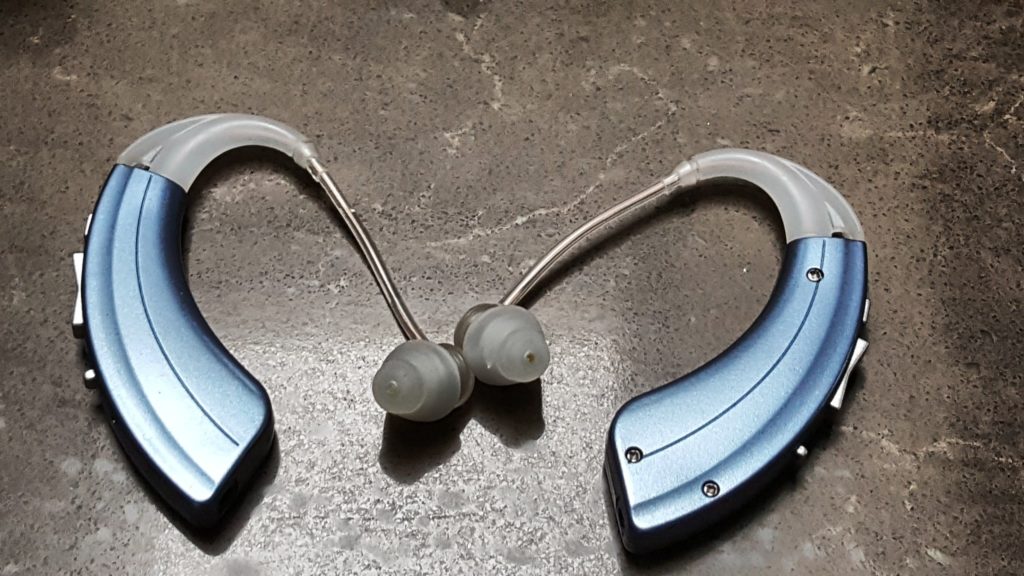
The top silver button switches from high-frequency boost to low-frequency boost.  The middle rocker is for volume and I have mine as low as it will go.  The bottom is a stiff on-off switch.

I paid $129.50 for a pair and it shipped direct from Britzgo.  It arrived maybe 2-3 days later – I was pleased with that.  The instructions say to charge them for 7 hours so I did that.

I then selected the ear cone that fit my ear best and had to fiddle with getting the thing on right.  I’m getting better at sliding the unit behind my ear and the little probe into my ear.

After a month of using them, I have some observations:

Pros:

  • Cost effective – I’ve learned quite a bit so far and feel like I’m getting pretty good value.
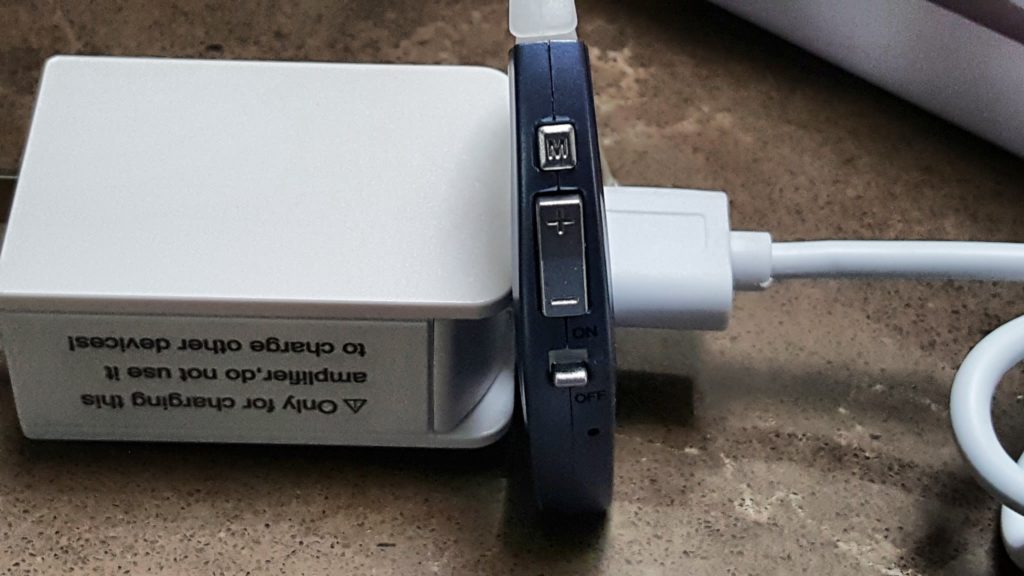
  • They do have good battery life – I haven’t run out yet and charge them each night.  What is cool is that the charging cable has a USB cable on one end so that gives you a lot of flexibility for charging in the field, on trips, etc.
  • Boosts the volume all I need – I am at the minimum setting right now.  I’d say my hearing loss is right on the border hence some sounds seeming loud to me.
  • I can hear sounds I haven’t heard in a long time at low and even normal volumes.  It’s pretty cool actually and hard to describe.

Cons:

  • Despite noise cancellation claims – it still boosts either some or all of the other sounds besides what you want.  It can be distracting but I can deal with it.
  • I wish I could lower the volume further.  Even at its lowest setting, some sounds are too loud.
  • I am using the smallest ear cone and it fits but the right hearing aid has a tendency to fall off.  I’m still working on the fit.
  • If someone drags a chair across tile or concrete the sound will make me jump!  My wife gets quite a kick out of that.
  • We went and saw the new Star Wars movie and while it did a remarkable job at some points early on, I had to take them out as the high-volume sounds like explosions were clipped and I am betting that was intentional to protect the wearer (me) from further hearing damage.  This is actually a pro come to think of it 🙂
  • I wish the tubes from the amplifier units to the ear cones were adjustable – I think that might be one reason why the right hearing aid falls out but I can mange for now.

So, it’s a bit mixed and not perfect by any means but at this price, I can afford to start and learn.  If I find something better, I can change.  If I lose something or ruin one, I am not going to panic!

For example, I may consider something from Otofonix or the Banglijian BLJ-109 at some point in the future.

I wanted to write this up and share about shopping for hearing aids on Amazon as I have had many people tell me that they can’t afford hearing aids even though they want them – well, at least you have options now.  I’d still recommend starting with a doctor first to make sure you know if you are a candidate for hearing aids and how much loss you need to compensate for.

In terms of the listings on Amazon – read the features and the reviews.  I always pay careful attention to what people write and not just the score.  There are a ton of vendors with a ton of models so be careful – I see some get lousy scores and I would flat out avoid anything less than four stars but it does depend on the price and how much you want to gamble.  My preference is to see at least 30 reviews but you will notice many of the hearing aids have fewer reviews so the more reviews the better in general.  No reviews at all would be too risky for me.

By the way, I did buy a small semi-rigid case to go in my pocket and hold both hearing aids.  I am very happy with it.

Please note that I will link to more hearing amplifiers at the bottom of the page and you will need to scroll down to see them.  There are a ton of options out there.  Be sure to read the reviews and there ought to be at least 30 to be credible.


If you find this post useful, please share the link on Facebook, with your friends, etc. Your support is much appreciated and if you have any feedback, please email me at in**@*********ps.com. Please note that for links to other websites, I may be paid via an affiliate program such as Avantlink, Impact, Amazon and eBay.


When Strength and Quality Matter Most