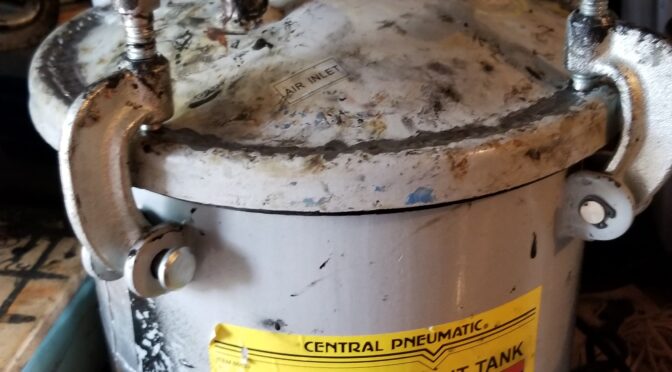
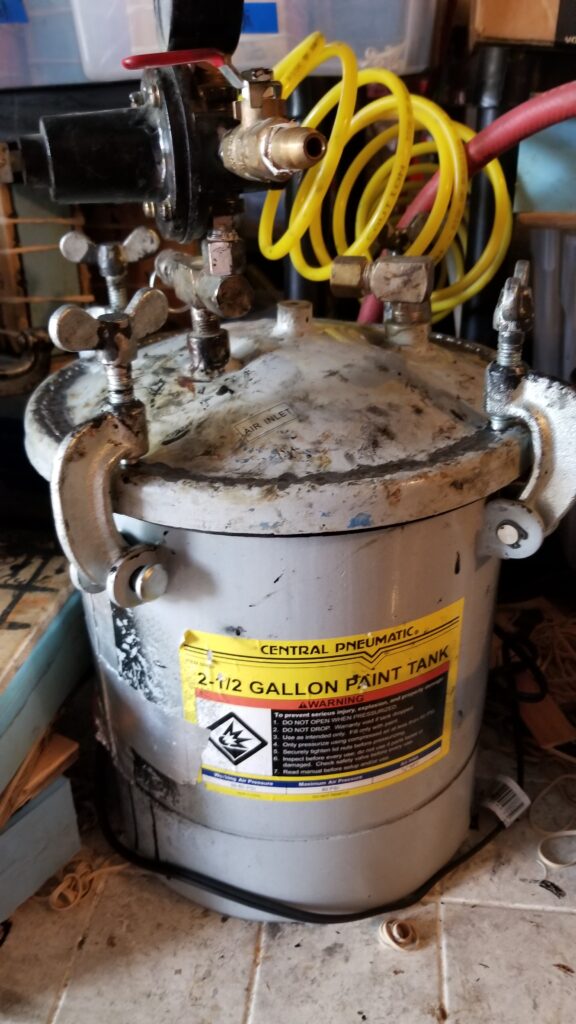
Folks, I’ve used Harbor Freight’s Central Pneumatic 2-1/2 gallon (10 liter) paint pots (HF Item 66839) for years to pressure cast grips. You may know them as “paint pots”, “pressure pots” – they are the same thing. I read fear-mongering stories on the Internet where folks are scared of them blowing up. You know what? They’re safe as long as you stay within their pressure rating and I know what I’m talking about. I’ve used my tanks through thousands of duty cycles at 60 PSI with no major problems.
There is a headache though – the cheap gaskets the tanks come with either don’t last or are a bear to seal. It used to be you had to make your own replacement gaskets or try to repair what you had but now there is an awesome ready-to-go quality gasket you can buy.
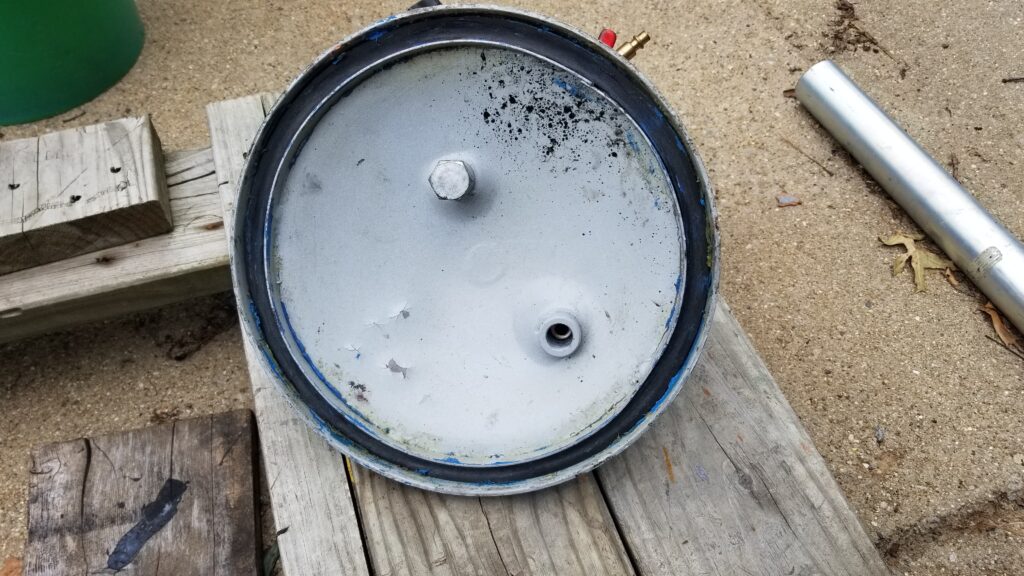
Here’s the lid of one of my modified tanks. You can see remnants of blue RTV everywhere from past fixes. The OEM gaskets are thin and don’t always seal very easily. I keep a wrench by my tanks to crank down the lids the last bit if there are air leaks after pressurizing because the original gaskets are so crummy.
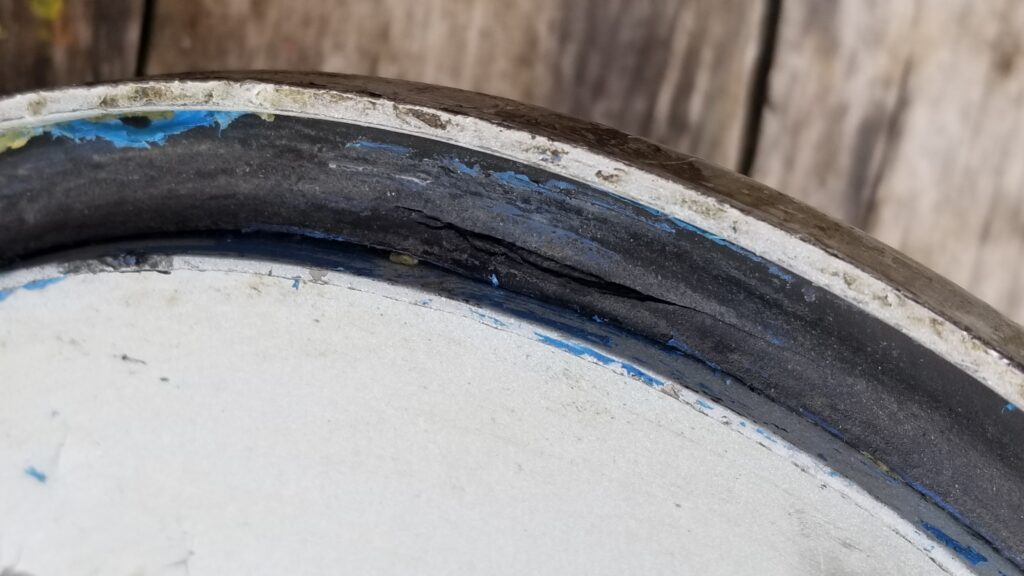
There’s a failure – see the groove/tear in the middle of the black gasket? In the past I would have filled that with RTV and let it cure for 24 hours. I don’t do that any more – I replaced this old gasket with a new one I will tell you about shortly.
How are they better? They are thicker and the durometer (firmness) of the gasket is such that there is a bit of give to get a really good seal. The gasket measures 10-5/16″ for the outside diameter and 9-5/16″ for the inside diameter. It’s also a 1/4″ thick which is great and the dogs (the bolts on top that secure the lid) have enough adjustment to accommodate this thicker gasket.
To cut to the chase, these units fit my pressure tanks perfectly. No more gluing, cutting, etc. These work right out of the box and are way, way better. They also fit a number of other thanks including:
TCP GLOBAL Brand 2.5 Gallon Pressure Pot Tanks Systems. Part# PT8310, PT8312 and PT8318
Binks or Devilbiss Brand 2.7 Gallon Paint Pressure Pot Tank Systems that use the Devilbiss Part# PT-33 Gasket. Binks Tank Part# 83C-210, 83C-220 and 83C-221
Other brands of tanks as well – many are made by the same Chinese factories and use the same size gasket.
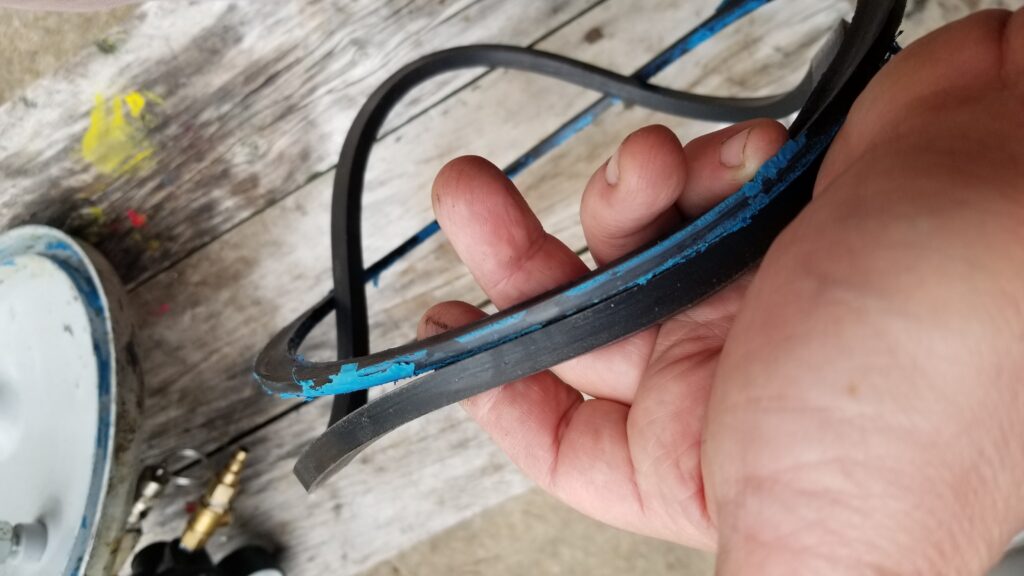
Look at the difference! The old gasket has the blue RTV on it and the new one is the much thicker all black gasket.
Installation is a breeze
Literally, pull the old gasket out and push this new one in place. I did not need to do any trimming. When I put the lid back on the tank, I did have to back off the toggle bolts in the dogs (clamps) so that they could pass over the edge of the lid given it’s new taller height but that was literally just backing the off a 1/4″ more or so. Then when I turned the bolts down, the clamping pressure fully seated the gasket and the job was done. I spent more time taking the pictures than I did replacing the gasket and adjusting the bolts!!
Here’s the tank with the new gasket installed. You can see the dogs (clamps) have plenty of adjustment. When I took this photo, I clamped the top down by hand with no wrench and pressurized the tank to 60 PSI – no leaks or problems. Seriously, these gaskets rock.
These TCP Global replacement gaskets are awesome. The seal works wonderfully and I can just tighten the lid down by hand now – no more wrenching. If you have a tank these gaskets will fit, I highly recommend them.
August 24, 2024 Update: They have held up great. I am now using them in all four of my pressure pots.
March 6, 2022 Update: These are still working great. I’ve slowly replaced most of my original HF gaskets with these and have no problems to report.
Note, I have to buy all of my parts – nothing here was paid for by sponsors, etc. I do make a small amount if you click on an ad and buy something but that is it. You’re getting my real opinion on stuff.
If you find this post useful, please share the link on Facebook, with your friends, etc. Your support is much appreciated and if you have any feedback, please email me at in**@*********ps.com. Please note that for links to other websites, I may be paid via an affiliate program such as Avantlink, Impact, Amazon and eBay.
Folks, my shop is unheated and the space where my 60 gallon oil lubricated Ingersoll Rand (IR) 2340L5-V sits can get well below freezing – sometimes even well under 20F. That presents a challenge because the lubricating oil gets thicker as it gets colder and this puts more and more of a load on the motor to start. What usually results is a tripped breaker -I know my 30amp breaker would trip regularly until I took some corrective actions.
One option you can run with is to run variable weight thinner synthetic oil in the winter. I don’t want to run into issues with my pump so I stick with IR straight weight compressor oil so I’m not really keen on doing that. There are guys who will disagree with me and that’s why I point out the option.
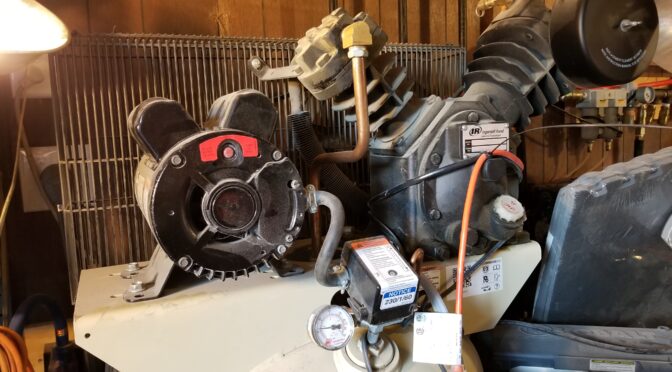
The solution I put in place works great. I simply put two Kat’s 24025 25 watt heating pads that measure 1″x5″ on each side of my pump level next to the oil reservoir. These heaters were designed to warm fluid reservoirs including those with oil. I’ve used a ton of them over the years for warming pressure tanks and what have you and have not had one fail yet. My oldest units are probably 3-5 years old and no problems — I just use them during the Winter.
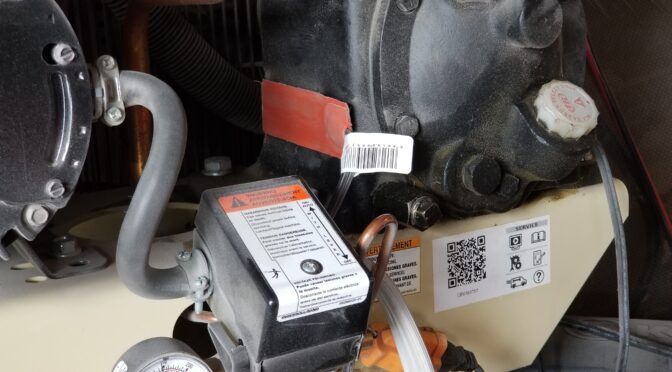
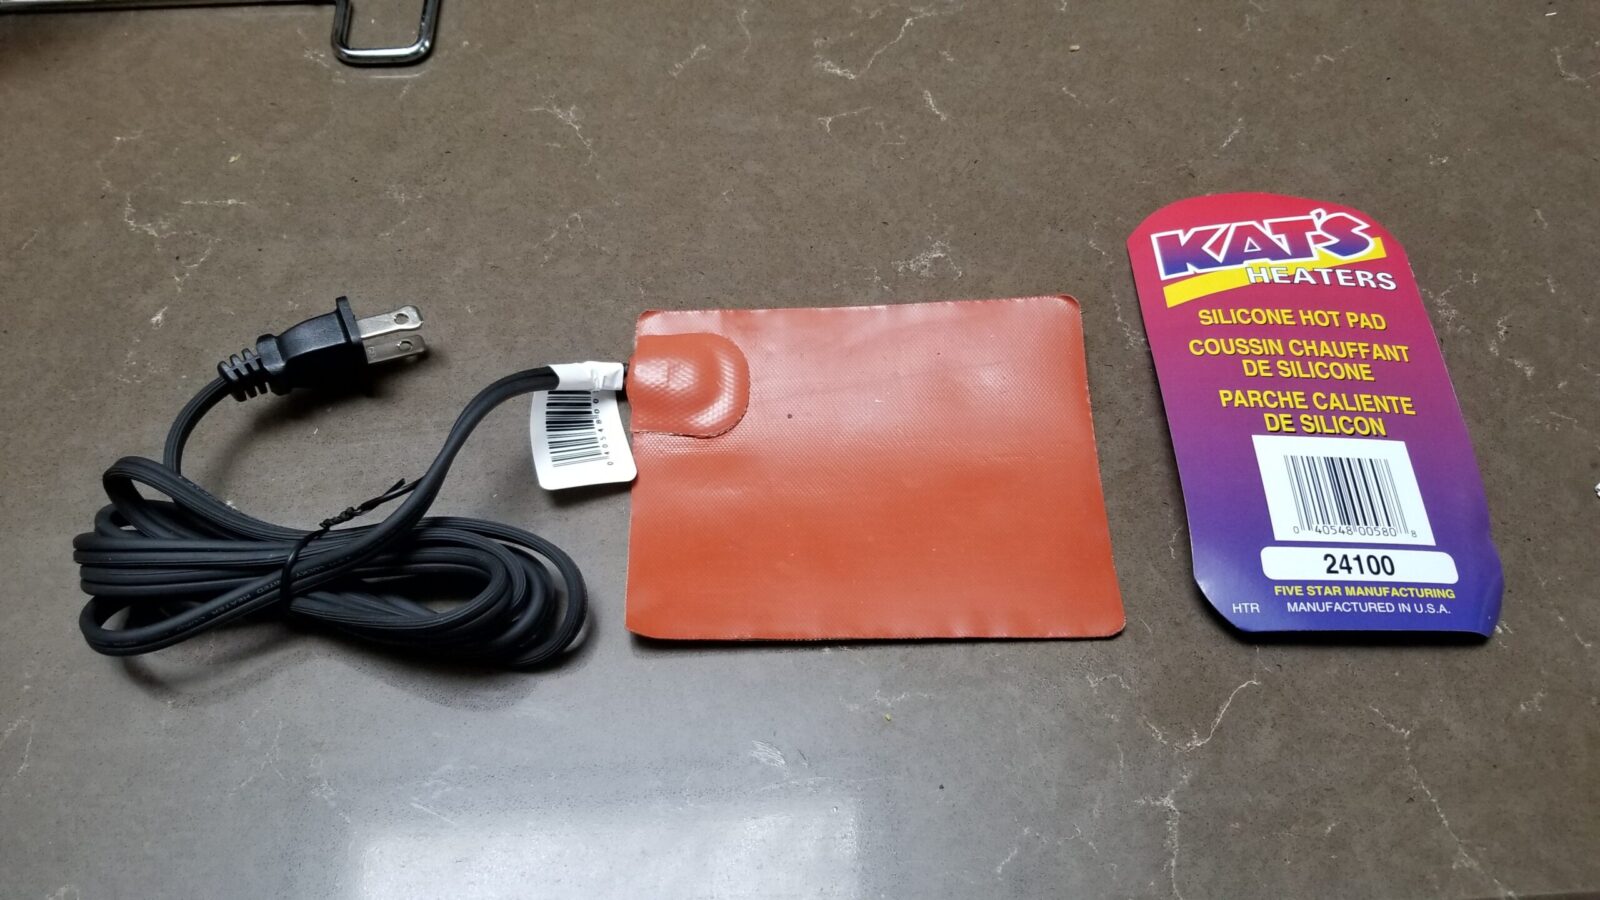
This is the Kat’s 24100 4×5 heater that I have at the bottom of my compressor to keep the condensate from freezing.
In terms of heating my compressor’s pump, I just run mine non-stop in the Winter but if you’d really rather only run them when it is at or below freezing, there are thermal power plug adapters that only turn on when it is that cold. Note, at 25 watts they do not heat fast. If your pump is real cold it could take it a while to get up to an acceptable temperature. That’s one reason why I just let them run and I can turn the compressor off independent of the heaters.
Along with the little 1×5 units, I use one larger 4×5 Kat’s 24100 pad at the bottom of my compressor to allow me to drain the condensate that would otherwise freeze. I do not run that non-stop as it is 100 watts. It’s on a thermally switched outlet that turns on at 35F and off at 45F. Yeah, it may run more than I need it to but I haven’t invested in a better controller yet for that part. I will list the digital controller I plan on getting some day so you can decide.
Installing is about as easy as it can get. The Kat’s units have a self-adhesive back and must be installed before you plug them in or you will ruin them. Clean the surface of oil and dust, peel the cover off the adhesive, stock the heater on and wait the prescribed time then plug it in and it warms up. Note, I have only used them on steel surfaces. They get hot and I would not be inclined to install them on plastic for example.
Kat’s products are made by Five Star Manufacturing and they have a ton of different products for different applications. Click here for their website.
Note: There aren’t as many Kat’s brand heating pads around now but there are a lot of different brands and sizes on Amazon – click here to see them.https://amzn.to/3J1Hpzn
The setup works great. No more tripping breakers due to thick oil caused by cold weather. I hope it helps you out.
If you find this post useful, please share the link on Facebook, with your friends, etc. Your support is much appreciated and if you have any feedback, please email me at in**@*********ps.com. Please note that for links to other websites, I may be paid via an affiliate program such as Avantlink, Impact, Amazon and eBay.
I live in a rural area and wind up doing a lot of my own repairs. About 2-3 years ago I invested in a 60 gallon Ingersoll Rand (IR) 2340L5-V air compressor which is their entry-level “Value Line” of industrial compressors. In hindsight, had I known more about “value” meaning “we made it cheaper”, I would not have made the purchase. Yes, it’s held up way better than my consumer air compressors but a buddy’s big Quincy compressor rocks and that is another story.
At any rate, I use a ton of compressed air for pressurizing my casting tanks and running all kinds of air tools. One of the reasons I went with the 2340L5-V was that I kept burning out the little 30 gallon consumer compressors. Failure is a big deal for me because when a compressor goes down in my shop, almost all work stops.
At any rate, I knew something was going on with my compressor before it stopped running completely. At the end of the air fill cycle that brings the tank back up to pressure, the switch would shut off but then there wasn’t any bleed down to relieve the pressure on the pump. This meant that the compressor may or may not restart without tripping the 30A breaker and it got worse with time. After this got really annoying, I decided it was time to fix it.
I did some reading and it turned out there were two likely culprits – either the check valve was leaking air back or the pressure switch was failing. I had problems with the check valve on other compressors so I jumped to conclusions and replaced that first. It didn’t fix the problem. Argh.
This is the 23474653-R pressure switch. It is just the switch and does not include the gauge, blow off valve or bleed off line (unloader) that you see.
So that left the pressure switch and this is where things just went sideways and I got frustrated. In searching online and calling the parts department, IR’s own parts department sold me the wrong switch and I was down for almost a week. So you don’t go nuts, you must make sure people know if you have the 2340L5 or the 2340L5-V because their pressure switches are different. You can make the better switch from the 2340L5 work but it will take a bit of re-plumbing the lines to do so. I may actually try that some day.
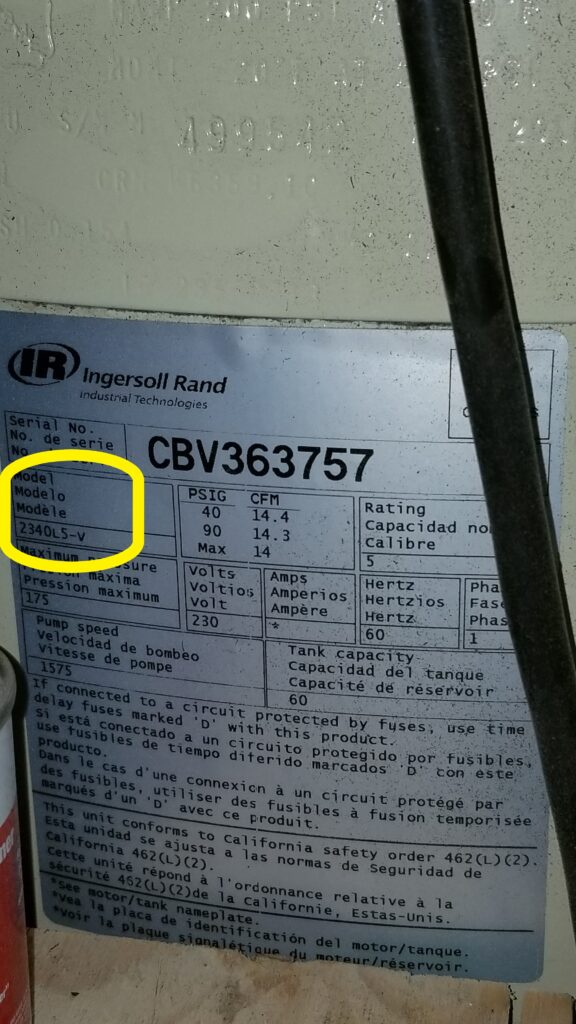
Next comment, do not go with the model number on the pump housing itself. The model number you need is printed on the big silver decal on the tank – not on the pump. The pump will say “2340” but that is not your specific model.
Right there outlined in yellow is the model number you must go by. 2340L5-V in my case.
For whatever reason, IR parts sold me the wrong part even though I asked the fellow to confirm it was right. So, frustrated and with my compressor down, more discussions were held and web searches done and the correct part for the 2340L5-V’s pressure switch is a 23474653-R. Interestingly enough, Tractor and Supply Company (TSC) is an IR dealer and the local store had one of these switches on the retail shelf. This gives you an idea that they are viewed as a wear item if a retailer is going to tie up the money and shelf space to stock one. It was $79.99 and they only had one so I called and confirmed with the clerk that they had one before I drove over. I’ve had way too many situations where a website said “X” was in inventory and when I went to the store, it was not so I try and confirm now. Thankfully, I drove to the store and picked it up.
I removed the cover already but this is what comes in the box. You will need to move your gauge, blow off valve, bleed down line, rear pipe plug and electrical lines over from the old switch to the new one.
Comments On The Swap
So, when it comes to the repair, it’s a fairly easy swap. I took a few photos from different angles to make sure I didn’t forget anything plus I labeled anything that might get turned around. Gone are the days when I try to keep it all in my head. Between my age and interruptions, I find it way too easy to forget things.
Two real important safety comments. Fully drain the compressor – in other words let all of the air out and open the floor drain. Why open the floor drain? Because it’s your double check that it is empty.
Second, please make sure the power is cut. I use a heavy stove/appliance cord going to a wall outlet. I both cut the breaker and unplug the cord. Why do both? It’s your double-check. If you are in a multiperson environment, follow lock out procedures.
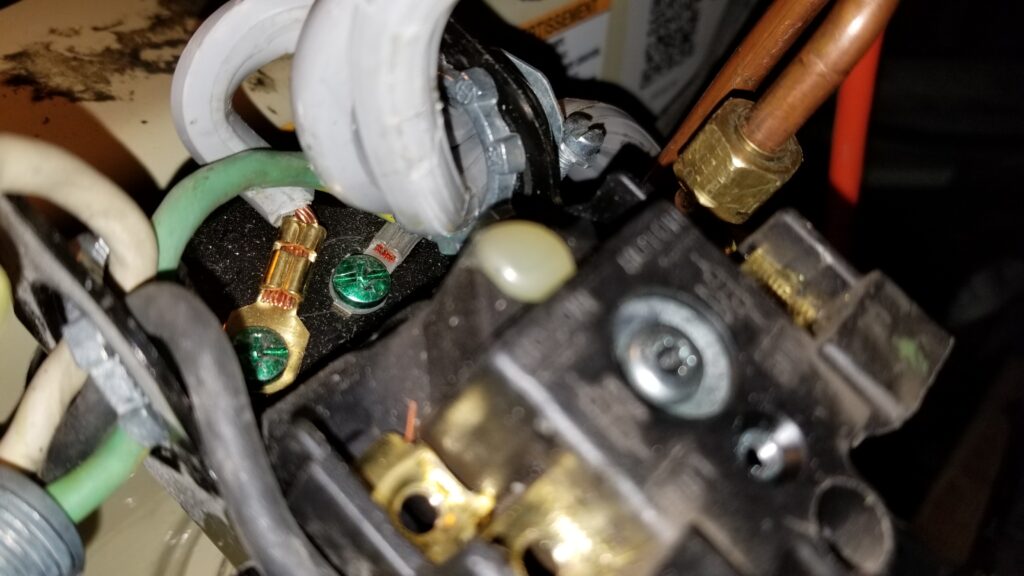
Note the top two poles are the hot legs coming from the wall. Folks when you go to remove the blead-off / unloader line, it is held on by a compression nut fitting. Let me give you a piece of hard won advice – use a flare nut wrench if you can to support as many sides of the nut as you can or worst case use a proper fitting box end wrench. Don’t ever use an adjustable wrench or you will likely round the corners off the nut as the jaws of the wrench give. Now IT does give you a new nut and that is plain 1/4″ copper tube if you screw up bad but you can re-use that whole piece if you are careful with removal and re-installation.Okay so the top two terminals are the hot legs from the wall. The middle set of terminals are the hot legs going to motor. Down on the bottom you have the neutral from the extension cord and the green/neutral going to the motor. These are thick wires in a tight space so be careful working things into position.Here’s an odd little thing I encountered. The pipe plug that goes in one unused position of the switch is actually 10mm. Why? I have no idea. The 10mm fit best so I ran with it. Everything else was SAE. For example, the housing itself that you see just above the wrench uses a 3/4″ wrench.Use pipe thread tape on all fittings and properly support the pipes and what not so the right things you care about are moving in the right direction. For example, I used a pipe wrench on this nipple to keep it from turning while I both removed the old pressure switch and installed a new one.Lesson learned, stay organized. That is a small magnetic tray. I cleaned all fittings and installed new pipe thread tape before reinstalling them.
Bottom line is that I installed the new pressure switch and the compressor proper bled off the pressure from the pump after cycling. In talking to IR parts they mentioned to me that this is the most common reason for the bleed down not to happen in my series of compressor – not the check valve. I believe that now. The pressure switch seems cheep and really strikes me as a consumable part now. Lesson learned.
By the way, I found out during the actual swap that IR printed the part number on the inside of the switch cover. Why hidden inside? If they had it on the outside, then this would have all been way simpler.
Also, next time my compressor stops unloading, I am going to order one of these switches vs. waiting for failure and having to scramble. It’s my fault for putting it off but I had a ton of other things going on and eventually it bit me.
I hope this helps you out as well. Bottom line, if you have a 2340L5-V then the correct pressure switch you need to order is the 23474653-R. That way you can avoid the drama I ran into.
One last shot of the right pressure switch box with the part number on the top right 🙂
If you find this post useful, please share the link on Facebook, with your friends, etc. Your support is much appreciated and if you have any feedback, please email me at in**@*********ps.com. Please note that for links to other websites, I may be paid via an affiliate program such as Avantlink, Impact, Amazon and eBay.
Here are switch listings on eBay. Be careful that it is a real IR part or a quality replacement vs. an inferior knock off that will not hold up.
The one thing I notice about getting older is that I don’t have the strength to go lugging around as much as I used to not to mention I don’t have a ton of patience either. This issue affects me when it comes to portable compressors.
Because of Ronin’s Grips, I have a big stationary 60 gallon Ingersoll Rand compressor. To work on cars, I run 50-100 feet of 3/8″ air hose to where I am working and life is great, For years I had a portable two gallon compressor that required AC that I sold because it weighed quite a bit and needed an electrical cord.
Last Spring, I started hearing about various tool companies making cordless air compressors that could be used to run nailers, staplers or even inflate tires. That idea definitely caught my attention.
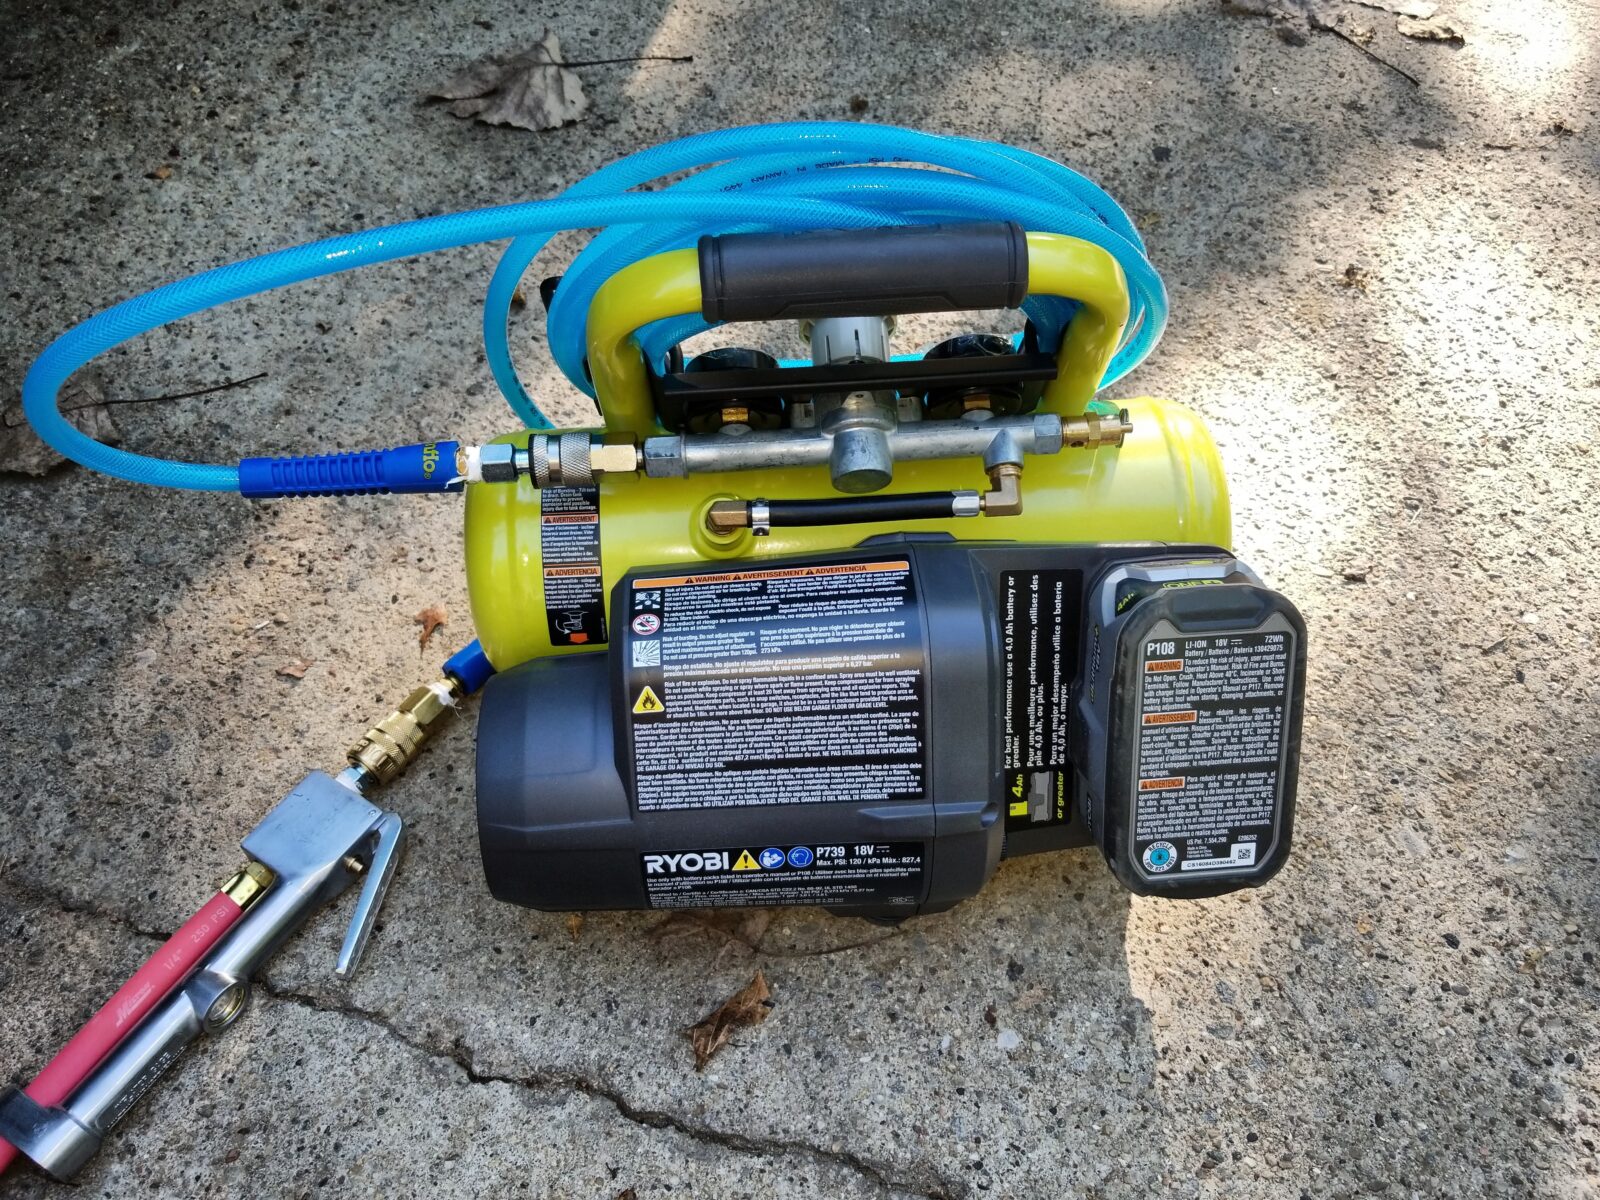
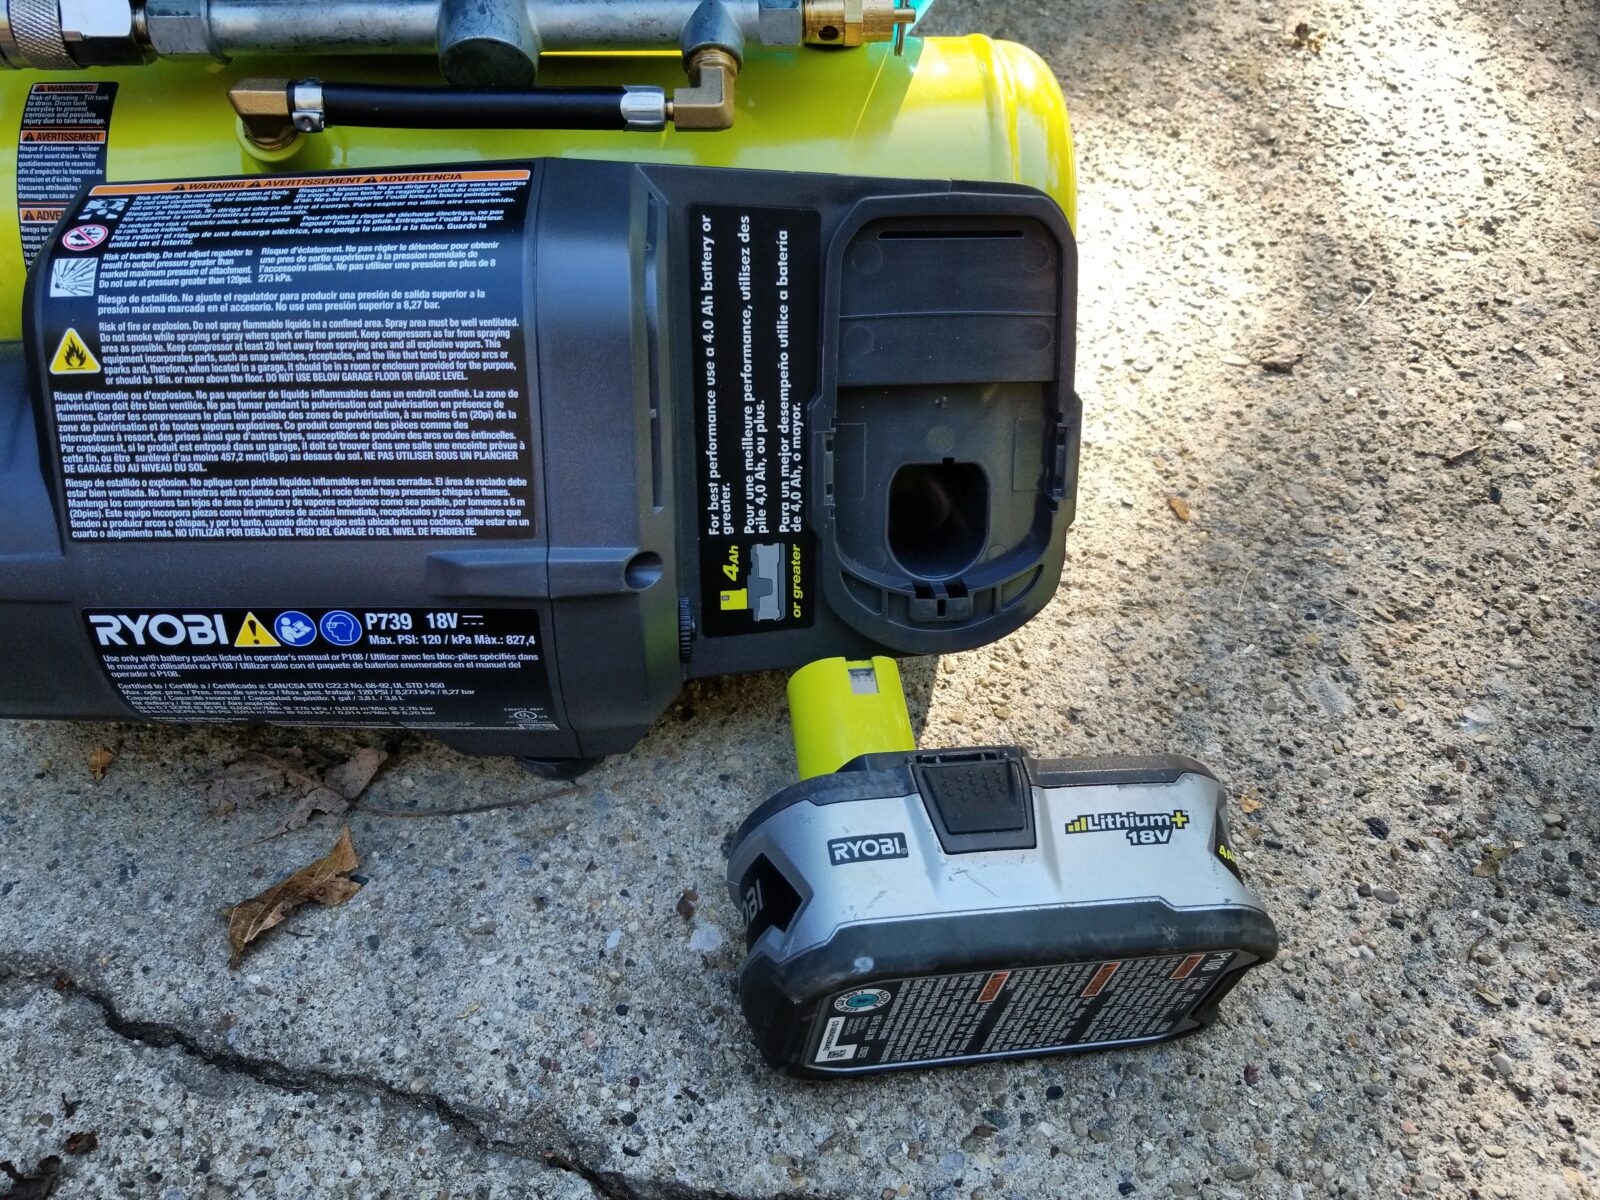
I then read about the Ryobi P739 1 gallon air compressor that uses their common 18 volt batteries. I have a ton of Ryobi tools and batteries so I bought one from www.homedepot.com with home delivery. Note, I specifically bought the model above – there are other previous models but I can’t speak to them. Also, the website will frequently sell different bundles (the unit with a charger and at least one battery) that you will probably not see in a store so at least check the website before you buy.
First off, this is not an inflator that puts out tiny amounts of air. This has a 1 gallon tank that is pressurized to 120 PSI and has an adjustable regulator.
This little compressor is meant for tools that have low air requirements or inflation as it does not put out a ton of air – 0.75 standard cubic feet per minute (SCFM) at 40 PSI or 0.5 SCFM at 90 PSI. Note, I am just going to write SCFM for the compressor because Ryobi says the above is a SCFM rating. CFM is different and click here if you want a pretty good explanation.
Once the tank is pressurized, you’ll have enough air to run a brad nailer, finish nailer or stapler. The question becomes how many nails can you drive before the compressor will need to kick on and refill the tank. The answer unfortunately is “it depends” because of the requirements of the tool. It will never put out enough air for tools that require a lot of air like ratchets, impact hammers, sanders, spray painters, etc. Don’t even consider it for those tools that say they require over 2 CFM. The Ryobi simply was not designed for those use cases and never claimed to be.
This little compressor will probably be great for 10-20 finish nails/staples and then need to run its compressor. If you try to use the tool too fast when it is trying to recharge the tank, odds are you will draw more air than the tool can deliver and the pressure will continue to drop. Remember – the compressor itself is small. When the tank pressure drops and the compressor kicks on, it will need time to recover.
You’ll notice I didn’t mention a framing nailer or even a roofing nailer. Odds are the compressor can do a few of those but it would never keep up. Portable job site compressors for nailers can deliver 3-5 SCFM @ 90PSI and keep up with even several nailers running. If you plan on some quick fix with just a few nails then sure, this would work.
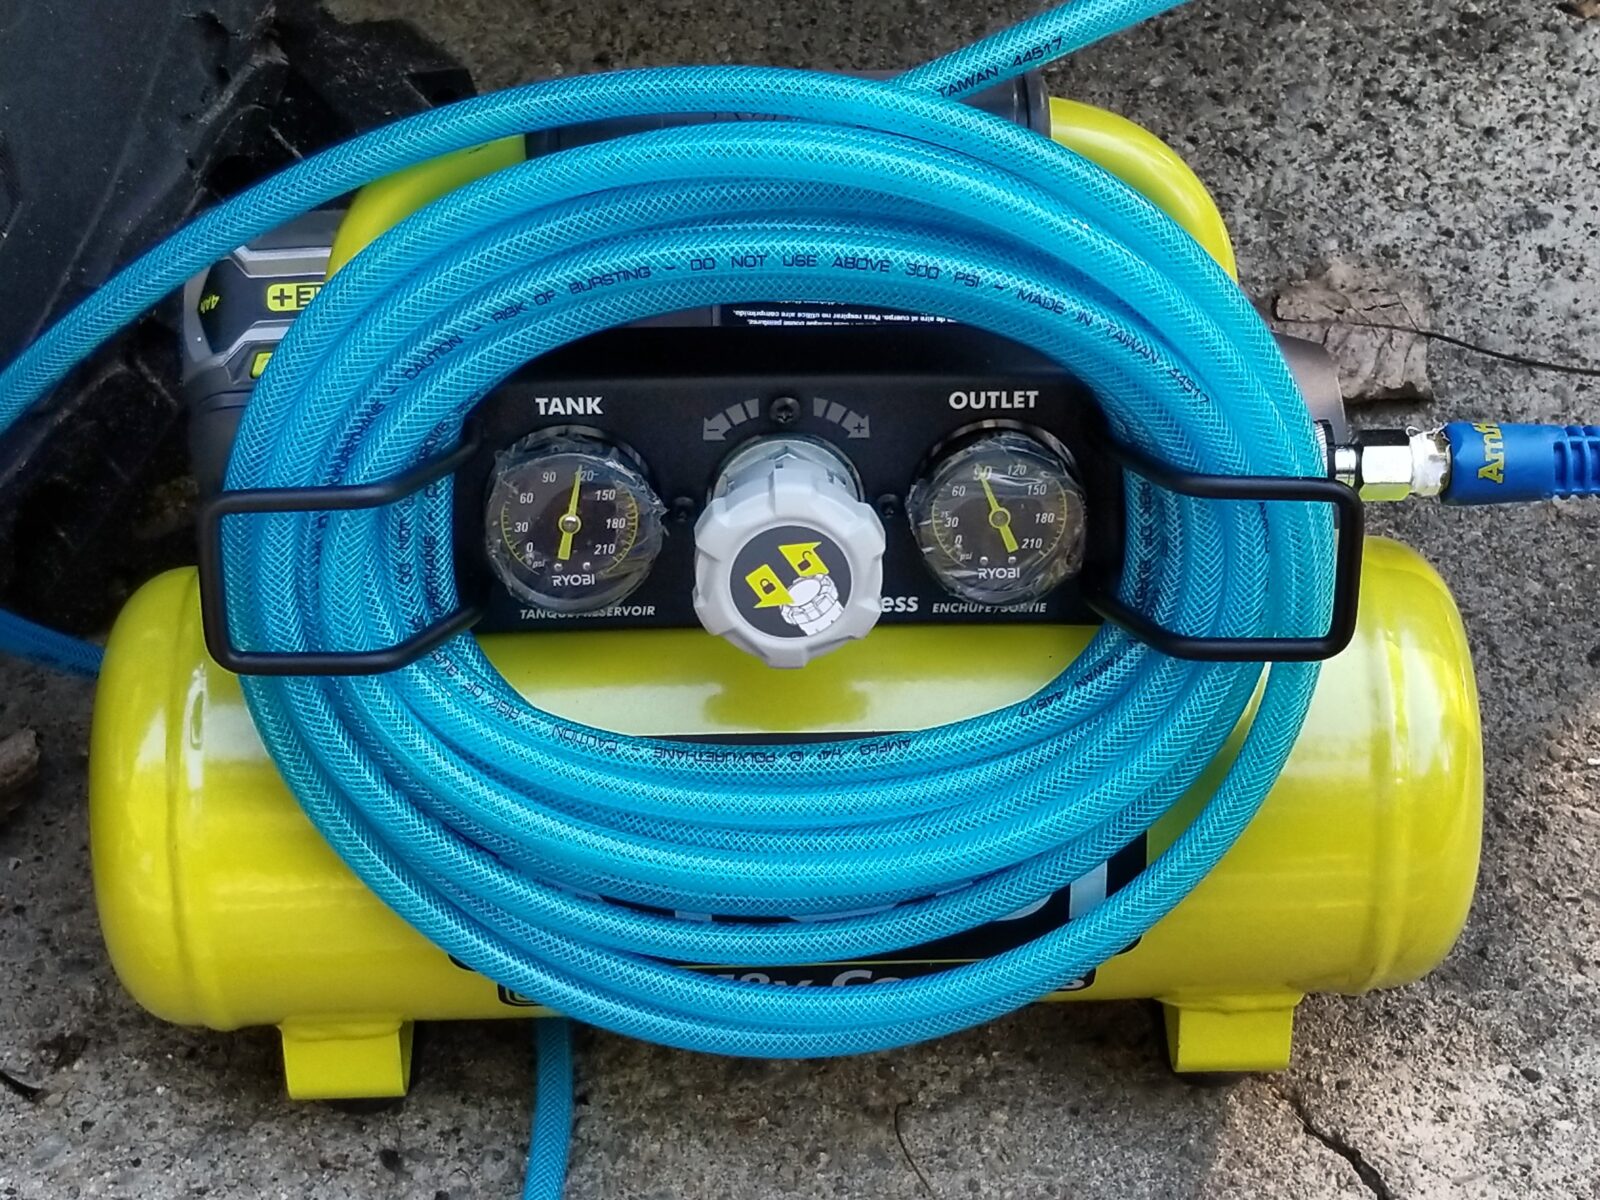
What this little Ryobi brings to the table is portability. It is only about 14 pounds before you add the battery and tools. I use one of the big 4 amp hour Lithium Ion batteries on it and then keep a 25 foot Amflo line on it with Milton 1/4″ quick connect fittings.
I like the Amflo line as it is made from polyurethane and remains flexible even in cold weather plus it doesn’t leave scuff marks everywhere. The old rubber and PVC air hoses are big, bulky and really get stiff. The challenge is keeping all the Amflo hose on the unit when moving it around. Velcro really helps. I started with an oddball strap that I had laying around. It helped but I needed two more to really secure it and used a cool double sided “Velcro” tape that is out now.
I use a hook and loop tape that rocks. The brand name you know is “Velcro” but you will hear people generically refer to it as hook and loop. At any rate, this stuff has the hook one one side and the loop on the other – you cut off the roll whatever length you need and it is simply fantastic for managing cables, or in this case, keeping that Amflo hose on the holder. I use three pieces – on the two sides and one at the top – because most of the time I am using just a short section for topping off tires.
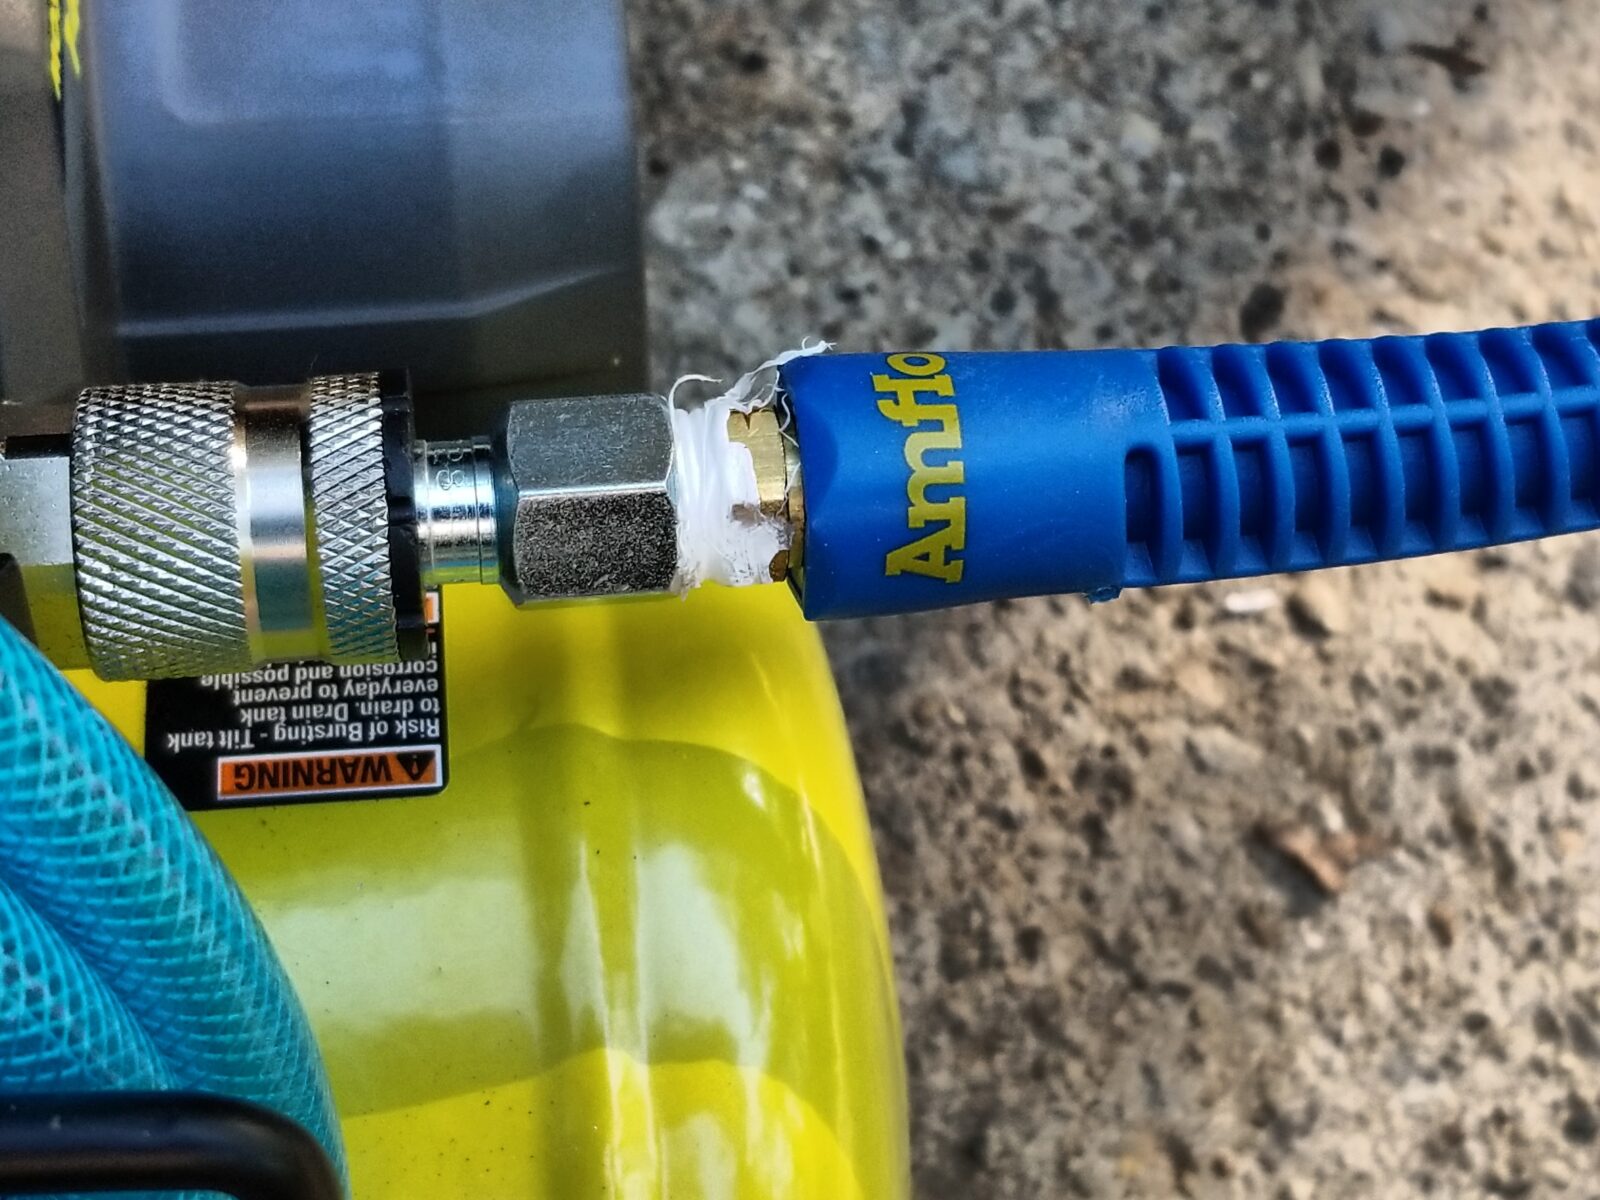
As mentioned in the past, I just use Milton fittings now. Harbor Freight, Home Depot and other discount brands have let me down one too many times including excessive air leaks with wear and even breaking.
One last small tip, use good Teflon tape. The stuff I am using right now is off Amazon and is way thicker than the cheapo stuff you often see.
I have a 16ga NuMax finish nailer and an 18ga Wen finish nailer that work just fine with this plus a Surebonder T-50 Stapler. I have others but these are the ones that I have used with the Ryobi and am happy. Again, I am not doing high volumes – more like small projects, repairs, etc.
It Rocks For Topping Off Tires
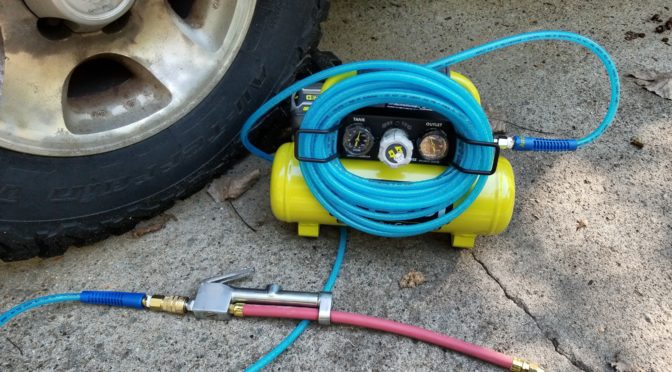
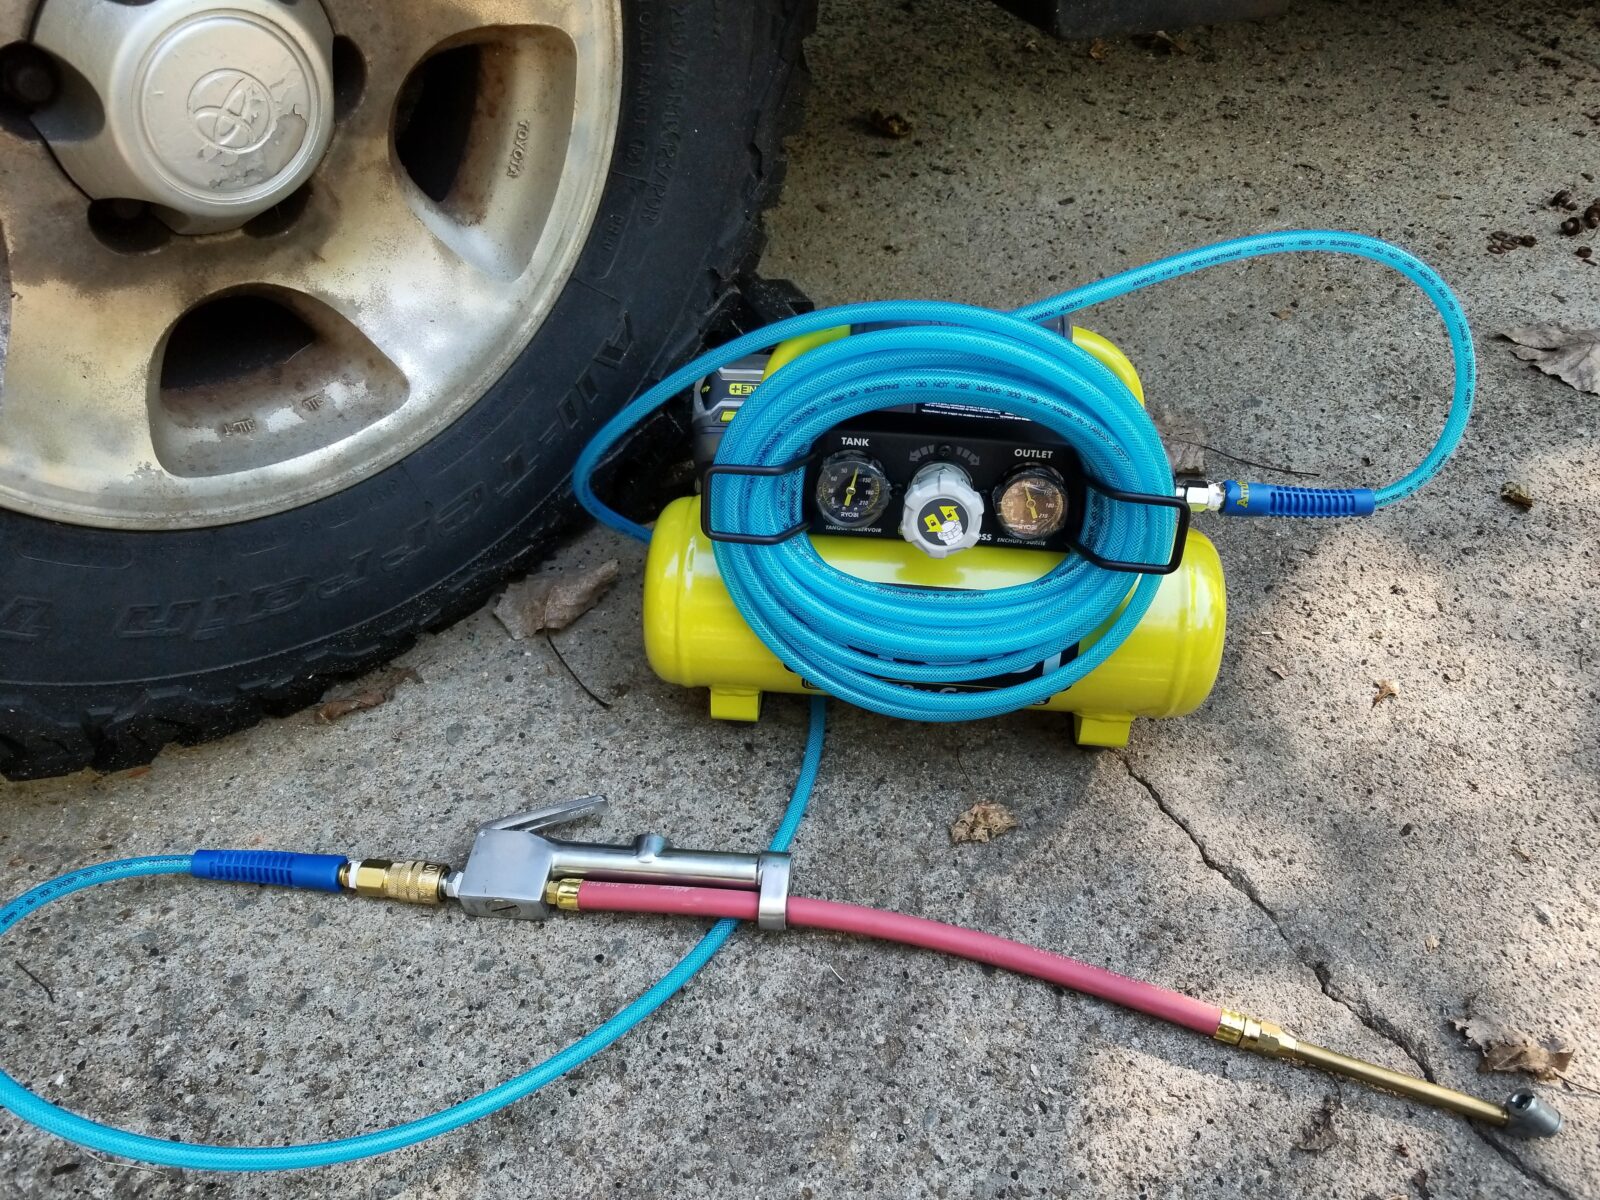
What I use the Ryobi for the most is to top off car and truck tires. It really makes this chore easy. Sure my big compressor is faster but to go around and add up to 5-10 PSI to a tire is easy with this. To give you an idea of size, the next photo shows the unit next to one of my Landcruiser’s good sized 275/70R16 tires.
I used to lug around a portable five gallon tank but it weighs a ton, is cumbersome and I might need to refill it several times before I get done. If I didn’t do that, I would have to pull the car around by my shop, hook up a line to reach it and then fill the tire – that can also be a headache unless the line is already hooked up.
What you see above is a Milton S-506 tire inflator that I keep on it. I have another in the garage that is beat to death but still working. It is so very, very handy to have the inflator and pressure gauge in one unit plus chuck heads at two angles for bikes, tractors, trailers, etc.
To give you an idea, I recently had to add about 2-4 PSI on each tire of my daughter’s 2002 Camry to get them up to 40 PSI. The regulator was set at 90 PSI and it had a freshly charged battery,
Part way into the first tire the compressor turned on and continued running as I did all four tires on the car. The battery’s LED charge indicator dropped one bar out of four. The compressor turned off maybe two minutes after I topped off the last tire.
In summary, I’ve been using this compressor for over two months mainly for topping off tires and that really puts some stress on the little unit. It seems to be holding up just fine. It gets lugged around my shop, the drive way in the trunks of cars and no problems. I can easily go out and check all our vehicle tires and top them off where they sit .
If you use Ryobi 18 volt tools, have the batteries and are in the market for a light duty portable compressor for the uses I outlined above, I’d recommend this one. If you use another brand of 18-20 volt tool, I bet your vendor is making a portable compressor as well that you might want to research.
5/21/2019 Update: This thing has been awesome. I use it at least once a week to top off tires and has been great. I’ve also used it a few times to run staplers and a finish nailer. I really like it. It definitely uses quite a bit of power so if you plan on using it a fair amount, I’d recommend at least 4.0Ah, or even better the new 9.0Ah, batteries you will be using the unit extensively. I always have several batteries with me too.
1/31/20 Update: Still going strong. I can’t begin to guess how many times I have used this to fill tires and no real problems so far. The one tip I would tell you is to not leave a battery in the unit. The battery slowly drains for some reason – it always has and I am not sure why since it has a mechanical on/off rocker switch. It’s not a big deal – I just unplug the battery after each use and then the battery lasts far longer. This little compressor is so handy that I have no qualms recommending it.
If you find this post useful, please share the link on Facebook, with your friends, etc. Your support is much appreciated and if you have any feedback, please email me at in**@*********ps.com. Please note that for links to other websites, I may be paid via an affiliate program such as Avantlink, Impact, Amazon and eBay.
I tell you what it is really hard to get by without a compressor but it can also be but it can also be a real headache if the circuit breaker regularly, or even unpredictably, trips when the compressor tries to top off the tank. There a couple of really easy modifications we can do to the compressor but before that, let’s step through a couple of things first just in case there is another issue at hand:
Safety Stuff
I actually spent more time trying to think about the what-ifs than actually writing the two options to make your compressor start softer but I do want you to approach this safely. I am assuming you are handy with a basic understanding of electrical wiring and compressed air to do this work.
First, you should be using a properly sized circuit or at least one that is very close. If your compressor needs far more than what your circuit is sized for, say 30 amps and you only have a 15 amp circuit, then the fix I am going to tell you may not help. It does often help when you have a circuit that is very close to the required amps but when there is a heavy draw, it exceeds the circuits capacity so the breaker trips. My experience is that consumer air compressors list a low draw number like 15 amps and can draw more than that under peak load. So, for example, if you have a 15 amp circuit and a compressor that says it needs 15 amps – you may be having some challenges that this modification might help with.
In terms of properly sizing a circuit, engineers and others can give you rules of thumb such as doubling the circuit capacity to allow for spikes in demand or to allow 6 amps per 1 HP for 1 phase or 1.25 amps per HP for 3 phase. Doing this means running new wire and installing new breakers. DO NOT JUST PUT IN A BIGGER BREAKER! The breaker is protecting the wiring from over heating and catching fire. Each thickness, or gauge, of wire has a limit to the number of amps it can carry. Never put a higher capacity breaker on a smaller cable – you are asking for trouble in the worst way.
Second, plug the compressor directly into the wall. An extension cord will likely introduce too much resistance and cause the breaker to trip so do not use an extension cord (assuming your compressor is not an air nailer or air brush model – they draw so little that they can use extension cords).
Third, I have only encountered this a few times over the years but breakers can wear out over time. If you investigate and it seems that you should have enough capacity and can’t figure out why your breaker is tripping, then try installing a new breaker and see if that helps. Again, install the right size and don’t put the wiring at risk of fire. If in doubt, bring in an electrician to straighten things out.
Fourth, if you look at your outlets and/or wiring and they look burned, there is any trace of soot or a burned smell stop and get an electrician to inspect the line. It may sound funny but I have seen lines fail over the years for a ton of unexpected reasons.
Now, on to making a compressor softer starting
IMPORTANT SAFETY ANNOUNCEMENT – BE SURE YOUR SYSTEM IS FULLY DRAINED AND THE COMPRESSOR IS UNPLUGGED (ENSURING THERE IS NO WAY IT CAN TURN ON) BEFORE YOU DO ANY WORK. The pressures involved can hurt you and we do not want that.
Make sure the unit is unplugged also just to be safe.
So, with those things said, let’s say you need to make your compressor work better with the circuit you have for whatever reason, let’s talk about what some folks call a “soft start” modification. It’s called this because it makes it easier for the pump and compressor to start and come up to speed before a heavy load is introduced.
The way a compressor works is that a motor has to turn the pump and send air through a filler tube into the main tank. Between that little tube and the tank is a check valve that screws in right at the top of the tank that keeps air from rushing backwards. Now when the compressor fills the tank each time, the switch controller opens a bleed off valve to empty the air in the filler tube to make it easier for the compressor to start next time. The problem is that the volume of air in that tube is relatively small and when your compressor starts, it can only turn a few times before the tube is full and then the motor must work much harder and thus draw more amps to overcome the check valve to put air in the tank. Depending on the amps required, this can then trip the breaker.
Look at this next photo. See how short and small that left tube is? The pump can only turn a few times before that left tube is pressurized – it never has a chance to build up speed and momentum in the flywheel. As a result when the pressure of the tank is reached it puts a lot of strain on the motor.
Note, the second smaller tube, which is often a flexible plastic, provides pressure to the cut off switch that automatically turns the motor off when the tank reaches a specified pressure. We are interested in the larger tube that runs from the head (top) of the compressor pump down to the top of the tank. It is usually much larger than the pressure switch tube.
The fix is simple – increase the air capacity between the pump and the tank! You want the motor to be able to start and the heavy flywheel build up momentum before it encounters the pressure behind the check valve.
Option one: Simply make a longer tube so there is more potential volume to fill
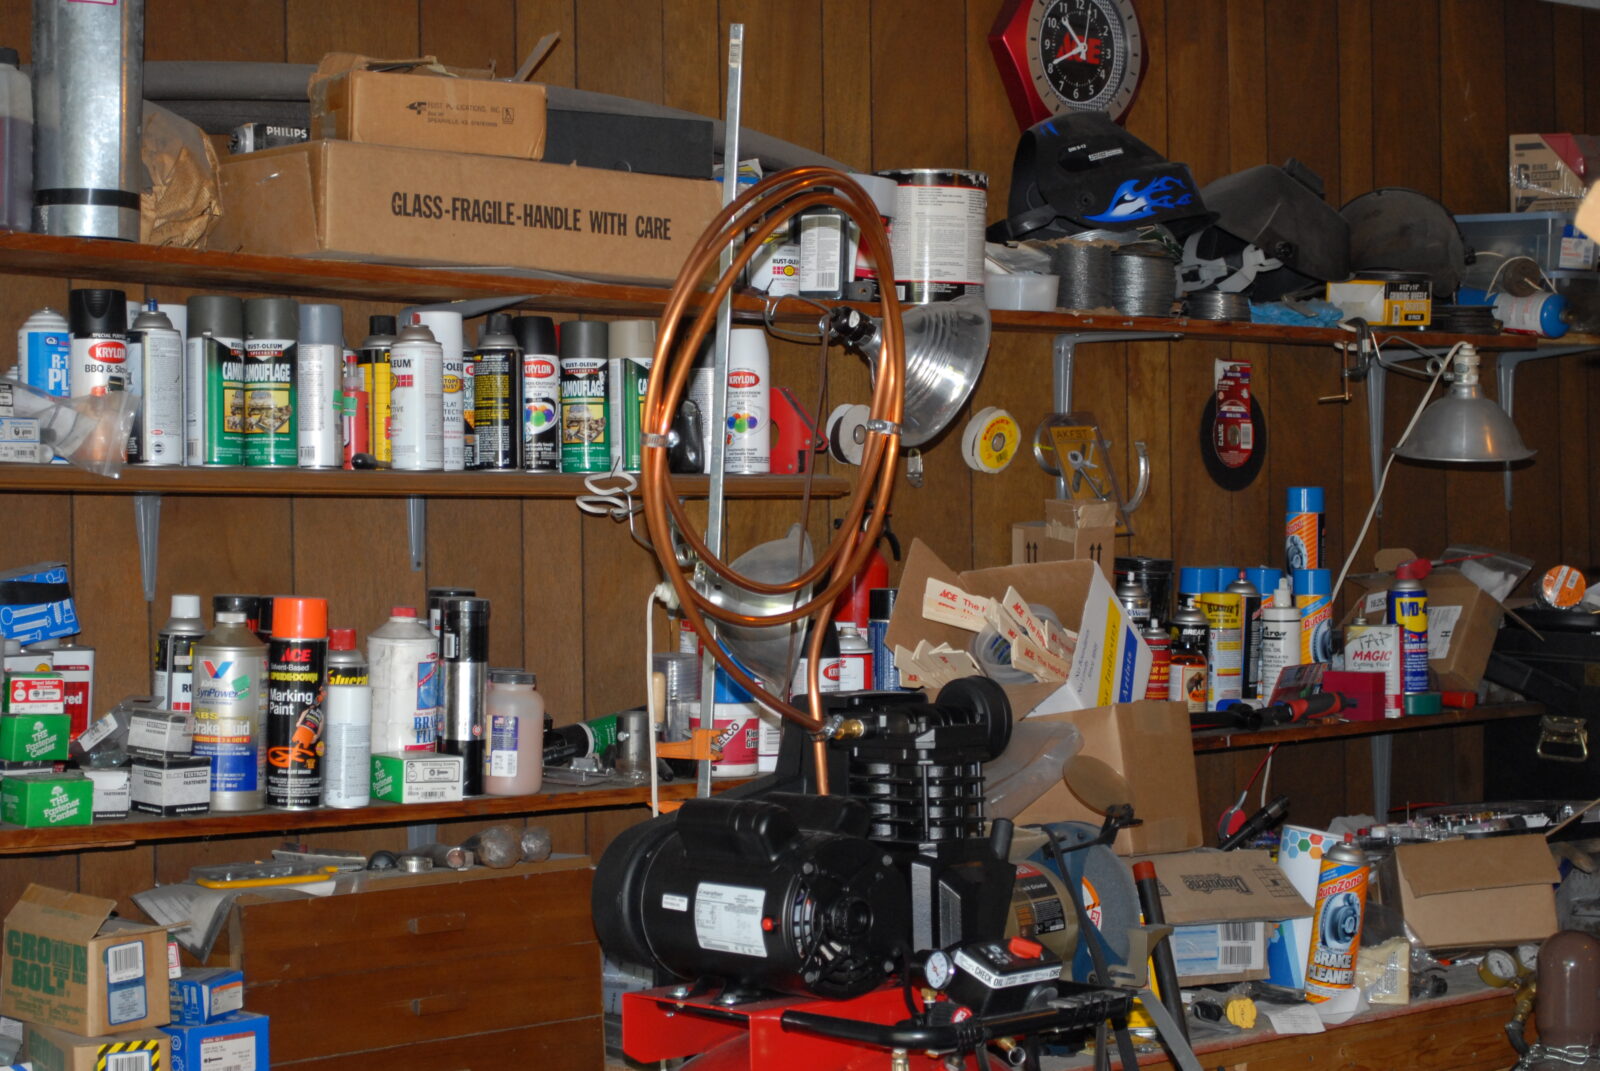
There are two options to make this softer starting. One is to just add a long length of copper tubing in between the compressor and the tank. You roll it into a coil and it kind of looks like a moonshine still and it does the job. The con is that it looks really funky. I did this with one of my early compressors and the photo below shows about 8 to 10 foot of tubing installed. I would replace whatever the original tubing was with the same size so you would do the same. You need to replace the compression fittings also and you can do the job in about 30 minutes. Note that I used hose clamps to keep the coils from rattling. Ugly as heck but it worked until I finally wore out the pump. I checked the date on my photos and I ran this setup from 2010 to 2014 – it does hold up.
Option two: Add a reservoir to really increase the volume
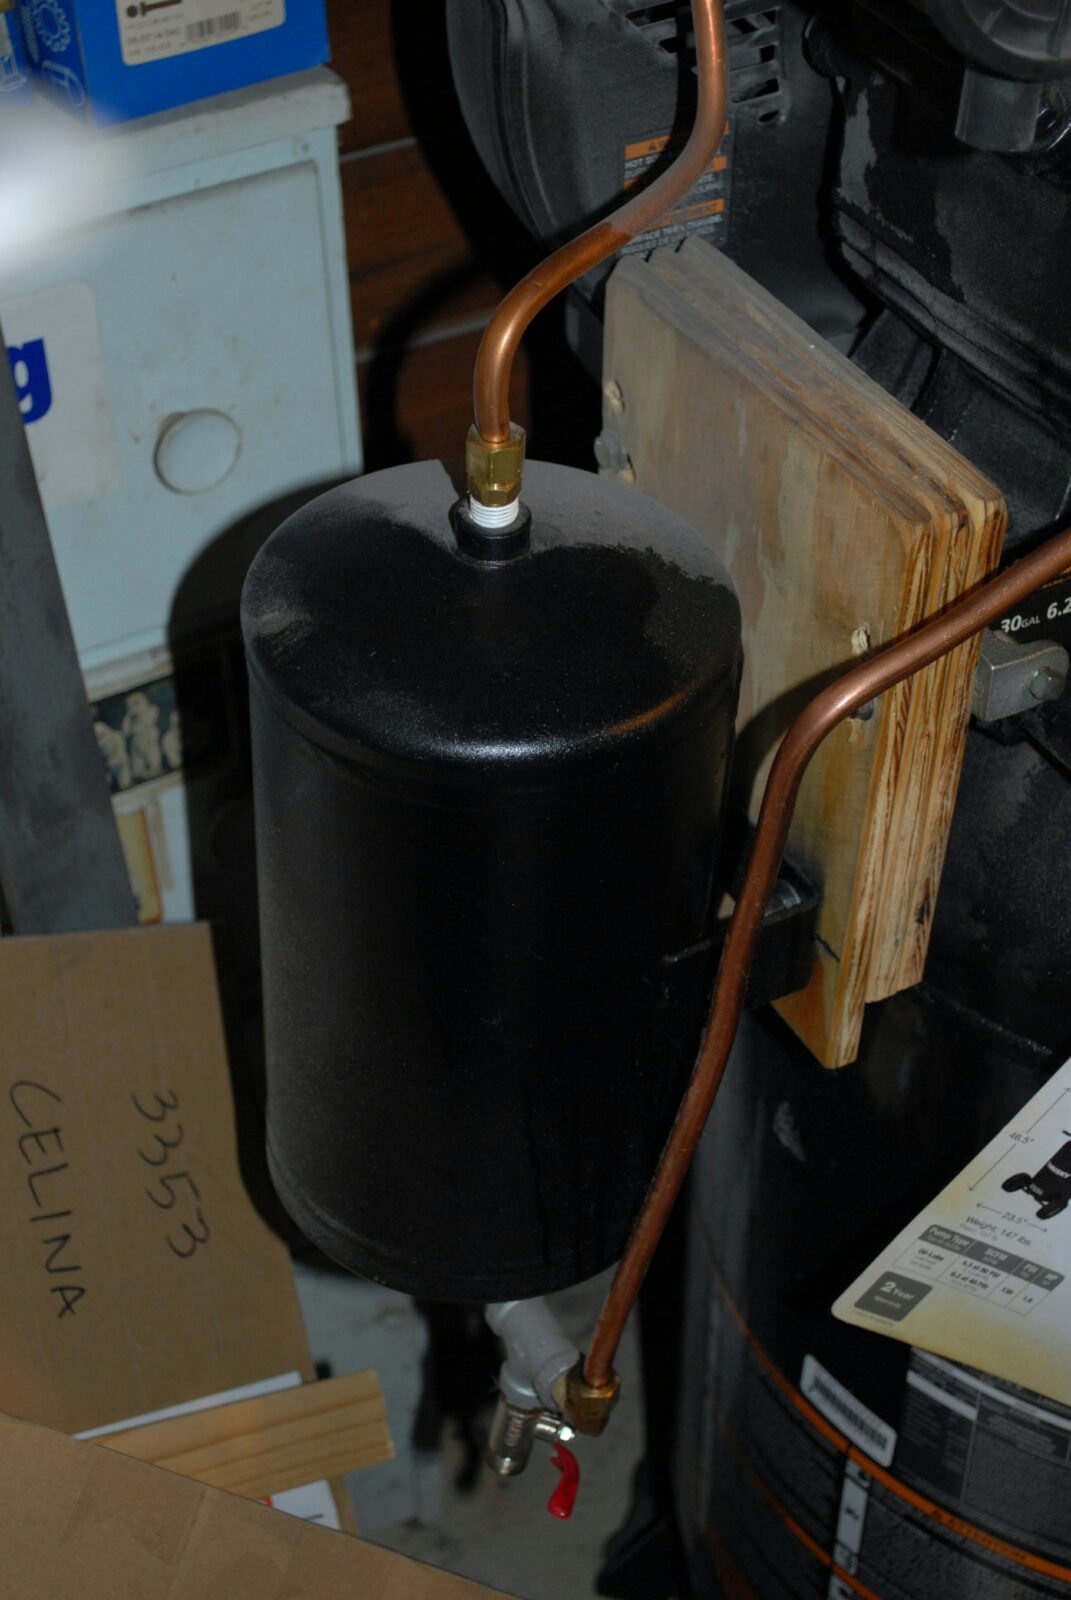
The second approach is a little bit more elaborate and involves putting a 1/2 to 1 gallon small air tank between the compressor and the tank. This allows the pump and motor to come up to speed before they must overcome the check valve. This works great. The only slightly annoying thing you will notice is that once the pressure is reached and the compressor cuts off, the pressure relief valve opens and the air runs out longer because there is more air in the line.
A couple of quick design considerations:
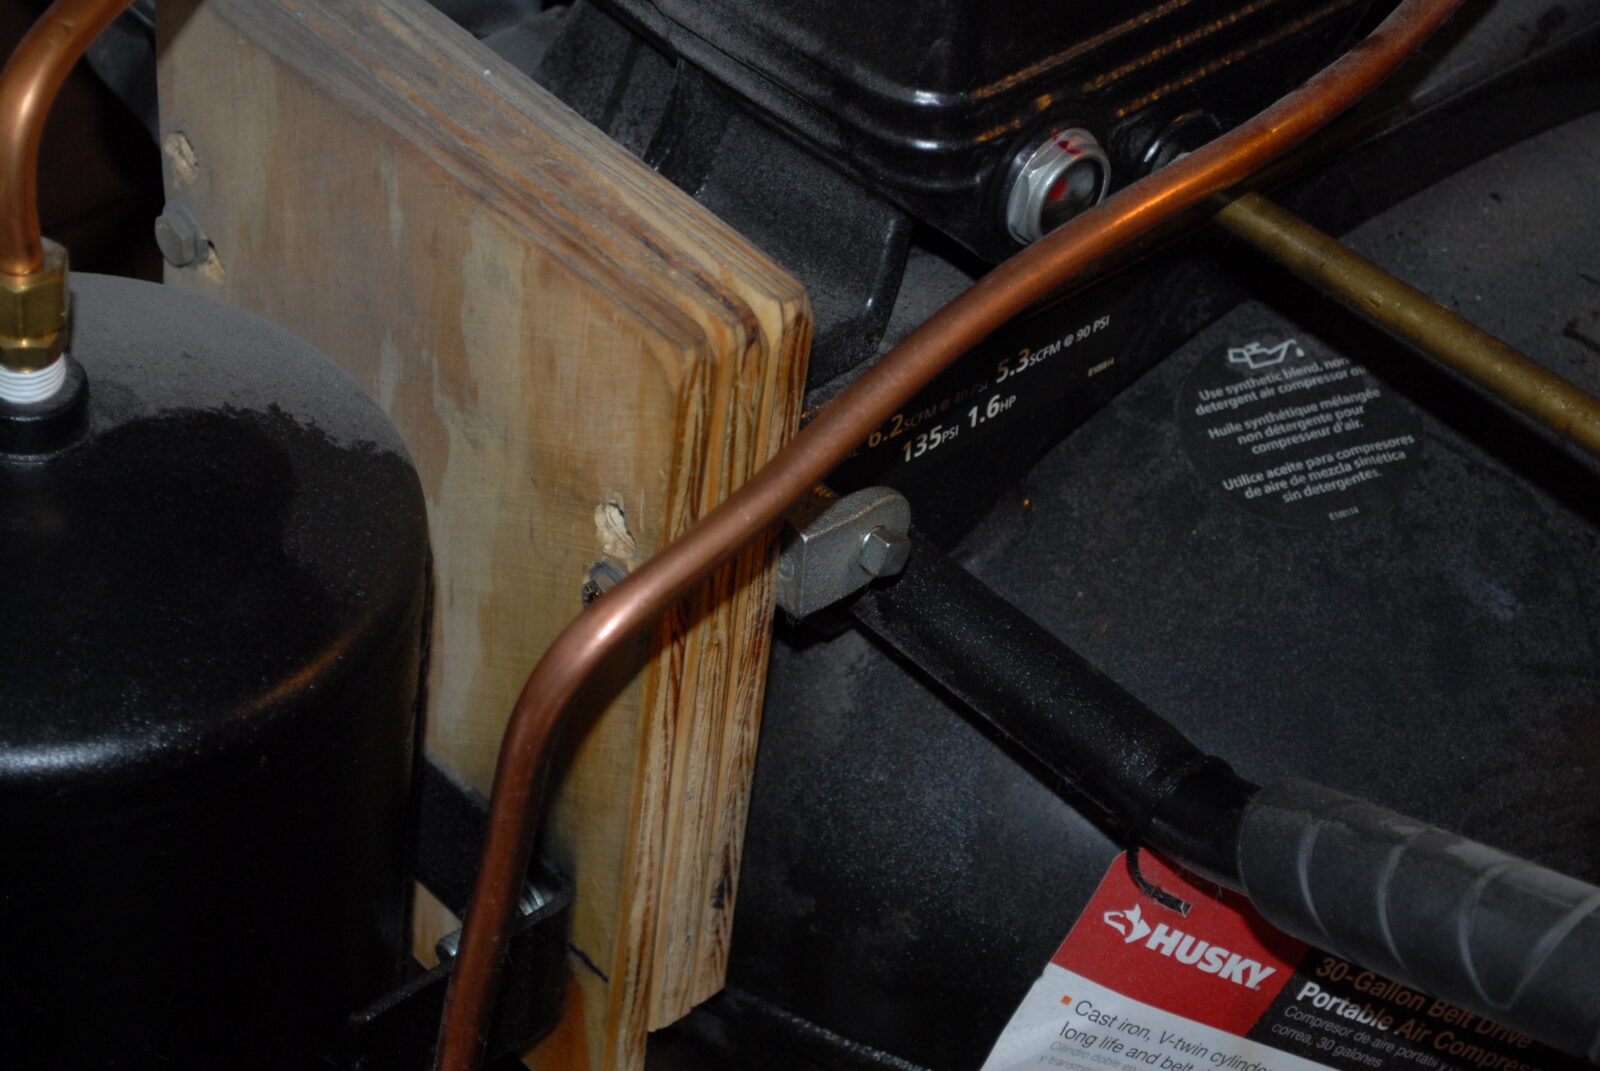
I carefully bent the aluminum using a tubing bender and tried to avoid abrupt turns.
The small tank you see is a Firestone 9125 1 gallon 150 PSI tank. The compressor filled the main tank to 135 PSI so the tank needed at least that rating to be safe. Be sure your tank is at least rated as high as your compressor.
Factor in the length of tank and if you will have enough room. The one pictured is 12″ long.
The tubing should be at least the same diameter as the original and the tank’s fittings should be adequately sized. This is a fairly small compressor in the photo.
I secured the tank to plywood and the plywood to the original compressor using the screw hanger fittings you find with conduit. I wanted it to be relatively portable and I also wanted the wood to take up some of the vibration.
I installed a T-fitting at the bottom of the tank to drain off moisture and never really found any. I would recommend you still add it even if it just gives you an ability to bleed off air if something happens.
Use quality Teflon/PTFE tape on all of your fittings to prevent leaks
An optional recommendation I would urge you to do is to either use brake-line wrenches or at least quality fixed wrenches to avoid rounding over the fittings. It is easy for an adjustable wrench to slip and round over the edge of a fitting. You need to tighten things firmly so they do not leak or come loose.
I got by with the above for a number of years until I could afford to both get a bigger compressor and pay an electrician to run a 240 volt service into my shop. I don’t need it now but these two approaches got me by for almost six years before I bought my current Ingersoll Rand.
If you find this post useful, please share the link on Facebook, with your friends, etc. Your support is much appreciated and if you have any feedback, please email me at in**@*********ps.com. Please note that for links to other websites, I may be paid via an affiliate program such as Avantlink, Impact, Amazon and eBay.