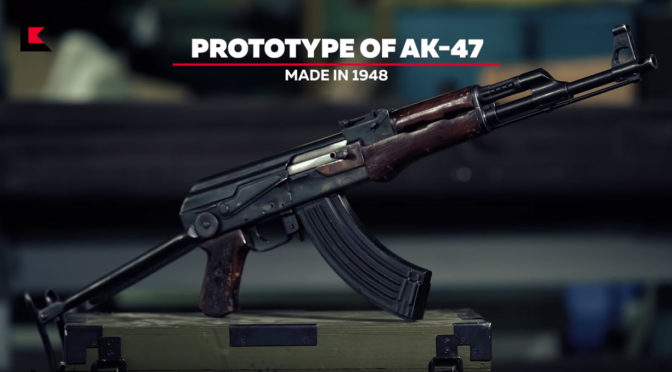
Tag Archives: AK-47

How to Install a Flat’s Lower Receiver Rails So They Align With The Front Trunnion

I heat treat the lower rails before I install them.  The best way I found to align the lower rails in a flat so they were both parallel with the upper rail and aligned with the trunnion was to use a drill bits of the proper size to locate the lower rail and I would then clamp the lower rail in place prior to spot welding.  This is one of those things where you want to check and double-check prior to and after each weld to make sure nothing shifted on you.

I use a Harbor Freight #45689 115 Volt spot welder with AK-Builder upper replacement tong and also tips.  It’s lasted me through quite a few builds over the years and is still going strong.  The tong makes it way easier to reach in and make the weld and the tips make the spot weld look a lot more like the real ones.  I have had to replace the tips once so far, just FYI.  You need to keep them clean to be most effective.

For beginners, there is no way to tell you how long to clamp and trigger the current for – many factors can affect how long it takes to heat the steel up enough for the two pieces of sheet metal to weld together.  You need to practice and you’ll notice the color, sound of the welder. the amount of time it takes to get a good weld and especially the feel of the clamps as they come together during the weld.  With practice you’ll feel when you have a good weld especially but it all adds up but you need to actually do it to learn.

Get scrap metal of about the same thickness to practice with.  AKM receivers are 1mm thick.  18 gauge is 1.02mm so it is good to practice with and old scrap receiver stubs are another.  With your first practice weld, go long and let the pieces really melt together so you can see.  You want to burn a hole to understand how long it takes, the sound and the feel of the tongs.  Then practice with less amounts of time until you find the sweet spot.  These welds should be pretty strong and not pull apart easy.  I do more spot welds than most and some guys look at photos of the rifle they are building and try to approximate the count and location, which is just fine.  One thing, if you do heat treat your rails before hand like I do, be careful you do not get the tongs up against the ejector and ruin the heat treat.  I’ve done it and the tell tale sign is that the ejector will be discolored from the heat.  If you do make this mistake you will need to heat treat the tip while it is in the receiver or else it will definitely peen over and be deformed in its softened state.  By the way, the steel should be relatively clean also and not have tons of grease or other contaminants on it either that might inhibit a good weld.

Just double check alignment very carefully before you spot weld and also that your welder’s tong does not get against the ejector and ruin the heat treat – assuming you did that before installation.

I hope this helps you out!


If you find this post useful, please share the link on Facebook, with your friends, etc. Your support is much appreciated and if you have any feedback, please email me at in**@*********ps.com. Please note that for links to other websites, I may be paid via an affiliate program such as Avantlink, Impact, Amazon and eBay.


Converting a Milled M70 Front End for a Sheet Metal Receiver Using Screws

Let me open this article with a comment for people new to building AKs – the best proven method is to use rivets.  The Soviets did a lot of testing and the best mechanical join of the forged trunnions to sheet metal was a mechanical rivet.  To this day, all commercial and military AKs are built using rivets.  In my journeys, I have built AKs using welds, screws and rivets – all have pros and cons.  What would I build an AK with that I care about?  The answer is easy – rivets.  This blog post documents my building a prototype using screws.  Has it held up to casual non-military non-full-auto use?  Yes.  What would I recommend to you to build your AK?  The answer is rivets.


In a previous post I described taking a milled stub and welding it to a sheet metal receiver.  Another approach is to drill, tape and use alloy screws.  So, let’s talk about that a bit.  I did this build back in 2010 also.  I actually still have the rifle and it’s one of my most reliable AKs.  It takes about any ammo I stuff in it and I don’t recall ever having any issues.

For those of you who are wondering why I didn’t do rivets – I was bored and wanted to try something different plus this is a range gun and not something mission critical.  Here we are 7 years later and it’s still doing fine – no cracks, no loose screws … but it isn’t stressed either.  When in doubt, do rivets or a milled gun.

Also, bear in mind that the front trunnion was made from the milled receiver stub so screws made it real easy.

In terms of this build, I milled the trunnion down the same as I did for the weld build.   I used my Hungarian AMD trunnion as an approximate guide for locating the holes and used two #10 screws for the front top and a 1/4″ for the rear.  In both cases, I opted for national fine.  10-32 and 1/4-28.  So, for 10-32, I used a #21 drill bit to make the hole  and for the 1/4-28, I used a #3.

For drill locating and drilling the receiver holes, I used the AK-Builder trunnion rivet locating jig.  You just put the trunnion on the jig, locate the hole, slide the receiver on and drill the hole.

Now for tapping, being square is a good idea.  I squared my table to the drill press’s chuck and used it to hold the tap.  I use Tap Magic cutting fluid to lubricate everything.

For the screws, I used alloy button heads and secured them with red thread locker.  I reached in with a Dremel and ground down protruding screws.

So there’s the front.  I used an air riveter to do the trigger guard.

End Result

Here’s a link to the AK-Builder Trunnion Hole Jig.


If you find this post useful, please share the link on Facebook, with your friends, etc. Your support is much appreciated and if you have any feedback, please email me at in**@*********ps.com. Please note that for links to other websites, I may be paid via an affiliate program such as Avantlink, Impact, Amazon and eBay.


Good animation of an AK-47 operating

I’ve seen other animations in the past that didn’t get into as much detail as this one.  In this video you get a pretty good demo of how the various parts work during the firing and automated loading of the AK-47 but they got the trigger wrong, etc.  This one shows the disconnector and trigger hook operating in the right manner for example.  I’m posting it because I think it always helps to understand what is going on inside a firearm for when you want to tune it, figure out what might be going wrong, and so forth.

Video: How to Field Strip an AK Rifle

To me, the AK family of rifles are some of the easiest designs on the planet to field strip … but I have done it hundreds of times.  For a newcomer, how to take the rifle apart can be daunting.  I took a few minutes and assembled some of my favorite videos and online resources / manuals to help clarify matters:

AK manuals that are online:

YouTube Videos:

Now Brownell’s did some videos on Youtube also but they split them into separate parts:

Part 1 – Disassembly:

Part 4 – Reassembly


We will have a future post about cleaning and maintenance so keep an eye out for it.

Video: Tales of the Gun – AK-47, The Kalashnikov, FULL EPISODE

In case you missed the original Tales of the Gun episode on the AK-47 when it aired in 2010, here it is. This is a very well done episode that goes into the history of the design and how it served in battle.   Fans of the Kalashnikov will definitely want to watch this.

By the way, what I like about this particular Youtube video is that the quality is pretty good and it is the whole episode vs. being chopped up.

AK Fire Control Plates Greatly Simplify Installation and Removal of the Trigger and Hammer Pins

A lot of guys, myself included, have run into retaining wires for the trigger and hammer pins in an AK and had a heck of a time removing or installing them depending on the design.  I can’t tell you how many I have had challenges with over the years for one reason or another.  I decimated the stock Zastava wire in my M77 the other day but I can explain that one – I now rather despise the wires and just pull them out with pliers with no plan of reusing them.  Thus, I bent the heck out of the wire just yanking it out.

There is a solution to the retaining wire problem – or at least, my problem with retaining wires.  About two years ago, I stopped using wires altogether and moved to the use of “plates” which are pieces of spring steel or sheet metal that simply go nose first onto the hammer, you then rotate the plate down and it engages the trigger pin and then finally the hole portion winds up aligned with the safety/selector lever hole.  What this does is the plate locks up the two pins and then the selector lever locks the plate in place.  They are incredibly simple to install and remove if you are doing work with the fire control group.

In terms of plates, there are basically two styles you will find.  One originated with RSA and I have used these for a few years now. I only have had one problem – during installation one part of the hammer pin portion snapped right off.  I called RSA and they promptly replace the plate.  Kudos to them for good customer service.

A relatively newer style is from Tapco but I haven’t used it yet myself though I do have one on order for my Vepr 12 to try out. It does the same thing but has a small tab.  I have big fingers and am wondering if this will make installation and removal any easier and let me point out that the RSA is a breeze to install and remove.


Best AK Reference Book – AK-47: The Grim Reaper 2nd Edition

Folks ask me what is the best reference book to learn more about AK rifles and the variations that are made all over the world. The Grim Reaper Second Edition book by Frank Iannamico is, hands down, my number one recommendation and I say that based on owning somewhere over a dozen books on the AK rifle.

The first version of the book was very good and with the second he improved the guidance and increased the number of photos.  In it, he provides:

  • Development of assault rifles
  • Production facilities in the USSR/Russia
  • The Russian AK-47 – Production, Type 1, Type 2, AKM and AKS
  • The Russian AK-74 – including the base AK-74, AKS-74, AK-74N, AK-74M, AKS-74U
  • The AK-100 series and AN-4
  • Related Russian AK designs including the RPK
  • AKs produced in Warsaw Pact and other countires – the coverage by country is something I find very valuable
  • AKs in America
  • Accessories including magazines, bayonets, optics and more 

This is definitely a book you will want to add to your library.  I literally keep it on the right side of my desk for quick access when I need to look something up. 

The bad news is that the price of these books always go up. The first edition did and the second has as well. As of 2/19/2024, the second edition is going for around $364 in new condition and the first edition is going for around $330. Why? Simple – supply and demand. With both books they produced a limited number and then everyone wants a copy because they are that good.

There are some good alternatives but they do not have the sheer breadth and depth of coverage that the Iannamico books do:

There are plenty of other books including user manuals, technical manuals, buyer guides and how-to building books that I’m not listing. The above is really to give you historical information to better appreciate the design.


If you find this post useful, please share the link on Facebook, with your friends, etc. Your support is much appreciated and if you have any feedback, please email me at in**@*********ps.com. Please note that for links to other websites, I may be paid via an affiliate program such as Avantlink, Impact, Amazon and eBay.