A few guys who read my blog post about assembling my SWAG press brake asked about my helmet. It’s an Antra AH6-260-0000 Solar Power Auto Darkening Welding Helmet that I bought in October 2014 according to my records. My old helmet died and would no longer automatically switch on and off so I did some digging. These days I pay a lot of attention to reviews on Amazon and this helmet got great reviews.
At this time, October 3, 2017, the helmet has an amazing 761 reviews with a score of 4.5 out of 5 stars. That score speaks volumes right there. I’m very happy with mine and have never had a problem – I use it with my Millermatic 211 MIG. It’s sensitive enough and switches very fast – I don’t see any flash at all plus it turns off fast which is a plus when I am doing lots of small quick welds on sheet metal.
The viewing port is good sized at 3.86 x 1.73″ and the shade can vary from 4/5-9 and 9-13. On the low end it could work with plasma if you really wanted it to and the upper end of the scale makes it suitable for TIG and MIG welding certainly.
I’d also tell you that it is very comfortable. It’s fairly light and the headgear does its job plus has a generous sized sweat band.
Now there are two real important things for me with a helmet and this has both – it must have a solar cell and battery backup plus the lens must change fast. The reaction time is a very important safety matter that a lot of guys do not realize. If a helmet changes slowly then damage to the eye due to arc flash accumulates. The Antra is rated to change in 1/25,000th of a second. That is pretty darned fast and like I said, I have never seen a flash. I trigger my MIG, the arc starts and bang – the lens is dark.
My last comment is that you can get spare parts for it too. A lot of helmets do not have anything and you are more or less buying a disposable unit at that point.
So, if you are looking for a welding helmet, I sure recommend this one after using it for three years with my MIG.
By the way, to protect it, I bought a Raider BCS-88 helmet bag as my shop is dusty. I still store it in my welding cabinet but it stays a lot cleaner now.
If you find this post useful, please share the link on Facebook, with your friends, etc. Your support is much appreciated and if you have any feedback, please email me at in**@*********ps.com. Please note that for links to other websites, we are only paid if there is an affiliate program such as Avantlink, Impact, Amazon and eBay and only if you purchase something. If you’d like to directly contribute towards our continued reporting, please visit our funding page.
My shop press is actually rated for 30 tons but I have used a 20 ton bottle for a safety margin. Until recently, my preference has been a hand pumped 20 ton bottle on my press. The reason for this is that when pressing barrels, pins, etc. I like to “feel” how much pressure I am applying. Years back, I bought a 20 ton air over hydraulic bottle from Harbor Freight as guys told me it was faster. What this means is that an air-operated mechanism pumps a piston and extends the bottle. For a variety of reasons, it sat by the press and never got installed – mainly I did not have an airline there and I didn’t really have the need – as my grips business increased, free time to build AKs decreased.
At any rate, with the new SWAG shop press, I didn’t want to stand around pumping the bottle so I ran an airline and installed the bottle.
Installing it was a breeze (not including running the air line). I just screwed in the head of the ram of the old bottle enough to pull it out. I then slid in the new bottle and adjusted the screw head until it was nice and snug. Done. I’m using regular 3/8″ air line with 1/4″ Milton quick connect fittings and it seems to have plenty of air.
Boy is the end result nice — I can use the air system to run the ram down to where I want to then take over by hand and feel what is going on. What a time saver.
One annoying issue I had to overcome was the pressure relief valve. The bottle still has one of the little “+” shaped valves that you have to slide the handle onto. SWAG makes a replacement handle you can slide onto the shaft and reinstall the pin but my budget was spent and then some. Instead. I found some tubing in my shop and made a little “T” handle and cut a relief into one end with my band saw for the pin to slide into. It’s way more convenient than using the long pump lever arm.
So the that’s it for the bottle. The next post will talk about the lower bending die and the series is done.
If you find this post useful, please share the link on Facebook, with your friends, etc. Your support is much appreciated and if you have any feedback, please email me at in**@*********ps.com. Please note that for links to other websites, we are only paid if there is an affiliate program such as Avantlink, Impact, Amazon and eBay and only if you purchase something. If you’d like to directly contribute towards our continued reporting, please visit our funding page.
I’ve used presses for many years and have watched them bend stuff and or even shoot stuff across a room. One of the scariest sounds I used to hear was the “BANG” when an AK barrel pin would finally let go and come out. My point is that with a press, you are working with tons of pressure — literally. If you have a 20 ton press, that means you could apply somewhere around 40,000 tons of pressure.
Presses are pretty simple really – you have a frame made of steel with an adjustable shelf and a hydraulic bottle jack. As you pump the jack, the ram assembly is pushed/pressed down and applies pressure on whatever you have underneath. The shelf is open in the middle and arbor plates, or some metal plates are used in the middle to hold the work when pressure is applied.
The problem is that many of the press plates supplied with presses are not up to the task. I bent the plates that came with with my press — they were basically two pieces of thick U channel mystery metal that couldn’t handle the load. Now some guys have reported their cast iron press plates shattering under load and causing injury.
A few days later a couple of heavy Priority Mail boxes arrived with one plate in each.
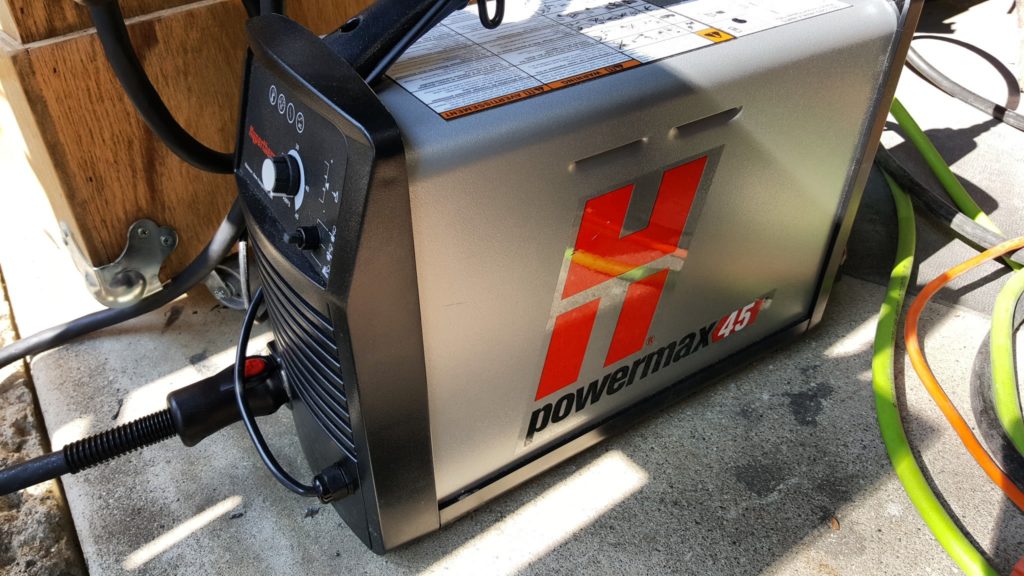
I looked at the plates and did some thinking – I planned the cut it such that my most likely used opening would be available. I then used my PowerMax 45 plasma cutter to cut the plate. The 1.5″ thick piece was way past the unit’s limit. I went real slow from one side, turned it over and then did the other. I then did some grinding to clean it up.
Here’s the SWAG brake sitting on the plates.
Nothing is permanently attached. The press and the plates can be pulled out if I need to do any work that requires a different configuration.
The following two plates are smaller but you can get them off Amazon:
6/2/2019 Update: These plates are awesome. I have put some tremendous pressure on them when pressing parts using a 20 ton air over hydraulic bottle hack and they have not given at all. They are well worth it.
If you find this post useful, please share the link on Facebook, with your friends, etc. Your support is much appreciated and if you have any feedback, please email me at in**@*********ps.com. Please note that for links to other websites, we are only paid if there is an affiliate program such as Avantlink, Impact, Amazon and eBay and only if you purchase something. If you’d like to directly contribute towards our continued reporting, please visit our funding page.
I occasionally run into situations where I need to bend thick sheet metal or even bar stock to make brackets. I needed to make a new battery box for my plow and decided it was time to get a press brake. I did some digging around decided to get one from SWAG Off Road – their “20 TON Press Brake Heavy Duty” model that you can buy built or as a kit. They made the tablesaw system that holds my Milwaukee Portaband and that is a really sweet set up. At any rate, the maximum width it can bend is 19.25″ with a 110 degree radius bend.
Now, what really caught my eye were the dimensions of mild steel stock this press brake could bend:
19″ wide if 3/16″ or thinner
15″ in 1/4″
13″ in 5/16″
11″ in 3/8″
6″ in 1/2″
3″ in 5/8″
Most of the stock I bend is 3/8″ or less so this was right in line with what I wanted.
The brake is designed to work with two different 20 ton Harbor Freight press models – the 32879 and 606043. My press is a 30 ton IIT H-frame so I had to make sure the total width of the brake was going to work – 22.125″ – and it did with room to spare. Note that while my press frame is 30 ton, I run a 20 ton bottle jack on it so I matched the press brake to my the actual press capacity I I run.
So, armed with that, I bought the kit for $224.95 shipped off Amazon and it showed up about a week later coming in several heavy USPS Priority mail packages.
The kit was very well packed and the instructions were very straight forward. I actually had a fun time assembling it. All you need is a welder, grinder, and a square (in my case, I used a 1-2-3 block for most of the squaring).
Their instructions were very straight forward. I am going to follow their steps in my write up and also add commentary.
I laid everything out and made sure I had all of the the parts before I started and I did.
Step 1 Weld in the Guide Rods and Ears
I hammered the rods part way into the bottom plate and made sure they were square. The fit is tight on purpose so you need a good sized hammer and a solid surface. You don’t hammer them in all the way as you are going to weld from the bottom. Be sure to tack weld the rods first and double check they are square one more time before you do the final weld. I used a 1-2-3 block to true my bars up. You do want to make sure they are fairly square as the brake’s blade assembly needs to be able to rid up and down them.
Next, they talk about tacking the “ears” back on that you can use to secure the brake in your press. These are the little tabs that go into the notches on the front of the lower assembly. Now save yourself some time and make sure the dimensions will work for you. I went through the whole building process and found out the tabs stopped my brake from going back far enough in the press to align with the ram and I had to cut them off. Knowing SWAG, I bet the brake lines up like a charm on the two Harbor Freight press models they mention so this is because I am using a very different press (It is something like 20+ years old now too :-). If the ears do work for you, you may need to file some excess metal off. One of my ears had just a bit of waste metal left after cutting that filed right off in just a few seconds. You can see the fit is great. As with the other stuff, fit it in place, tack weld and then do the final weld when ready. By the way, tack weld first to avoid the metal warping from the heat and moving out of the position you need – this is true for the whole kit.
In case you are wondering, I am using a Miller 211 MIG with gas. It works great for me. It has a far better weld and duty cycle than the Harbor Freight model I started with years go.
To protect my eyes, I use a very well regarded Antra AH6-260-0000 Solar Power Auto Darkening Welding Helmet that works great for me.
Step 2 – Weld the Vertical Guide Tubes
Next carefully position the guide tubes on the brake’s blade. I used a Harbor Freight steel welding table and a number of magnetic clamps to get everything in position and secure before I then tack welded, tested the fit and then did the final welds. Note, the blade edge of the die is facing up and the guides are aligned to what will be the top of the die. I am a bit obsessive with welding. I had the heat cranked up on the welder and did two heavy passes. My welding will never get me any awards – even I admit I am a grinder 🙂 I forgot to get a picture of the welds at this step but you’ll see them later.
Step 3 – Welding the Bottom Die
The first step is to weld the two carriage bolts into place that will hold the guide later. You *must* do them now as you will not have access to them once the angle iron is welded in place. I simply turned the heat down on the Miller, put the wing nuts on the bolts to hold them in place and did a few quick welds.
Now the next part is to weld the angle iron in place. In their instructions, SWAG said I might need to grind the bottom of the angle iron to get it to sit evenly in the channel. That did not seem to be a problem with my parts. To align the angle iron in the channel, I sprayed non-stick on the upper die and then installed it on the lower die and checked alignment. This seemed to work really well – the weight and position of the blade lined the angle iron up perfectly (a month later an I am still happy with it). I then tack welded the angle iron base in place on the lower die and then welded it in place doing a section at a time on opposing sides. I welded a closing X – starting with the corners and then moving inward a few inches at a time to avoid warping.
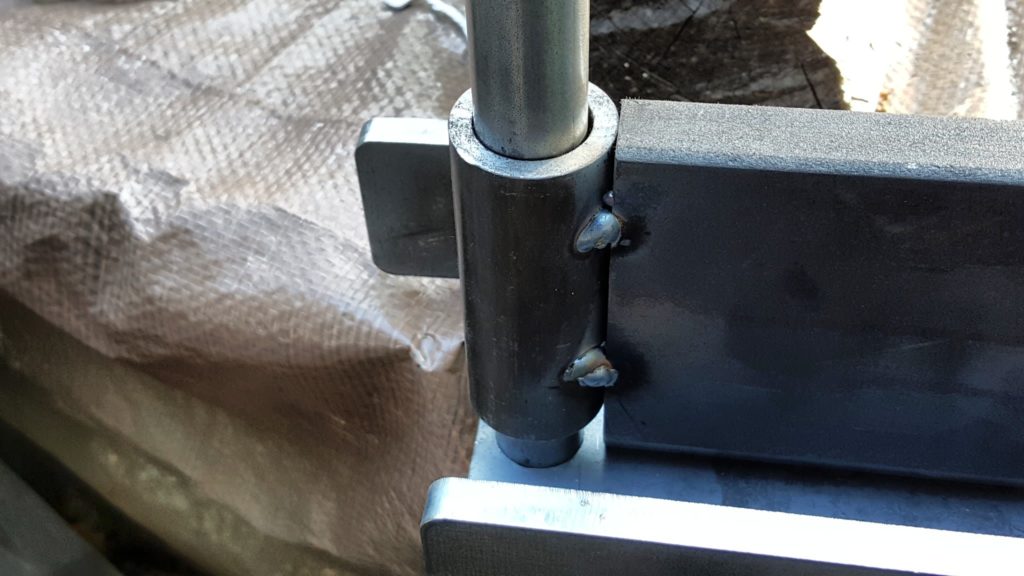
Step 4 – Weld the Shaft Collar
For me, the collar helps be center on the ram of my press but I do not leave it connected. I definitely wanted it though so I welded it on. I measured and found the center, positioned the collar, tack welded it and then did the final weld.
Step 5. Paint It
My shop is basically an unheated garage so I have to fight condensation. Unpainted / unoiled surfaces tend to rust so cleaned all the parts when brake cleaner and applied three coats of Black Satin Krylon that combines a primer and the paint in one finish. Definitely let it cure for a day before you reassemble — this is an important lesson I learned years ago – dry to the touch and cured ready to use are two different things.
At this point I had to get the press ready and that meant installing real press plates that could safely (emphasis on safely) handle 20 tons of pressure. Candidly. the cheap cast iron plates that come with most presses are not up to the task so we’ll talk about this in the next blog post.
If you find this post useful, please share the link on Facebook, with your friends, etc. Your support is much appreciated and if you have any feedback, please email me at in**@*********ps.com. Please note that for links to other websites, we are only paid if there is an affiliate program such as Avantlink, Impact, Amazon and eBay and only if you purchase something. If you’d like to directly contribute towards our continued reporting, please visit our funding page.
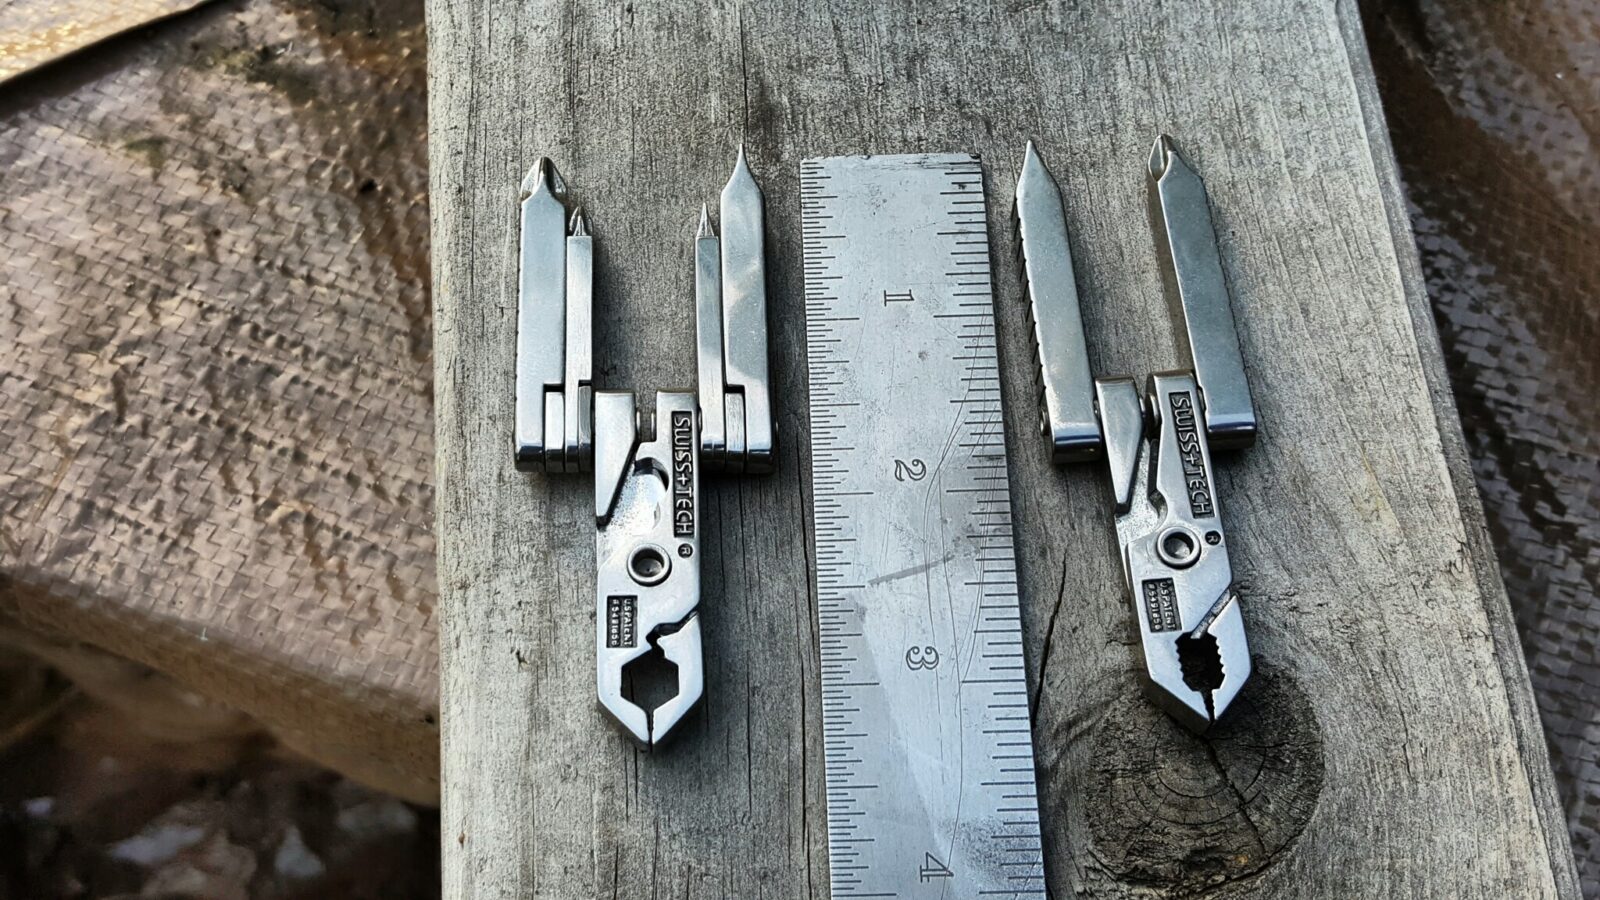
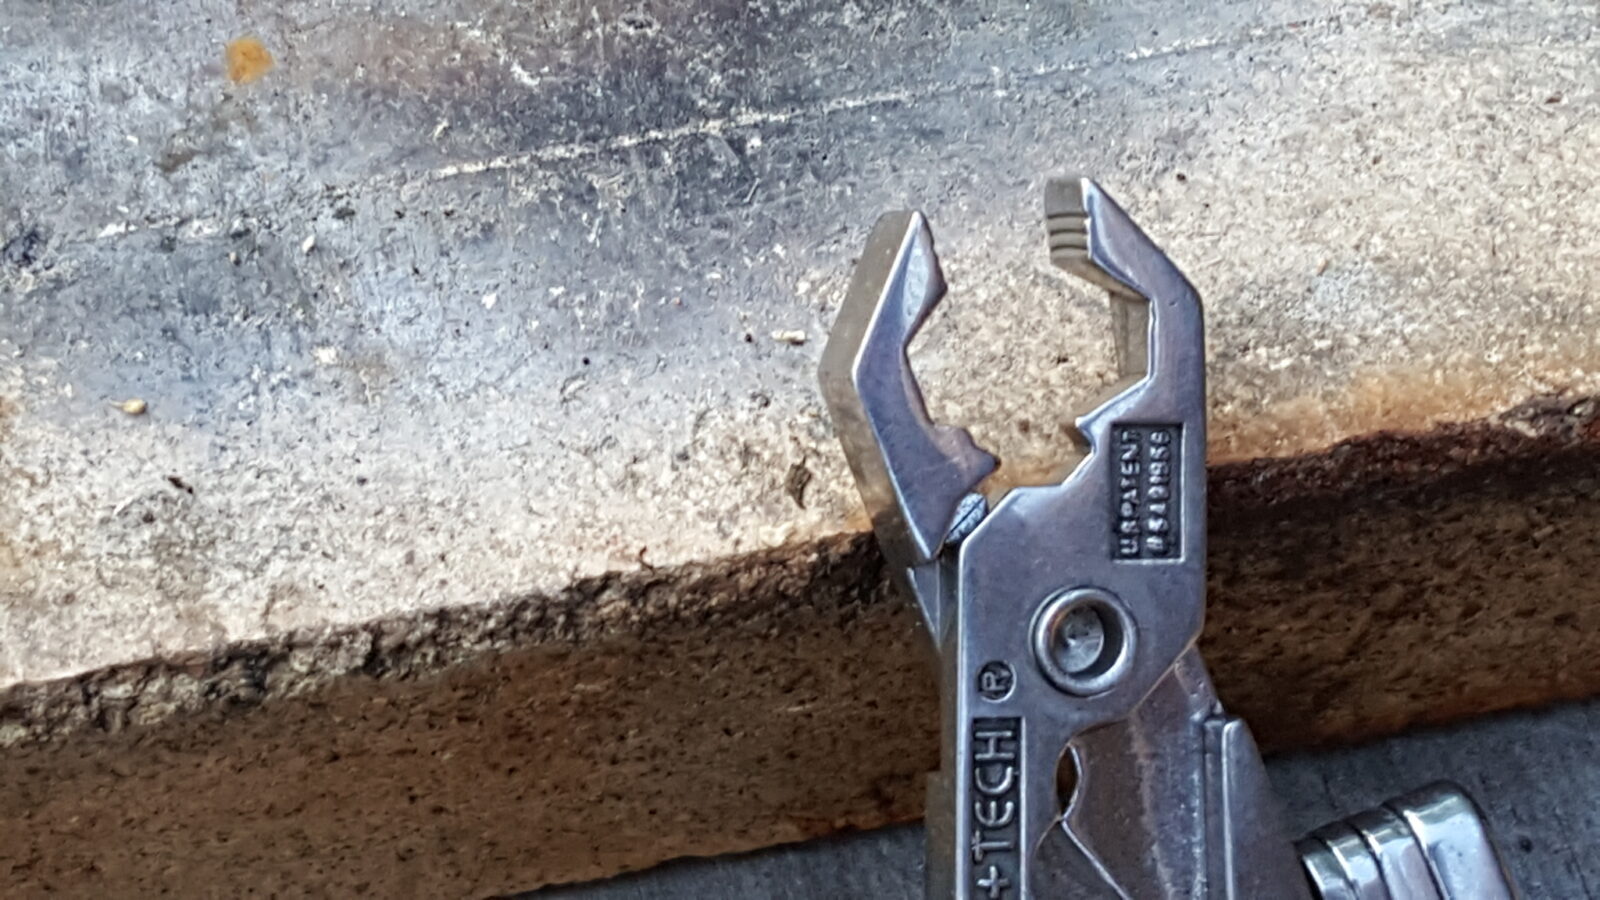
For my job, I wind up travelling and I can’t tell you how many times I have had luggage parts come loose or need to fix a zipper. The beauty of these Swiss+Tech tools is that they are tiny and light. They will never win a brute strength contest but when you need a simple screw driver or a small strong set of pliers/tweezers, or wire cutter these things kick butt. I think it is rather unfair when people compare them to full sized tools – they were never designed for that. Look at the pivot pin – it’s a tubular rivet!
I’ve had both tools for years. I just bought this new set off Amazon to put in luggage. The 6-in-1 goes in my carry on bag and then 19-1 goes in my check-in. If you just want to buy one, get the 6-in-1. That can get just about any small job done and are cheap off Amazon.
By the way, you can fix a ton of problems when travelling with the 6-in-1, a roll of electrical tape and a few zip ties of varying lengths. For example, if a zipper pull comes off, insert a small zip tie, run 4-6 layers of electrical tape around it and then cut off the excess zip tie. Done.
Another plus is that they are so cheap you don’t feel bad if they get lost. I gave my wife one as a stocking stuffer and that went over like a lead brick – don’t do that 🙂
So, can you fix a car with these? No. Fix stuff better than fingers alone when travelling? Absolutely.
7/20/19 Update: I can’t tell you how many times these little things have bailed me out on trips. When I lose one, I buy a new one – in other words they are worth it to me. Also, I’ve not had one fail. I’ve yanked up stuck zippers, tightened screws on luggage. cut small wires, etc.
If you find this post useful, please share the link on Facebook, with your friends, etc. Your support is much appreciated and if you have any feedback, please email me at in**@*********ps.com. Please note that for links to other websites, we are only paid if there is an affiliate program such as Avantlink, Impact, Amazon and eBay and only if you purchase something. If you’d like to directly contribute towards our continued reporting, please visit our funding page.
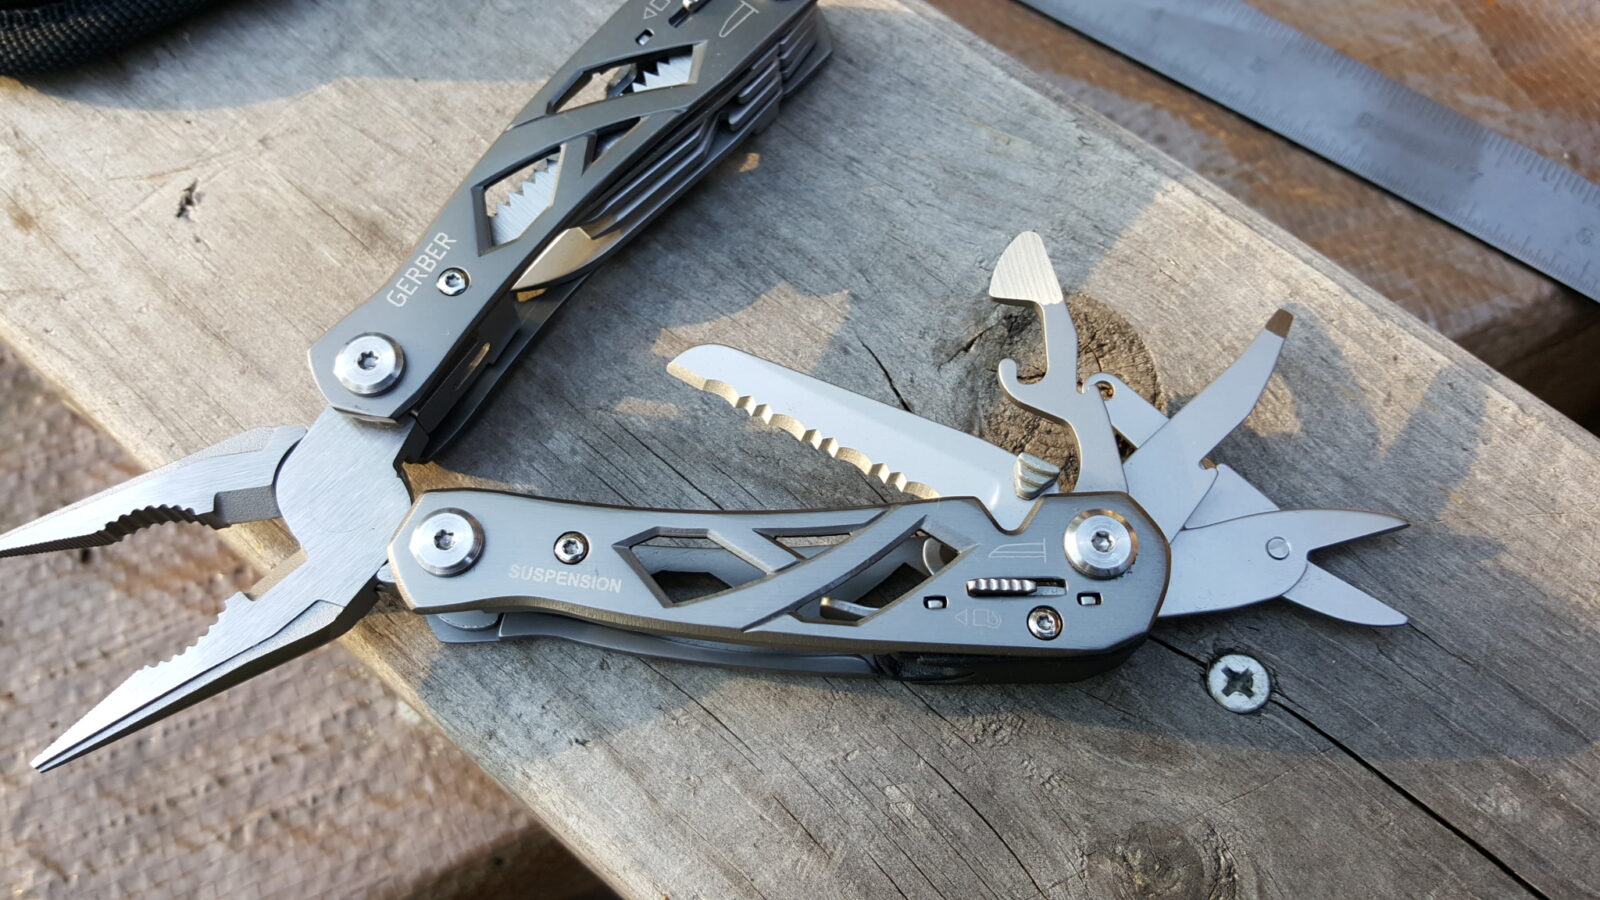
Guys, I like multi tools when I travel or go camping. I have torn up a boat load of cheap imported ones and a Stanley just by trying to use the pliers to grab on to something really tight. I have never had a problem with a Gerber or Leatherman tool – let me say that up front.
At any rate, I wanted to find something compact and with locking blades. I have a Gerber multi tool that I have used a ton since 1998 and my only issue is the lack of a lock on the blade. You don’t really think about the lock until the first time you are really yanking on something to cut it and that blade starts to close! It’s been my goto tool for years and is showing its age.
At any rate, I did some digging around and decided on the Gerber Suspension. All the tools I worried about have a positive locking system and the handles fit your hand pretty well. It has 4.6/5 stars with 1,493 reviews on Amazon. That is a pretty darned good score! I get the warm fuzzies when I see scores like that and the unit was only $23.49 shipped with Amazon Prime.
Here are features and my thoughts
Needle-nose Pliers – Important
Wire Cutter/Stripper – Important
Straight Blade – Important
Serrated Blade – Maybe – they work great on rope
Phillips Screwdriver – Important
Large and Medium Flathead Screwdrivers – Important
Scissors – I have no idea if I will ever really use this but it is an interesting design and seems solid
Bottle Opener – Important – this is an Emergency Beer Access Tool
Can Opener – Important – I can’t tell you how many cans I have opened over the years thanks to the can opener in my old Gerber]
Saw – not that important
Awl – not that important
Lanyard Ring – not that important
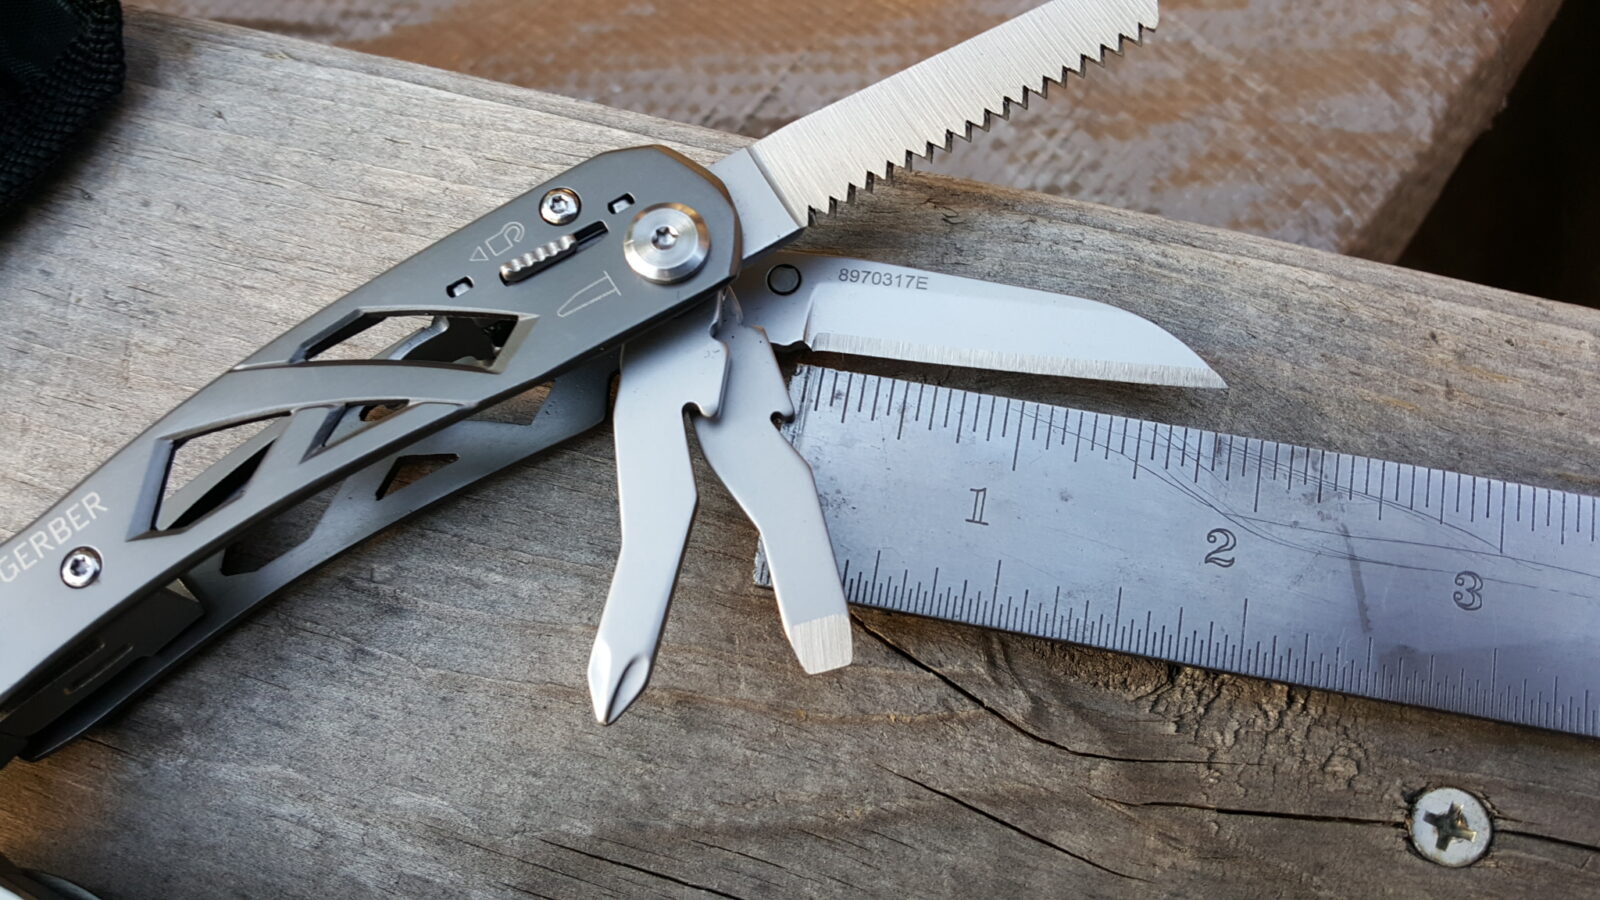
Open, it is 6.5″ long and closed it is 4″ long plus it has a little belt / storage pouch.
Here are photos of mine:
So far, everything seems solid. I tested the locking mechanisms and they work. I took a steel rod and grabbed on with the pliers as hard as I could and nothing bent. I’ve had tools in the past where if I did that the handles would crumple. Literally, I put a bar in a vise, grab hold with the pliers and then try and turn the bar which is pretty much impossible. The Suspension held up just fine.
I’m going to be using this more over the summer and we’ll see how it holds up.
If you find this post useful, please share the link on Facebook, with your friends, etc. Your support is much appreciated and if you have any feedback, please email me at in**@*********ps.com. Please note that for links to other websites, we are only paid if there is an affiliate program such as Avantlink, Impact, Amazon and eBay and only if you purchase something. If you’d like to directly contribute towards our continued reporting, please visit our funding page.
I have a lot of fun experimenting with stuff. I tend to need punches fairly regularly and what I had was a mishmash of sizes and models from Craftsman, Astro, Harbor Freight and who knows what else. I was working the other day and had stuff laying everywhere and thought to myself that there must be a more organized approach plus some of my punches were looking pretty abused (I’ve bent the crap out of some of the real small ones trying to start pins) so I started digging on Amazon. Interestingly enough, TEKTON makes an 18-piece gunsmith punch set that gets very good reviews on Amazon – 4.6 stars with 181 reviews is pretty remarkable. So, I ordered it and was pleasantly surprised at what arrived – it was very well done.
The set was well packed and includes a walnut bench block that is laser etched with what punch is to go in what hole. Now for a slob like me, that is a God-send.
The punches have a nice heft, feel good, are well finished and have worked fine so far. TEKTON claims they are high carbon heat treated steel and seem to be holding up just fine.
(8) roll pin punches: 1/16, 5/64, 3/32, 1/8, 5/32, 3/16, 7/32, 1/4 inch
(2) solid punches: 1/16, 3/32 inch
(1) center punch: 5/16 inch
I have it sitting to the side of my bench and now I can move the whole set right to where I need it vs. digging for whatever punch I need.
So if you are shopping for punches with a stand, take a look at this set. It is a great deal when you look at the cost relative to the quality you get.
2/27/20 Update: I’ve beat the heck out of mine and most punches are still holding up. I’ve bent a few of the smaller ones but I have really beat the hell out of them trying to free stuck pins so I am not surprised. Guess what I did, I bought a second Tekton set for spares. I’m still happy with it. All the sizes let me grab one for use as a slave pin as well like what you really need to align all the components with Glock hammer pins.
If you find this post useful, please share the link on Facebook, with your friends, etc. Your support is much appreciated and if you have any feedback, please email me at in**@*********ps.com. Please note that for links to other websites, we are only paid if there is an affiliate program such as Avantlink, Impact, Amazon and eBay and only if you purchase something. If you’d like to directly contribute towards our continued reporting, please visit our funding page.
I tell you what it is really hard to get by without a compressor but it can also be but it can also be a real headache if the circuit breaker regularly, or even unpredictably, trips when the compressor tries to top off the tank. There a couple of really easy modifications we can do to the compressor but before that, let’s step through a couple of things first just in case there is another issue at hand:
Safety Stuff
I actually spent more time trying to think about the what-ifs than actually writing the two options to make your compressor start softer but I do want you to approach this safely. I am assuming you are handy with a basic understanding of electrical wiring and compressed air to do this work.
First, you should be using a properly sized circuit or at least one that is very close. If your compressor needs far more than what your circuit is sized for, say 30 amps and you only have a 15 amp circuit, then the fix I am going to tell you may not help. It does often help when you have a circuit that is very close to the required amps but when there is a heavy draw, it exceeds the circuits capacity so the breaker trips. My experience is that consumer air compressors list a low draw number like 15 amps and can draw more than that under peak load. So, for example, if you have a 15 amp circuit and a compressor that says it needs 15 amps – you may be having some challenges that this modification might help with.
In terms of properly sizing a circuit, engineers and others can give you rules of thumb such as doubling the circuit capacity to allow for spikes in demand or to allow 6 amps per 1 HP for 1 phase or 1.25 amps per HP for 3 phase. Doing this means running new wire and installing new breakers. DO NOT JUST PUT IN A BIGGER BREAKER! The breaker is protecting the wiring from over heating and catching fire. Each thickness, or gauge, of wire has a limit to the number of amps it can carry. Never put a higher capacity breaker on a smaller cable – you are asking for trouble in the worst way.
Second, plug the compressor directly into the wall. An extension cord will likely introduce too much resistance and cause the breaker to trip so do not use an extension cord (assuming your compressor is not an air nailer or air brush model – they draw so little that they can use extension cords).
Third, I have only encountered this a few times over the years but breakers can wear out over time. If you investigate and it seems that you should have enough capacity and can’t figure out why your breaker is tripping, then try installing a new breaker and see if that helps. Again, install the right size and don’t put the wiring at risk of fire. If in doubt, bring in an electrician to straighten things out.
Fourth, if you look at your outlets and/or wiring and they look burned, there is any trace of soot or a burned smell stop and get an electrician to inspect the line. It may sound funny but I have seen lines fail over the years for a ton of unexpected reasons.
Now, on to making a compressor softer starting
IMPORTANT SAFETY ANNOUNCEMENT – BE SURE YOUR SYSTEM IS FULLY DRAINED AND THE COMPRESSOR IS UNPLUGGED (ENSURING THERE IS NO WAY IT CAN TURN ON) BEFORE YOU DO ANY WORK. The pressures involved can hurt you and we do not want that.
Make sure the unit is unplugged also just to be safe.
So, with those things said, let’s say you need to make your compressor work better with the circuit you have for whatever reason, let’s talk about what some folks call a “soft start” modification. It’s called this because it makes it easier for the pump and compressor to start and come up to speed before a heavy load is introduced.
The way a compressor works is that a motor has to turn the pump and send air through a filler tube into the main tank. Between that little tube and the tank is a check valve that screws in right at the top of the tank that keeps air from rushing backwards. Now when the compressor fills the tank each time, the switch controller opens a bleed off valve to empty the air in the filler tube to make it easier for the compressor to start next time. The problem is that the volume of air in that tube is relatively small and when your compressor starts, it can only turn a few times before the tube is full and then the motor must work much harder and thus draw more amps to overcome the check valve to put air in the tank. Depending on the amps required, this can then trip the breaker.
Look at this next photo. See how short and small that left tube is? The pump can only turn a few times before that left tube is pressurized – it never has a chance to build up speed and momentum in the flywheel. As a result when the pressure of the tank is reached it puts a lot of strain on the motor.
Note, the second smaller tube, which is often a flexible plastic, provides pressure to the cut off switch that automatically turns the motor off when the tank reaches a specified pressure. We are interested in the larger tube that runs from the head (top) of the compressor pump down to the top of the tank. It is usually much larger than the pressure switch tube.
The fix is simple – increase the air capacity between the pump and the tank! You want the motor to be able to start and the heavy flywheel build up momentum before it encounters the pressure behind the check valve.
Option one: Simply make a longer tube so there is more potential volume to fill
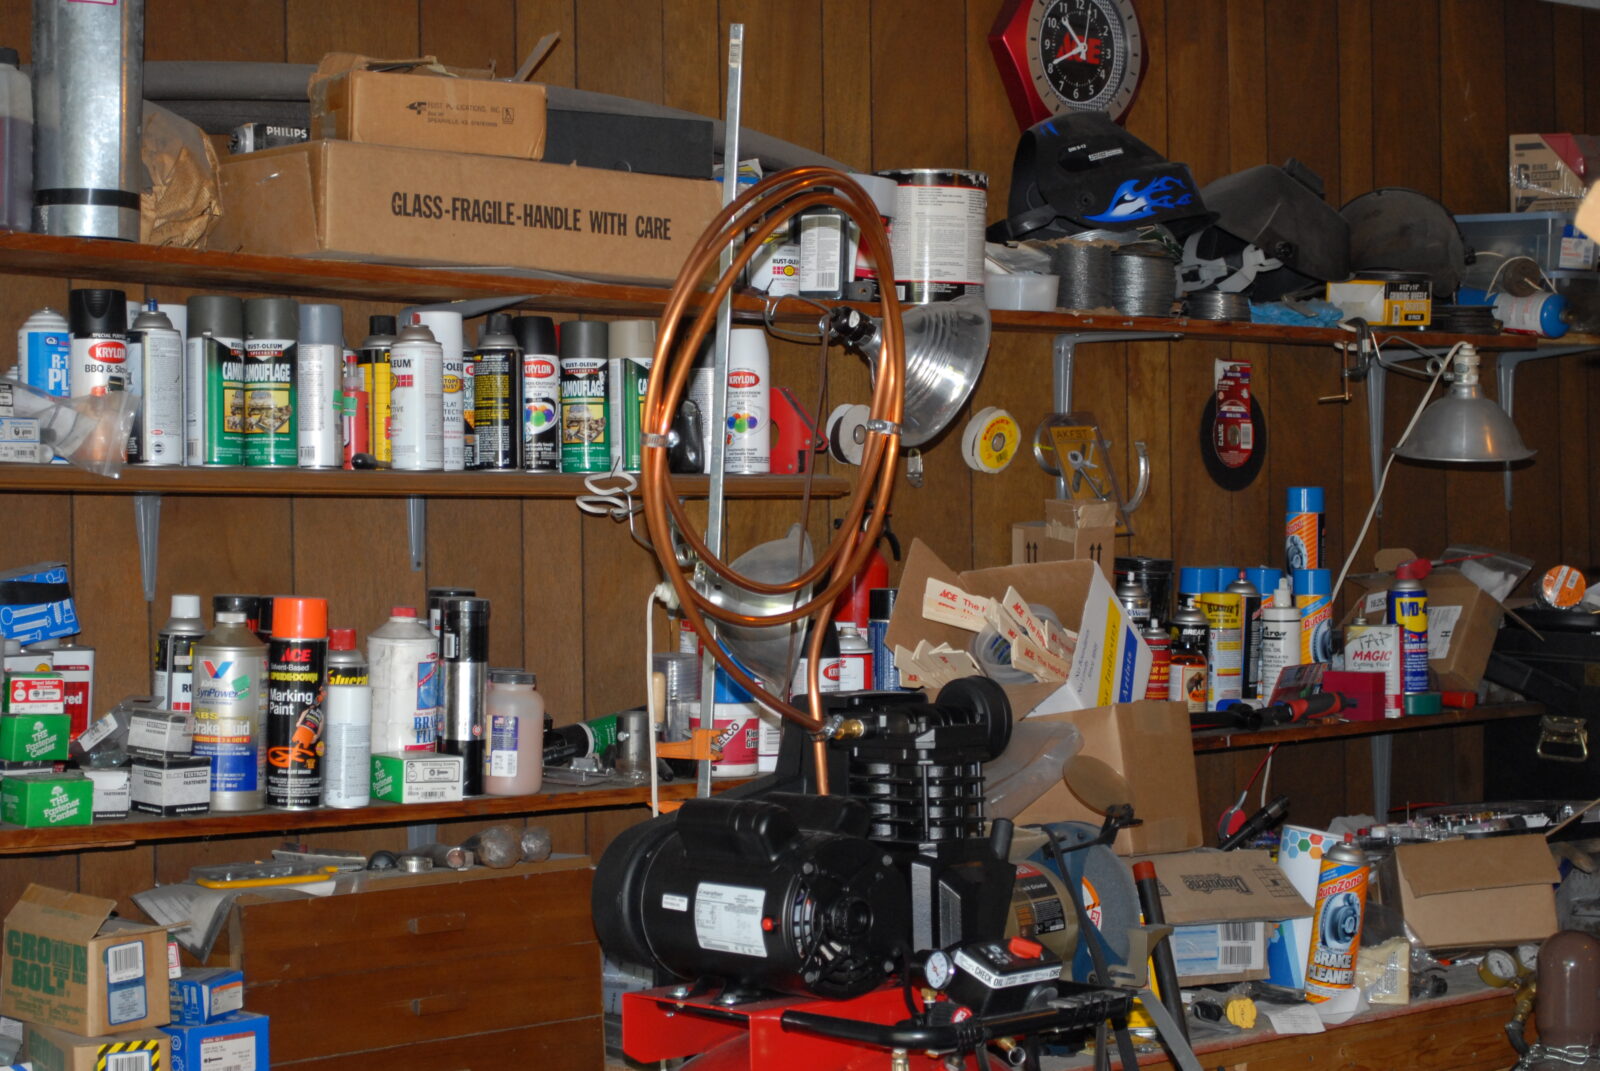
There are two options to make this softer starting. One is to just add a long length of copper tubing in between the compressor and the tank. You roll it into a coil and it kind of looks like a moonshine still and it does the job. The con is that it looks really funky. I did this with one of my early compressors and the photo below shows about 8 to 10 foot of tubing installed. I would replace whatever the original tubing was with the same size so you would do the same. You need to replace the compression fittings also and you can do the job in about 30 minutes. Note that I used hose clamps to keep the coils from rattling. Ugly as heck but it worked until I finally wore out the pump. I checked the date on my photos and I ran this setup from 2010 to 2014 – it does hold up.
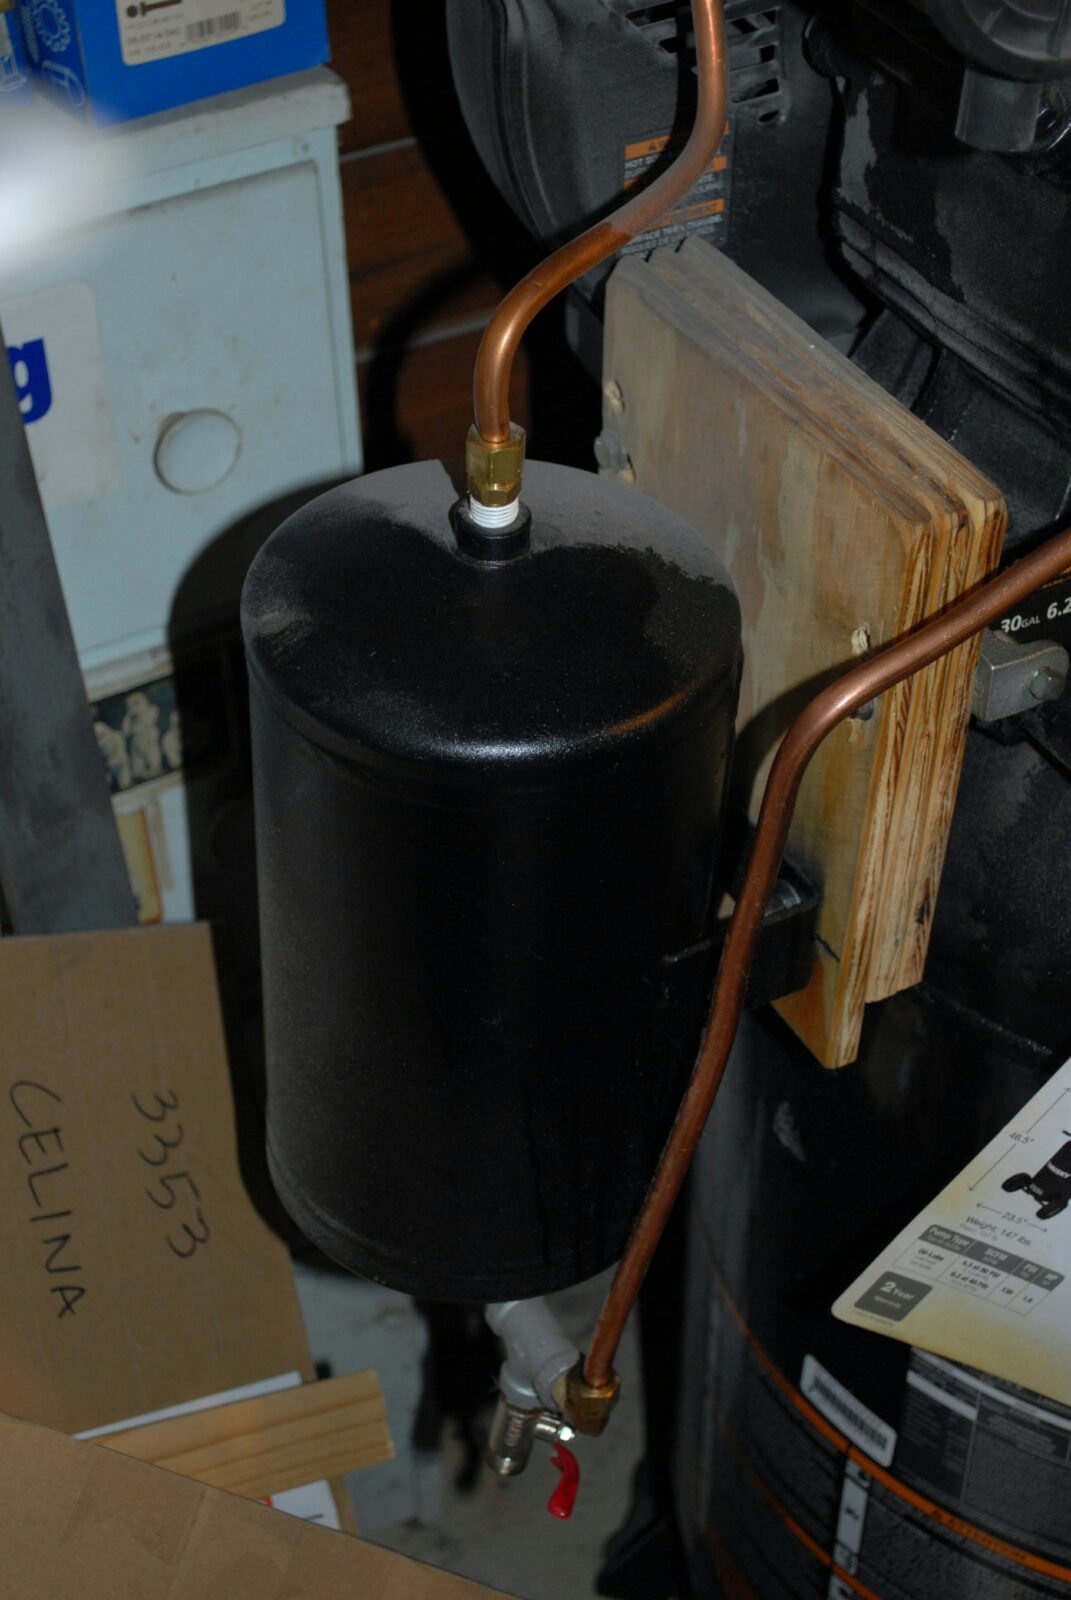
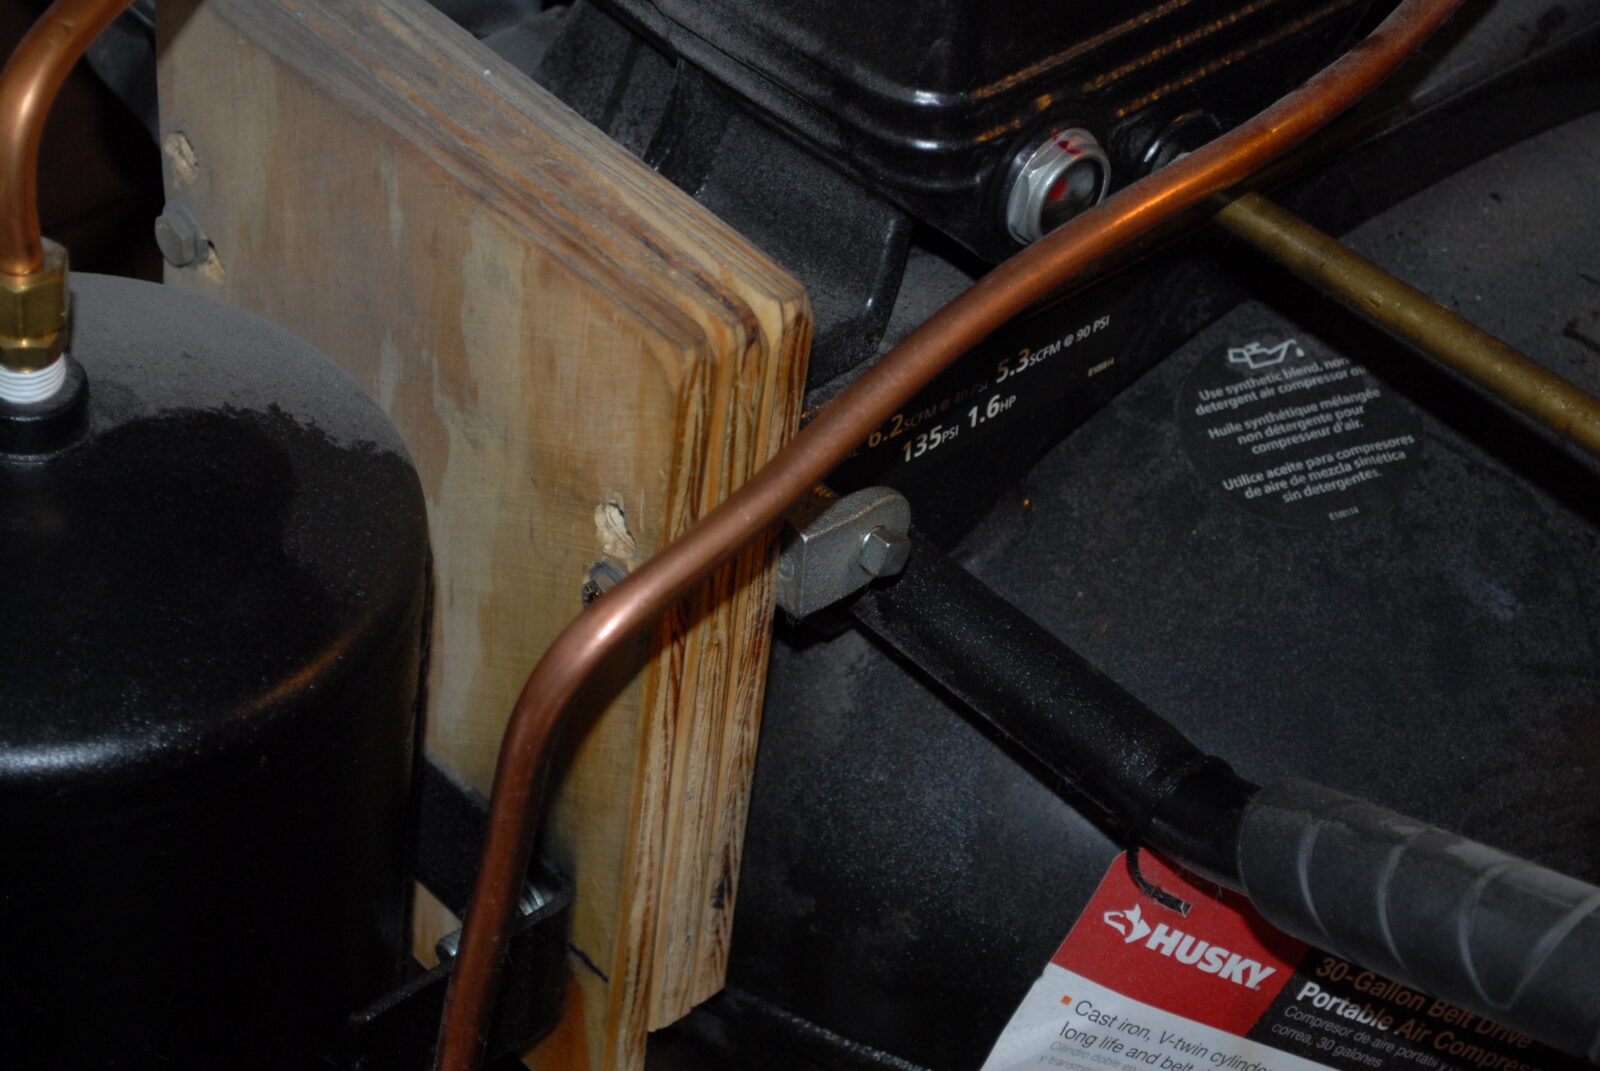
Option two: Add a reservoir to really increase the volume
The second approach is a little bit more elaborate and involves putting a 1/2 to 1 gallon small air tank between the compressor and the tank. This allows the pump and motor to come up to speed before they must overcome the check valve. This works great. The only slightly annoying thing you will notice is that once the pressure is reached and the compressor cuts off, the pressure relief valve opens and the air runs out longer because there is more air in the line.
A couple of quick design considerations:
I carefully bent the aluminum using a tubing bender and tried to avoid abrupt turns.
The small tank you see is a Firestone 9125 1 gallon 150 PSI tank. The compressor filled the main tank to 135 PSI so the tank needed at least that rating to be safe. Be sure your tank is at least rated as high as your compressor.
Factor in the length of tank and if you will have enough room. The one pictured is 12″ long.
The tubing should be at least the same diameter as the original and the tank’s fittings should be adequately sized. This is a fairly small compressor in the photo.
I secured the tank to plywood and the plywood to the original compressor using the screw hanger fittings you find with conduit. I wanted it to be relatively portable and I also wanted the wood to take up some of the vibration.
I installed a T-fitting at the bottom of the tank to drain off moisture and never really found any. I would recommend you still add it even if it just gives you an ability to bleed off air if something happens.
Use quality Teflon/PTFE tape on all of your fittings to prevent leaks
An optional recommendation I would urge you to do is to either use brake-line wrenches or at least quality fixed wrenches to avoid rounding over the fittings. It is easy for an adjustable wrench to slip and round over the edge of a fitting. You need to tighten things firmly so they do not leak or come loose.
I got by with the above for a number of years until I could afford to both get a bigger compressor and pay an electrician to run a 240 volt service into my shop. I don’t need it now but these two approaches got me by for almost six years before I bought my current Ingersoll Rand.
If you find this post useful, please share the link on Facebook, with your friends, etc. Your support is much appreciated and if you have any feedback, please email me at in**@*********ps.com. Please note that for links to other websites, we are only paid if there is an affiliate program such as Avantlink, Impact, Amazon and eBay and only if you purchase something. If you’d like to directly contribute towards our continued reporting, please visit our funding page.


![The Gerber Suspension Multi Tool [22-01471] is Pretty Nice!](https://blog.roninsgrips.com/wp-content/uploads/2017/07/IMG_20170705_195345.jpg)


