Okay, I’m the proud new owner of a 2021 Ram 2500 Tradesman and the original halogen lights were pretty anemic. I did two things to address this – first, I replaced the high beams with Lasfit LED emitters and that’s a story for another day. With that said though, I’ll tell you that upgrading to the Lasfit LED high beams was stunningly worth it – I can’t tell you the last time I was so happy with an upgrade.
| 2/13/24 Update: Lasfit is no longer an Amazon seller. If you search on LED headlight options, there are a bunch of sellers out there getting good reviews. Click here to see them in a new tab. |
Now that I am done gushing over the high beam upgrade, the second thing I did was to investigate installing a LED light bar on the truck. That’s really the focus of this post.
I guess it must be the pandemic because there aren’t a lot of custom fit aftermarket options right now but there are still a ton of lighting options using general fit LED light bars – the kind that you normally bolt on to a bumper, roll bar, etc.
My first thought was to mount a light on the bumper but I run a Western plow in the winter. I could have mounted a 26″ bar behind the front lower plastic grill in the bumper or even cut it out for a clear shot but it wasn’t really appealing to me.
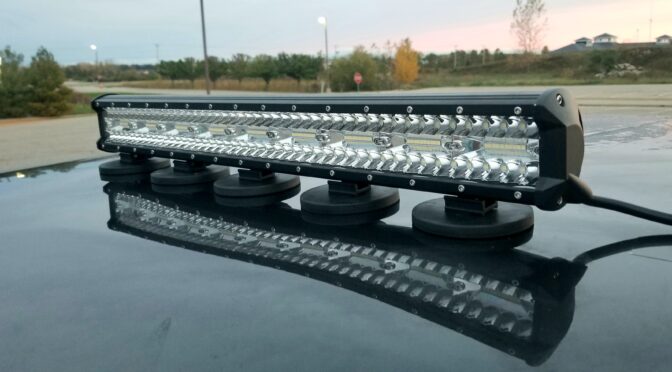
Then I got to thinking about how tall the truck was. My 2021 Ram 2500 with the snow package is sitting pretty tall in the air. The top of the cab is about six and a half feet (80-ish inches) off the ground. If I mounted a light bar up there, it would have the elevation to cast a ton of light.
Lighting Options
Over the years, I’ve used a number of inexpensive light bars off Amazon and had while some brands weren’t so great due to leaking water into the LEDs, I’ve had pretty good luck with Nilight. You’ll read mixed reviews of their customer service but fortunately I’ve not needed to work with them.
So, I started looking at NiLights and was particularly interested in their triple row light bars as they can output a ton of light. Honestly, for any of these vendors, take their lumen and wattage claims with a huge grain of salt – there’s a ton of marketing hype. In general, bigger bars and more emitters give you more light – that’s just a rule of thumb to go by.
So, I’ve had light bars up to 12″ wide in the past but they were double row and nothing to spectacular in terms of light output. So, I figured I wanted another Nilight and some width greater than 20″ and they have a bunch of options.
In terms of mounting, I really didn’t want to go drilling into my new truck. On one hand I could mount a light behind the plastic lower grill in the bumper but I really wanted to go high because I do plan to install LED fog lights in the future.
| Nilight offers a ton of different light bars on Amazon. Click here and a new tab will open listing of them. |
Magnetic Mounts
So, one way to mount is to use rubber coated magnetic mounts. They are removable and hold pretty good but they honestly do have limits and will blow off the truck if you don’t think things through carefully. I really wanted to go this route, at least for now as I could remove the light when not needed plus move it around to where I needed light.
| Nilight sells 2pc Magnetic LED bases on Amazon. Click here to open a new tab to see the listing. |
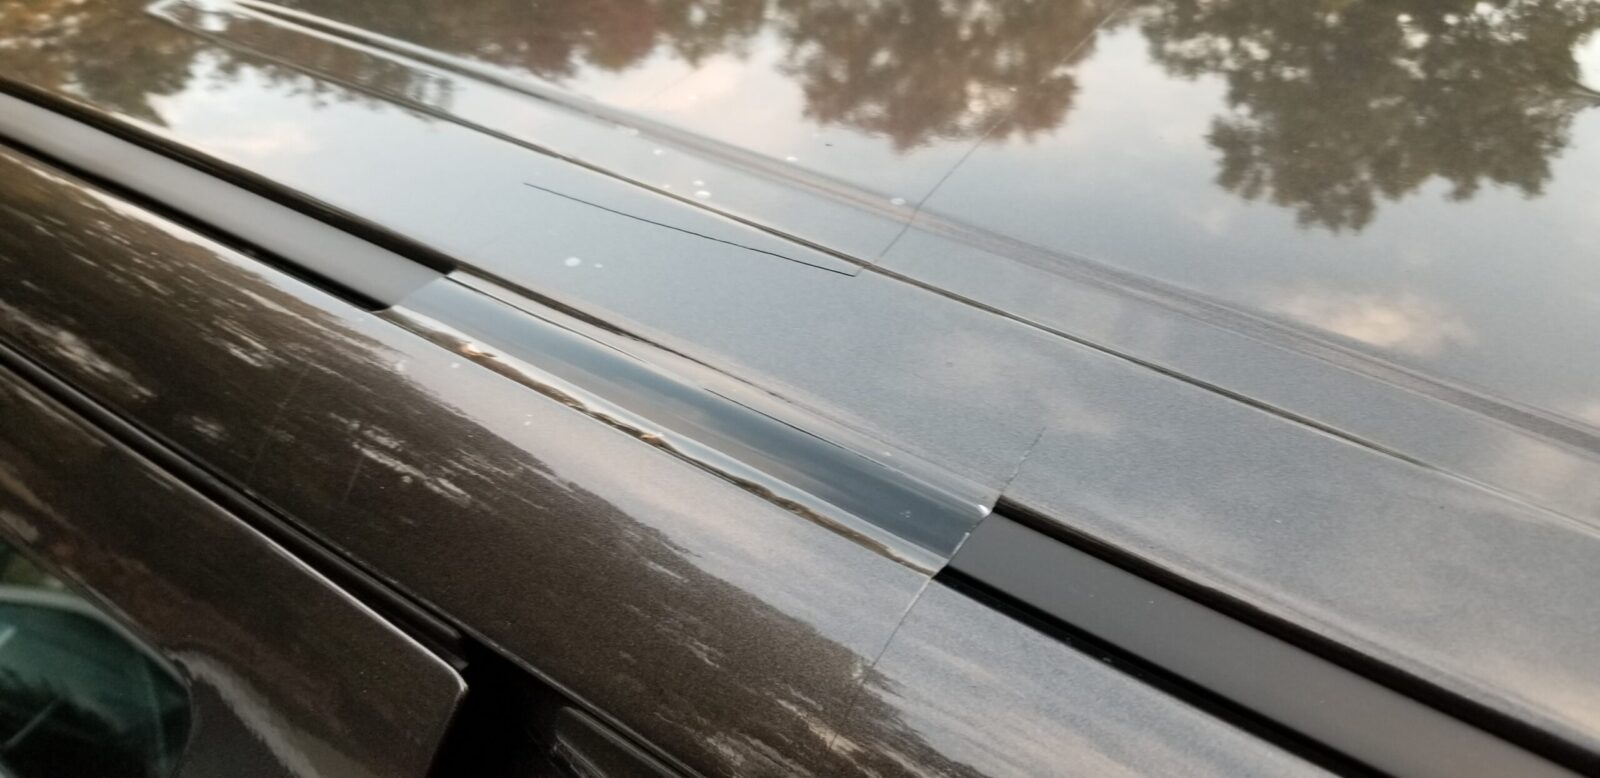
Going with magnetic mounts does require you to think about some things. First and foremost, are they strong enough to hold the light in position? What you will find is that they tend to be very strong and pulling a magnet straight off a good metal roof is genuinely hard but that’s not the real issue. You need them to not gradually slide backward and come off at the speeds you plan. In general, the bigger the surface area of the light (width x height).
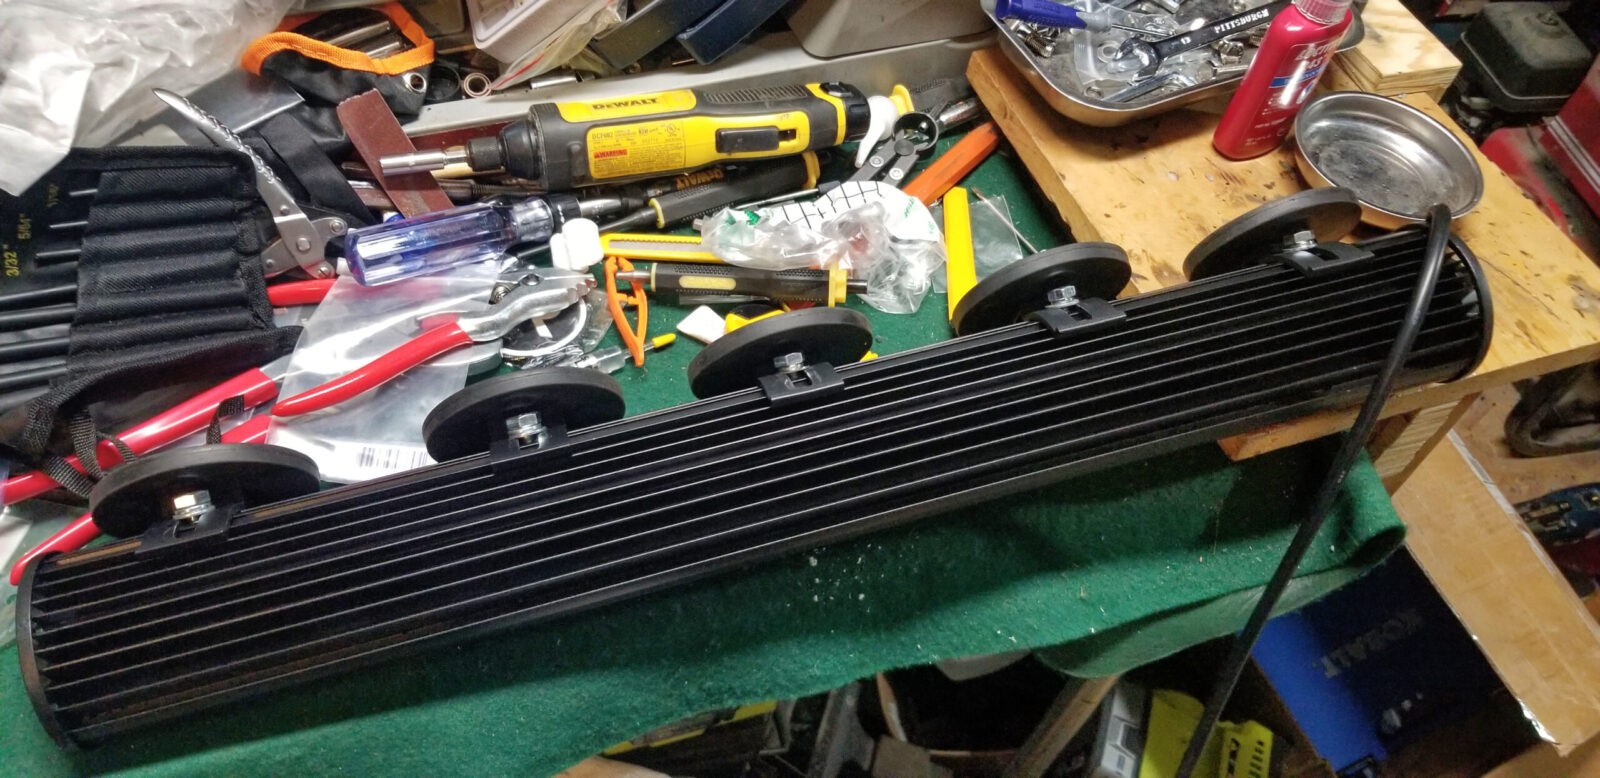
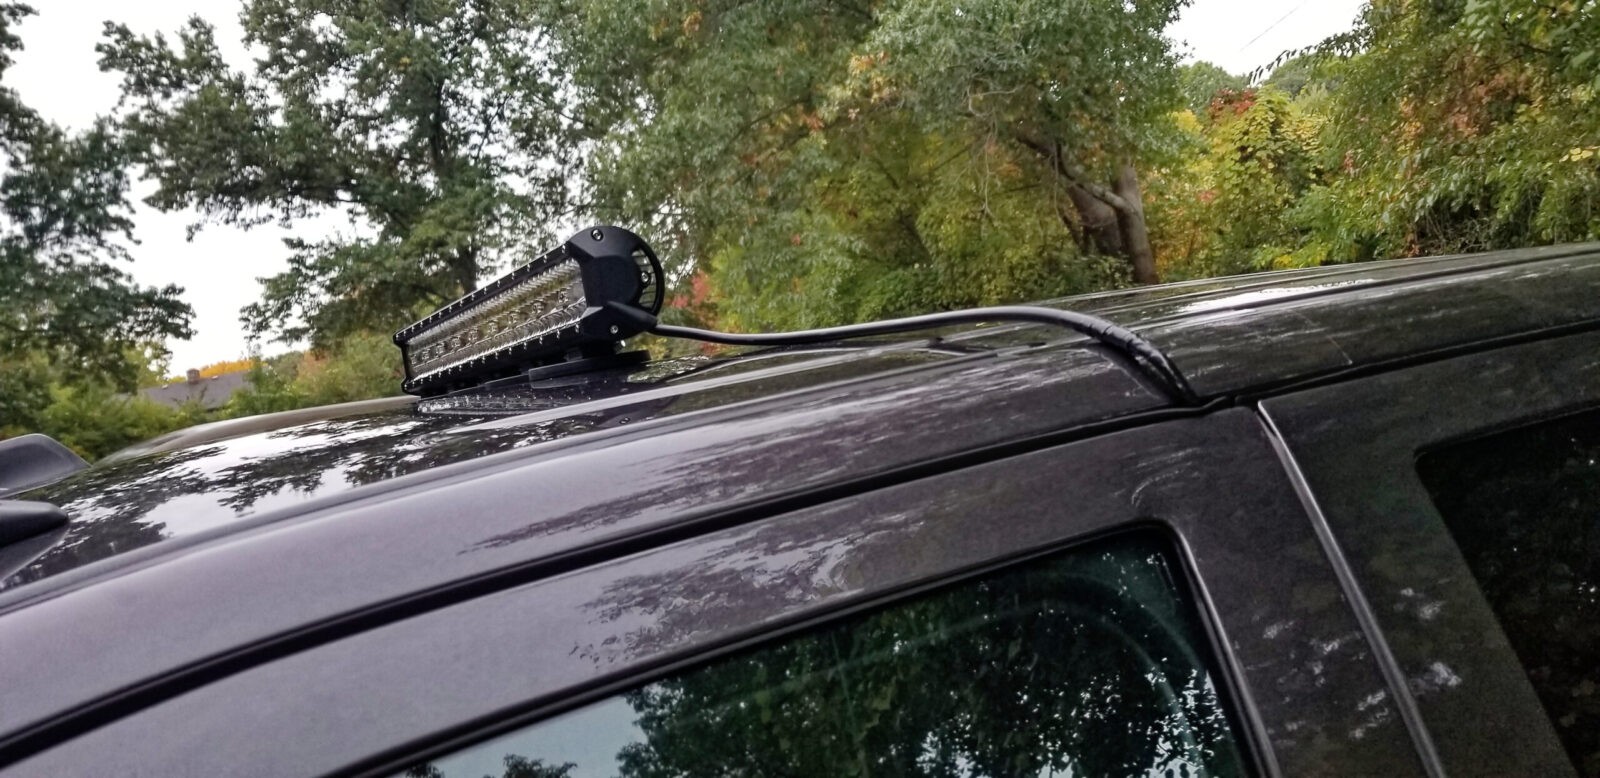
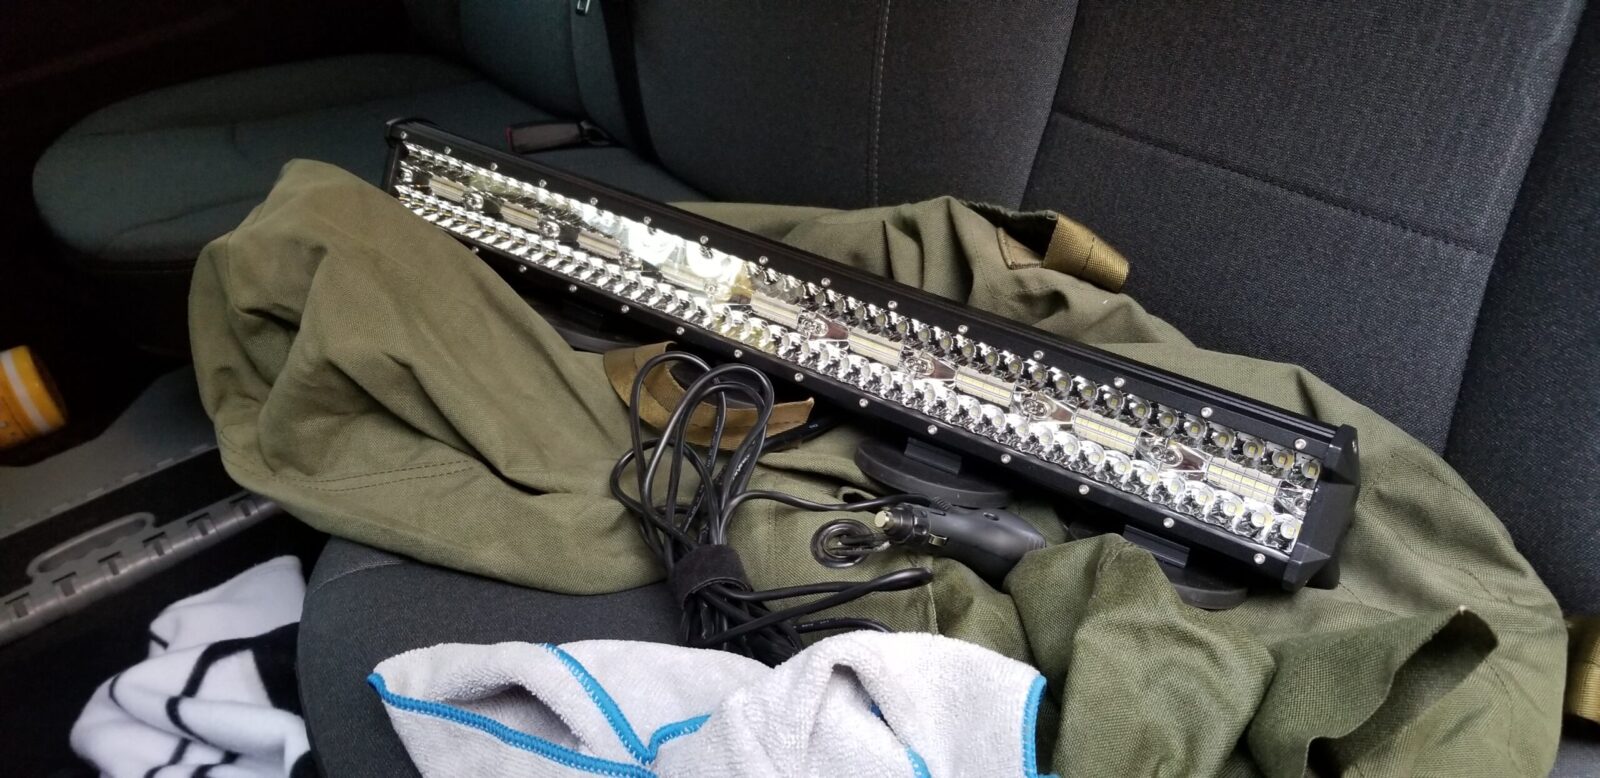
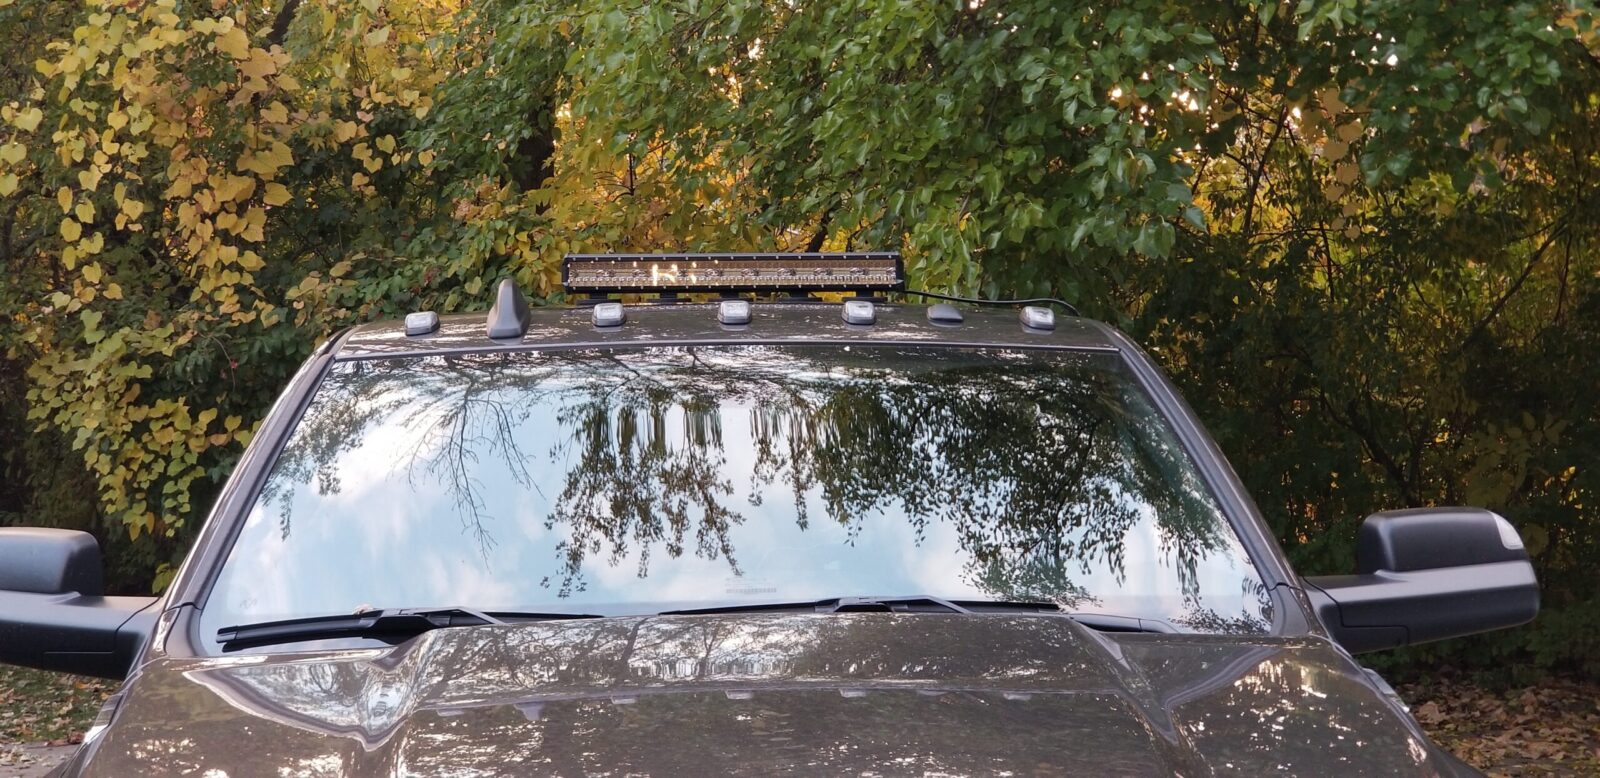
As I thought about it, I reigned in my length to 26″. I sure debated the 37″ bar but there were two reasons why I went with the shorter bar. First, guys reported that the actual draw of the 26″ Nilight 18025C-A light bar was around 5 amps and that was good because I planned to power the light from the dash mounted cigarette lighter – more on that shortly.
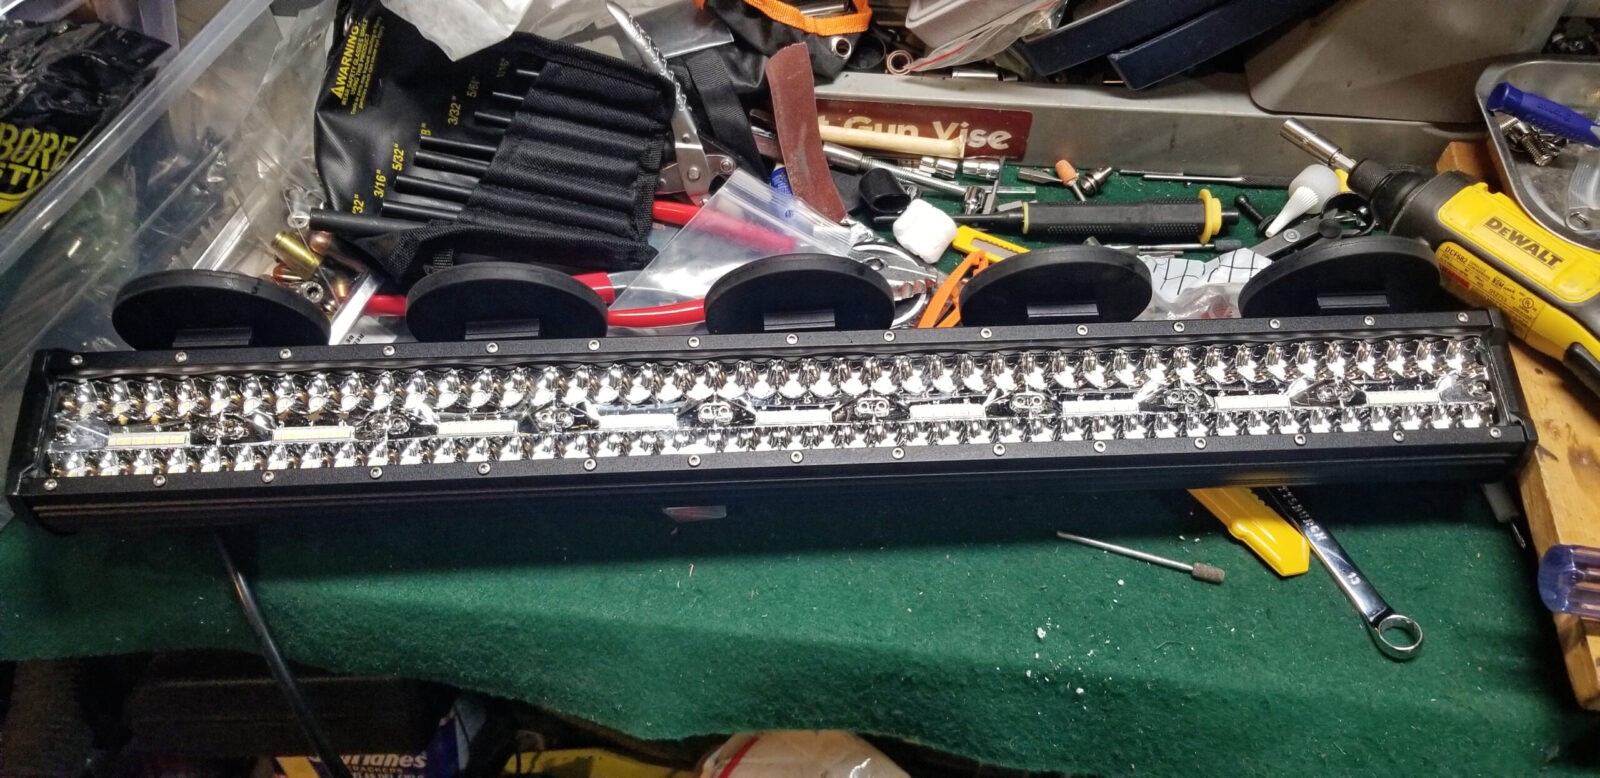
Second, I wanted to lower the risk of the light sliding around. The 26″ Nilight 18025C-A bar comes with three mounting points but I wanted to add more to make sure it didn’t move so I ordered additional set of the Nilight 90035B mounting brackets. That then gave me the ability to mount five of the magnetic bases. I figured that would do the job.
Powering the Nilight 18025C-A Bar
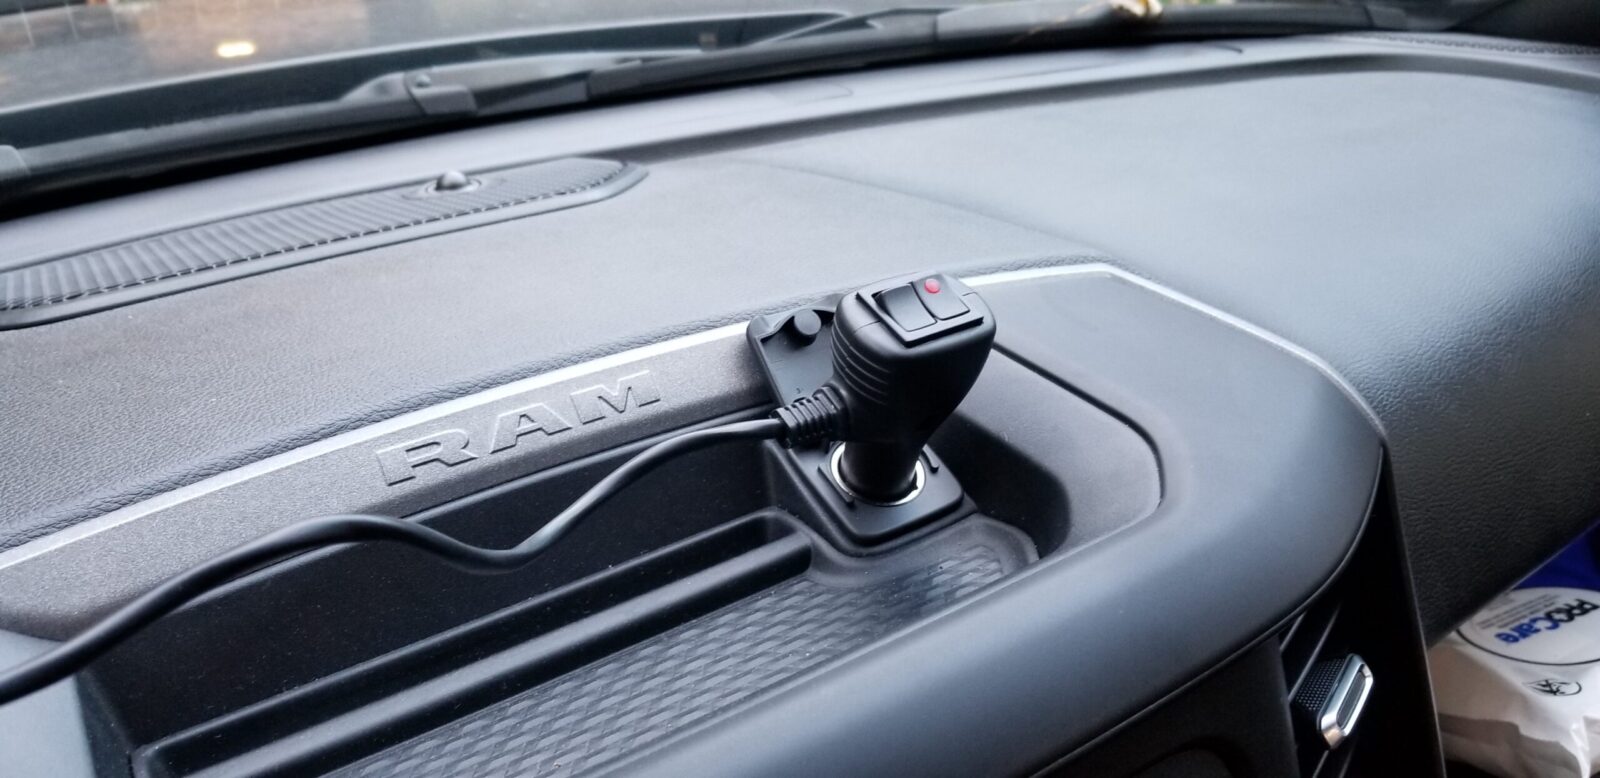
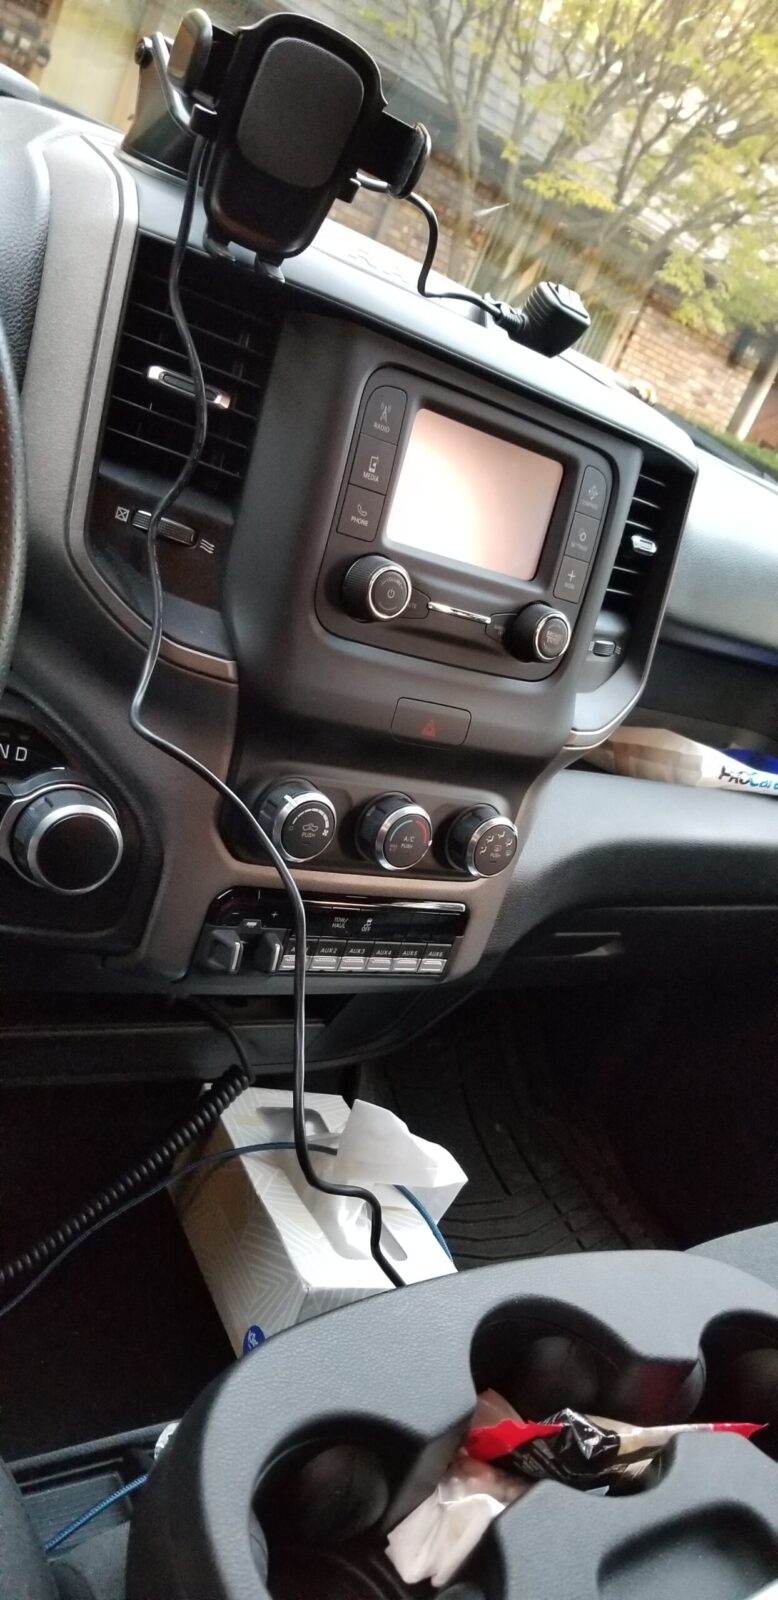
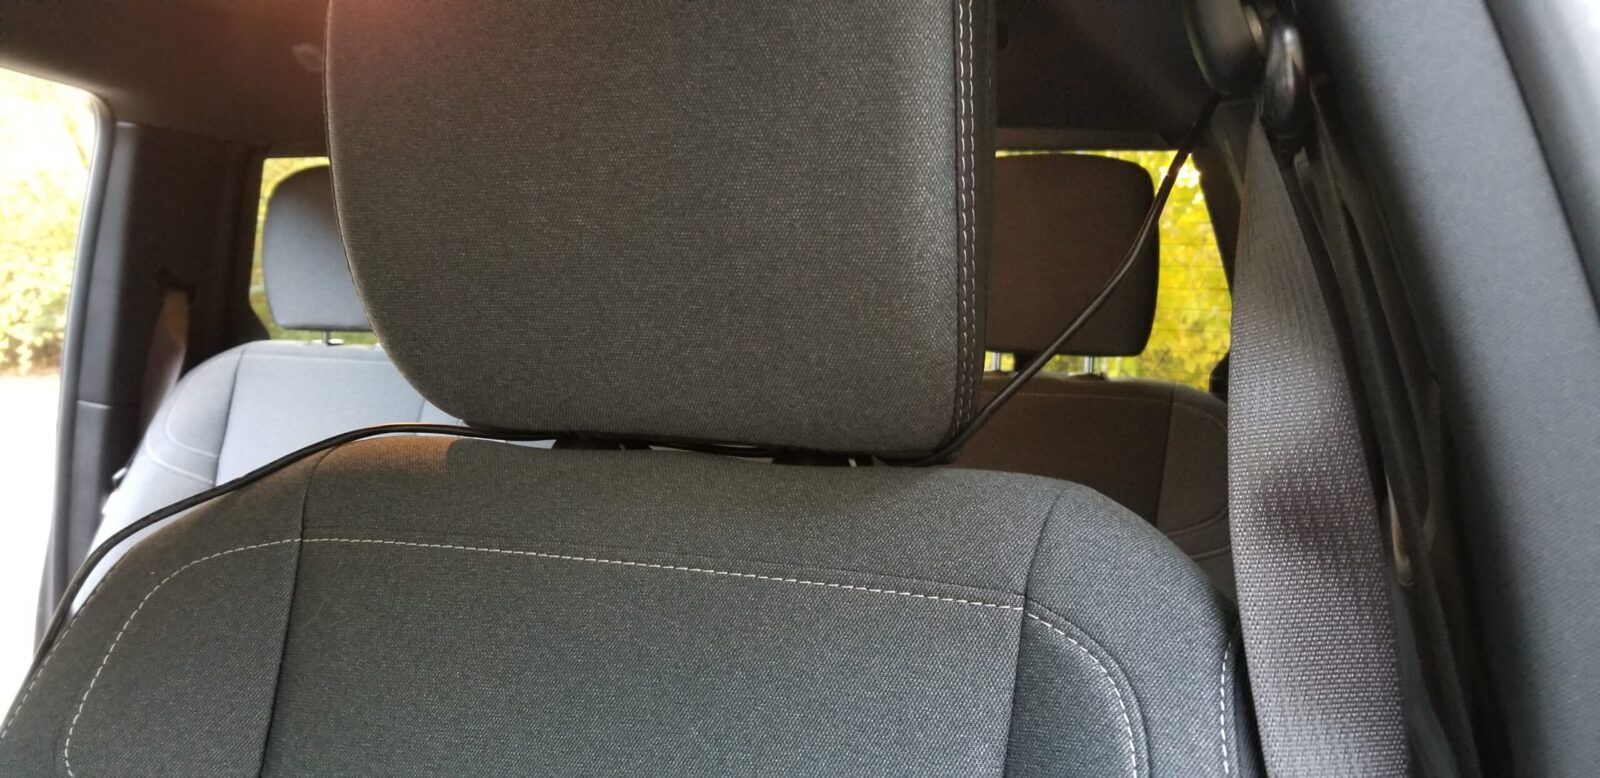
With all of the lighting gear on order, the next thing to consider was the power. Since it was going to be removable, I wanted the power to be mobile as well and not hardwired.
For those of us old enough to remember the old cigarette lighters you know where the name comes from. For those of you wondering what I am talking about, I am talking about the odd looking tubular 12 volt power receptacle in your car or truck. Back in the day, there was a little plug that you pushed in that would cause a little heating element to get red hot and you could light a cigarette or stogie from it … or anything else for that matter – it was like a little red hot space heater or stove element.
In most vehicles, the units can provide 15-20 amps. In a Ram, my understanding is that the center dash unit has a 20 amp fuse. If you are trying to calculate watts, volts x amps = watts so a 20 amp 12 volt circuit can provide 240 watts.
Remember my earlier comment about light bar watt and lumen claims typically being higher than reality? The 26″ bar listing says 540 watts. That is a ton of juice — maybe it’s what it would be if some old incandescent bulb was used but it’s not really drawing that.
There are these really cool switched plugs that have a on/off switch along with a momentary switch and a 10 foot cord. They are well made but I do wish the wire was thicker but it didn’t cause a problem. Note, you can buy these with either the ground (negative) or positive being the momentary switched circuit. I opted for the positive momentary switch because I could just turn the light on for second, let go and it would shut off. If you don’t want it at all, you can just cut off blue momentary wire.
Adding The Mounts To The Nilight 18025C-A
I should point out that I did try just using the original three mounting points that came with the bar and three magnets. During some highway driving tests during the rain I thought it moved some and didn’t think that was secure enough, at least not to my liking. The lights are modular so adding a couple more mounts was easily done.
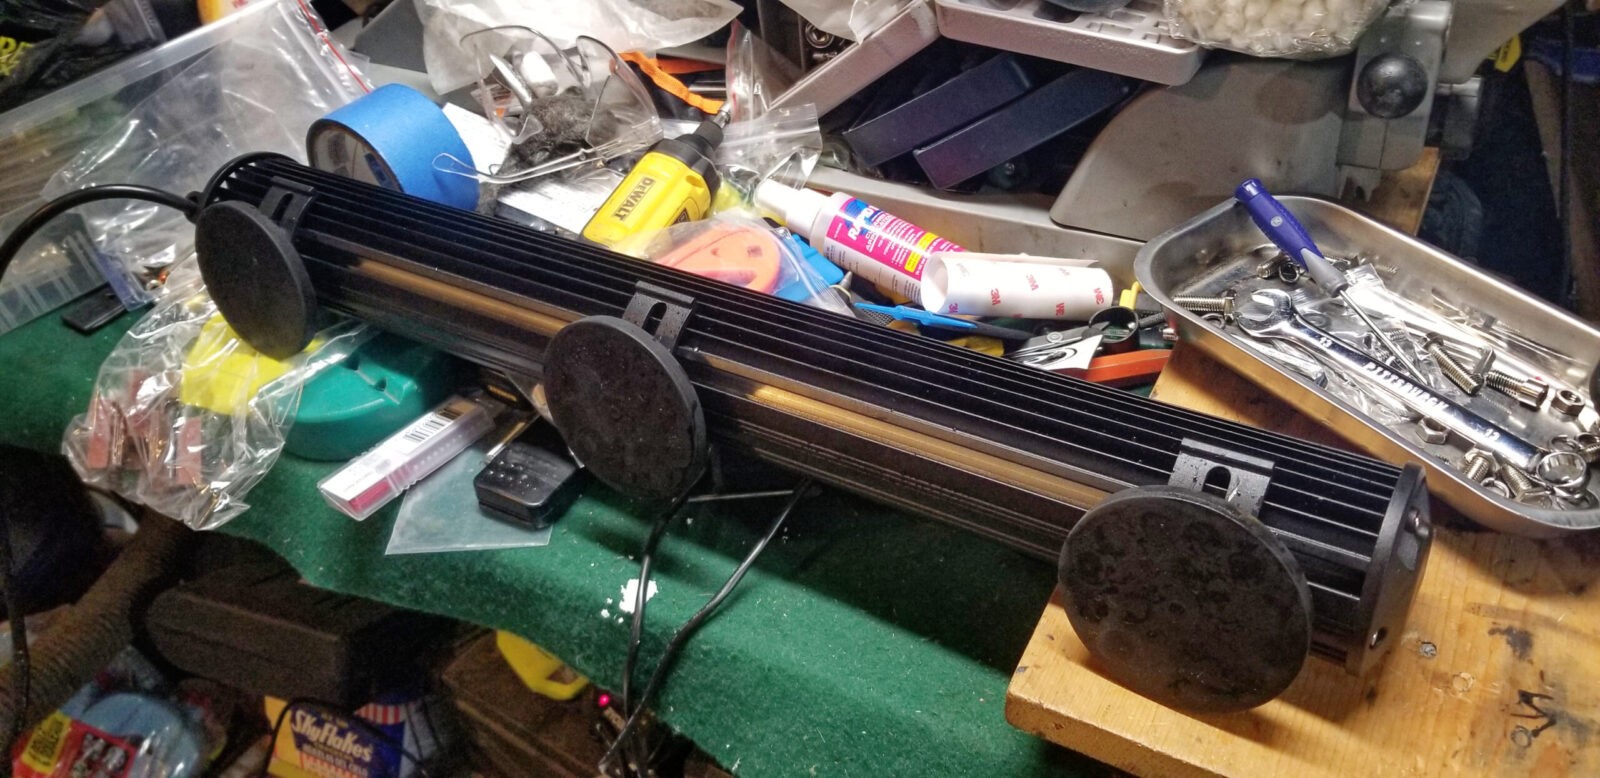
The first thing I did was to unscrew the end cap from the end without the wire. I removed the end cap and the gasket so I could then slide in two extra M8 hex nut for the two extra mounts I planned.

In terms of the mounts, I found that their supplied allen/hex socket screws were really a bad idea on their part. You can’t access them easily at all and they limit adjustments so I switched to regular hex head M8 bolts.

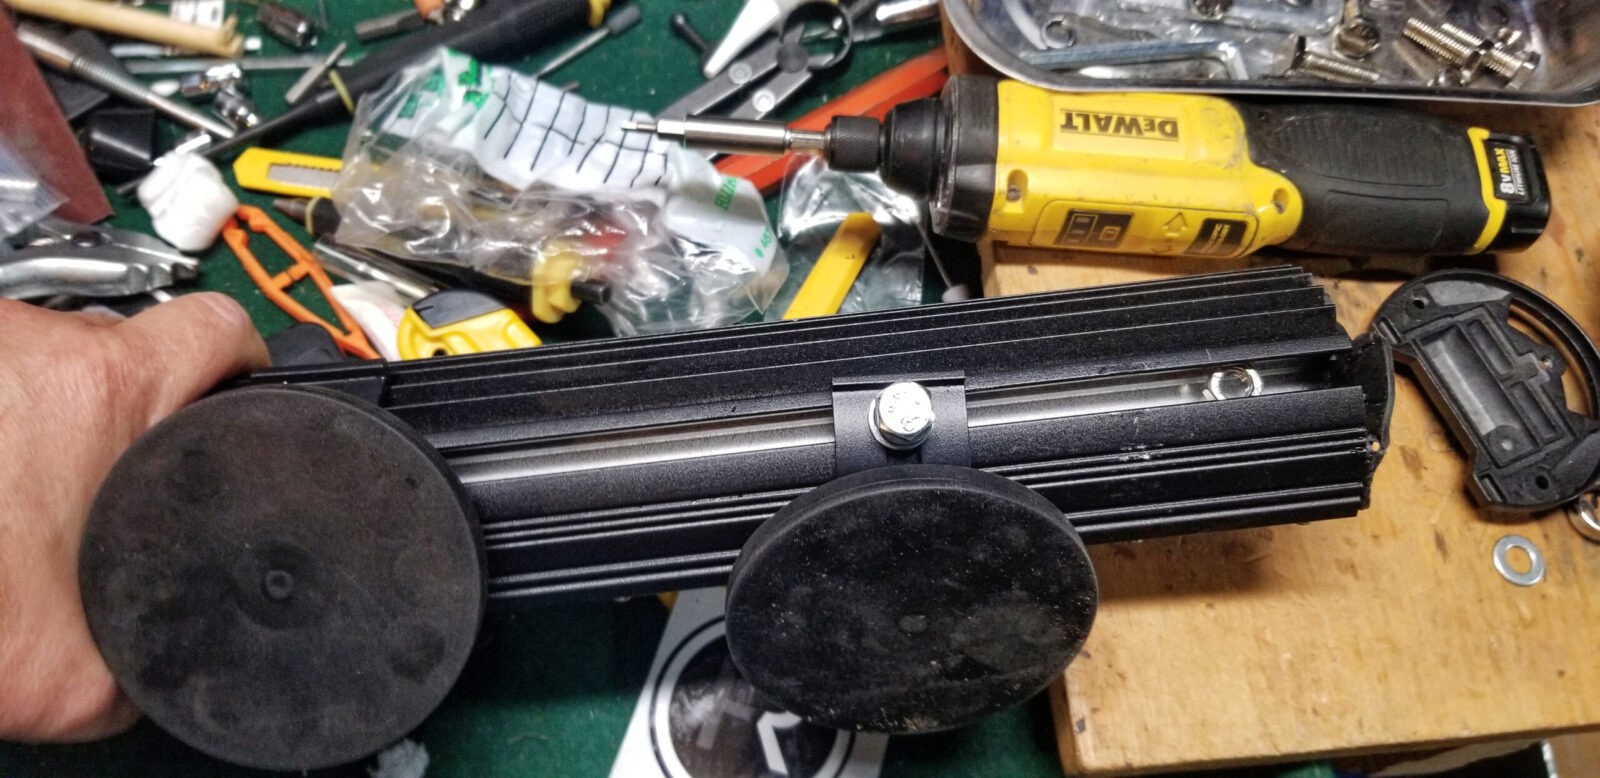
I did apply blue Loc-tite to the bolts going into the rubber pads. In hindsight, I think this might have been overkill. If I ever want to take the pads off, it will take a bit more effort but then again they aren’t going to vibrate loose so easily either.
Wiring The Nilight 18025C-A
Wiring is very straight forward – red line in the light’s short lead cord to the red line on the power cord. If you want the momentary positive to trip the light also, connect the blue and red cord together. Only do this if you buy the momentary positive version of the cord.

case on cable assemblies so you can then get to the exposed individual wires. They are cheap and very handy. The alternative is careful slitting with a box cutter/razor.
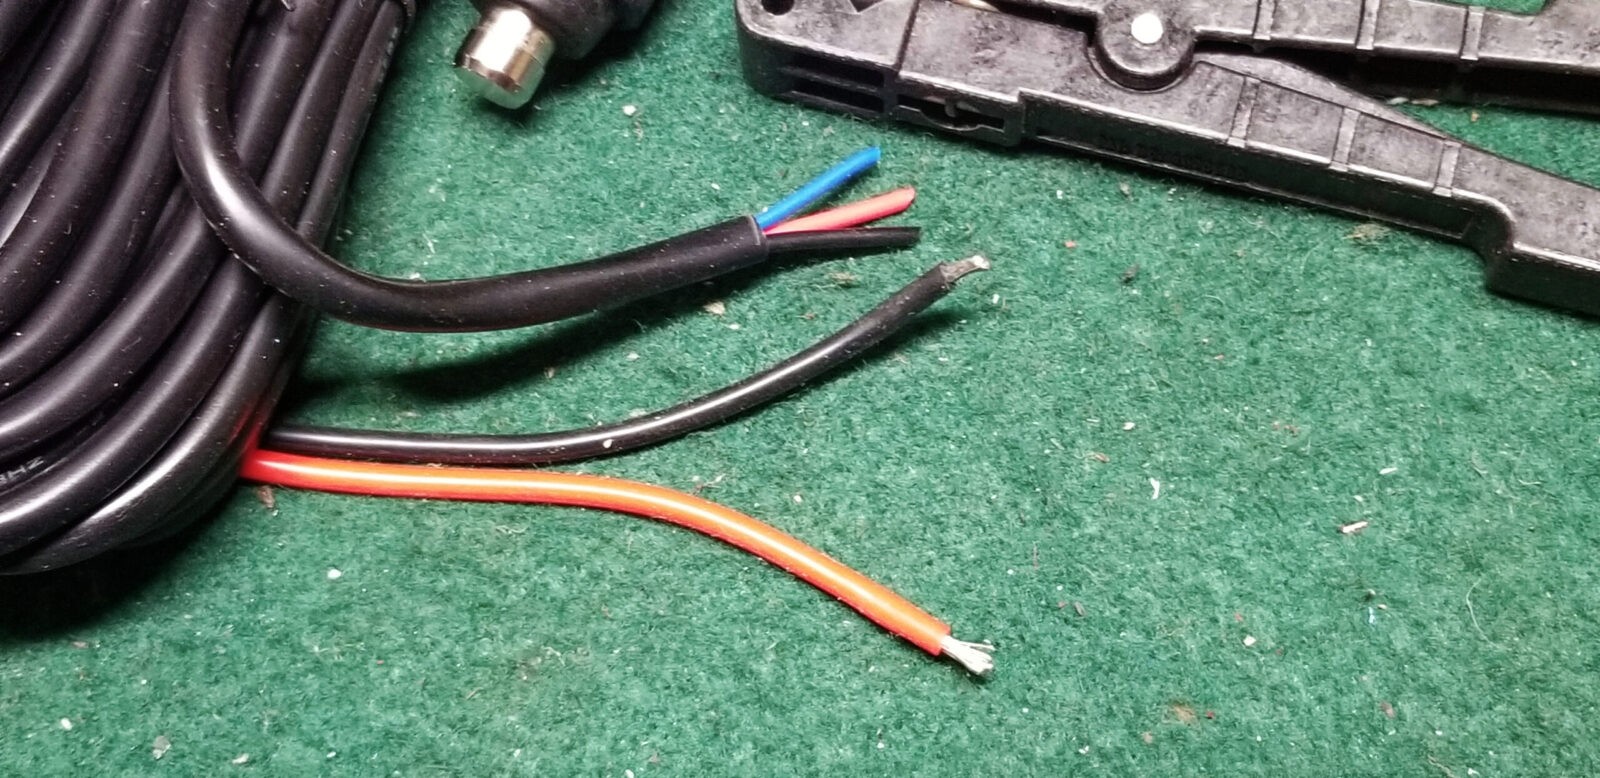
As far as wiring goes, you can use any of the solderless crimp on connectors or you can just solder the lines together. If I know I will need to take something apart then I will use good crimp on fittings. Otherwise, if I want a slim connection that will last, I use a soldering iron and resin flux core solder.
Be sure to test everything before you close up the circuits. I tested the LED light bar itself before I did anything else.
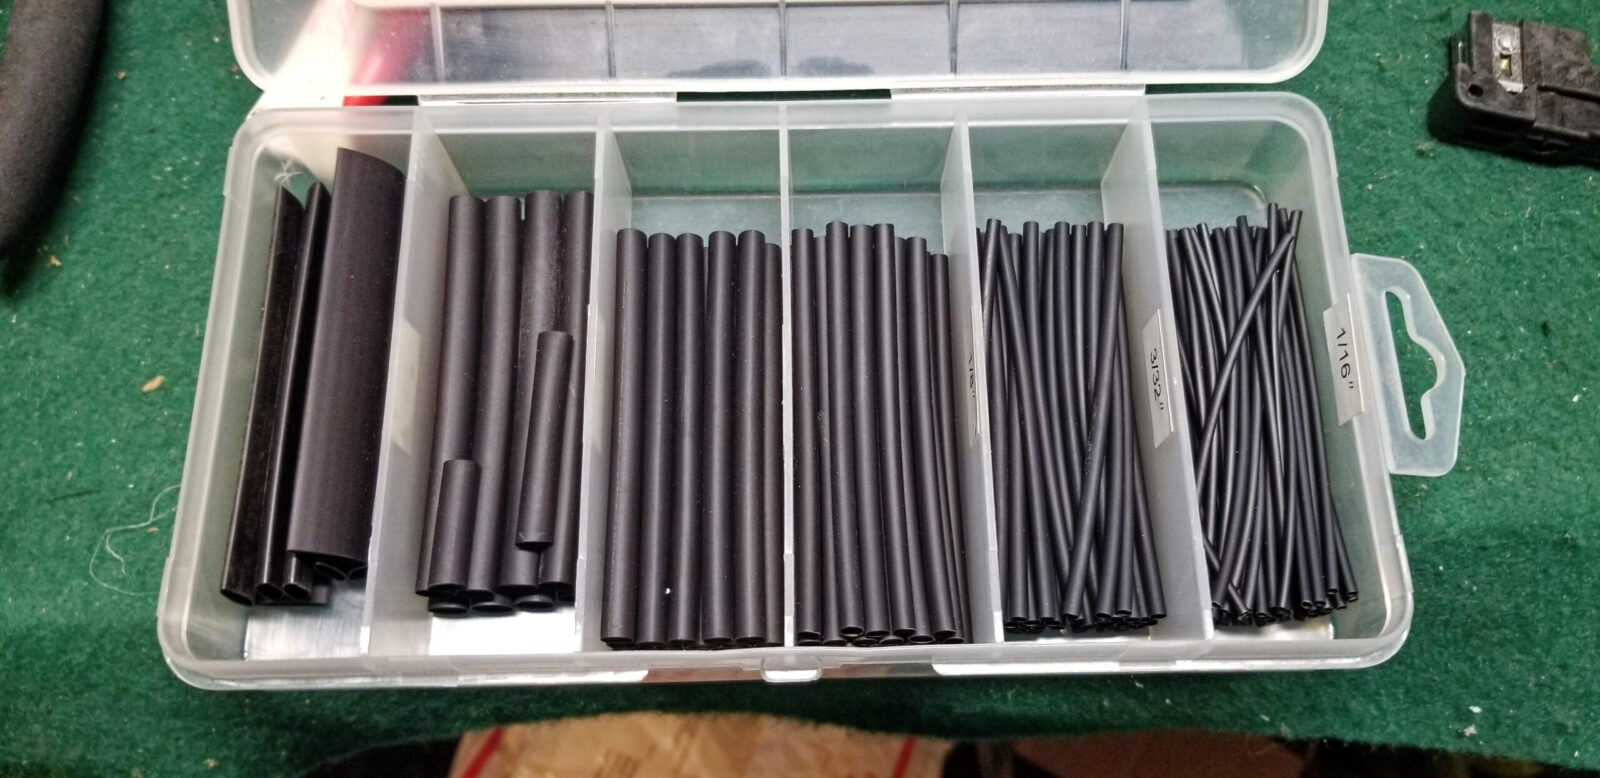
After soldering, I like to put shrink tubes over each line and then over the bundle to keep moisture out and reduce strain. By the way, if you aren’t familiar with shrink tubing, it shrinks when heated – I prefer to use a heat gun but have also used a lighter in a pinch.
If I want to reinforce it further then I may add on a layer or two of quality 3M electrical tape – overkill I know but I don’t want things to fail easily from flexing or moisture.
I also looked at where the light cord was going to rub on my truck’s roof and added a piece of thick decal vinyl to protect the paint.

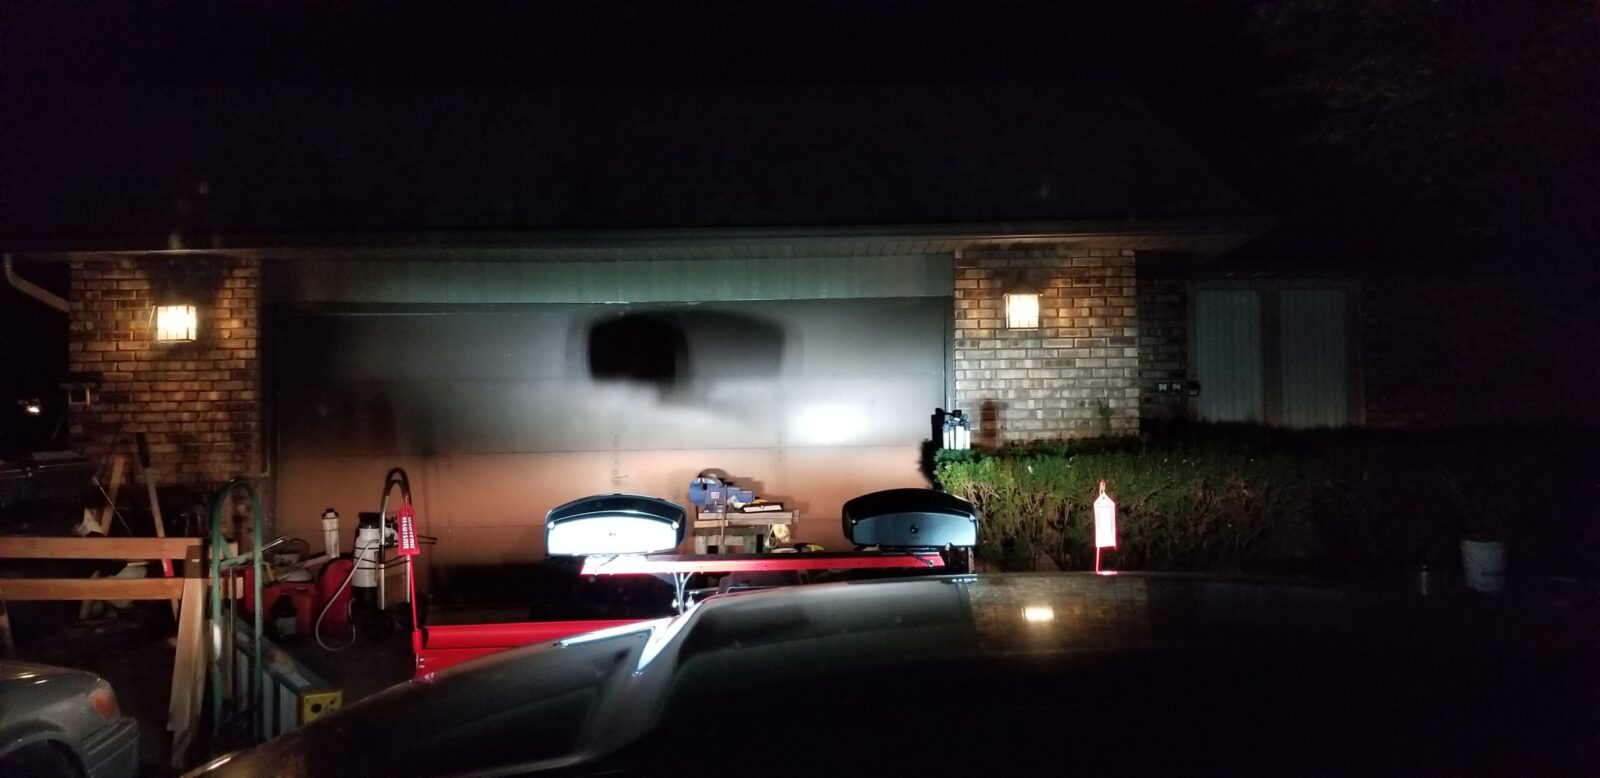
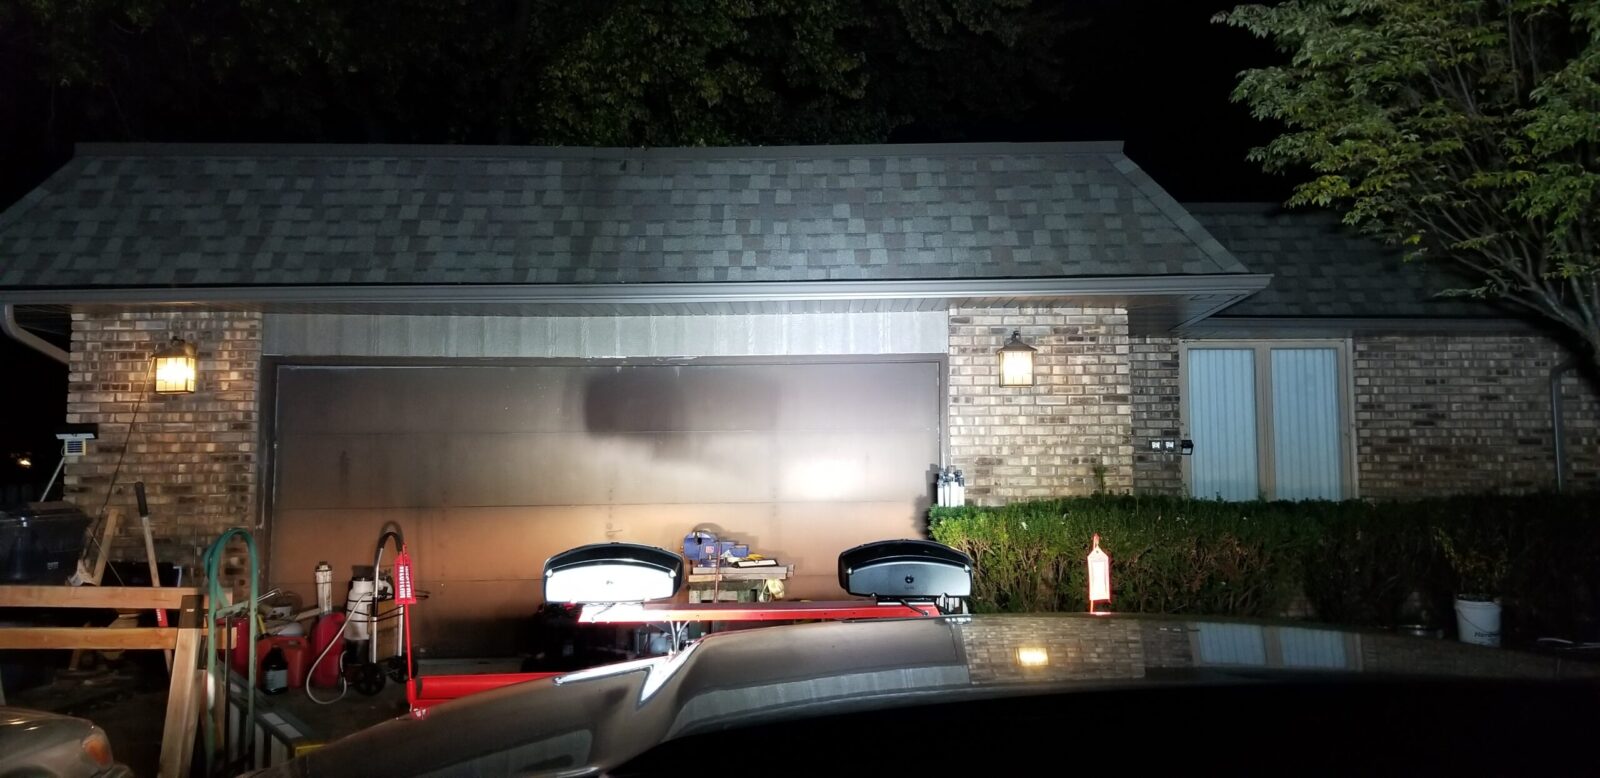
Nilight 18025C-A Results
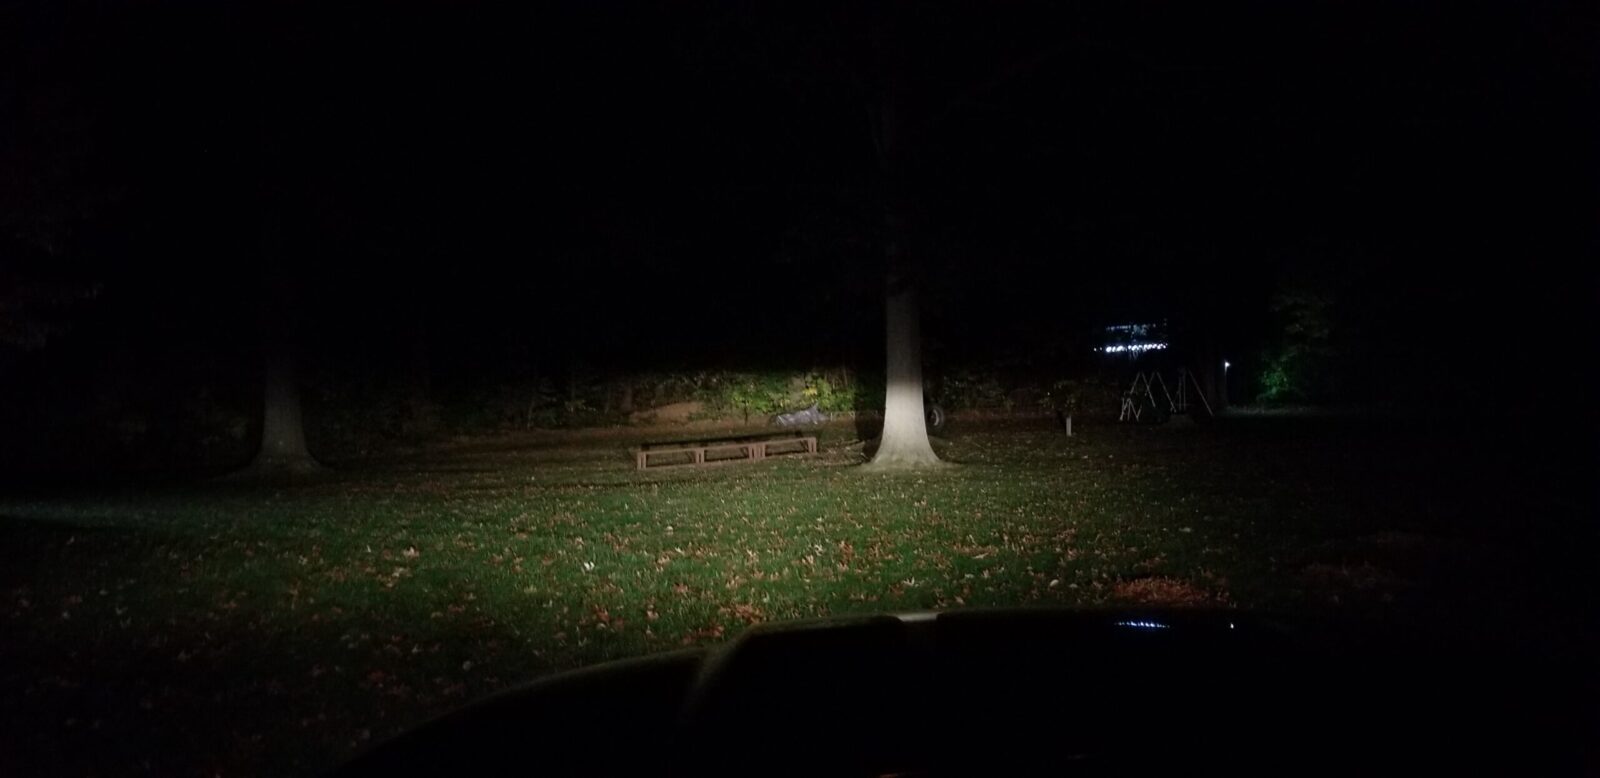
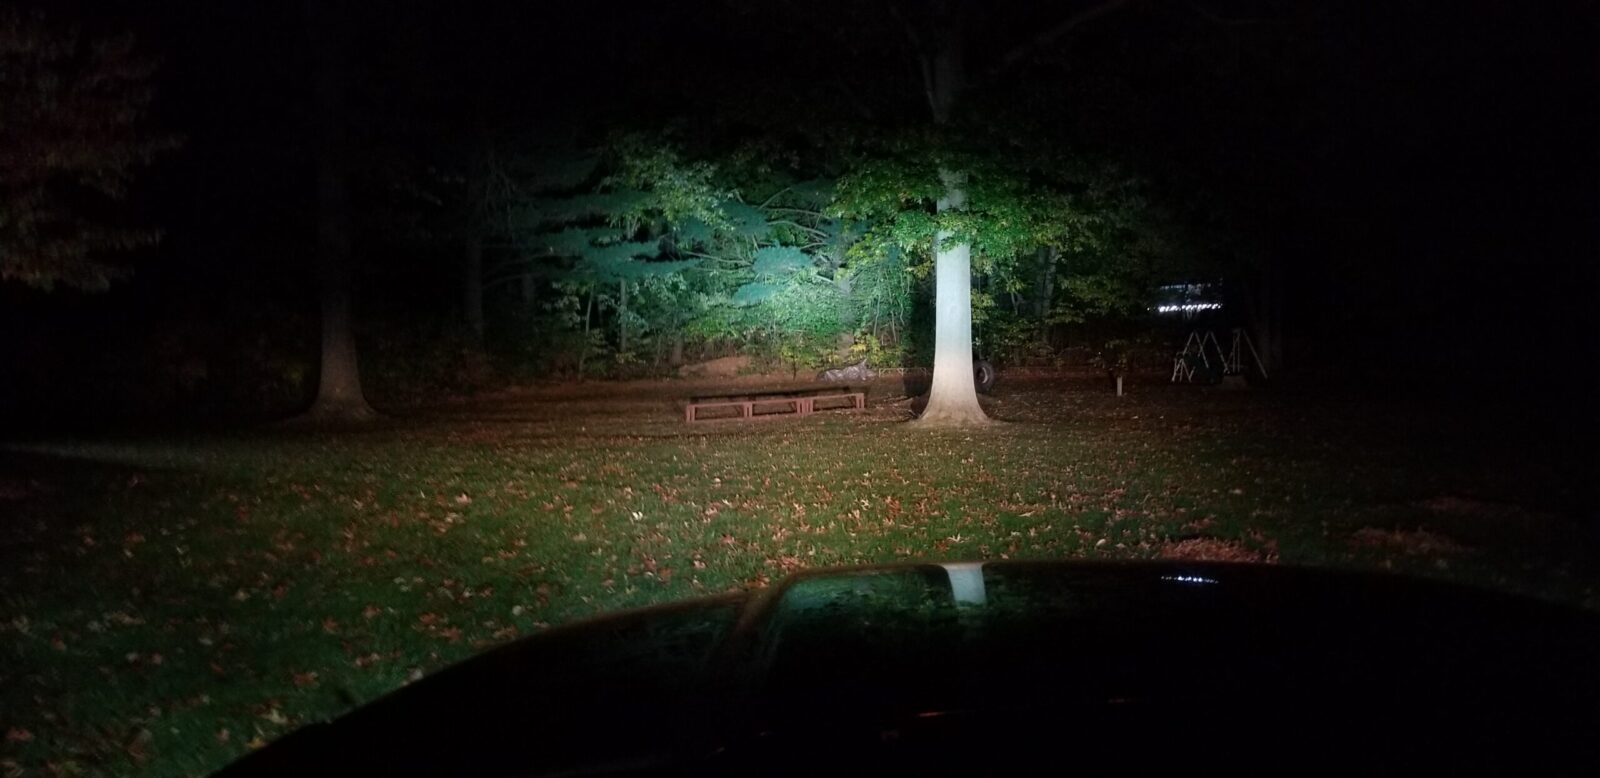
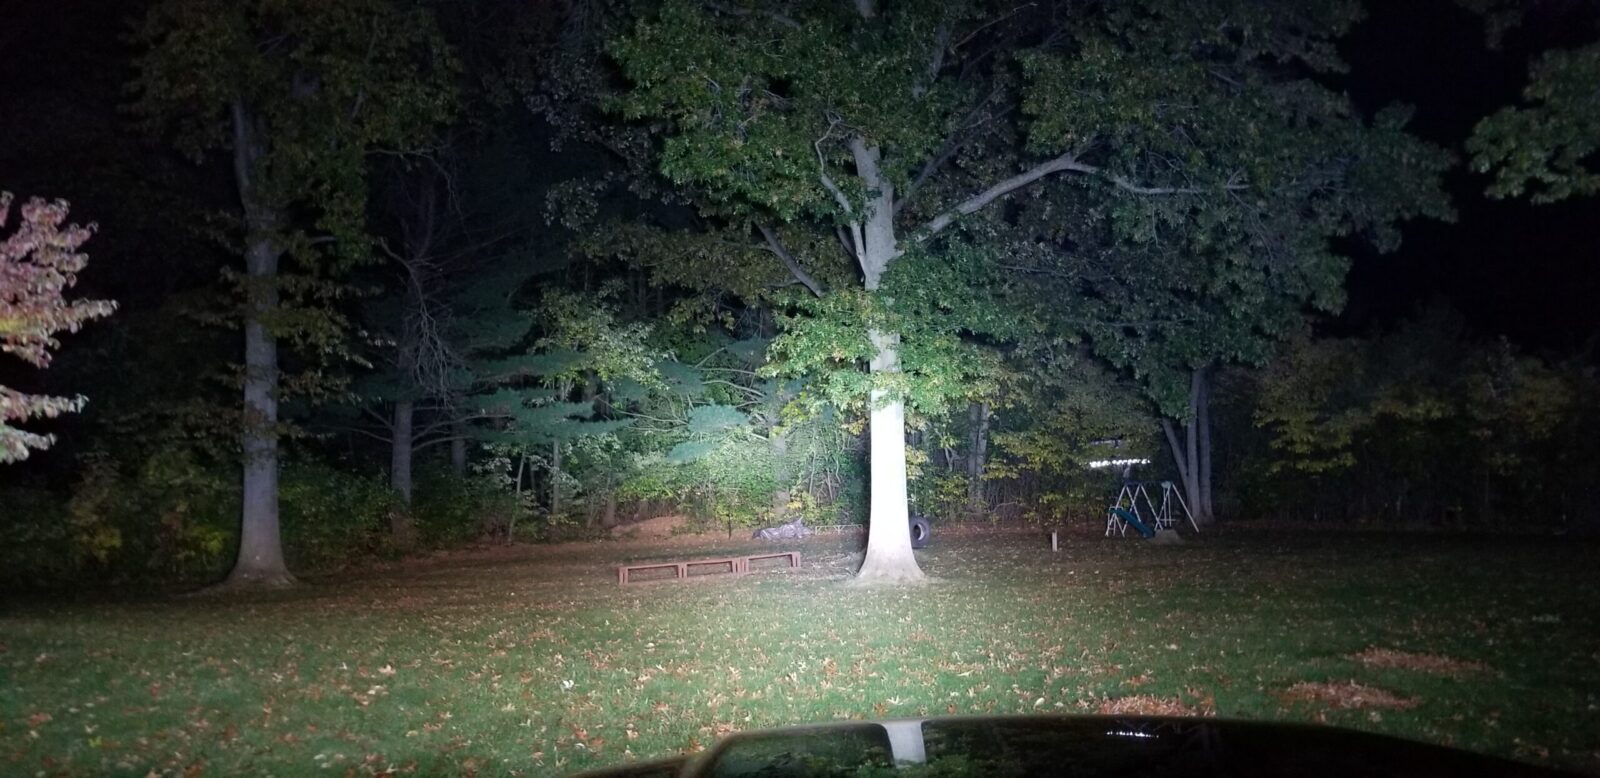
Let’s look at some photos that I took at night and the measures at all based on my laser range finder that I measured before hand from the front of the truck:
Summary
First off, it is stunningly bright and casts it very well both forward and to the sides – the breadth of the field of light cast actually surprised me. So, in terms of the shear volume of light it is kicking out and it’s ability to light things up in all directions, it definitely exceeded my expectations.
The switch works remarkably well. The switches have a nice feel and I like that there is a fuse in the switch assembly protecting the truck’s outlet. At no time did the cord feel warm due to excessive draw and I can’t see that it is limiting the brightness of the LEDs any so that worked out just fine.
Next, it seems to stay put – even during rain. Most of my driving has been around town and 35-45mph. I did go on the highway at 65-75mph for 10-15 minutes a few times but not for hours on end. I also have no intention of putting this through a car wash – I really am not sure how it would fare one way or the other.
I would recommend that you keep a towel in your truck to clean the roof before you clamp on the light and also inspect the magnets to make sure they are clear — otherwise you are liable to scratch up the roof or where ever you clamp the light to.
I also decided to keep the light stored in an old duffel bag under my back seat vs. having any risk of it coming off. I put a micro fiber towel in there too – I mainly bagged it to prevent stuff from getting stuck to the magnets and then scratching things up.
The only downside is that I would need to know before hand that I might need the light and install it vs. leaving it attached all the time. I figure in the Spring that I’ll look into installing the flood lights and then decide if I want to do anything after that.
So, I am very happy with the result and hope this gives you some ideas as well.
Note, I have to buy all of my parts – nothing here was paid for by sponsors, etc. I do make a small amount if you click on an ad and buy something but that is it. You’re getting my real opinion on stuff.
Please share the link on Facebook, Forums, with colleagues, etc. Your support is much appreciated and if you have any feedback, please email us in**@*********ps.com. If you’d like to request a report or order a reprint, please click here for the corresponding page to open in new tab.