Tag Archives: kit

Uzi Part 2 of 7: Stripping the Parts Kit

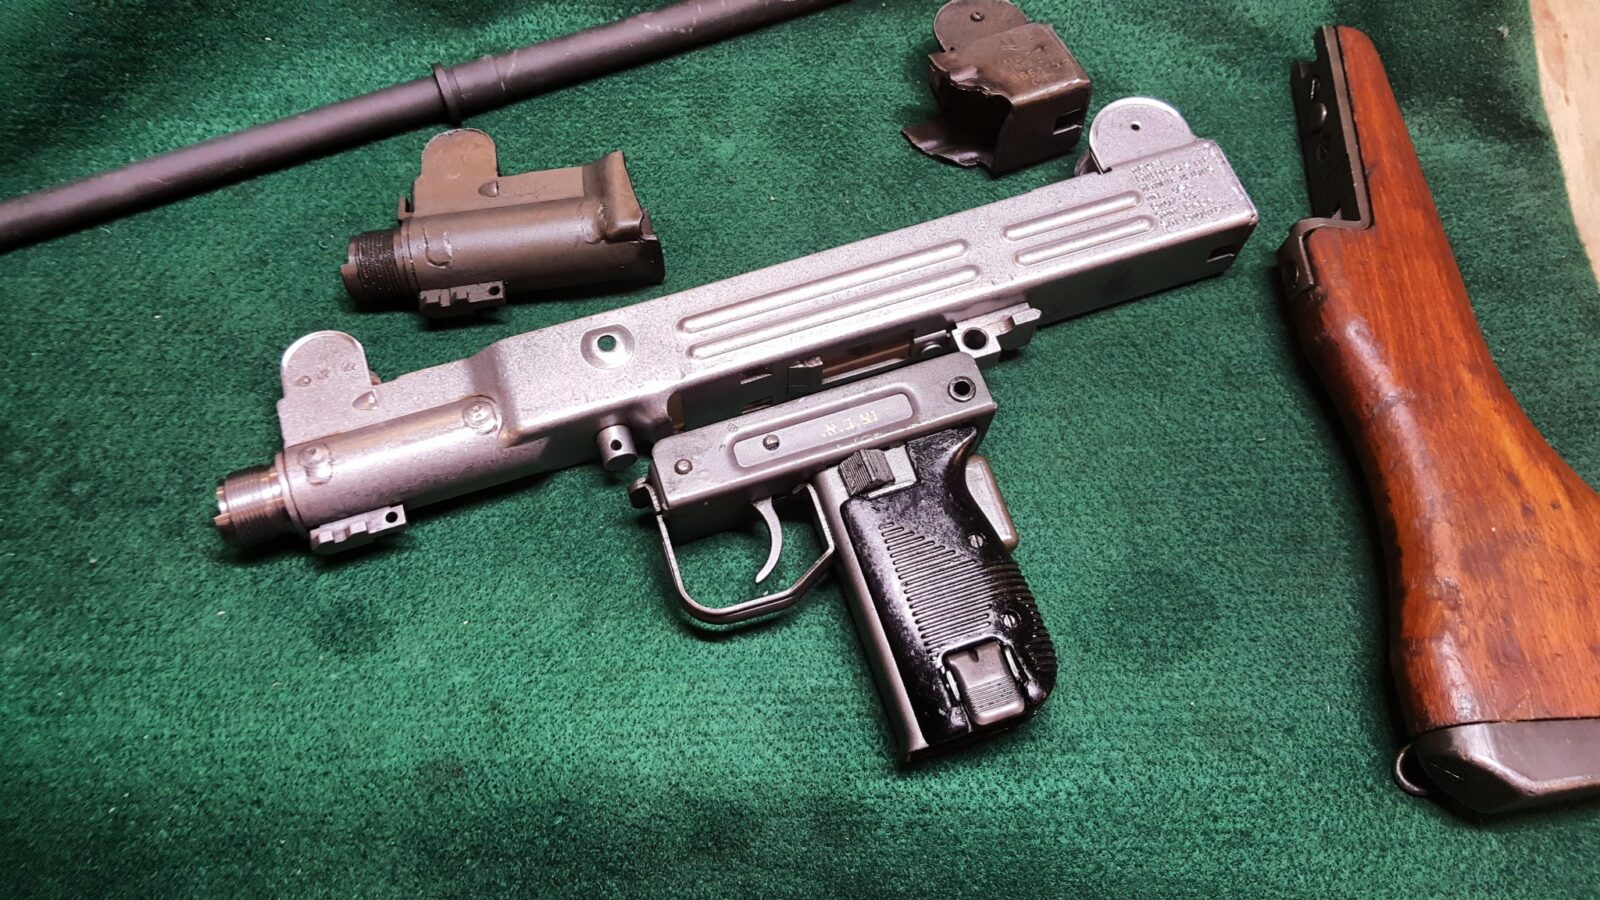
Now there are parts you need from the kit to do your assembly so let’s step through them.  I would highly recommend that you have a means to organize your parts and not lose them.  Zip-Loc bags, parts tray, etc.

Also, another fellow did a great write up on his disassembly – click here to read it.

1] Remove the handguards – they are held in place by two slotted screws.  I highly recommend you always use gunsmith/hollow ground screw driver bits that fill the whole slot of a screw to avoid tearing the screws up.  These screws are not under much torque and mine very readily came out.  You may want to replace these with new handguards.  Mine were in tough shape due to being bounced around in the parts kit bag.

2] You will need the front sight assembly.  It is comprised of the inner sight itself, a locking nut and a washer underneath.  A real Model A Uzi front sight tool makes a world of difference as you can easily loosen the locking nut and then unscrew the whole assembly.


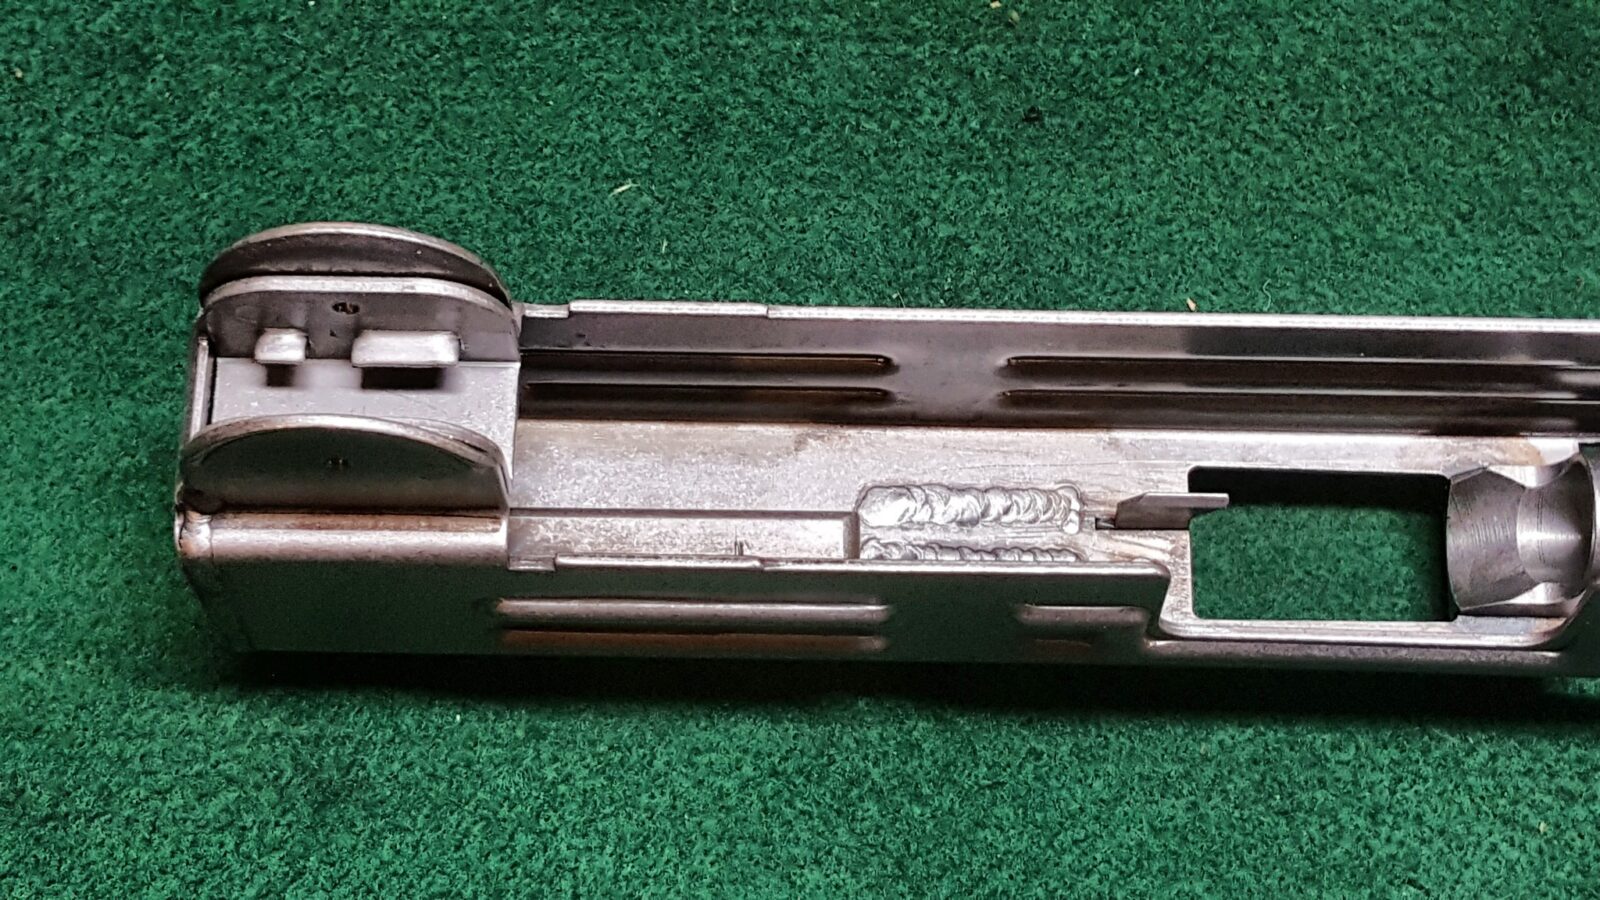
3] Remove the barrel nut catch assembly.  It is comprised of the catch itself and a spring.  Reach in from the rear under the sight, push the tab down with your finger and pull the assembly out.  You can do this with your fingers.  If you look at the first photo in step one, you can see the catch still in the old receiver stub – it is the L-shaped protrusion over the threads.  You’ll notice the new receiver (which is still in the white in these photos) does not have it.  Now, in the second photo, if you look at the old stub on the right you will see the tab of the catch sticking out – this is what you push down with your finger while pulling out of the front.

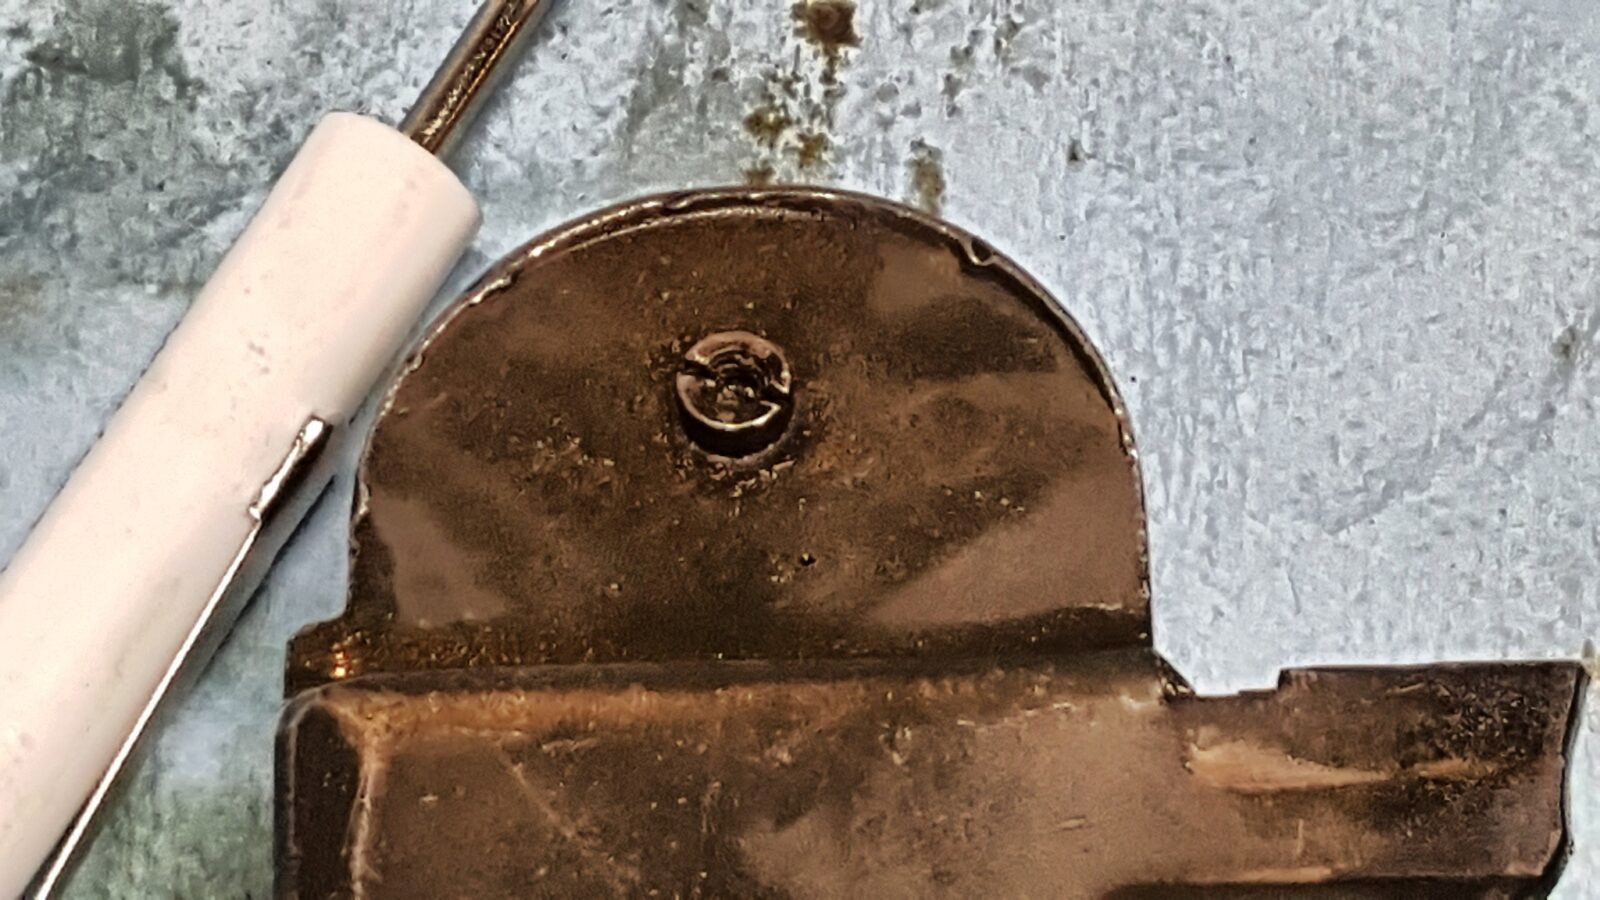
4] You will need to salvage the front sling swivel.  I sanded mine down flat, center punched the middle of the rivet, start with a small 1/8″ drill bit and worked my way through larger and larger bits until the swivel separated from the old rivet.  I then used a punch and removed the remnants of the old rivet from the center of the swivel.  By the way, I’ll tap the sling and mount it with a button head screw and Loc-Tite in a later post.  Don’t worry about tracking down a replacement rivet and squishing it unless you really want to.

5] Remove the rear flip sight assembly.  Now, there is a slotted screw on one side and a tiny nut on the other.  Be careful when you loosen the nut as it will come right off.  I used a long punch to push the screw back far enough to then grab the screw and pull it out.

6] The next step removes the top cover catch.  The rear sight spring actually covers the catch assembly so just pry the spring upward and you will see the top catch and the captive spring.  Now be careful – this spring will launch if it slides over the rear lip so carefully remove the top catch itself by sliding it out the front.

7] You will need the barrel nut.  Mine was in a small bag in the parts kit.

8] You need the top cover.  Now I bought a modified one with a picatinny rail attached.  If you use the original cover, there is a small wedge called the “cocking pawl” that you will need to remove.  My cover was lose in the bag so I just set it to the side.

9] You will need the return spring assembly but you will need to cut the buffer plate off at the end of the guide rod.  I just took a pair of diagonal wire cutters, made one snip from the side and it literally came right off the return spring guide rod.  Be careful not to bend the guide rod – you will use this spring assembly with the new bolt.

10] You need two things from the submachine gun open bolt.    Put the bolt on a bench block and push/tap out the extractor retaining pin from the side of the bolt – tap/push on the small side with a punch.  The extractor looks like a screw from the rear end of the bolt but it actually presses right out.  Push from the end with a punch or small screw driver and it will push right out the front of the bolt face.  Note, the slot is so you can use a screw driver to rotate the extractor into proper position when you install it.

11] In my parts kit, the entire grip frame assembly was in the bag.  Now there are some critical changes that must be made to it but for now, set it to the side.  The grip panels were chewed up so I bought a new set of those along with handguard panels.

12] You need the complete wood buttstock assembly with the entire wood stock mounting bracket system and all the hardware on the stock.

That’s it for now.  The next blog post will get into the details of how to refinish the wood stock plus permanently attach it.


If you find this post useful, please share the link on Facebook, with your friends, etc. Your support is much appreciated and if you have any feedback, please email me at in**@ro*********.com. Please note that for links to other websites, I may be paid via an affiliate program such as Avantlink, Impact, Amazon and eBay.


Uzi Part 1 of 7: The Uzi Kit, Receiver and Barrel

One of the firearms that had an impact on me growing up was the iconic Israeli Uzi.  In the 1980s you would see them in the news, TV shows and movies all the time.  Today, being quite a bit older, what interests me is the history and engineering that led up to this weapon.  Suffice it to say that Israel has known conflict even before the country was founded in May 1948 and certainly ever since.  Israel first fielded the Uzi in

I’m not going to duplicate the history as there are some excellent resources out there that explain the political climate and how the Uzi came into being.

  1. The first is a book by David Gaboury entitled “The Uzi Submachine Gun Examined” that is the single best reference guide I found. I can’t recommend it enough and you will not regret buying it.
  2. There are three overview videos on Youtube that provide good context – especially if you prefer watching  a video to reading.
  3. The Wikipedia entry provides a decent overview as well.

The Uzi has evolved into a variety of weapons including the micro uzi, semi-auto versions and so forth.  What interested me was the full size Uzi that I had grown up hearing so much about and you’d see them with the original wood stock and the metal folding stock.

Over the years, I’ve made many AKs and ARs for personal use.  I’ve been really busy but wanted to build something different.  For the past several years I have noticed that there are a ton of Uzi kits for sale from the various parts kits vendors and this sparked my interest.  For me, part of the challenge of building from a kit is learning how to do so legally and finding all the parts.

I knew I wanted to build a carbine vs. a pistol so that shifted me in the direction of a wood stock for a number of reasons:

  1. To be classified as a rifle, the barrel needed to be at least 16″ with an overall length of 26″.
  2. To get the overall length, that meant I either needed an even longer barrel or a permanently attached stock that would surpass that 26″ minimum.
  3. The resulting carbine would be front end heavy and the wood stock would help balance things out.
  4. I am not a huge fan of my cheek being on sheet metal – I prefer wood with a gently bend.

Now you many have a different perspective and that is just fine but due to this I ordered two wood stocked Uzi kits from Robert RTG.  I only planned to build one Uzi but purchased a spare kit for donor parts just in case.  What arrived were two seriously oiled kits.  The wood was a tad beat up as were the pistol grip and handguard panels – probably from being packed with the parts.  The bolt and fire control group honestly looked like new.

In terms of the receiver, all my research pointed me to buying one from McKay.  They offer just the bent receiver shell and you can do all the welding or a fully welded receiver that is all set for semi-auto use and ready for you to assemble with.  I opted for the ready-to-go model and based on McKay’s reputation, I also ordered my 16″ 1:10 twist 9mm NATO chambered barrel from them also.  I placed my order direct with McKay, had them ship it to my FFL, Scott Igert, and it arrived a week later.

McKay really did a real nice job on the receiver.  Here it is with some of the original stubs sitting by it:

Here are the details that McKay took care of when they make their fully welded receiver:

  1. The front trunnion has a reduced inner diameter to prevent installation of a military model
  2. The rear barrel support ring must not allow a military barrel to be installed
  3. The bottom of the semi-auto feed ramp will block a full auto sear – in other words, it is just a tad too long for the full length original sear to fit.
  4. The right side of receiver behind the ejection port has a block bar welded in place that prevents the installation of an original full auto open bolt.

The other plus is that everything above is American made so that means the receiver and the front trunnion count as US-made parts.  By the way, in terms of 922r, an Uzi has 13 parts on the 922r parts list so that means three must be replaced with US parts to meet the maximum limit of 10 foreign parts.  The McKay receiver, front trunnion and US-made barrel will enable you to meet the parts count requirement.

By the way, there are a lot of other posts about how to do an Uzi:

For Uzi parts, my go-to sources are:

At any rate, let’s wrap this post up and will discuss the the parts you will want to remove from the old kit.


Note, I have to buy all of my parts – nothing here was paid for by sponsors, etc. I do make a small amount if you click on an ad and buy something but that is it. You’re getting my real opinion on stuff.

If you find this post useful, please share the link on Facebook, with your friends, etc. Your support is much appreciated and if you have any feedback, please email me at in**@ro*********.com. Please note that for links to other websites, I may be paid via an affiliate program such as Avantlink, Impact, Amazon and eBay.