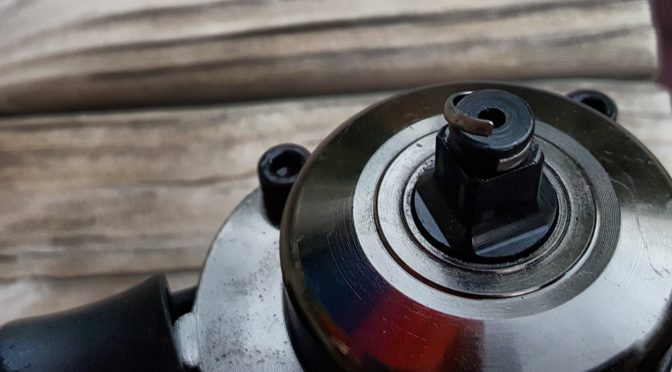
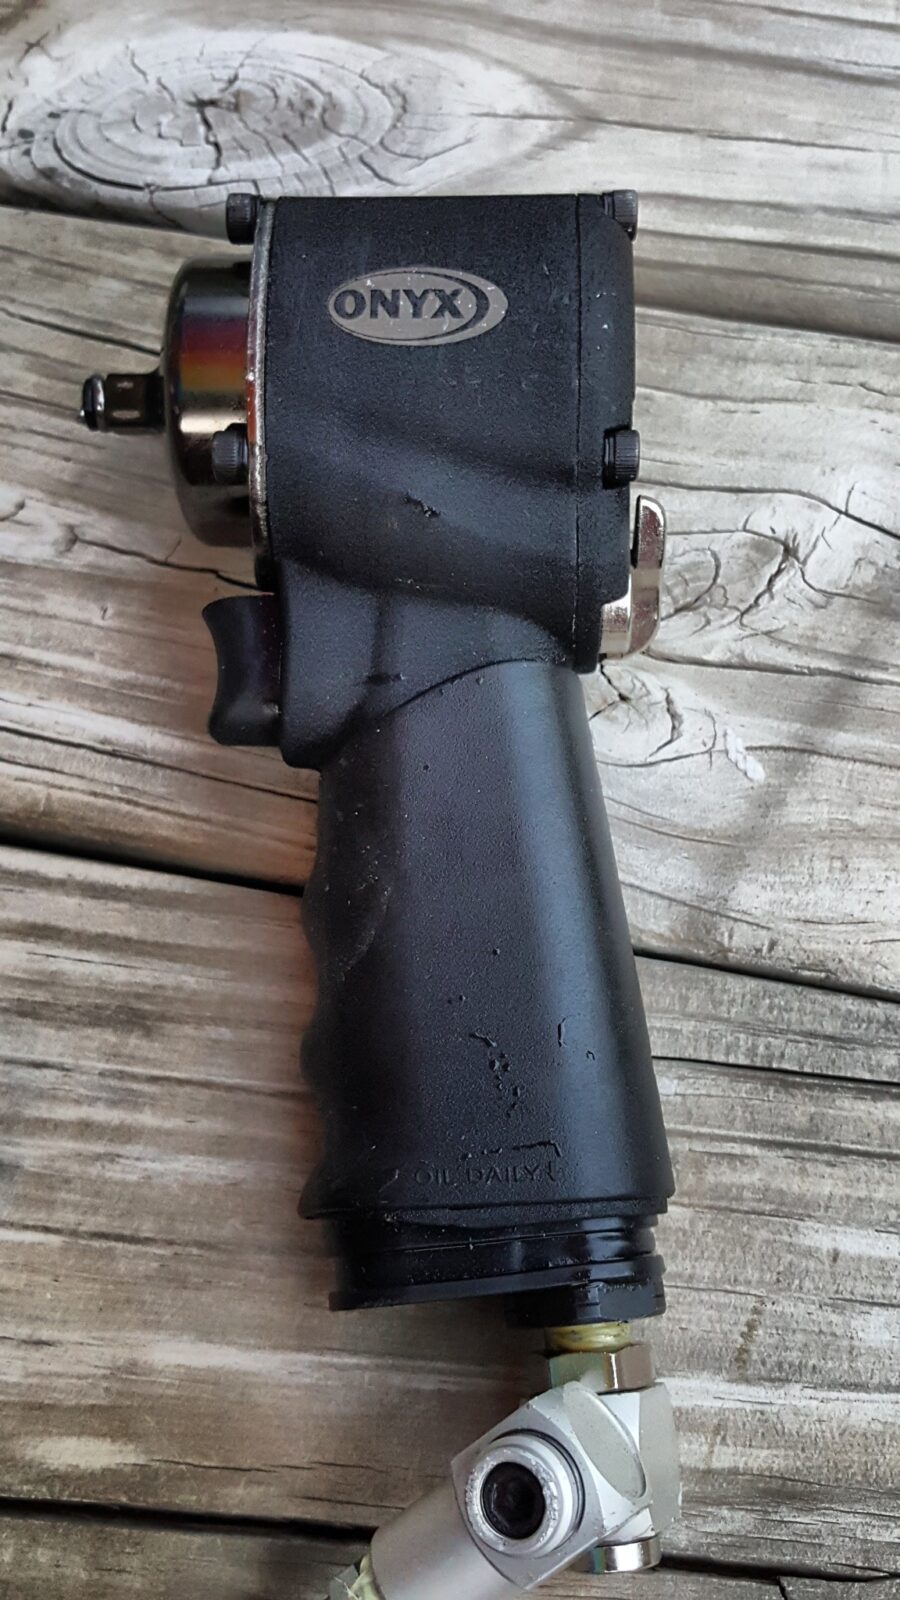
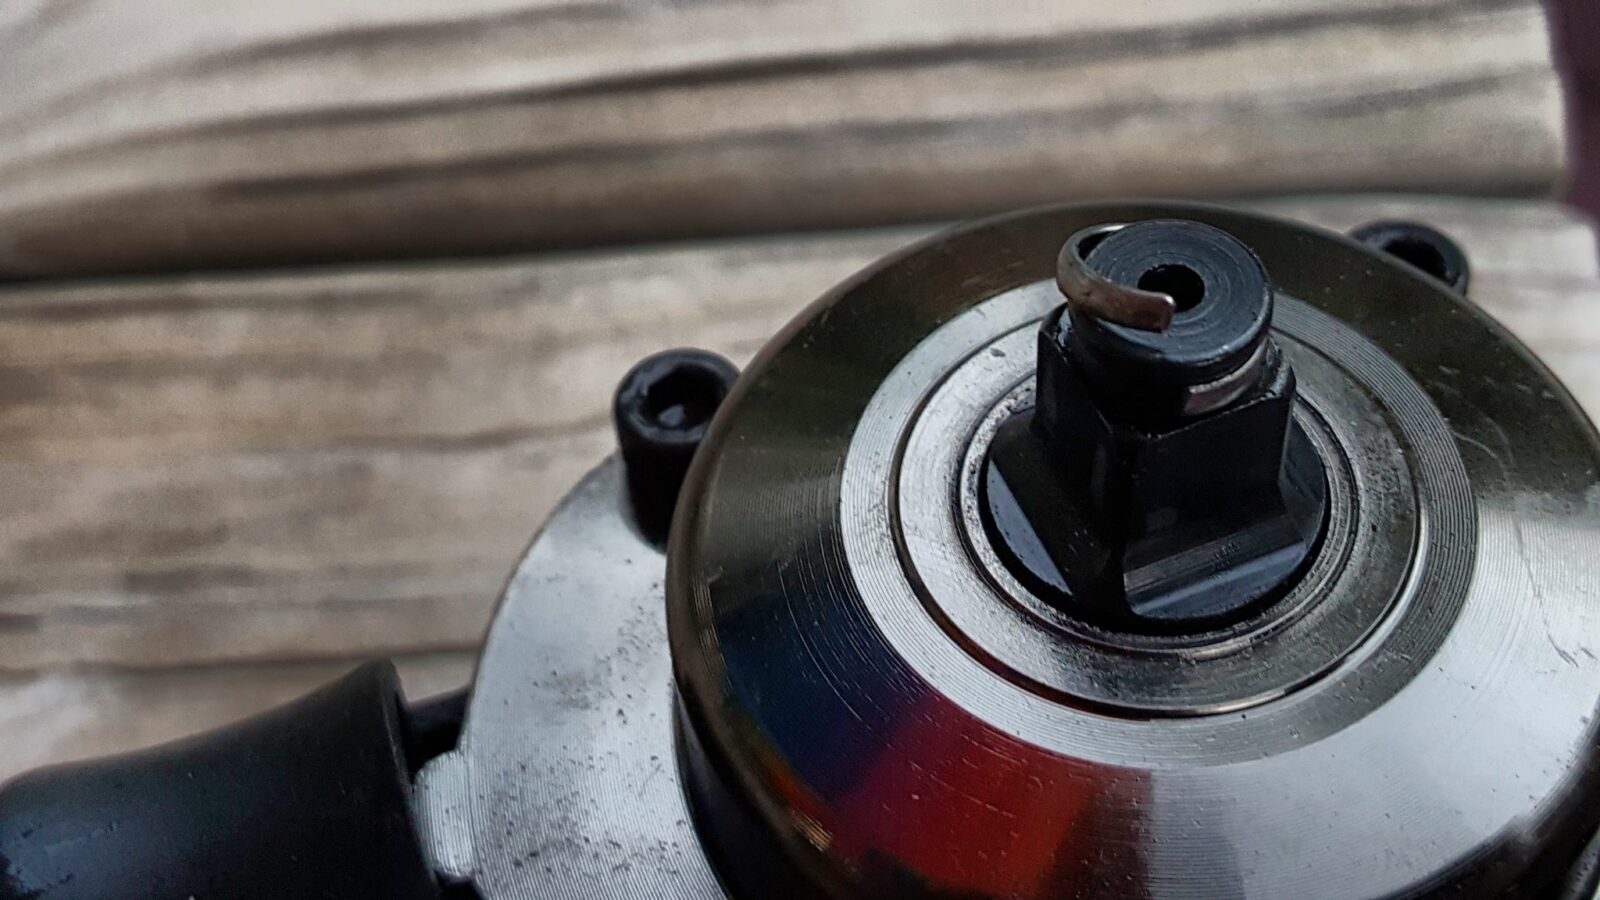
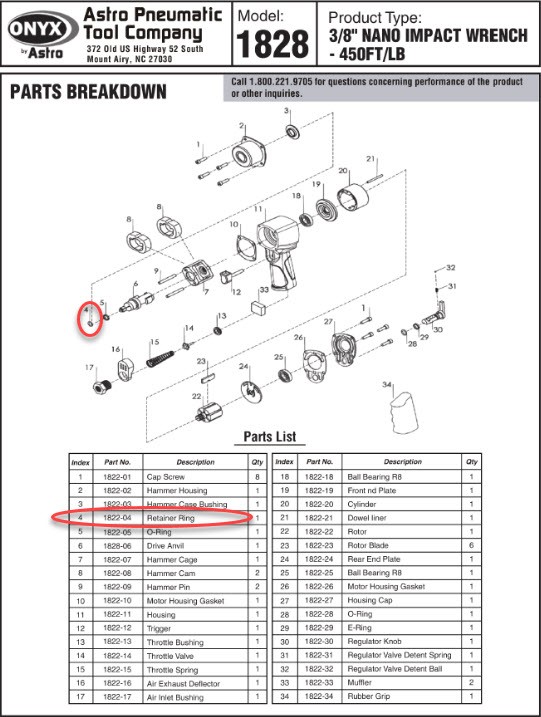
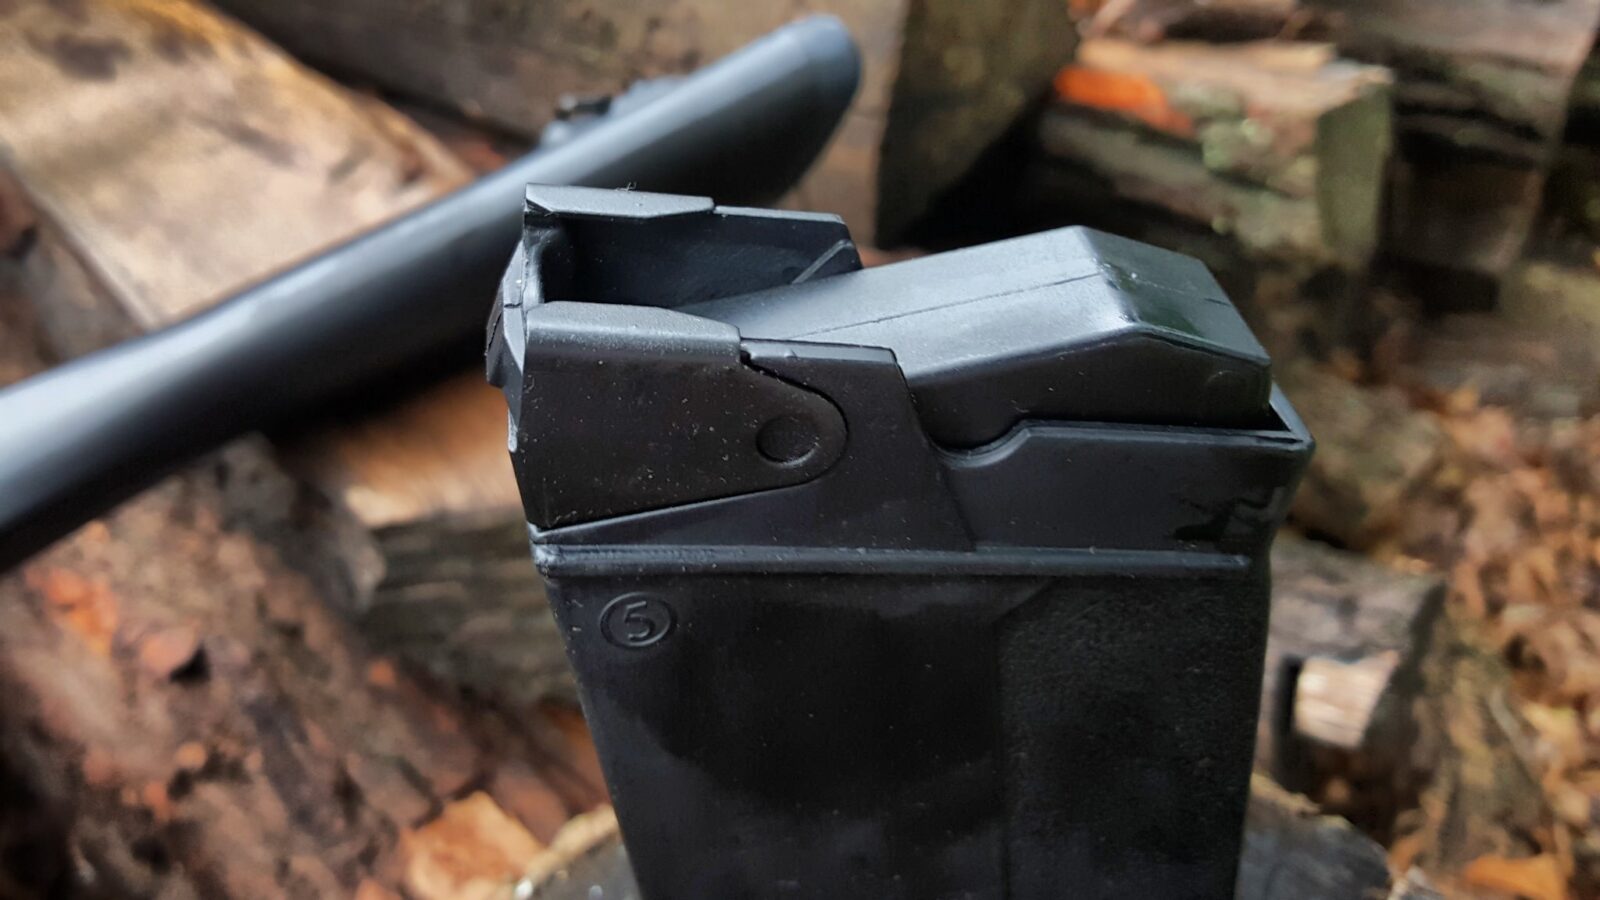
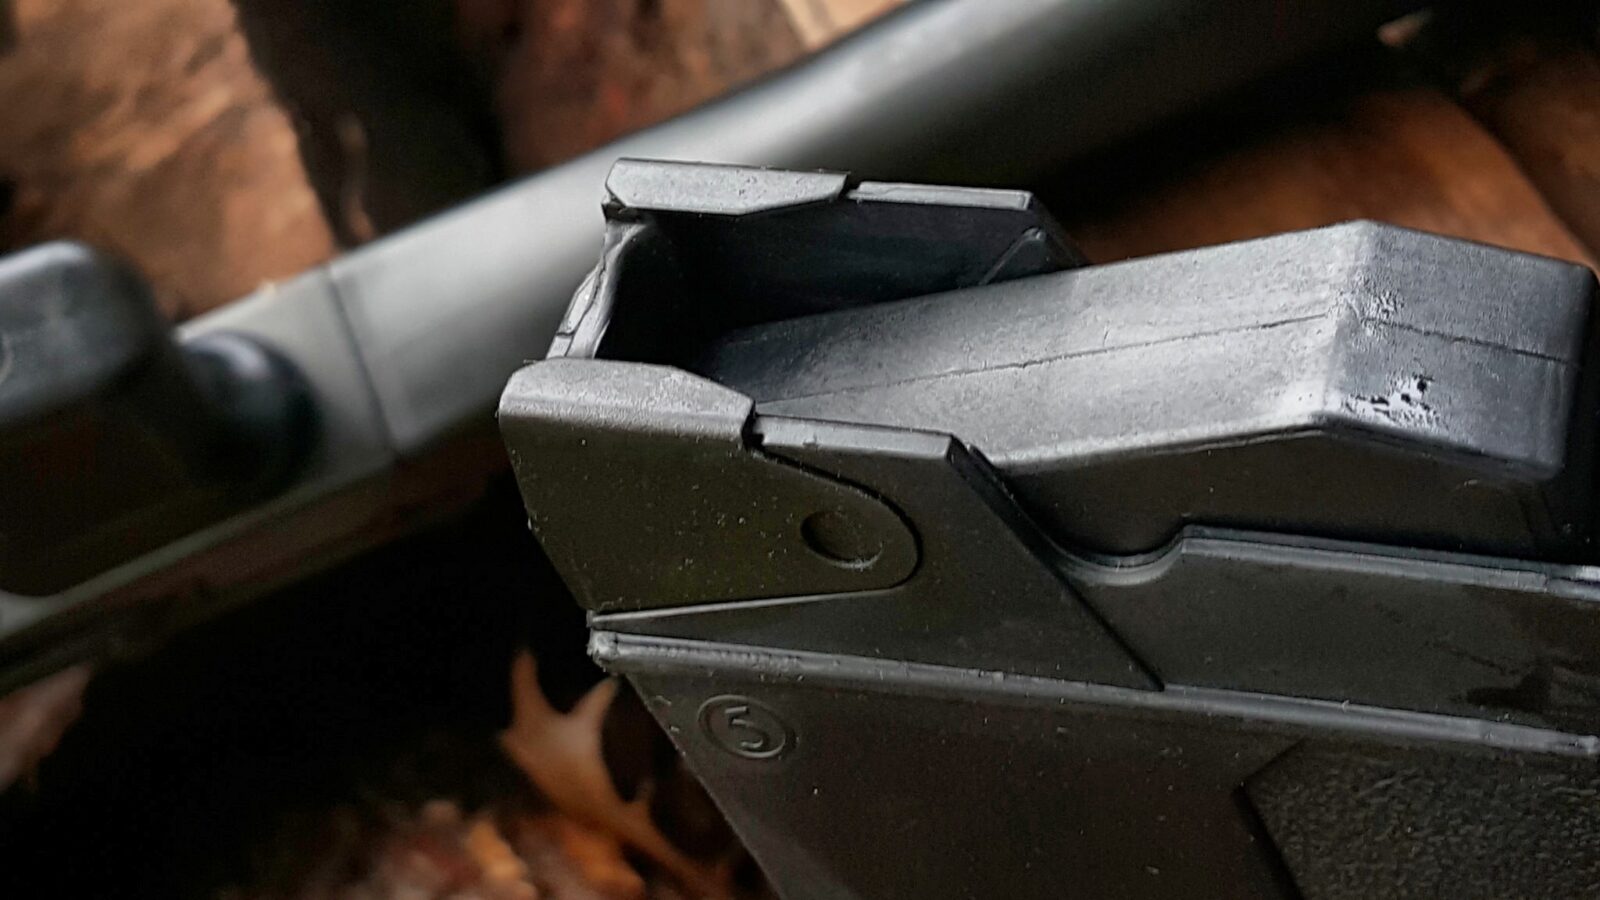
Well, after only moderate use my Onyx 1828 3/8″ Nano Impact Wrench has a problem. On the nose is a small retaining ring, that holds sockets in place. It came out of its groove and bent. At first I couldn’t figure out why it was so hard to put sockets on or take them off the wrench. The last one I had to hammer off and then saw what the problem was:
The retaining ring that holds the sockets on the nose had bent! It was so bad that I didn’t even try to see if I could get a socket on as you can see in the above photos.
First, I checked Amazon to see if I could return it but could not – no worries – I bought it back on January 25, 2018 — about eight and a half months ago. So, I Googled Astra Pneumatics, found their warranty page and they said to call (800-221-9705) with the model number of the unit (The 3/8″ Onyx I have is model # 1828) and the part that I needed from their breakdown sheet located on the main product page – so I got that too:
I circled it in red above for reference – it’s part number 1822-04 and called the 800 number. The phone was promptly answered and the lady I spoke to was very professional. They knew there was a problem with a previous generation of the wrench sold earlier by Amazon that they had since fixed. She said she’d be very happy to send me a new ring for free. “Cool – I don’t have to send it in” so I gave her my info.
Here we are two weeks later and still no ring. I called again and this time wrote down the name of the customer service agent and she gave me a reference number, which the last agent did not. I told her I was bummed because I needed the wrench and the sockets just fell off when I was trying to do odd position work – which was true. The sockets were just falling off on work with any downward angle.
So, I talked to her on September 11th and we’ll see how things go. I’m hoping the ring comes this time or I will call back and escalate matters. I really like the wrench – it’s light, powerful and can get in tight spaces but that all doesn’t matter if it can’t retain its sockets.
So, I wanted to pass this along in case you are having a similar issue and you want to know who to contact and what to request. I’ll update this post once I have the ring and the unit back in operation … or, worst case, I have to call a third time and escalate but I think things will get resolved this time as the customer service agent made sure (literally) that I wrote down both her name and the reference number.
We’ll see.
This started on 9/11/2018.
Update 9/20: They sent the wrong size retaining ring!!! The replacement unit must be for the 1/2″ model. It’s 8:07pm and they closed at 3:30 Pacific so I left a general voicemail as Marcy’s voicemail box in customer service is not accepting messages. I’m now getting irked.
9/21 – Called and talked to Marcy who confirmed they sent the wrong size ring. I told her this was causing problems for and I’d really appreciate it if they would send the ring some way other than first class mail. She mumbled something to the effect that she couldn’t do anything about it or it was out of her control.
9/26 – Still dead in the water and am ticked off.
As an update, some time in October 2018 this got resolved. I called and asked to talk to a supervisor. It turns out the rings were back ordered but she had a stash to help out people who had waited a long time. She sent me two and I was back in business. If you are going to buy one, first find out if they have changed the socket retaining ring/clip design. I think someone at that firm told me they had but confirm this. If it weren’t for this problem, I’d be very happy. The wrench itself works fine otherwise.
2/21/20 Update: I use this wrench occasionally when I am in a tough spot. I don’t use it more because I don’t trust the hog ring to last. I really can’t recommend this tool given the challenges I’ve had and knowing that hog ring is a problem.
If you find this post useful, please share the link on Facebook, with your friends, etc. Your support is much appreciated and if you have any feedback, please email me at in**@*********ps.com. Please note that for links to other websites, I may be paid via an affiliate program such as Avantlink, Impact, Amazon and eBay.
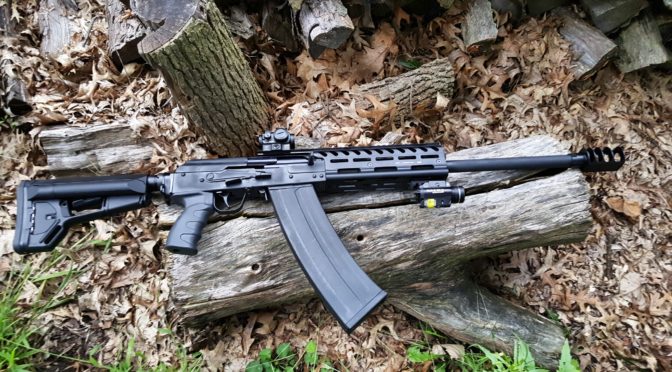
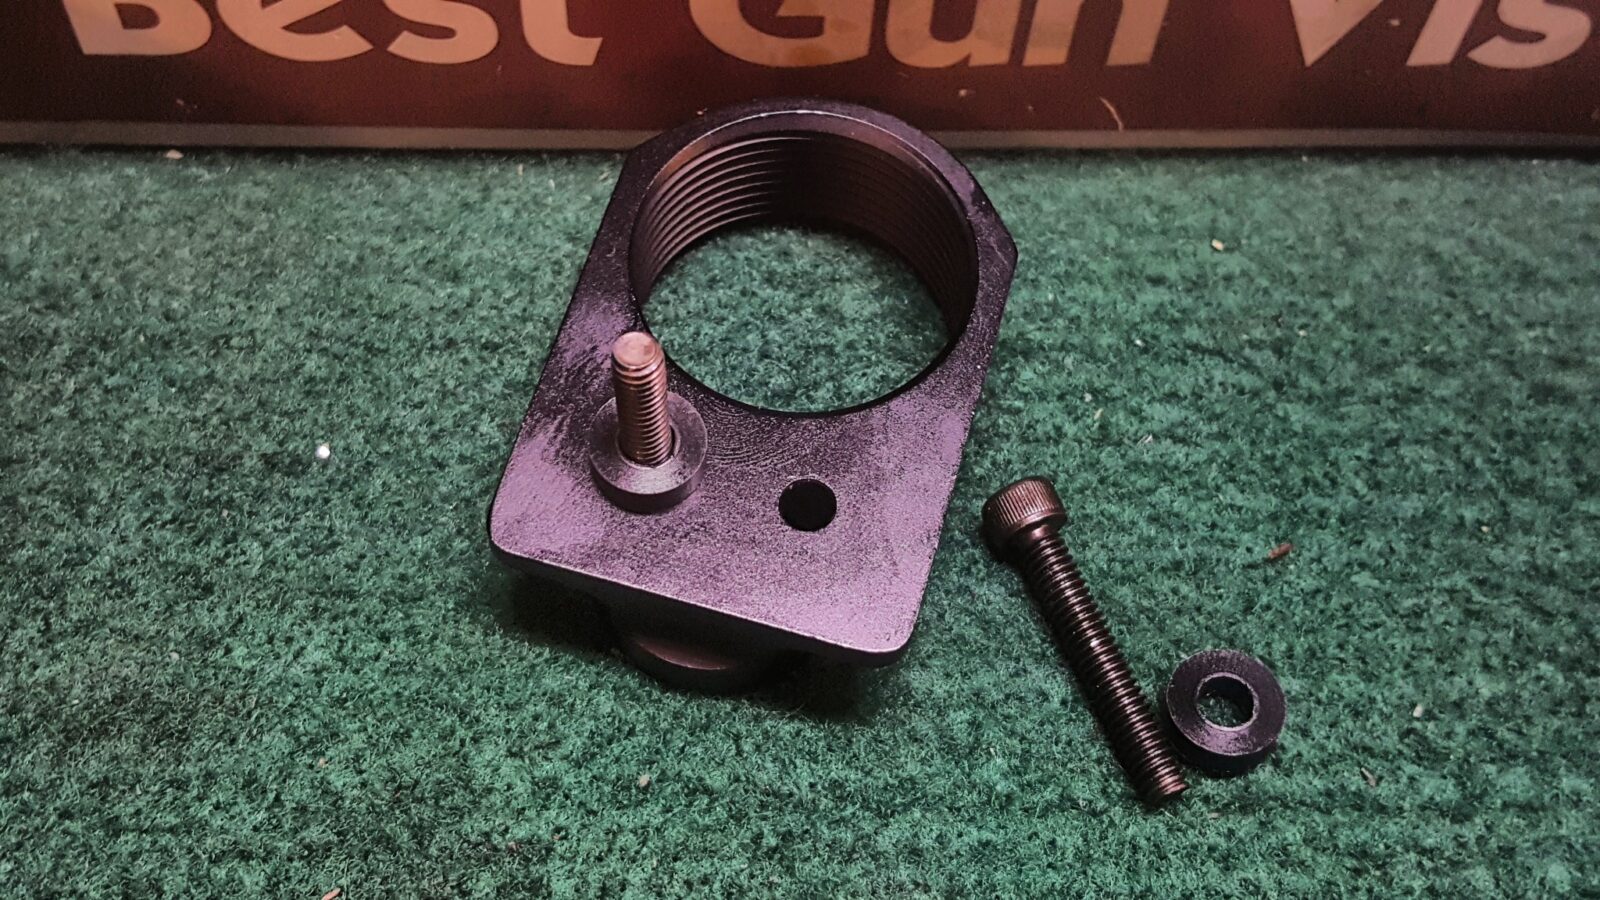
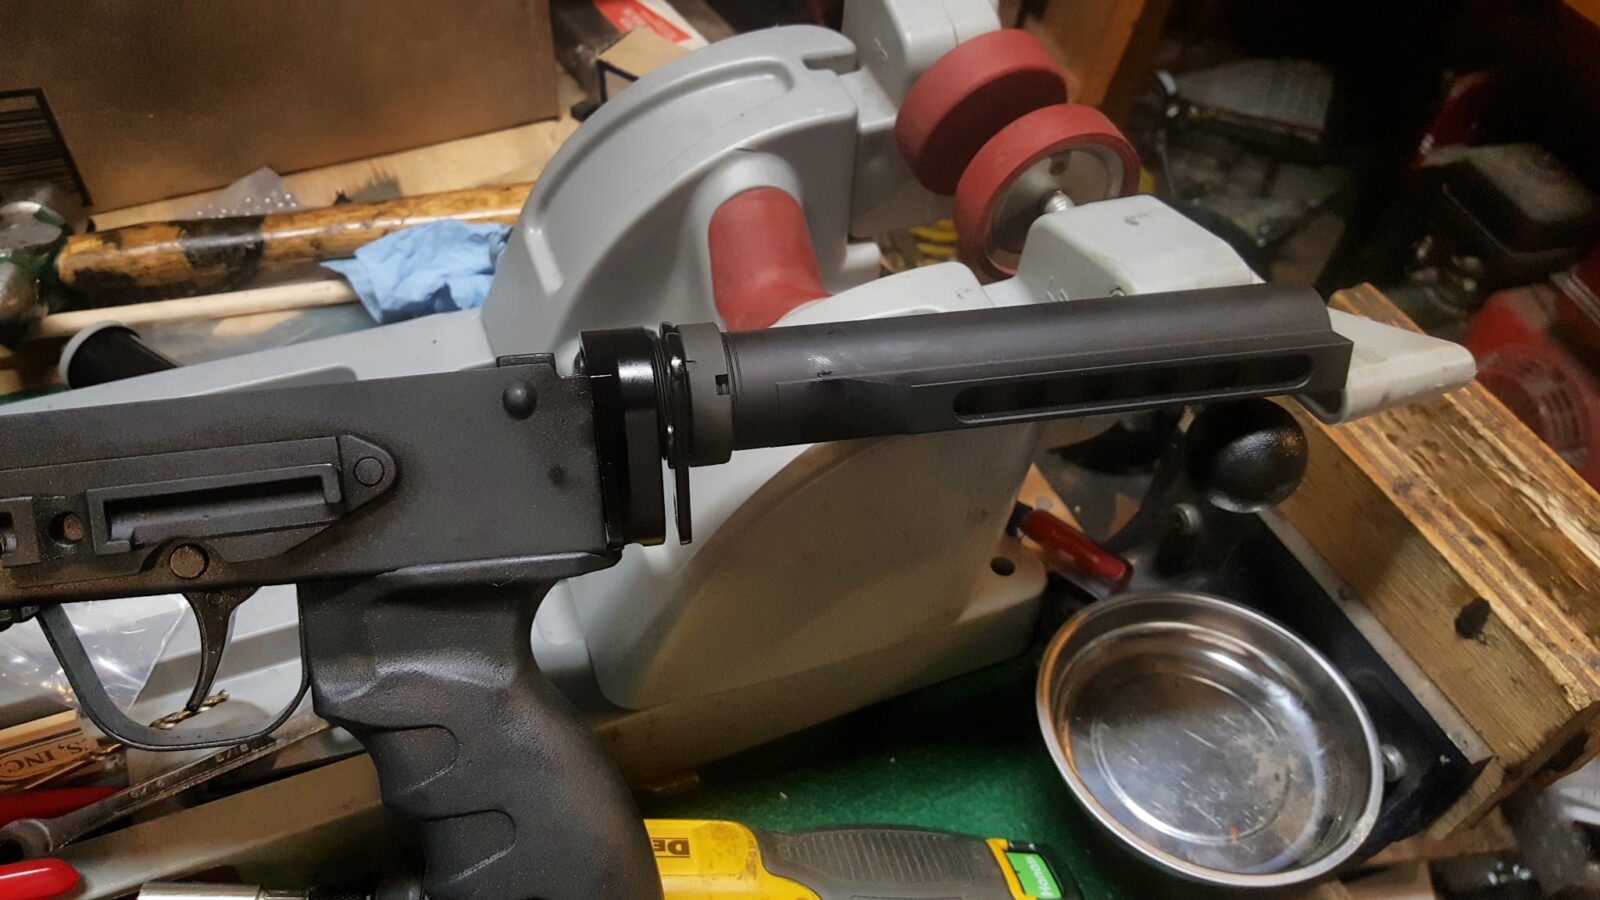
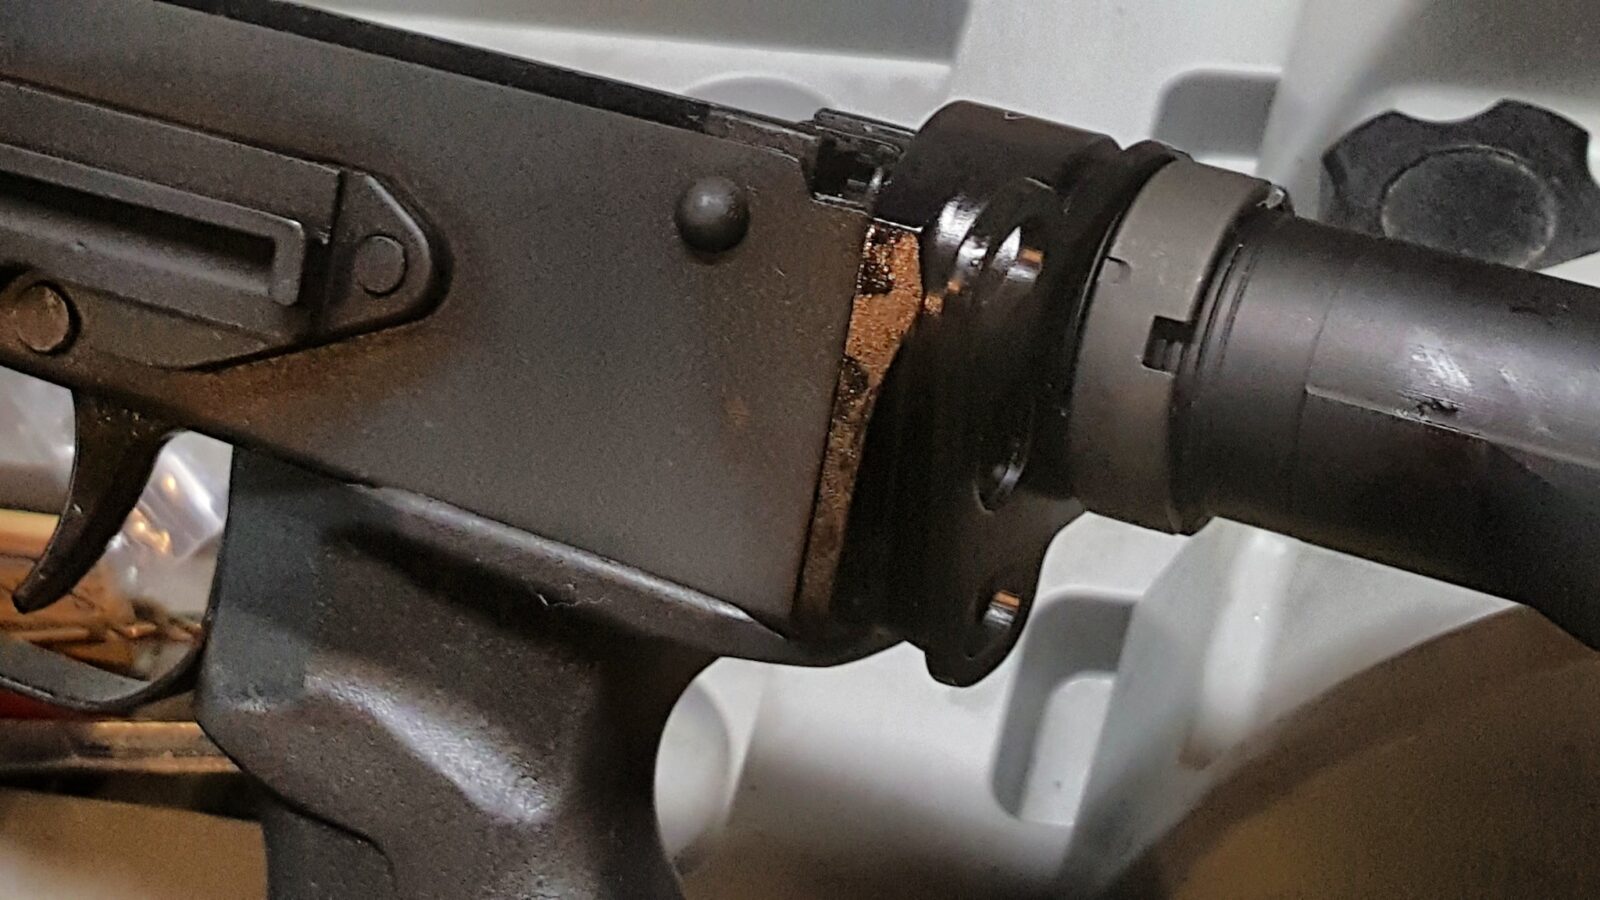
I like M4 stocks and did some digging around. In the past, I have used Ace/Double Star and other modular adapters. The problem with them is that unless you cut the tang off the rear trunnion, you have a rather long receiver block sticking out of your rifle and I wanted to avoid that.
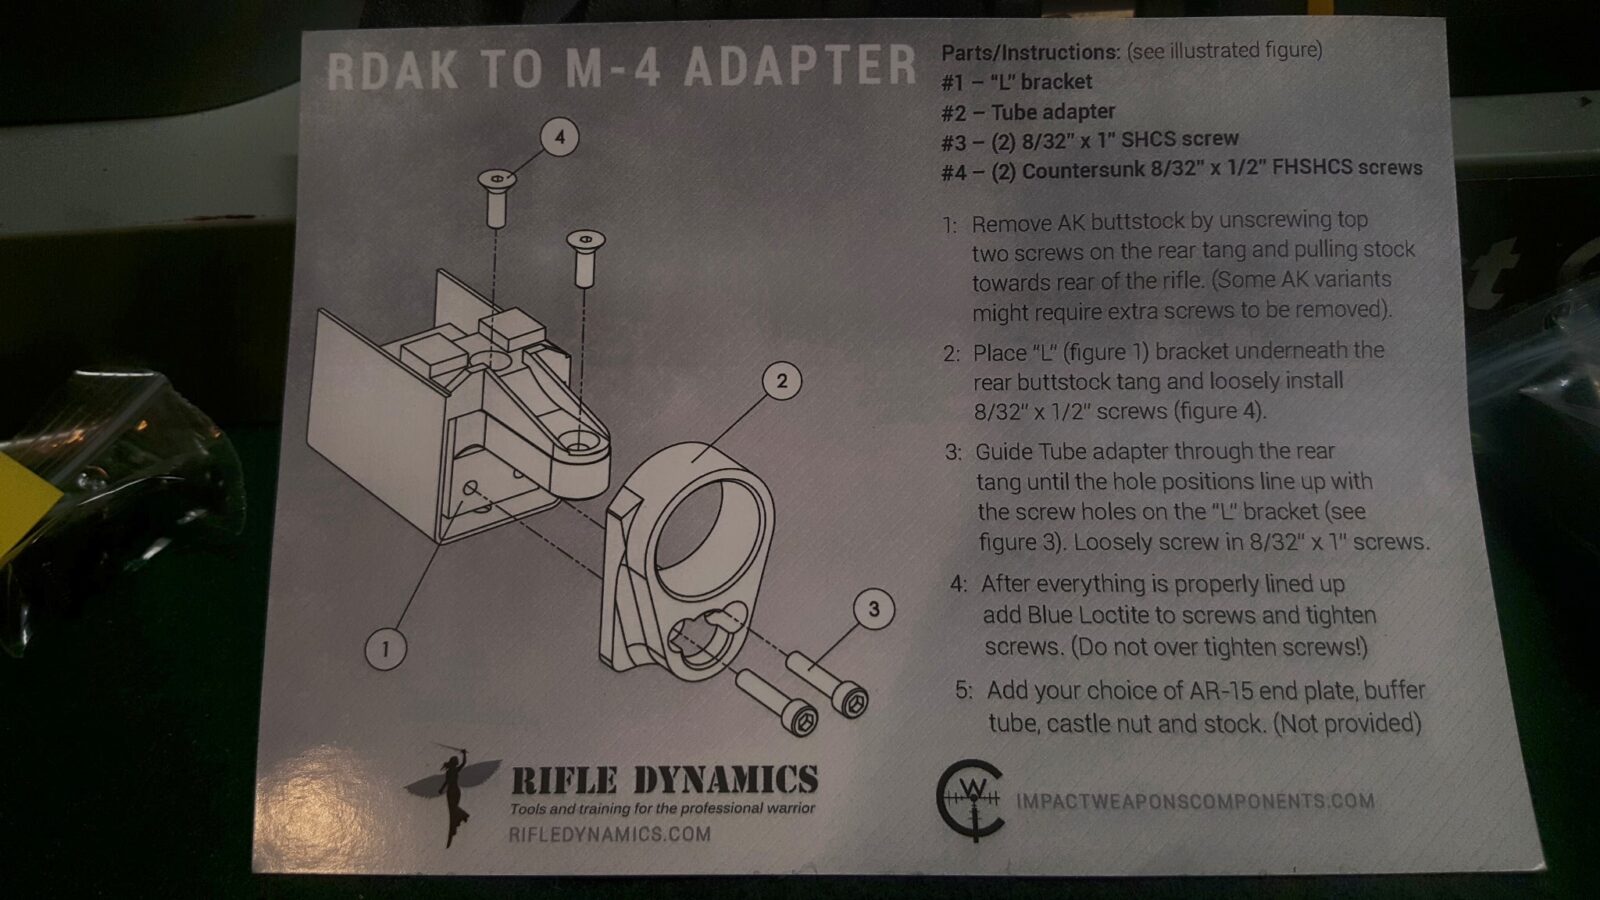
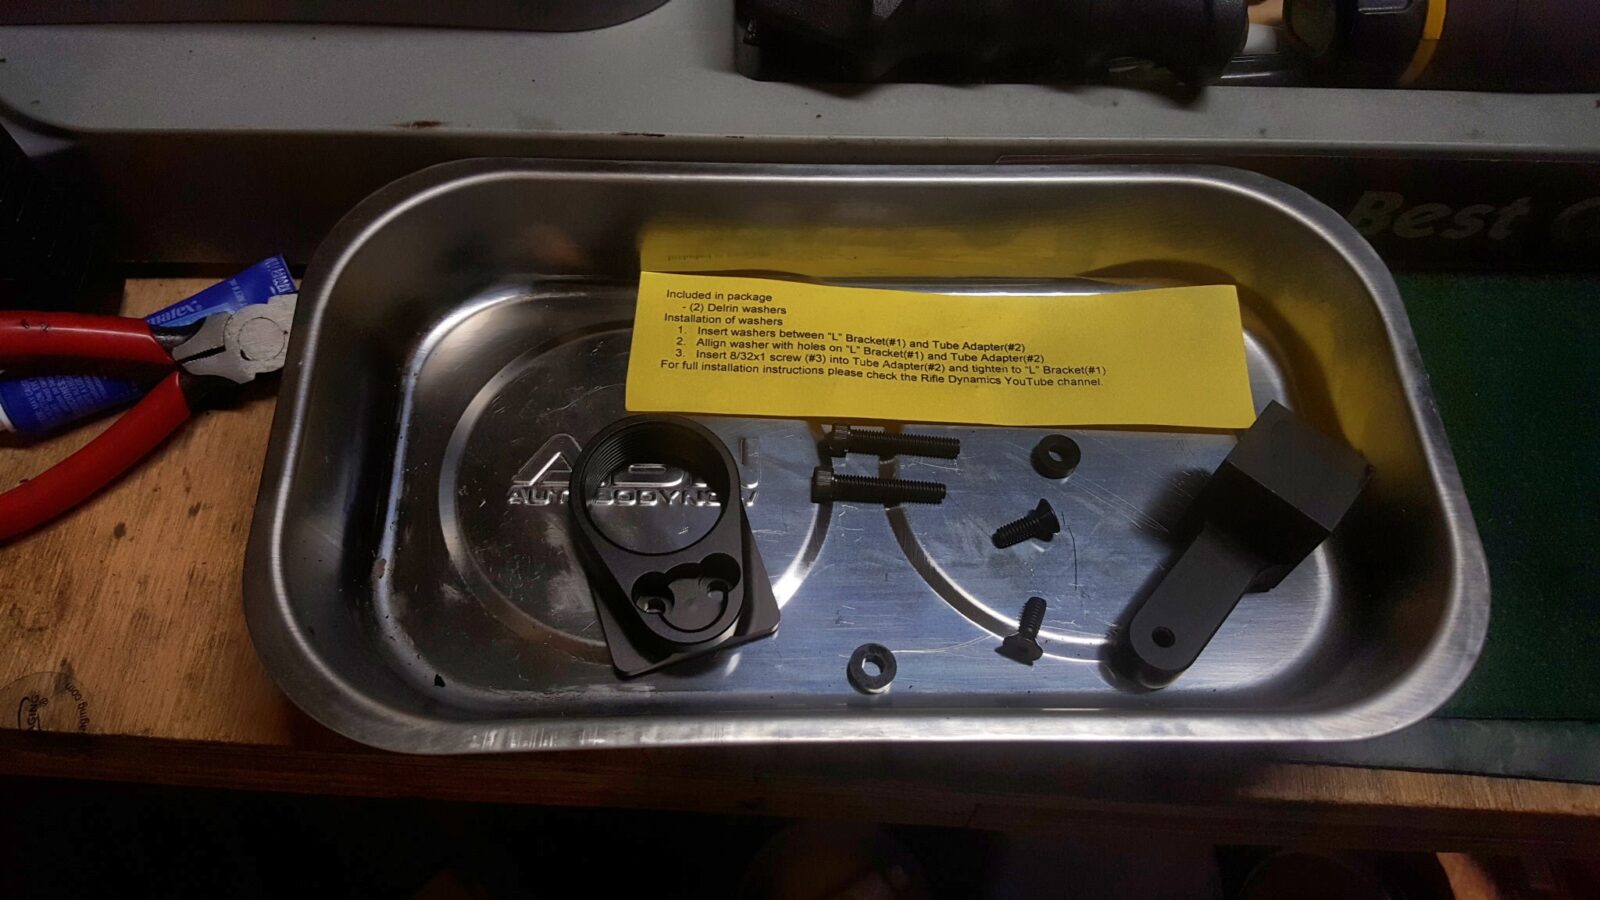
The unit comes with clear instructions but do read the little yellow supplement they include. After getting feedback about the angle the unit positions the buffer tube at, they added two small Delrin washers that need to be installed also.
Installation took about 10 minutes – in large part because I was snapping photos but also because I didn’t want to rush and make a mistake.
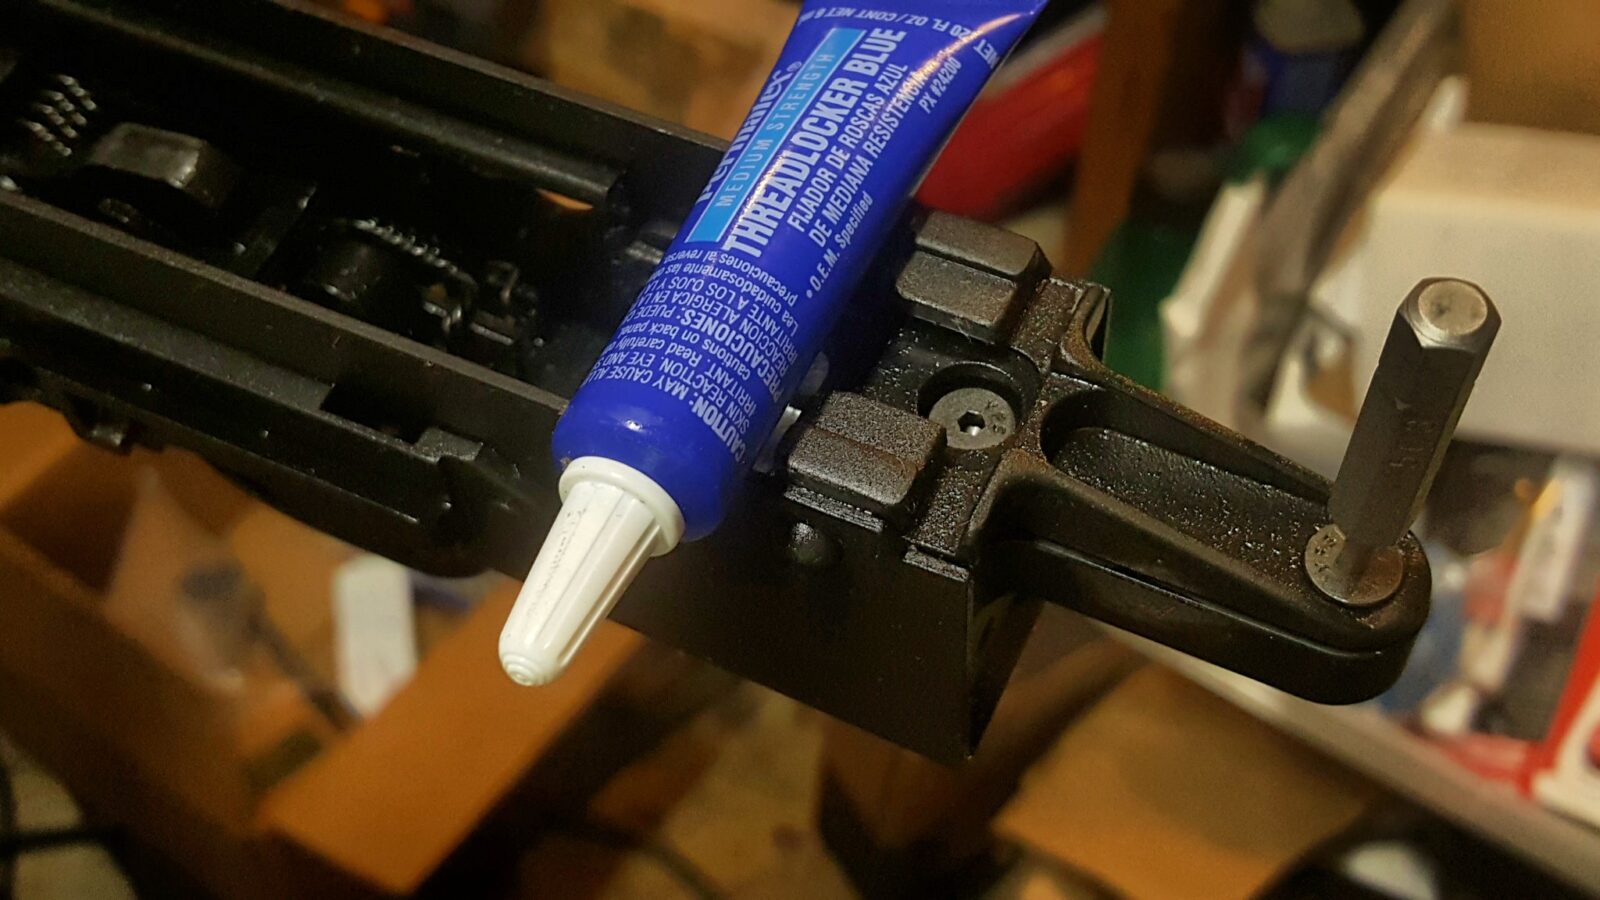
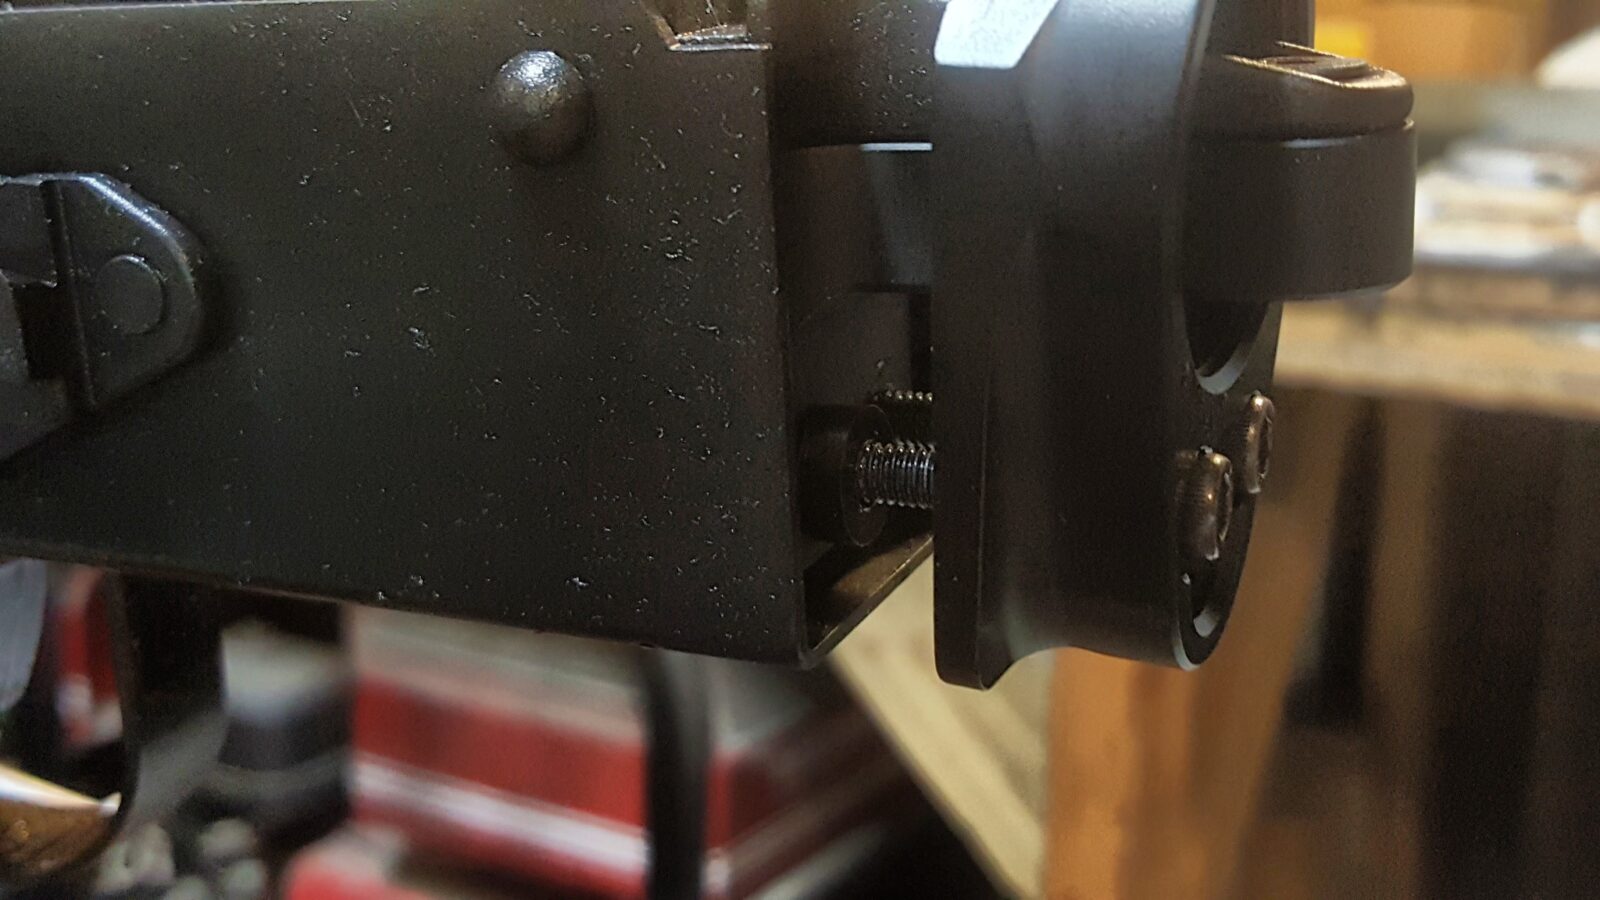
So the big L-Bracket just goes under the tang and is screwed into place. I put Blue Loc-Tite on both screws to prevent them from loosening up. Based on past experiences with stocks that loosened up using modular mounts, be sure to use some form of thread locker. I did not tighten the screws down yet because I wasn’t sure if I would need to wiggle the tube adapter into place or not.
So with the L-Bracket in place, I then attached the Tube Adapter. The Delrin washers go between the Tube Adapter and the L-Bracket. I applied Blue Loc-Tite to these screws also.
I then tightened down all the screws and that was it.
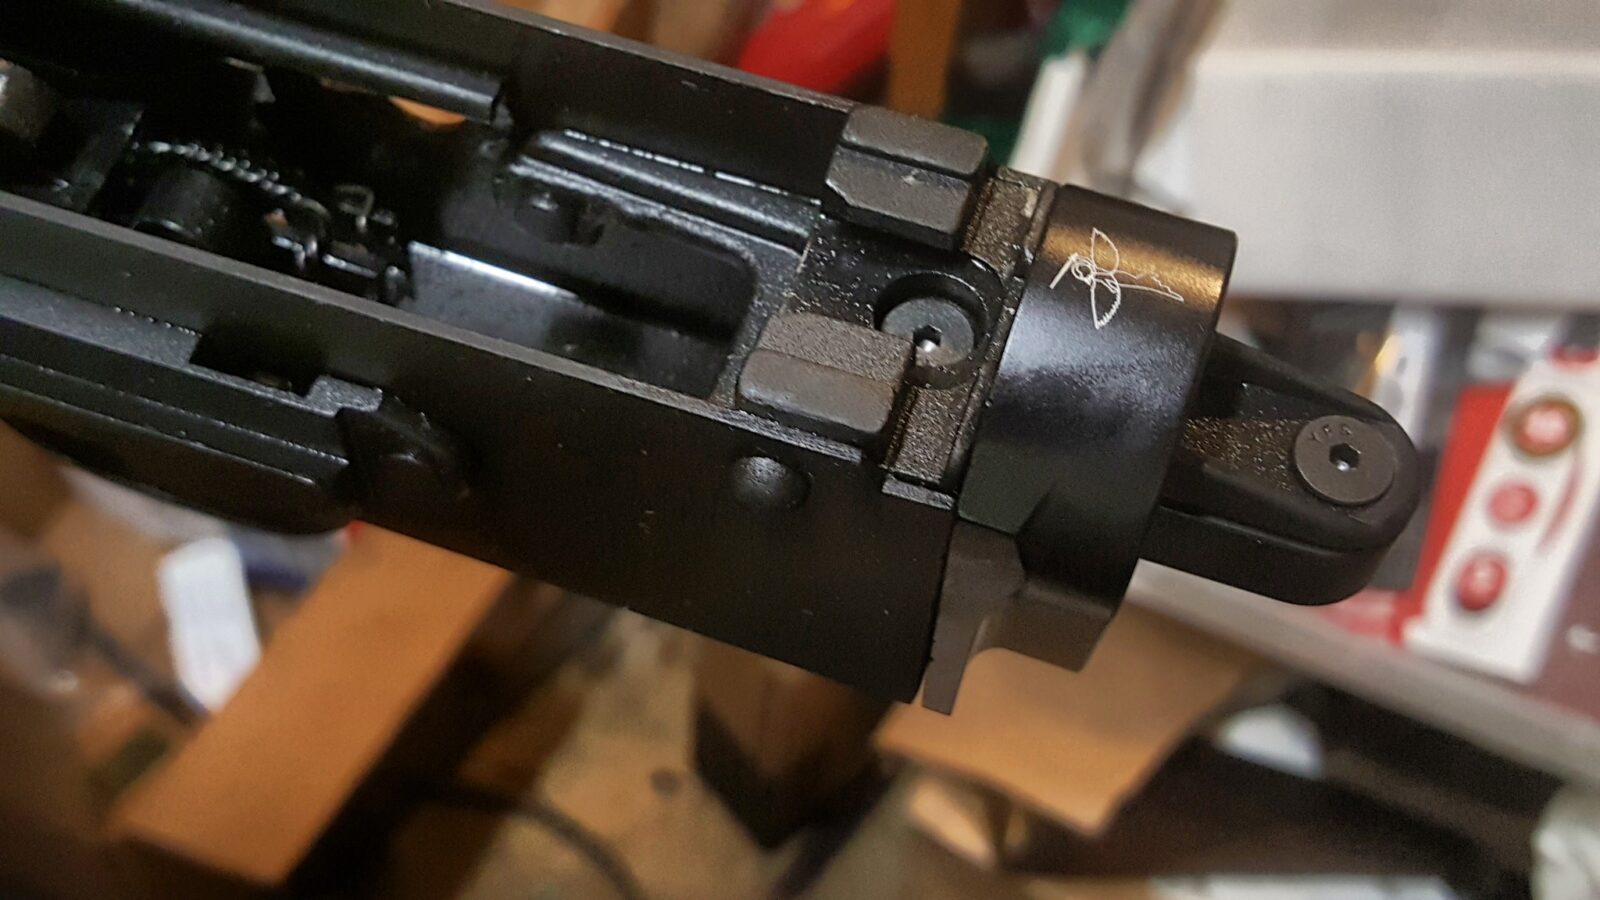
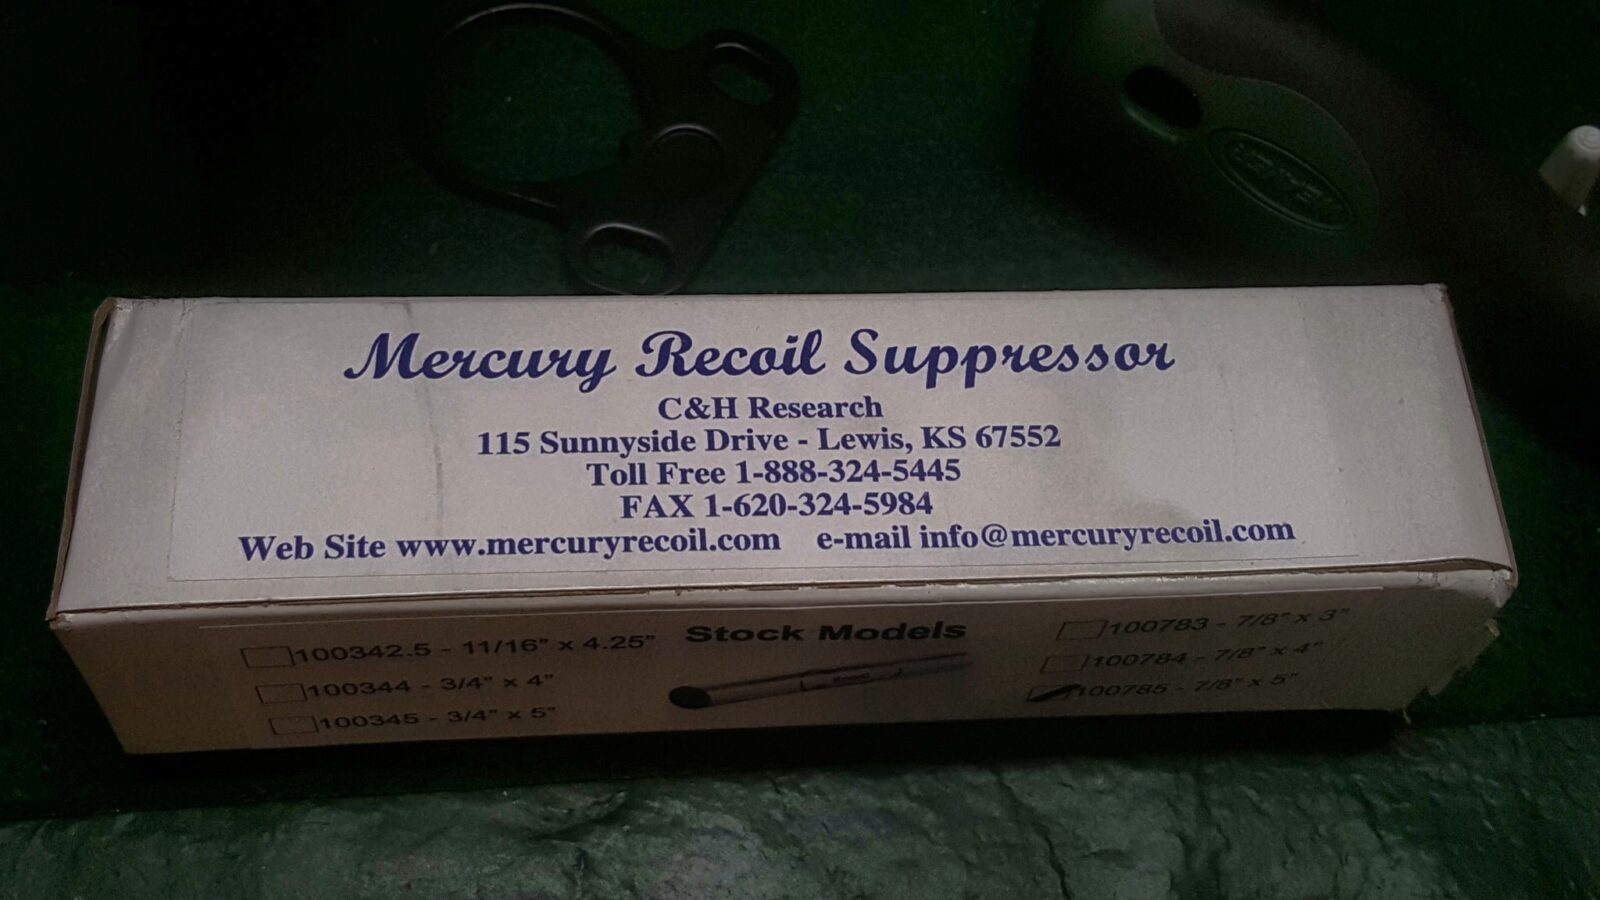
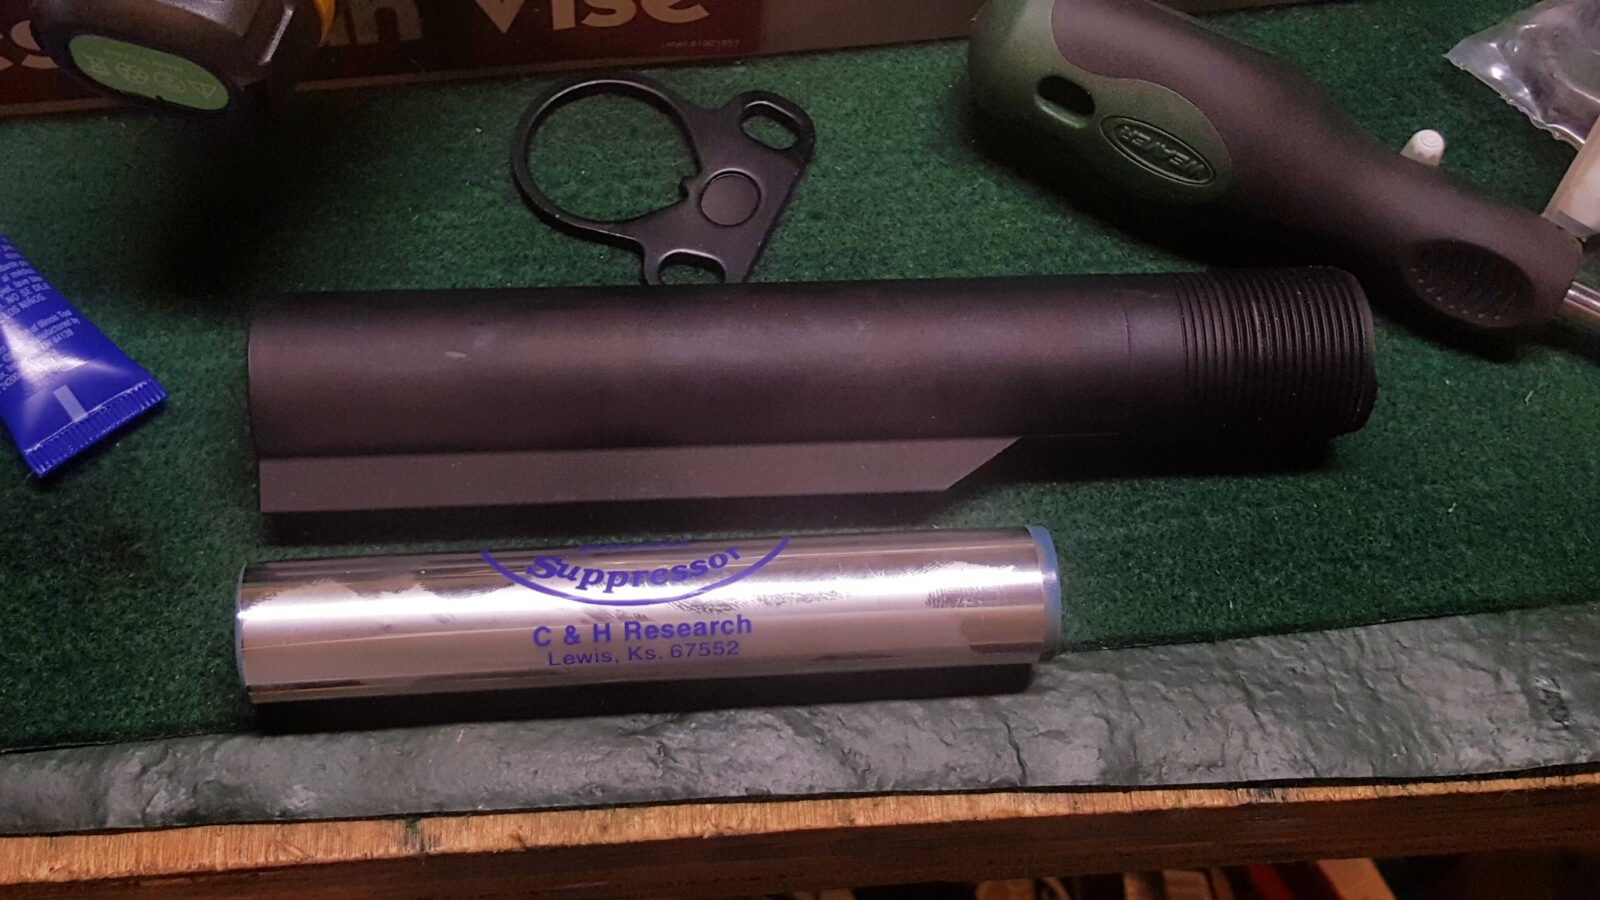
Adding a C&H Mercury Buffer to the M4 Buffer Tube
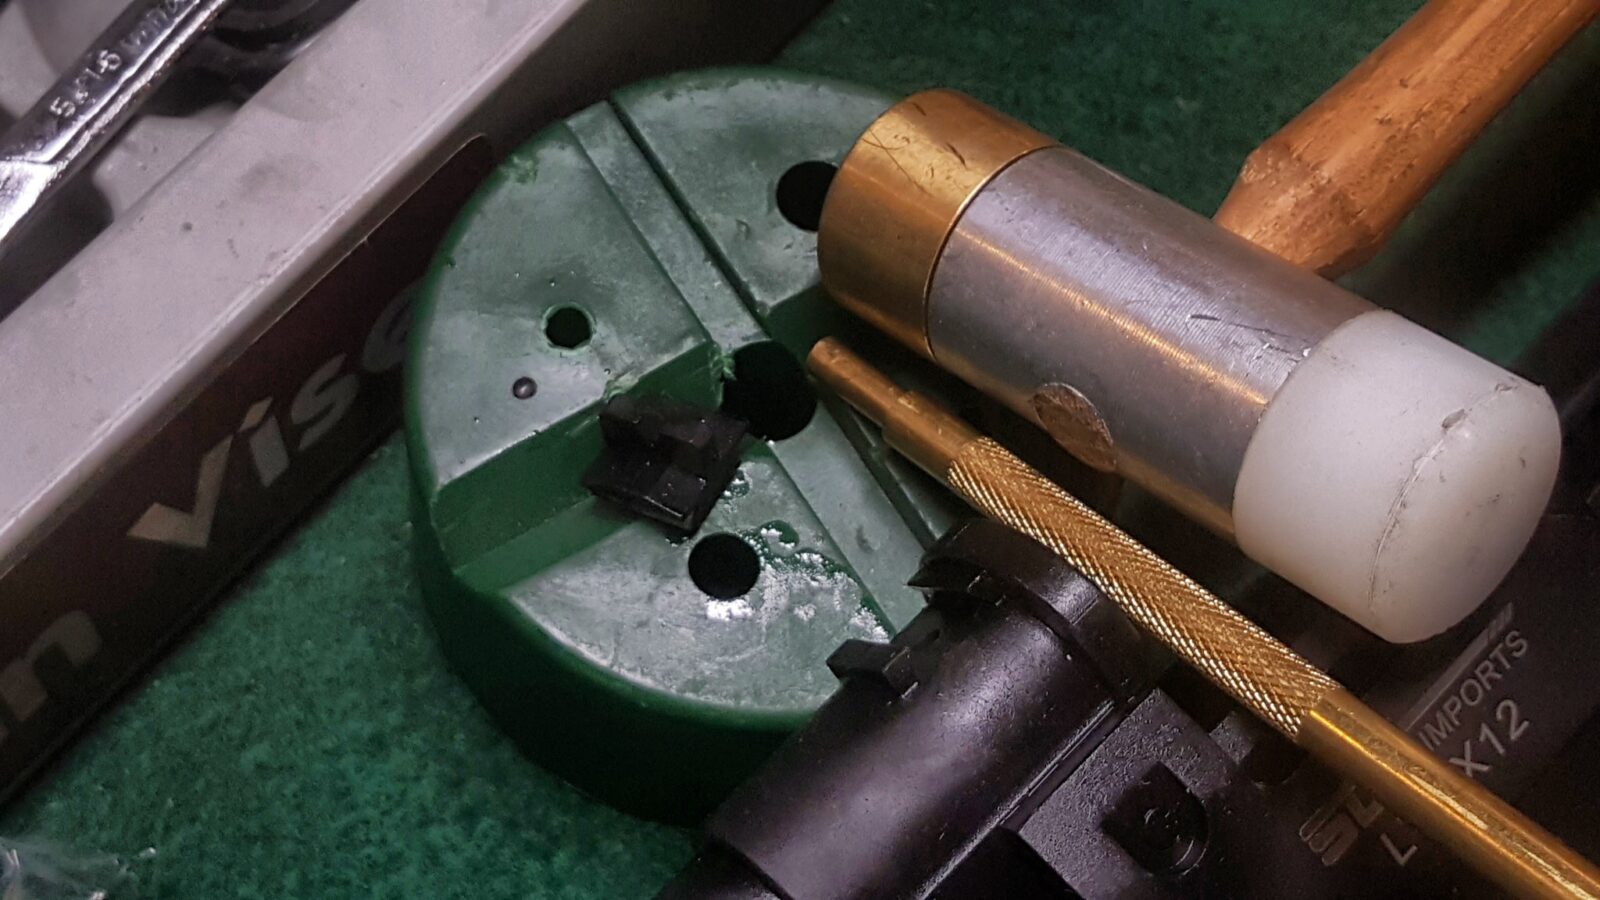
Based on past experience with other similar firearms, I knew the Lynx would be front heavy plus I knew 12 gauge shotguns in general have a fair amount of recoil. Both of these could be addressed by installing a C&H Mercury Recoil Suppressor. I use the model 100785 as I know it will slide down the buffer tube of an M4 given the suppressor measures 7/8″ x 5″. You wouldn’t use this in a normal AR because the buffer tube would have the buffer and spring inside. However, in our case, an AK does not use the buffer tube so that means we can do whatever we want. I ordered by unit from MPC Sports, where I have bought them in the past.
I’ve used these a number of times over the years in shotguns and rifles to add weight to the rear and to reduce the recoil. This last part is interesting. Basically you have a 7/8″ diameter heavy tube that is 5″ long that is hollow. Inside it is partially filled with liquid mercury and then very tightly sealed — there is no way it is coming out.
What happens is that when the firearm is fired and the rearward motion starts, the mercury liquid sloshes in the tube. The tube goes back and the mercury partially stays in place until it is hit by the front of the tube. This helps to split the recoil impulse into two parts – the initial impulse and then when the mercury hits.
If you can’t afford a mercury buffer you could always fill the rear 5-6″ with bird shot and then cap it with a thick layer of epoxy.
The Mil-Spec six position buffer tube is a straight forward unit made by Expo Arms and I bought it from Primary Arms. You will still need to get the castle nut and end plate of your choice. Primary Arms, Brownells and Palmetto are all good places to check. I really do not recall where I got the castle nut and end plate I used on this project – they were in a parts bin.
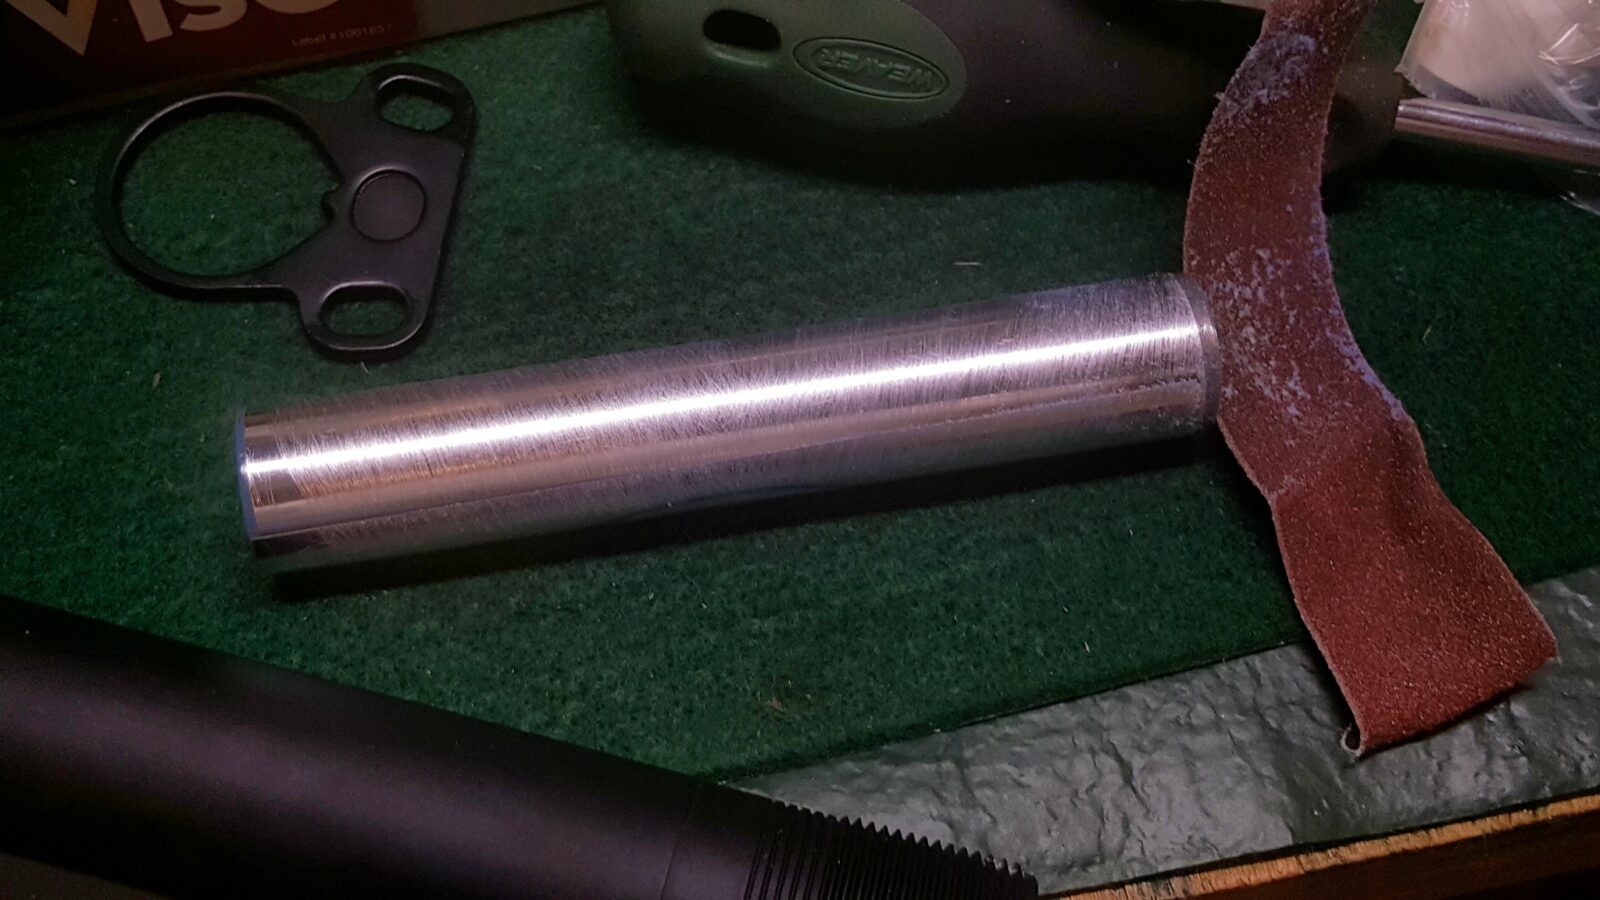
Installation is very simple because all you need to do is epoxy it into the buffer tube. I would recommend scuffing the tube with a bit of sand paper so the epoxy can stick well and then spray down the supressor and the inside of the buffer tube with brake cleaner.
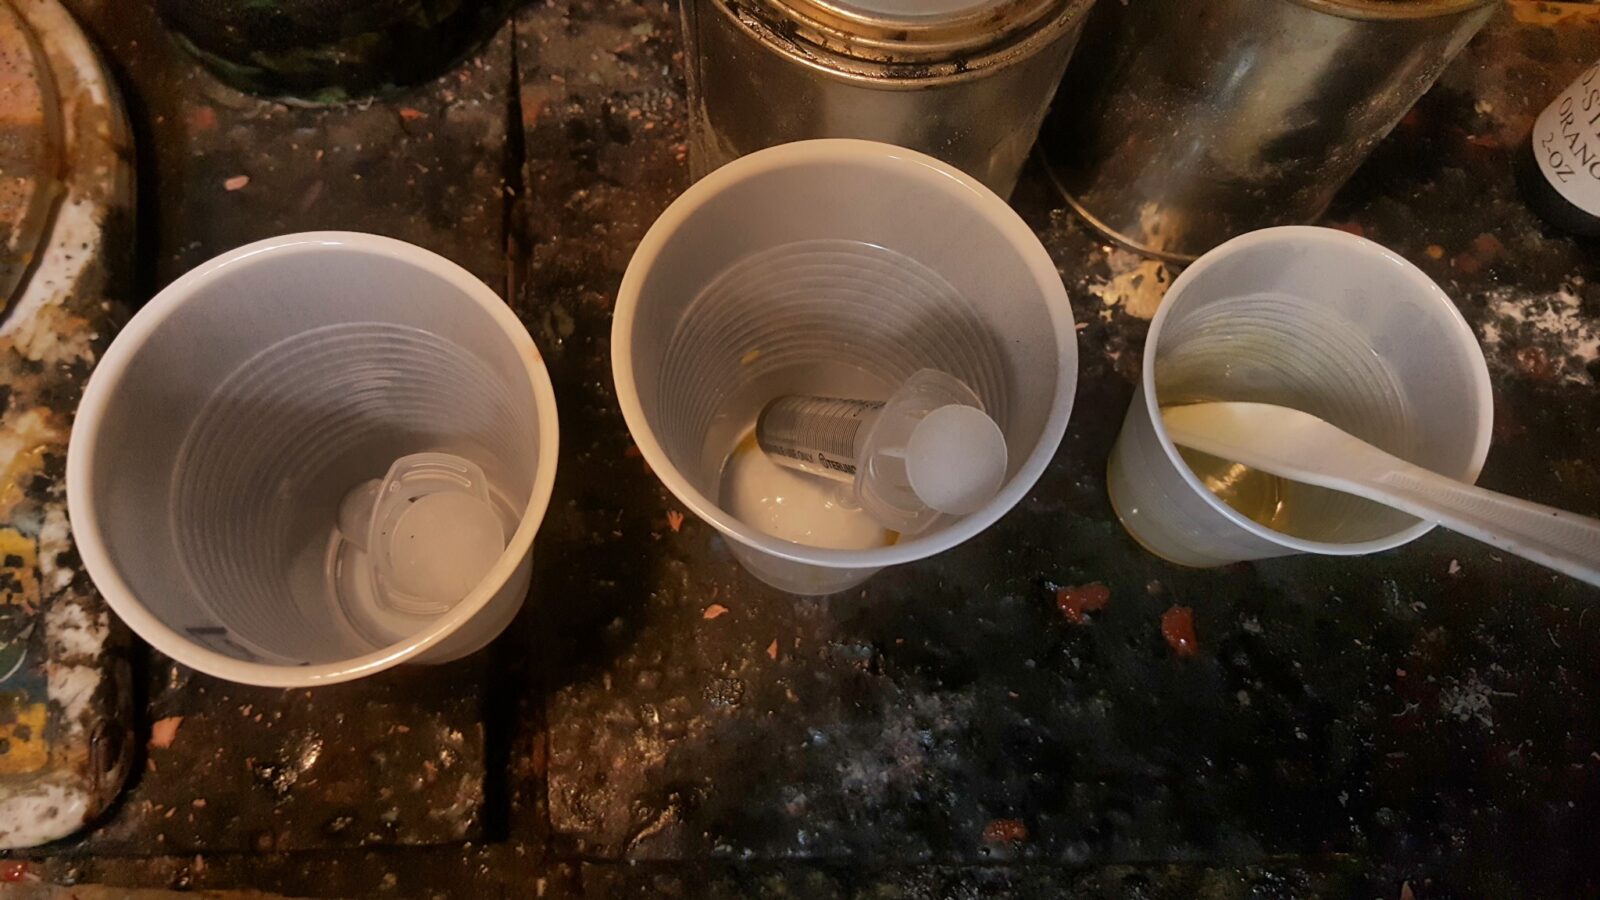
Not all epoxies are up to the task. I’d recommend Brownell’s Acra-Glas liquid epoxy for this (not their gel version). I use 10cc syringes to meter out 4 parts resin to 1 part hardener. I mixed up and used 4 batches so 16 cc of resin and 4 cc of hardener. Make sure you stir it completely. The stuff has a long pot like so really mix it well.
I secured the buffer tube in my vise and made sure it was vertical. Next, I poured a bit down in the tube first – just enough to put a thin layer at the bottom and inserted the suppressor into the tube and poured in the remaining epoxy. It will need to sit and cure for 2-4 hours before you can handle it. I keep an eye on the remnants in the mixing cup to see when it is hard enough to handle as the temperature will affect how long it takes. Note – it needs to cure 24 hours to reach full strength and you’d want that before firing the weapon and subjecting the epoxy to stress.
At any rate, after pouring, wipe off any epoxy you may get on the tube. Brake cleaner on a rag will help until it cures. After that, it would likely require sanding to remove so be sure it is clean before you walk away.
So with that done and curing I moved on to the grip.
Installing the Ronin’s Grips AK-12 Grip
The Lynx comes with a basic pistol grip but I wanted to use one of my AK-12 grips. These are very ergonomic and feel really good to me. I wear an XL-size glove and both the size and angle work for me.
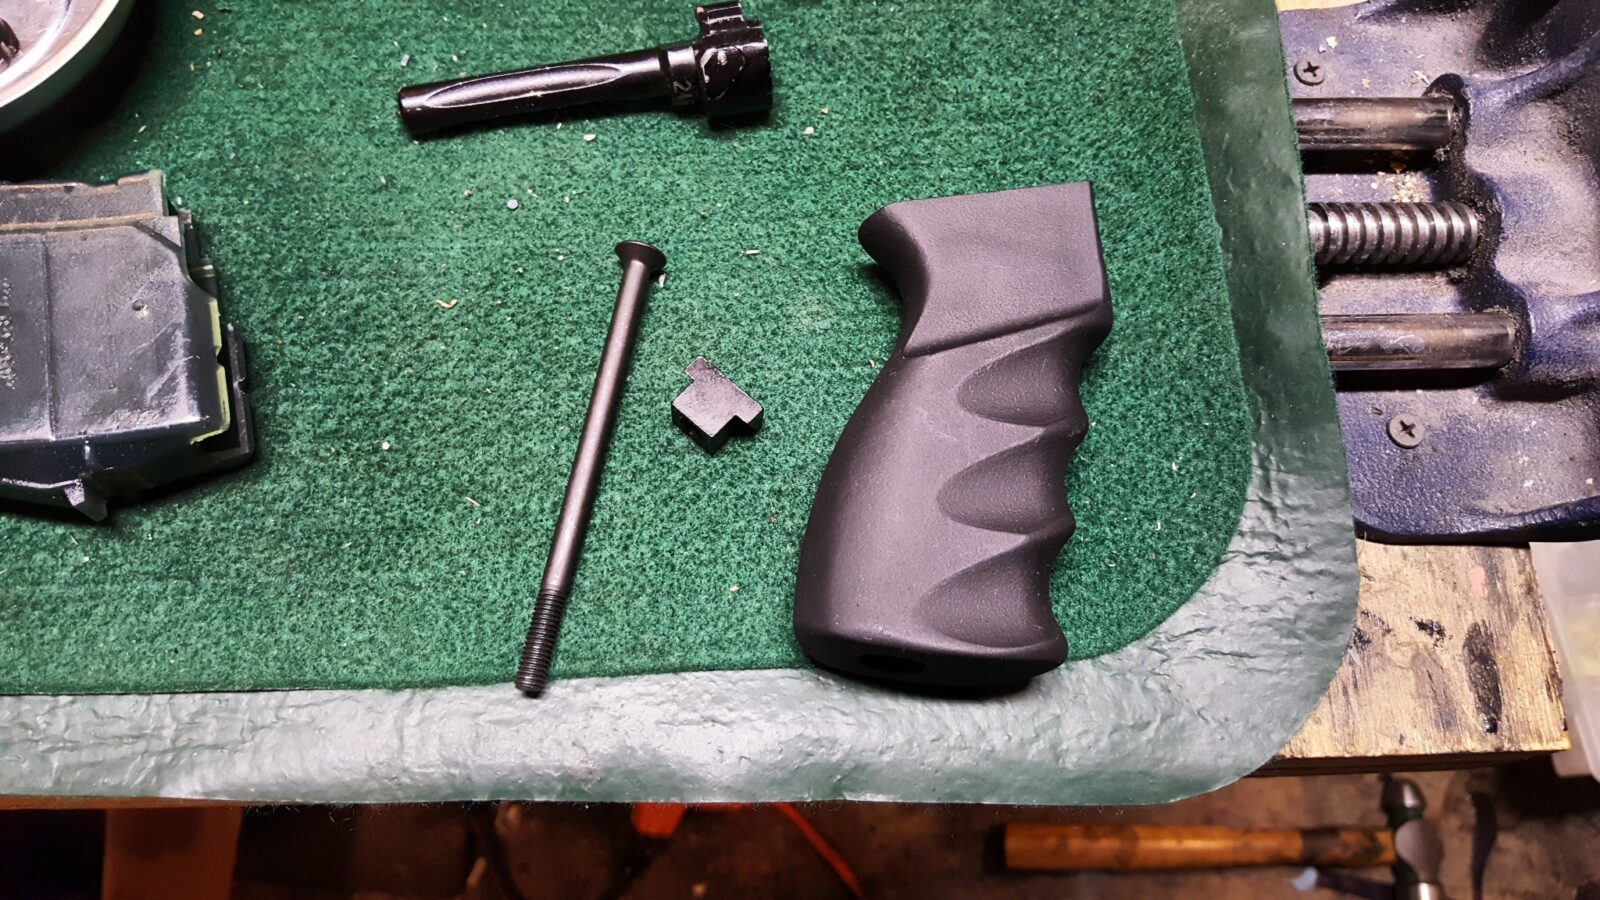
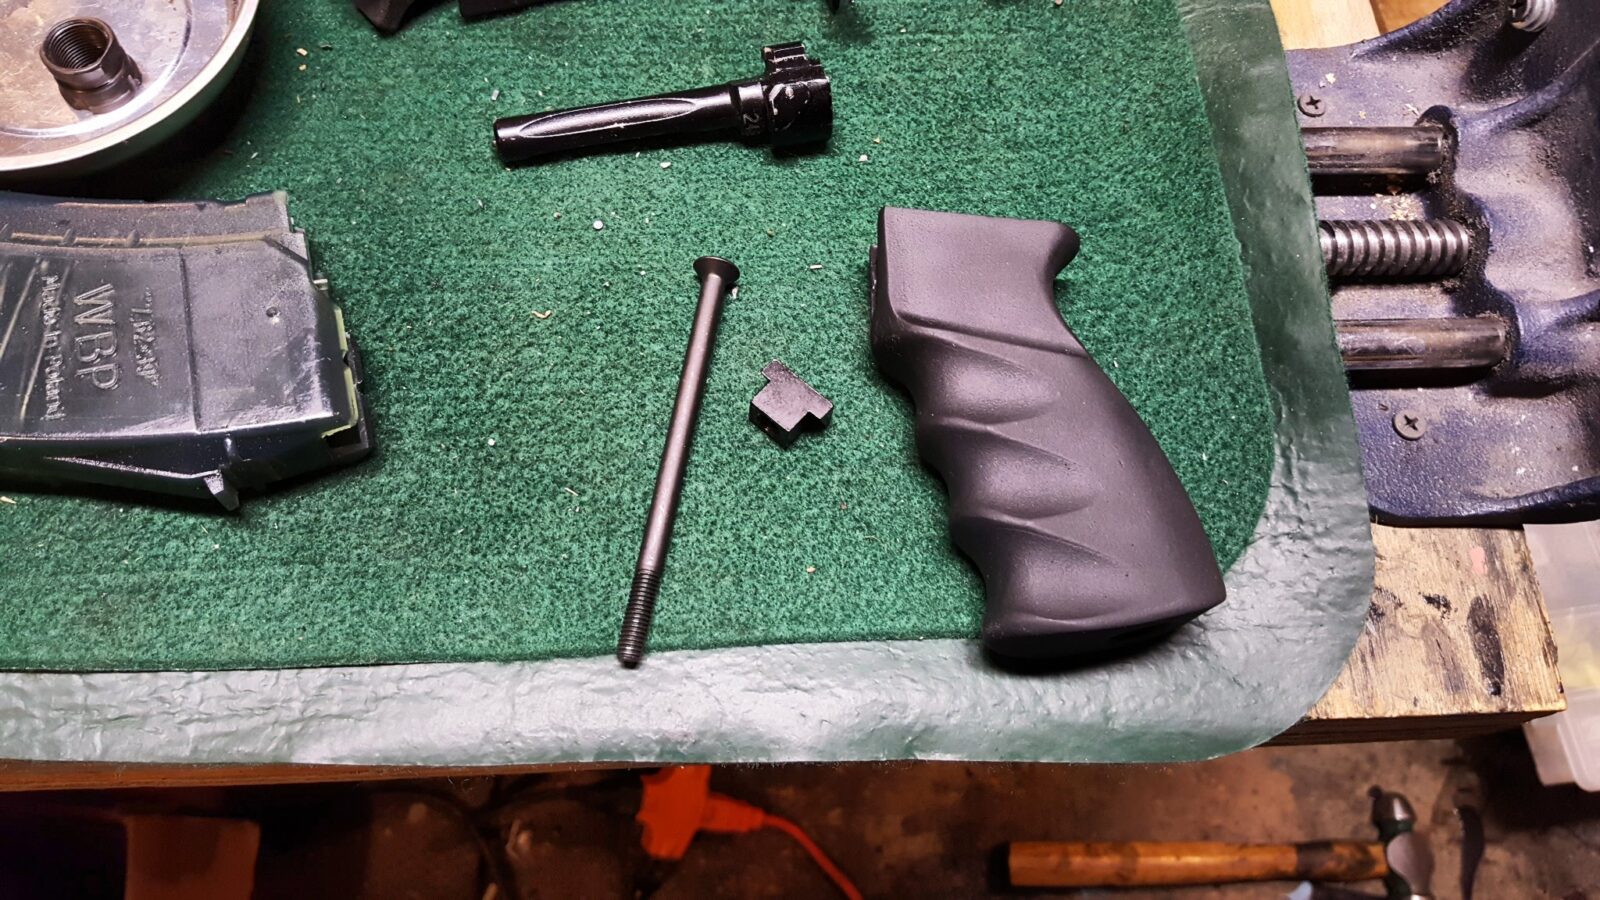
I replaced the small 5mm bolt with one of our 6mm alloy bolts and also used a 6mm grip nut that I had in my parts bin to secure the grip in place.
In the same manner as other AKs, the grip nut sits in the square hole behind the trigger guard and then the grip sits on the other side and the bolt pulls them together with the receiver sandwiched in the middle.
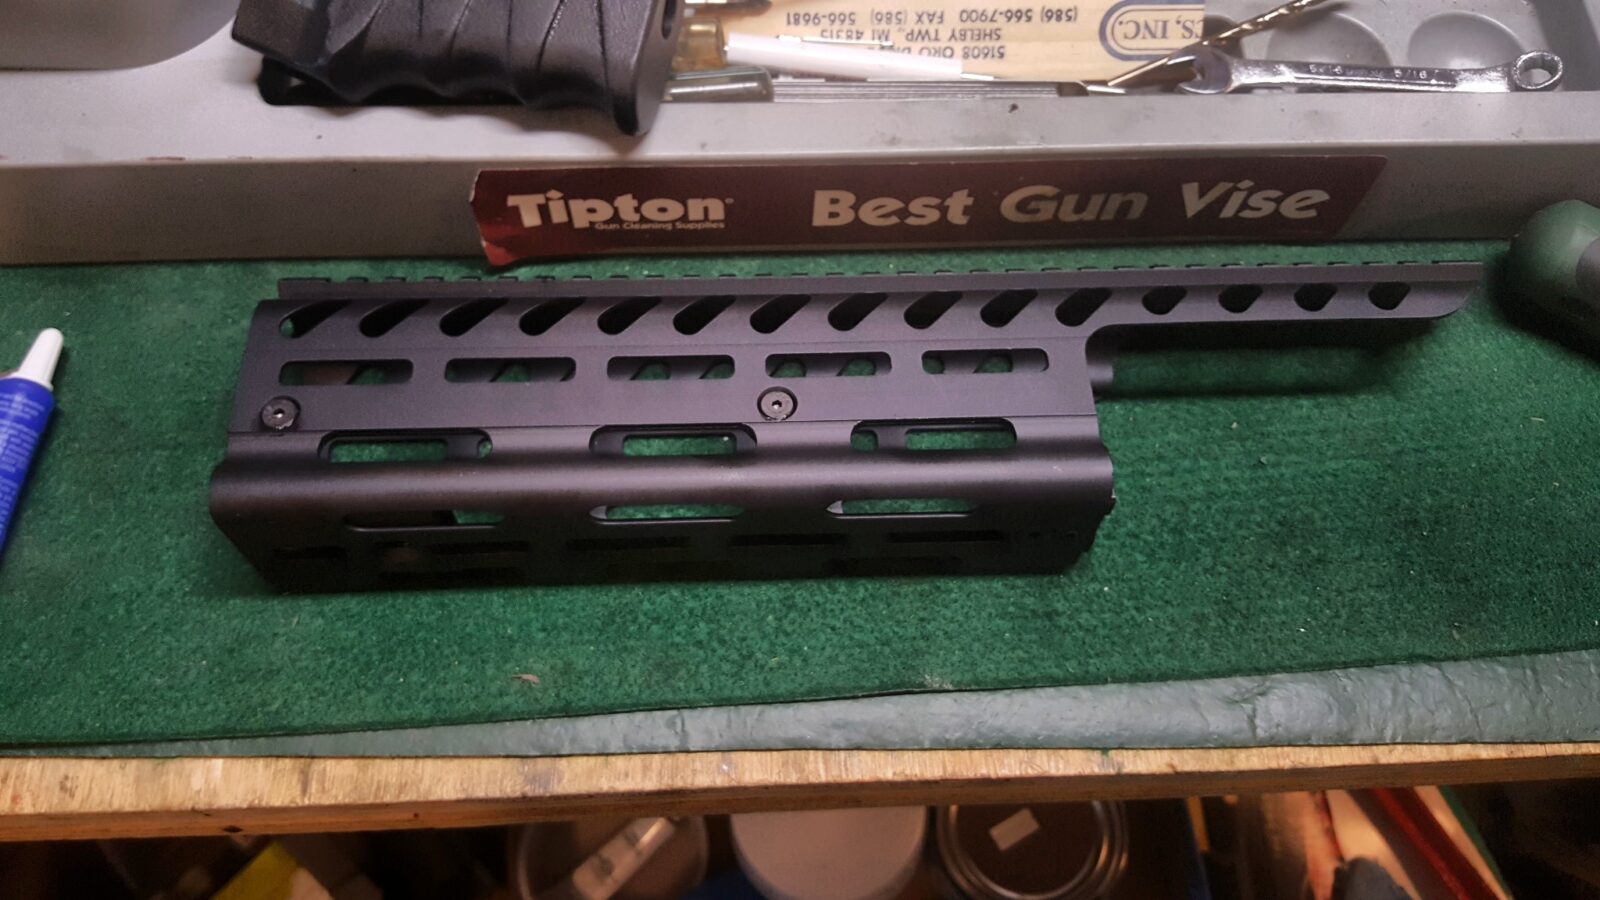
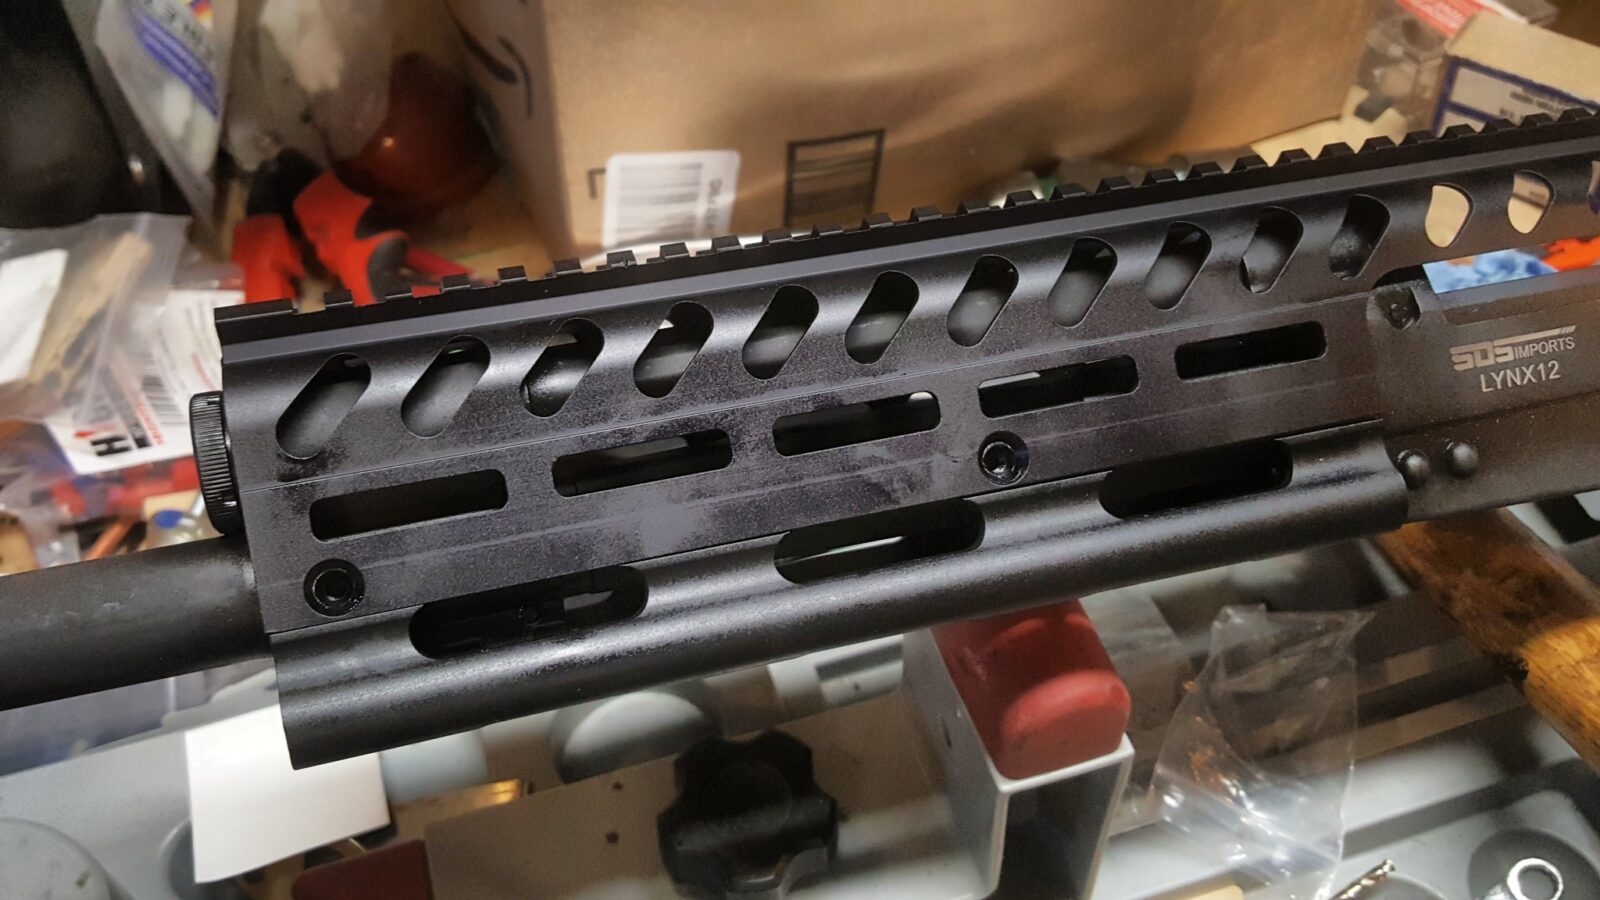
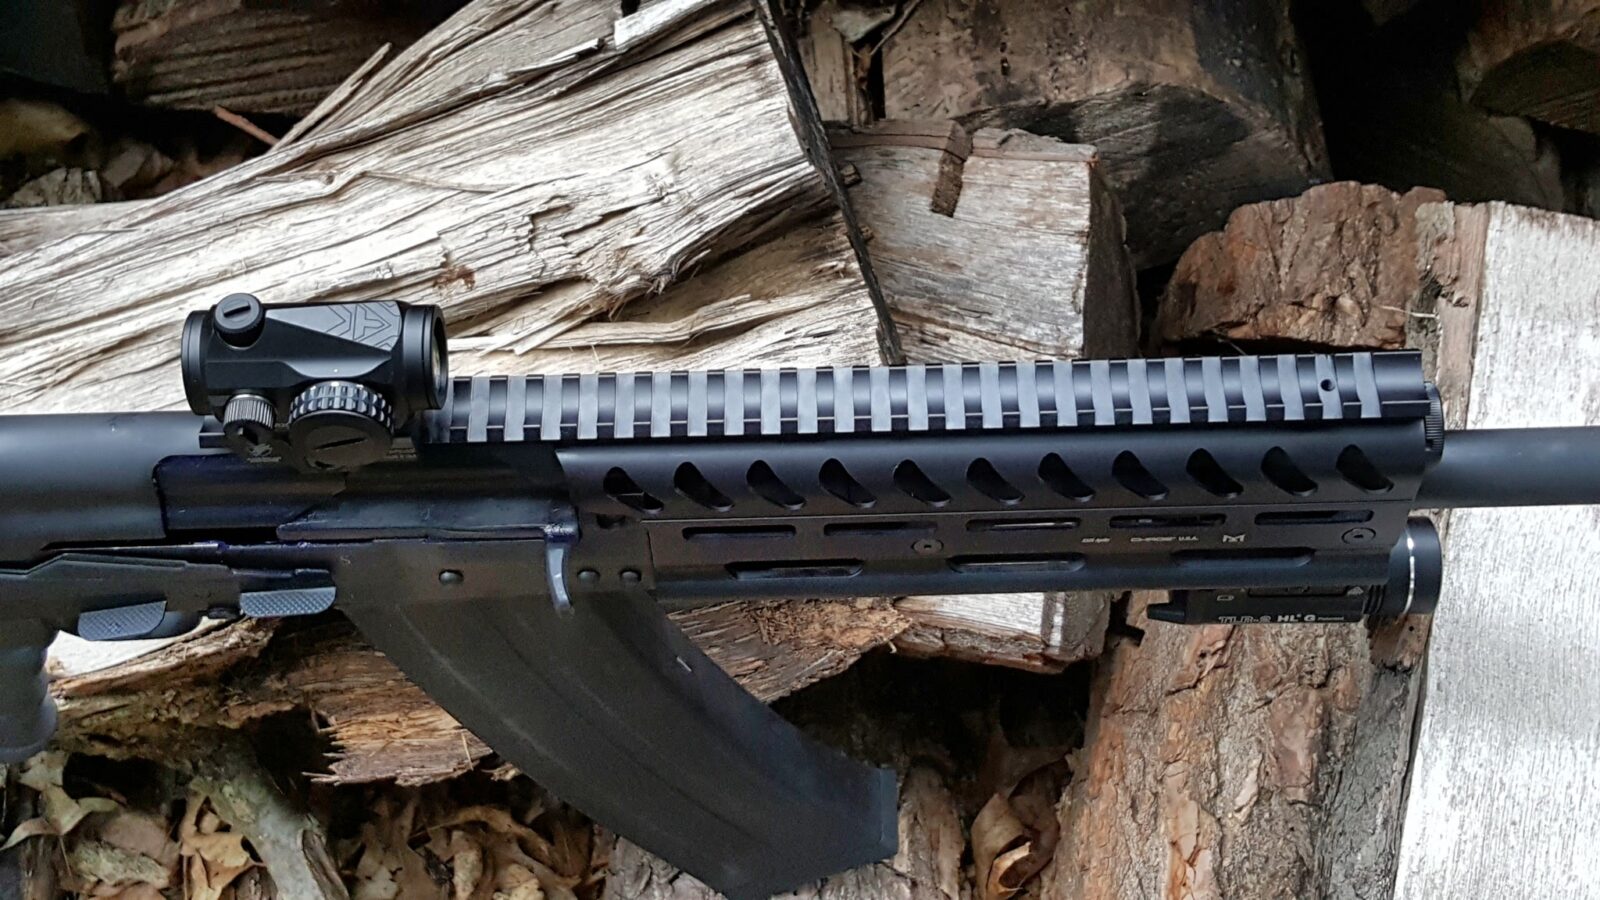
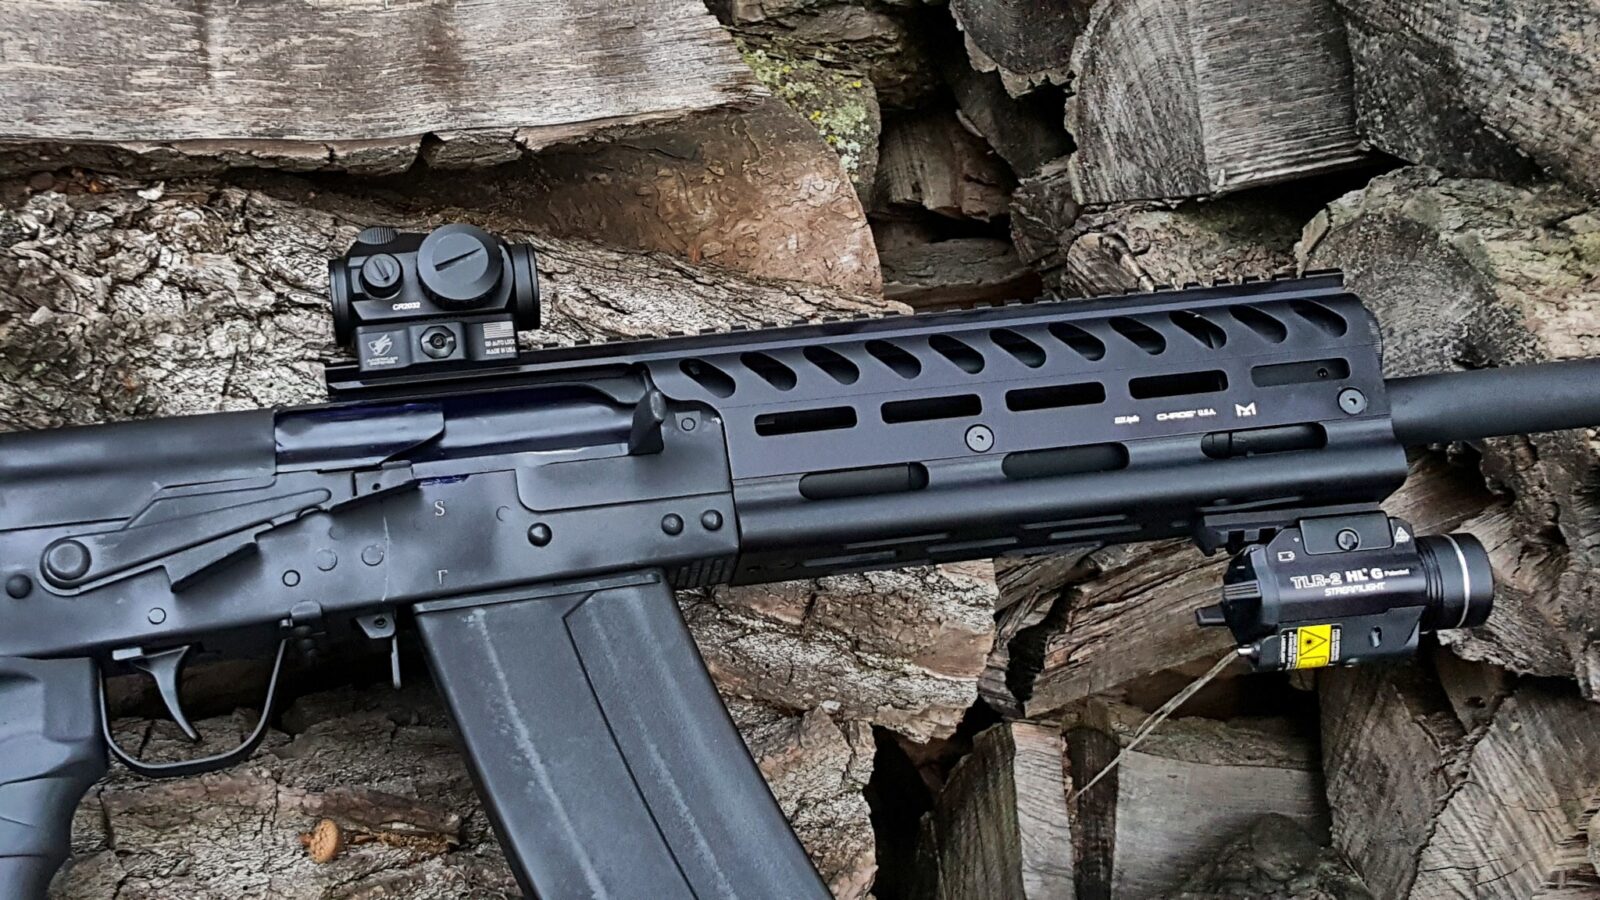
Adding a Chaos Saiga 12 Apollo 12 Extended Rail
The Lynx can use Saiga handguards so you have a lot of options. Note that I am using a Chaos rail and Chaos has since gone out business. The rail in question was their Apollo 12 Extended M-LOK Rail.
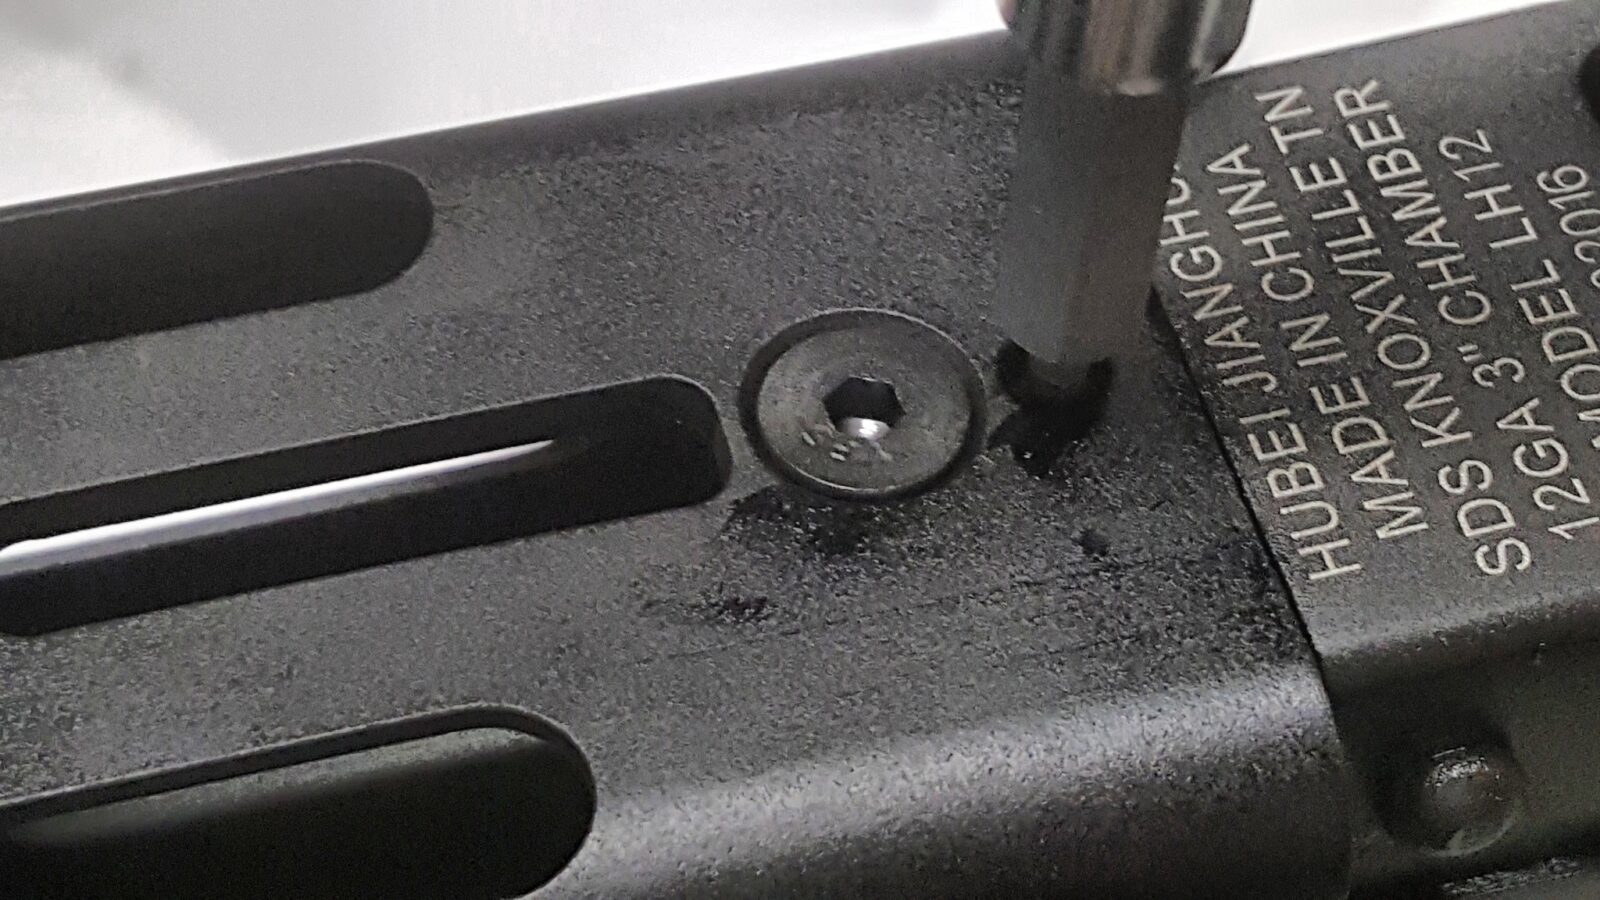
Installation is pretty easy. You will need to remove the original sights though. A small punch can be used to drift out the rear sight and either a small wrench or pliers can be used to unscrew and remove the front sight. I’d recommend having a Zip Loc bag or something to store these parts in just in case.
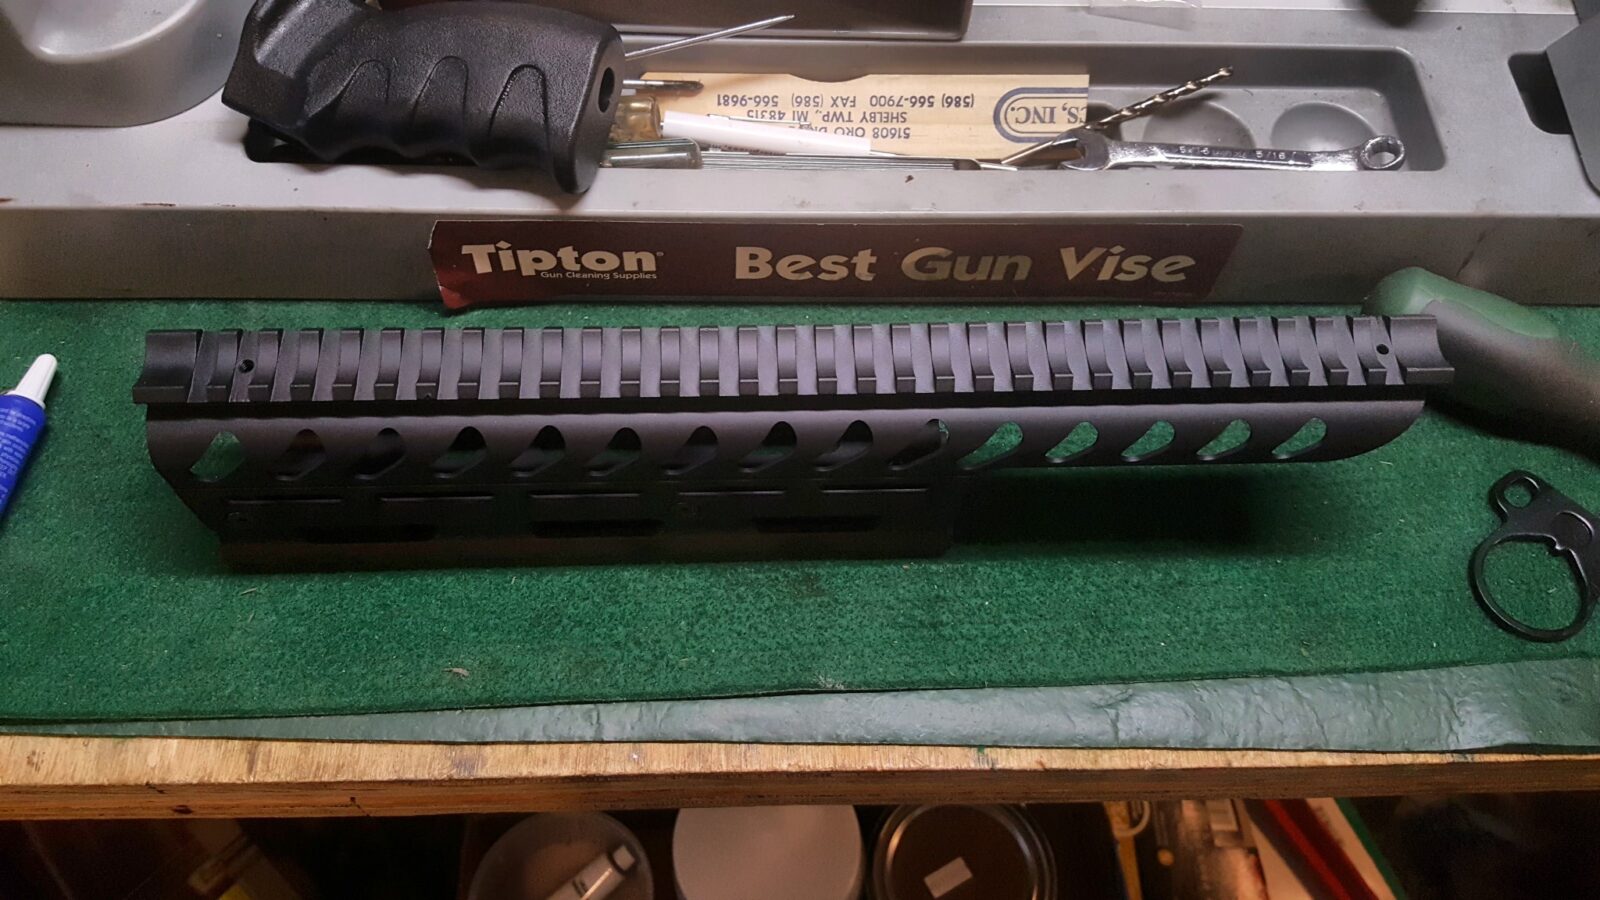
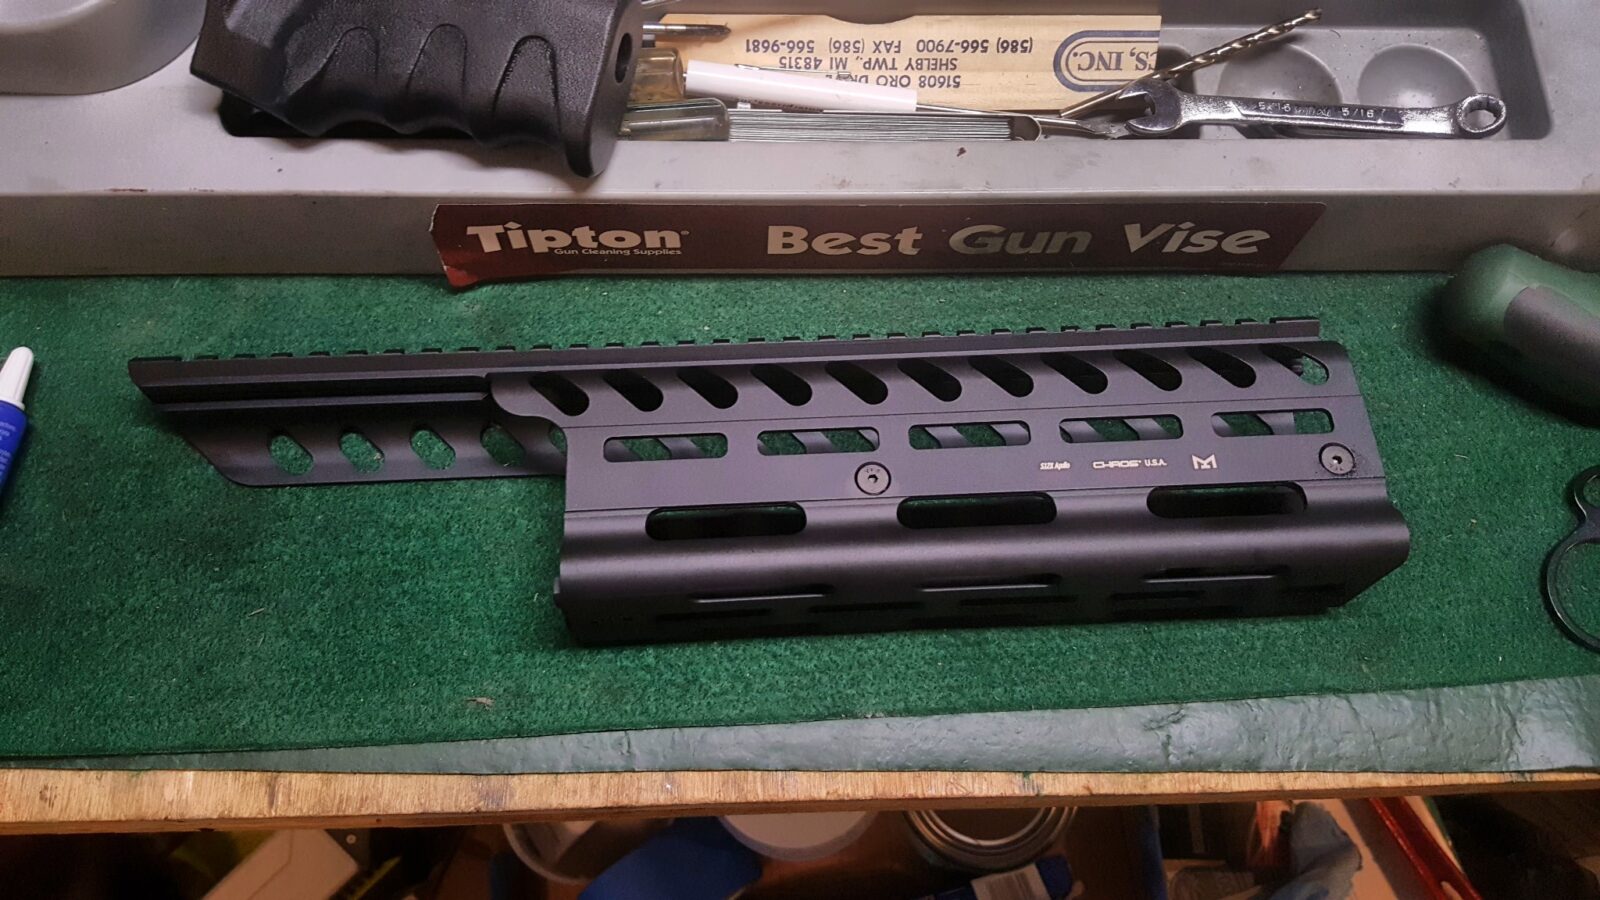
Unscrew the four screws on the sides to split the rail system into its two halves. The bottom slides into position. Use their screw to secure the front. Use Blue Loc-Tite on it too. In the rear by the receiver is a set screw. Back it out, apply Blue Loc-tite and then screw it down. It will push on the barrel lock the handguard into position so it will not wobble.
With the base secure you can install the top half when ready. Notice how I said that. What I found is that the bolt carrier must be installed and the dust cover installed before you install the top half. So, I went ahead lubricated the shotgun and closed it up before I installed the top rail. This also brings to light that the screws will need to be removed to gain access to inside the shotgun for cleaning. Time will tell how well that works out. If it drives me nuts, I’ll cut the rail off flush with the gas tube seat. Right now though, I sure like how it positions my red dot.
Lubricating the Lynx
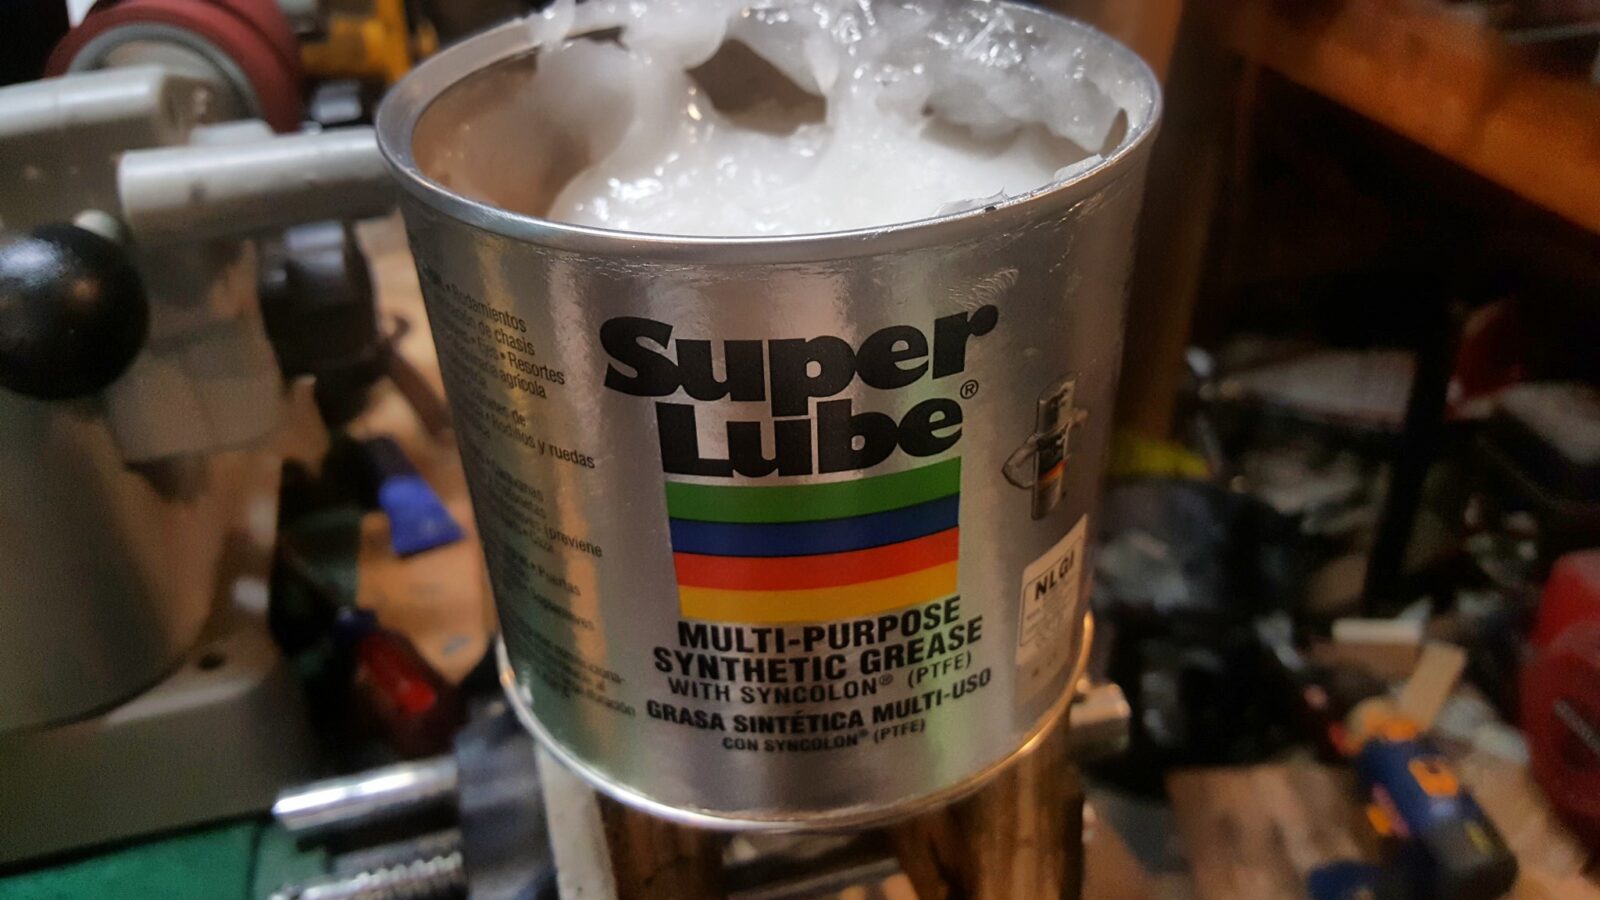
As mentioned above, I had to install the bolt carrier assembly and dust cover to then finalize the rail. I am doing something different with the Lynx. A month back I started using Super Lube synthetic grease on my Uzi and it worked great. With the Lynx having the heavy parkerization on everything, I used Superlube to grease the rails and all sliding surfaces. I used a precision oiler with Mobil 1 5w-30 full synthetic on all of the rotating parts. Boy did this combination make things operate smoothly!
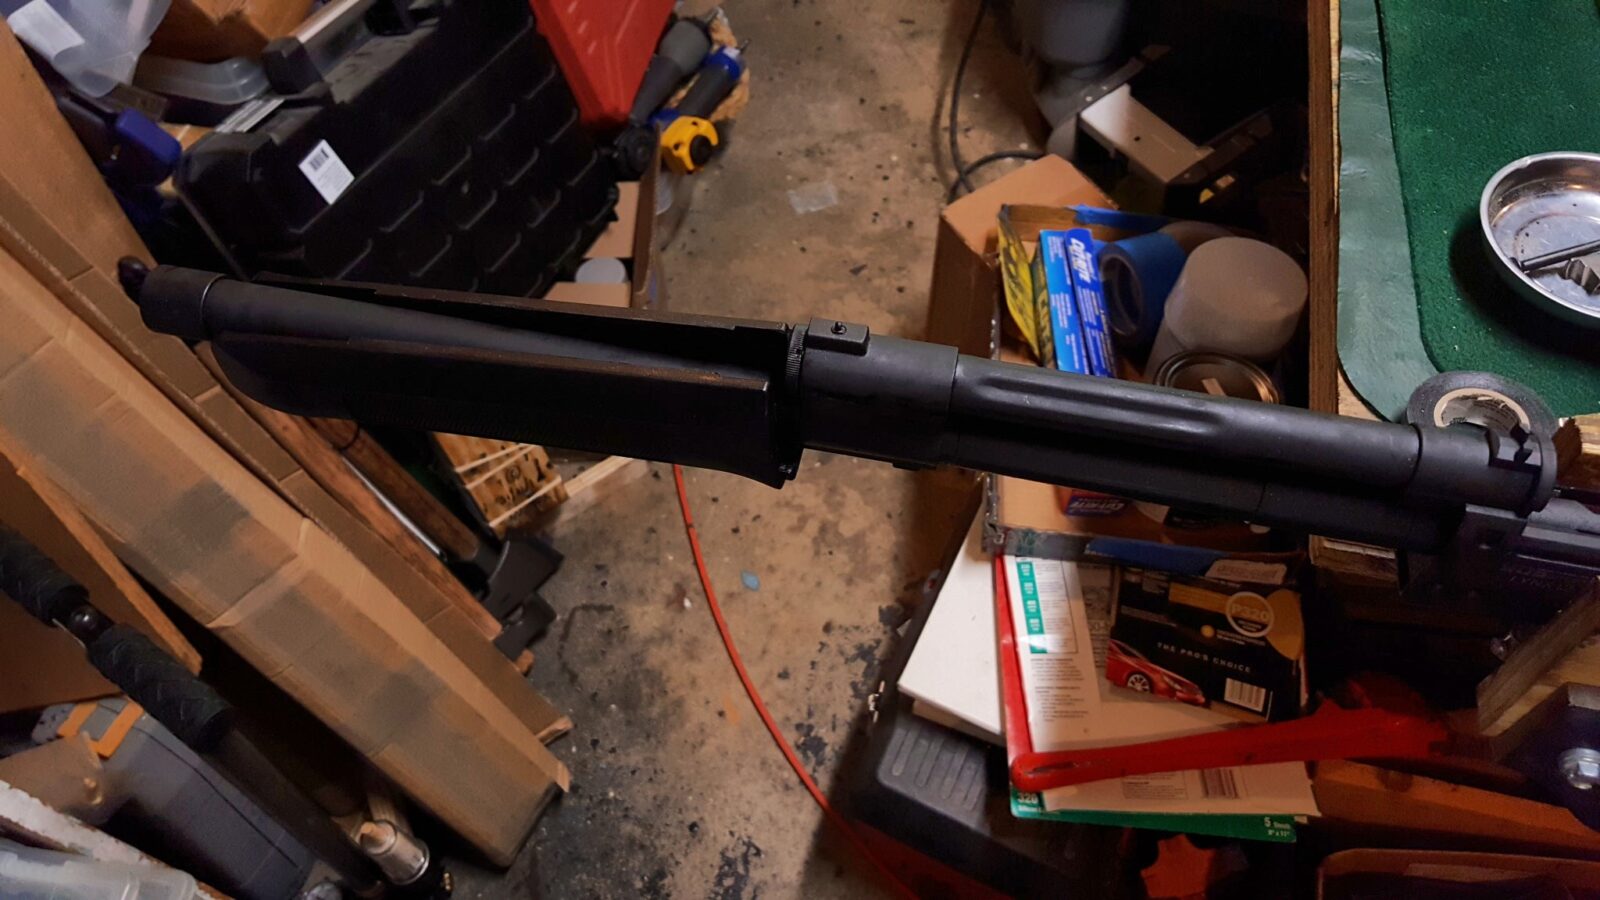
Installing the M4 Mil-Spec Buffer Tube
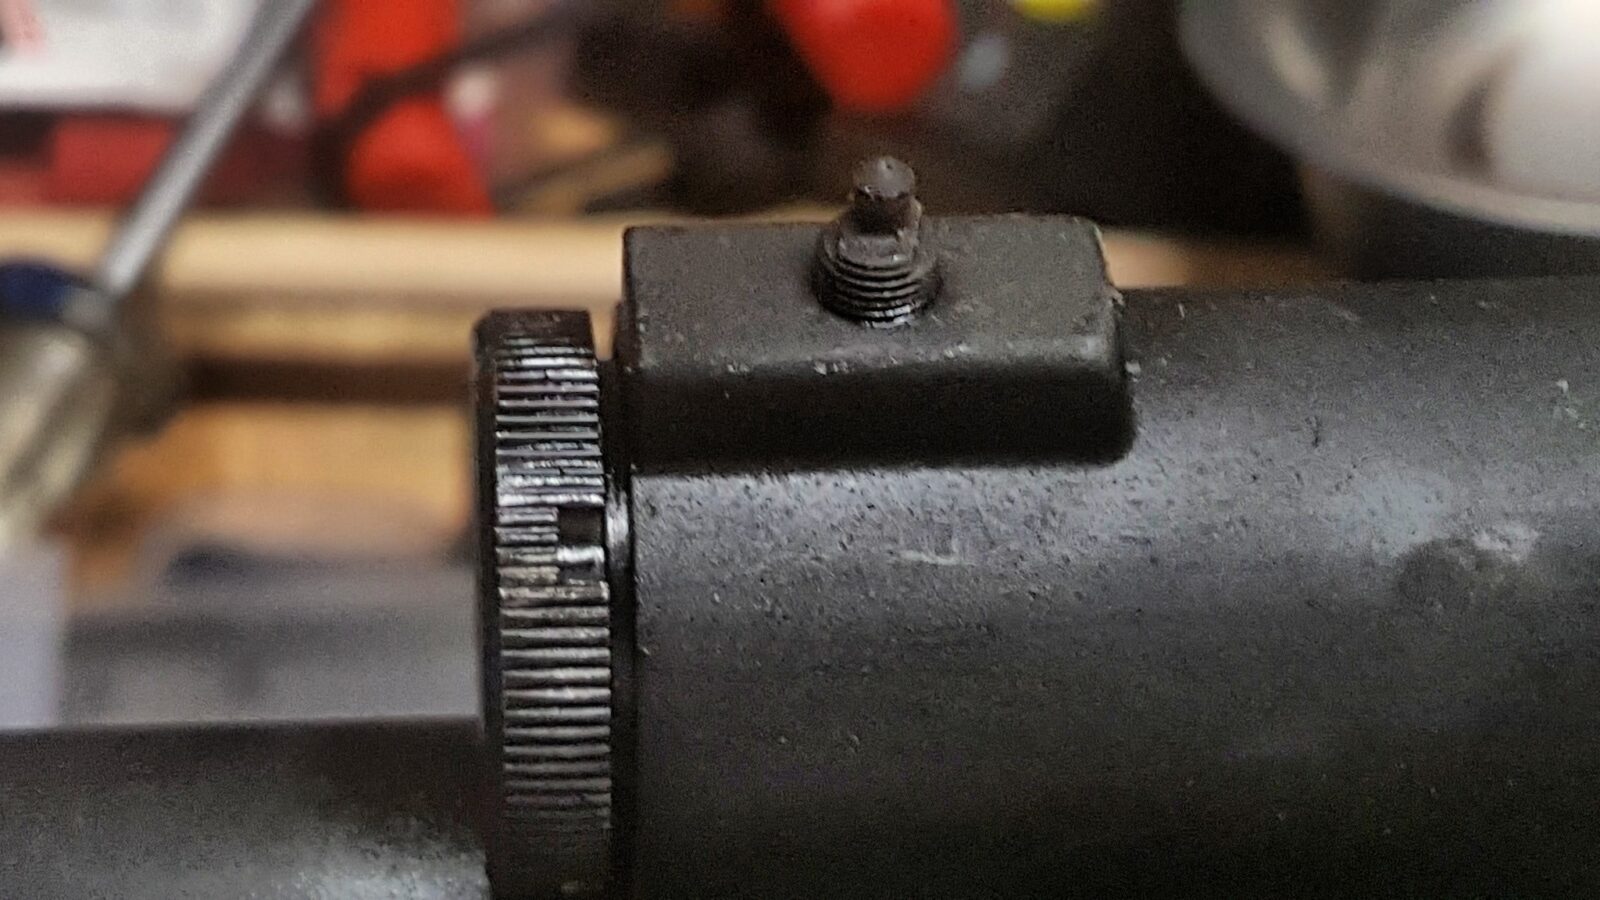
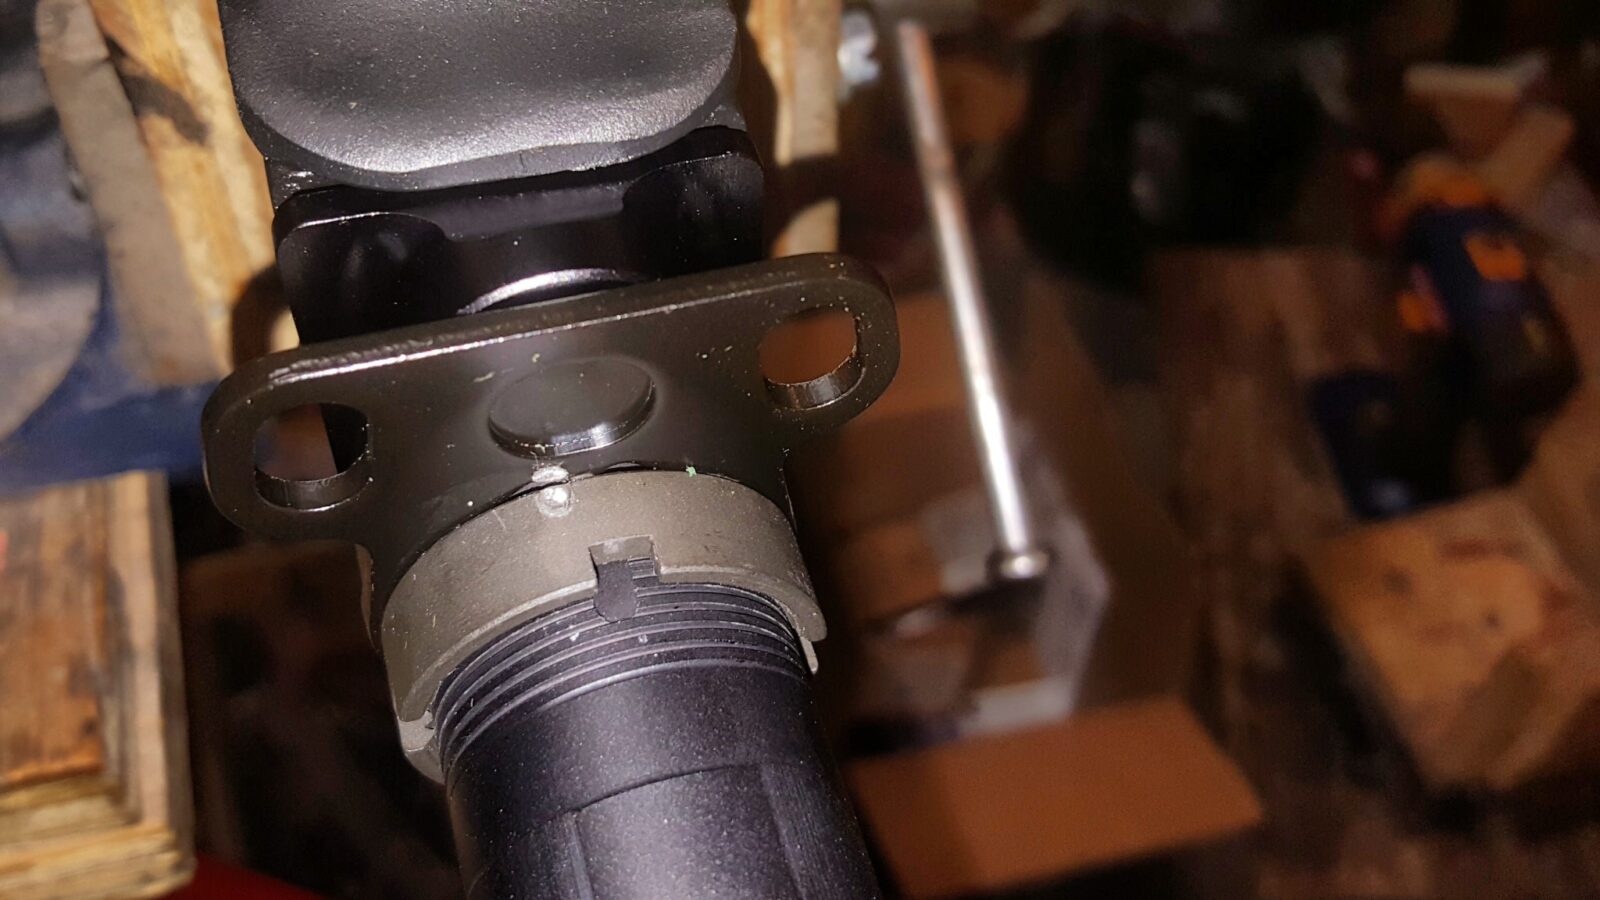
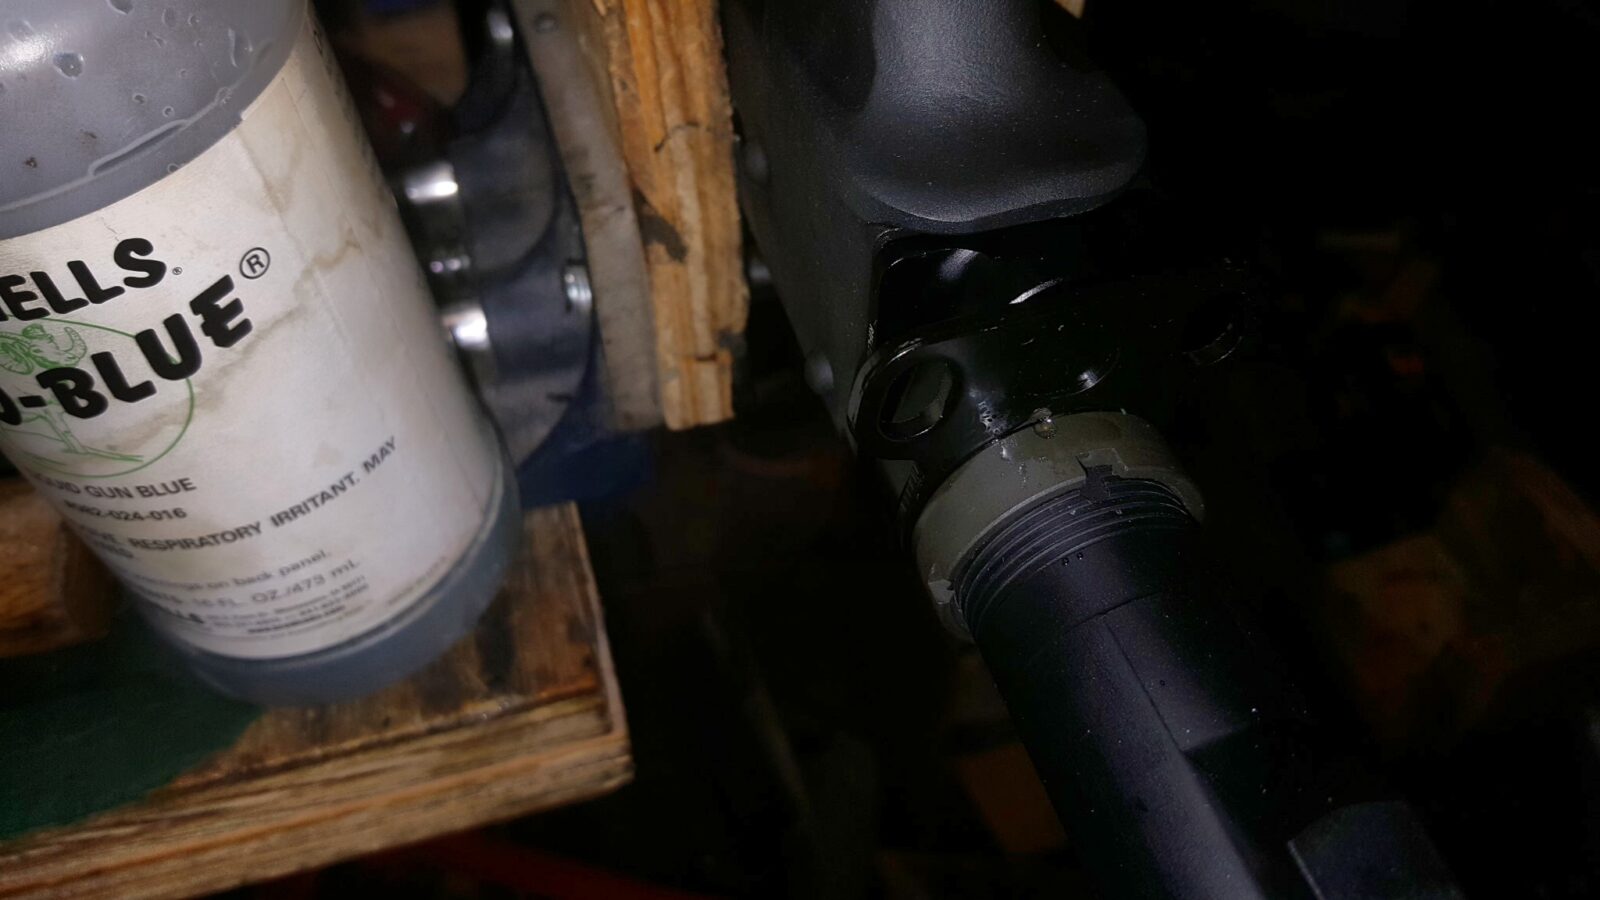
By now, the buffer tube with the mercury suppressor was cured enough to be safely installed. Basically, it is installed the same as on an AR but it is much heavier. Thread the castle nut all the way to the end of threads, install the end plate and then screw the tube into the Rifle Dynamics stock adapter. Note need to buy the end plate and the castle nut – they typically do not come with a buffer tube.
When you are almost out of space to screw the buffer tube because of the end plate riding in the groove, stop, push the end plate into the adapter and tighten the castle nut down using your favorite tool.
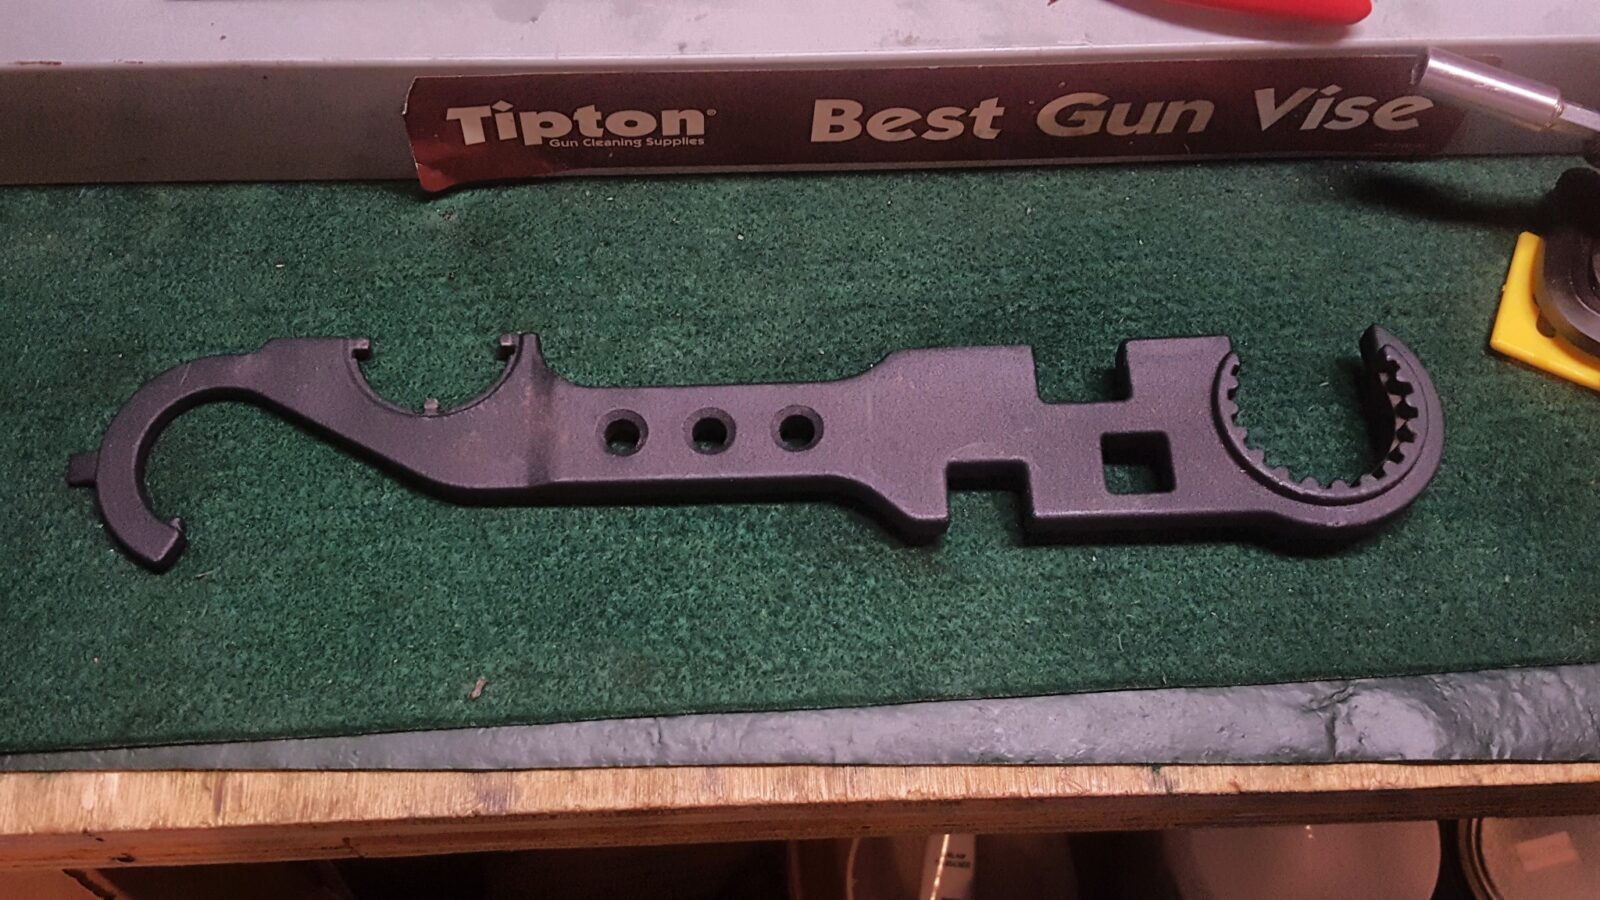
While I used the above pictured wrench, I’ve since switched to the Magpul wrench and swear by. It’s the best wrench I’ve found for stock work including castle nuts.
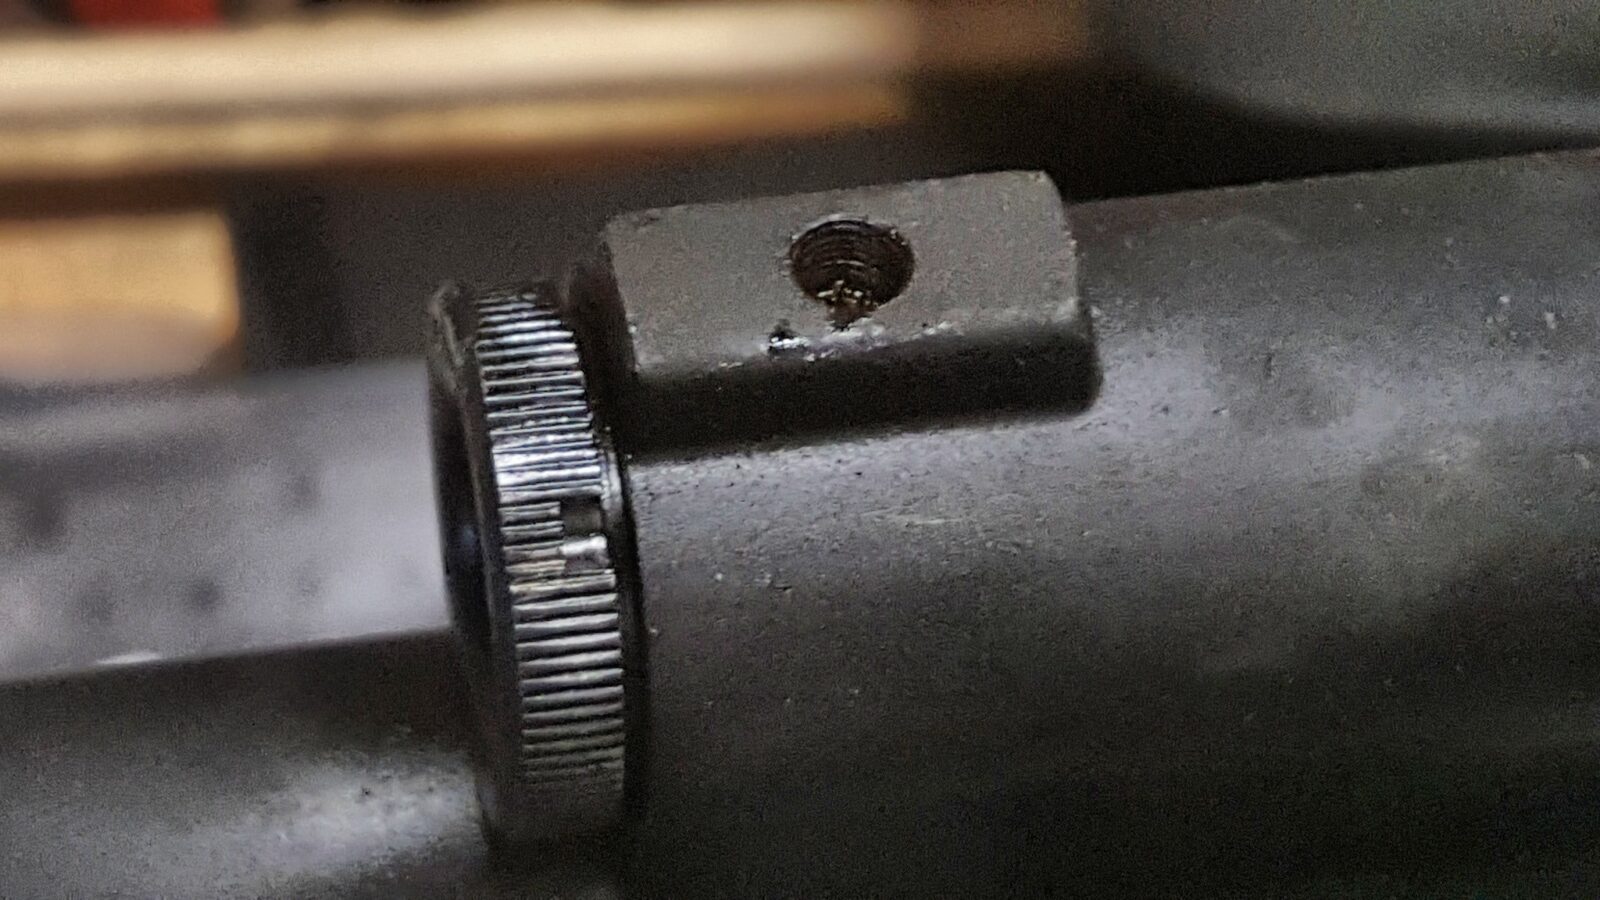
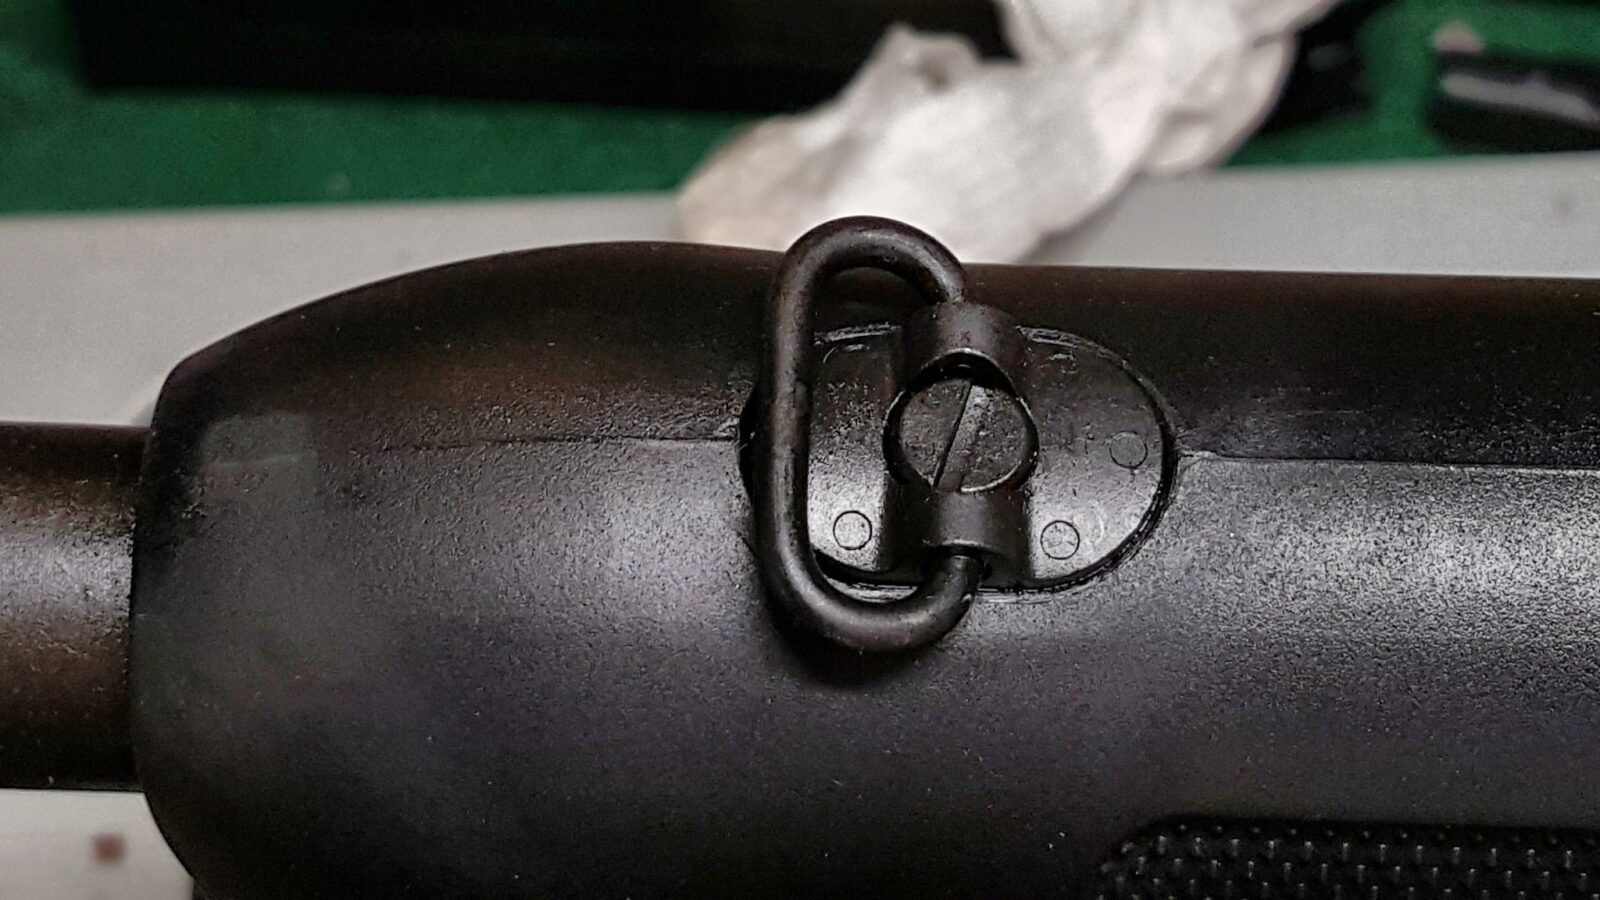
In the next photo you can see that I am using a end plate with sling loops plus you can see that I staked the castle nut. Because of the recoil of the 12 gauge, I created a small divot with a center punch – this is known as “staking”. It will mechanically lock the castle nut in place. I could have put Blue Loc-tite on the castle nut but I went old school.
I then used a cotton swab and some Brownells Oxpho-Blue to cold blue the bare metal to a black color and then wiped it down with WD-40.
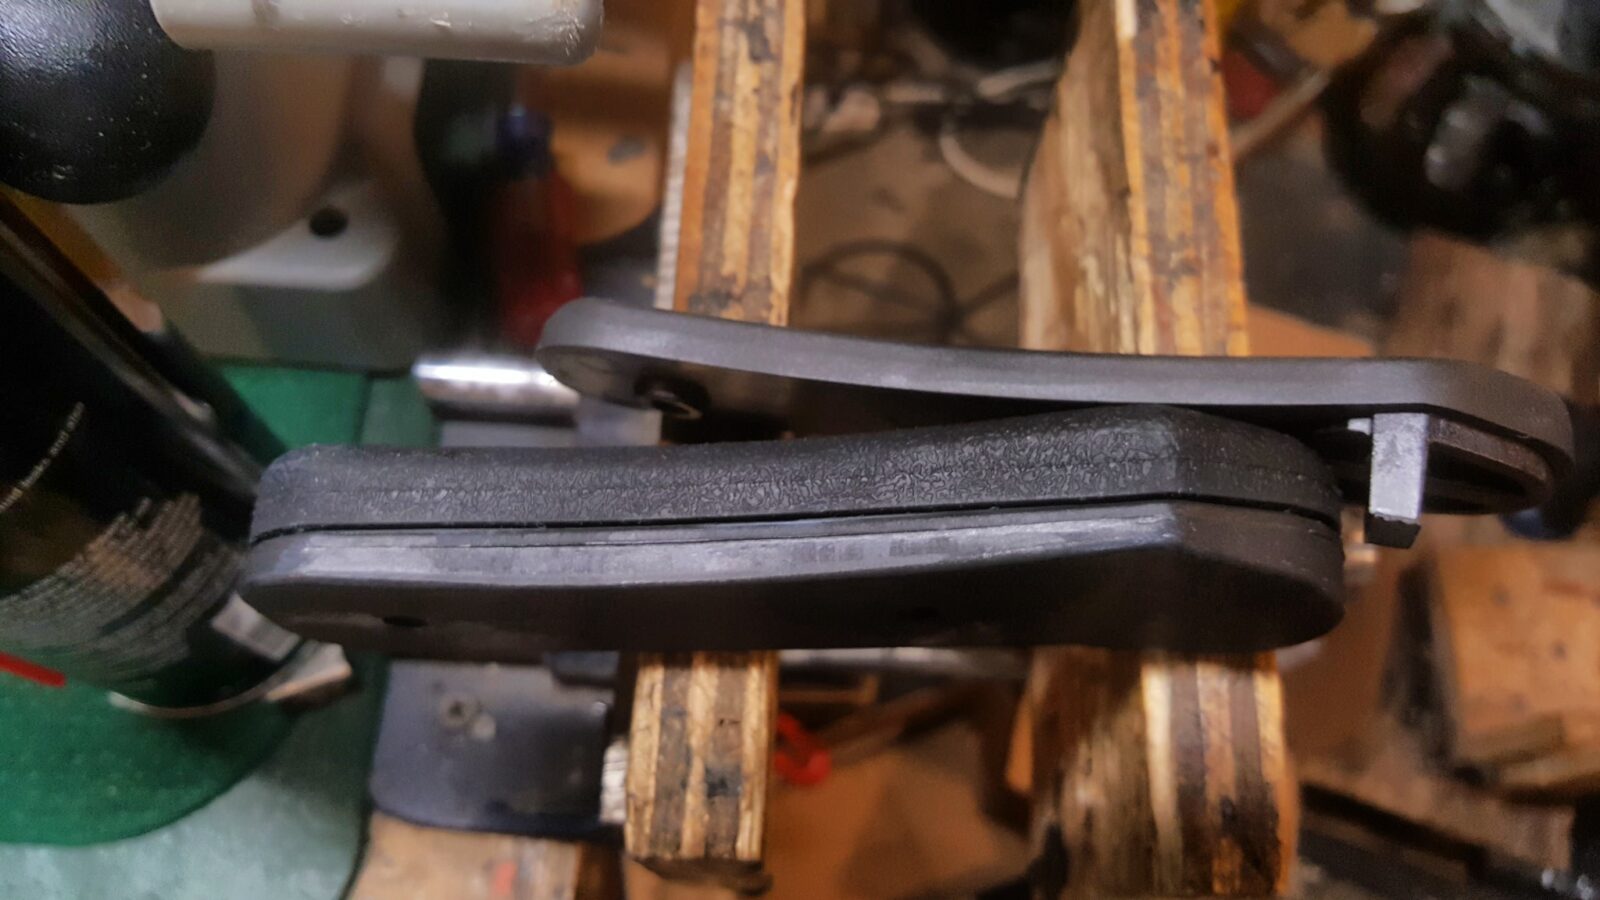
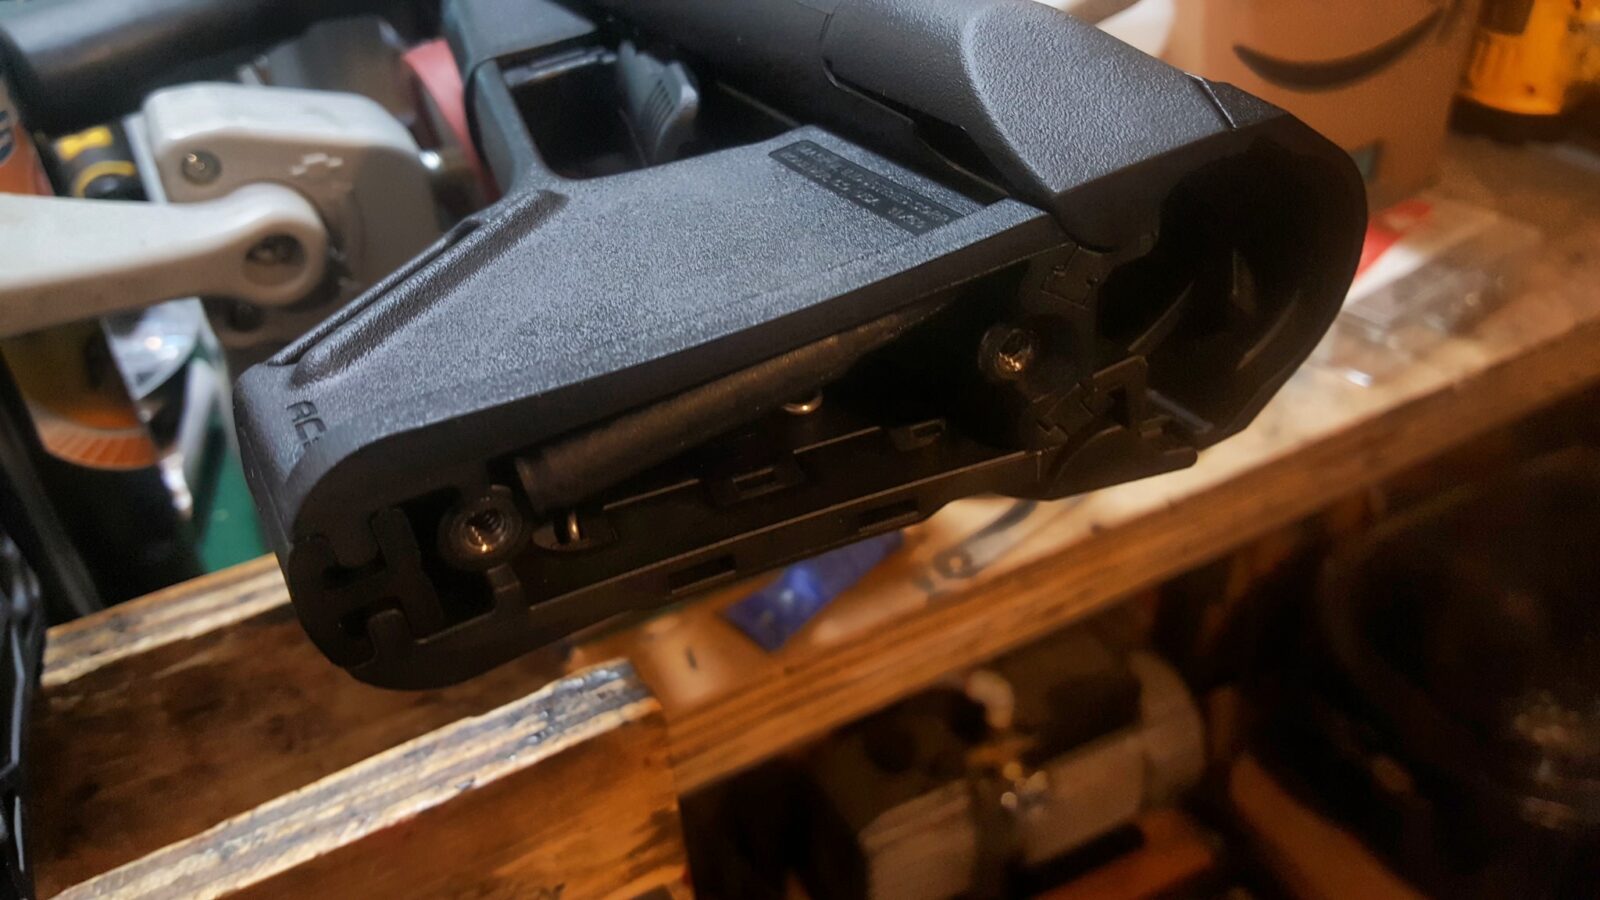
Installing the Magpul ACS Stock with Limbsaver Pad
I like the Magpul ACS stocks. They are comfortable, have a locking lever to keep them from wobbling and have storage compartments you can either really use for storage or fill with epoxy and bird shot to further adjust the weight and balance of a rifle.
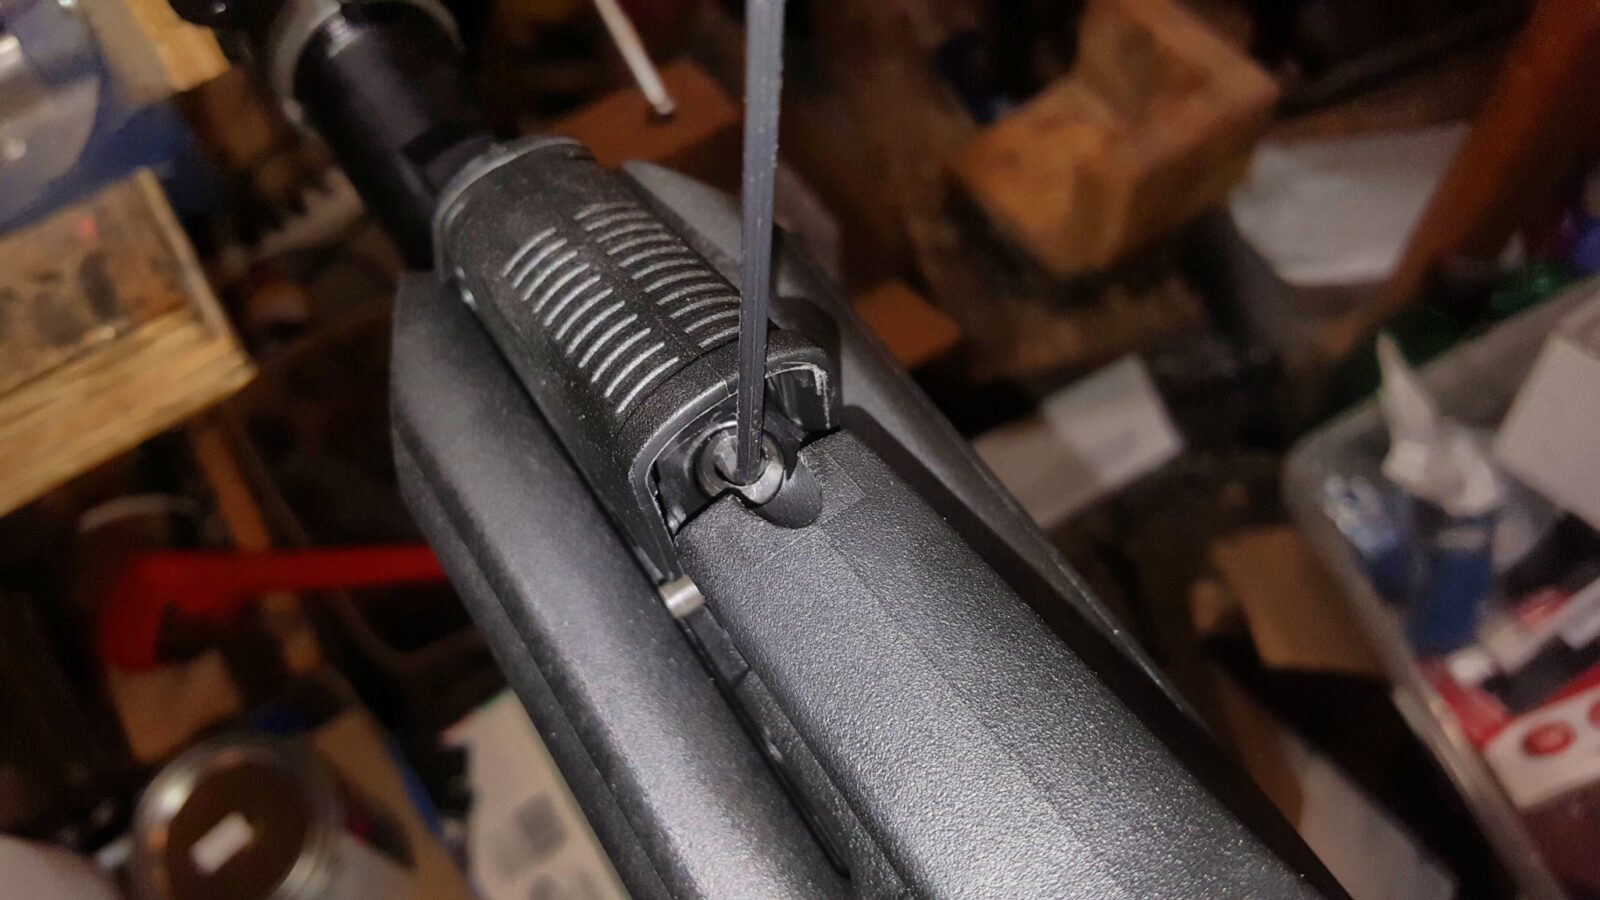
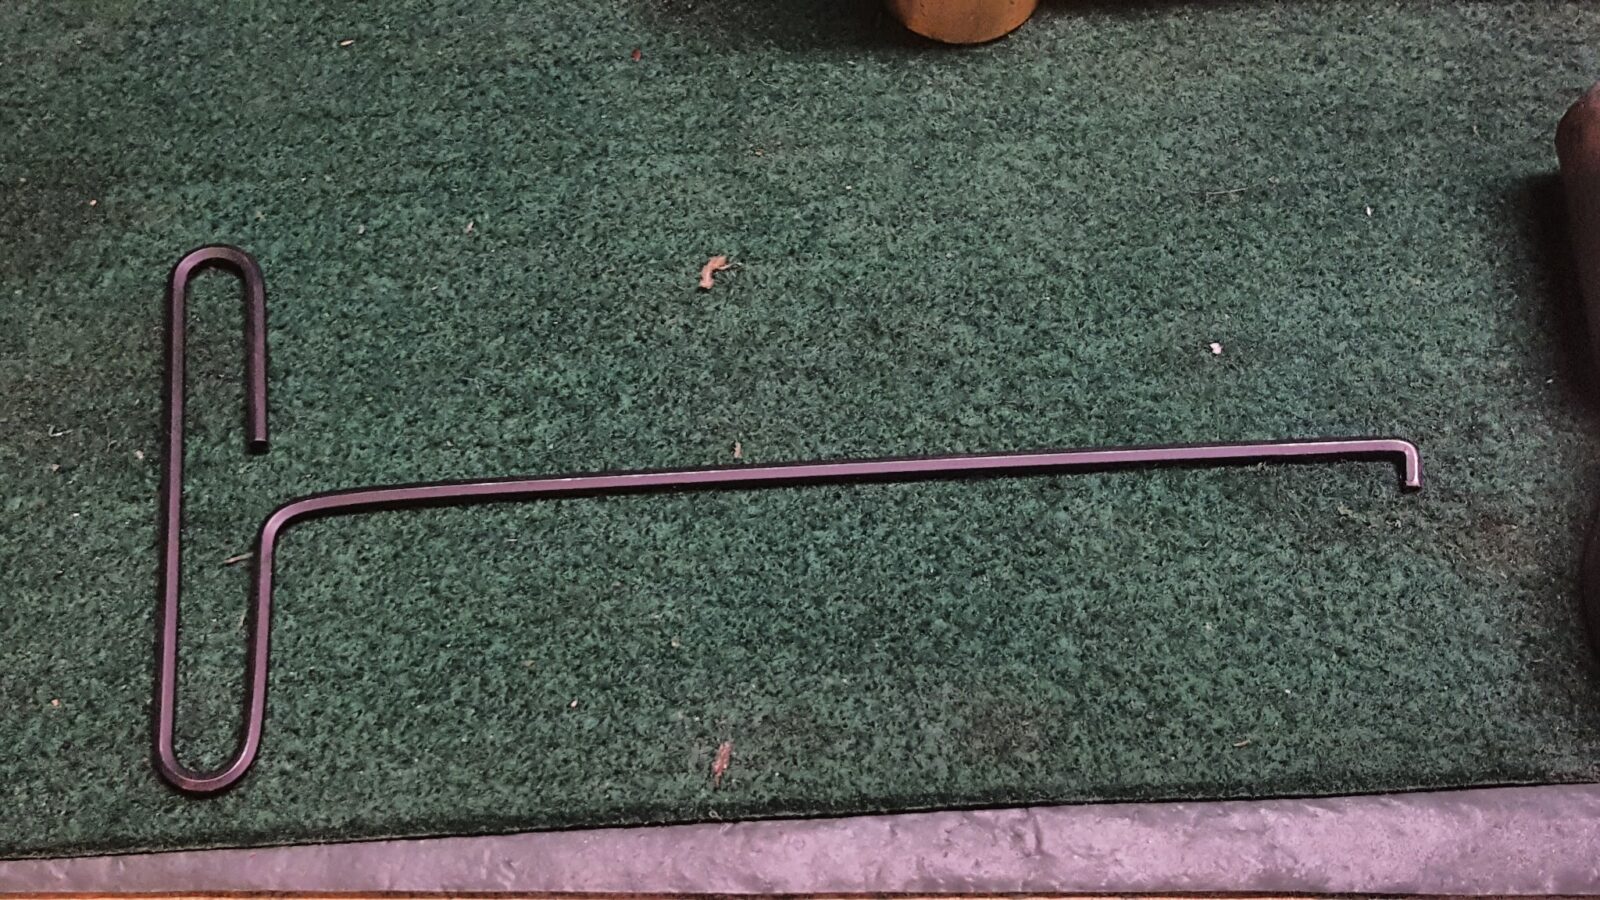
As luck would have it, I don’t have a photo of the stock before installation but will tell you that the one challenge is to lift the locking pin. Magpul gives you a dummy cartridge to help with this but I made a tool to hook the pin and lift easy as can be.
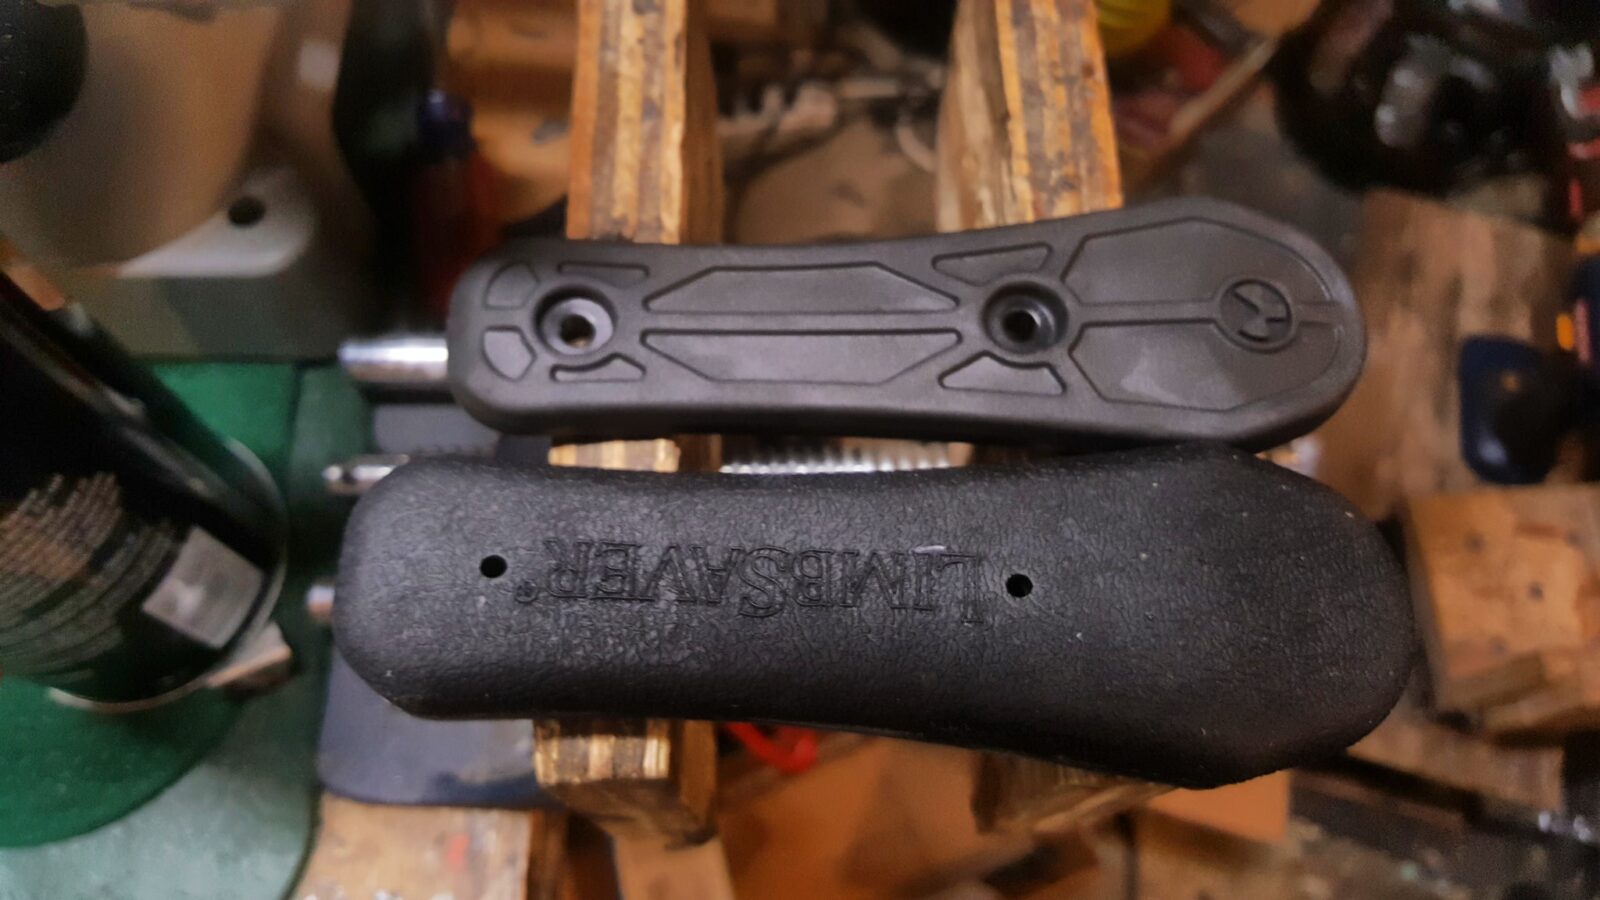
Now one thing that is nice with hard recoiling firearms is a decent recoil pad. I’ve long been a fan of Limbsaver pads and they make a model specific for the Magpul ACS, ACS-L, CTR, MOE, STR and UBR. It’s nice and thick and provides a lot of cushion especially compared to the original pad it replaces.
I purchased the Magpul ACS for Mil-Spec buffer tubes from Primary Arms and the recoil pad off Amazon.
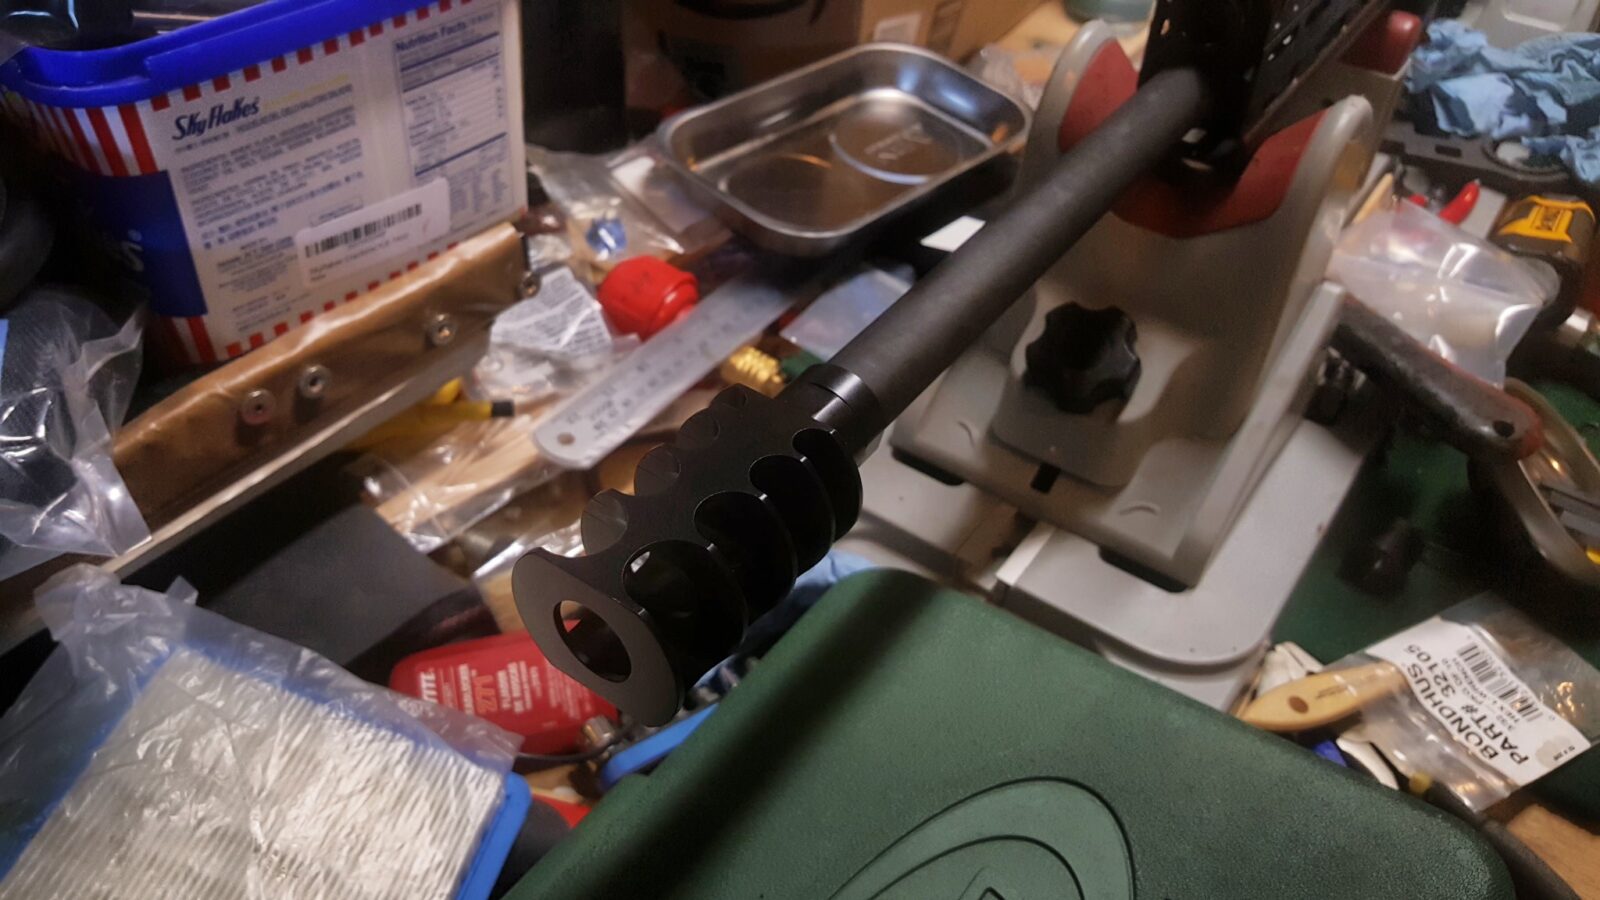
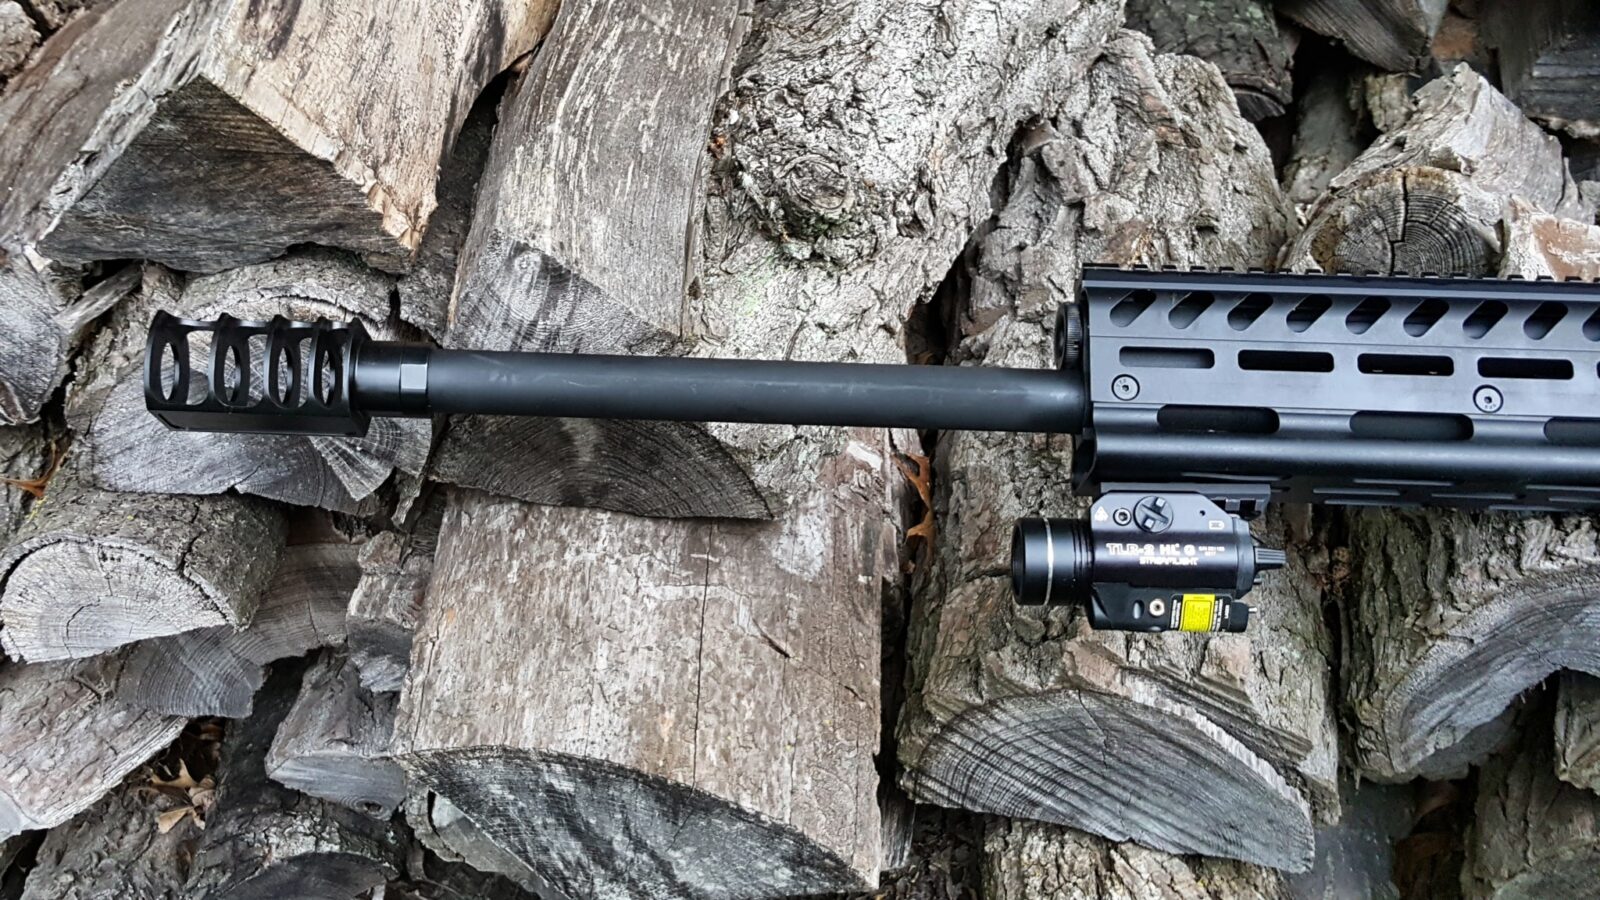
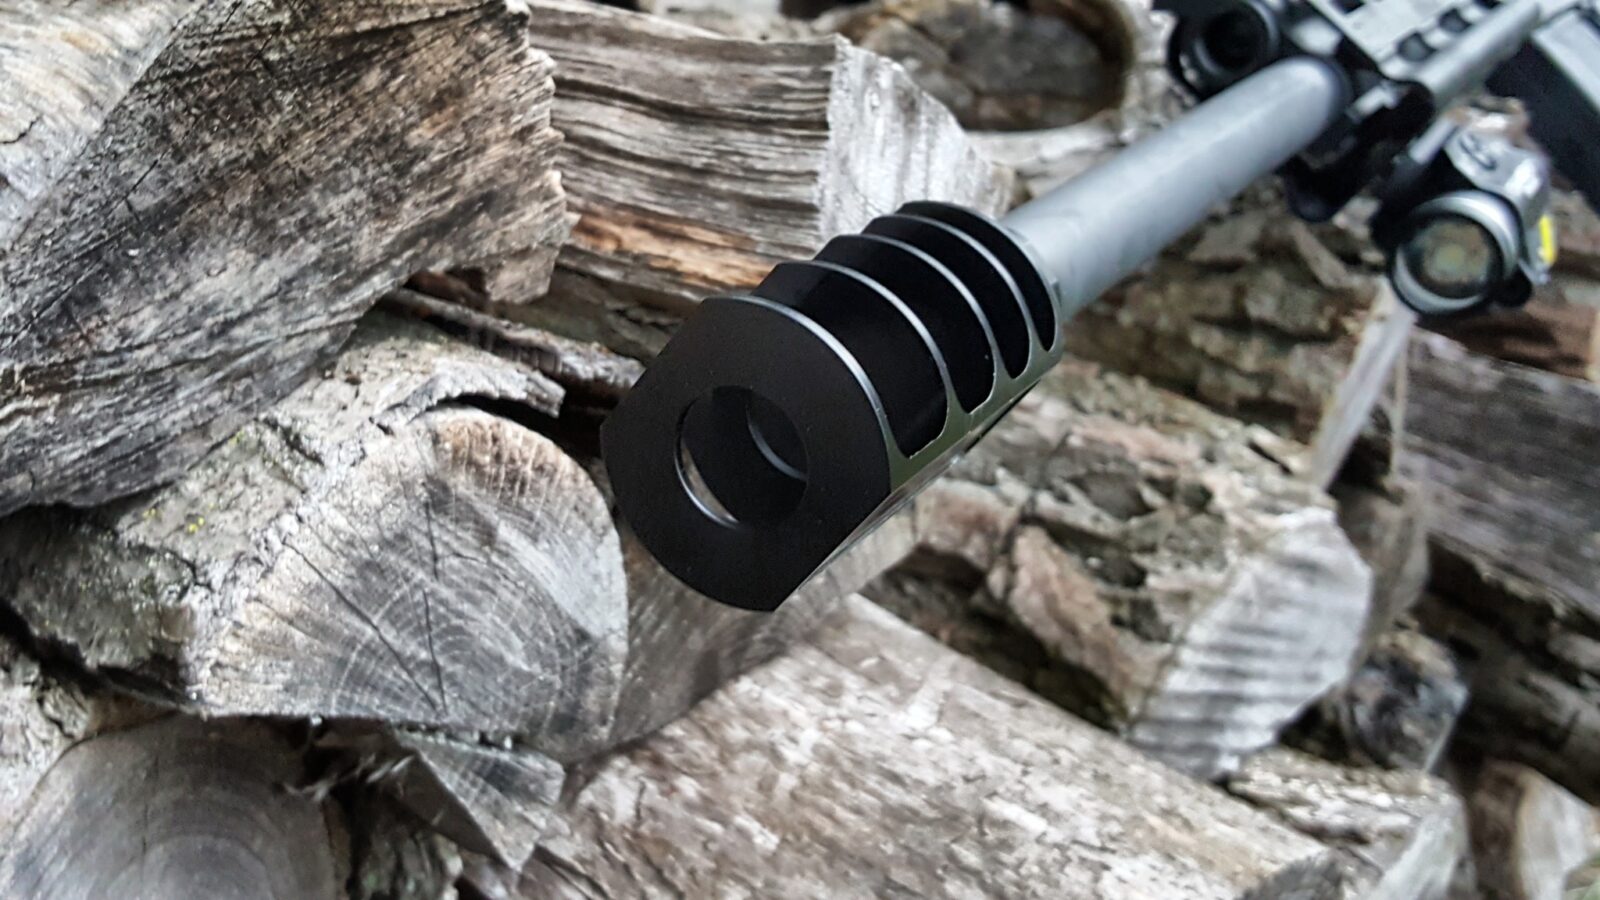
Installing the JMac RRD-4C 12 Brake
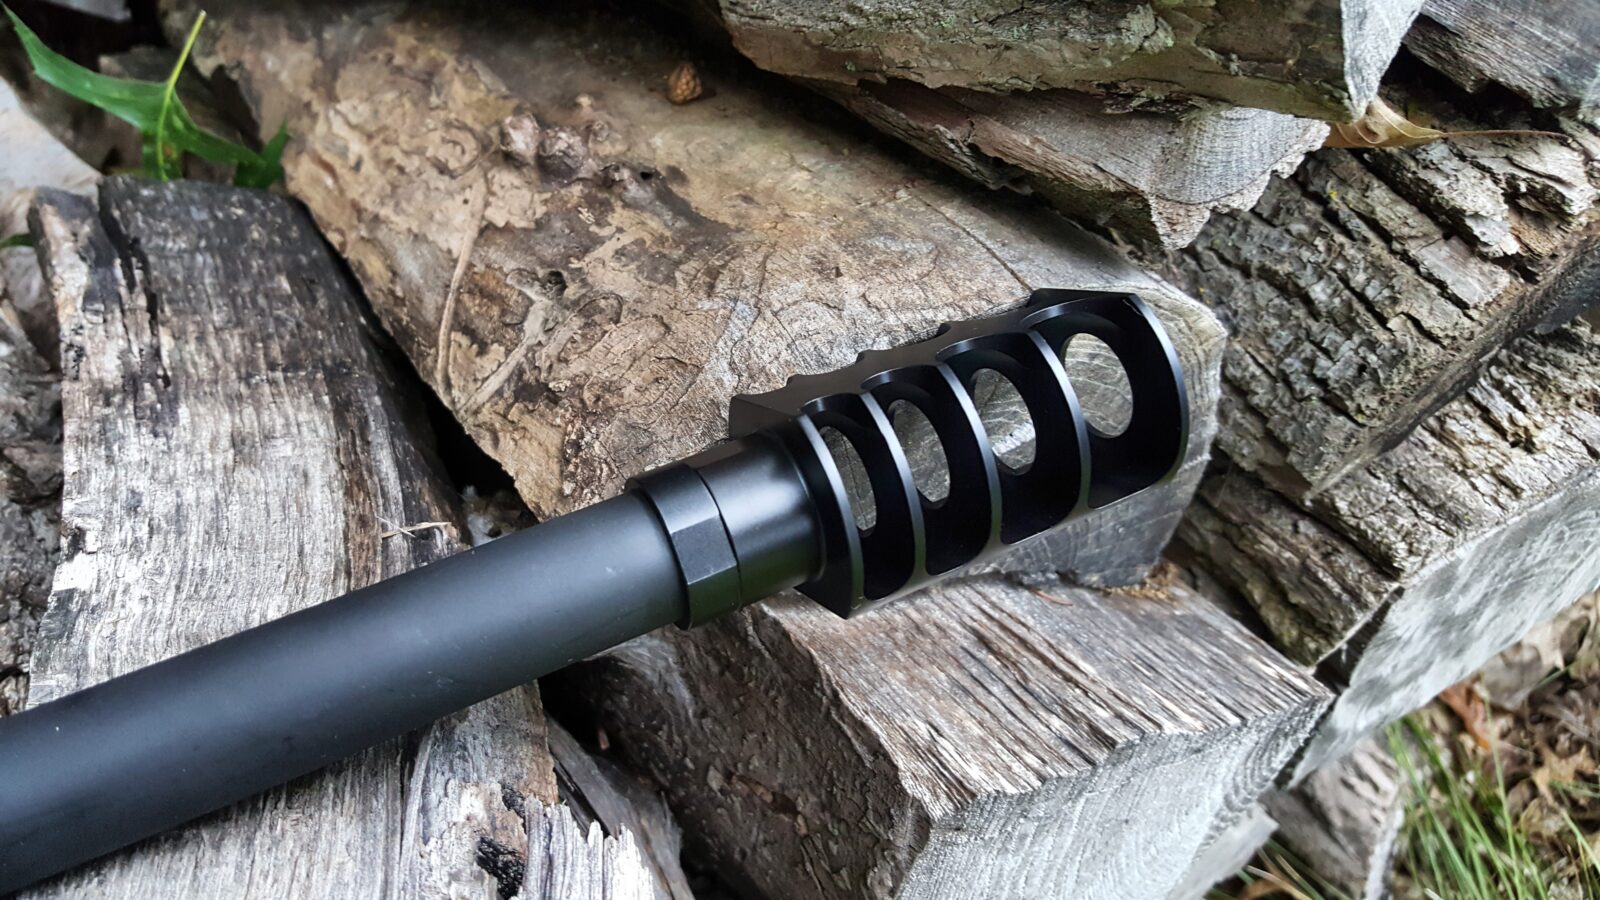
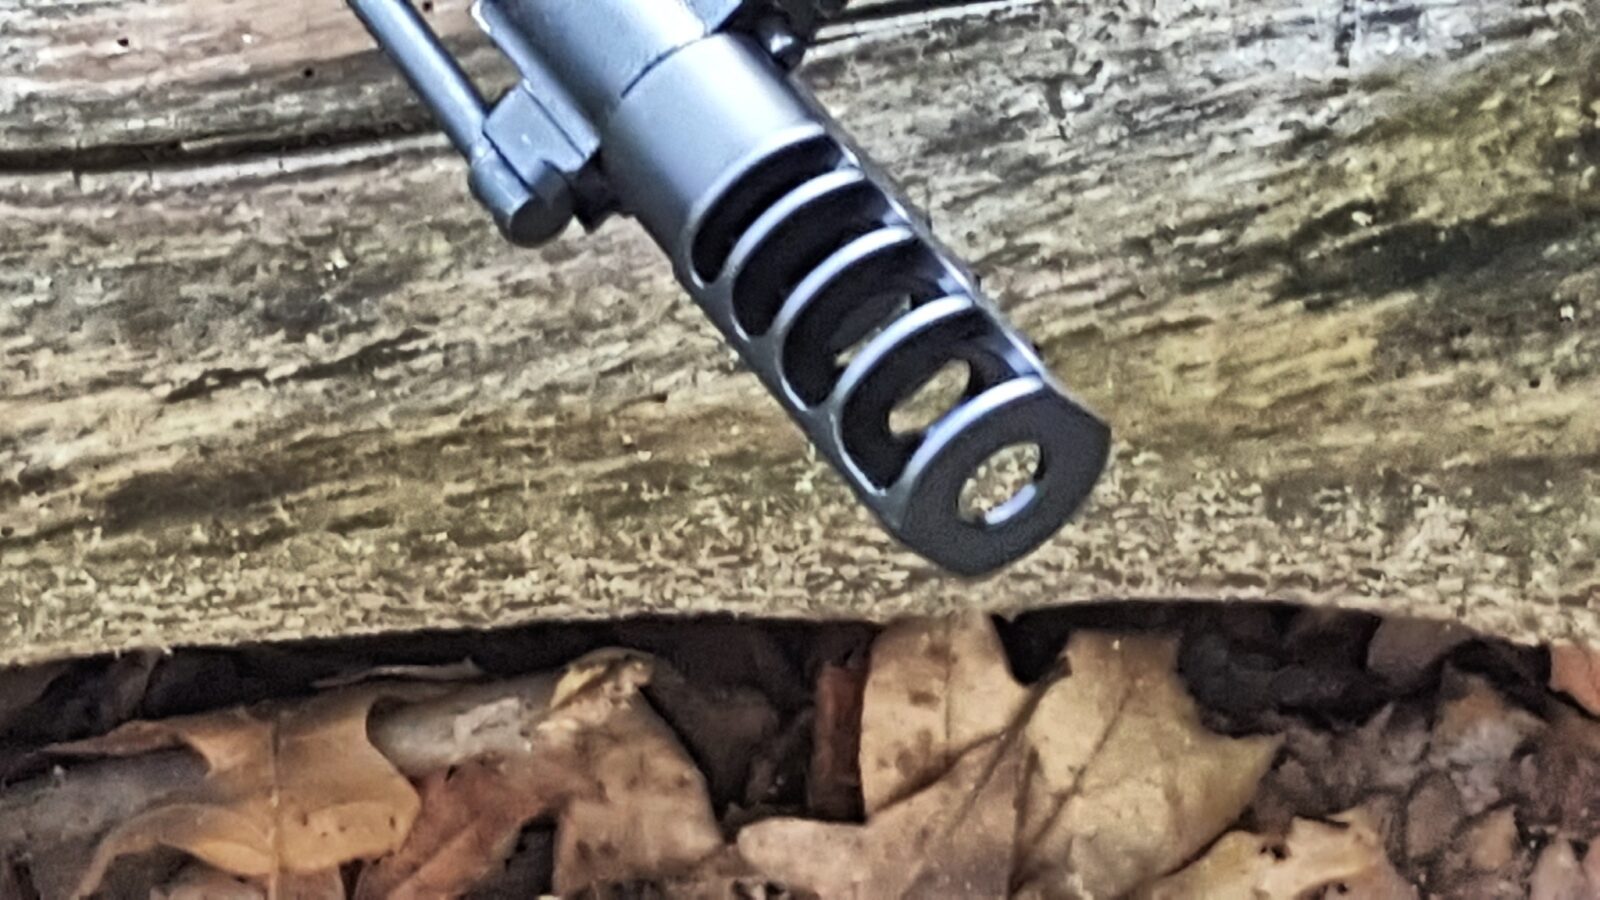
If you want to tame recoil, a good brake is essential. Justin McMillion and his company JMAC Customs make some great brakes so reaching out to him for a brake made perfect sense. He recommended their RRD-4C “12” brake.
The first thing I noticed was it’s size – it’s huge and badassed looking. Installation is a breeze. Unscrew the thread protector from the Lynx to expose its threads. Screw on the jam nut as far as you can and then thread on the brake as far as you can. Back it off enough that the brake is flat and the chambers are venting up as shown below. Then tighten the jam nut up against the back of the brake to lock it in place.
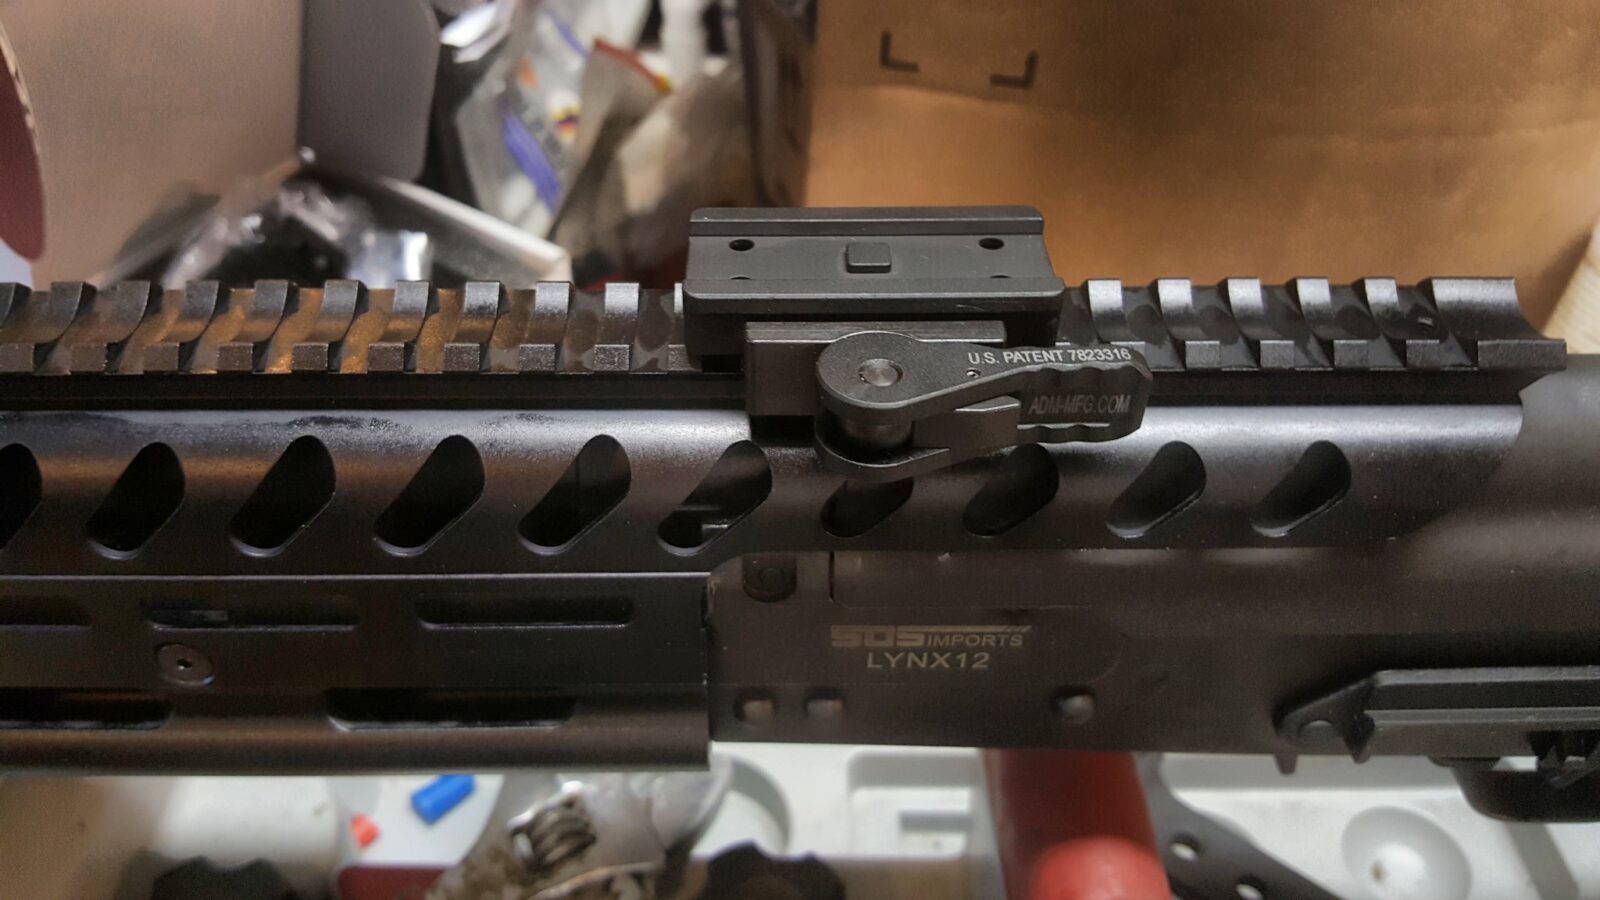
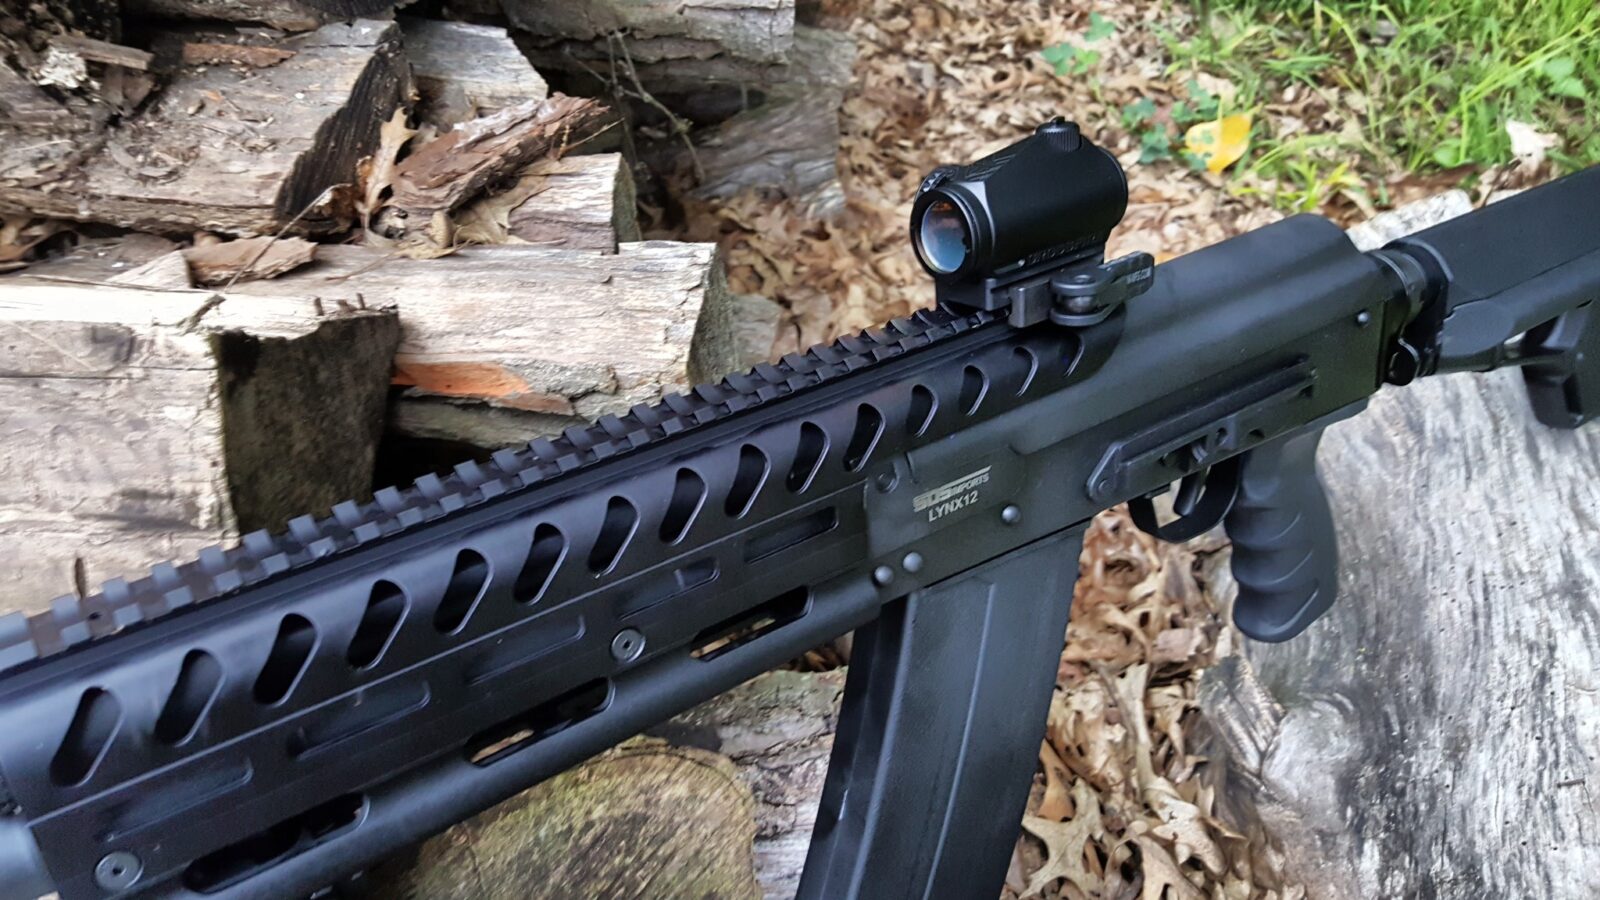
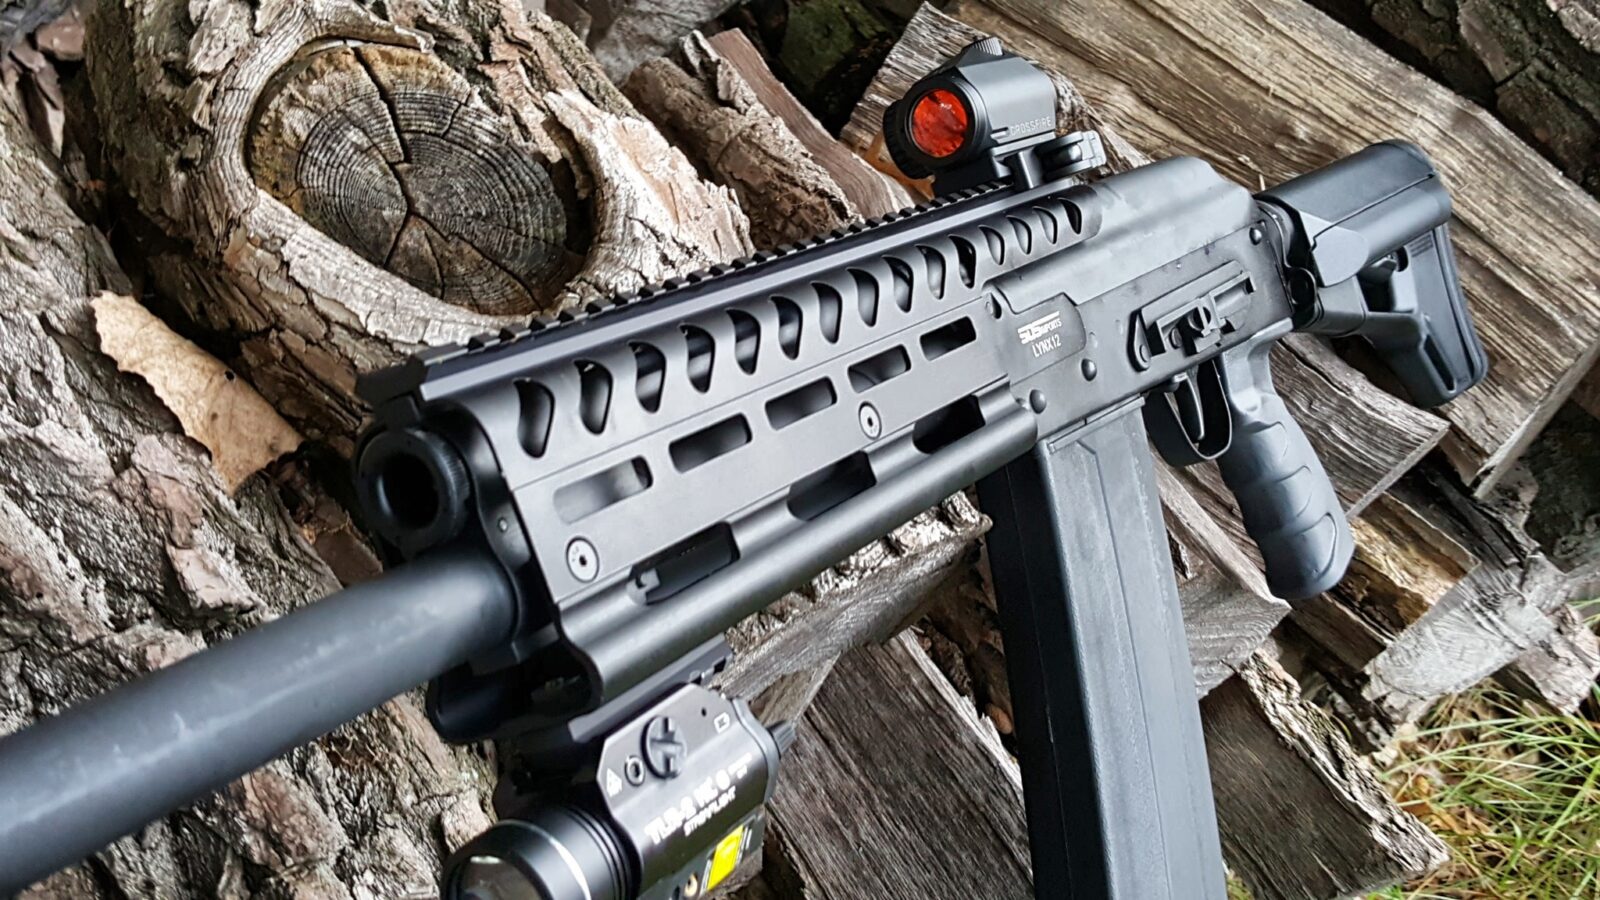
Installing the Crossfire Red Dot and American Defense Quick Release Lever
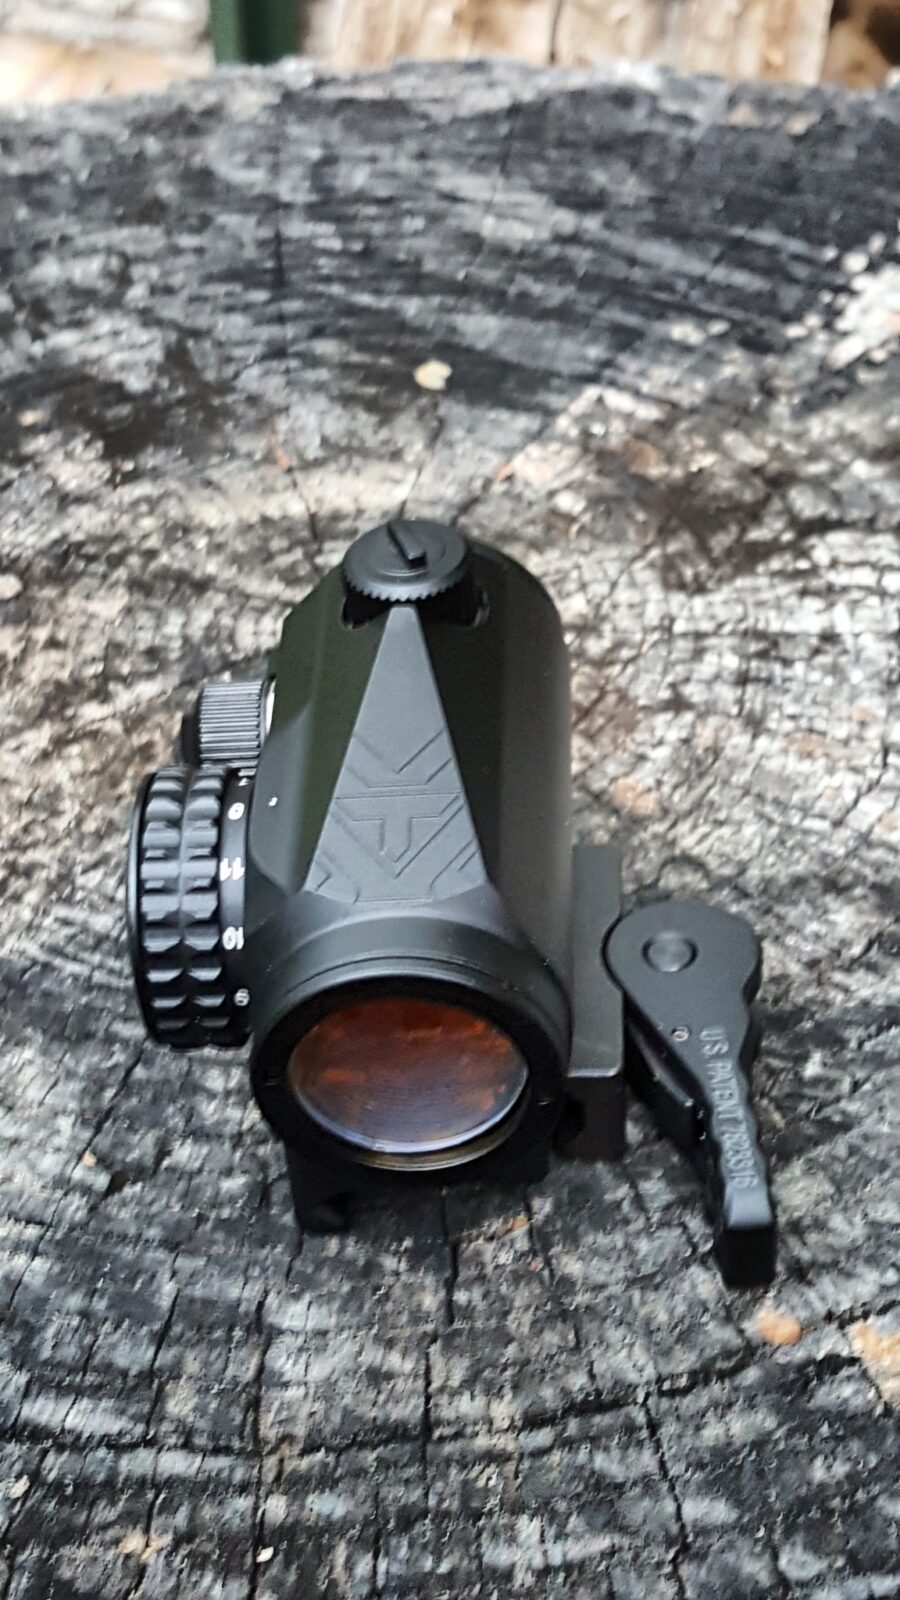
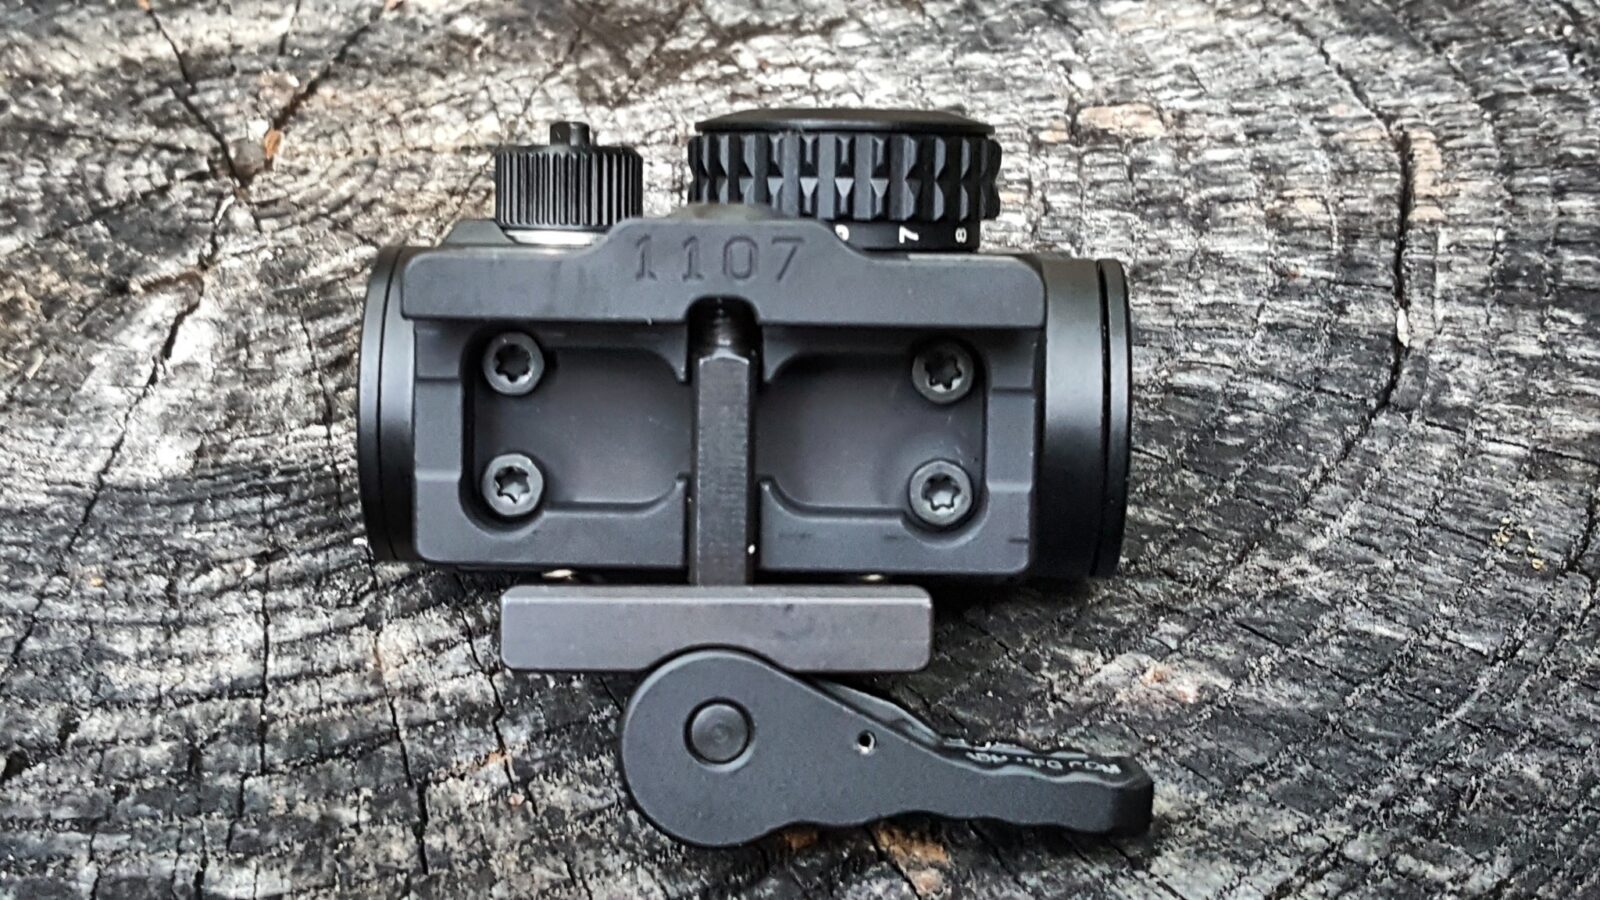
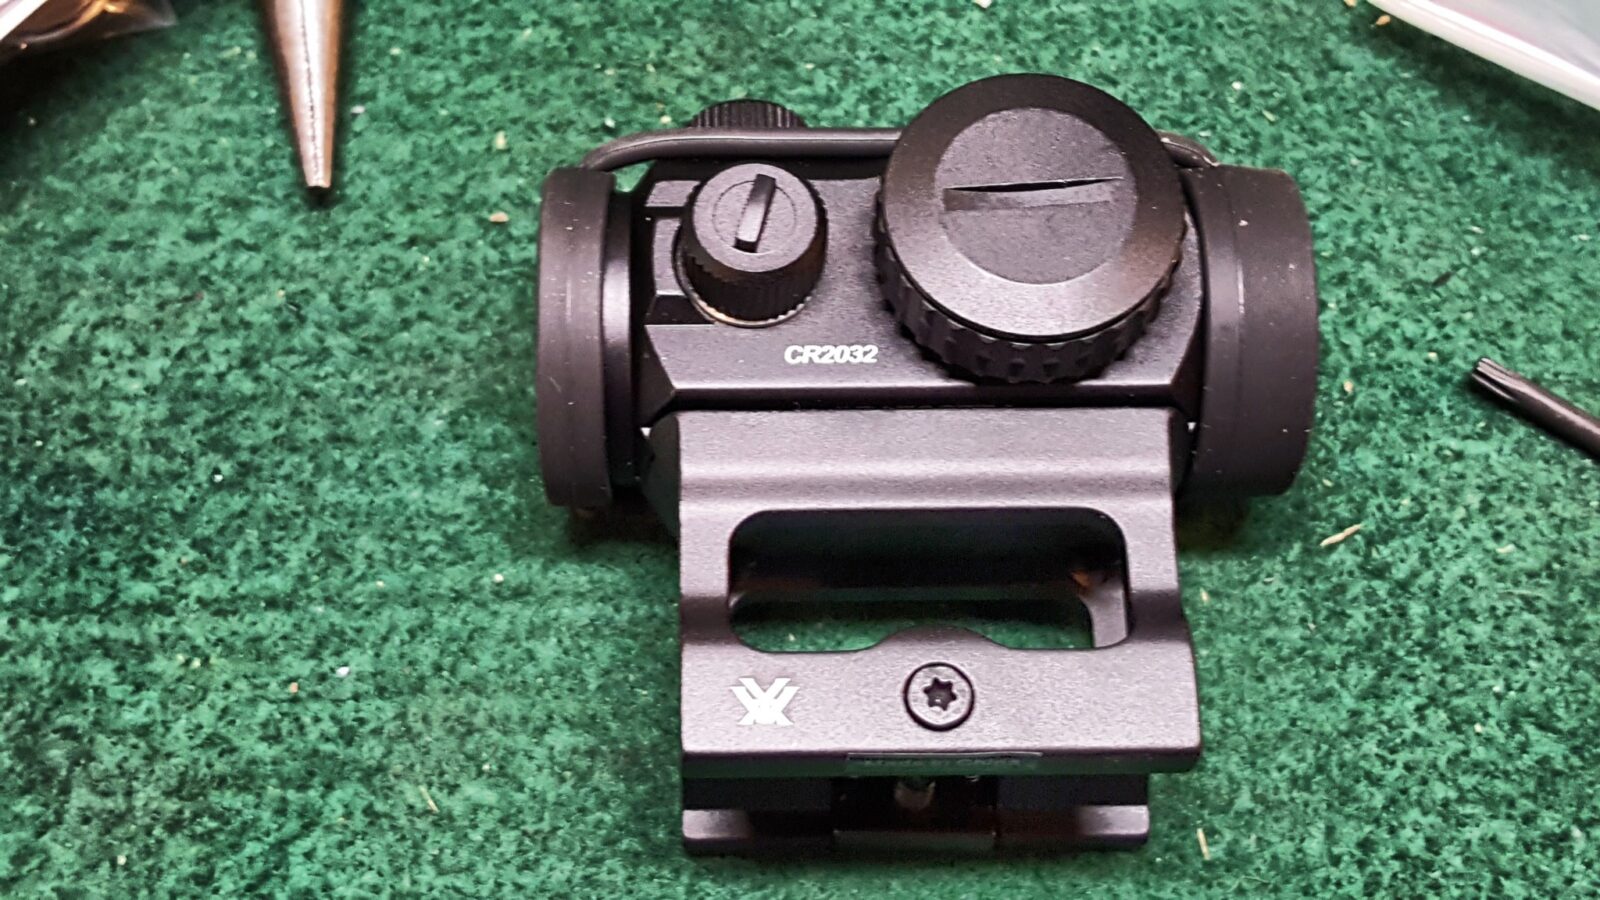
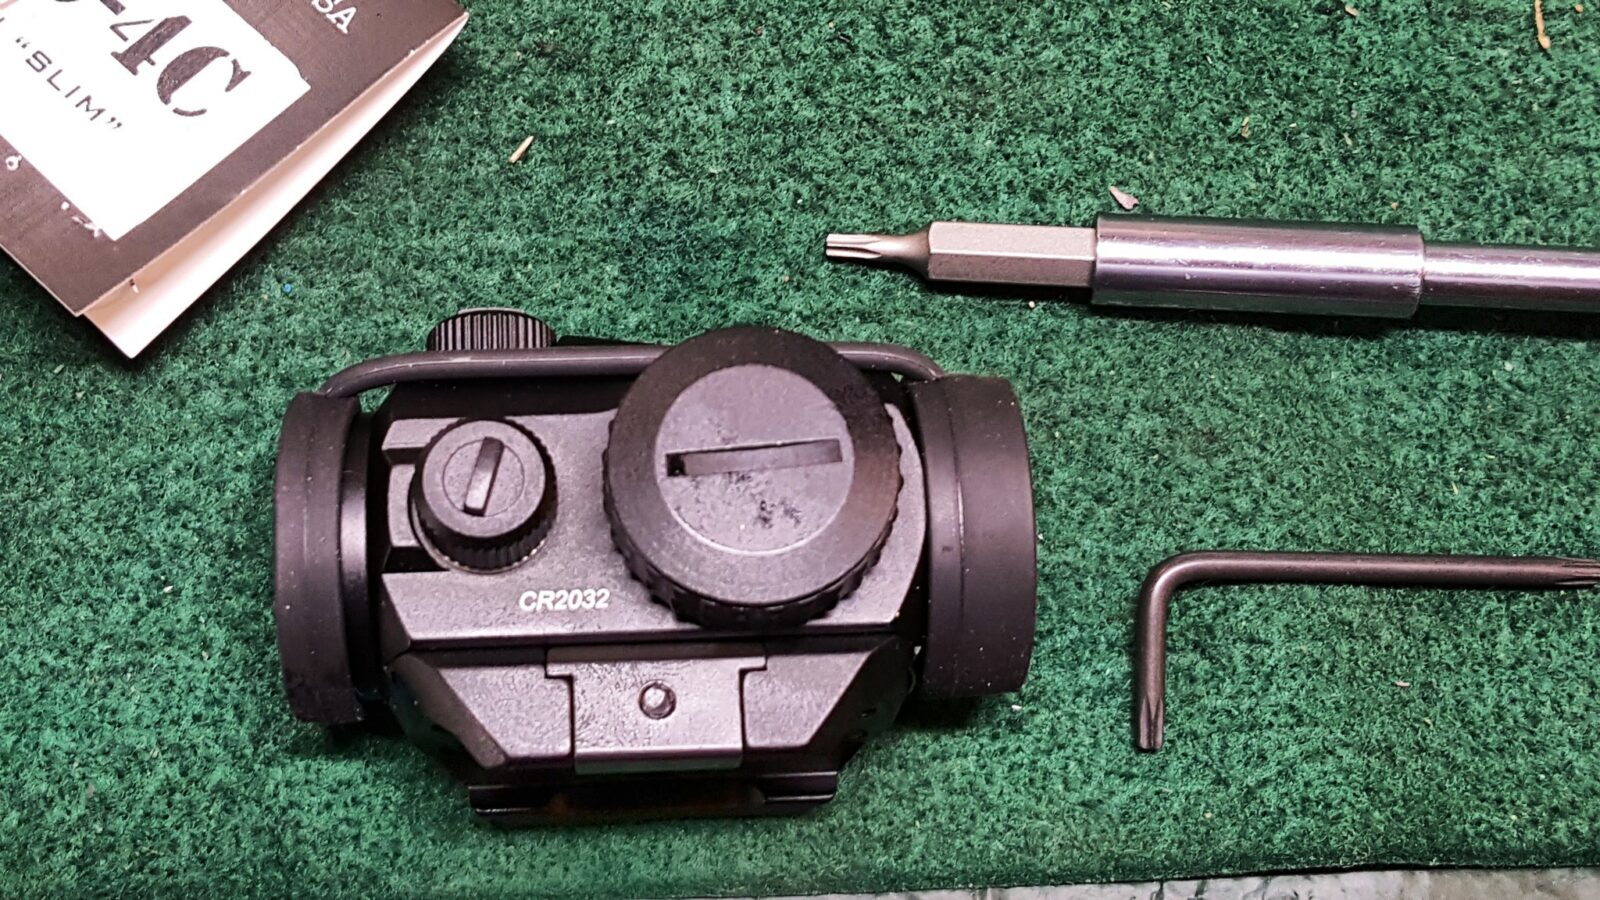
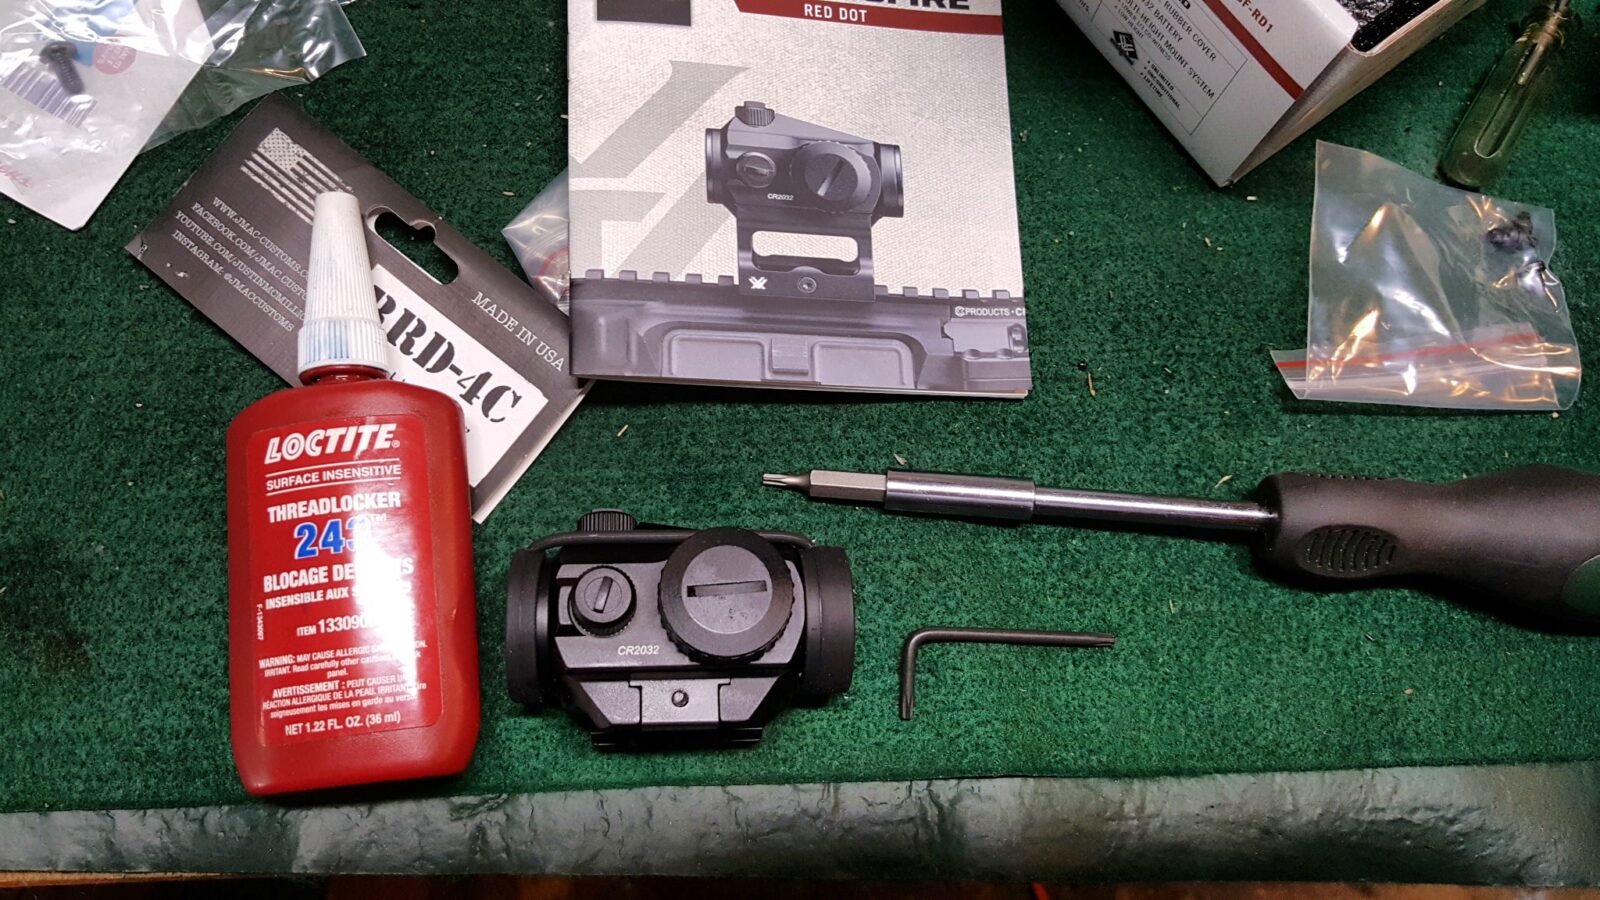
My go to red dot these days is the excellent Vortex Crossfire unit. It’s small and only has a 2 MOA dot. It comes configured for an AR but you can remove the tall base and use the supplied shorter one for a lower mount. Recently, I started using American Defense bases because they have a solid quick release lever so you can remove the red dot quickly. The base required is the AD-T1-L STD.
You just unscrew the four little screws on the bottom of the optic, apply Blue Loctite on the screws and attach it to the new base. Not hard at all! The results are totally worth it.
Caution about eBay: Watch out for cheap counterfeit products on eBay. I would recommend buying the optic and mount from a reputable dealer to make sure you are getting the real deal. The cheap knock offs just do not hold up.
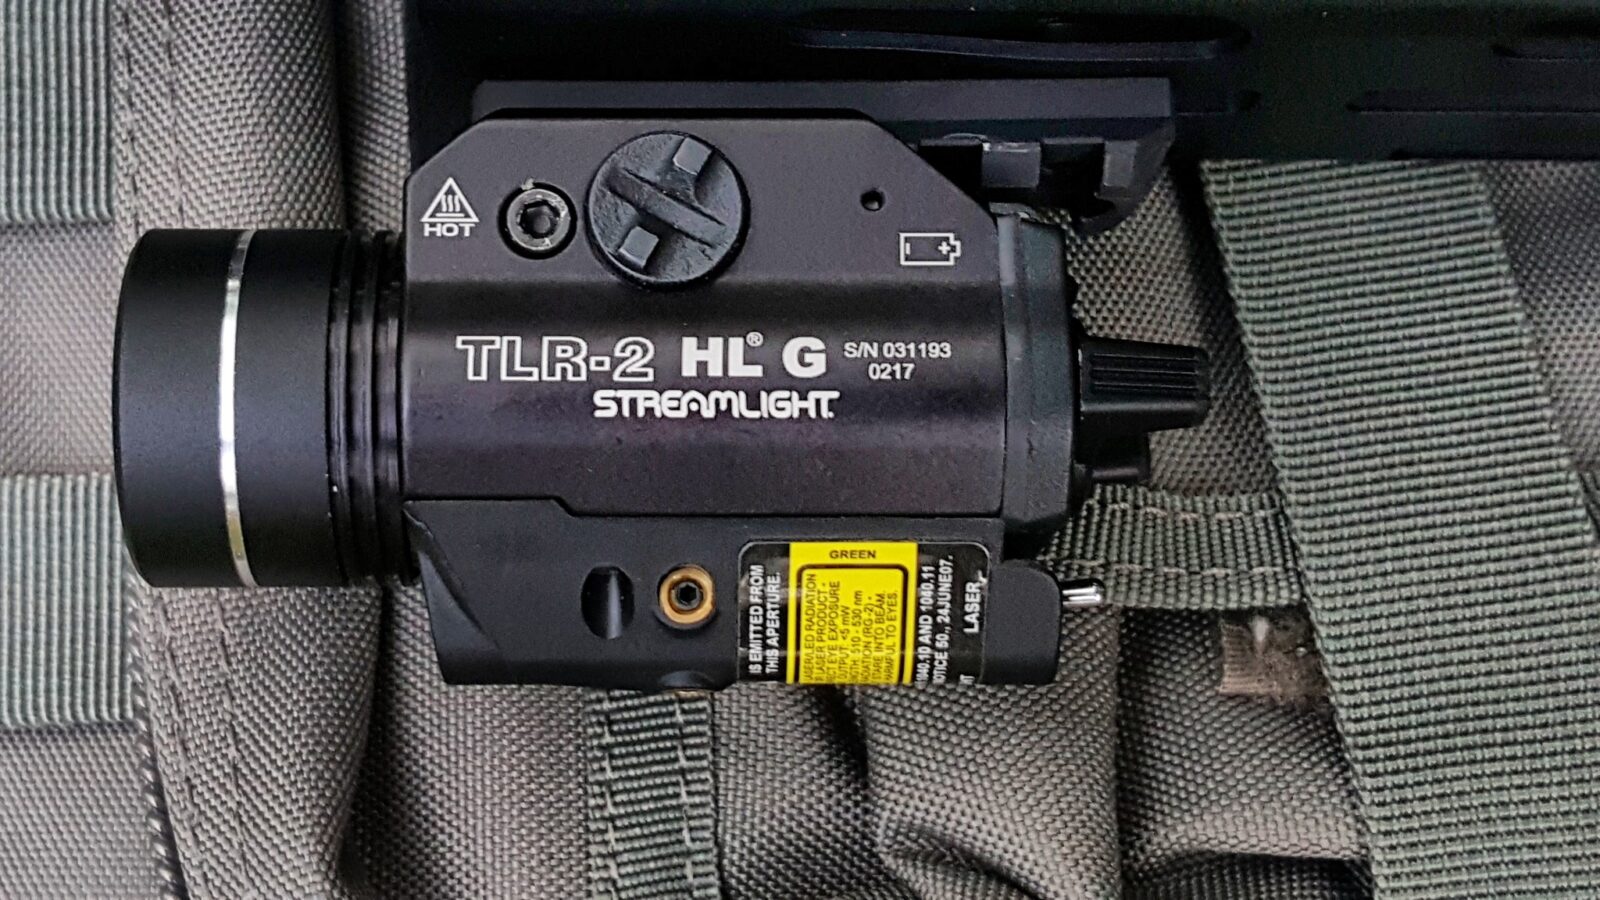
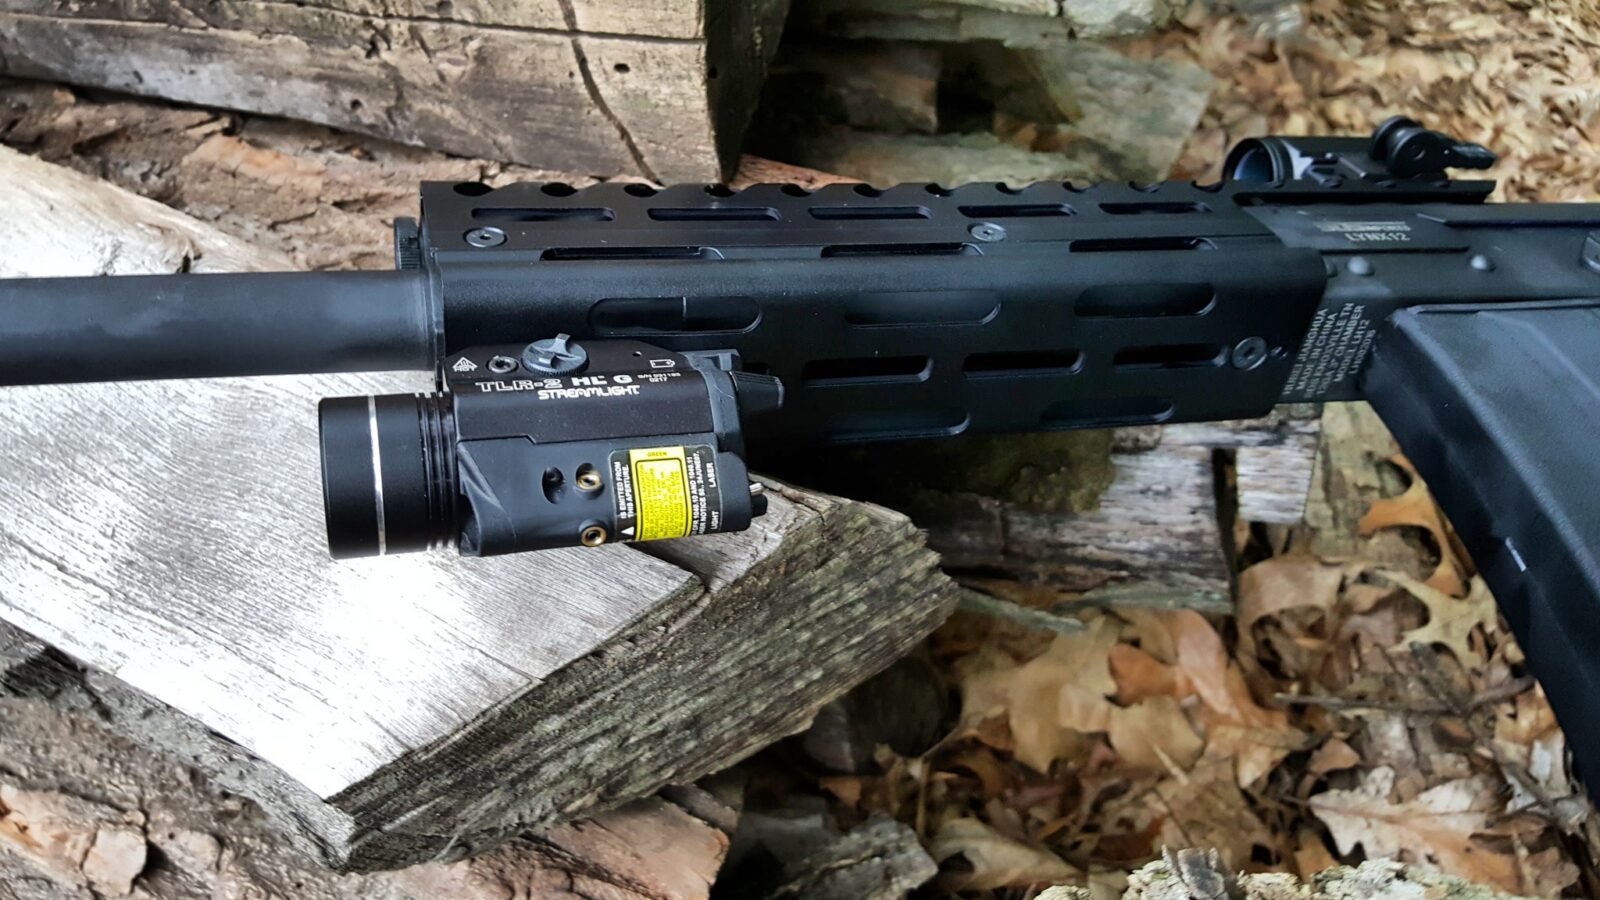
Streamlight TLR-2 HL G
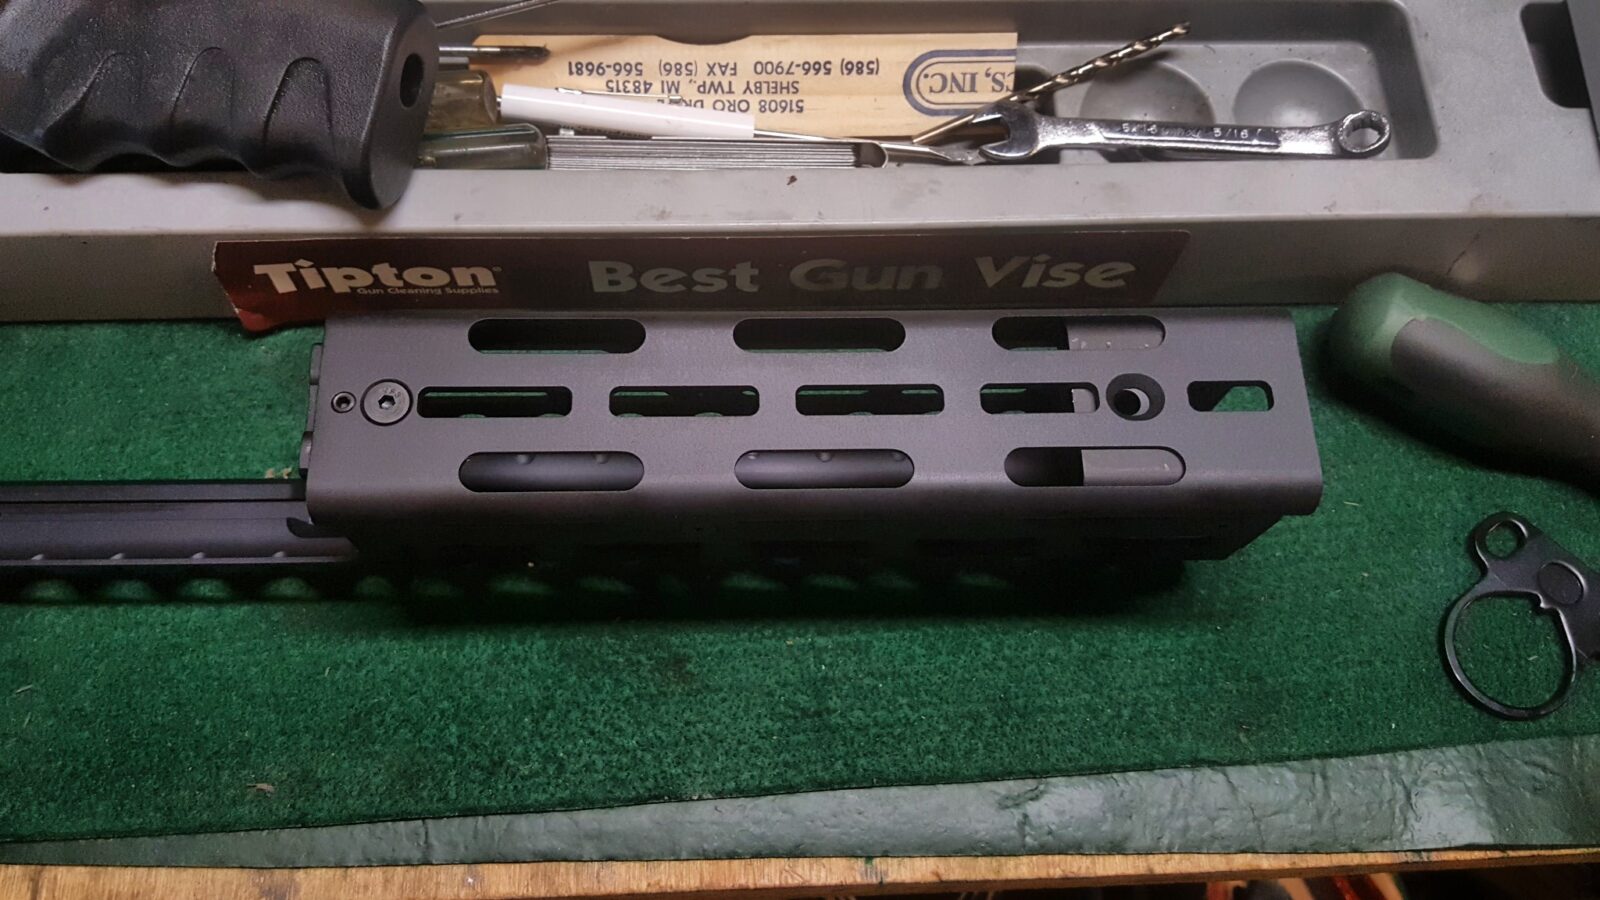
I installed a small 5 slot Magpul M-Lok aluminum rail section on the bottom front of the handguard to hold a Streamlight TLR-2 HL G 800 lumen light and green laser. I have found they hold up remarkably well. In this age of cheap Chinese products, I would recommend buying a light that will work when you need it most.
To mount it, follow the directions with the light to install the key for the Picatinny rail. It comes with several and then it just screws onto the mount with the thumbscrew,
Caution about eBay: Watch out for cheap counterfeit products on eBay. I would recommend buying the Streamlight from a reputable dealer to make sure you are getting the real deal. The cheap knock offs just do not hold up.
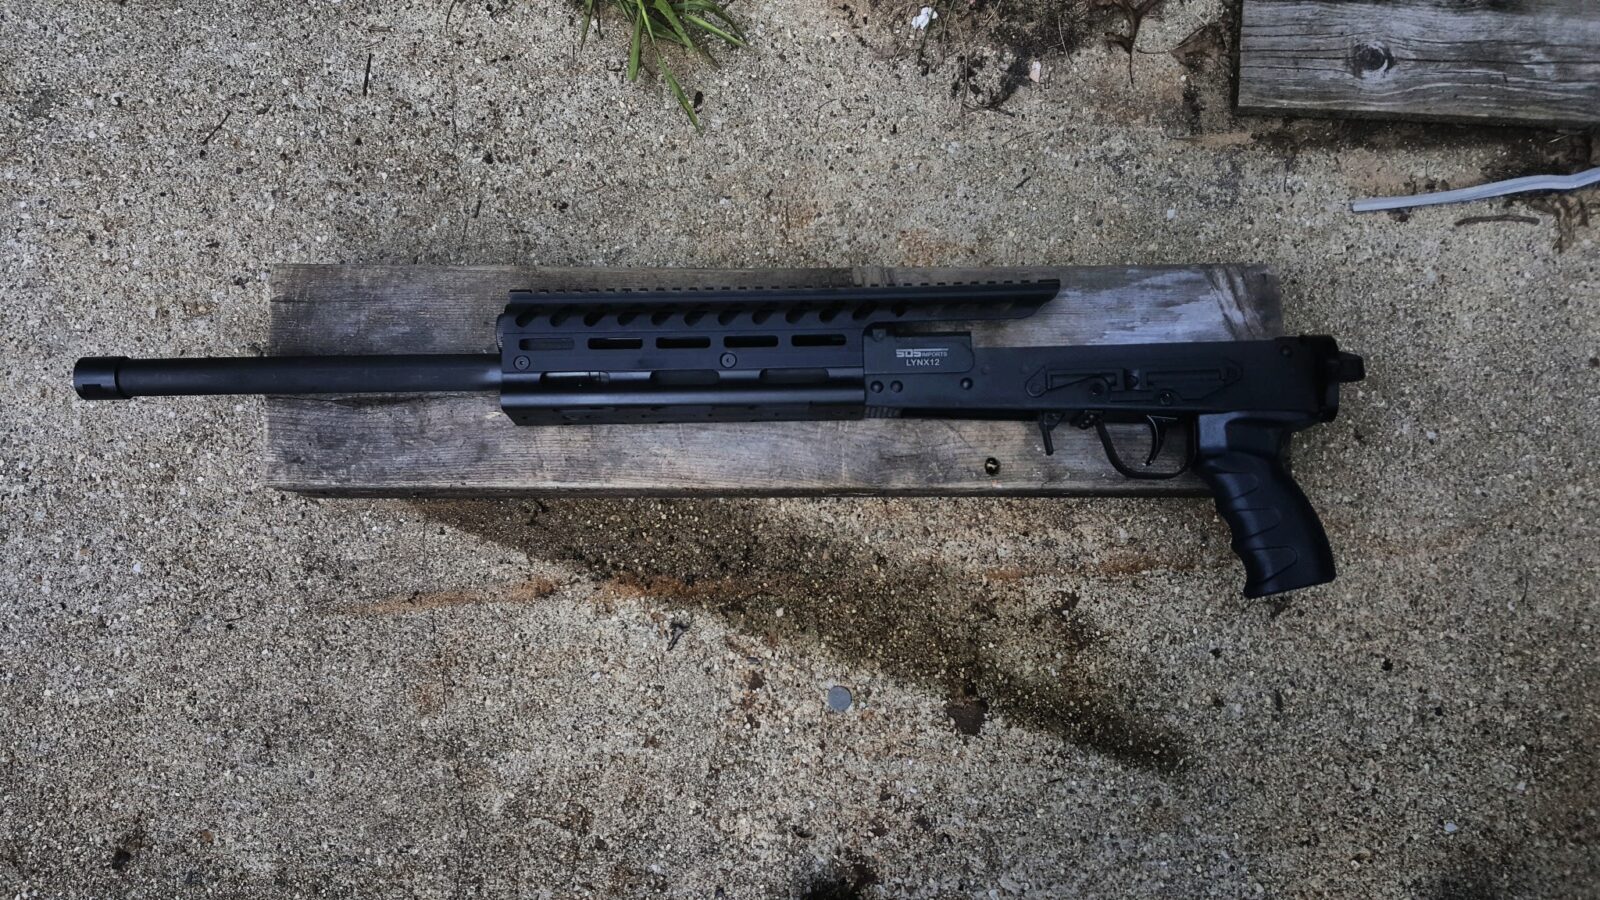
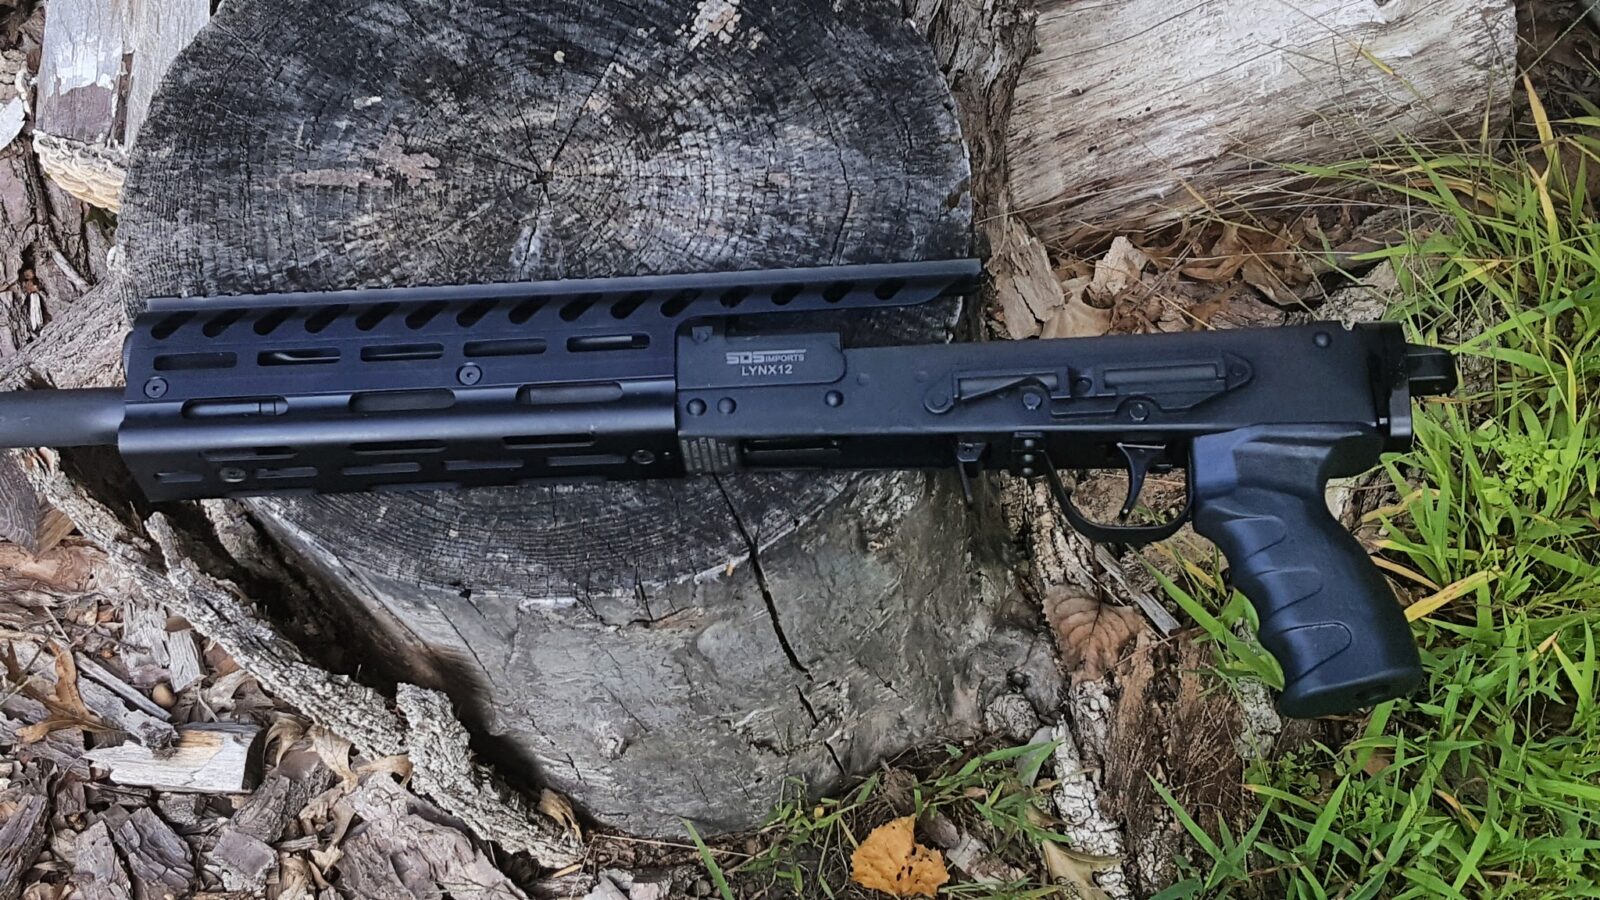
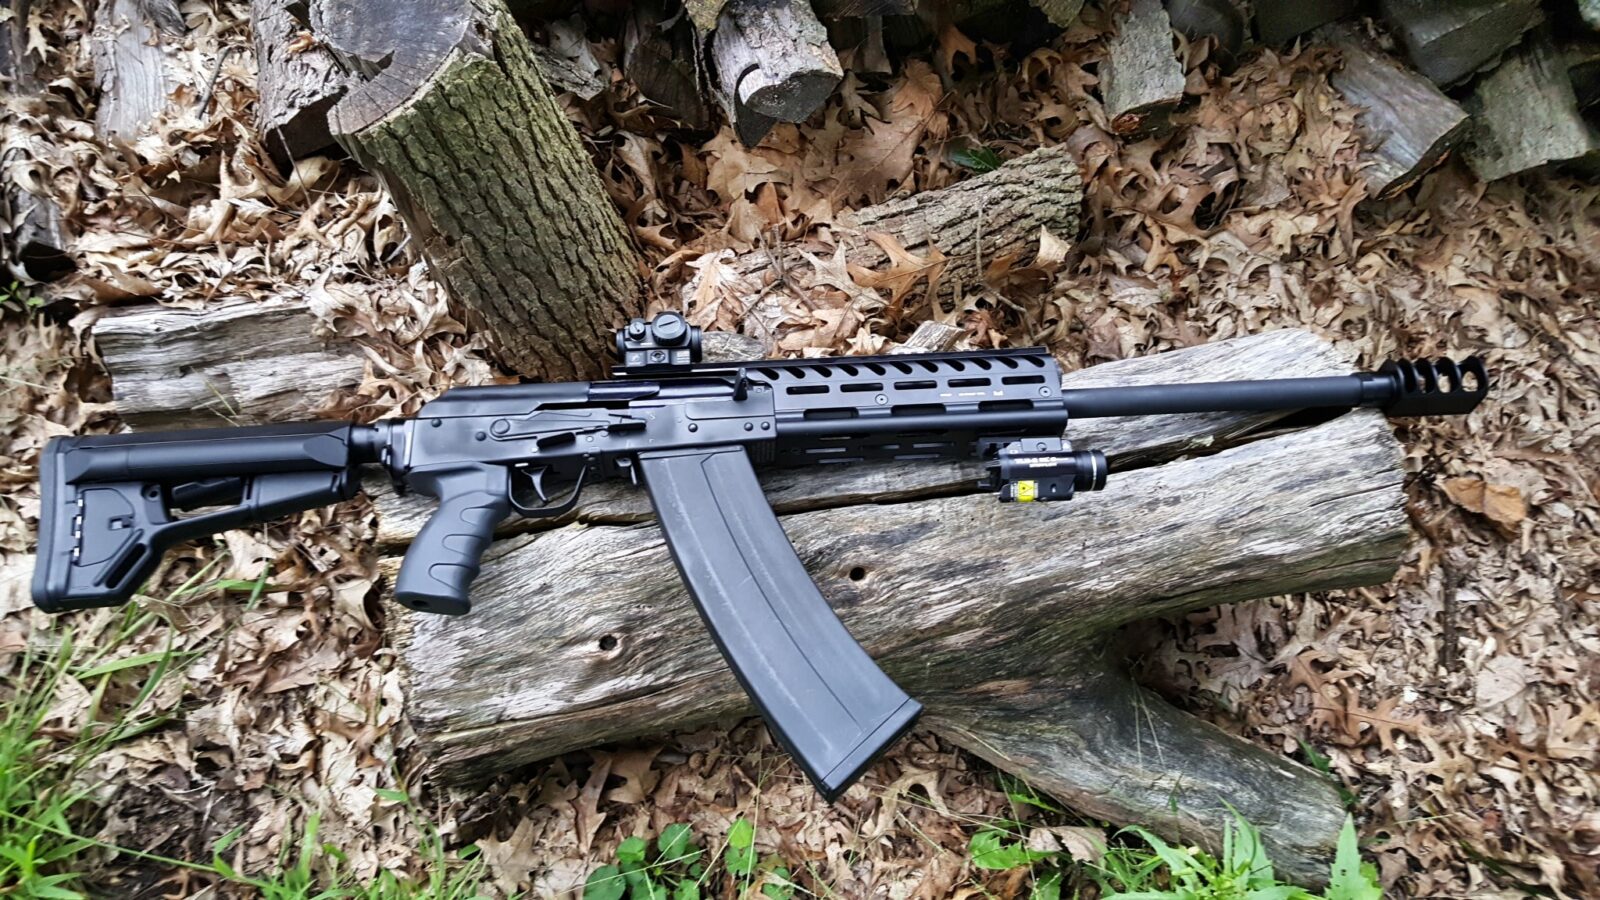
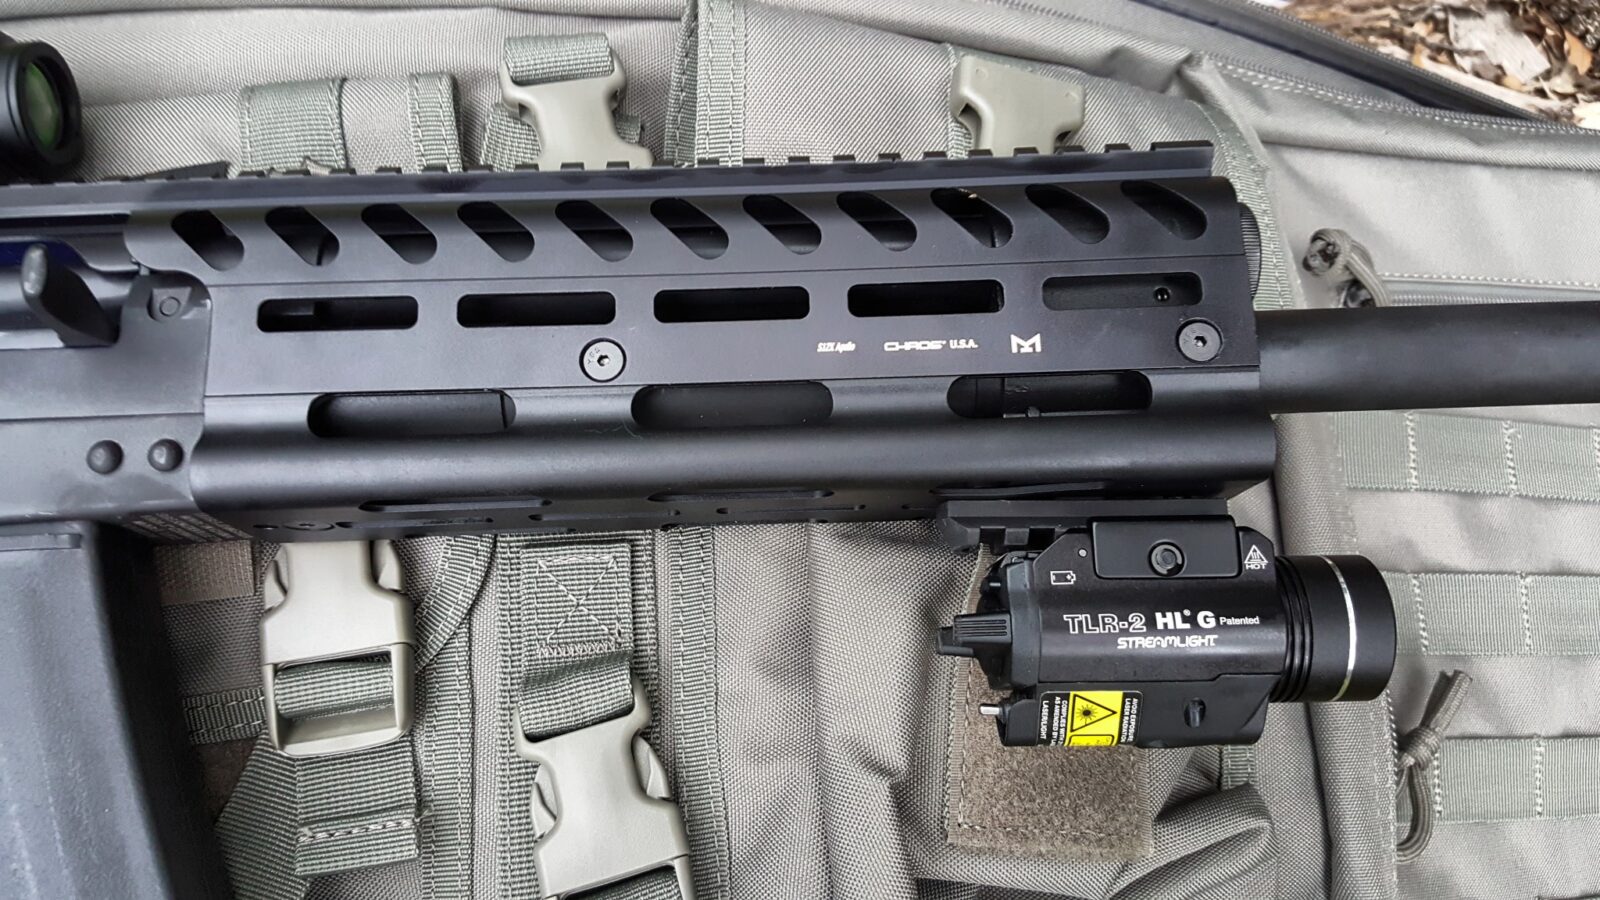
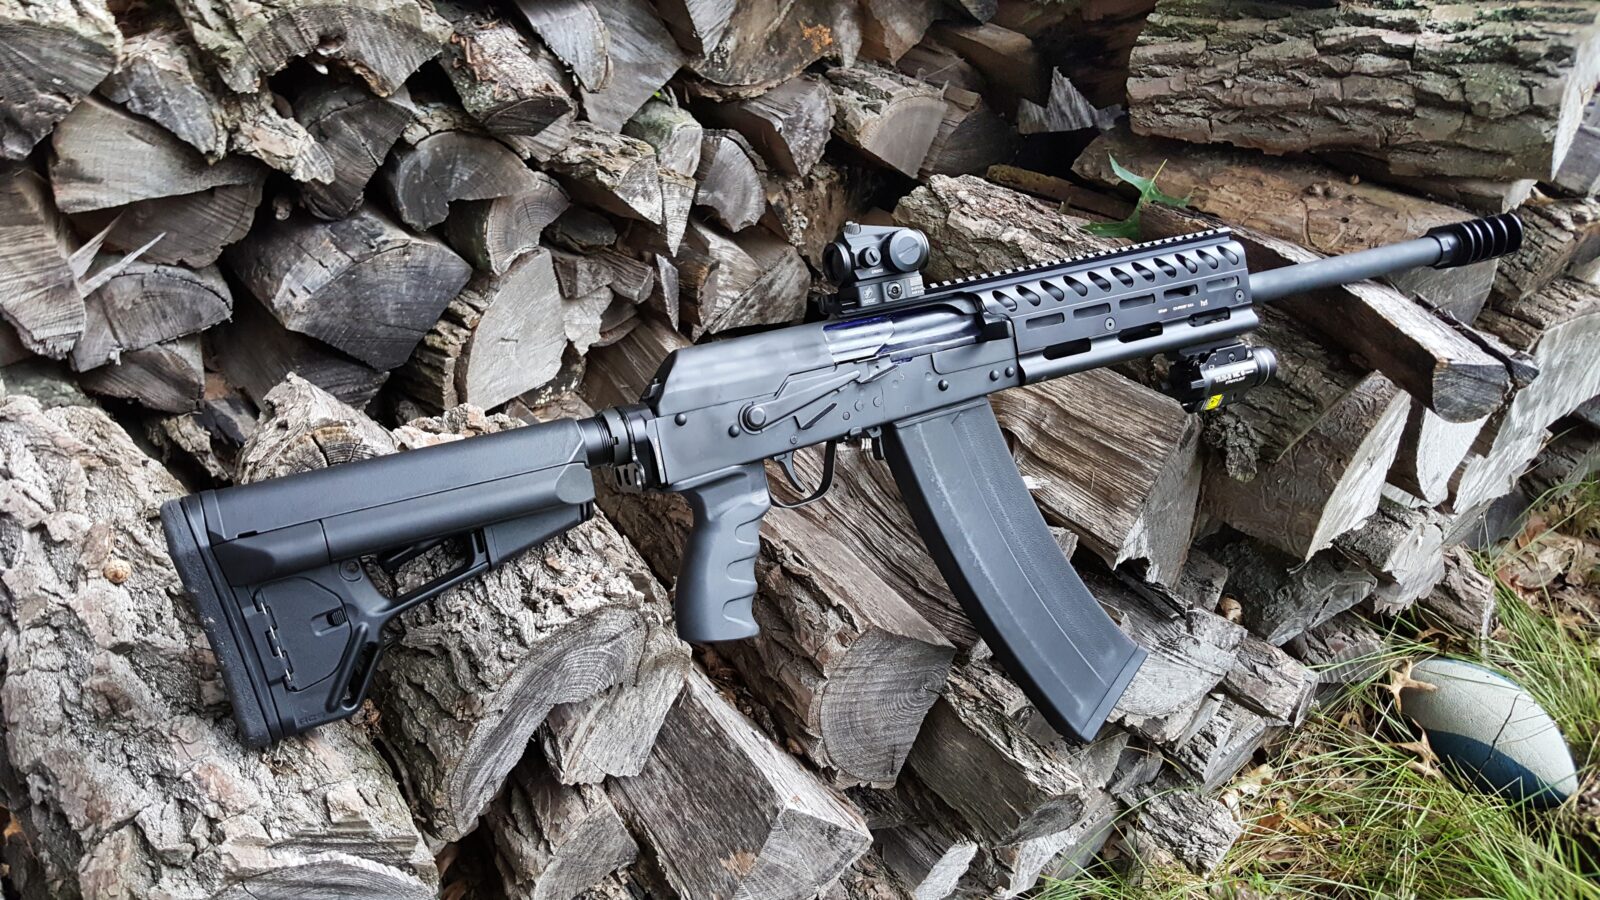
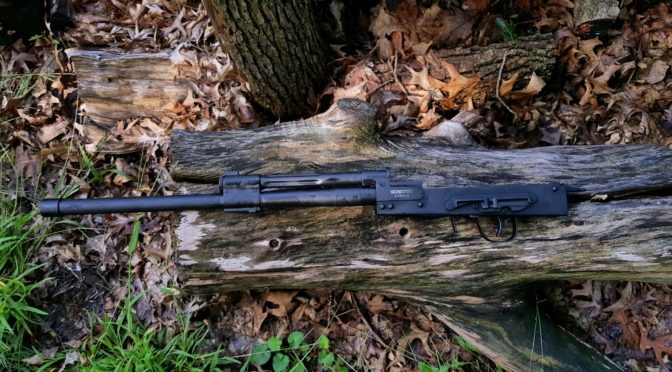
The End Result
I am very happy with how it turned out. The balance is great and the red dot is located just right – when I bring the shotgun up – the dot is right where I need it. I definitely need to take it to the range and like how it turned out. By the way, the magazine you see is the new SDS 10 round unit.
I hope you enjoyed these blog posts. There will be more to come 🙂
Note, I have to buy all of my parts – nothing here was paid for by sponsors, etc. I do make a small amount if you click on an ad and buy something but that is it. You’re getting my real opinion on stuff.
If you find this post useful, please share the link on Facebook, with your friends, etc. Your support is much appreciated and if you have any feedback, please email me at in**@*********ps.com. Please note that for links to other websites, I may be paid via an affiliate program such as Avantlink, Impact, Amazon and eBay.
In the first post, I documented my favorable first impressions of the SDS Lynx 12 shotgun. After posting, at least 10 gentlemen have come forward stating how much they like their Lynx 12 shotguns and nobody reported any problems. In this post, I’ll write about taking the shotgun apart in order to install my planned customizations, which will be in the next post.
Call me old school, but the first thing I did was to read the manual 🙂 The next thing was to hose down the hole shotgun and wipe it down to remove all the odd smelling rust preservative. I really didn’t care for the tacky feel to be there while working on it. Once removed, I sprayed on Rem Oil to prevent rust while I was working on it. Rem Oil is nice and thin and doesn’t have too much of a smell. It’s my go to for situations like this. If you do remove the preservative, just be sure to apply whatever oil or rust inhibitor you prefer.
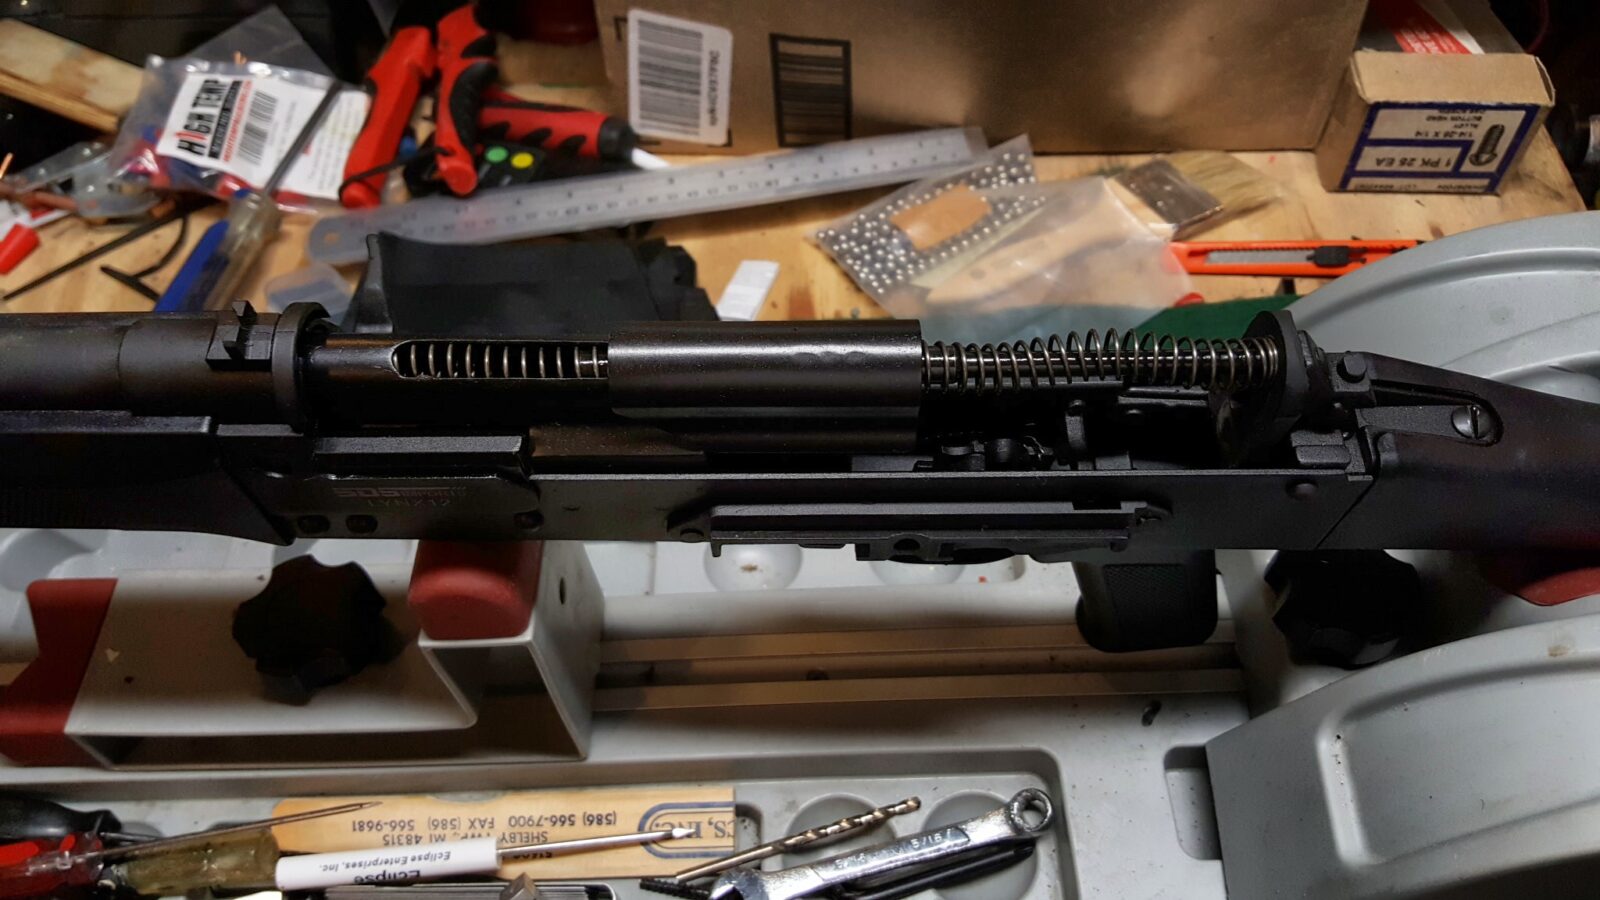
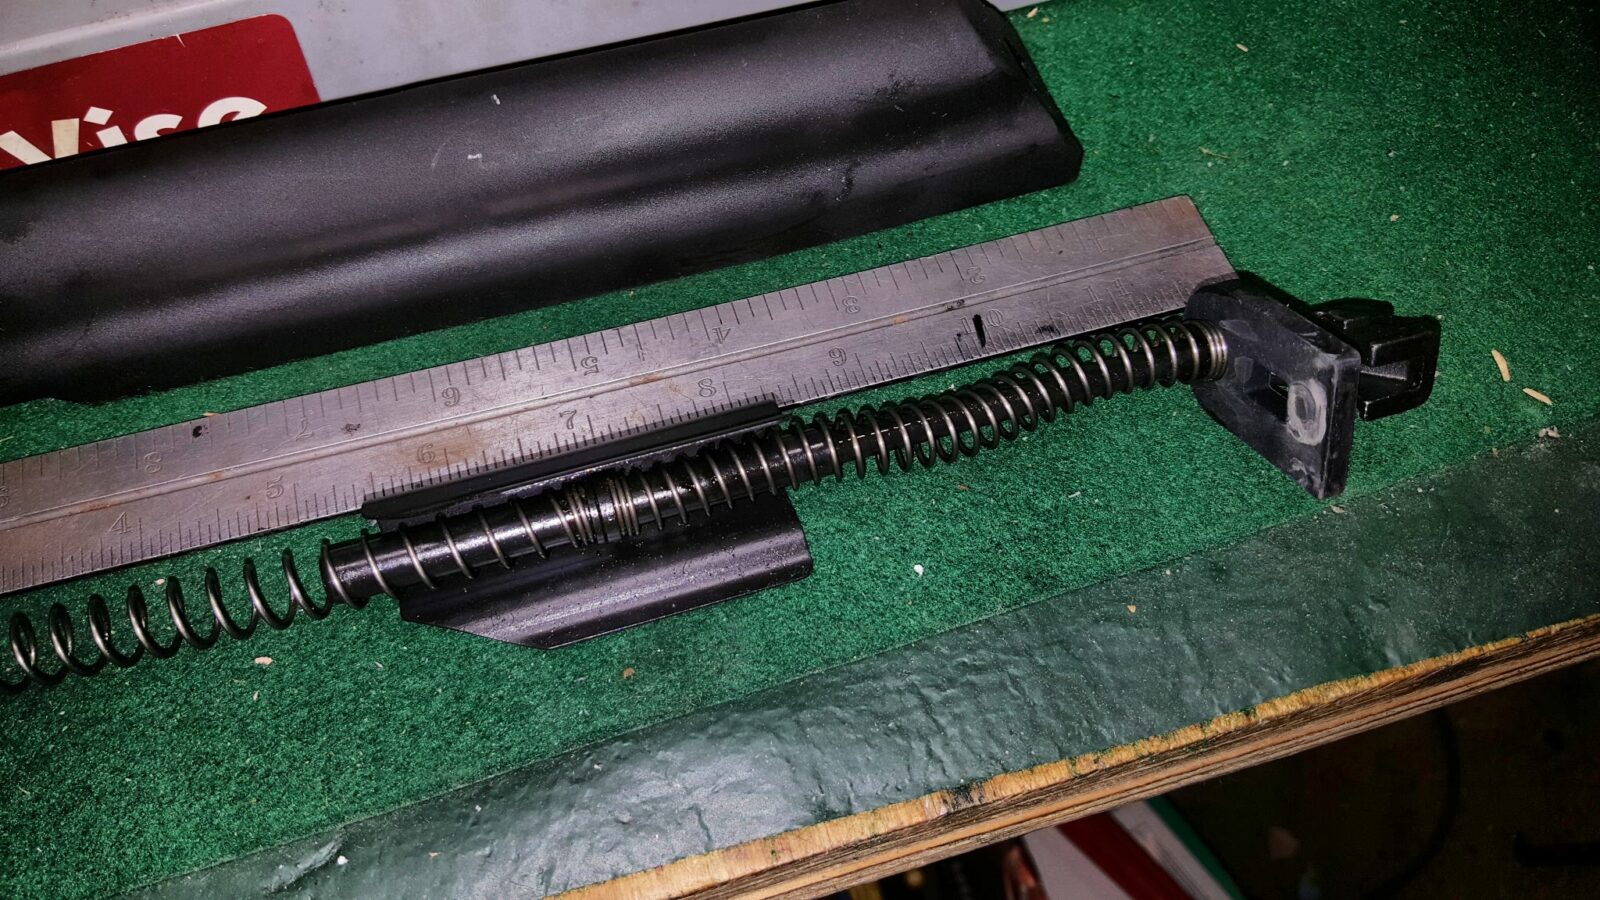
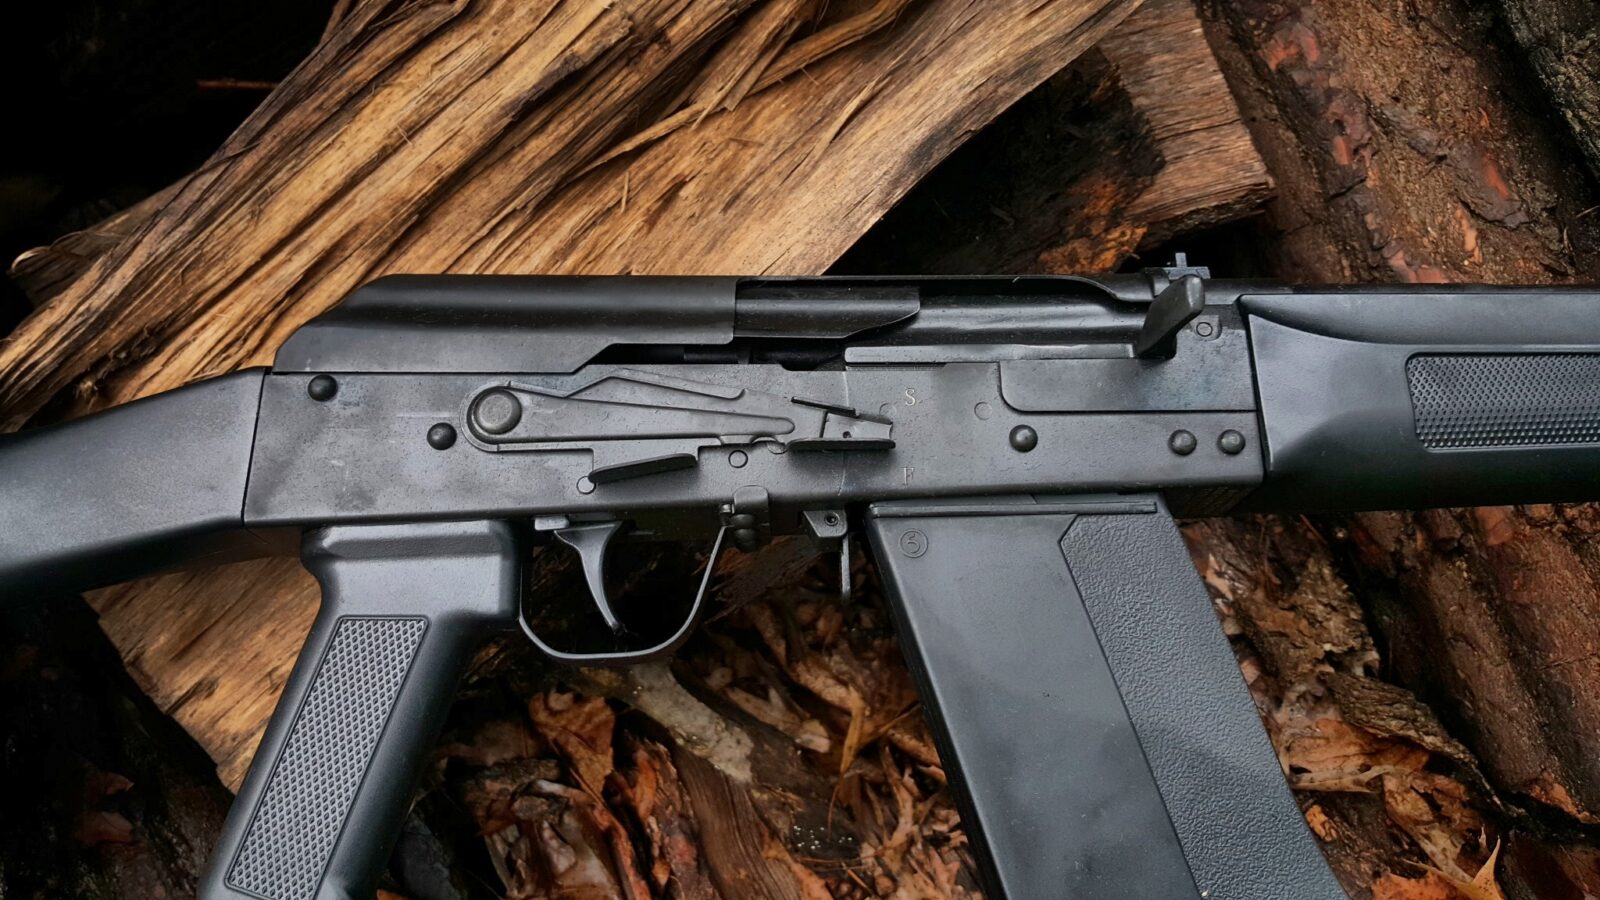
Removing the Dust Cover and Recoil Spring
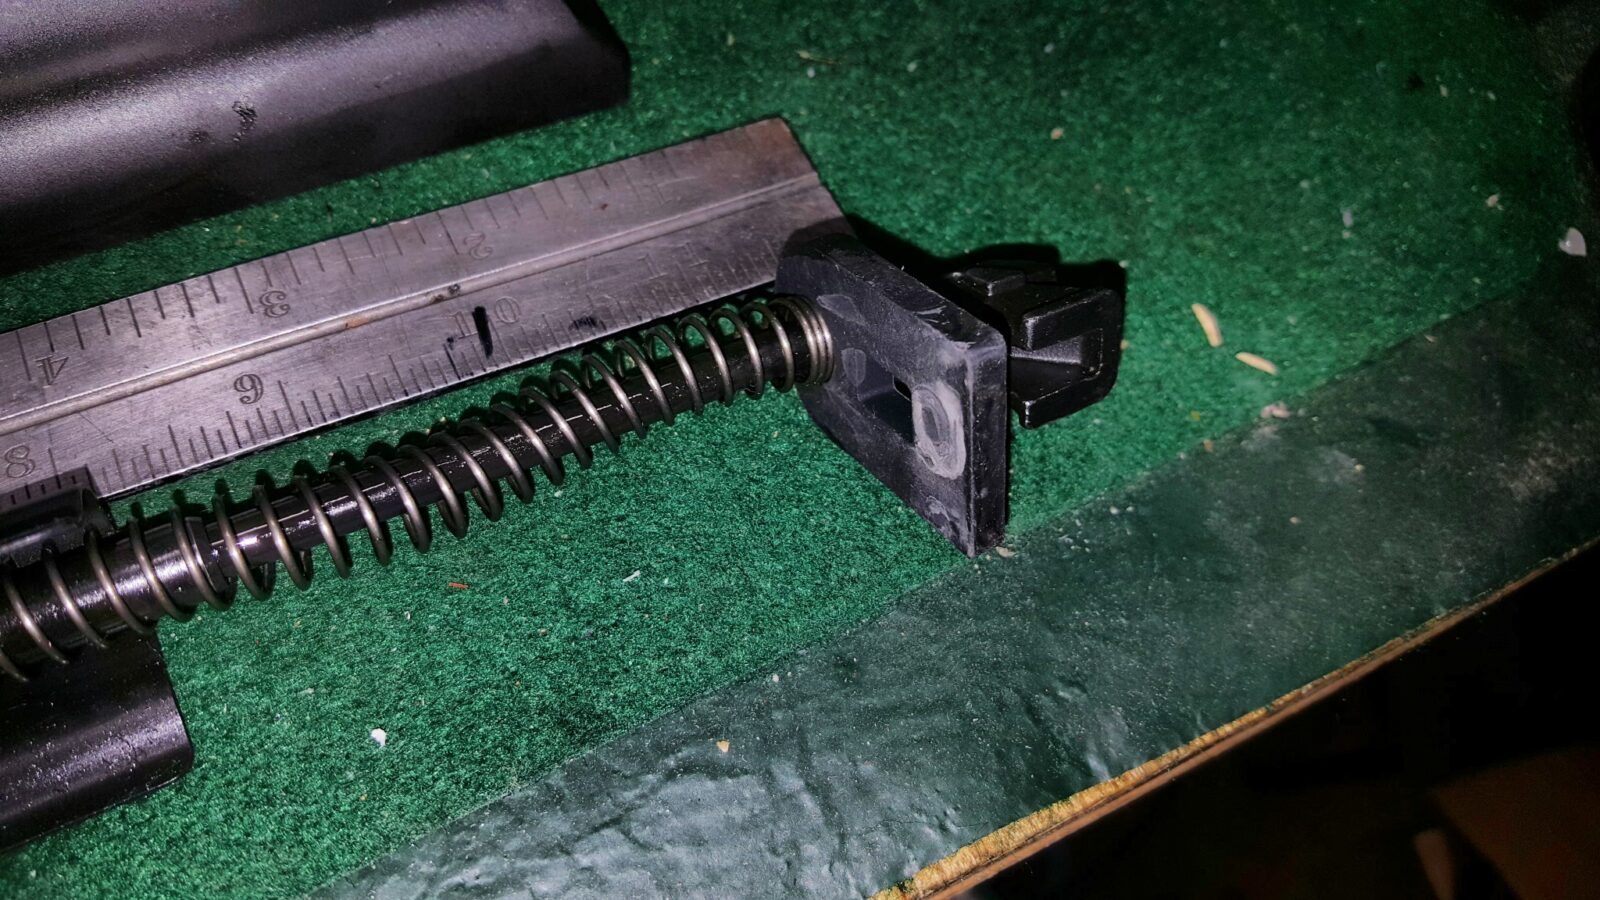
The dust cover comes off by pushing the release latch (the little button that sticks up) on the recoil spring and pushing the whole assembly forward while lifting the dust cover up and off the receiver.
You’ll notice I have the Lynx sitting in my Tipton vise. I’ve had it for years and it really makes working on long arms way easier.
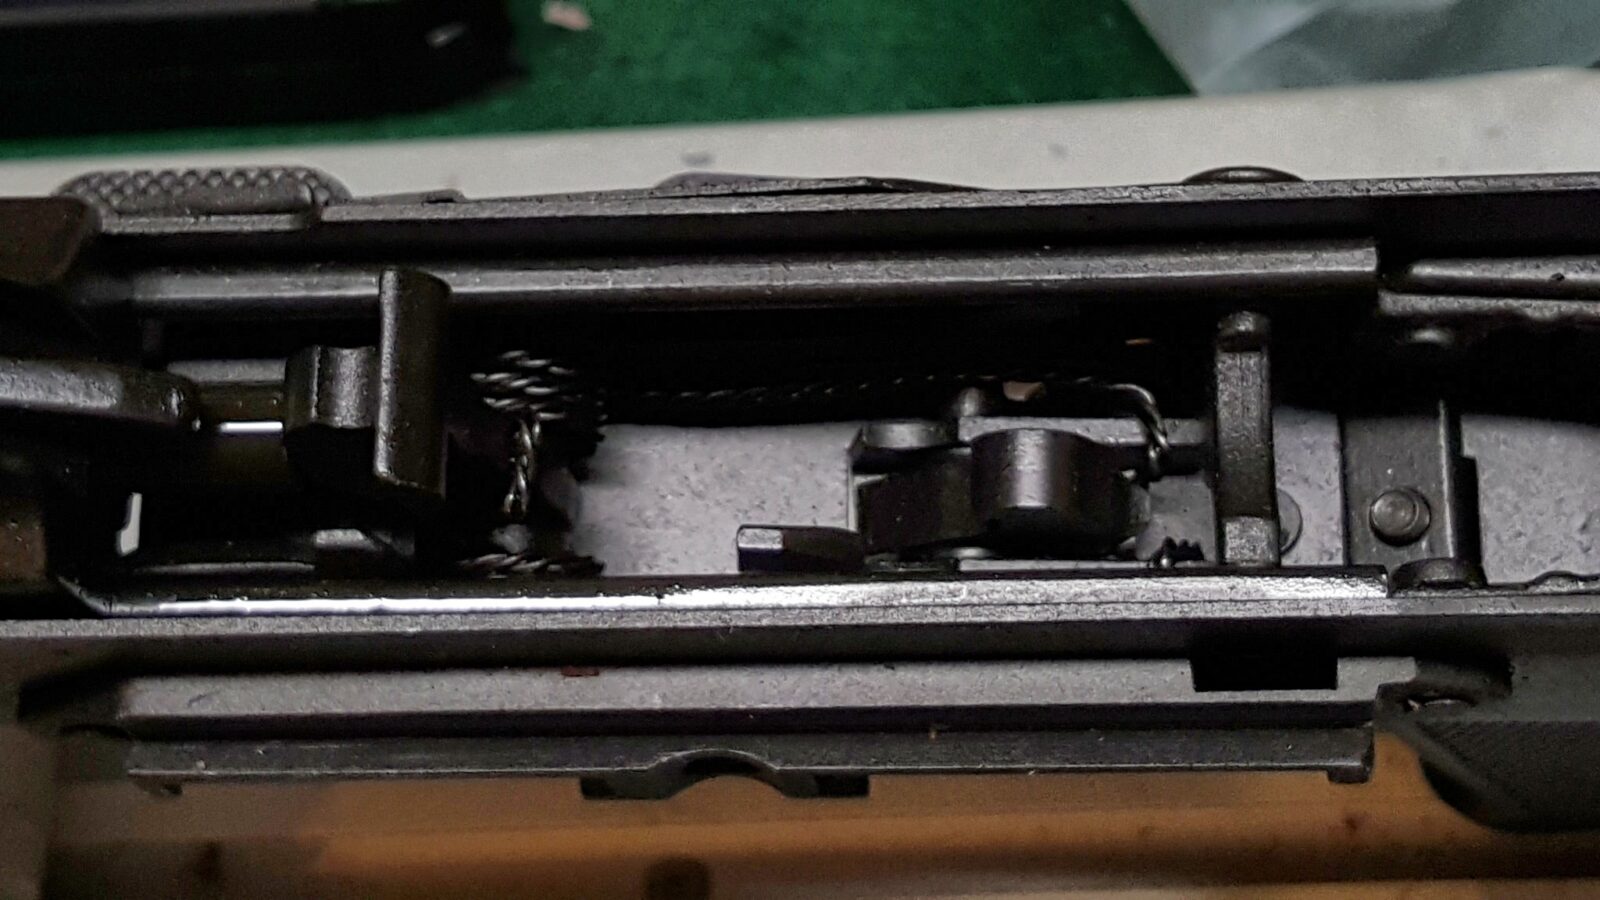
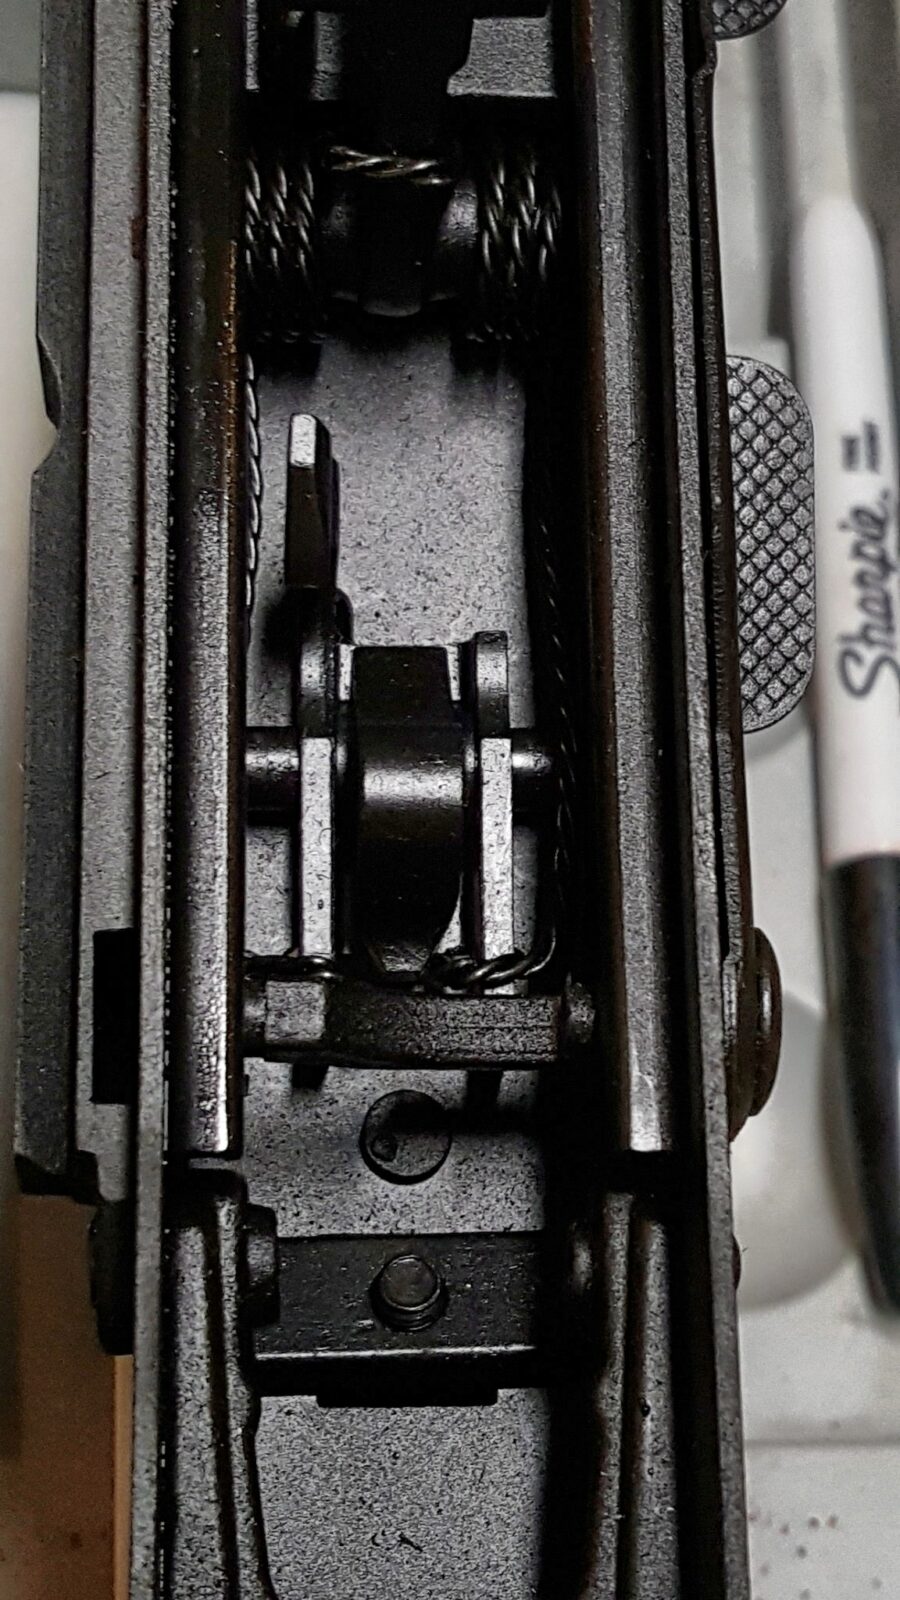
With the dust cover off, you can get a good look at the recoil spring assembly. Some guys will call this the operating spring or the return spring but basically it absorbs the energy of the bolt carrier assembly coming back after firing and then when the spring has enough energy, it pushes the bolt carrier assembly forward to then cock the trigger and strip a round off the magazine and go back into battery.
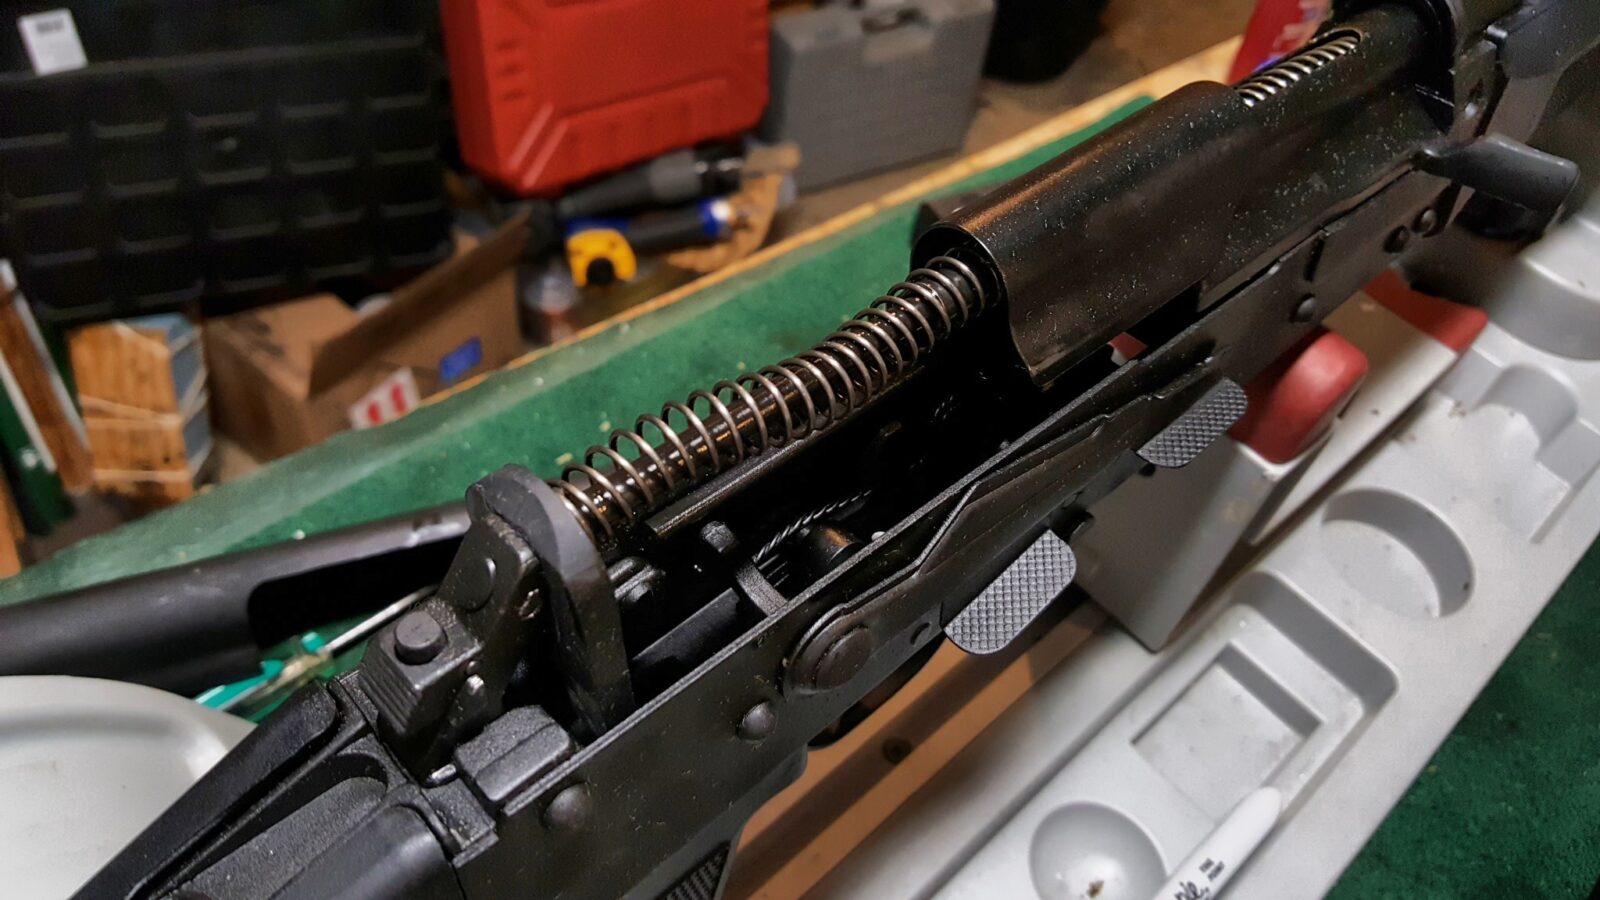
Compared to a regular AKM, you will notice the release latch and the rubber buffer assembly at the rear. I find the use of a buffer interesting. Normally the spring should absorb the energy and my bet is that the designers put it there in case the user either adjusts the gas regulator such that the system is over-gassed and the carrier comes back with more force than the spring alone can handle or they put it there just in case of a round that generates more pressure than what the spring can handle but the gas regulator doesn’t exactly have the right setting — imagine needing a gas setting of “3.5”. At the third position there is too much gas but at 4 there is too little. I have little doubt it is a good idea. I’d recommend to keep a spare buffer on hand and inspect the one in the shotgun regularly. It ought to last a long time under most conditions but the buffers are dirt cheap.
To remove it, push forward on the rear part that normally protrudes from the dust cover. It should slide forward in the slot that holds it on the trunnion until it is free and you can then lift up and pull back to remove the assembly from the bolt carrier and shotgun overall.
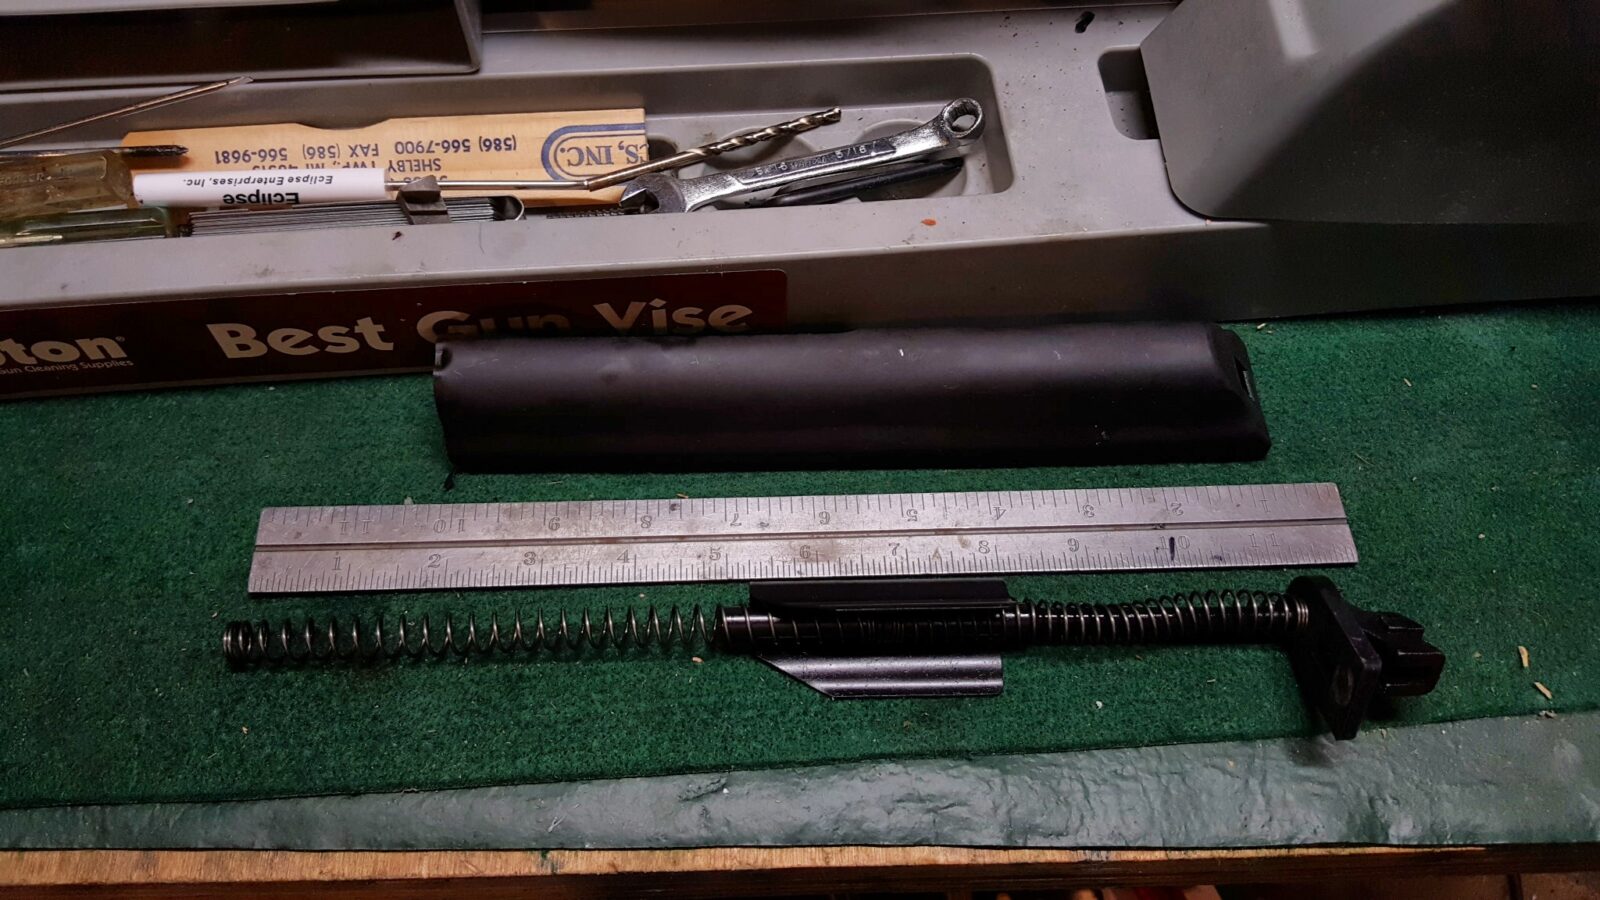
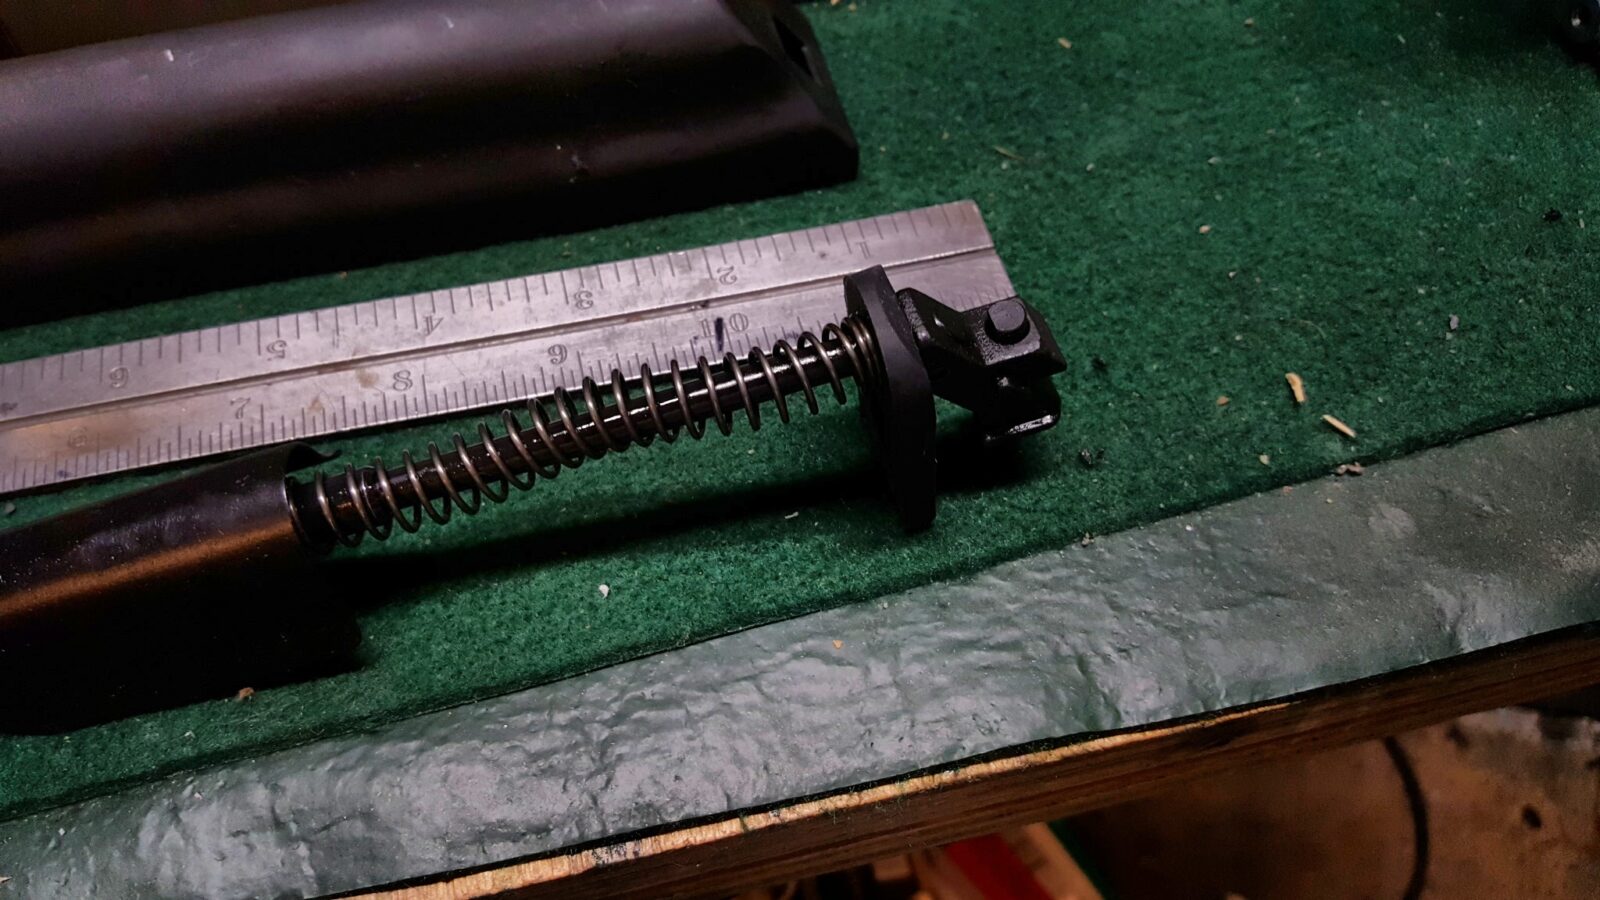
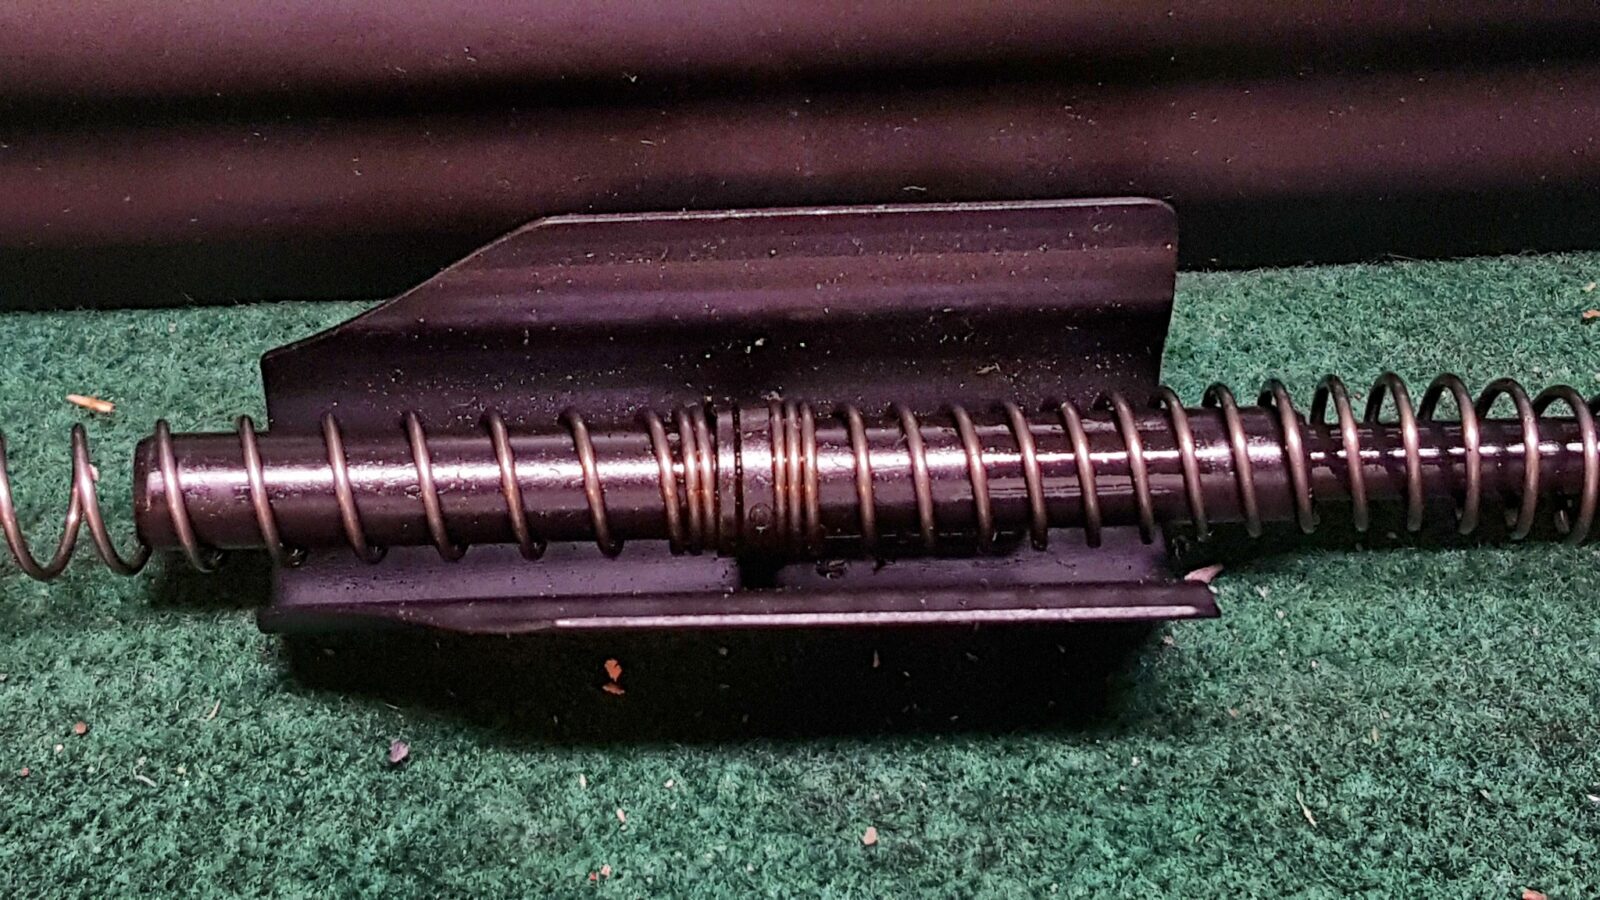
You will also note that the designers made the recoil spring assembly two parts – the rear is a tube like an RPK or older milled AKs with one spring. There is then an additional cover that rides on that rear tube and normally closes the otherwise enlarged ejection port in the dust cover. In front of that is then a floating spring.
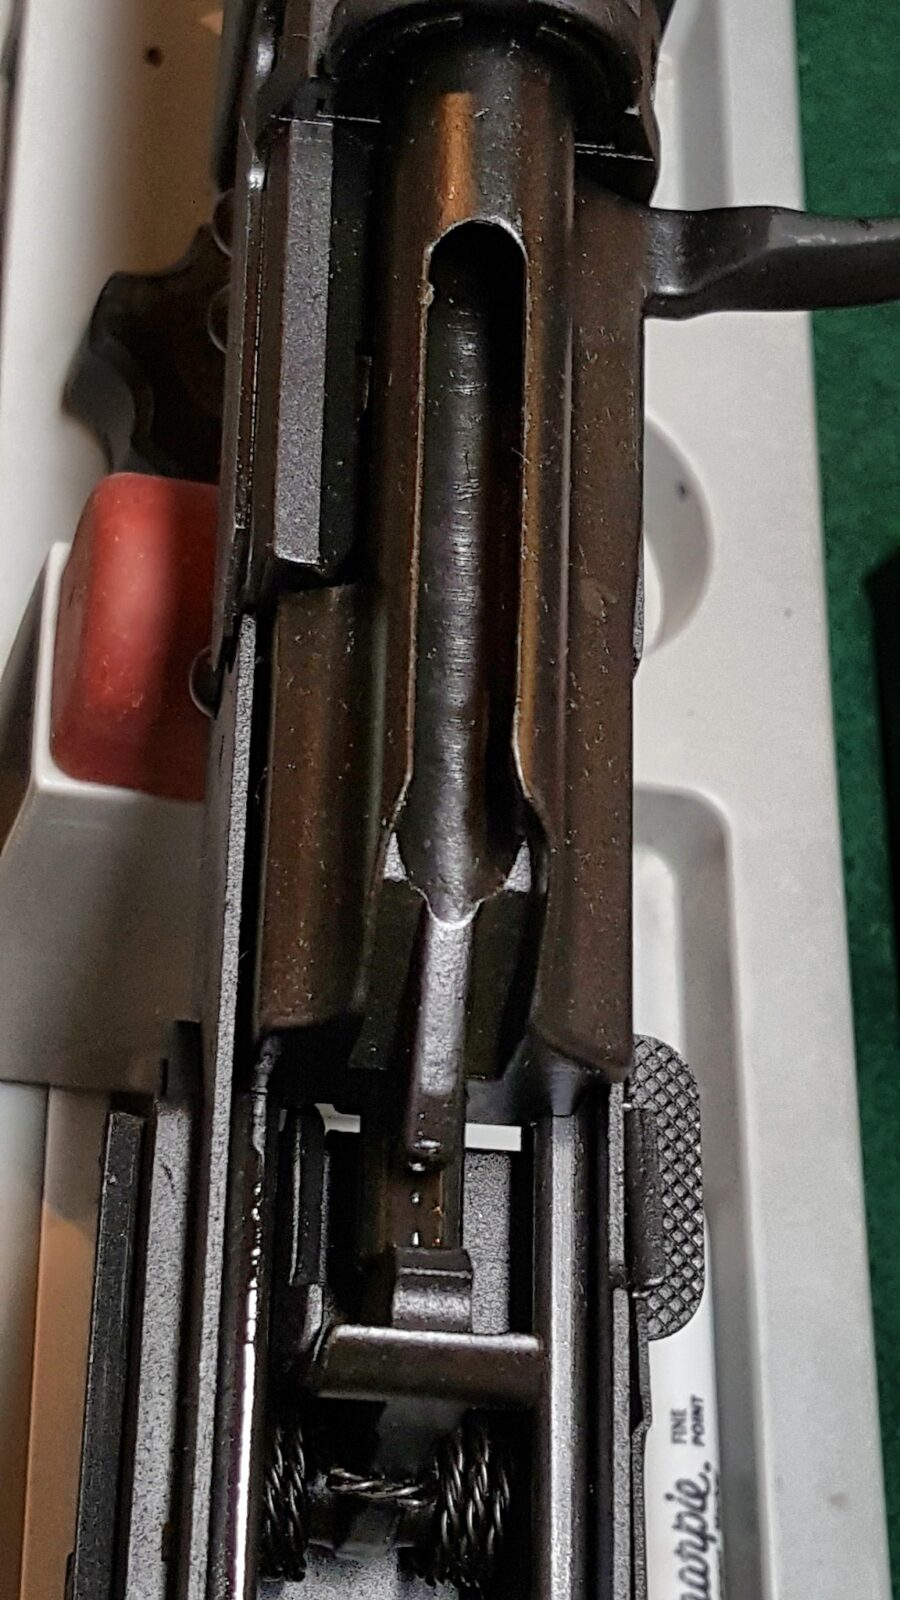
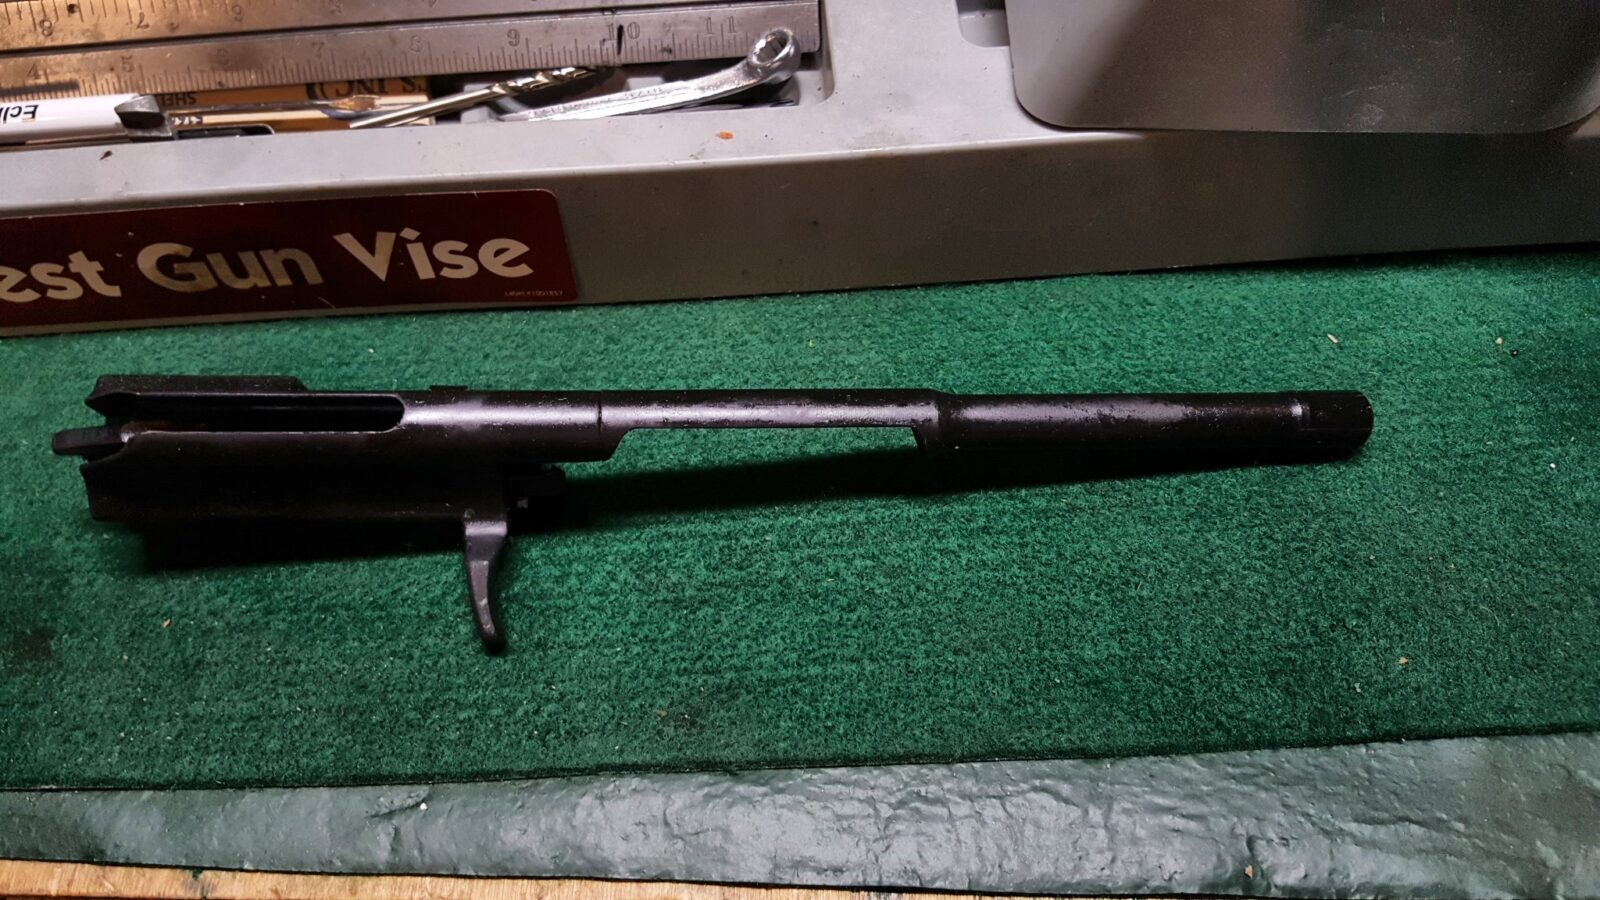
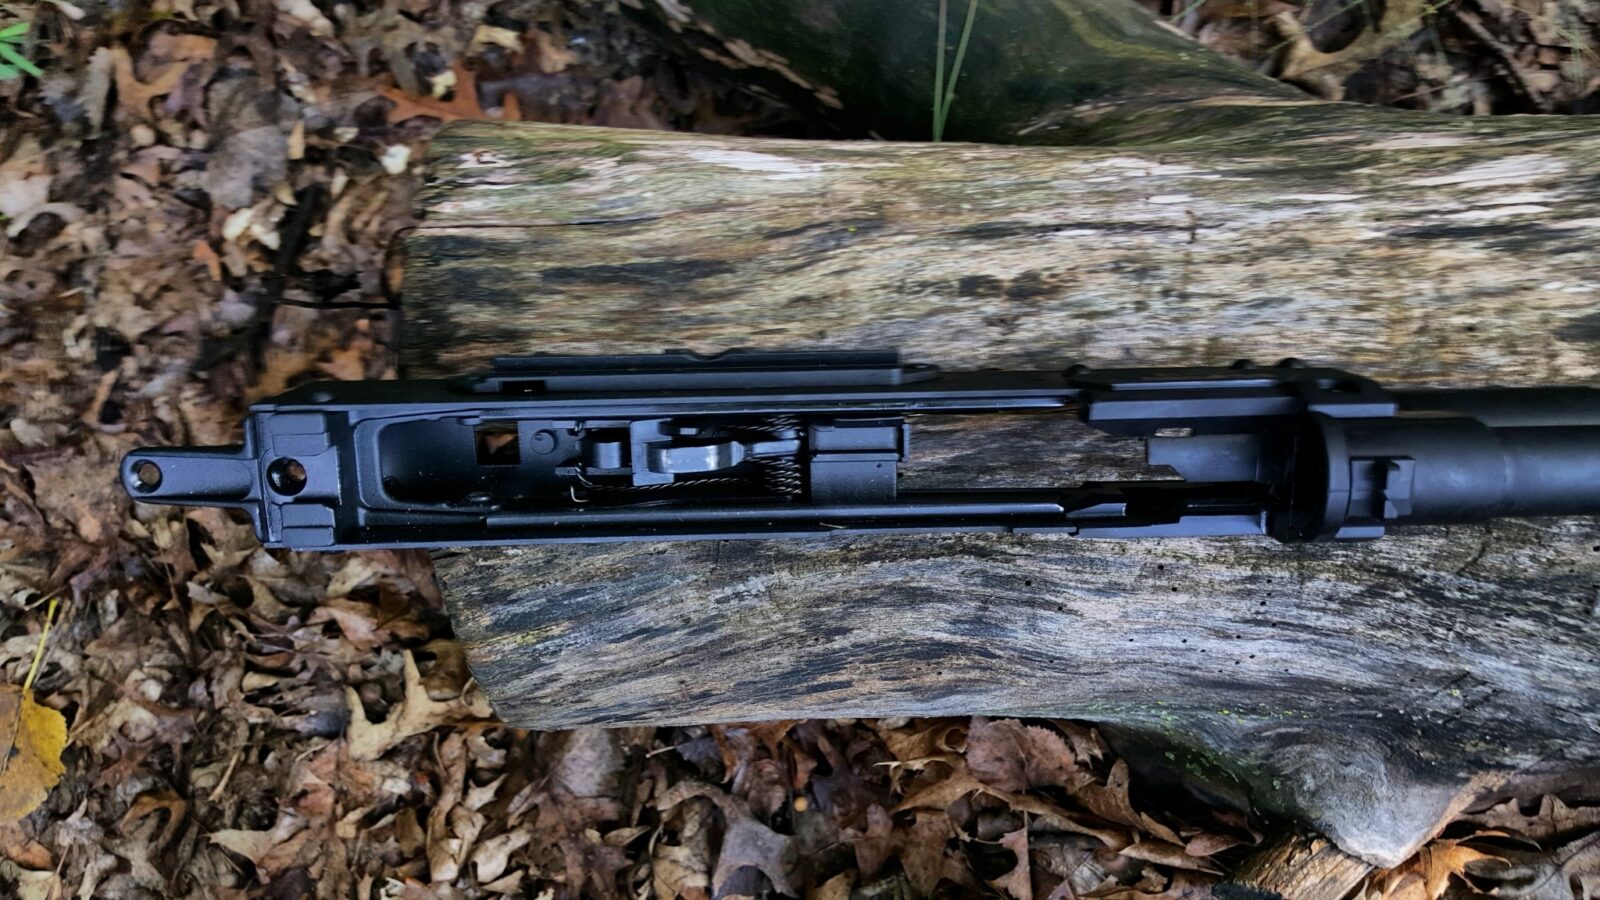
Removing the Bolt Carrier Assembly and Looking Inside the Receiver
First, remove the bolt carrier assembly. It slides to the rear of the receiver and can then be lifted up out of the receiver. Note – it must be fully to the rear or the receiver’s guide rails will retain it.
It’s interesting how the bolt carrier is short. In the gas tube, which is pinned in place, is a disc, that some call the “gas puck” or just “puck” which is the gas piston. Unlike an AKM, the gas tube is held in place by the gas tube seat (it reminds me of a rear sight block in a way) that would need it’s retaining pin to be punched out to be removed. When you tilt the shotgun forward and back, you can hear the puck moving back and forth in the gas tube. I didn’t take the gas tube assembly apart but it looks straight forward enough.
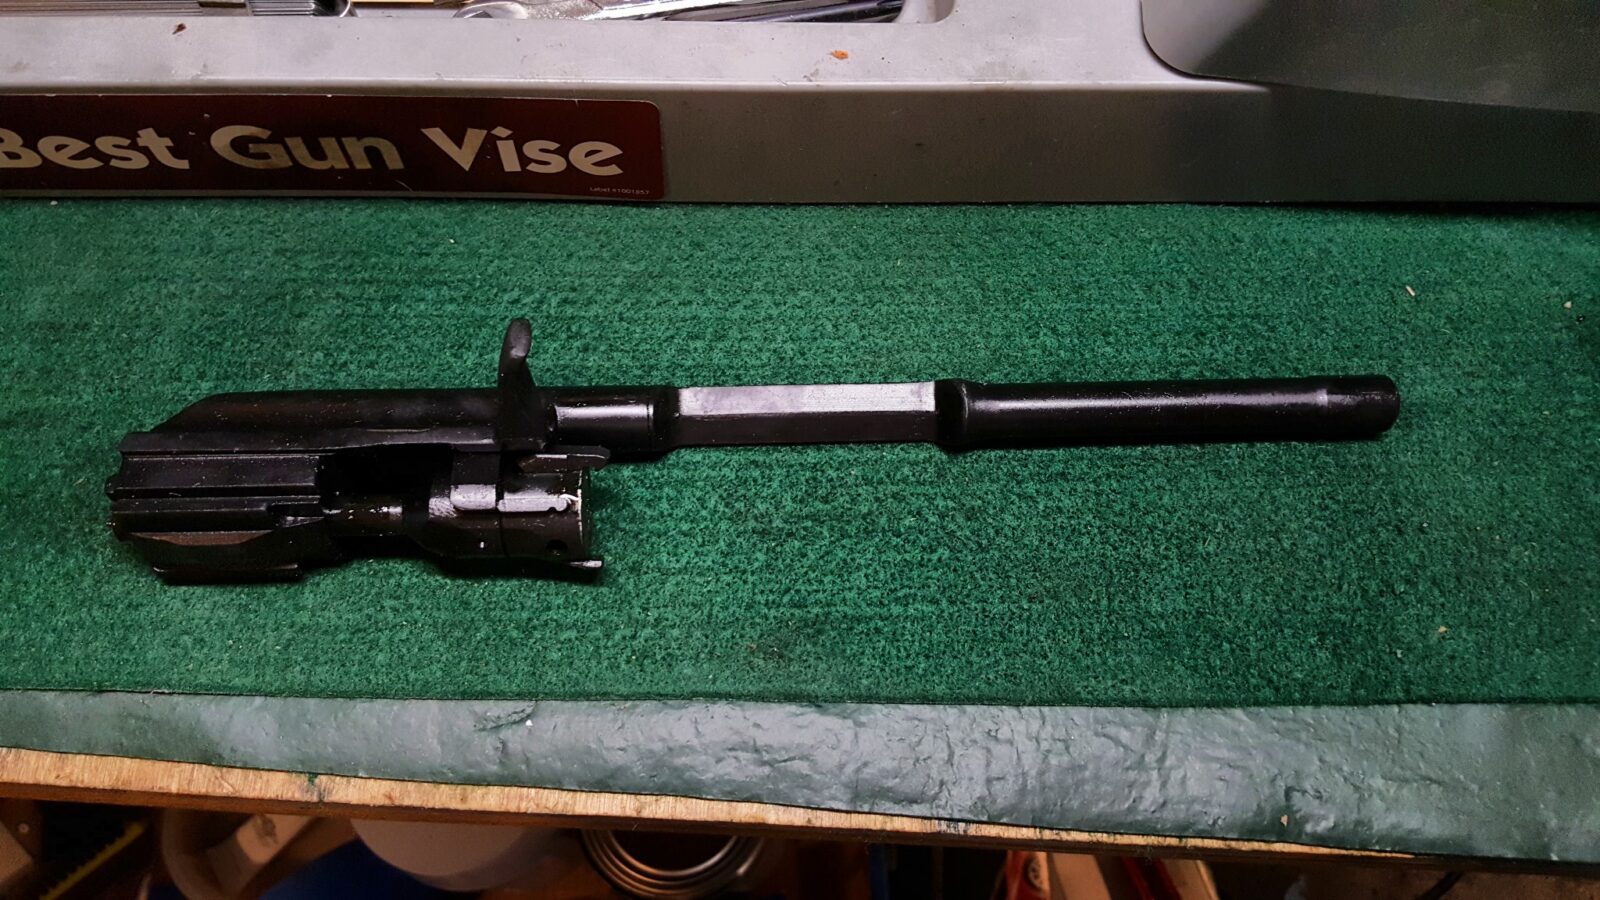
The carrier is holding a really massive bolt. It operates very much like any AK – the bolt head has a cam that travels through a slot in the carrier that in turn rotates it into or out of battery.
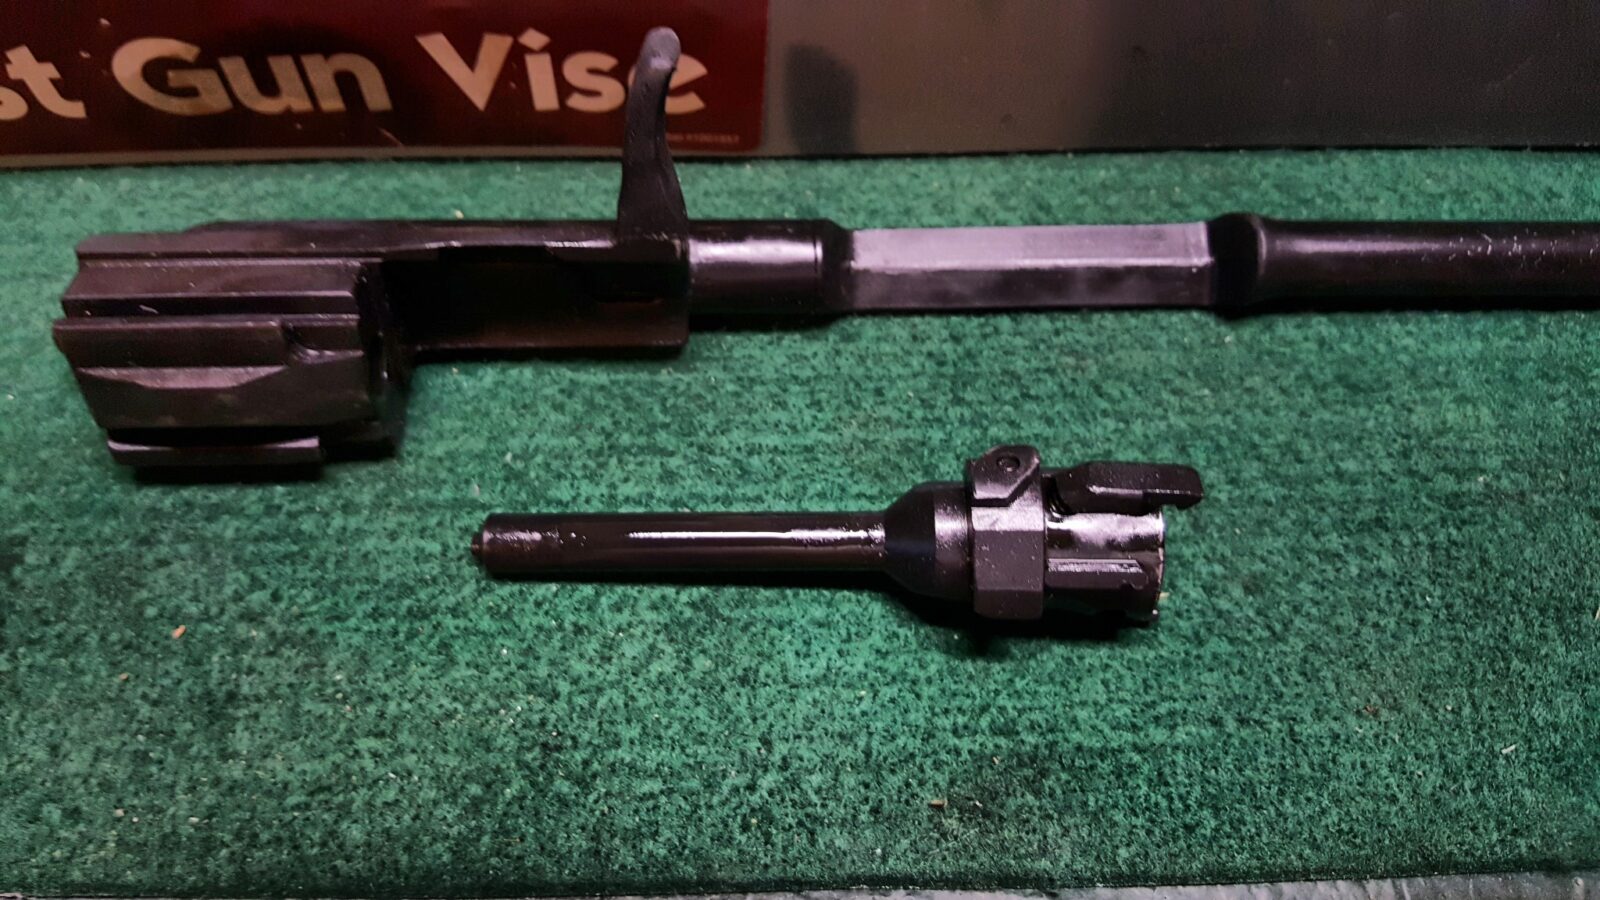
By moving the bolt head to the rear, the cam can be rotates out of the slot and the bolt head then removed from the carrier.
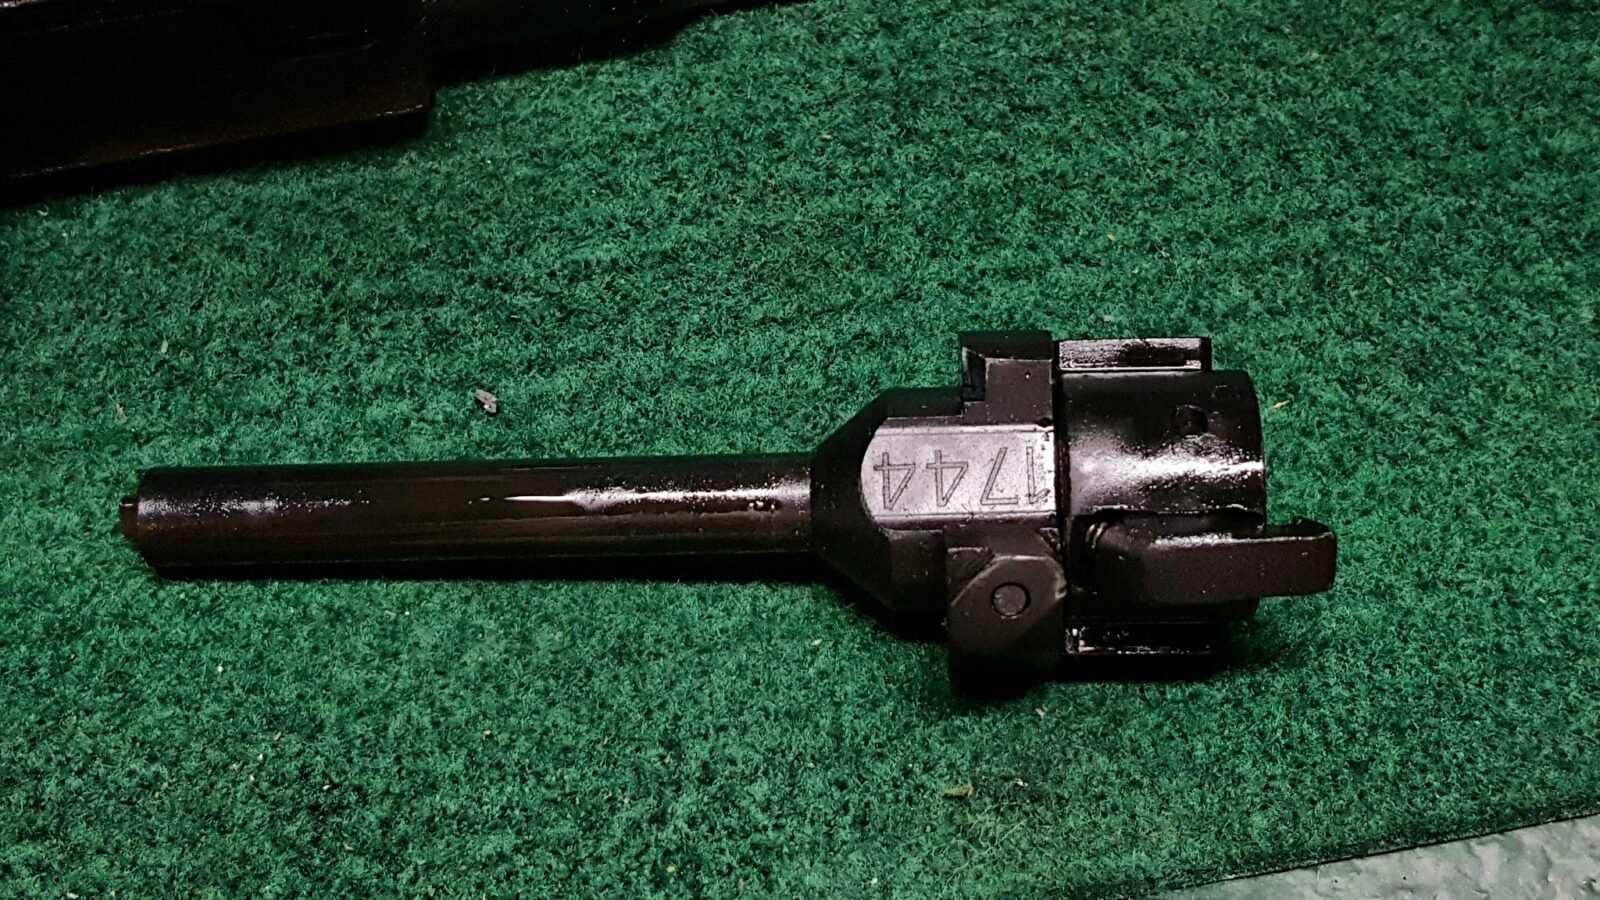
Look at the size of the extractor!
Interestingly, the firing pin has a spring pushing it backward compared to the floating firing pins you normally find in an AK rifle. In this photo you can see the tail of the firing pin pushed out the back of the bolt body by the spring.
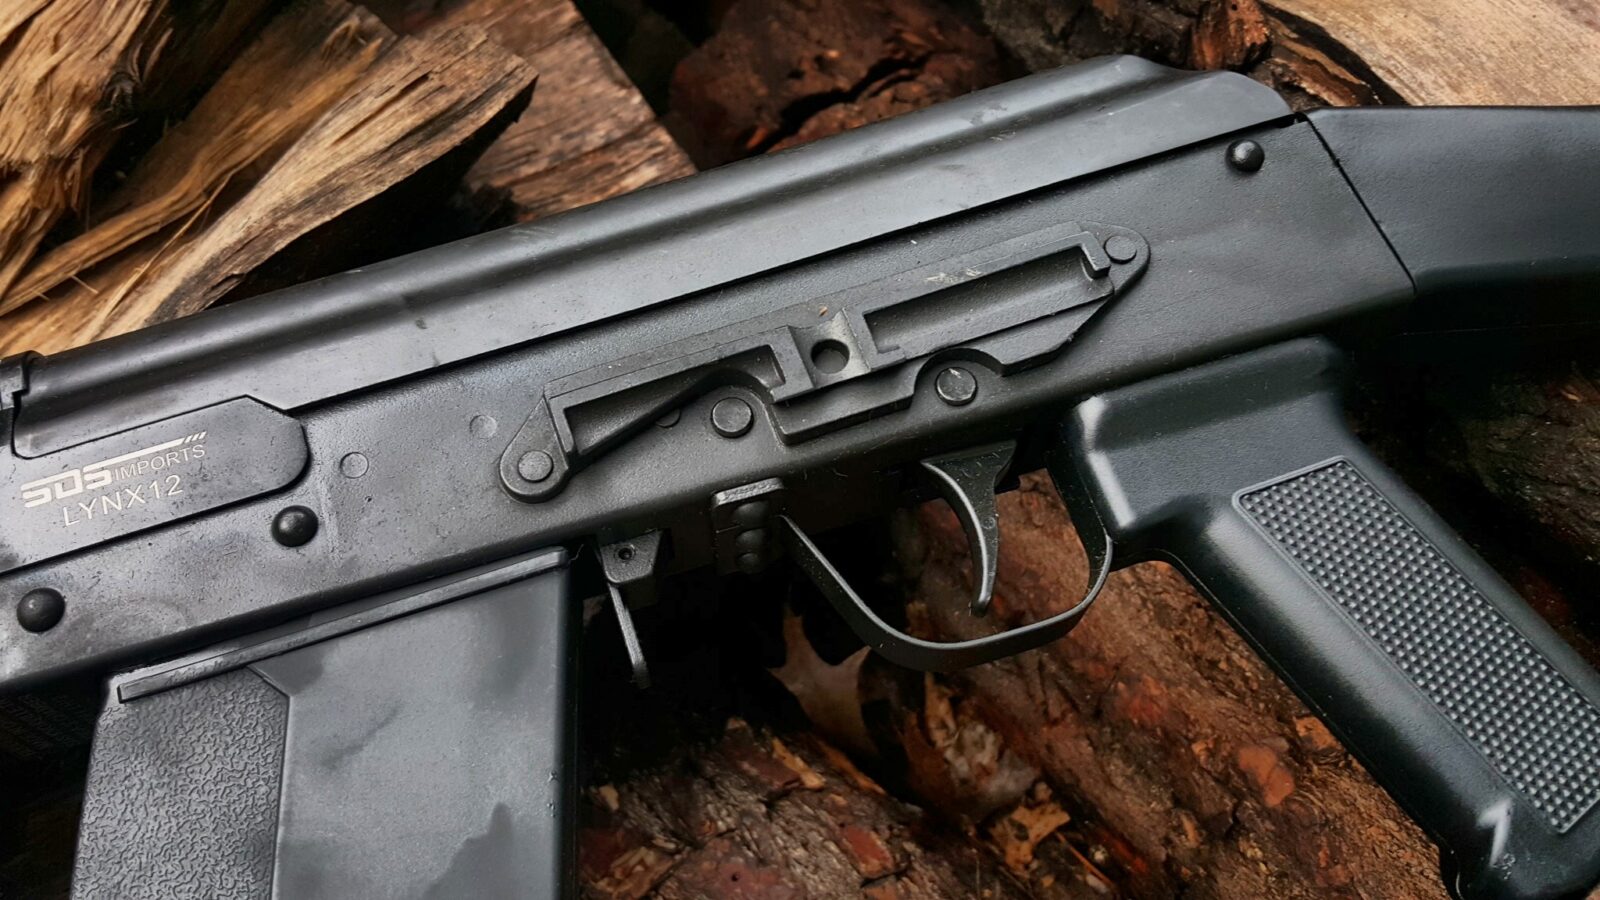
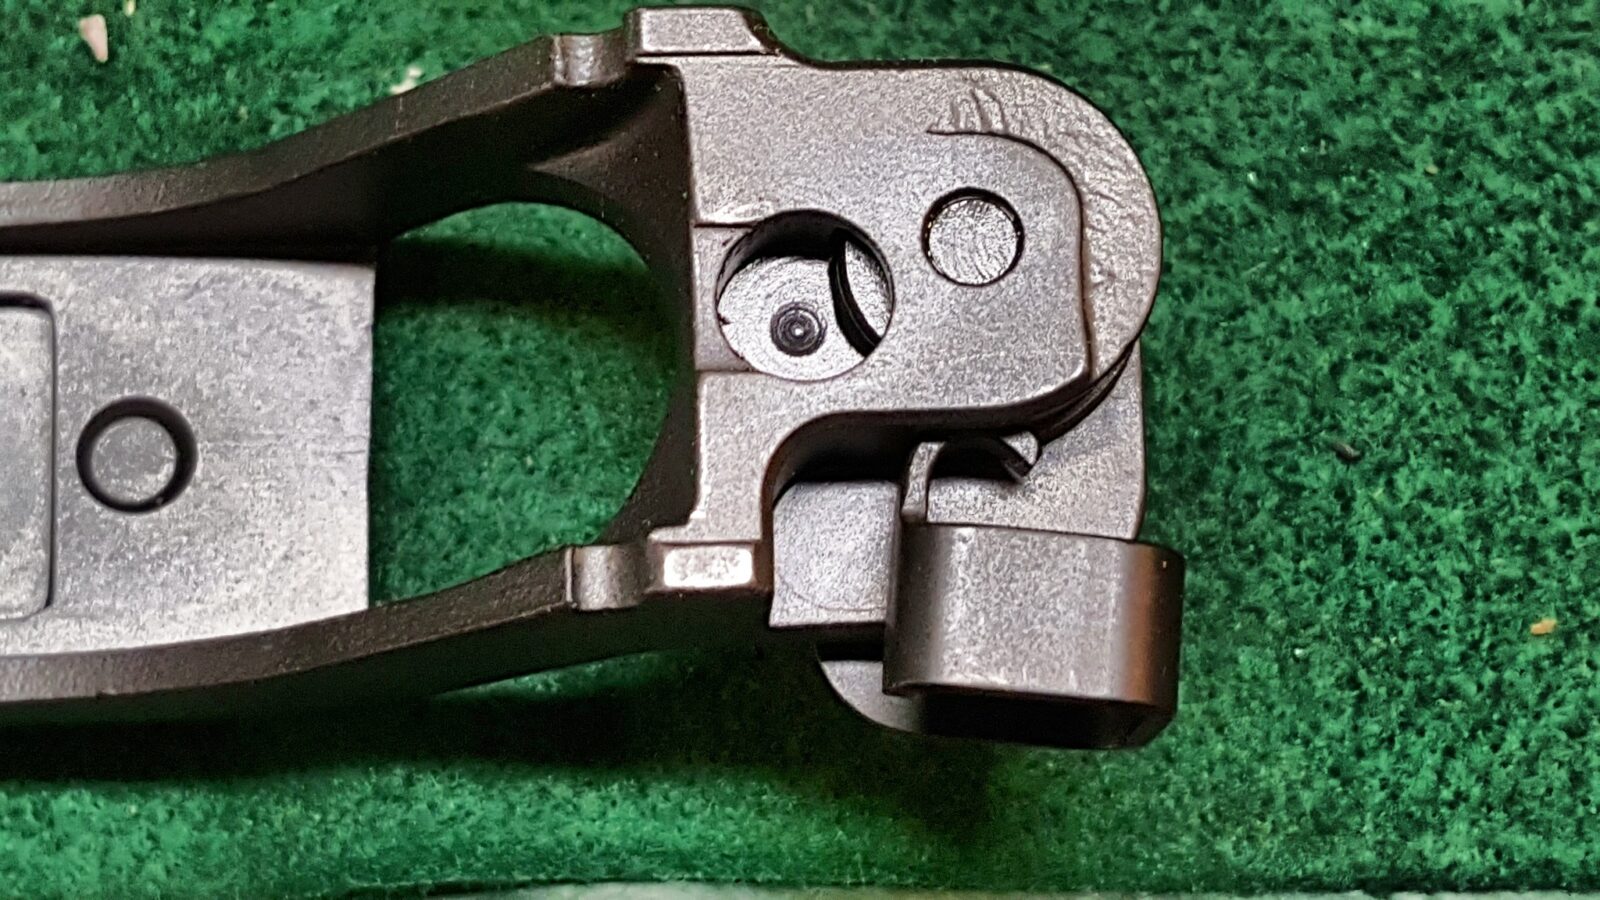
Looking down in the receiver was a very typical looking fire control group. Note, it has been tweaked slightly to work in a Saiga or Lynx so if you want to replace the fire control group you will need to either buy one made for the the Saiga or Lynx or you will need to make some modifications.
Normally I replace the fire control group (FCG) with a US made set but the Lynx’s trigger is surprisingly decent. Not great, but decent. It was gritty from the parkerizing and lack of use but I figured grease and time could cure that. I may well swap it out in the future but time will tell.
The Pistol Grip
Now I did run into one surprise that I did not expect – see the grip nut below? I figured it would be a regular AKM nut meaning threaded for a 6mm diameter x 1.0mm pitch screw. It’s not. I did not expect this but the grip screw is actually smaller than an AK’s. The screw is actually 5mm diameter x 106mm long. I did not bother finding out the pitch by the way because it would not be staying! Instead, I focused on the hole in the receiver – it was the same size as a normal AKM grip nut. Whew – Problem solved. I would replace it with a beefier AKM nut and one of our high-strength alloy grip screws (I’ll detail that in the next post).
To remove the grip, there is a blade screw head on the base. Simply unscrew it and remove the grip and the grip nut.
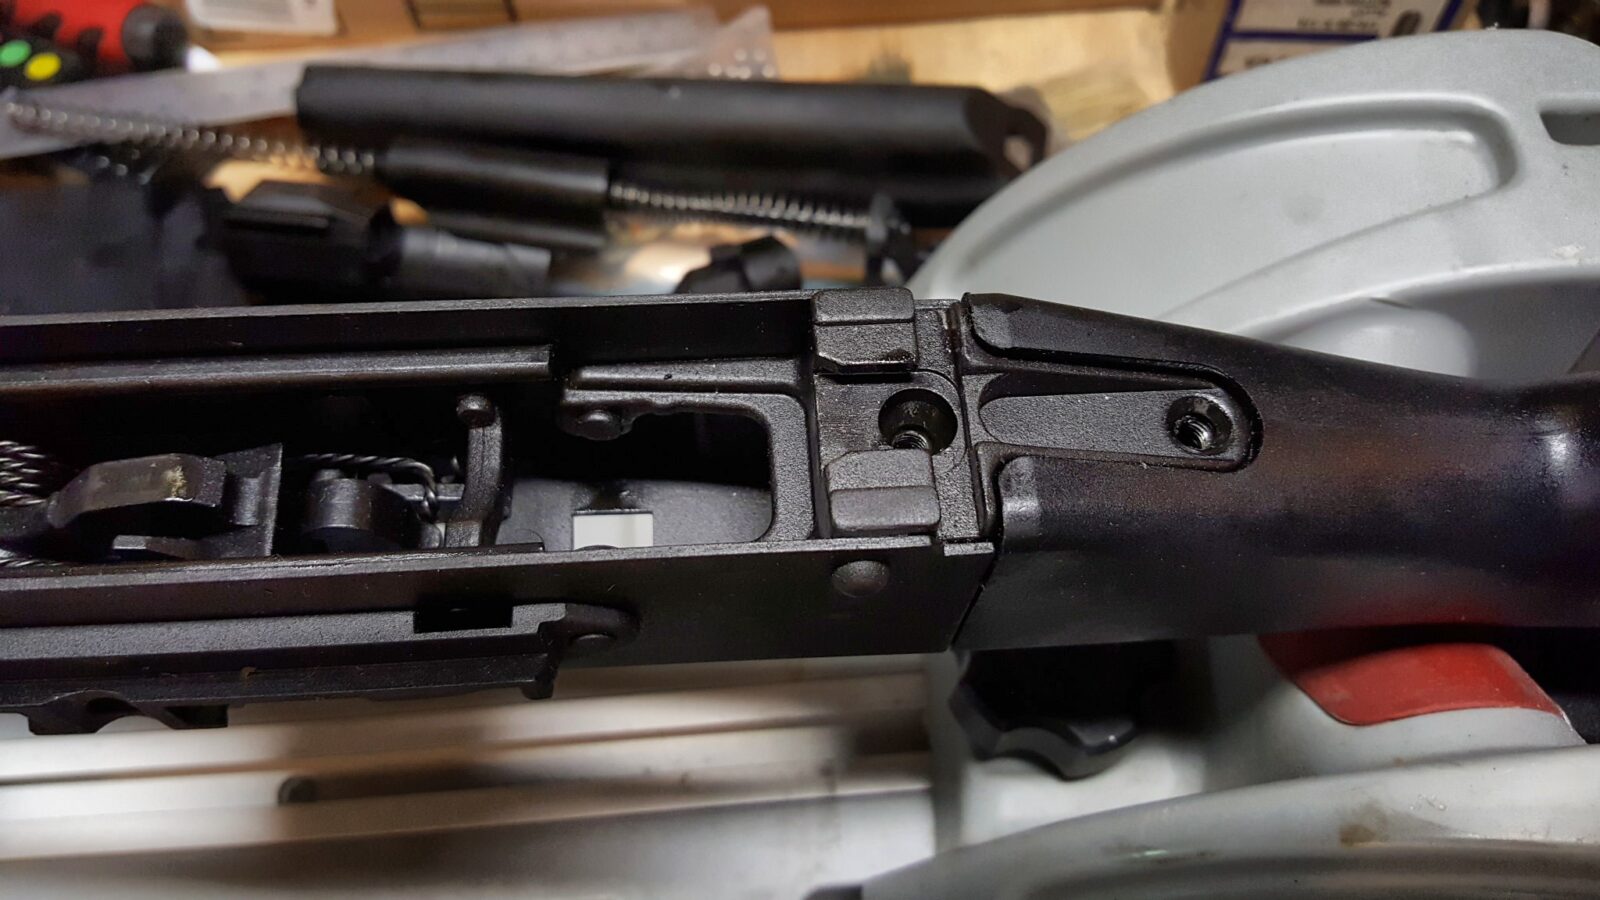
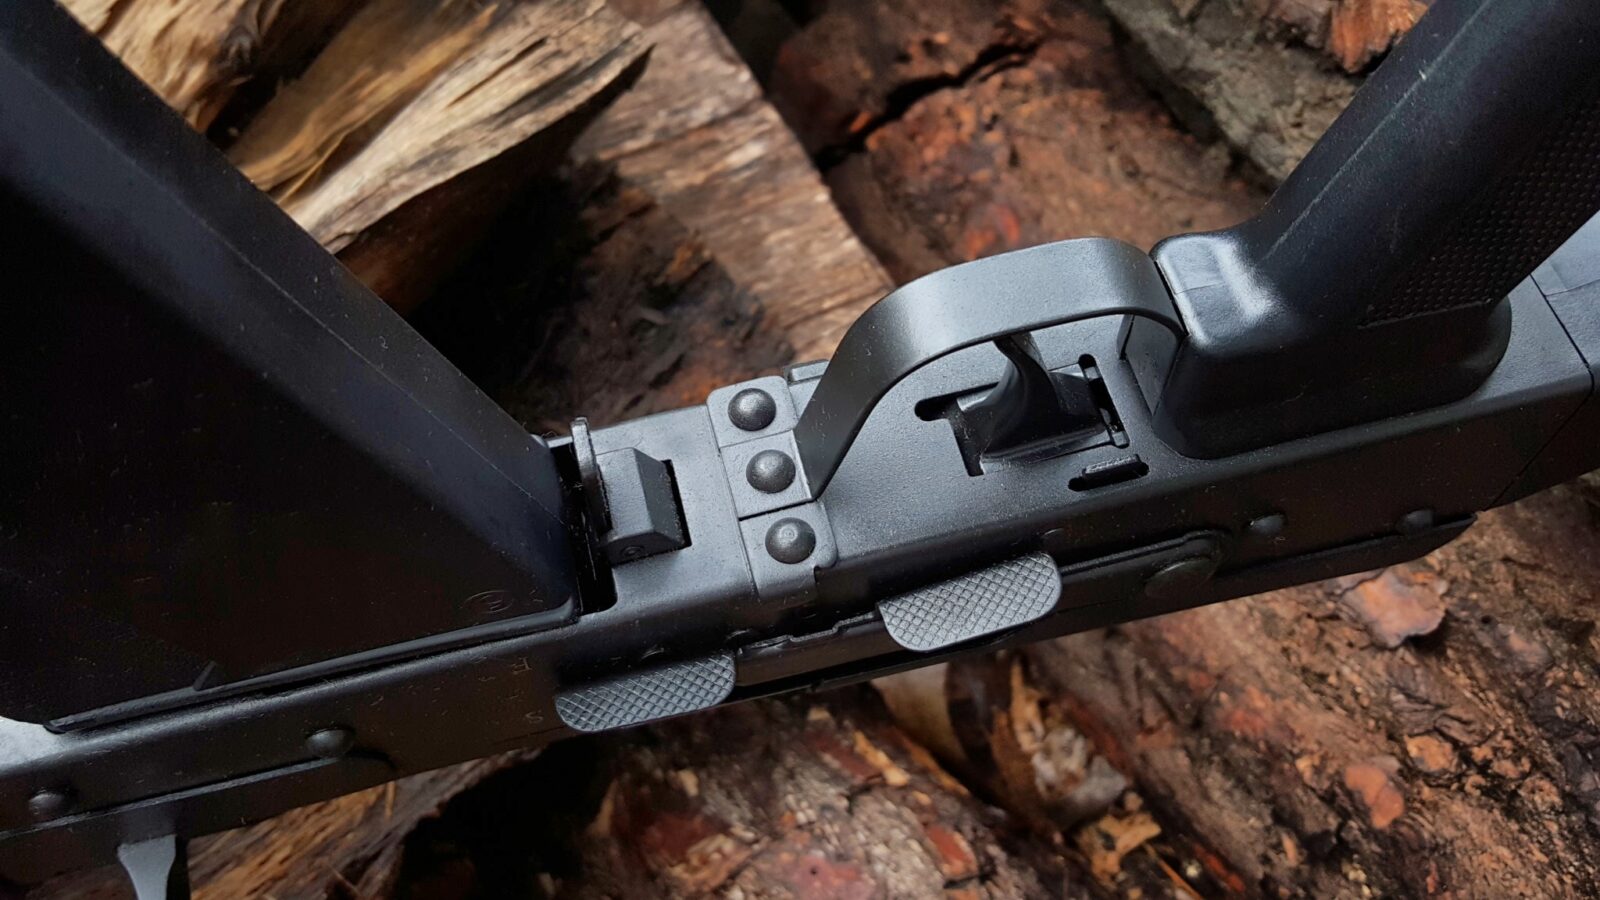
Removing the Buttstock
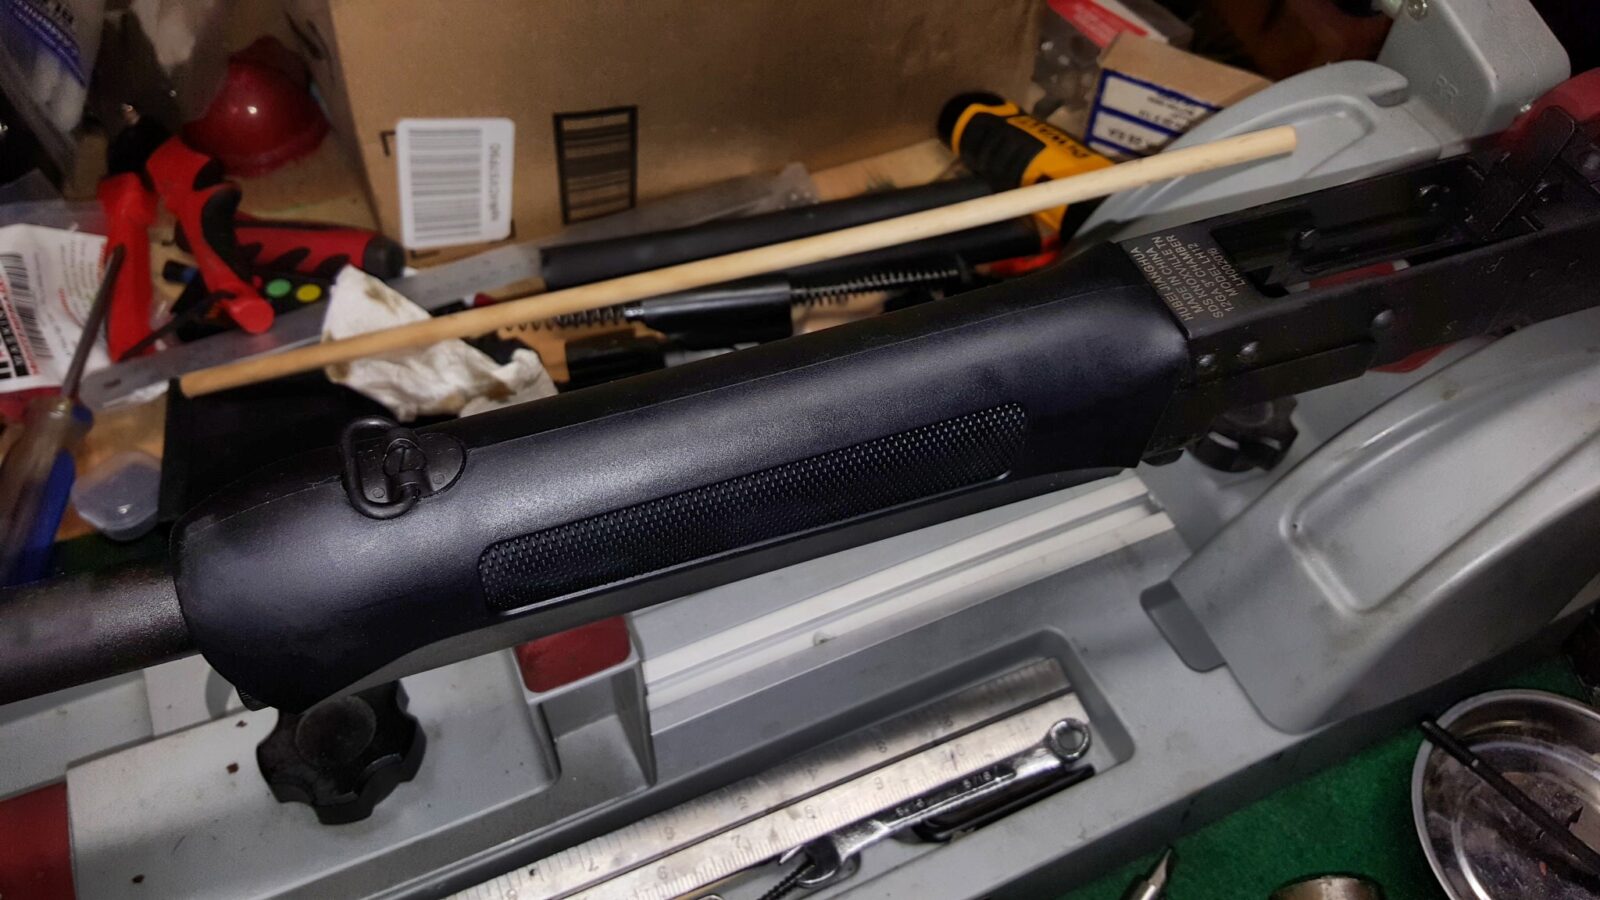
The plastic buttstock is held in place by two machine screws on the top of the rear trunnion. The rear trunnion is an AK-74 forked style with the front portion open. The stock with its lightning cuts on the side harks to the 74 also other than having a recoil pad thicker than what you would find on a 74.
Given how front heavy the shotgun felt, I was not surprised to find out that the buttstock was actually hollow. The Chinese installed threaded inserts for strength. I think that is commendable actually. The fit of the buttstock to the receiver is both well done and very tight. This is what will bear the recoil – the screws are just there to hold it together.
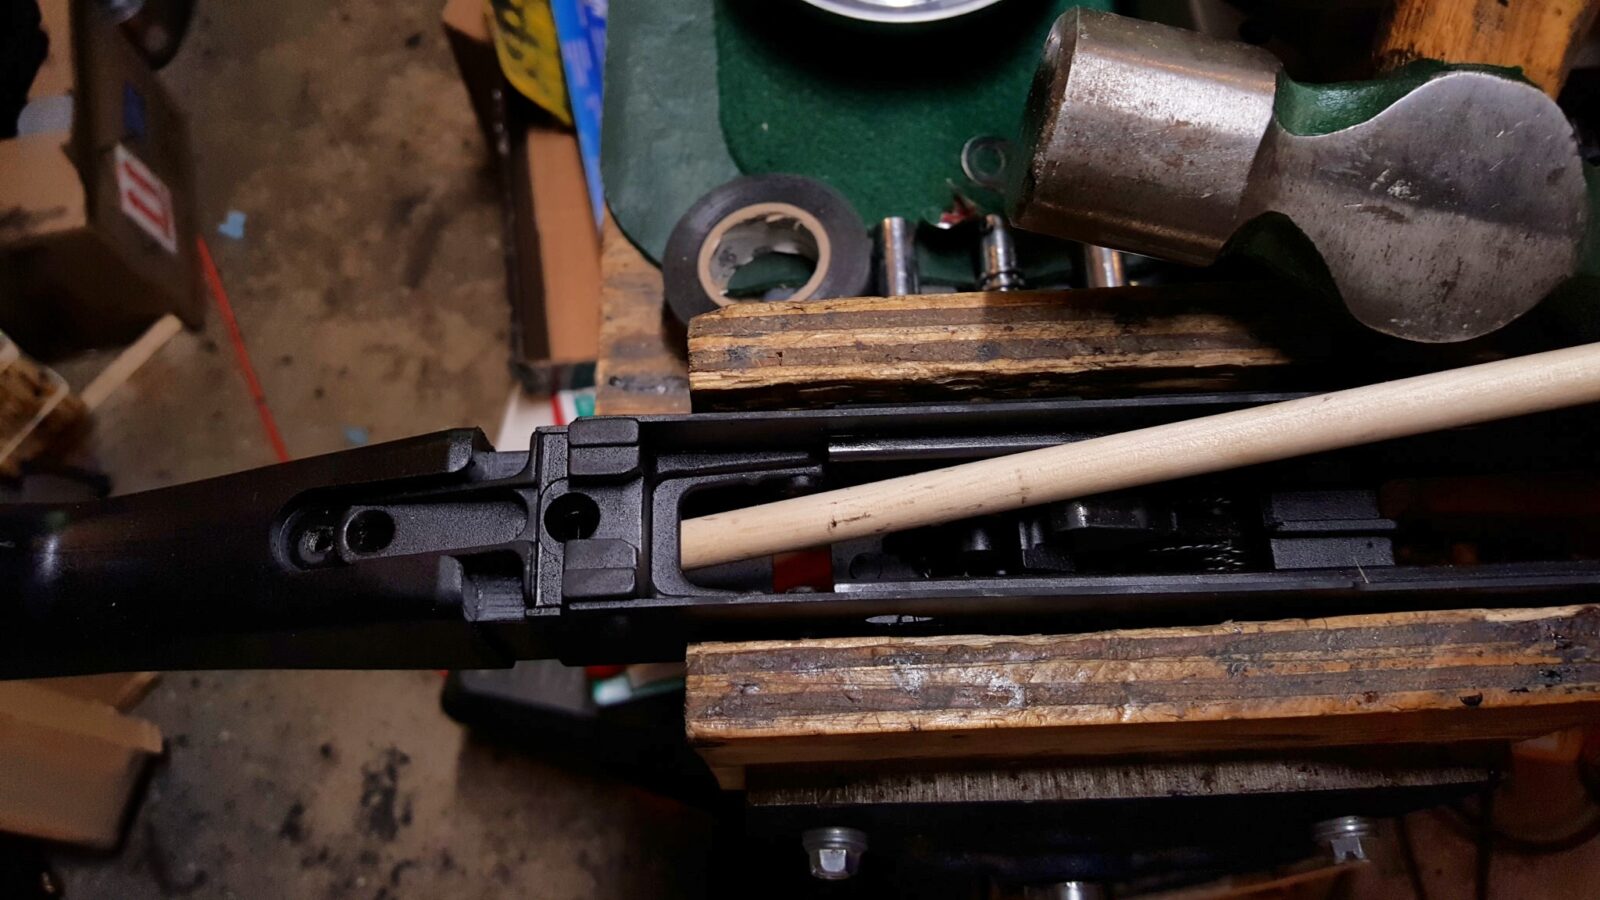
Because of the tight fit, I secured the rifle in my vise after removing the selector lever. I then used a wood dowel and hammer to tap on the lip of the stock to push it backwards out of the receiver. It really didn’t take much force to get it out. For those of you who have tried to get an old varnished AK-47 stock out of a receiver, you know exactly what I mean and the Lynx requires just a small fraction of that.
The Forearm
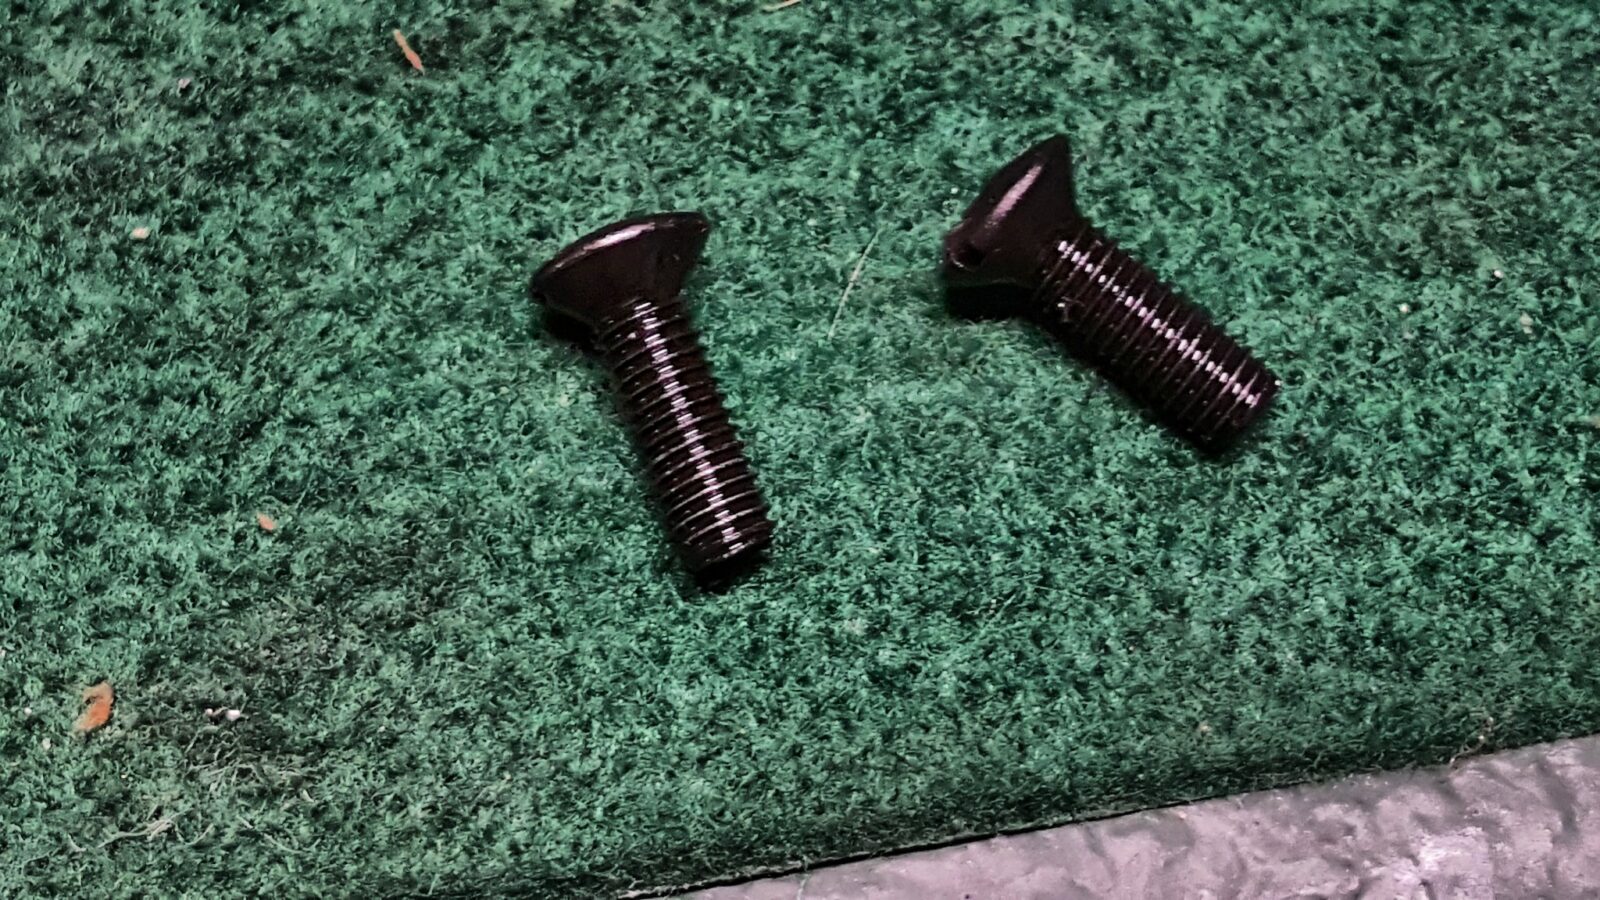
The sporting looking forearm is held in place by a 5mm diameter x 11mm long screw. Unscrew it and push the handguard forward past the gas tube and then pull it off the barrel. Mine was a tight fit so I did need to pull it off the barrel and not just lift. I did use a small piece of wood and a hammer to get it started out of the receiver.
Done
At this point, I had the shotgun all the way apart other than the muzzle cap. I left that on to protect the threads while I worked. The next blog post will detail the customizations and a few surprises that happened along the way.
If you find this post useful, please share the link on Facebook, with your friends, etc. Your support is much appreciated and if you have any feedback, please email me at in**@*********ps.com. Please note that for links to other websites, I may be paid via an affiliate program such as Avantlink, Impact, Amazon and eBay.
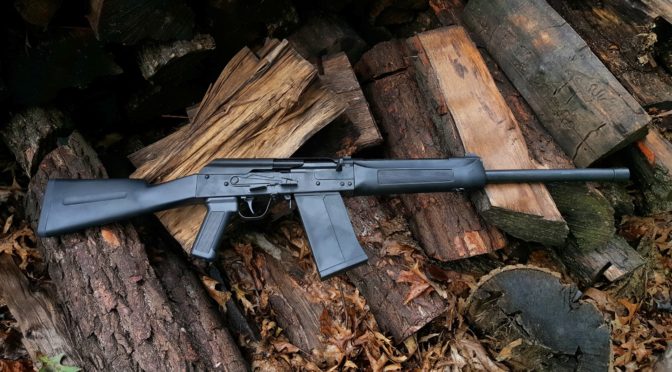
For some reason, I never really got into the Saigas when they were the hot conversion ticket. I guess it was because I was mainly working on rifles and had a Vepr 12. At any rate, when I heard from Paul Popov that SDS was importing a Saiga-12 clone known as the Lynx 12 from China where it was made in the same factory that made the Type 56 AKs. Even better, it did not need the conversion and the street price was about $499, I contacted Scott Igert, my friend who owns Modern Antique Firearms in Benton Harbor, MI, to order me one.
In short order the shotgun arrived and then promptly sat idle as I was busy with a ton of other projects. Scott nudged me along to take a look as he was curious about the Lynx 12 also as were clients of his. That prompted me to get my act in gear and take a close look at the shotgun by taking it apart to install a bunch of modifications I had planned.
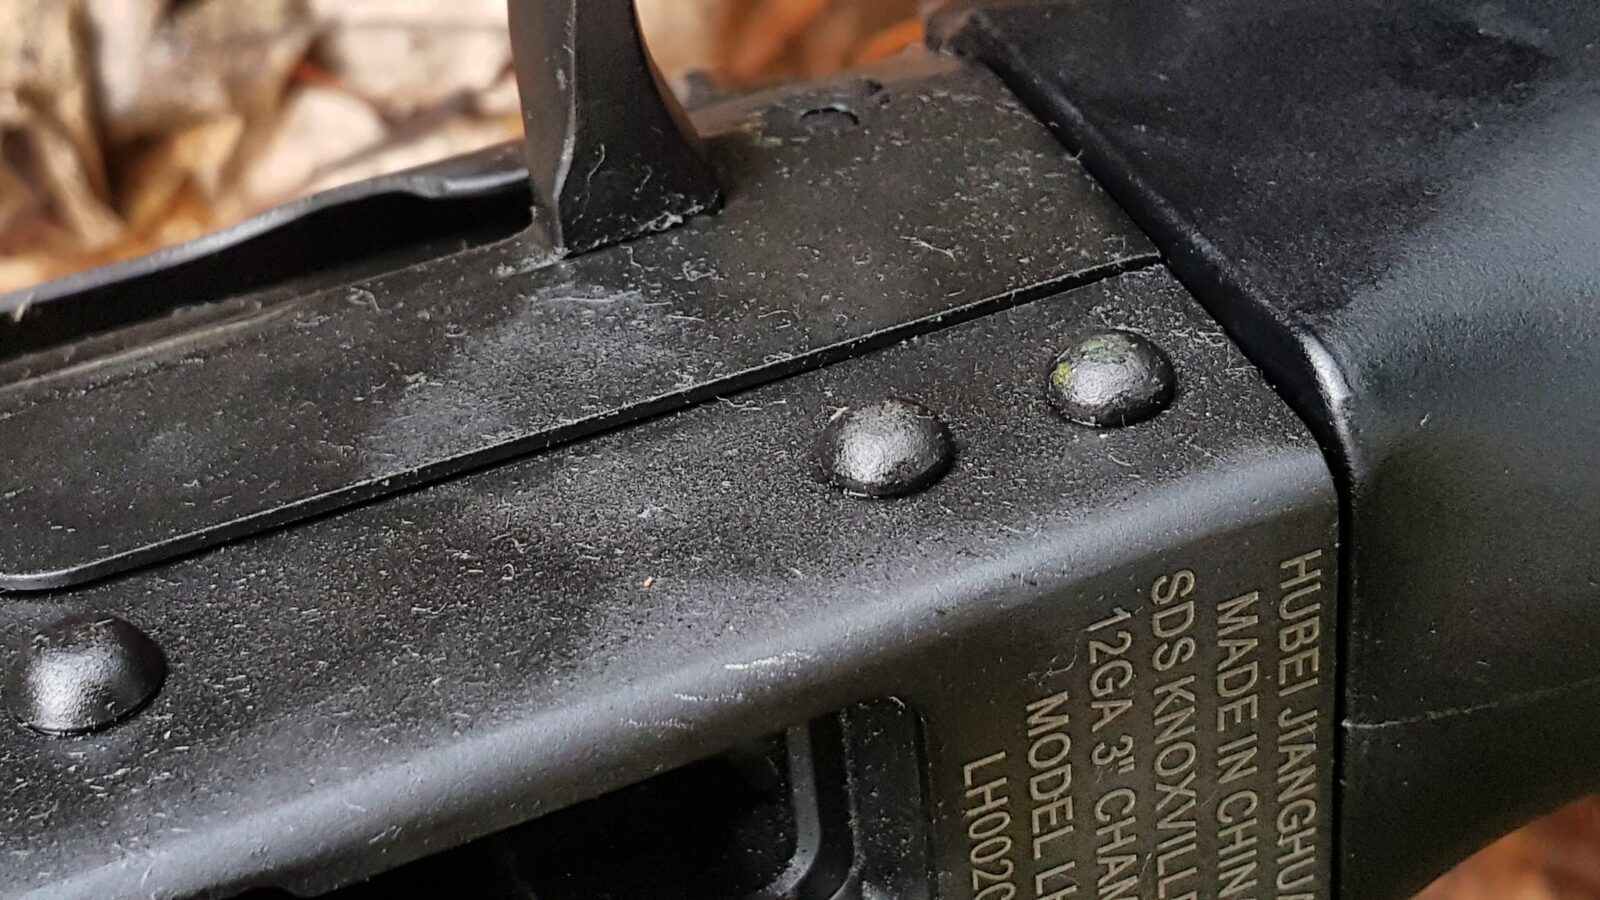
The first step was to give it a careful external exam. The Lynx had a nice heavy uniform dark parkerized finish – probably a manganese “park” given the color. There was some type of preservative on it that had the most interesting smell. I have no way to describe it other that to say it did not smell like the typical cosmoline-ish anti-corrosion coatings I was used to. Note, parkerization does not prevent rust but what it does do is create a textured surface that oil, preservatives or even weapons finishes can “grab” hold of an stay in place. For example, when I build an AK, I have found that abrasive blasting, followed by manganese parkerization and then Norrell’s Molyresin is a remarkably durable finishing process. By the way, I have a post on how to do make and apply your own manganese parkerization.
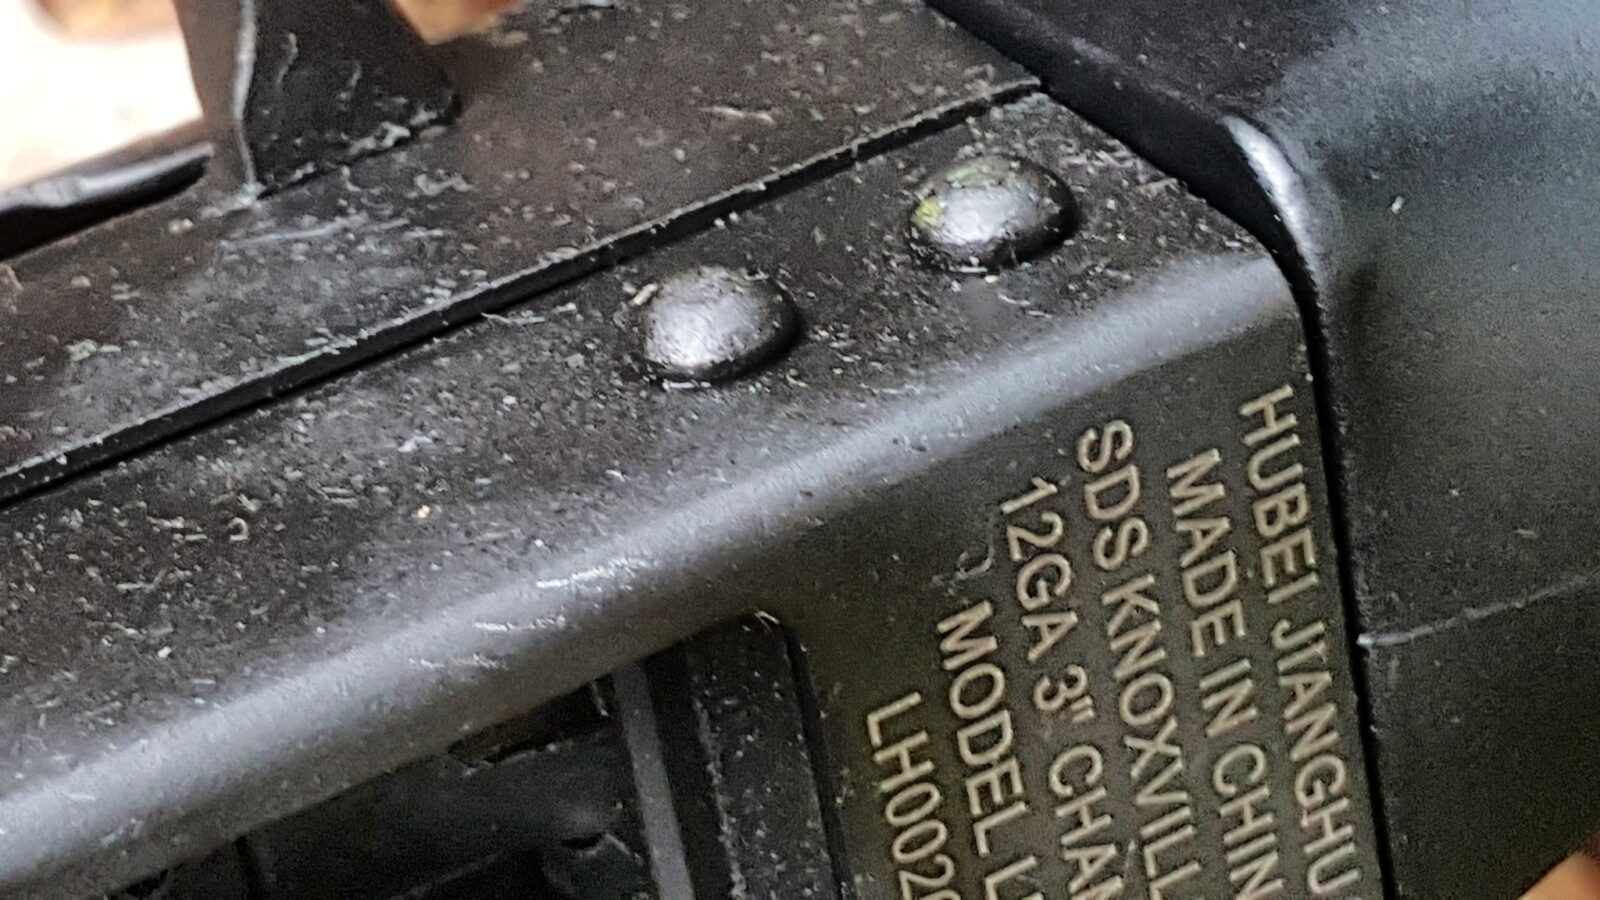
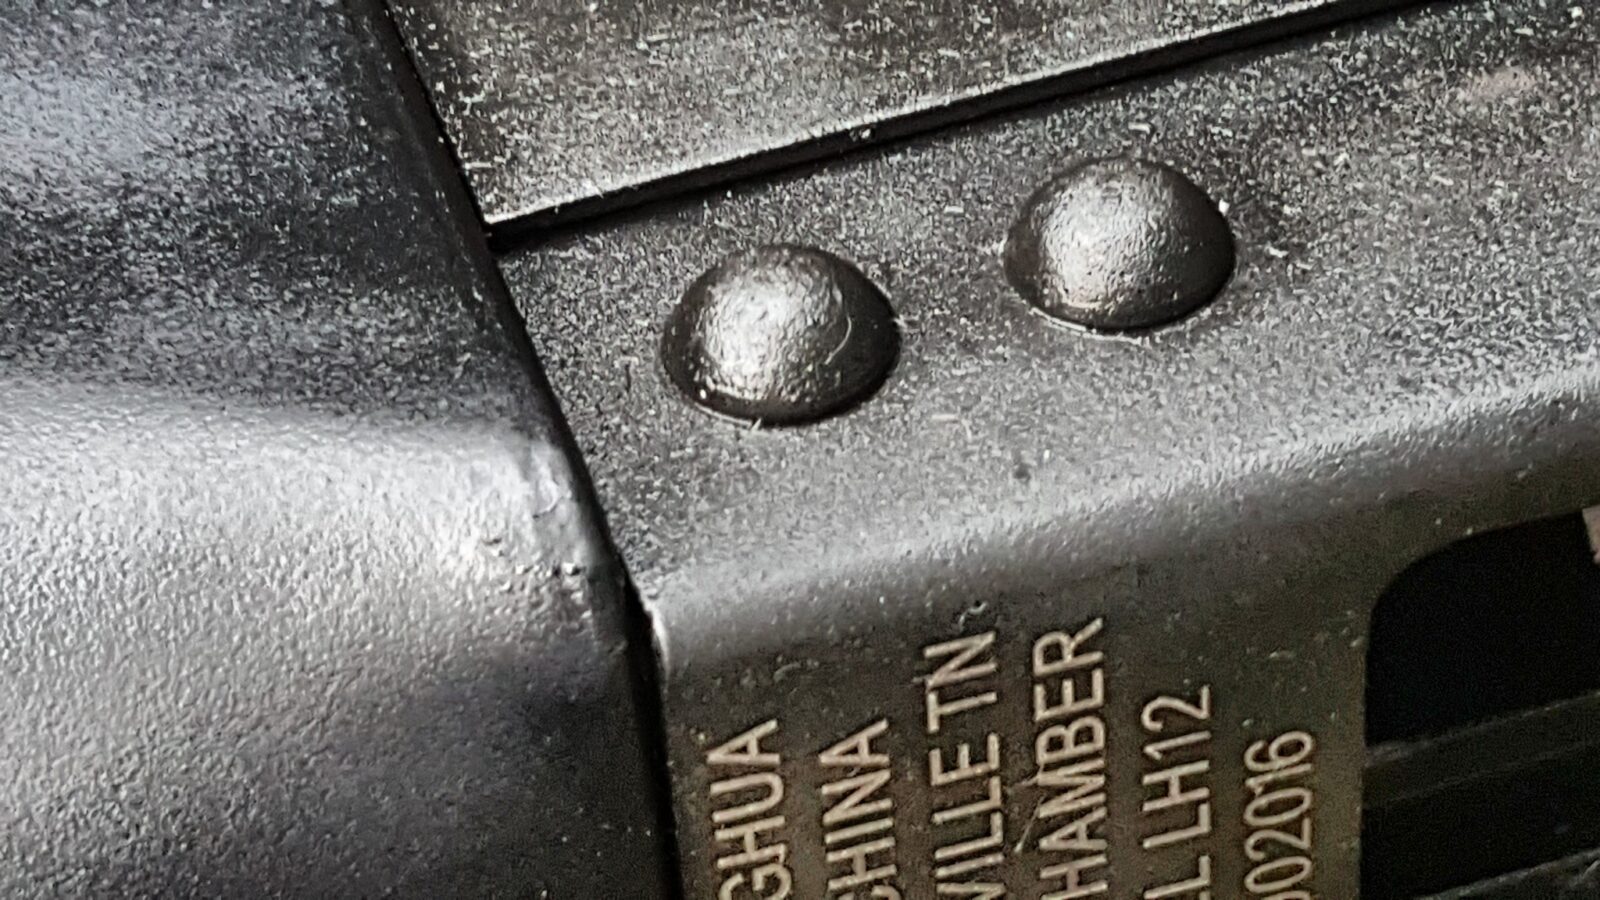
The rivets were pretty good – in a few cases the domes were flatter than others, which is me nit picking, but they all were sitting nice and snug against the sheet metal. Rivets are pretty amazing and result in strong attachments of the forged trunnions to the sheet metal as long as they are formed properly and the Lynx’s rivets are solid.
I found it interesting that the front trunnion sits on top of the sheet metal receiver. The fitment was pretty good.
There were reports of early models having sharp edges but I did not see any. All edges and the parkerized finish were well done.
I did notice that the rear stock screw as a bit chewed up by whomever installed the rear stock. Normally you see this when someone uses a screw driver blade that is too small. Not too bad and since I planned on replacing the rear stock, I really wasn’t worried about it.
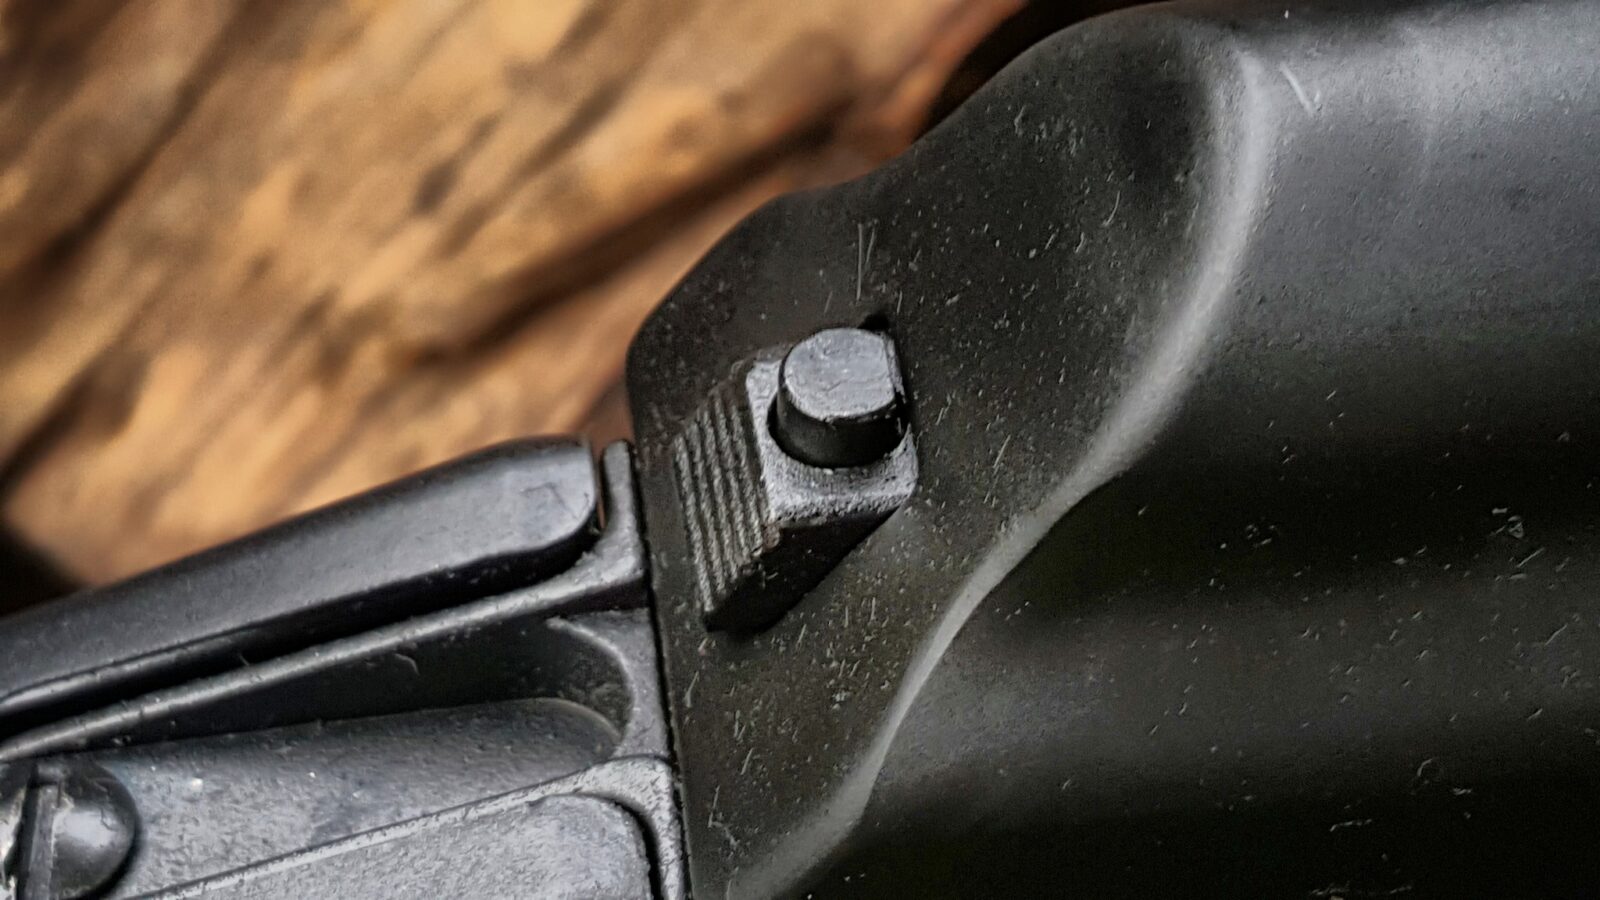
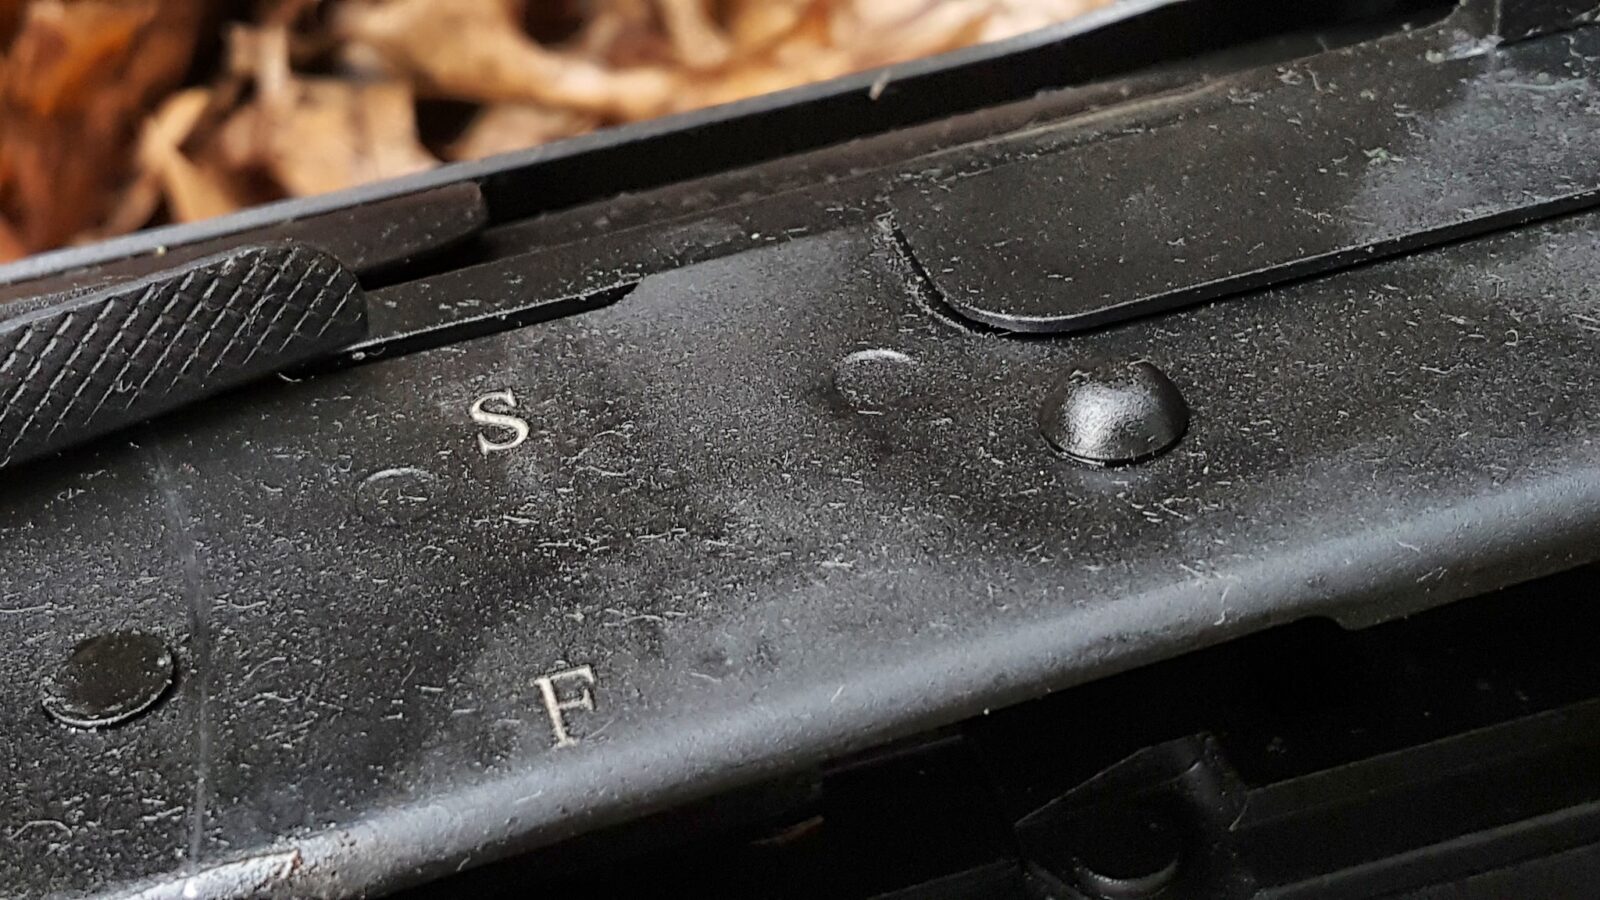
The selector lever was noticeably loose. On most AK rifles, it takes a bit of effort to move the lever between the safe and fire positions. The lever on the Lynx moves very easily. I’ll bend the lever slightly or use a center punch to increase the depth of the detent. Again, not a big worry.
Because the shotgun is brand new and the fire control group and the inside of the receiver are all parkerized, the action was pretty rough. This was to be expected – the parts need to wear in. I knew from experience that cleaning and better lubrication would help.
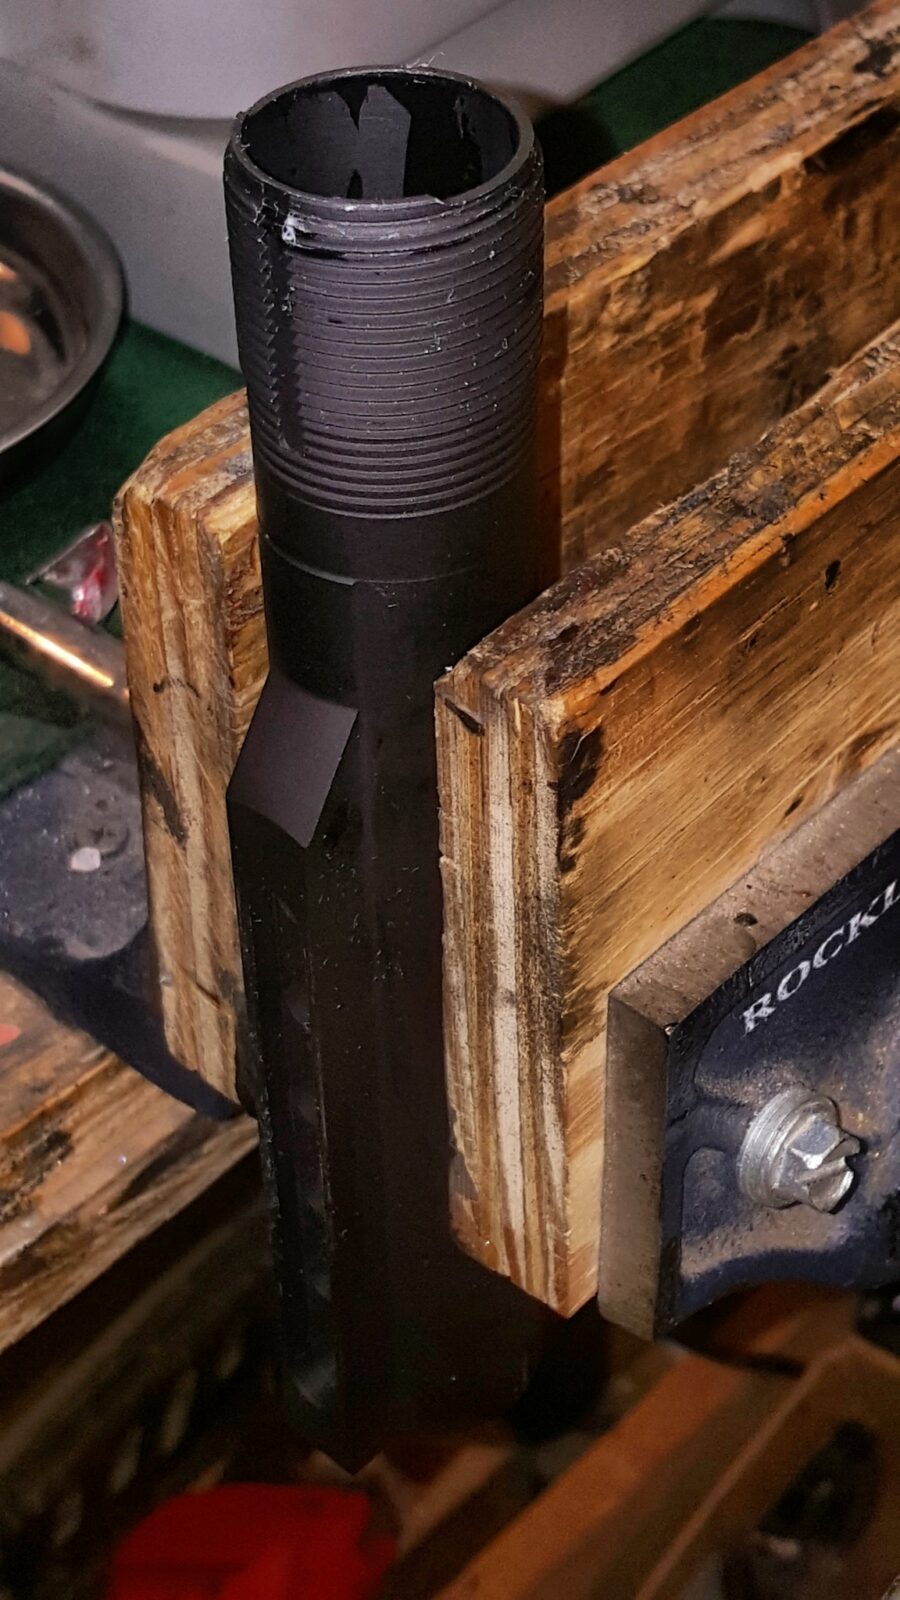
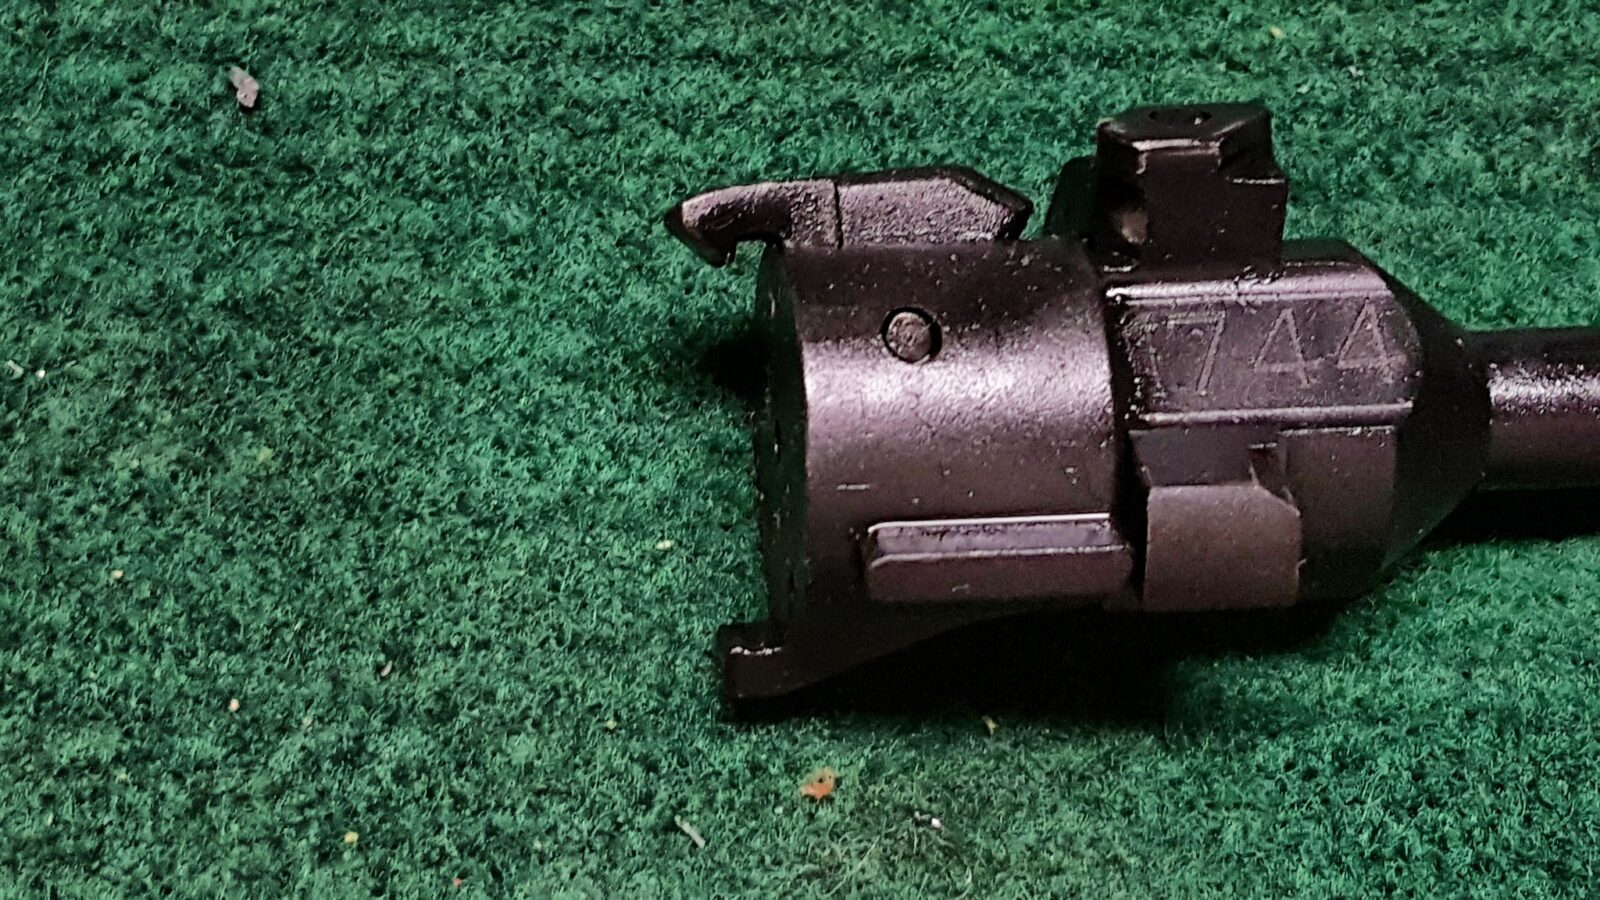
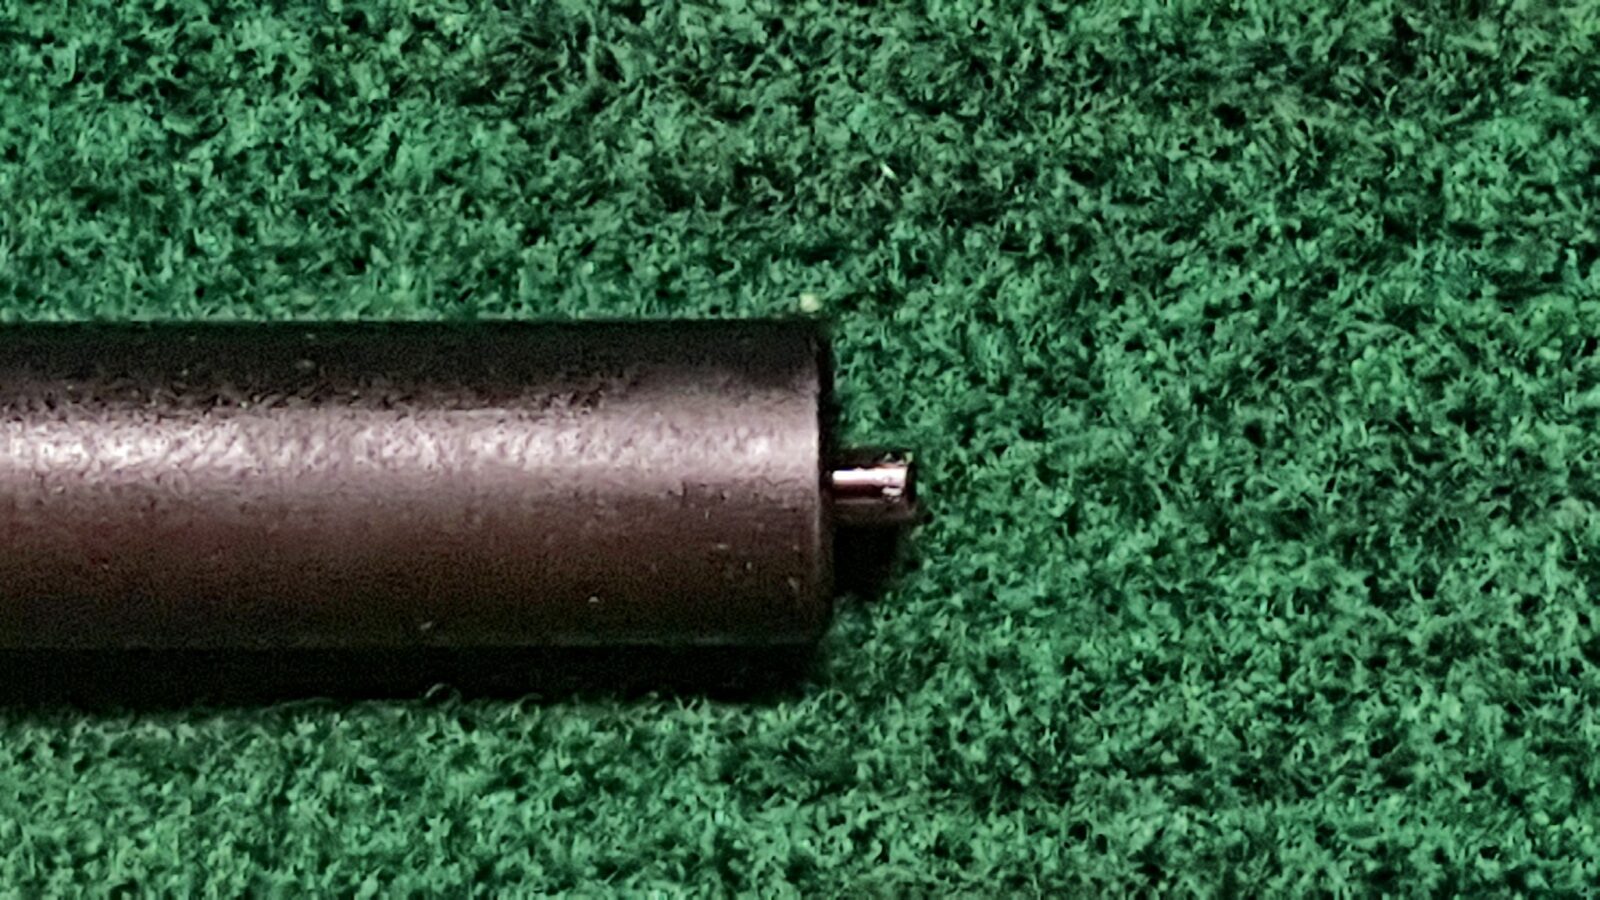
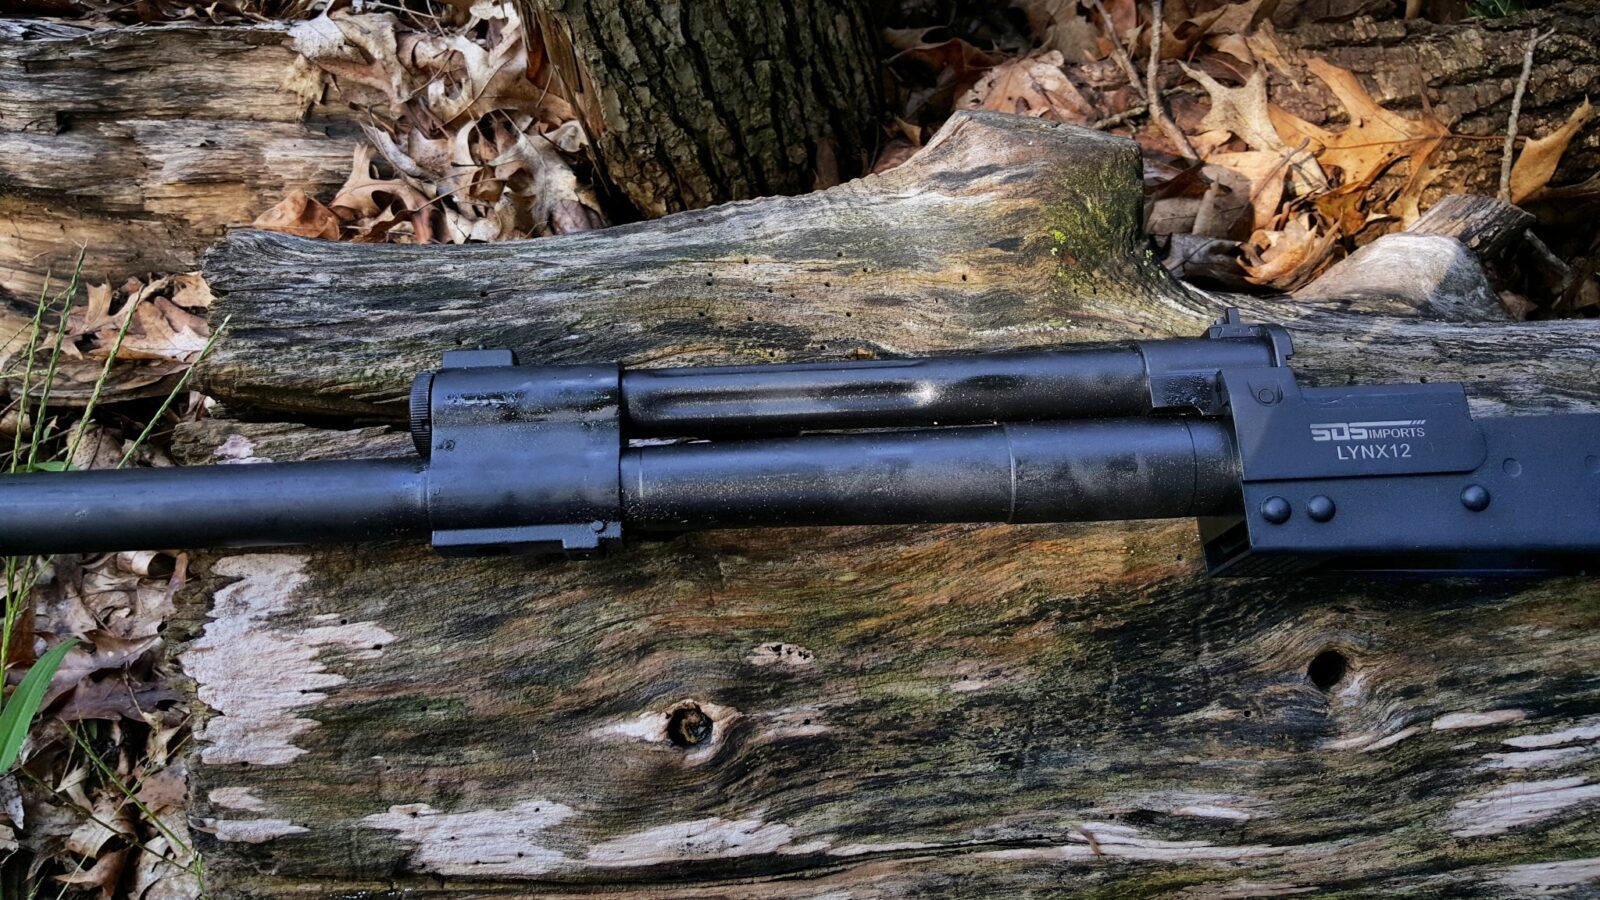
The muzzle cover was easy to remove and threaded nicely. It is threaded to use Saiga chokes and brakes.
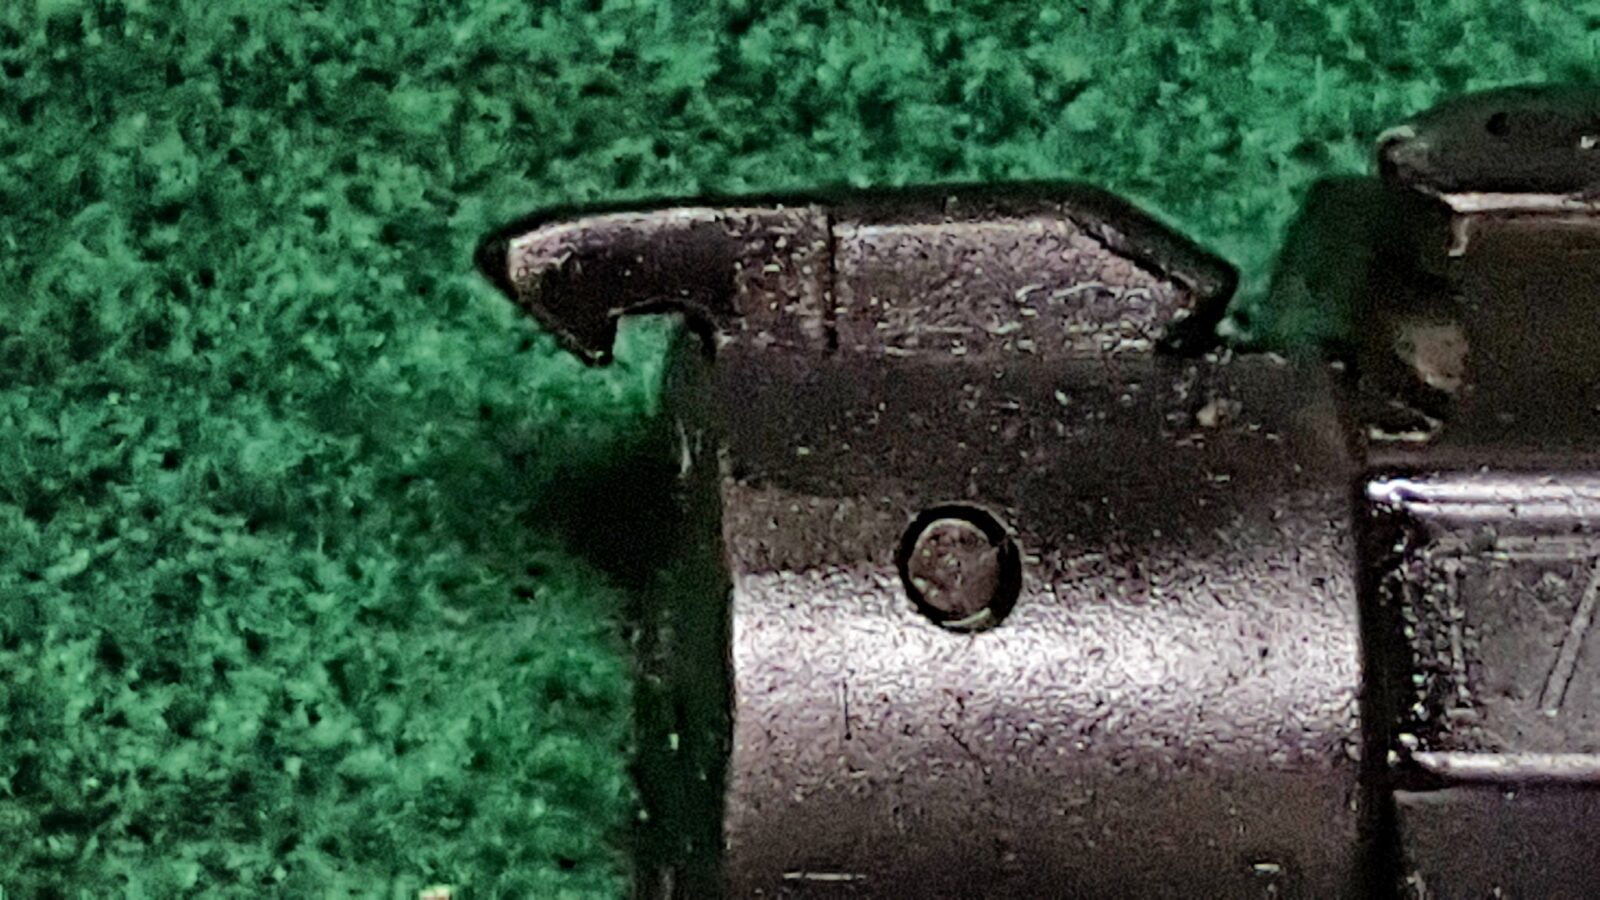
The dust cover has an additional retainer spring and pin that you do not see on most AKMs to hold the dust cover in place. Notice the attention to detail that the retaining button is shaped to allow the dust cover to clear it better.
A nicely done optics side rail is already installed and begging to be used.
It’s a good thing that is there because I really think you will want to run a red dot either via a scope mount or on a front rail. The Lynx’s sights are to the front and rear of the gas tube. The rear has a dovetail and can be drifted with a pin punch to the left or right. The front sight is threaded and can be adjusted up or down. They definitely are functional but I don’t care for them at all to be perfectly honest.
…smallest dot = basically no gas, no rounds will usually cycle when the regulator is on this position. Next smallest dot = “00” buckshot, high velocity rounds and slugs. Next to largest dot = all things in between your results and field testing will be required to see what your individual shotgun will run in this setting. Largest dot = birdshot and other lower powered ammunition.
You’ll notice it has an AK-74 looking buttstock but it is actually hollow and very light. It’s nicely formed and installed but the net result is that the shotgun is light overall but very front-heavy. I planned to replace the buttstock, grip and forearm from the start and I will describe what was one and why in future posts in this series.
It uses Saiga magazines also. One five round mag comes with the shotgun and SDS now sells 10 round magazines also that you can readily find. It’s actually harder to find spare five round SDS-brand magazines right now than the 10 round units.
By the way, if you are interested about how it shoots, I haven’t had a chance to take it out yet. In researching the shotgun and how durable it was, I talked to Paul Popov and he has 350 rounds through his with no signs of trouble. I also talked to Justin McMillion at JMAC Customs and they have put through about 500 rounds also with no problems showing up. Here is a great overview video from Justin and his wife Ashley:
To sum it all up, I was pretty impressed with my initial just out of the box assessment. I’m certainly not done though as I bought the Lynx specifically to customize and blog about. The custom Lynx 12 blog series will have two more posts – one about disassembly and then one with the customizations I made.
If you find this post useful, please share the link on Facebook, with your friends, etc. Your support is much appreciated and if you have any feedback, please email me at in**@*********ps.com. Please note that for links to other websites, I may be paid via an affiliate program such as Avantlink, Impact, Amazon and eBay.
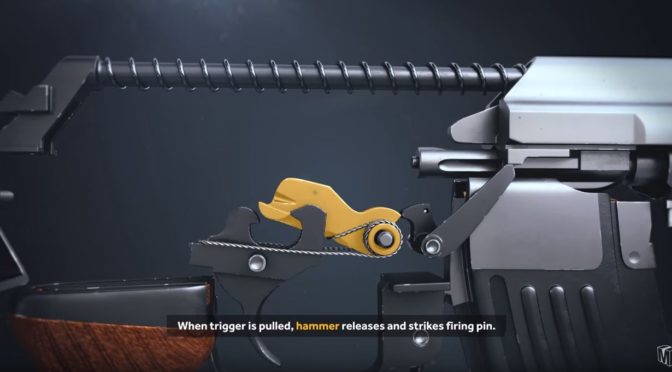
I posted a Forgotten Weapons video a few months back where Ian does a great overview of the Type 2 Avtomát Kaláshnikova (AK). Џон Ивошевић shared with me this cool computer animation of the parts and operation of a Type 2.
This is incredibly detailed – if you are into AK rifles, this is worth watching:
I’m amazed and hope you find it cool as well.
If you find this post useful, please share the link on Facebook, with your friends, etc. Your support is much appreciated and if you have any feedback, please email me at in**@*********ps.com. Please note that for links to other websites, I may be paid via an affiliate program such as Avantlink, Impact, Amazon and eBay.
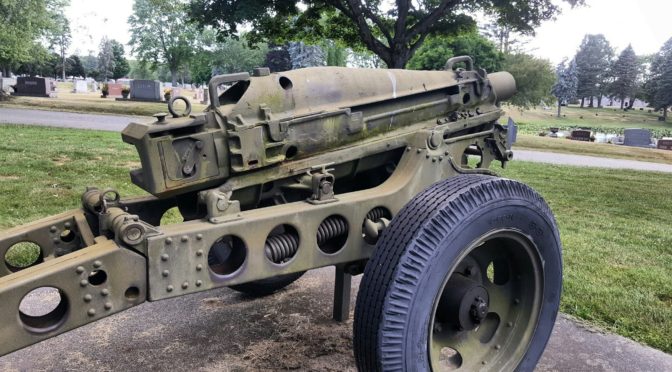
Right off the bat, I found the following fascinating old WWII-era USMC training film on the M1A1:
A collector actually owns one and this next video gives a bit of history and shows the howitzer firing:
The next is historic combat footage of an M1A1 being fired in Saipan:
And last is historic footage of a pack howitzer being unloaded by a crew and assembled at Fort Hale, CO.
These videos pretty much satisfied my curiosity. After all these years, I finally know a bit more about the old howitzer and got to see it operate.
12/25/23 Update: I found out the YouTube links had broken and fixed them.
If you find this post useful, please share the link on Facebook, with your friends, etc. Your support is much appreciated and if you have any feedback, please email me at in**@*********ps.com. Please note that for links to other websites, I may be paid via an affiliate program such as Avantlink, Impact, Amazon and eBay.
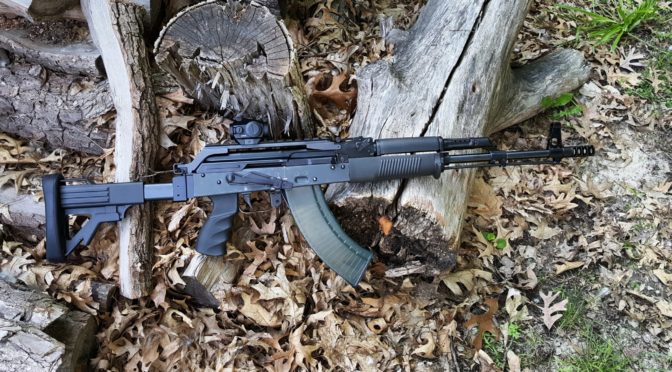
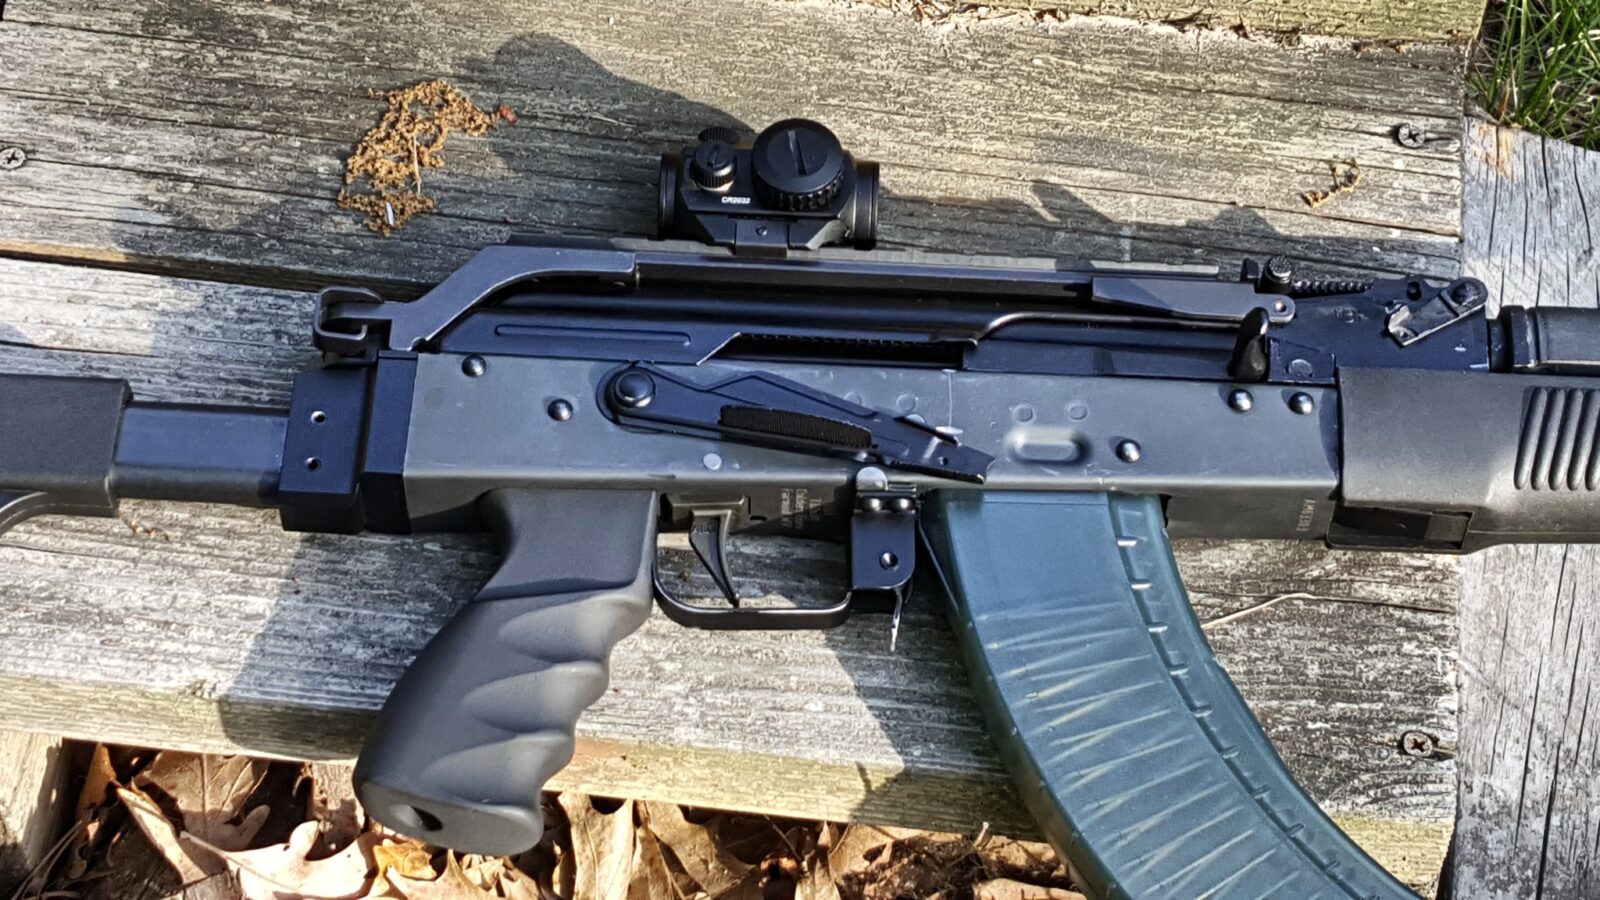
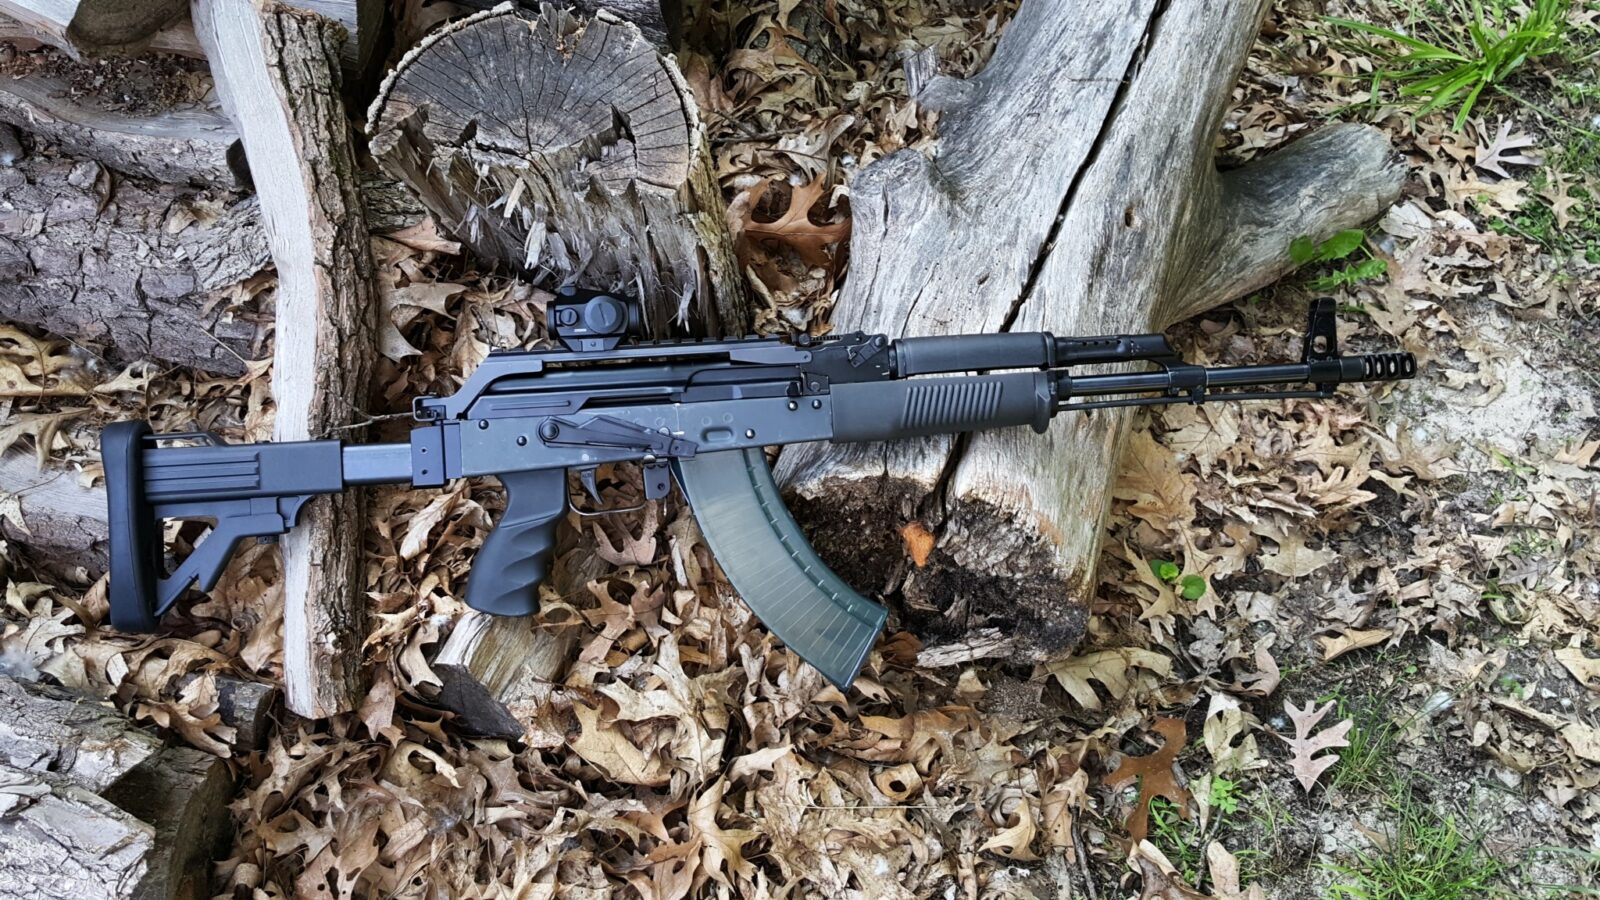
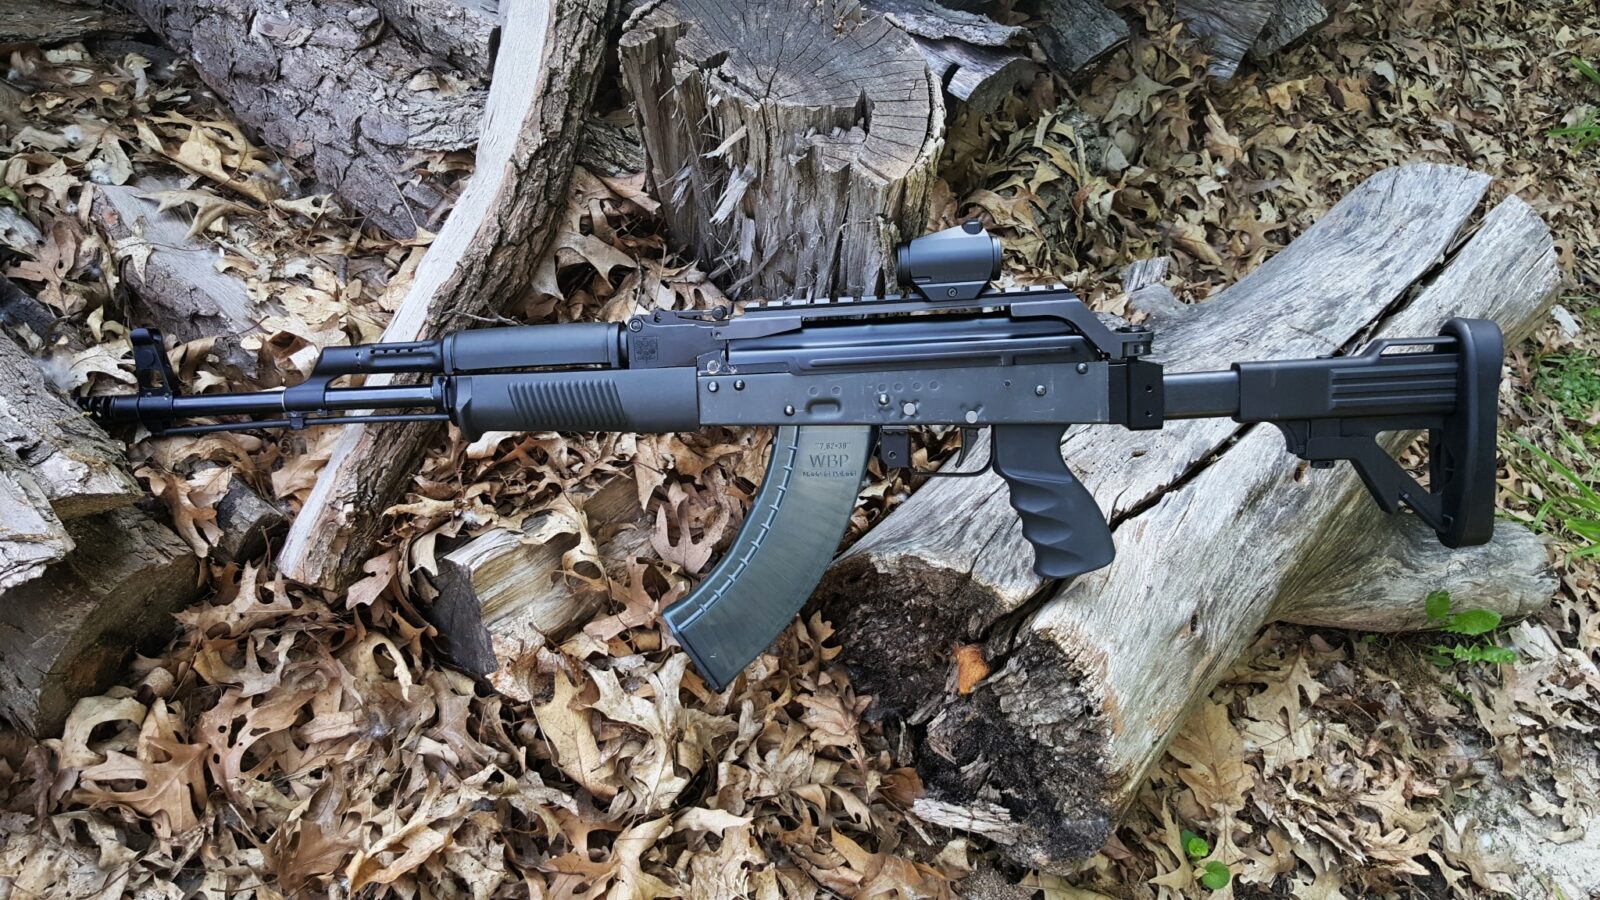
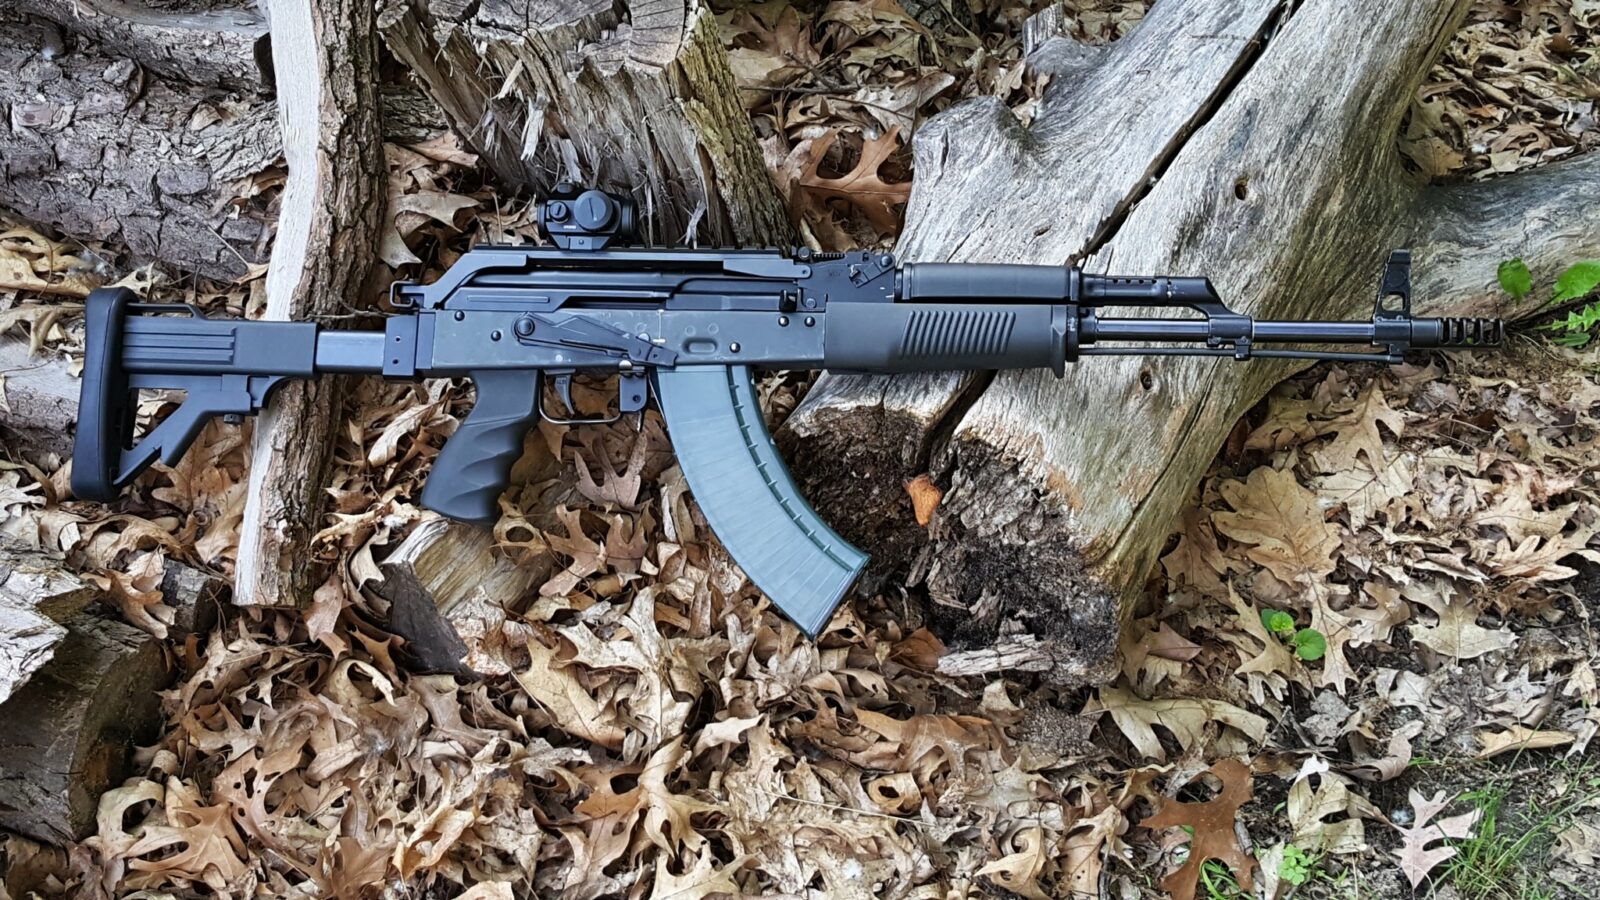
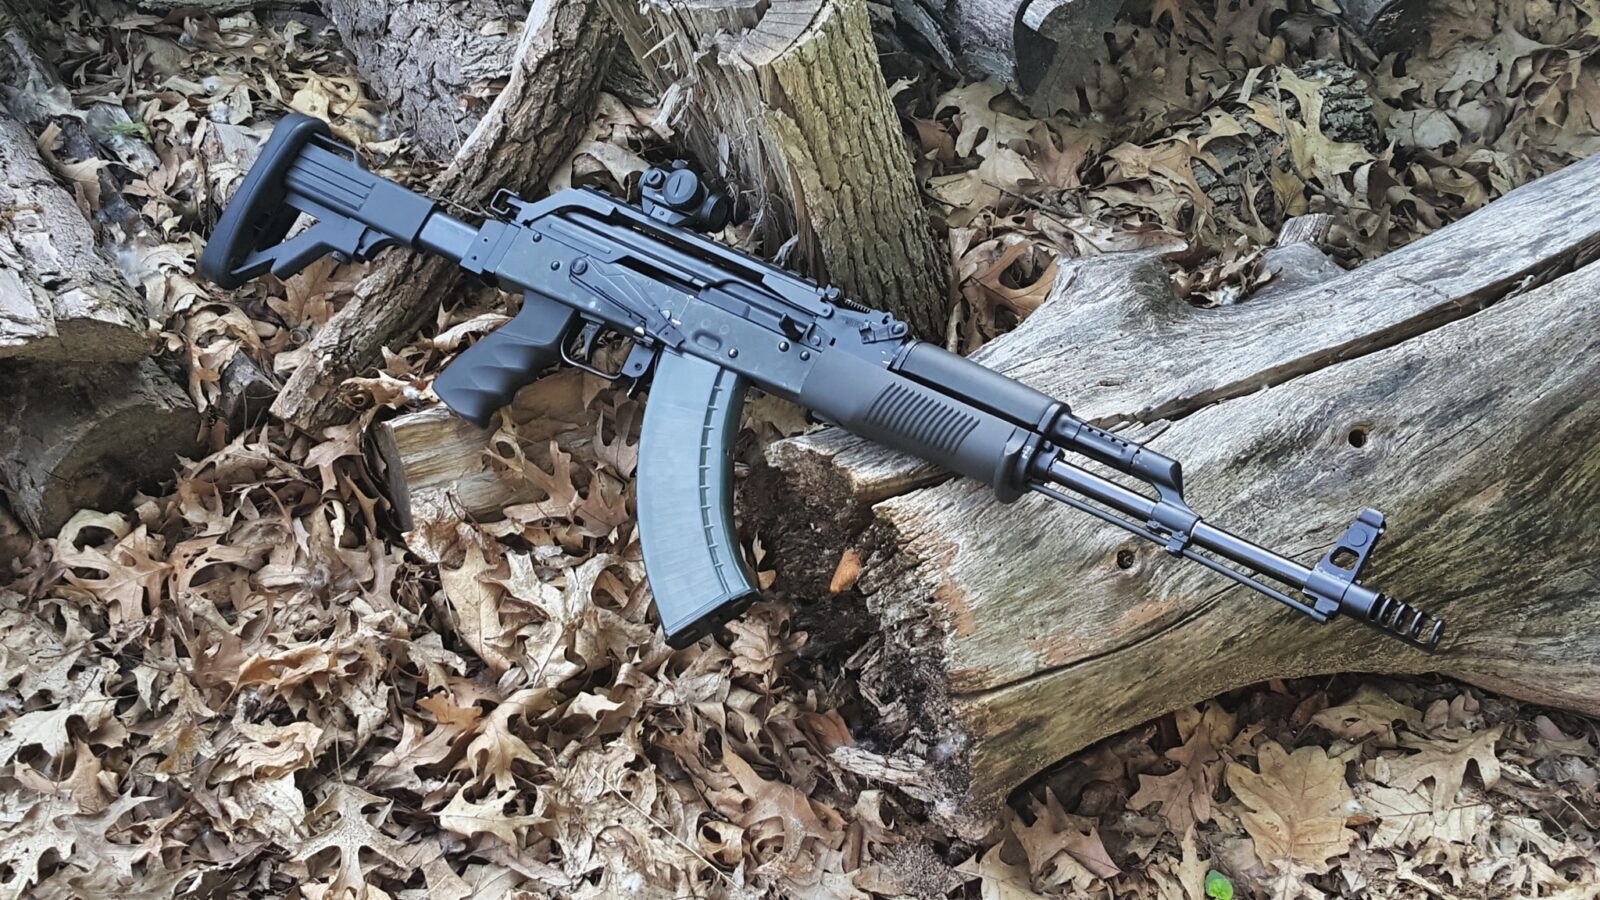
So here we are at the end. All that was left was to install the buttstock, handguards, muzzle brake, optic and test fire the rifle.
Beryl Furniture
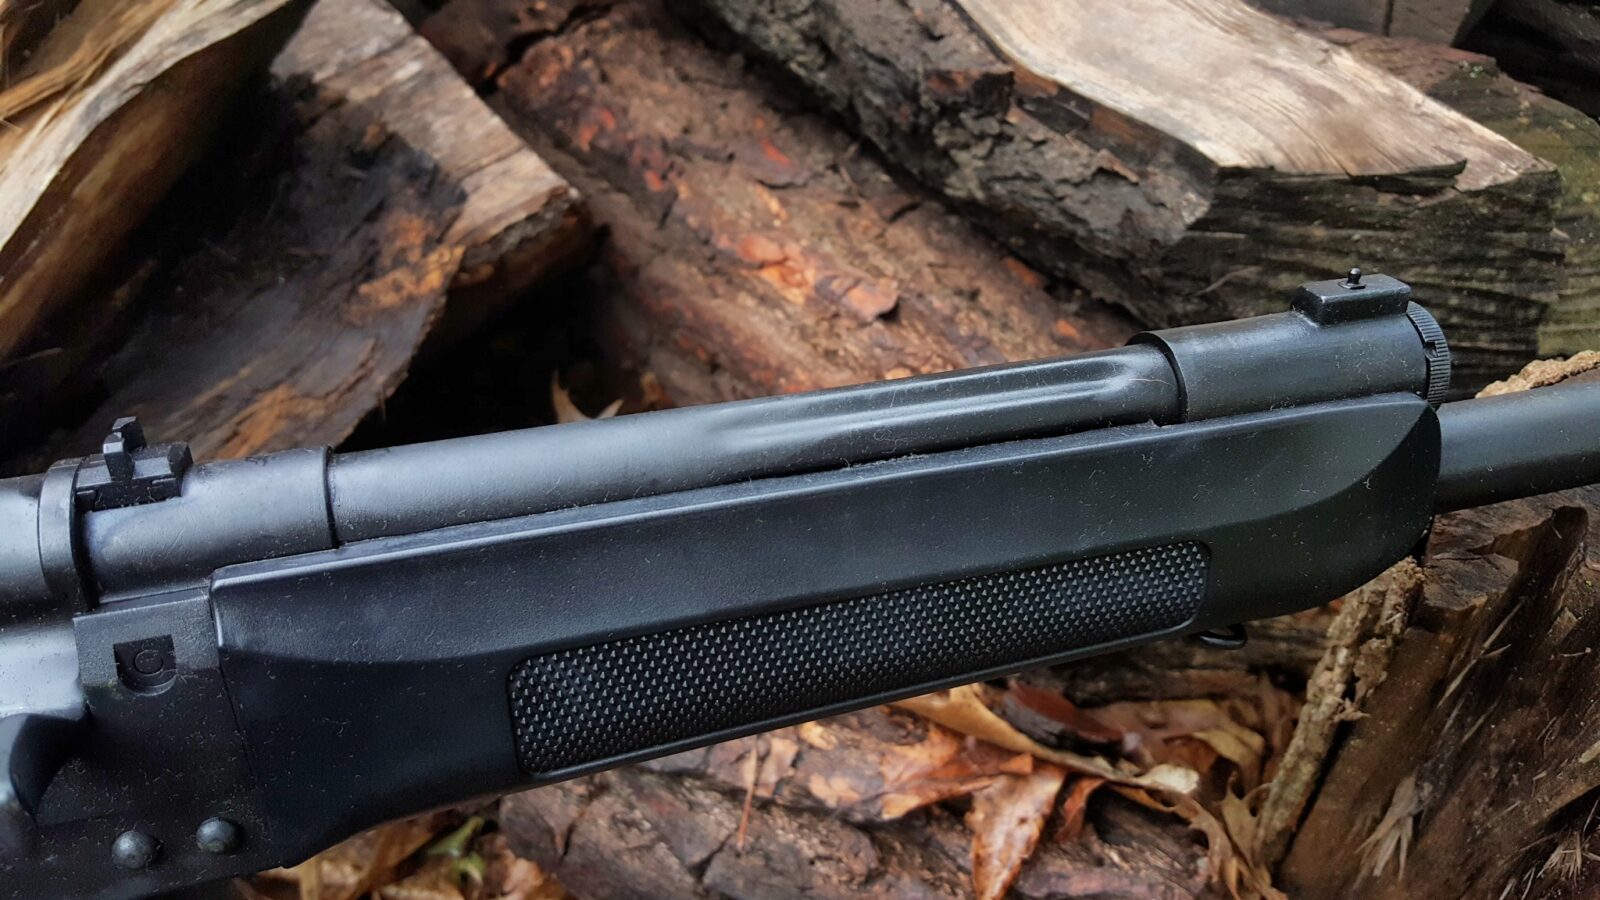
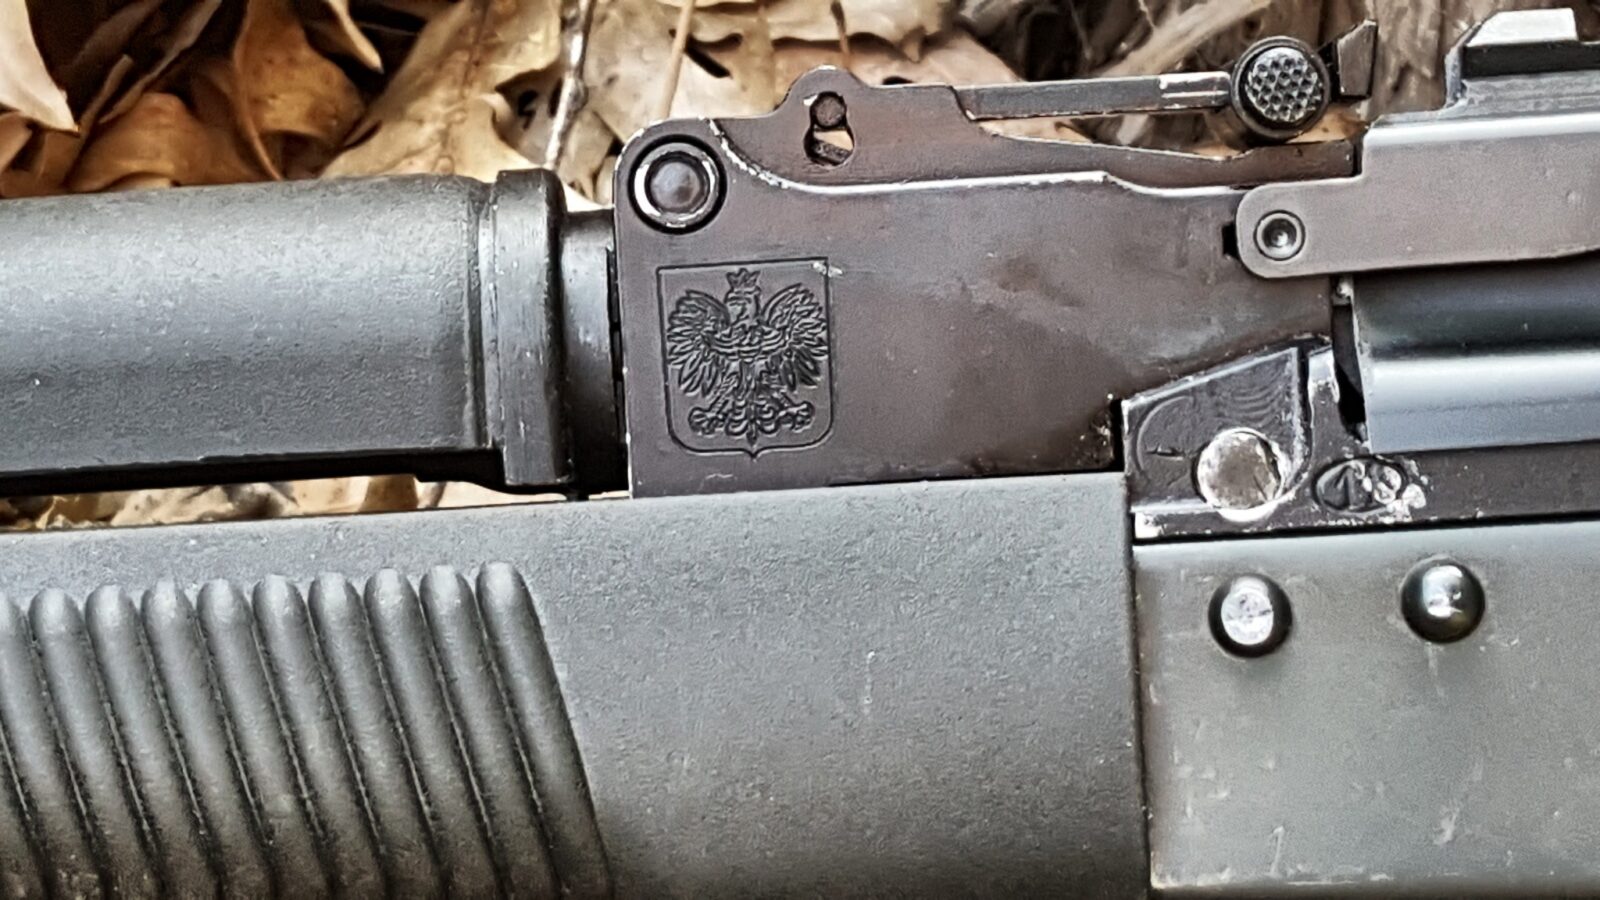
The Poles evolved the Beryl furniture over the years so I went with a particular handguard from Robert RTG that I liked, buttstock from Arms of America and one of our grips.
The lower handguard is what you would find on a kbs wz. 1996A Beryl. The upper is one I had in a box and pretty flimsy. I ordered a genuine Polish upper that I will install after I refinish the rifle.
The upper and lower go on the same as any AKM. I really like the lower – that lip you see makes for a very natural handstop.
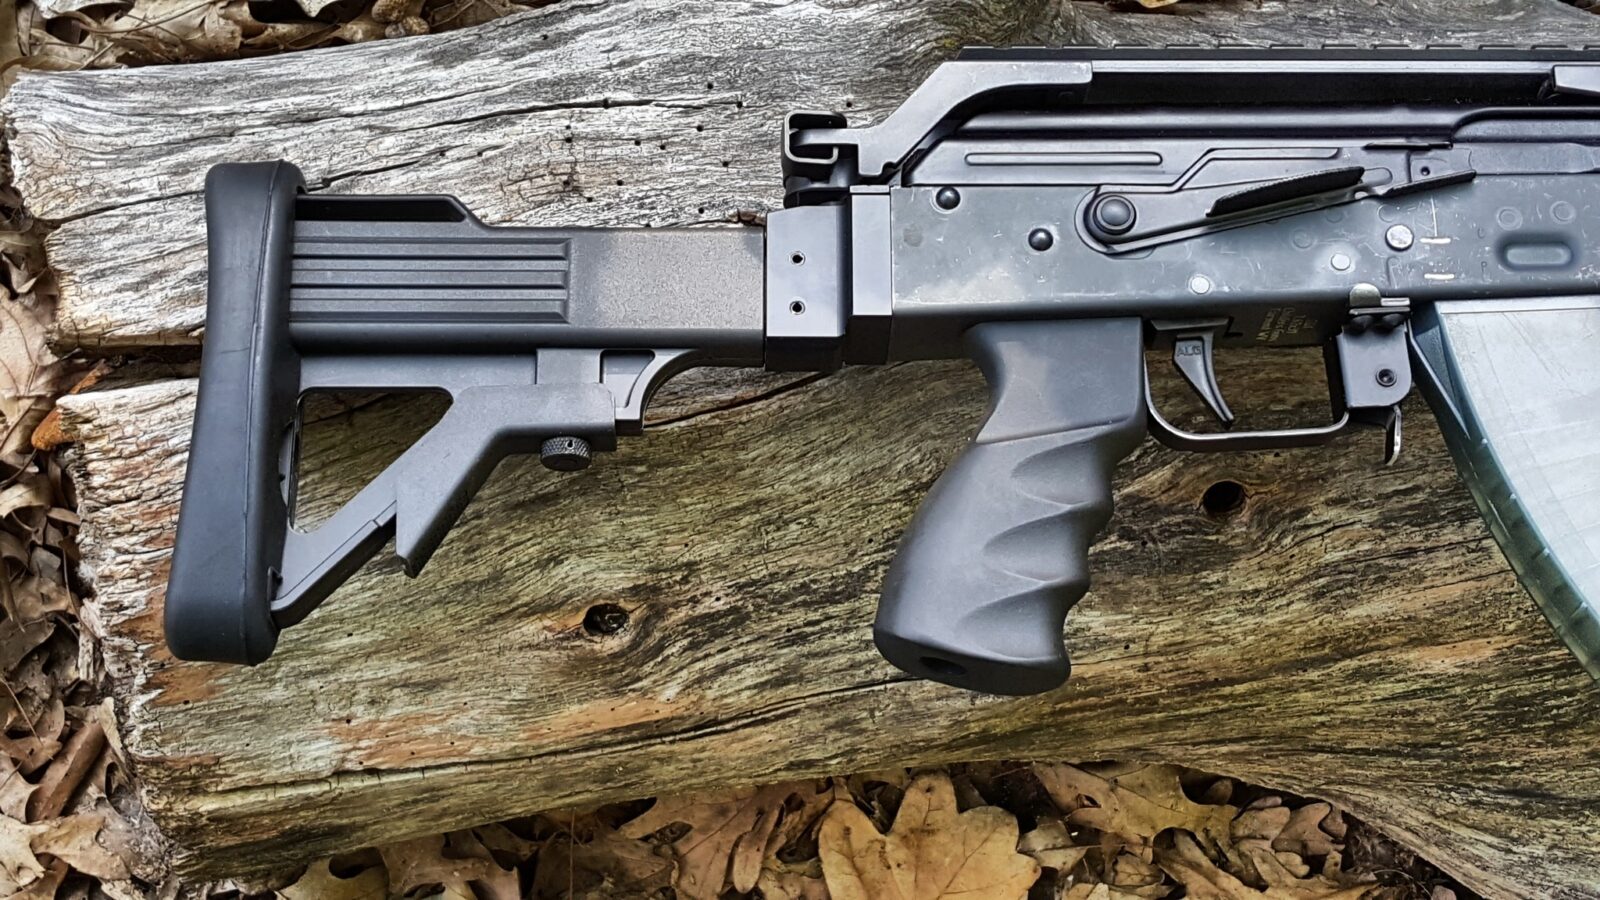
Now the buttstock definitely caught my eye. The Poles went through some different models. The first model I see with this collapsing stock is the kbs wz. 1996C Beryl. What I like is that it connects to the receiver the same as any other AK stock so I can change if I ever want to. On the con side, it rattles. I prefer telescoping stocks that are solid. It’s not the end of the world and I’ll live with it to have the unique buttstock.
The grip is our second generation Beryl model. The earlier model Beryls I saw had an AKM-ish looking grip. The first model I have seen with this type of grip is the kbs wz. 1996C Beryl.
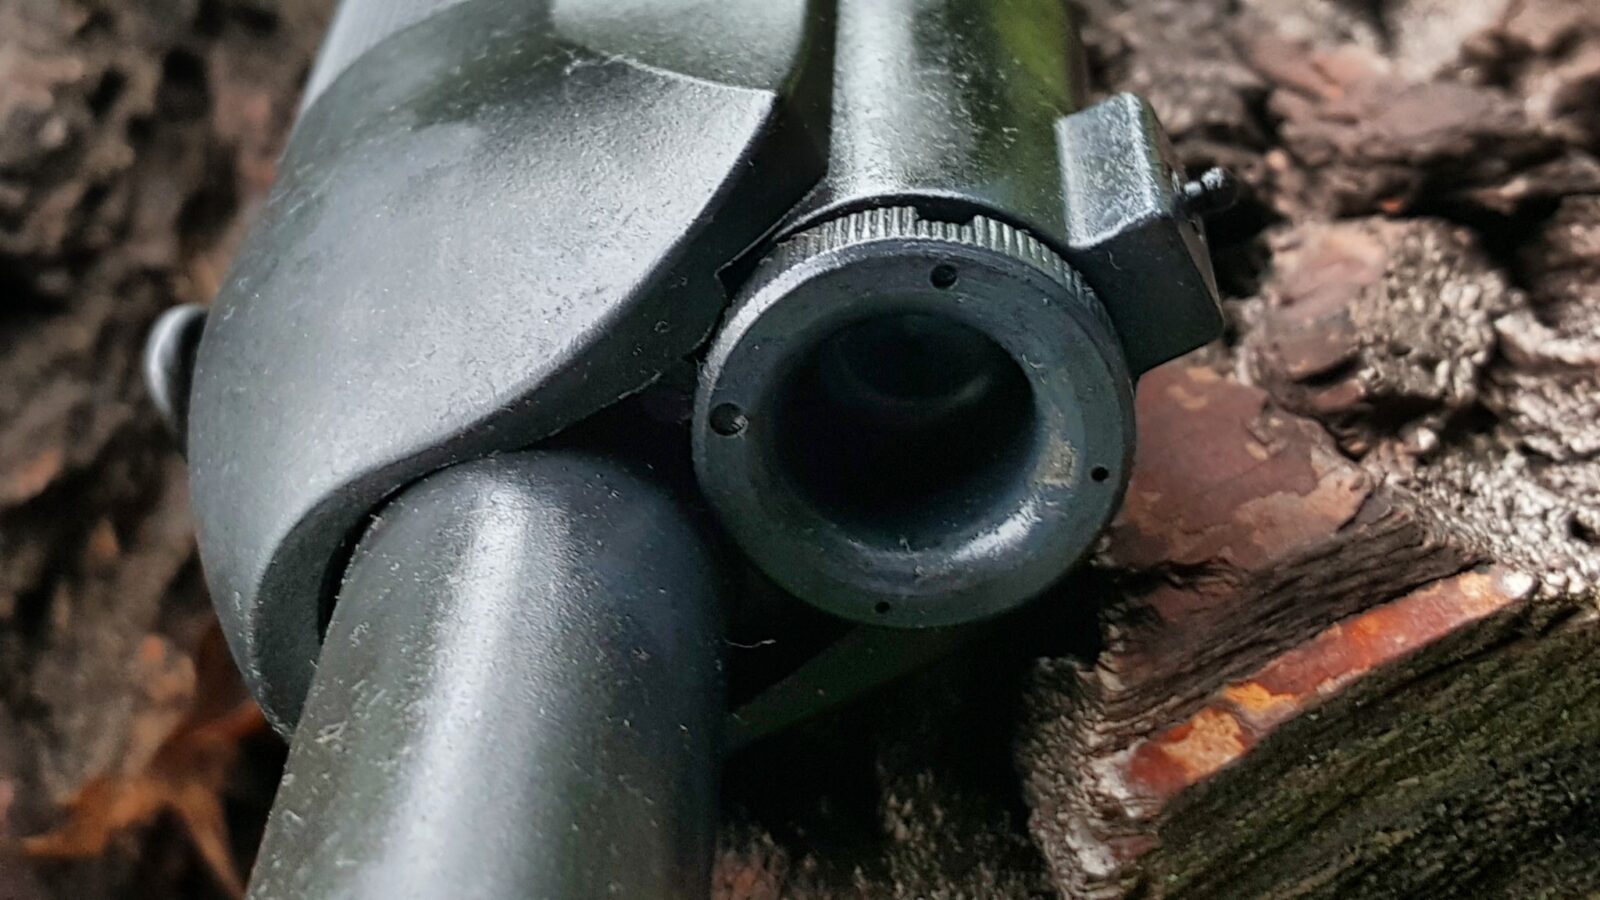
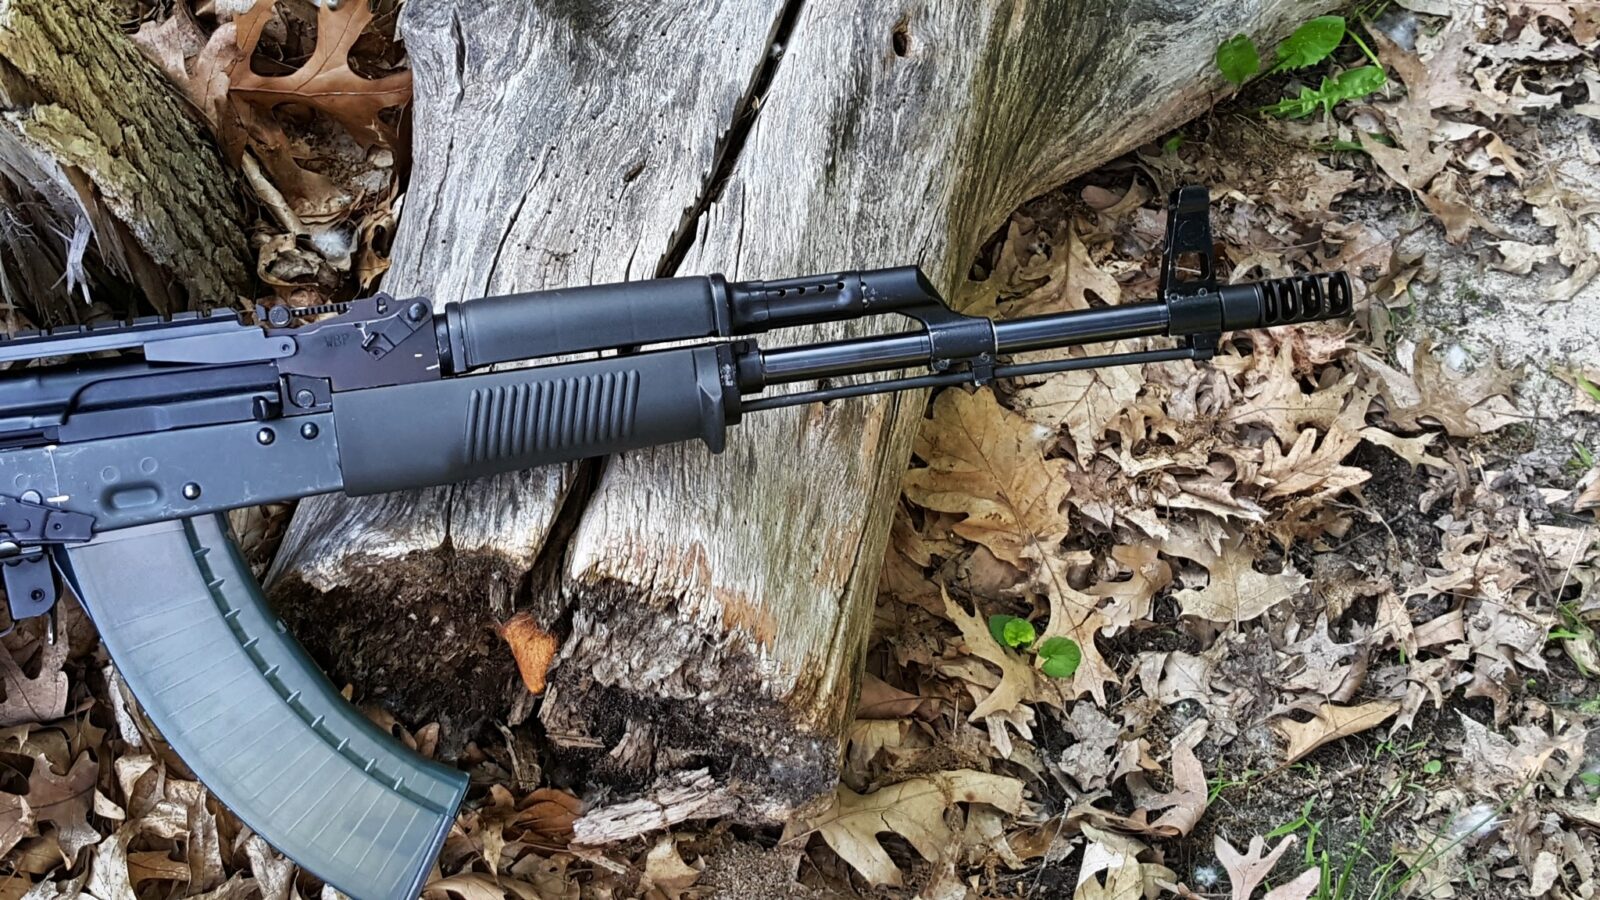
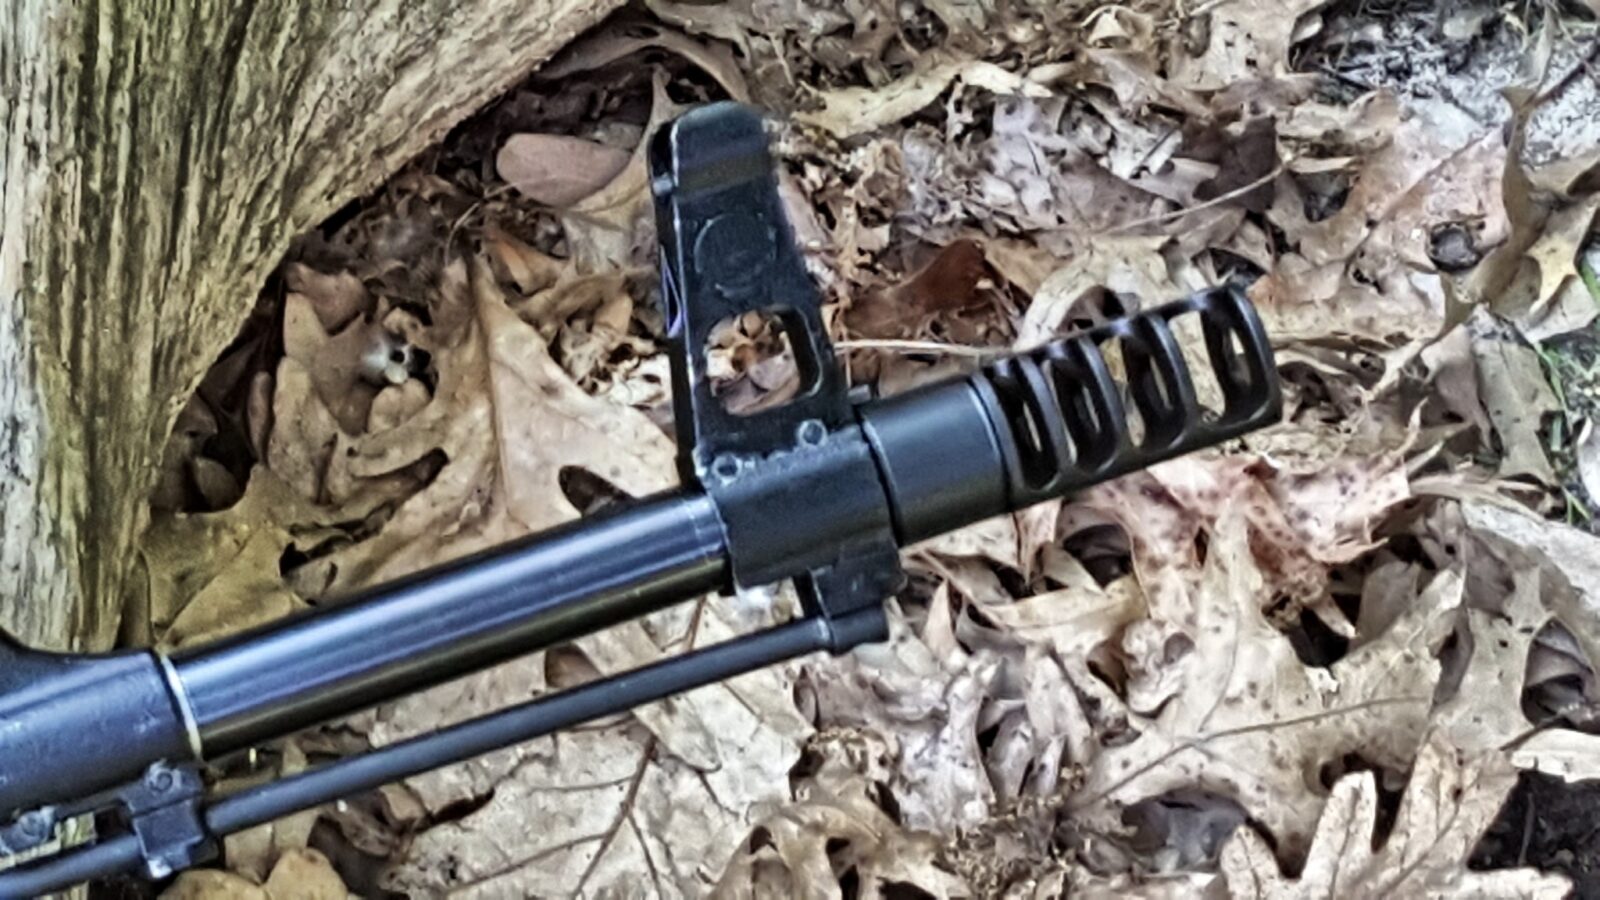
The Beryls were originally chambered in 5.56 NATO and have a unique brake. This rifle is in 7.62×39 so I had to take a departure and go with another brake. Justin McMillion of JMAC Customs makes some very cool effective brakes and ordered his RRD-4C “slim” brake. It looks and functions great.
Note – the Arms of America kit does not come with a cleaning rod so I ordered a Polish AKM rod from them and that is what you see in the photos.
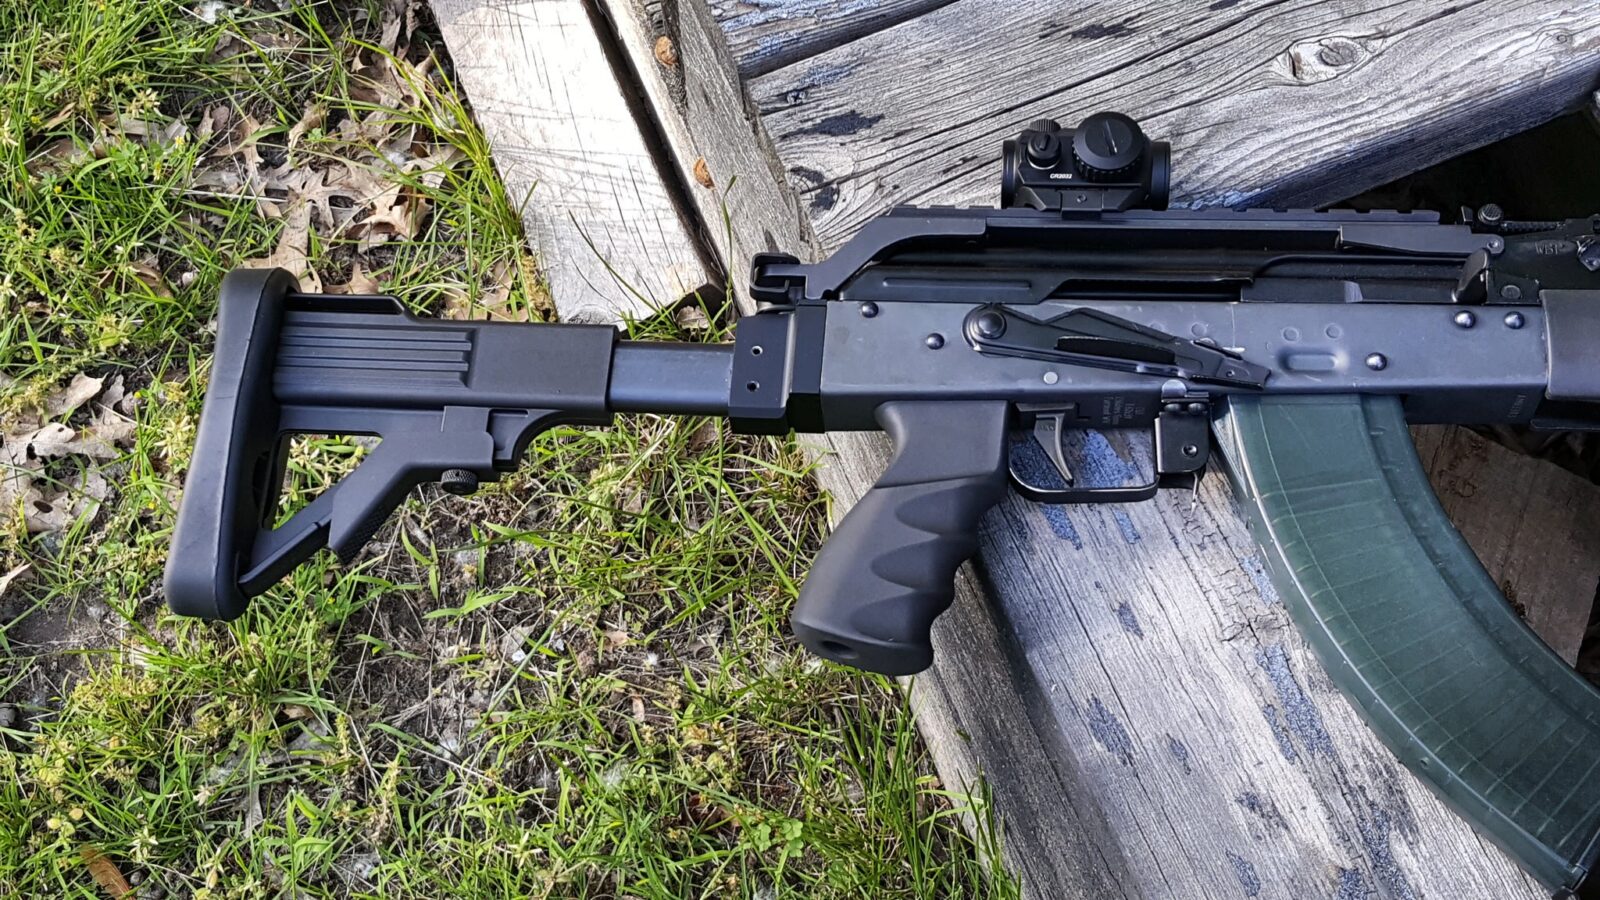
Vortex Crossfire Optic
To round things out, I went with a Vortex Crossfire red dot. I had a few reasons for doing this:
Vortex optics are solid
The red dot is only 2 MOA whereas some are 4 and can obscure a small target
It can sit right down on the rail and be closer to the bore than some red dots
I removed the riser, used some blue medium Loc-Tite on the screws to hold low-rise plate in place and installed it on the rifle.
I used a laser boresighter to sight in the Crossfire plus I lubricated everything and took it to the range with by buddy Niko.
Range Results
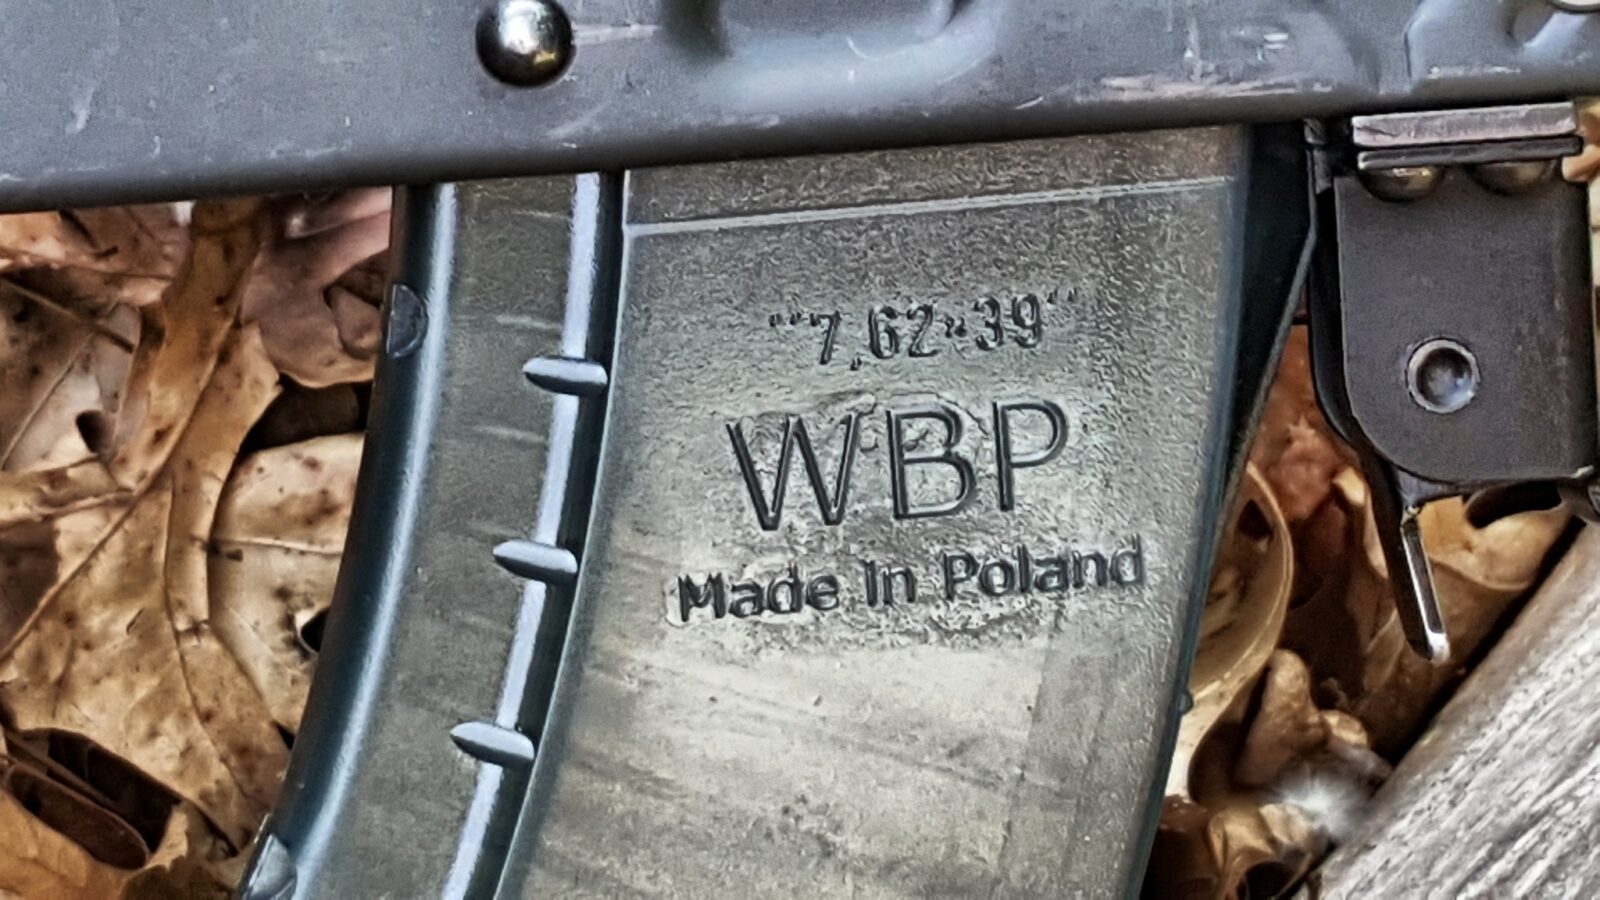
The rifle ran superbly. I did find that I need to tune the mag catch a bit to work with steel magazines. It works just fine with the WBP polymer mags you see in the photos and they have a noticeably thinner tab than my steel mags.
A fellow asked me how well the RRD-4C brake works and this video is of Niko shooting at targets – you can see how little the 7.62×39 Golden Tiger ammo is recoiling.
As it stands right this minute, I think this is both my most accurate AK and reliability has been exceptional. So, I still need to parkerize it and finish it but that needs to wait as I have a few other projects I want to line up and do them all at once.
Here’s how the rifle looks right now:
If you find this post useful, please share the link on Facebook, with your friends, etc. Your support is much appreciated and if you have any feedback, please email me at in**@*********ps.com. Please note that for links to other websites, I may be paid via an affiliate program such as Avantlink, Impact, Amazon and eBay.
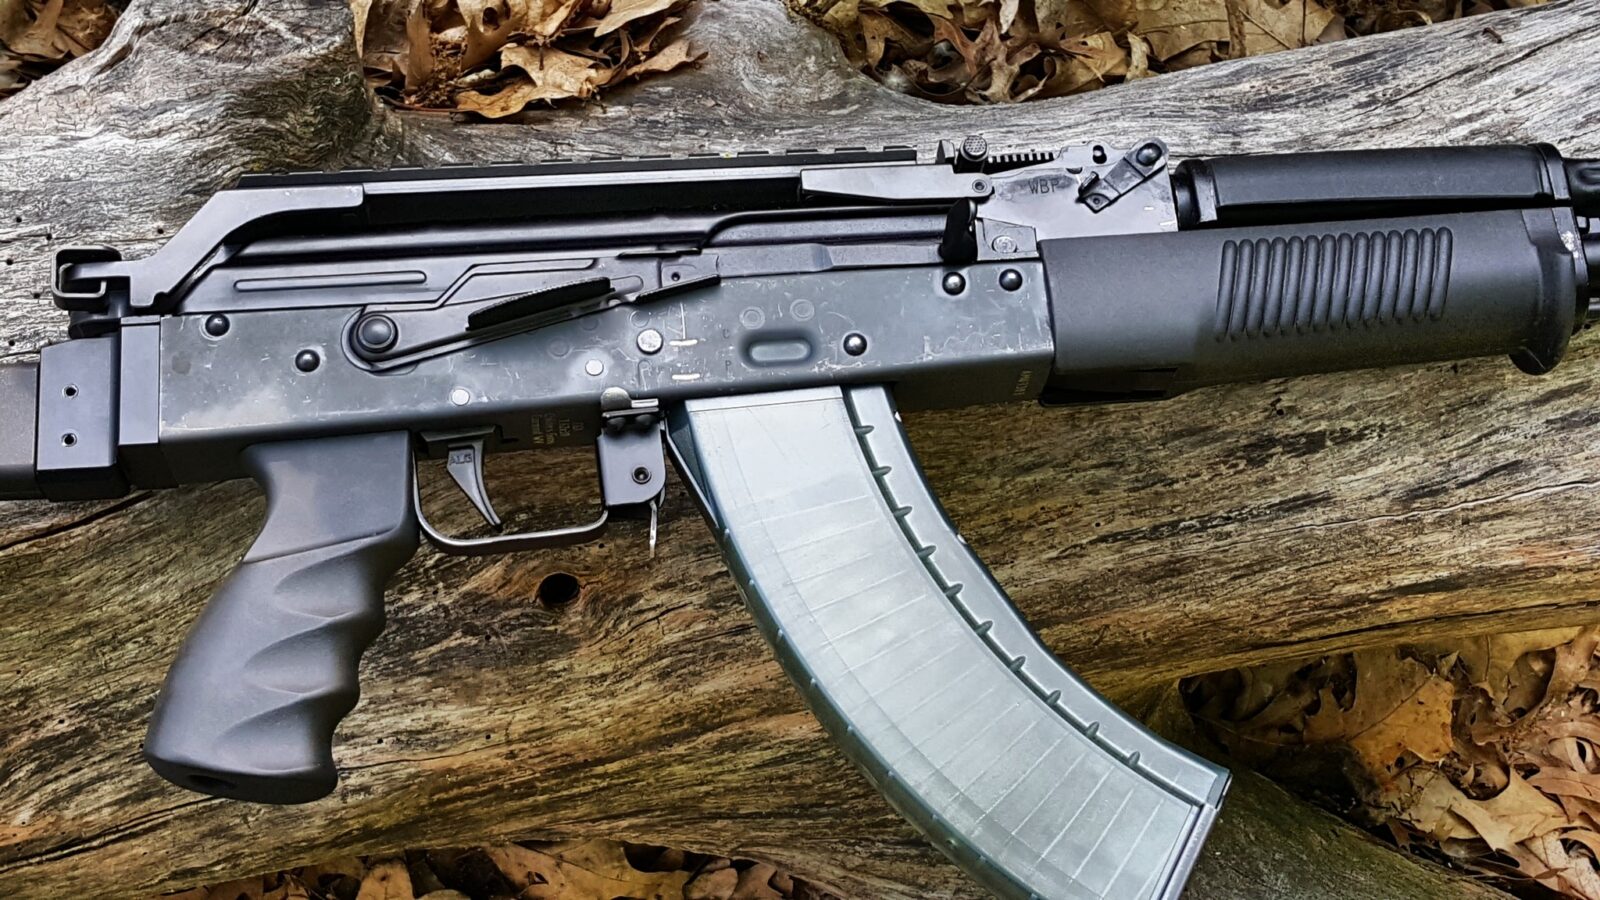
With the 7.62×39 Polish Beryl inspired rifle otherwise complete, it was time to install the fire control group, optics rail and the furniture. This post will focus on these elements.
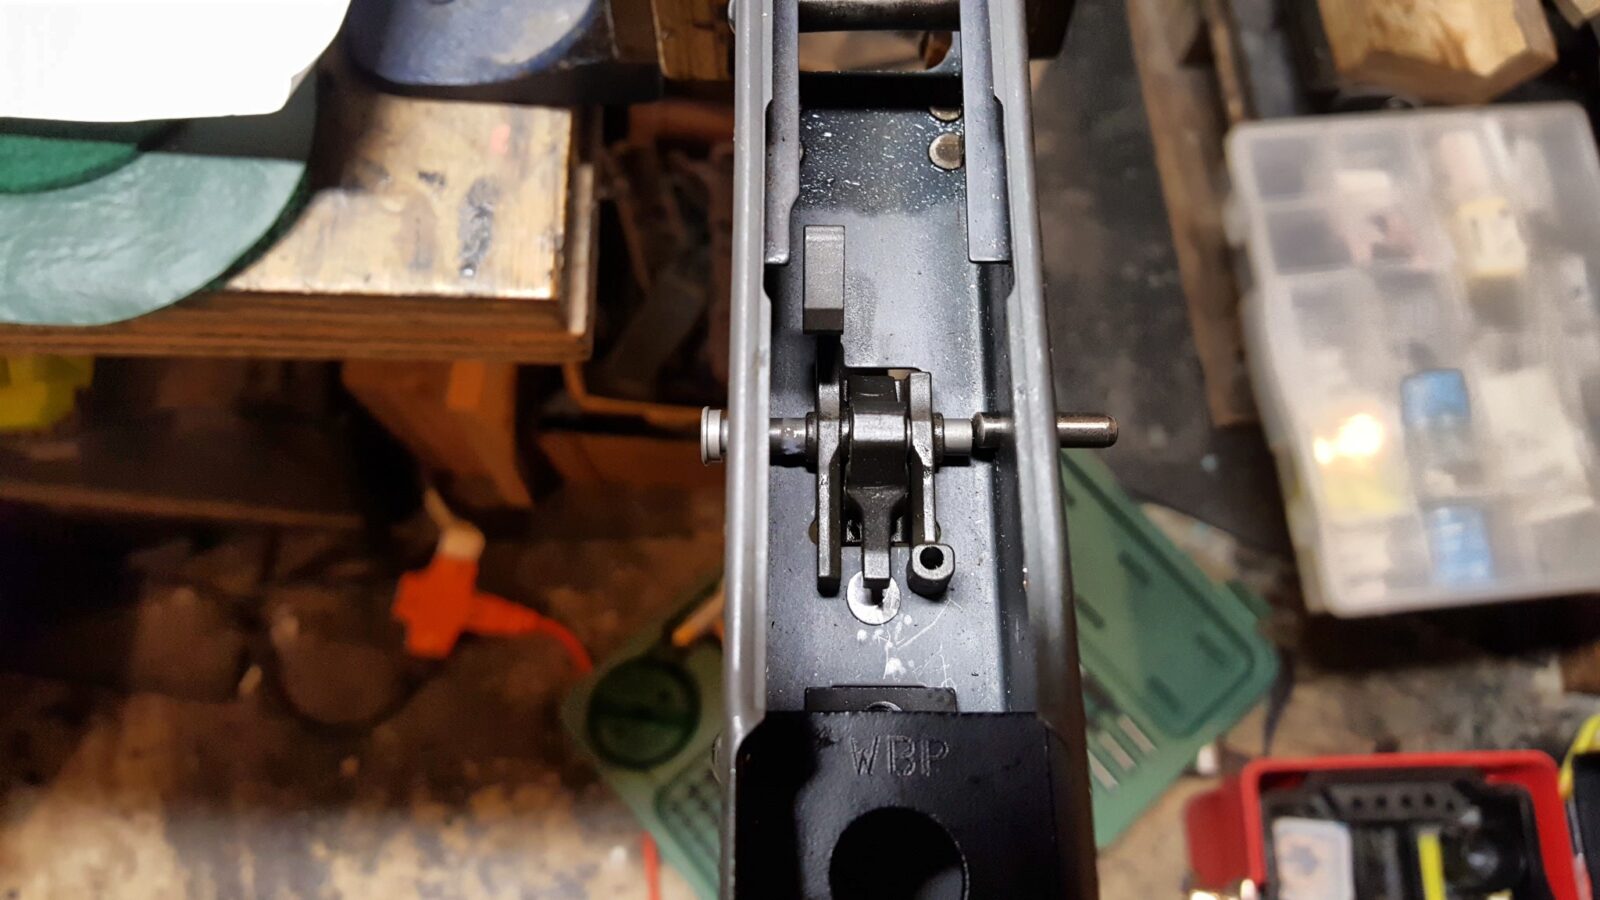
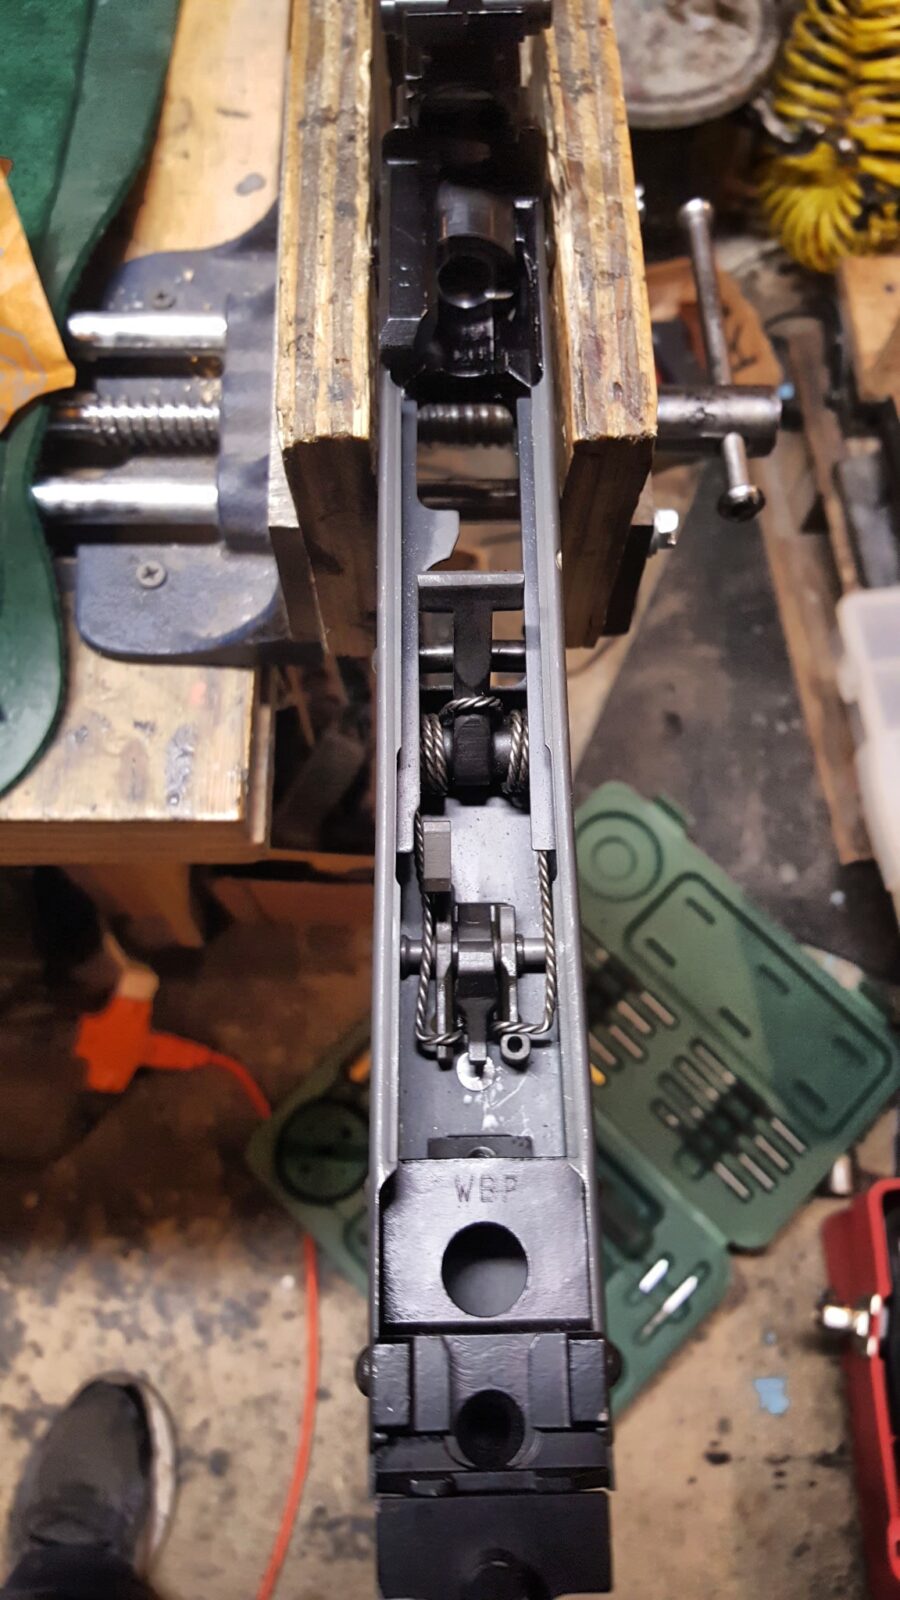
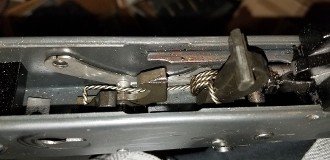
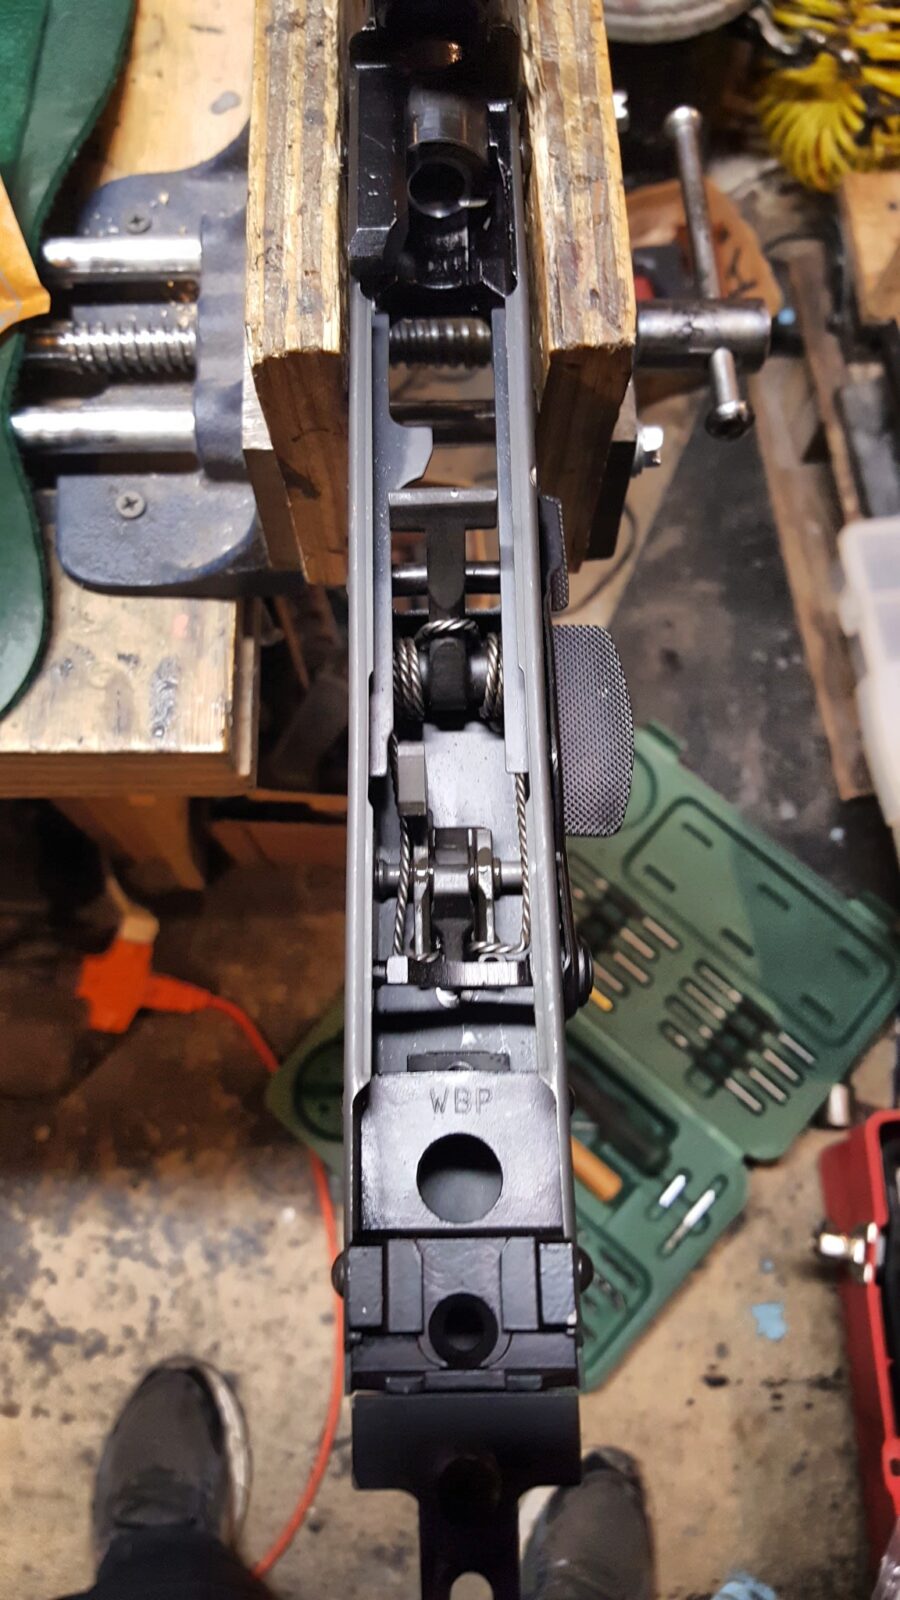
The Fire Control Group (FCG)
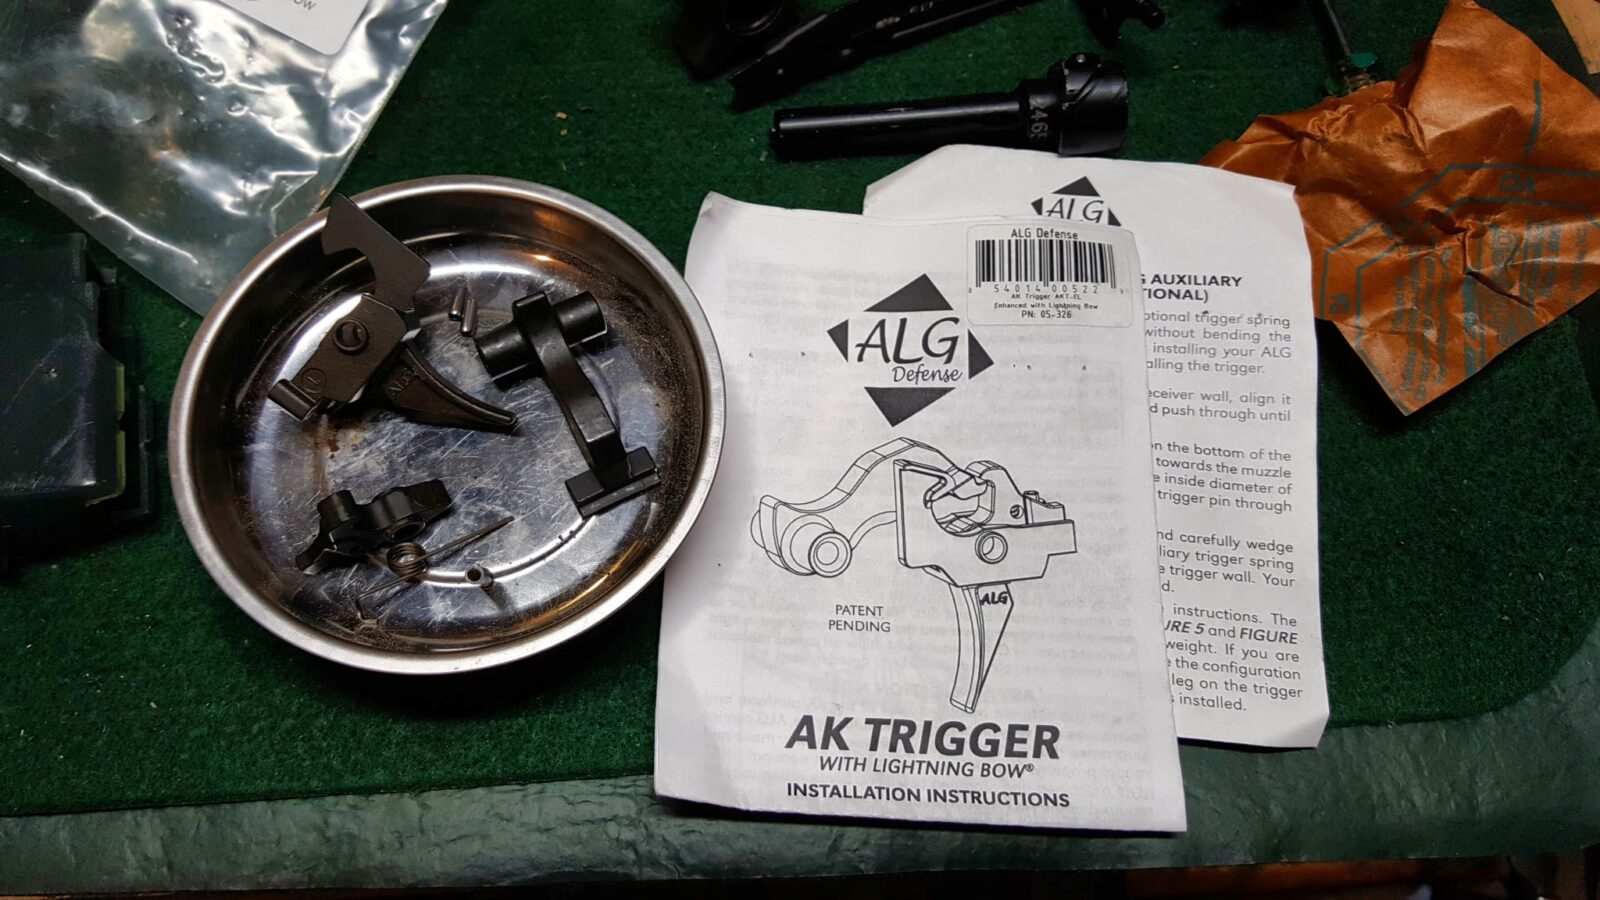
For some time now I have heard how good the ALG triggers are. I have grown very accustomed to Tapco G2 triggers over the years and know how to tune them but reports were coming in about their not being in accordance with Russian design specifications so this prompted me to try the ALG AK Trigger with Lightning Bow (AKT-EL).
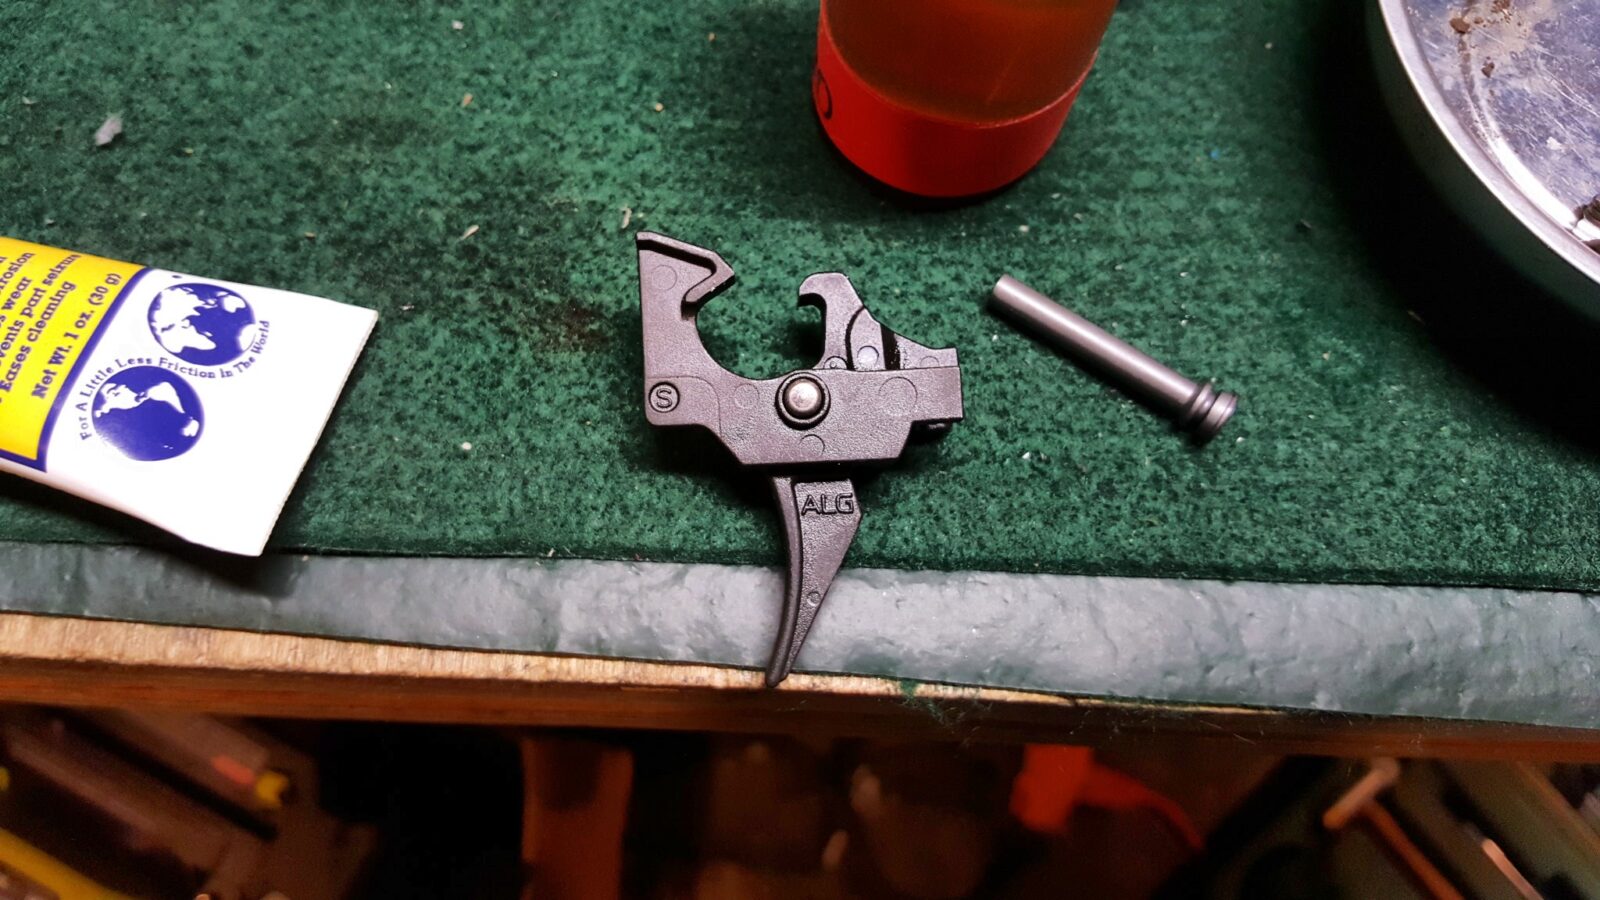
The trigger comes with a spring booster if you want a heavier pull but I wanted the lighter pull. Wow – this trigger blew me away. It installed the same as any other AK trigger.
I would recommend something to them and to you though – make a quick slave pin or capture pin that you can use to assemble the trigger assembly outside of the rifle, lower it in and then press it out of the way when you install the actual pin. In my opinion, ALG should supply one with their trigger but you can make one from an old trigger pin, an old drill shank, whatever.
6/29/23 – We do make and sell AK trigger slave pins in case you would like to buy one – please click here.
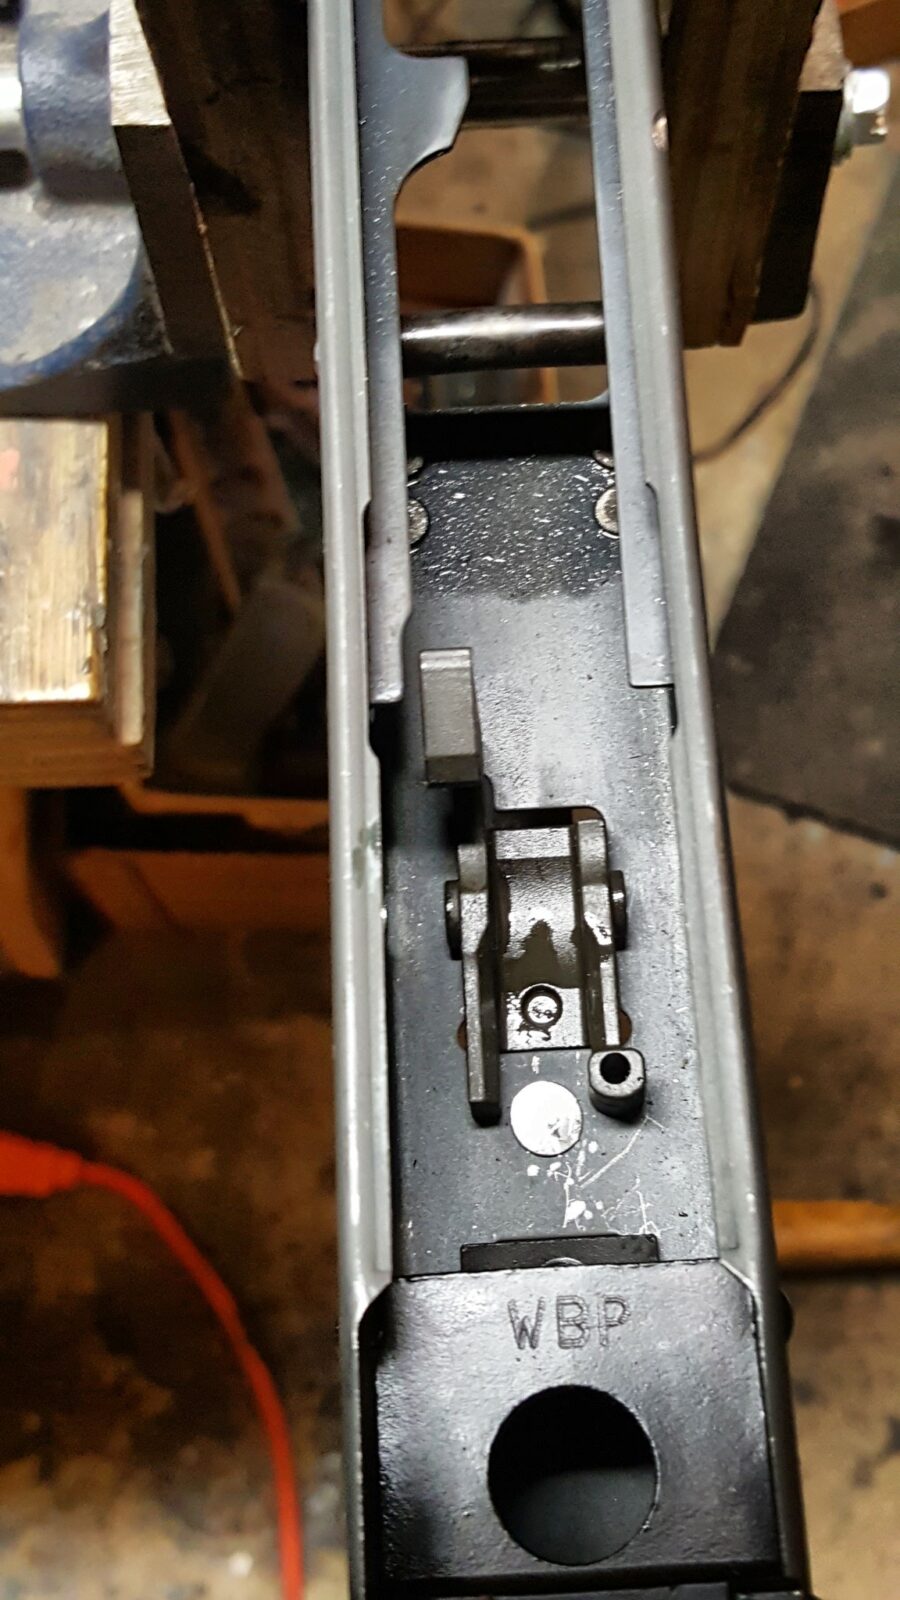
I didn’t even polish the FCG and just inserted it as-is. Seriously, I will never go back to Tapco. These ALGs are wickedly good.
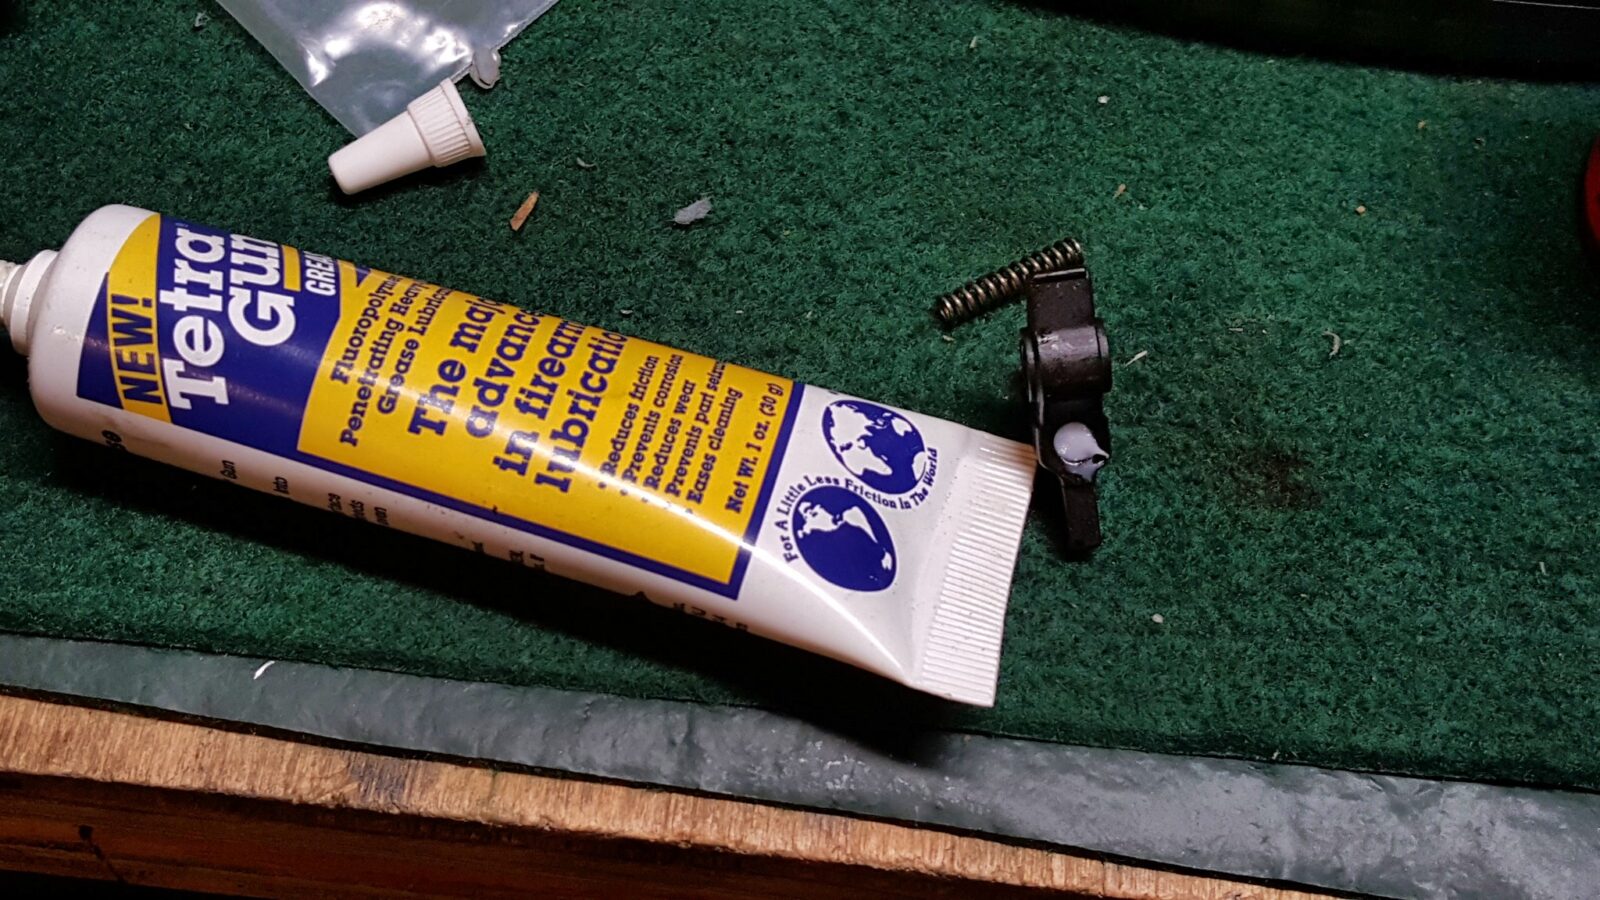
I do not like the original shepherd hook wire for securing the FCG pins and instead now use our American made properly dimensioned AK fire control retainer plate. Click here for the page in our store.
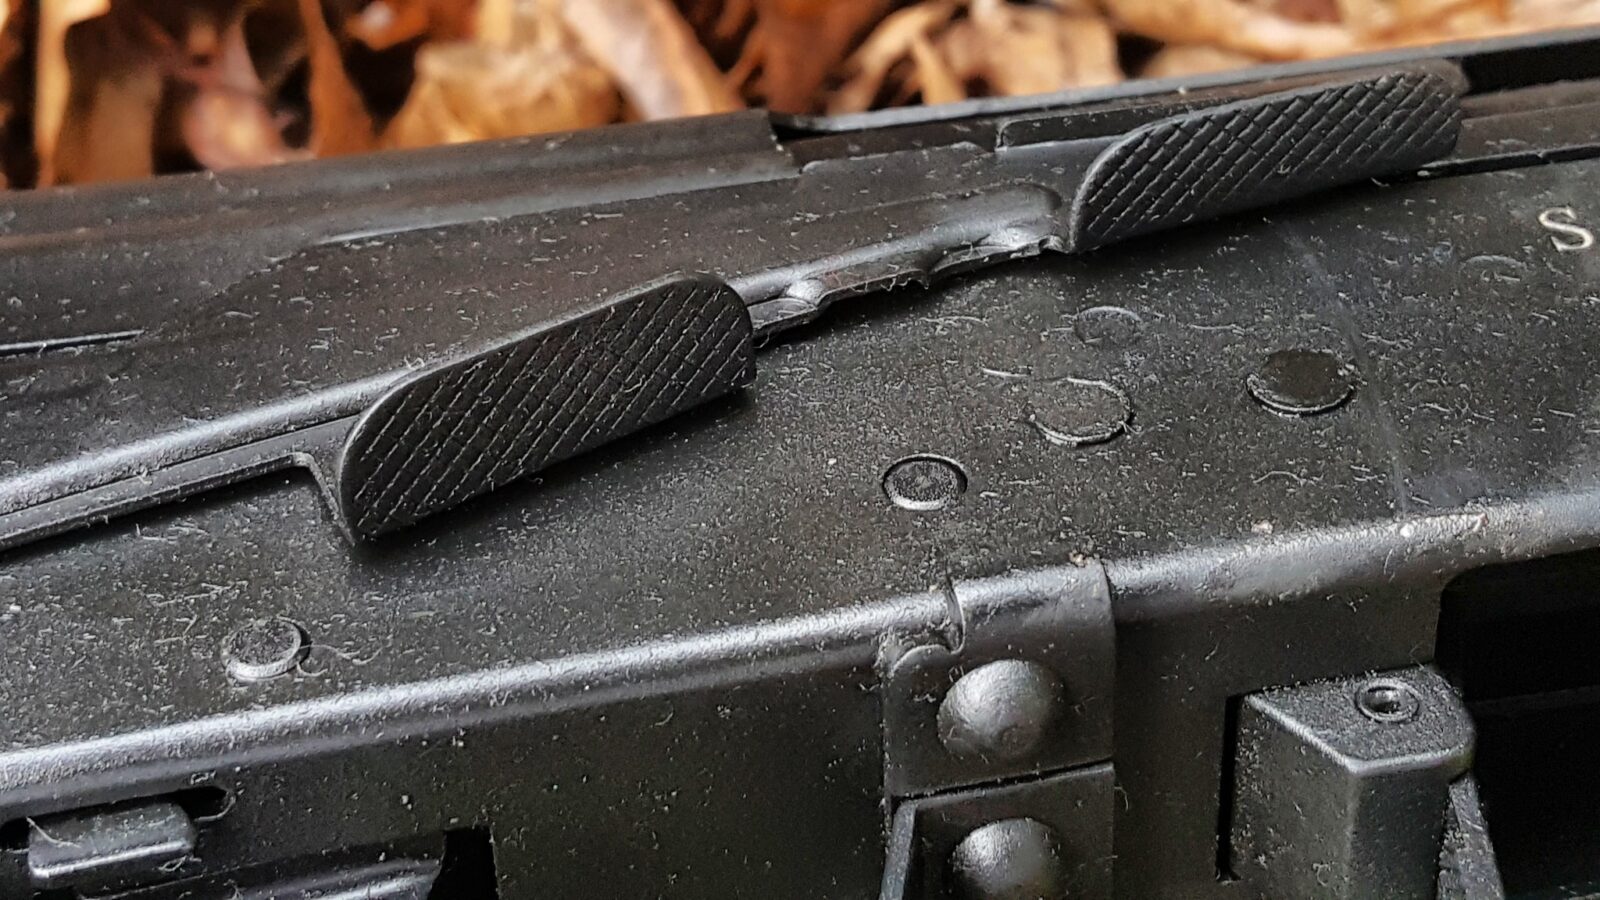
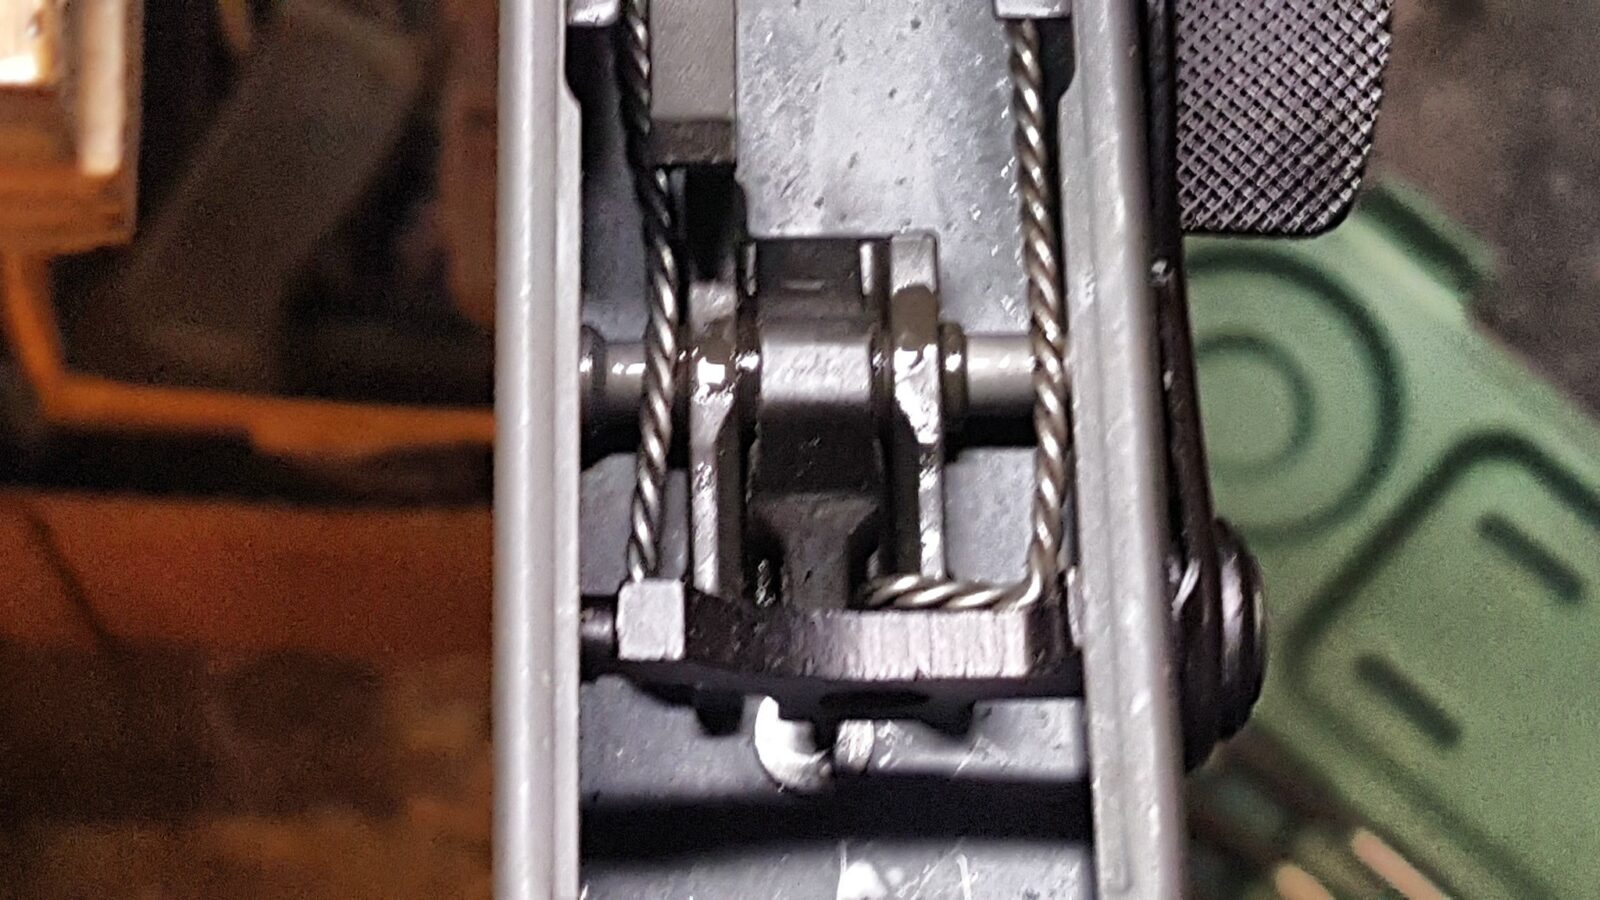
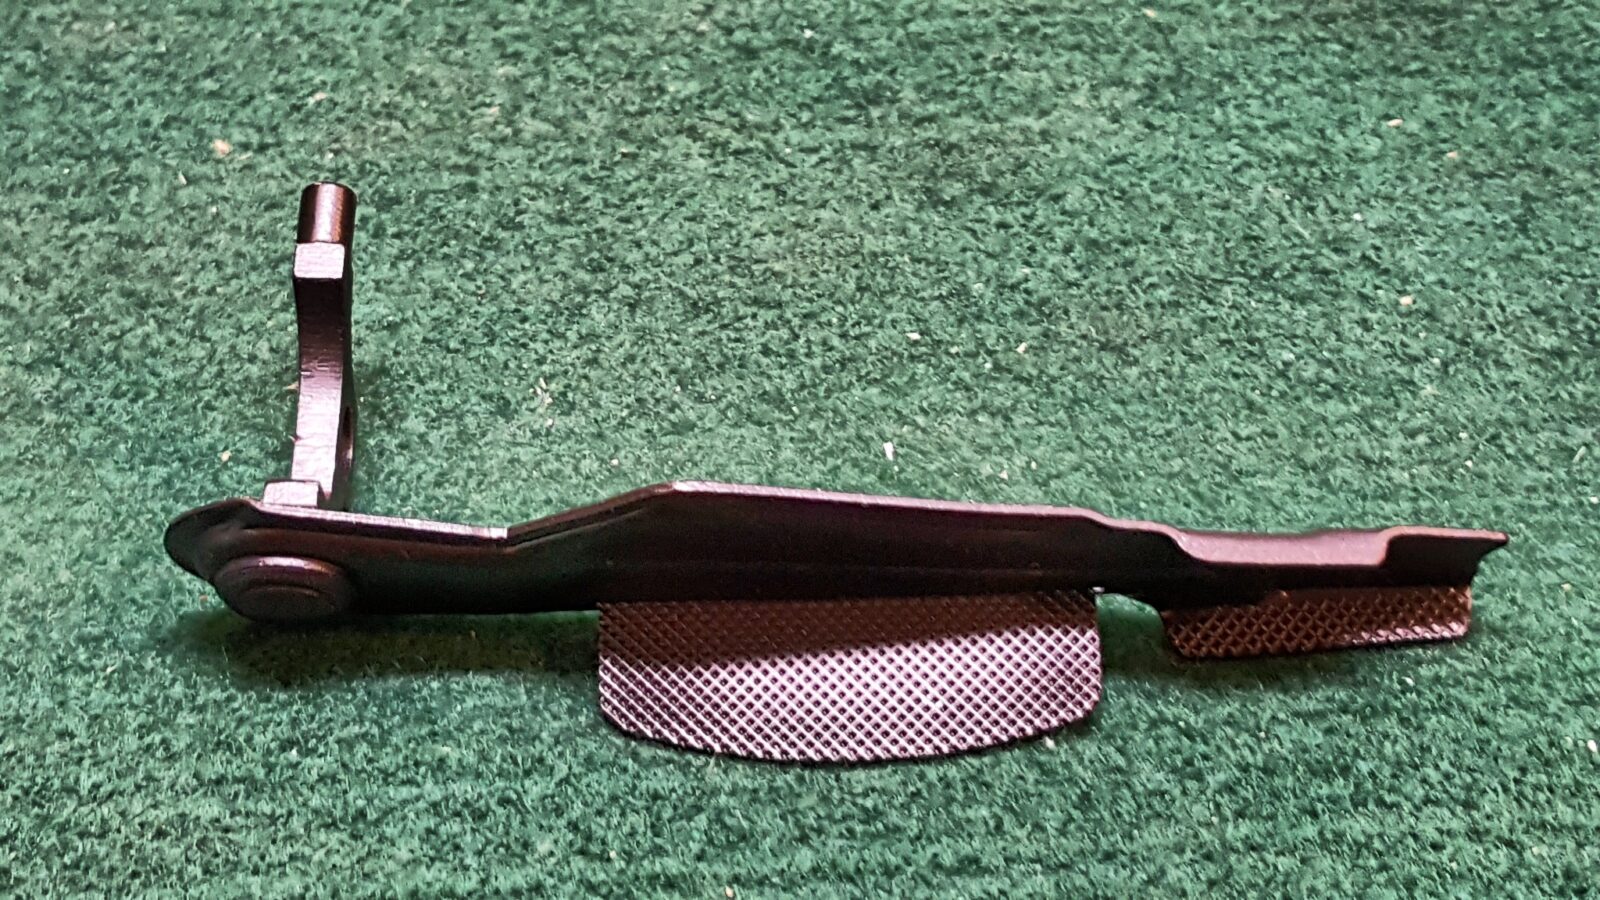
In the next photos you can see the giant over-sized selector lever. It drives me nuts and will either get ground down or replace by a standard AKM lever. It’s totally up to you but I will not buy the extended mag release and selector lever again – they just are not my preference.
At this point I installed one of our new Polish Beryl grips as well. They Beryl uses the typical grip nut that uses a 6mm diameter 1.0mm pitch grip screw.
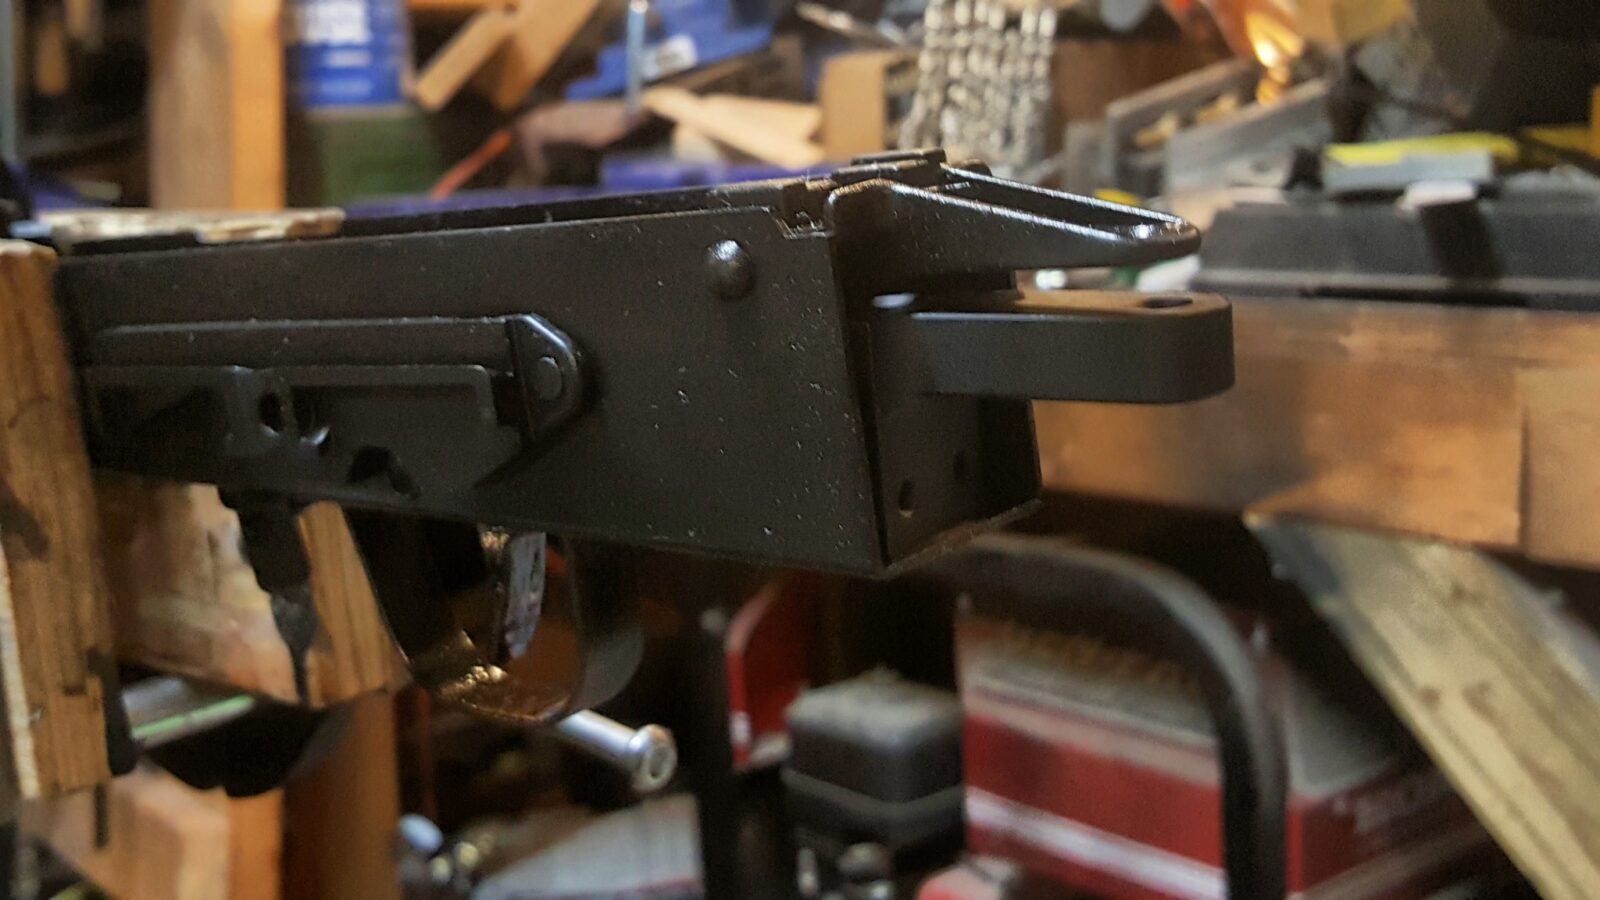
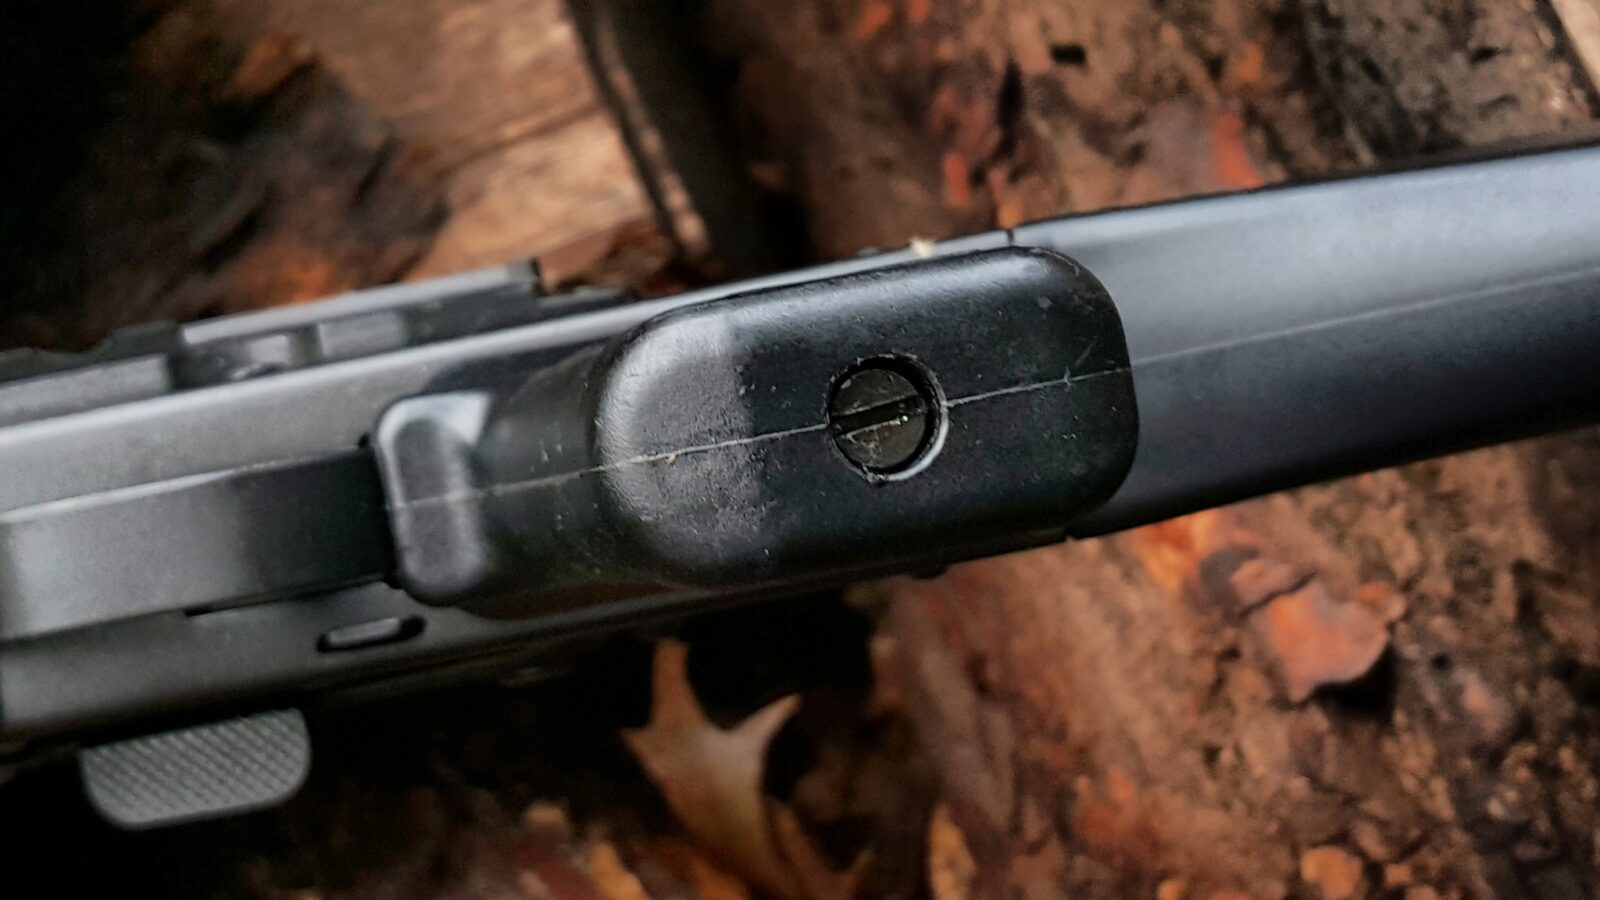
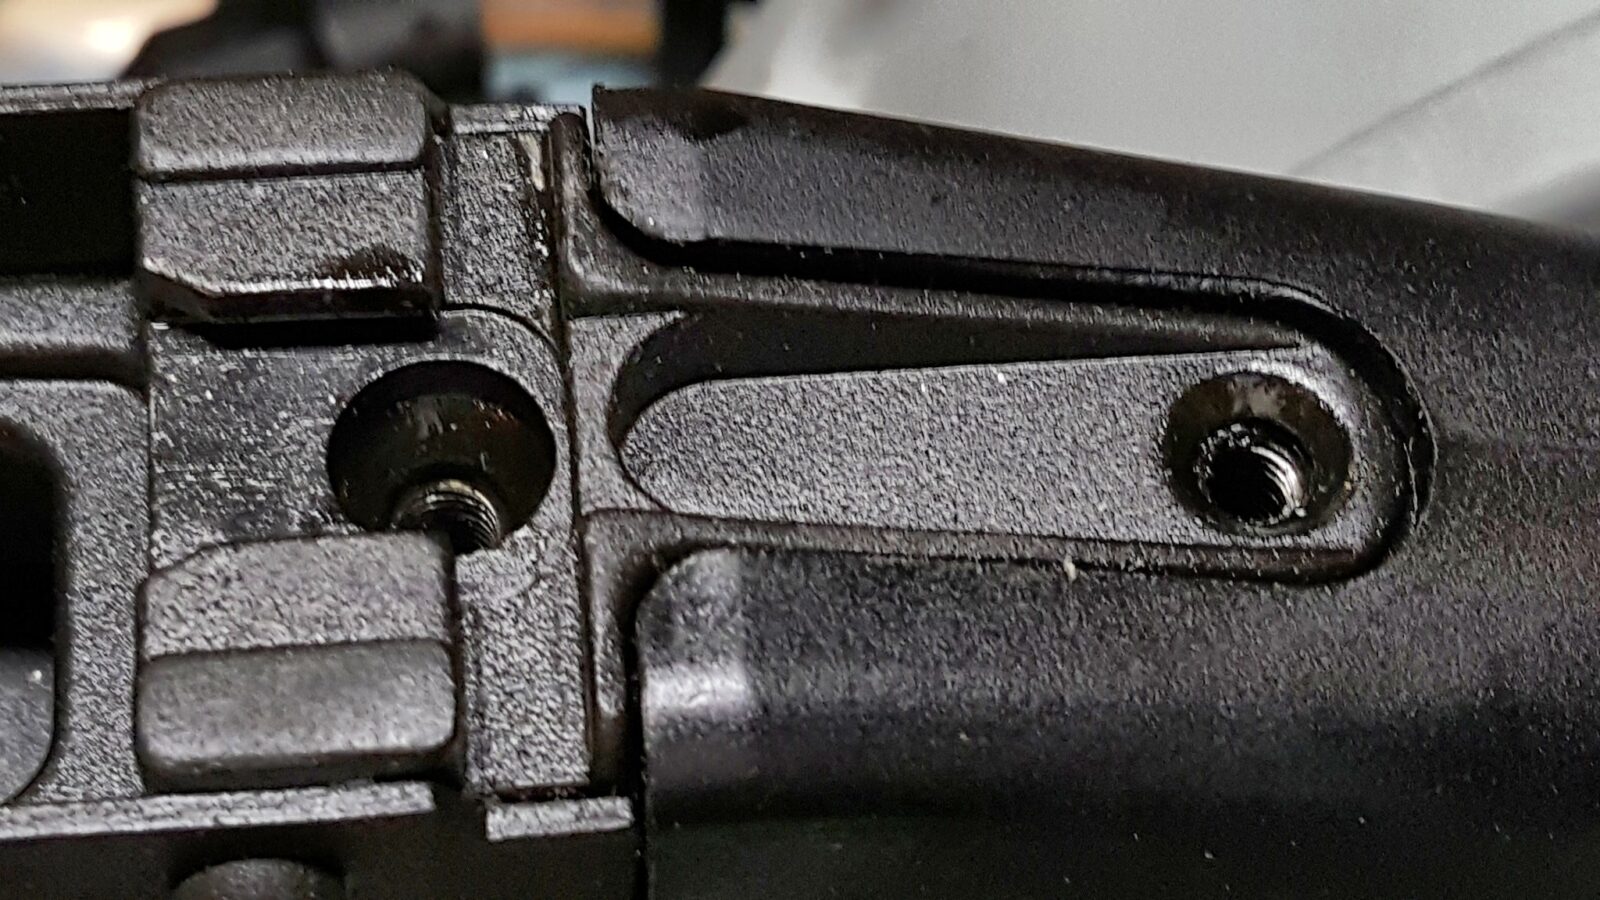
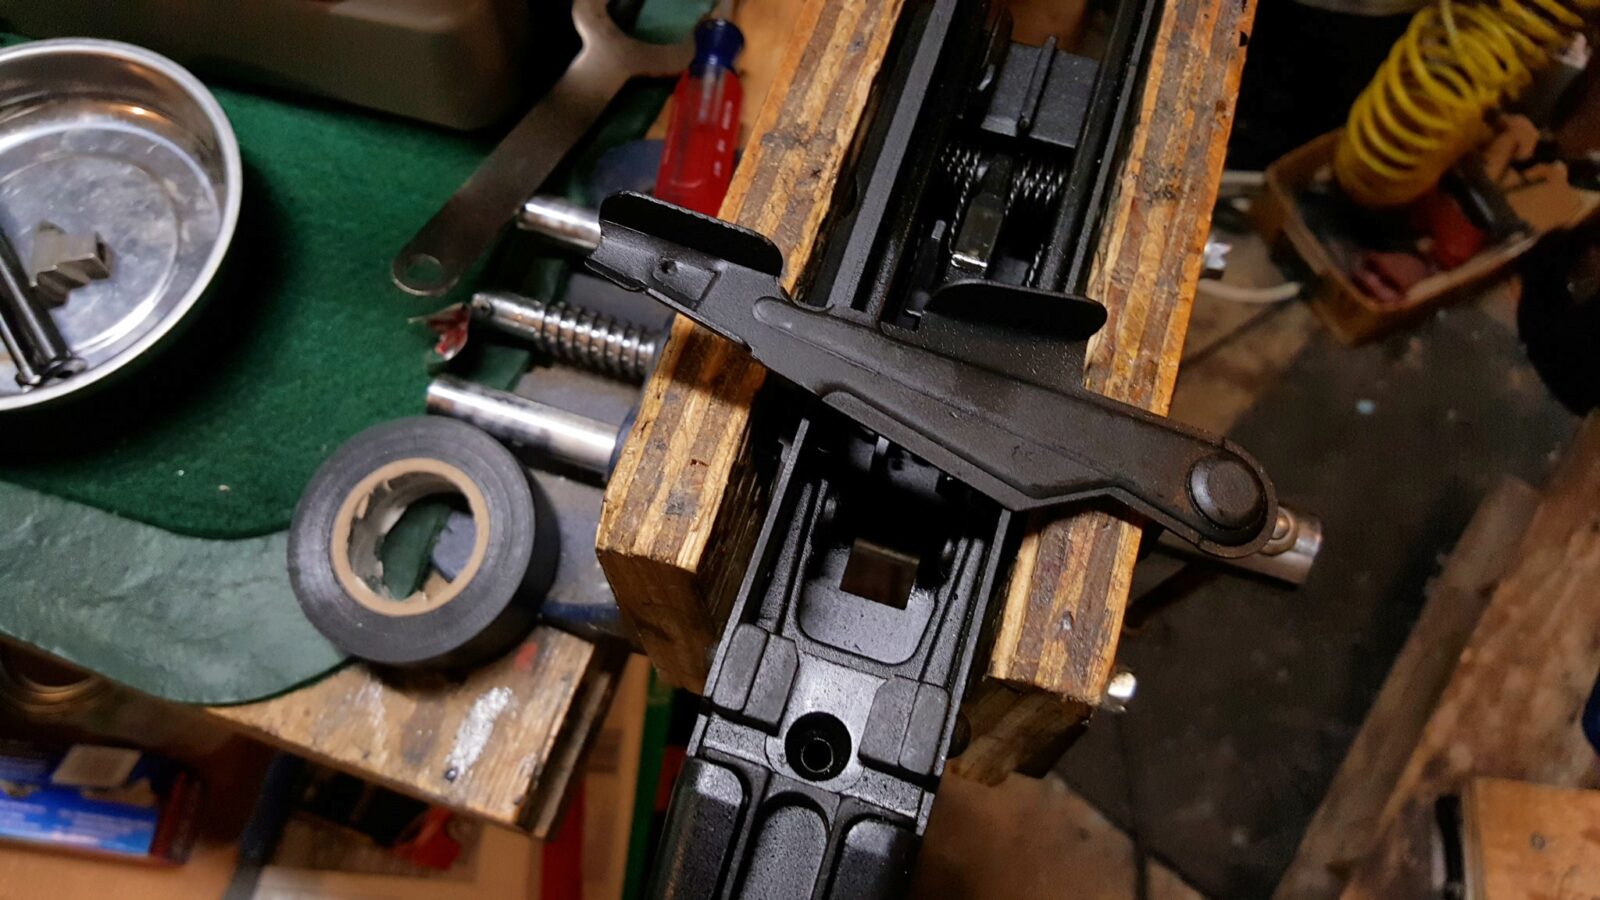
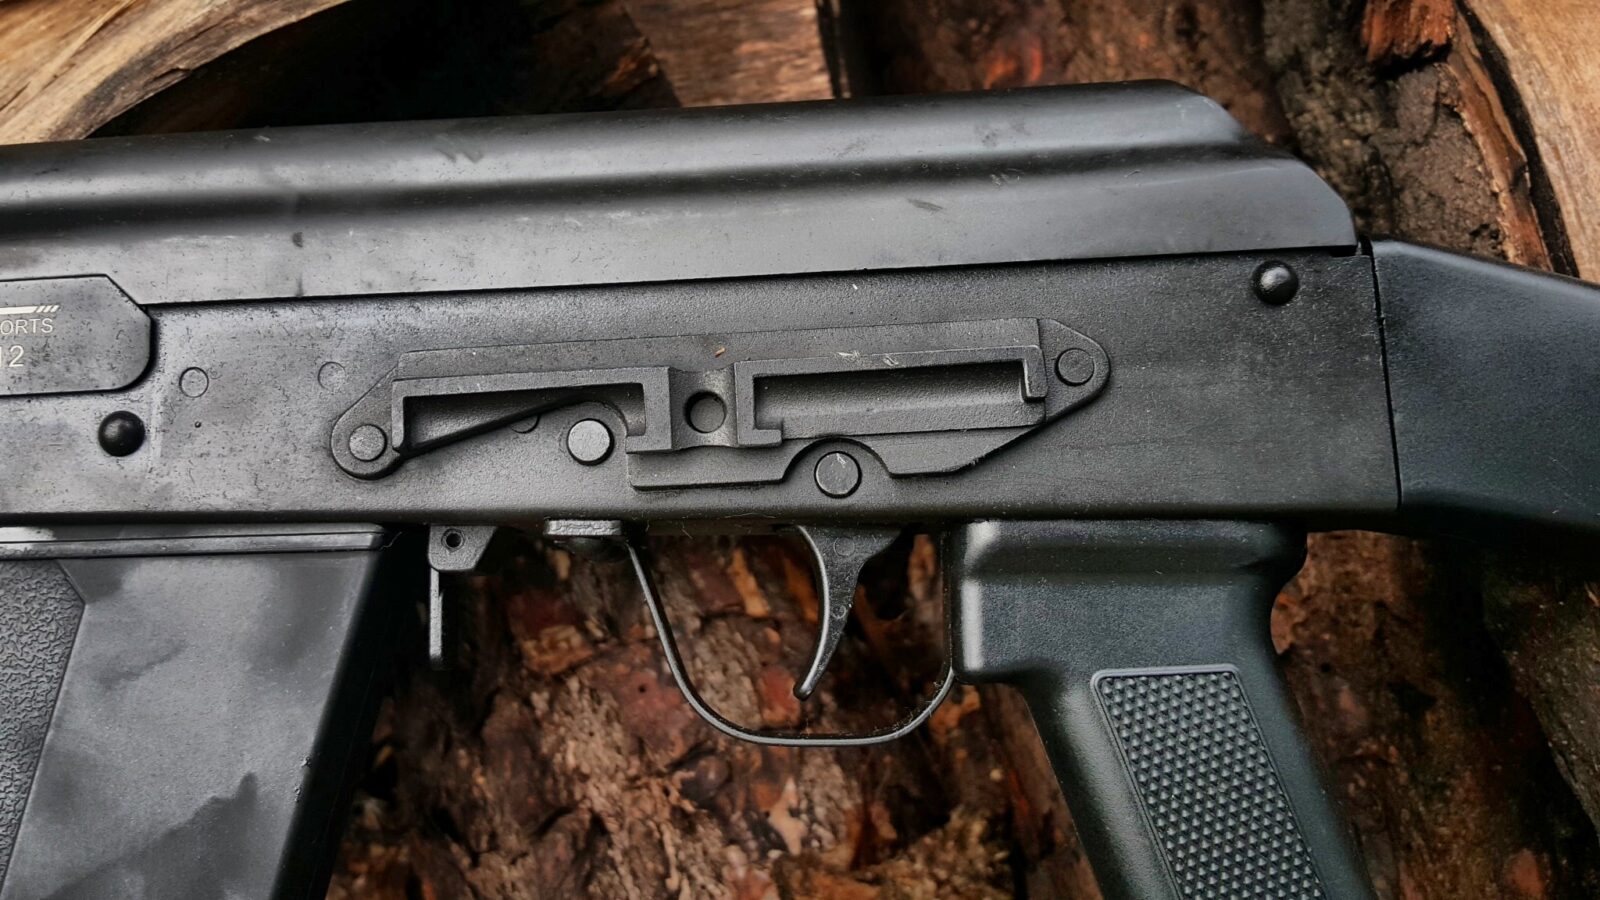
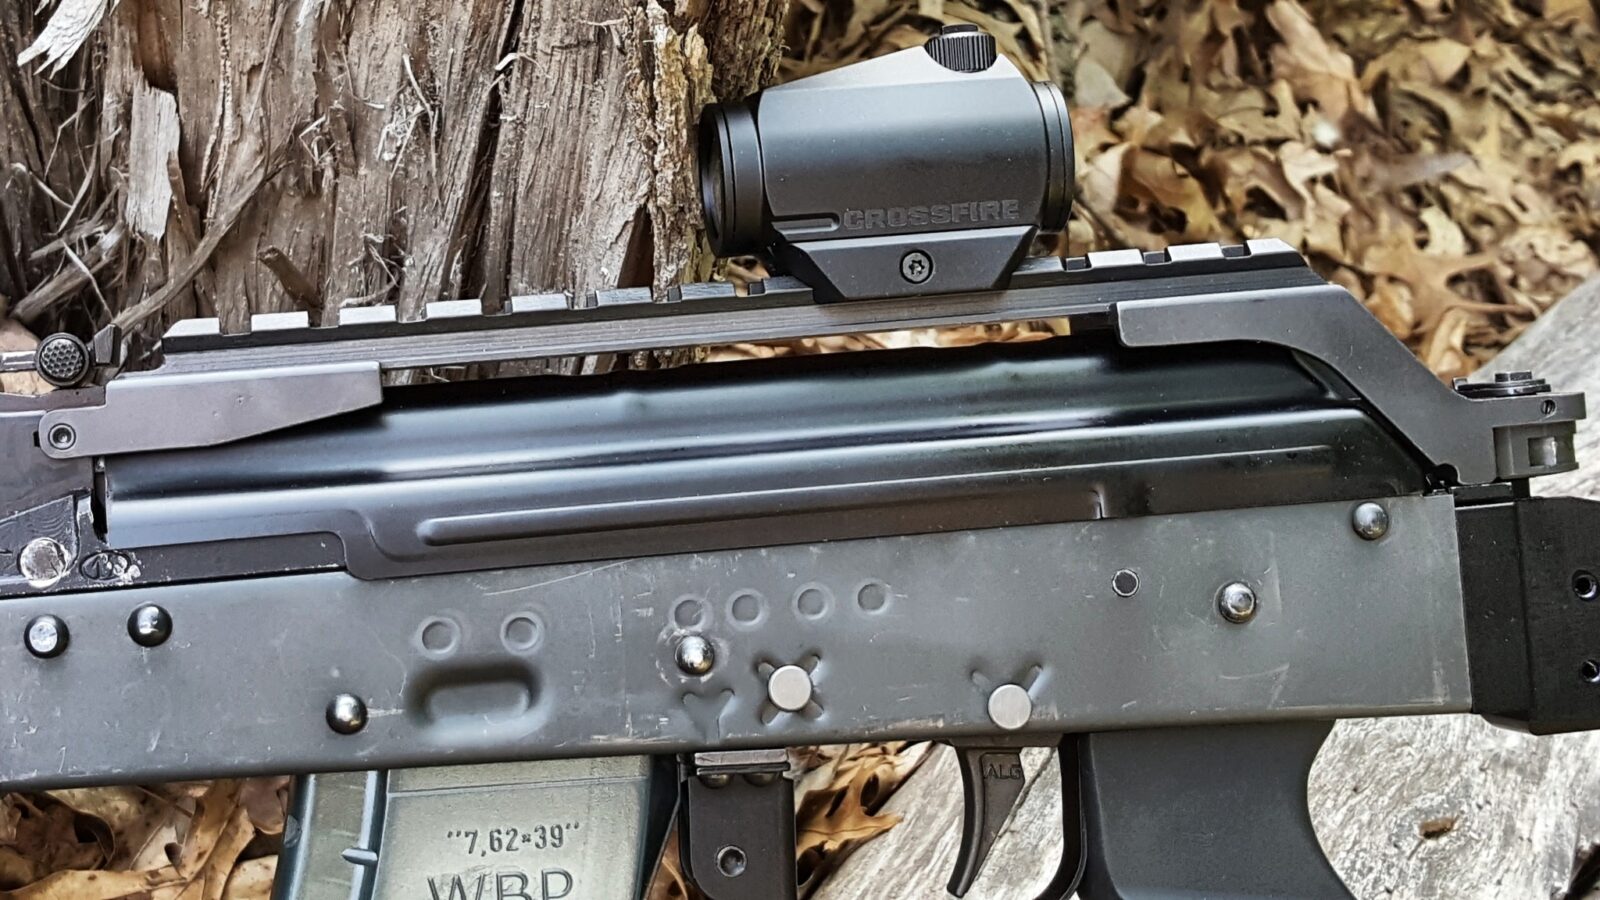
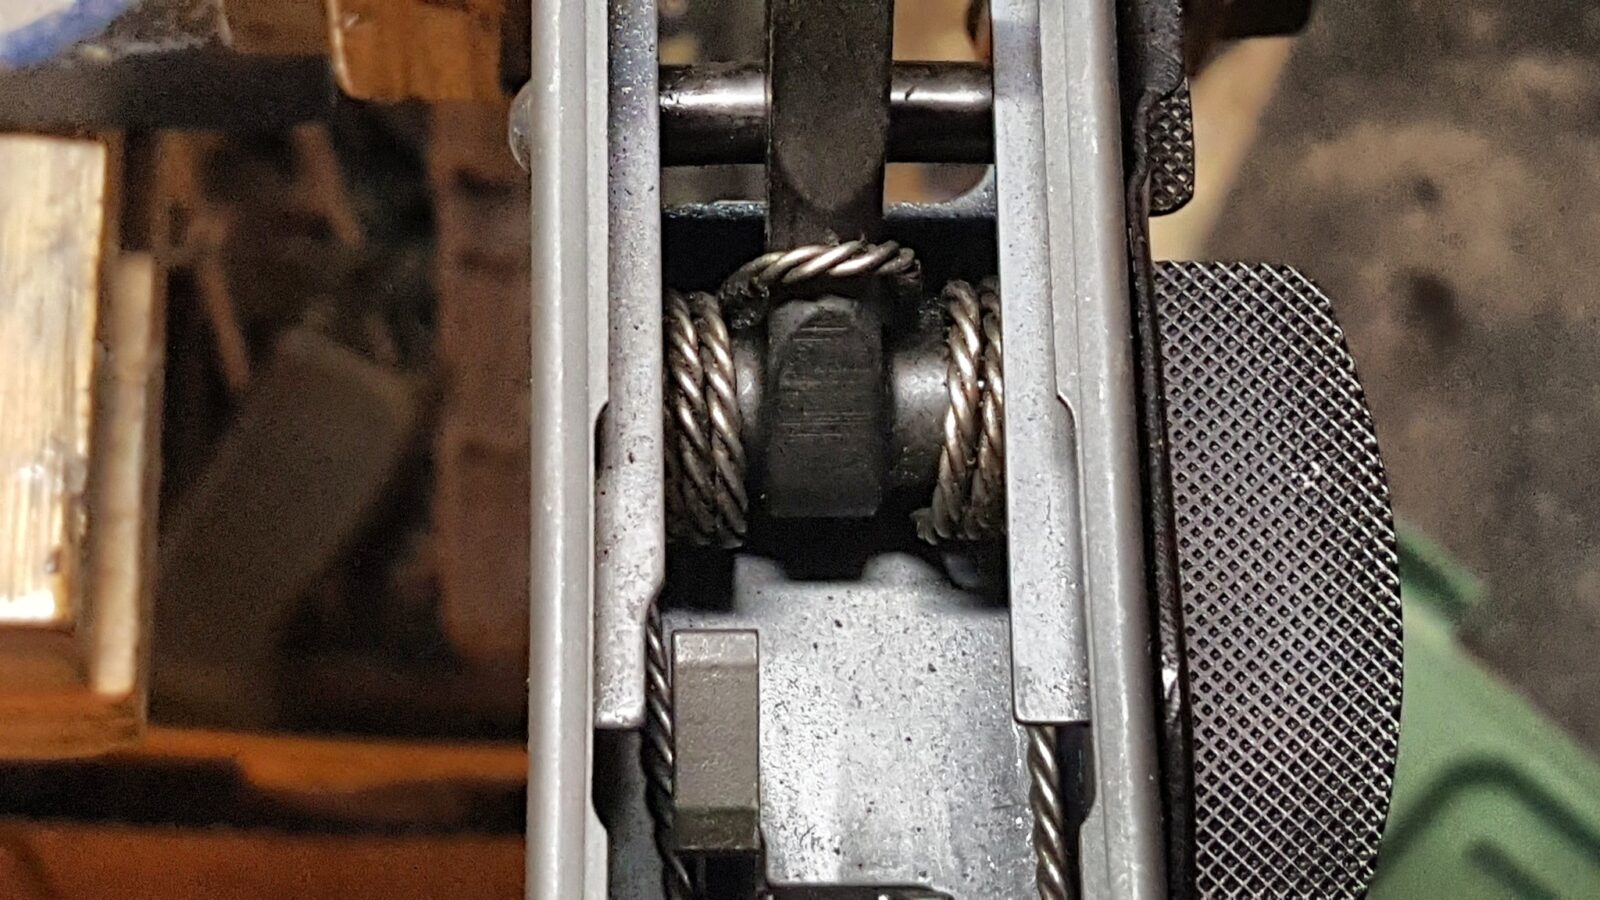
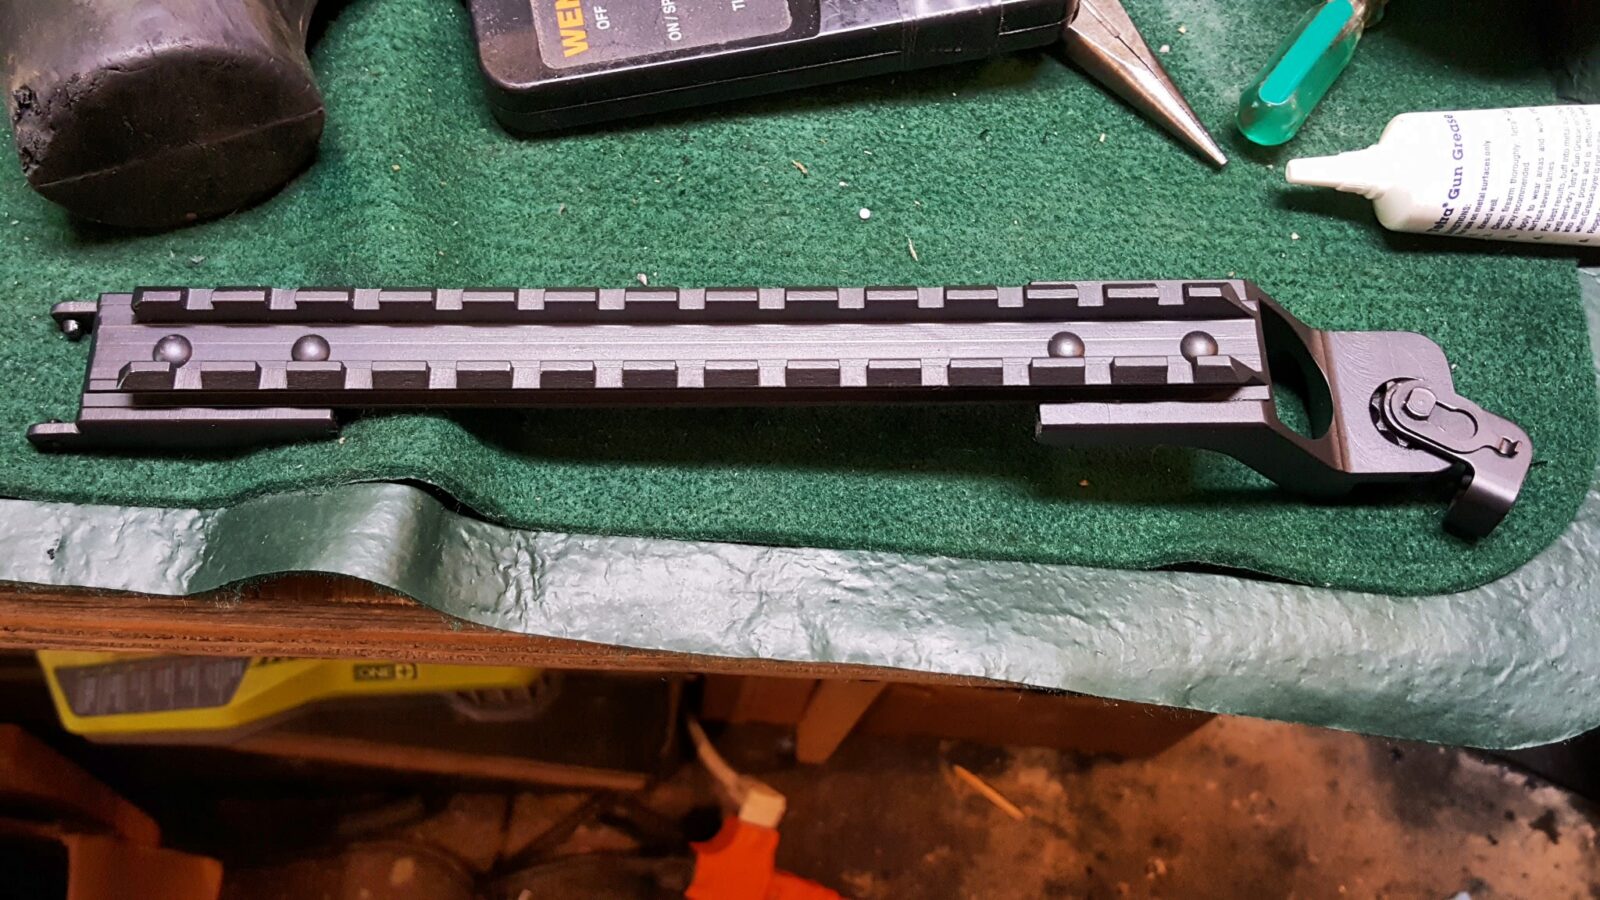
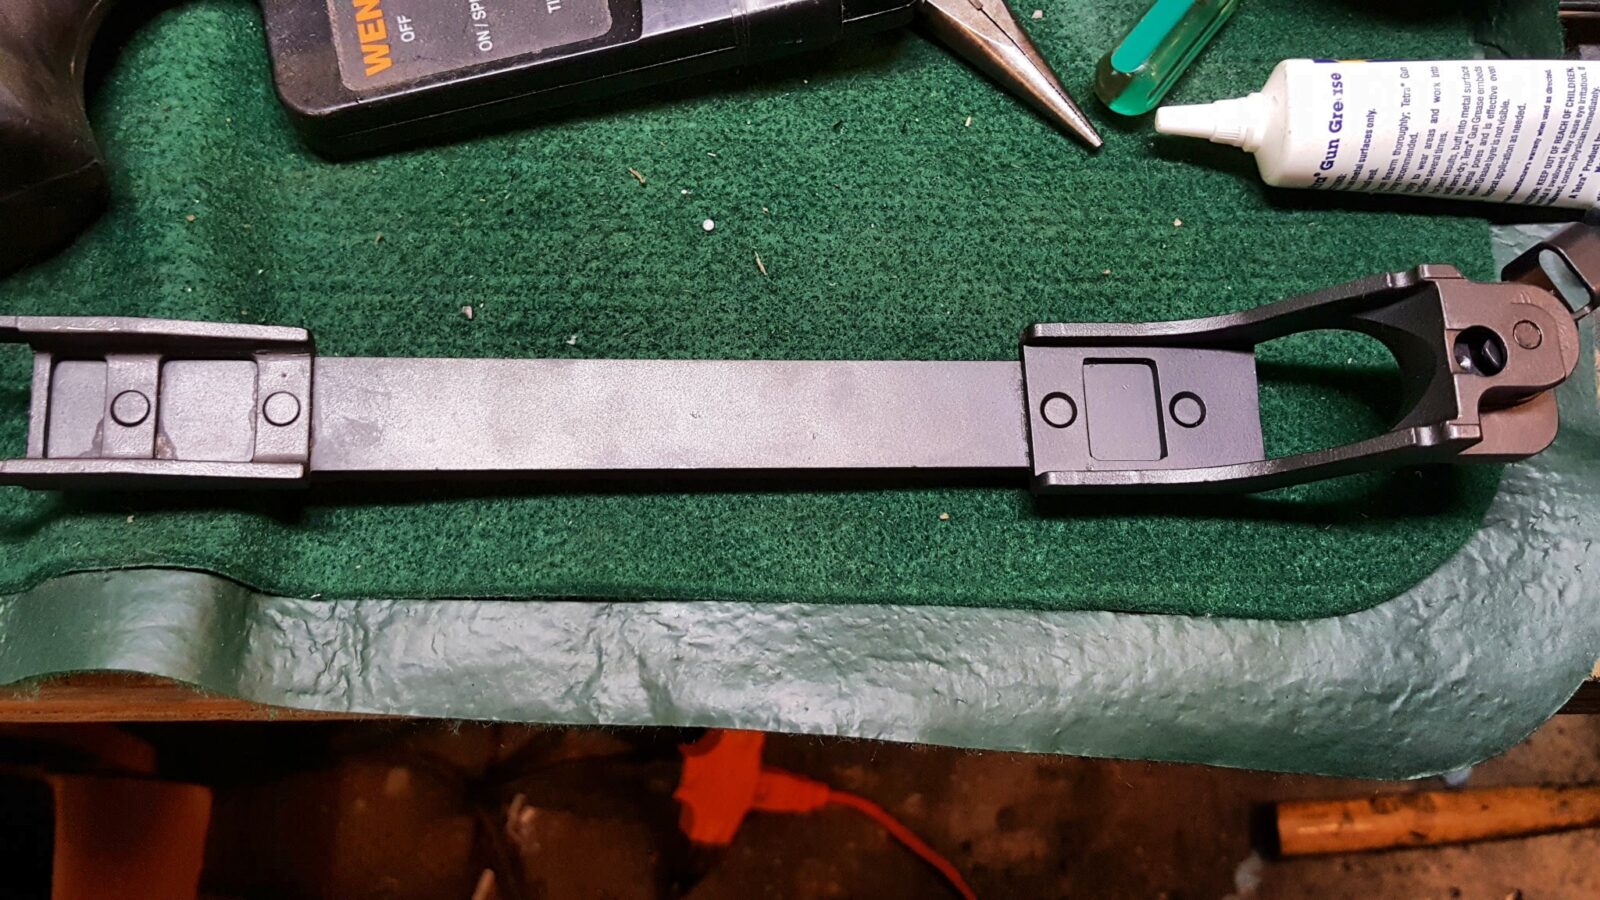
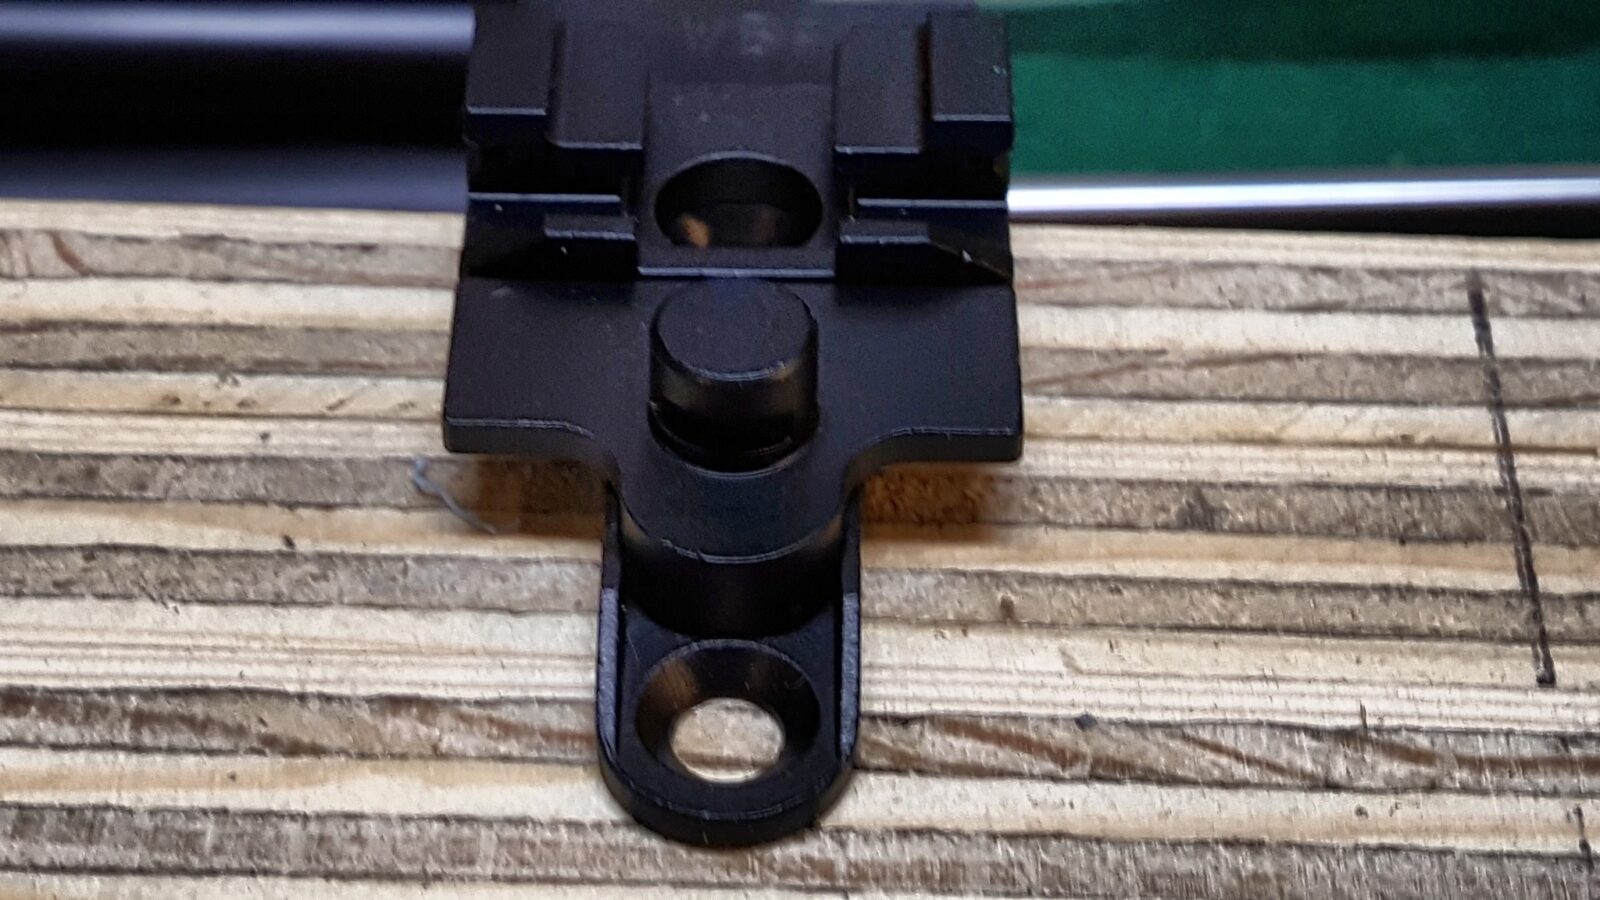
The Beryl was the first AK-platform that I know of that had an integral optics rail that ran from the rear sight block (RSB) to the rear trunnion. It did not need the traditional AKM side mount optics rail.
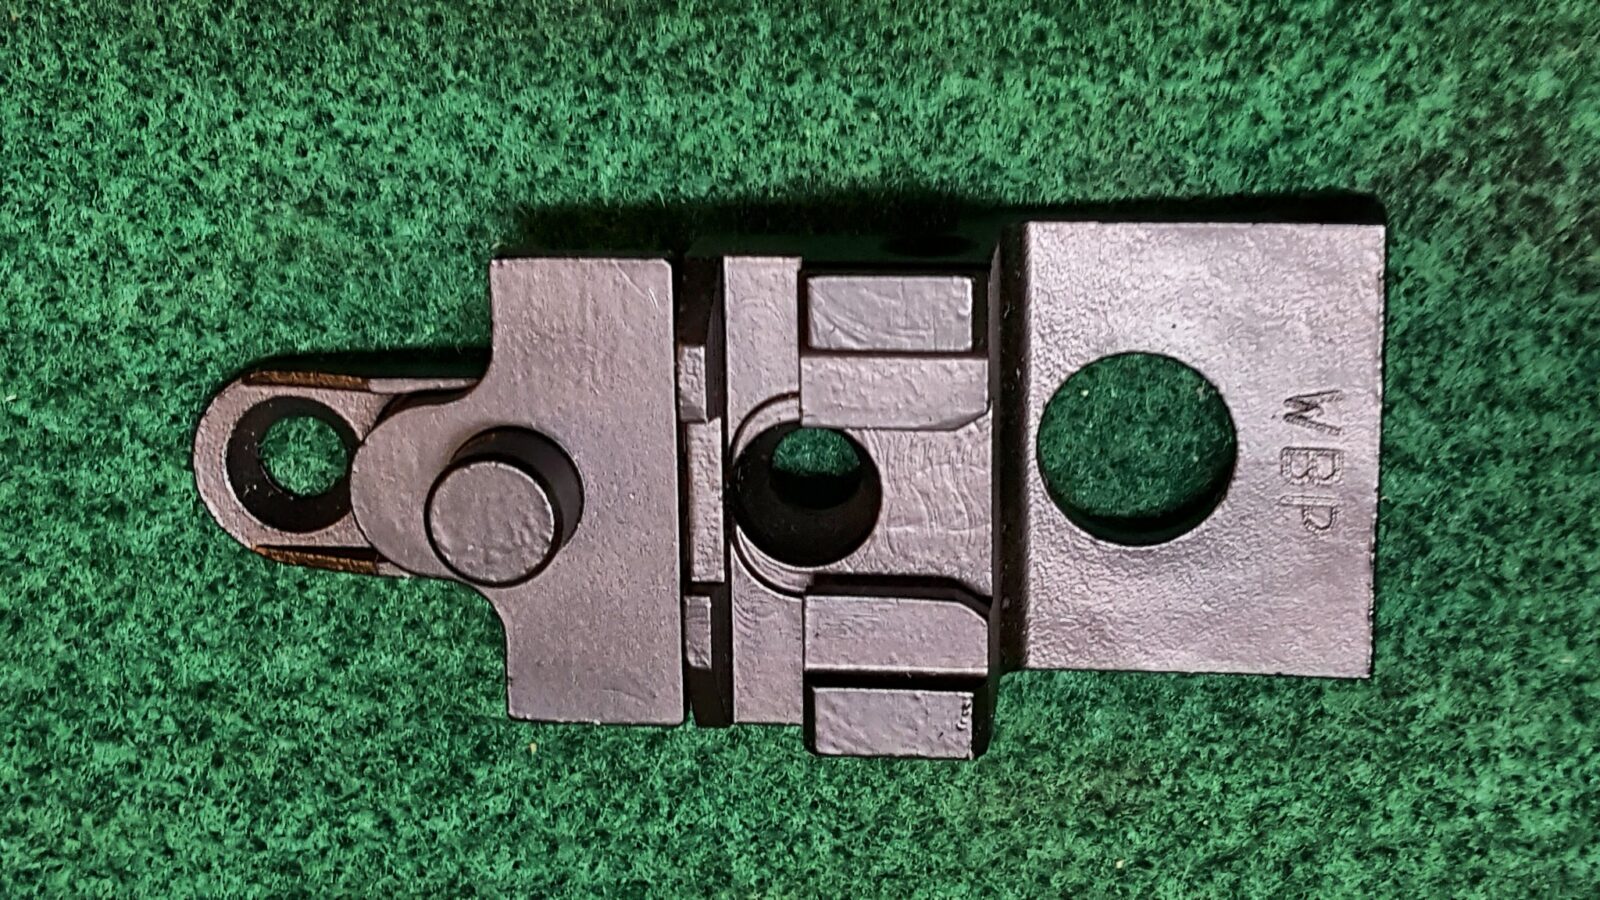
Now the WBP kit I bought had a Weaver rail and they have since moved to the Picatinny standard – just FYI. I believe my rail is known as the POPC III.
I really did not know what to expect when I ordered the kit and was blown away by how the Poles did this. The rail is solid steel and built like a tank. It attaches to the RSB via two small grooves that are machined into the back just below the rear sight leaf.
It then locks onto a cylindrical protrusion on the rear trunnion.
This did take some minor fitting. I sanded off a bit from the front edge of the rail and rounded the cylinder just a tiny bit to help the above pictured hole slide into place. I went slow and test fit over and over. This thing locks up incredibly solid – literally zero play.
All that is left now is the furniture and the test firing.
If you find this post useful, please share the link on Facebook, with your friends, etc. Your support is much appreciated and if you have any feedback, please email me at in**@*********ps.com. Please note that for links to other websites, I may be paid via an affiliate program such as Avantlink, Impact, Amazon and eBay.