I’ve been involved with AK rifle building since 2006 and there’s something we take for granted – how rivets are used to secure the forged trunnions, and trigger guards to the sheet metal receiver. Not to mention the center support and side mount scope rail. Some have asked why rivets were even used thinking they were some low-end choice. The truth is quite different. Let’s move ahead and take a deeper focused look at the engineering behind the use of the rivet in the AKM rifle – it wasn’t a lowly choice by any means.
Section 1: Introduction to the AKM Stamped Receiver and Rivet-Based Assembly
The design of the 7.62mm AKM represents a pivotal moment in 20th-century small arms manufacturing. Its departure from the milled-receiver construction of its predecessor, the AK-47, in favor of a stamped-steel receiver assembly, necessitated a comprehensive and robust method for joining dissimilar components under significant operational stress. This report provides a detailed engineering analysis of the riveting system employed in the AKM, examining the materials, dimensions, geometry, and underlying mechanical principles that make it a successful and enduring design.
1.1 The Evolution from Milled to Stamped: Engineering and Production Imperatives
The original AK-47, while exceptionally reliable, was built upon a receiver machined from a solid forging of steel. This process was labor-intensive, time-consuming, and resulted in significant material waste. The primary engineering driver for the development of the AKM, introduced in 1959, was the optimization for mass production.1 Soviet engineers sought to reduce manufacturing complexity, cost, and the overall weight of the rifle without compromising the platform’s legendary reliability.2
The solution was a paradigm shift from a milled receiver to one formed from a single 1.0 mm thick sheet of steel.1 This change dramatically reduced machine time and cost, allowing for faster production rates to meet the vast needs of the Soviet military and its allies. However, this created a new engineering challenge: a thin, U-shaped stamped steel shell lacks the inherent strength and rigidity to contain the forces of a firing 7.62x39mm cartridge and guide the bolt carrier group with the necessary precision.4 The AKM’s riveting system is the critical design element that solves this problem. The following table summarizes the four AK-47 types:
| Type Designation | Weapon Model | Receiver Construction | Description |
|---|---|---|---|
| Type 1 | Early AK-47 (1948–51) | Stamped | First design; lightweight stamped sheet metal with riveted trunnions. Abandoned due to reliability and tooling issues. |
| Type 2 | AK-47 (1952–53) | Milled | First successful milled version; added a rear socket for the stock and heavier construction. |
| Type 3 | AK-47 (1954–59) | Milled | Refined milled design with lighter weight and simplified manufacturing over Type 2. Most common milled AK-47. |
| Type 4 | AKM (from 1959 onward) | Stamped | Standardized modern AKM receiver; made from stamped sheet metal with riveted trunnions, very lightweight and economical. |
1.2 The Functional Role of Trunnions and Rivets in the AKM Design
The AKM design cleverly separates the functions of pressure containment and component housing. The immense stress of firing is handled by two key high-strength components: the front and rear trunnions.6
- The Front Trunnion: This is a precisely machined block of steel that serves as the heart of the rifle. It holds the barrel, provides the locking recesses for the bolt’s rotating lugs, and contains the peak chamber pressure upon firing. It absorbs the primary rearward thrust of the cartridge case.5
- The Rear Trunnion: This machined steel block provides the mounting point for the buttstock and serves as the rear stop for the recoiling bolt carrier group, absorbing its kinetic energy at the end of each cycle.1
The thin stamped receiver acts as a chassis, holding these trunnions and the fire control group in their correct spatial relationship. The rivets are the non-detachable fasteners that permanently join the high-strength trunnions to the receiver shell, transferring the operational loads and creating a unified, rigid structure from otherwise disparate parts.1 Alternative methods like screwing are unsuitable due to the risk of loosening under intense vibration, while welding could warp the thin receiver and create brittle heat-affected zones.7 Riveting provides a permanent, vibration-resistant, and mechanically sound solution.
1.3 System Overview: Mapping the Primary Rivet Groups
The rivet pattern on an AKM is not arbitrary; it is a carefully laid out system designed to secure components and reinforce the receiver. The primary rivet groups, which will be analyzed in detail in subsequent sections, are as follows 8:
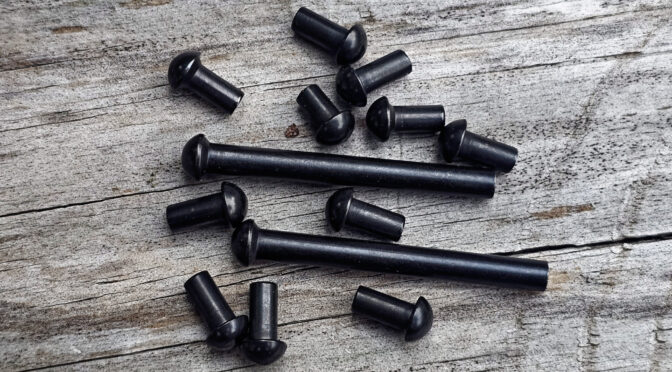
- Front Trunnion Rivets: A group of six rivets securing the front trunnion to the forward section of the receiver.
- Rear Trunnion Rivets: Two long rivets (for a standard fixed stock) that pass through the receiver and the rear trunnion block.
- Trigger Guard Rivets: A group of five rivets that attach the trigger guard assembly to the bottom of the receiver.
- Center Support Rivet: A single rivet and internal sleeve located midway down the receiver that prevents the receiver walls and guide rails from flexing.
The precise placement of these rivets is critical to the firearm’s function and is standardized across Warsaw Pact production, as can be seen in various build templates and diagrams.10

Section 2: A Typology of AKM Rivets: Form, Dimensions, and Location
The rivet set used in an AKM is not a homogenous collection of fasteners. It is a specific kit of components where the geometry and dimensions of each rivet type are engineered for its designated location and mechanical function.
2.1 Rivet Geometry: A Detailed Taxonomy
The rivets used in a standard AKM can be classified into several distinct geometric types, each with a specific purpose.
2.1.1 The Swell Neck Rivet
This is the most specialized and structurally critical rivet in the AKM design. Its geometry features a standard domed head, a shank of a specific diameter, and a distinctive conical flare, or “swell,” located directly beneath the head.9 This swell is designed to fit into a corresponding dimpled (countersunk) hole in the receiver sheet. This interface creates a mechanical interlock that provides superior resistance to shear forces, a concept that will be analyzed in detail in Section 4. These are used in the highest-stress locations, such as the trunnion attachments.8
2.1.2 The Domed (Universal) Head Rivet
This is a standard solid rivet with a semi-spherical head, often referred to as a universal or round head type.15 These are used in locations where the specialized shear-resisting properties of the swell neck are not required, but a secure clamping force is still necessary, such as the upper front trunnion holes and parts of the trigger guard assembly.9
2.1.3 The Flat Head Rivet
The center support rivet is unique in that it features a very low-profile, flat manufactured head.8 This is a design constraint dictated by clearance requirements. The bolt carrier group reciprocates along guide rails inside the receiver, and a standard domed rivet head in this location would interfere with its movement. The flat head ensures a smooth, unobstructed path for the carrier.18
2.2 Rivet Specifications by Location
The following table synthesizes data from military specifications, gunsmithing resources, and commercial rivet sets to provide a comprehensive reference for the dimensions and types of rivets used in a standard fixed-stock AKM. All imperial measurements have been converted to metric for engineering consistency.
Table 2.1: AKM Rivet Dimensional and Type Specification
| Rivet Location | Quantity | Rivet Type/Shape | Shank Ø (mm) | Shank Length (mm) | Factory Head Ø (mm) | Factory Head Height (mm) | Required Receiver Hole Ø (mm) |
| Front Trunnion, Lower | 2 | Swell Neck, Domed Head | 4.0 | 9.5 | ~7.1 | ~2.1 | 4.0 |
| Front Trunnion, Middle | 2 | Swell Neck, Domed Head | 4.0 | 9.5 | ~7.1 | ~2.1 | 4.0 |
| Front Trunnion, Upper | 2 | Standard, Domed Head | 4.0 | 9.5 | ~7.1 | ~2.1 | 4.0 |
| Rear Trunnion, Long | 2 | Swell Neck, Domed Head | 4.8 | ~50.8 | ~7.4 | ~2.8 | 4.8 |
| Trigger Guard, Front | 4 | Standard, Domed Head | 4.0 | 9.5 | ~6.9 | ~2.1 | 4.0 |
| Trigger Guard, Rear | 1 | Standard, Domed Head | 4.0 | 7.9 | ~6.9 | ~2.1 | 4.0 |
| Center Support | 1 | Standard, Flat Head | 4.0 | Varies | ~7.0 | Low Profile | 4.0 |
Data compiled and converted from sources.9 Dimensions are nominal and may exhibit minor variations based on country of origin and production year. Shank length for the center support rivet varies with the sleeve used. Rear trigger guard rivet length can vary depending on the use of a reinforcement plate.17
2.3 Analysis of National and Historical Variations
While the core Soviet design established the standard, minor variations in rivet specifications and patterns exist among different national producers of the AKM and its derivatives.
One of the most well-documented distinctions is in the front trunnion rivet pattern. Soviet/Warsaw Pact AKMs (Russian, Polish, Romanian, etc.) feature a parallel vertical alignment of the three rivets on each side of the trunnion. In contrast, many Chinese Type 56 rifles utilize a staggered or triangular rivet pattern for the front trunnion.12
Furthermore, small dimensional differences in the rivets themselves have been observed. For example, measurements of demilled kits have shown that Romanian factory-formed rivet heads for the trigger guard average around 6.9 mm – 7.2 mm in diameter, while Chinese examples can be slightly larger, averaging around 7.4 mm in diameter with a greater head height.15 These differences, while minor, reflect distinct manufacturing practices and tooling but do not alter the fundamental engineering principles of the riveting system.
Section 3: Metallurgy and Material Science of Soviet-Era Rivets
The choice of material for the AKM’s rivets is a critical aspect of its design, reflecting a deliberate balance between manufacturability, strength, and cost. The material must be soft enough to be formed without fracture, yet strong enough in its final state to withstand the violent operational stresses of the firearm.
3.1 Material Composition: Analysis of GOST Standard Low-Carbon Steels
Based on an analysis of Soviet-era general-purpose fastener standards, such as GOST 10299-80, the rivets used in the AKM are made from a low-carbon, unalloyed, quality structural steel.20 These steels are not high-performance alloys but are cost-effective, readily available, and possess the specific mechanical properties required for cold-forming applications. The two most probable grades are
Сталь 10 (Steel 10) and Сталь 20 (Steel 20).20 The number in the designation indicates the average carbon content in hundredths of a percent (i.e., 0.10% for Steel 10, 0.20% for Steel 20).22
Table 3.1: Nominal Chemical Composition of Soviet Rivet Steels (GOST 1050)
| Element | Symbol | Steel 10 (% Content) | Steel 20 (% Content) |
| Carbon | C | 0.07 – 0.14 | 0.17 – 0.24 |
| Manganese | Mn | 0.35 – 0.65 | 0.35 – 0.65 |
| Silicon | Si | 0.17 – 0.37 | 0.17 – 0.37 |
| Phosphorus | P | ≤ 0.035 | ≤ 0.035 |
| Sulfur | S | ≤ 0.040 | ≤ 0.040 |
| Chromium | Cr | ≤ 0.15 | ≤ 0.25 |
| Nickel | Ni | ≤ 0.25 | ≤ 0.30 |
| Copper | Cu | ≤ 0.25 | ≤ 0.30 |
| Iron | Fe | Balance | Balance |
Data compiled from sources.22
3.2 Mechanical Properties: The Engineering Balance of Malleability and Strength
The selection of low-carbon steel is a masterstroke of process-integrated engineering. The material’s properties are ideally suited for both the installation process and the final application.
- Malleability and Ductility: The extremely low carbon content makes these steels very soft and ductile in their annealed (as-supplied) state. For Steel 10, the hardness is approximately 143 HB, and for Steel 20, it is around 163 HB.22 This high ductility allows the rivet’s shank to be cold-formed (upset) into the buck-tail or formed head with a press, flowing to fill the hole completely without cracking.25 A harder, higher-carbon steel would be too brittle for this process.
- Work Hardening and Final Strength: While the rivets are initially soft, the process of cold-forming induces significant work hardening (also known as strain hardening). As the steel is plastically deformed, dislocations are generated and rearranged within its crystal structure, which impedes further deformation. This has the effect of increasing the material’s tensile strength and hardness in its final, installed state. The rivet becomes substantially stronger than it was before installation. This elegant mechanism means that the assembly process itself is the final step in achieving the required mechanical properties, eliminating the need for a separate, costly heat treatment cycle for the millions of rivets produced.
3.3 Heat Treatment and Surface Finishing
It is critical to distinguish between the treatment of the rivets and the treatment of the receiver. The rivets themselves are not heat-treated after installation.27 Their final strength is a product of material selection and work hardening.
In contrast, the 1.0 mm stamped receiver is selectively heat-treated. Specifically, the areas around the fire control group (hammer and trigger) pin holes and the tip of the integral ejector are hardened to prevent wear and elongation under repeated stress.4 A common specification for this spot-hardening is a Rockwell C hardness of 38-40.13 Attempting to use a non-heat-treated receiver will result in rapid failure, as the pin holes will stretch and deform, leading to malfunction.13
The standard finish applied to military-issue rivets is a black oxide coating.9 This is a conversion coating that provides mild corrosion resistance and a durable, non-reflective black finish that matches the rest of the firearm.
Section 4: Engineering Rationale and Stress Distribution Analysis
The AKM’s riveting system is more than a simple collection of fasteners; it is an integrated system designed to manage and distribute the complex forces generated during the firing cycle. Understanding this system requires analyzing the stresses on the primary components and the specific design features created to handle them.
4.1 The Trunnions as Primary Load-Bearing Structures
As established, the trunnions are the true load-bearing elements of the AKM.
- Front Trunnion Stress: The front trunnion bears the highest peak stress in the system. When a cartridge is fired, the expanding gases exert a force on the bolt face, which is transmitted directly to the locking lugs on the front trunnion. This force is on the order of thousands of pounds, corresponding to chamber pressures that can reach approximately 45,000 psi for the 7.62x39mm cartridge.5 The integrity of the trunnion’s locking lugs is paramount. This is why properly forged and heat-treated trunnions are essential; failures of substandard cast trunnions often manifest as cracks or complete shearing of the locking lugs.5
- Rear Trunnion Stress: The rear trunnion experiences a different type of load: a high-energy impact. At the end of its rearward travel, the entire mass of the bolt carrier group (approximately 500 grams) slams into the front face of the rear trunnion. While the peak force is lower than the chamber pressure, it is a significant, repetitive shock load that must be absorbed and transferred into the receiver shell without causing deformation or failure.7 This repeated impact is why the rear trunnion rivets are often described as taking the most “abuse” in the system.7
4.2 Analysis of Forces: Shear Stress on Trunnion Rivets
The primary force that the trunnion rivets must resist is shear. The rearward thrust on the front trunnion and the impact on the rear trunnion create forces that try to slide the trunnions relative to the receiver skin. The rivets act as pins, resisting this shearing motion. The load is distributed among the rivets in a group, with each rivet carrying a fraction of the total shear force.
4.3 The Swell Neck/Dimple Interface: A Design Solution for Maximizing Shear Resistance
The most ingenious feature of the AKM’s riveting system is the use of swell neck rivets in conjunction with dimpled receiver holes. This is a specific design solution to the problem of transferring high shear loads into a thin (1.0 mm) sheet of metal.
In a standard rivet joint, the shear load is borne by the bearing surface of the hole against the rivet shank. In a 1.0 mm receiver, this bearing area is minuscule, making the hole highly susceptible to elongation or “egging” under load, which would lead to a loose trunnion and catastrophic failure.
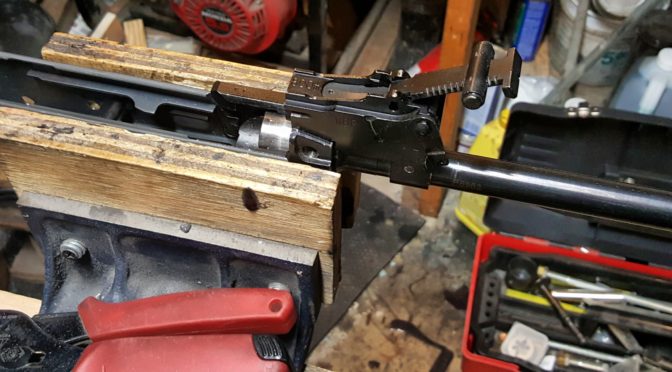
The swell neck/dimple system fundamentally changes this dynamic. The process involves using a specialized die to press a conical countersink, or “dimple,” into the receiver hole.8 The front or rear trunnion must be in place behind the receiver to support the sheet during this process.8 When the swell neck rivet is installed, its conical swell nests perfectly into this dimple.13
| The basic formula for shear stress (τ) is τ = F/A, where F is the applied force and A is the area over which the force is acting. This formula calculates the average shear stress across the area. Explanation: Shear Stress (τ): It’s a measure of the force acting parallel to the surface area of a material, causing it to deform or potentially fail by sliding or shearing. Force (F): This is the component of the force that is parallel to the surface area. Area (A): This is the cross-sectional area of the material that the force is acting upon. It’s the area of the surface where the force is applied, not the total surface area of the object. So, as the area increases, the sheer stress decreases all things being equal. |
This creates a mechanical interlock. The shear load is no longer concentrated on the thin edge of the hole. Instead, it is distributed across the entire conical surface area of the dimple. This vastly increases the bearing surface, dramatically reduces the bearing stress on the receiver material, and effectively locks the trunnion and receiver together, preventing any relative movement.6 Gunsmithing guides explicitly warn against trying to achieve a flush fit by removing material from the receiver instead of dimpling; doing so defeats the entire purpose of the design, leaving only the rivet’s core to resist shear and guaranteeing eventual failure.6 This feature is the key to making a thin stamped receiver perform as if it were much thicker and stronger at these critical junctions.
4.4 The Role of the Center Support and Trigger Guard Rivets in Receiver Rigidity
While the trunnion rivets handle the primary firing loads, the other rivet groups serve a crucial structural reinforcement role, stiffening the inherently flexible U-shaped receiver.
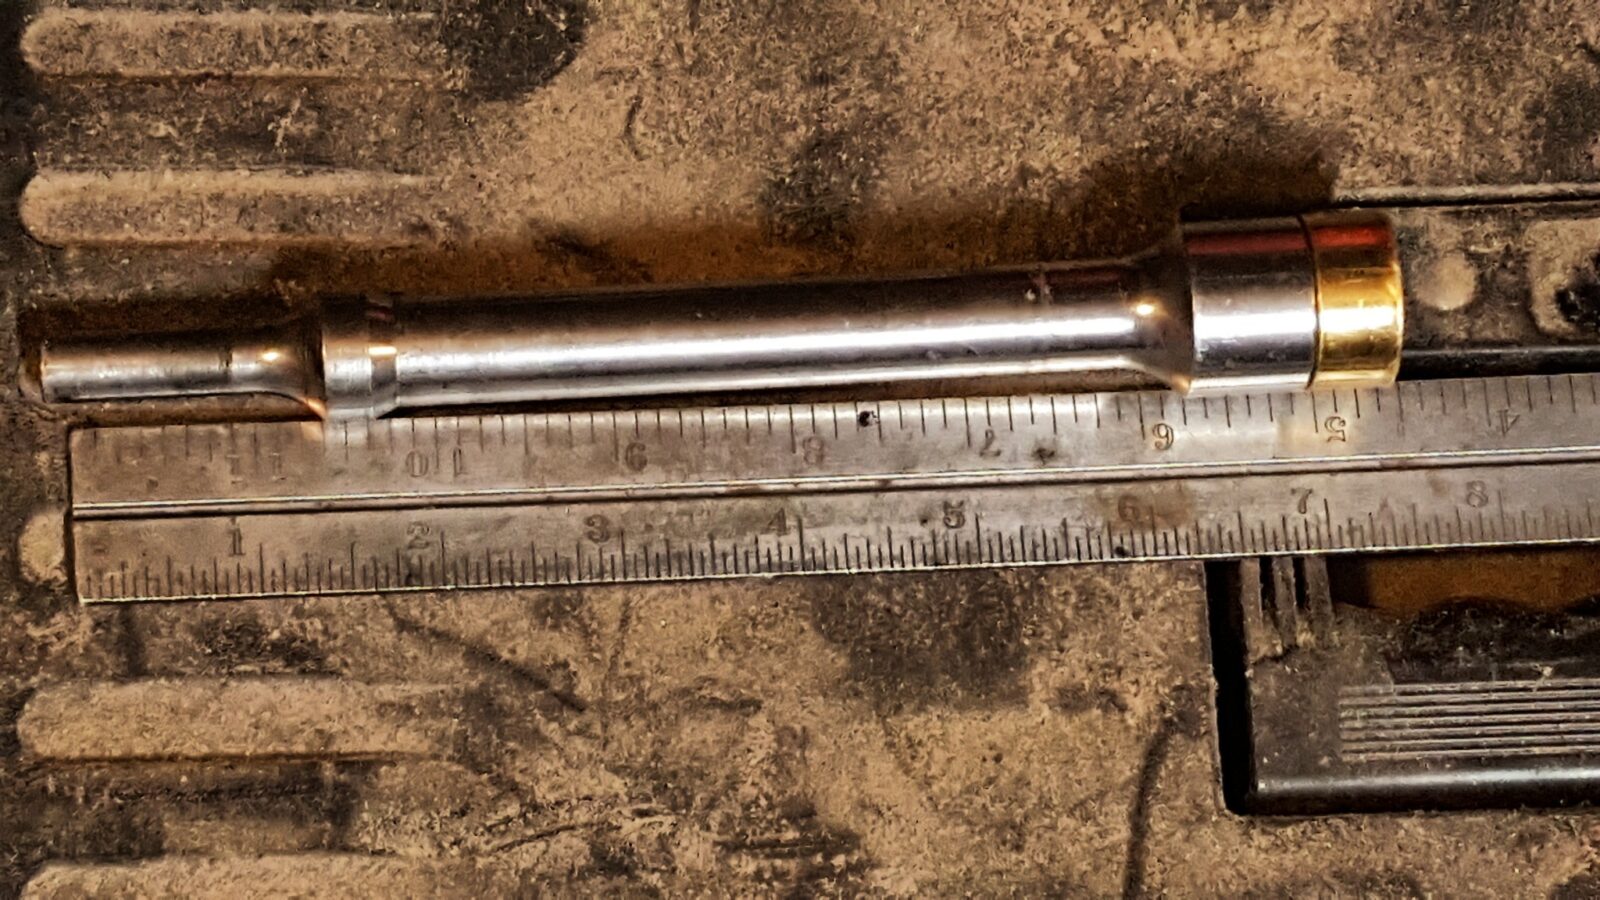
- Center Support: The center support consists of a rivet passing through a steel sleeve that bridges the two sides of the receiver.8 This assembly acts as a critical cross-member. It prevents the long, unsupported upper guide rails from flexing inward under the lateral forces exerted by the reciprocating bolt carrier, ensuring smooth and reliable cycling. It also prevents the receiver walls themselves from bowing or pinching.33
- Trigger Guard Assembly: The trigger guard is not merely a safety feature. When its five rivets are properly installed, the entire stamped steel trigger guard assembly acts as a structural floor plate for the receiver.34 This significantly increases the torsional and latitudinal rigidity of the large magazine well opening, preventing the “U” from spreading or twisting under load.
Together, these rivet groups transform the flexible stamped receiver shell into a strong, cohesive chassis capable of withstanding the rigors of military service.
Section 5: The Riveting Process: A Technical Guide to Proper Formation
Achieving the designed strength of the AKM’s riveted joints is entirely dependent on the correct installation process. This is a precision manufacturing operation that requires specialized tooling and meticulous adherence to procedure. Using improper methods, such as a hammer and a simple punch, will result in substandard joints that compromise the safety and reliability of the firearm.
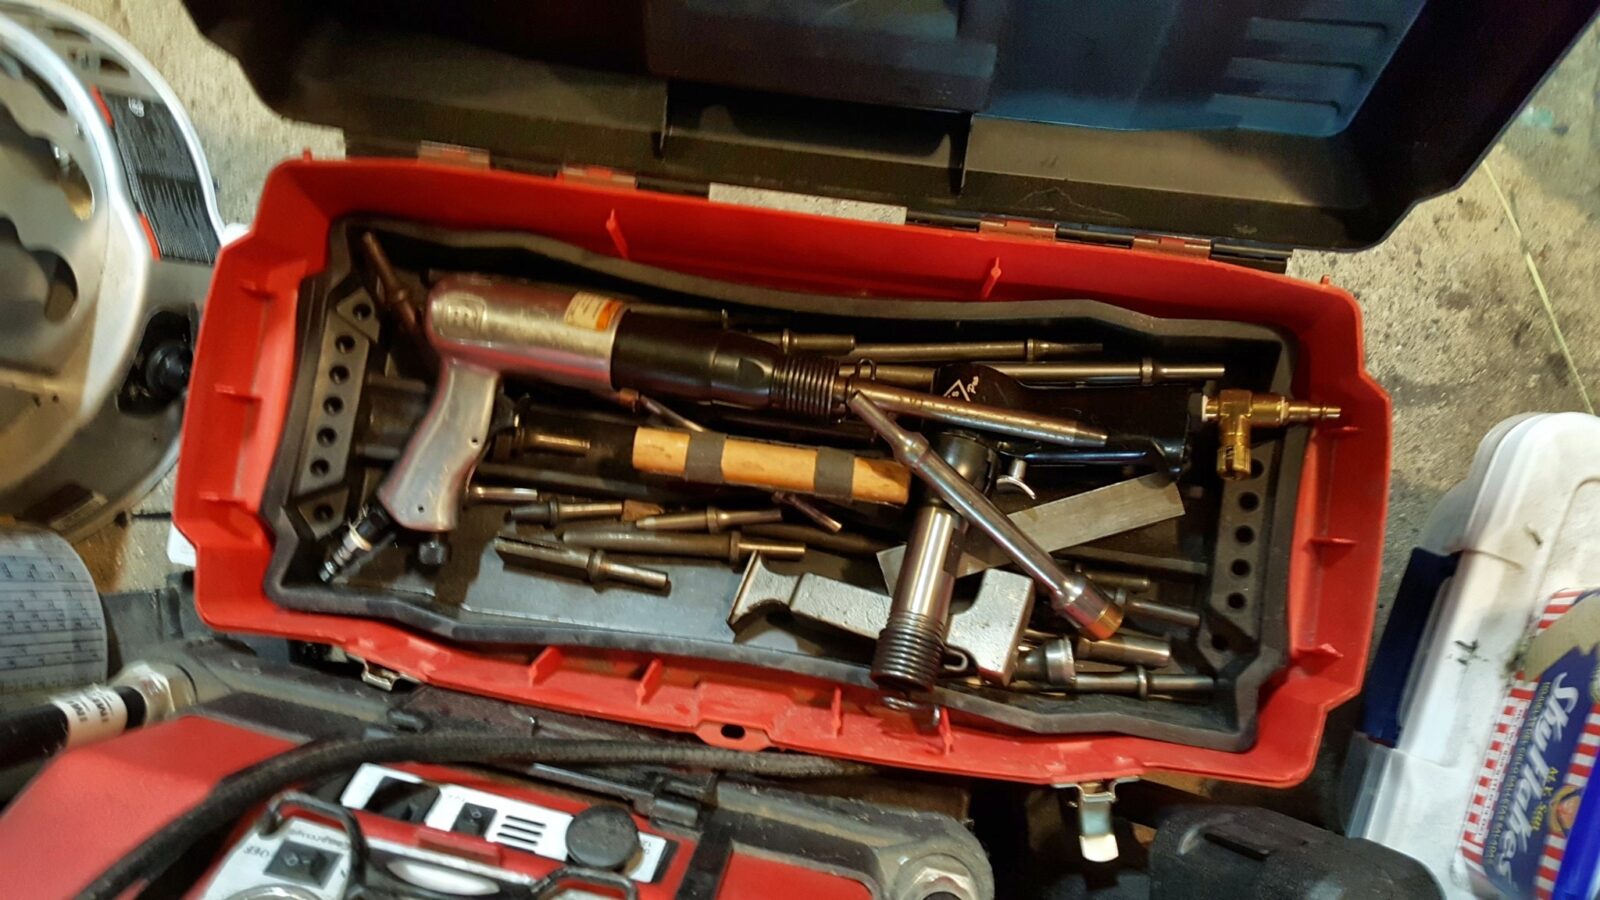
5.1 Essential Tooling: Jigs, Presses, and Forming Dies
Modern, correct riveting practice relies on a set of specialized tools to ensure control and repeatability.
- Hydraulic Press: A shop press, typically with a capacity of 12 tons or more, provides the slow, controlled, and immense force needed to properly form the rivets without impact shock.13
- Riveting Jig: A purpose-built jig, such as those made by AK-Builder or Toth Tool, is essential. These jigs securely hold the receiver and trunnion assembly, ensuring it is square to the press ram. They have recesses to support the manufactured head of the rivet, preventing it from being flattened, and they align the forming tool perfectly coaxial with the rivet shank.8 Different jigs or configurations are used for short trunnion rivets, long rear trunnion rivets, and the trigger guard.33
- Forming Dies and Tools: A set of hardened steel forming tools is used to shape the rivet. This includes cupped support dies for the manufactured head and various forming punches to create a correctly shaped, domed buck-tail on the other end.16
5.2 Receiver and Component Preparation
Proper preparation of the components is as important as the riveting itself.
- Hole Location and Drilling: Rivet holes must be precisely located on the receiver blank. This is typically done using a plastic layout guide and a transfer punch to mark the hole centers.10 The holes are then drilled to the correct diameter (e.g., 4.0 mm for a 4.0 mm rivet) using a drill press and high-quality drill bits.37 An undersized hole will prevent the rivet from seating, while an oversized hole will result in a weak joint.
- Deburring: After drilling, all holes must be carefully deburred on both sides. Any burrs or sharp edges will prevent the rivet from sitting flush against the receiver and trunnion, creating gaps that compromise the joint’s integrity.6
- Dimpling: For all swell neck rivet locations, the receiver holes must be dimpled. This is done using a specialized dimple die in the hydraulic press, with the trunnion installed in the receiver to provide backing support. This forms the conical seat that the rivet’s swell neck will engage.8
5.3 Step-by-Step Installation Protocol
The general sequence for riveting an AKM receiver is as follows, using the appropriate jigs and press tools for each step 8:
- Trigger Guard Riveting: The trigger guard assembly is typically installed first, often with a dedicated jig. The four front rivets and the single rear rivet are pressed to secure the guard and magazine catch assembly.13
- Front Trunnion Riveting: The front trunnion is placed in the receiver, and the six short rivets are installed. Care must be taken to use swell neck rivets in the four lower and middle holes (which should be dimpled) and standard domed rivets in the two upper holes.8
- Rear Trunnion Riveting: The rear trunnion is installed using the two long rivets. This requires a specialized long-rivet jig to support the receiver and apply force linearly down the long shank of the rivet.8
- Center Support Installation: The center support sleeve is inserted, and the special flat-headed rivet is pressed into place, again using the long-rivet tool.8
5.4 Inspection and Verification of a Correctly Formed Rivet
A properly formed rivet must meet specific visual and mechanical criteria.
- Visual Inspection: The manufactured head must be perfectly flush against the receiver surface with no visible gaps. A common field test is to hold the receiver up to a bright light source to check for light passing under the rivet head.39 The formed head (the buck-tail) must be symmetrical, well-rounded with a dome shape similar to the manufactured head, and centered on the rivet’s shank. It should not be flattened, cracked, or off-center.40
- Mechanical Integrity: The finished rivet must be completely tight. There should be absolutely no detectable movement between the trunnion and the receiver when force is applied. The entire assembly should feel and behave as a single, monolithic component. A loose rivet is a failed rivet and must be drilled out and replaced.
Section 6: Conclusion: The Engineering Elegance of the AKM Riveting System
6.1 Synthesis of Findings: A Robust System for a Stamped Platform
The comprehensive analysis of the AKM’s riveting system reveals a design that is far more sophisticated than its rugged appearance suggests. The transition from the milled AK-47 to the stamped AKM was a manufacturing revolution, and the riveting system is the lynchpin of its success. The key findings of this report can be synthesized as follows:
- A Purpose-Engineered System: The AKM’s riveting system is a holistic solution to the engineering challenges posed by a thin, stamped-steel receiver. It successfully mates high-strength, load-bearing trunnions to a lightweight chassis, creating a firearm that is both durable and easy to mass-produce.
- Specialized Components: The system does not rely on generic fasteners. It employs a heterogeneous set of rivets, each with a specific geometry (swell neck, domed head, flat head) and dimension precisely tailored to the mechanical requirements and spatial constraints of its location.
- Optimized Material Science: The choice of low-carbon steel (such as Soviet Steel 10 or 20) is a deliberate act of engineering efficiency. The material’s initial ductility facilitates easy cold-forming, while the installation process itself induces work-hardening, providing the final required strength without the need for a separate heat-treatment process.
- Advanced Structural Mechanics: The strength of the system is derived not merely from the clamping force of the rivets but from advanced mechanical principles. The swell neck/dimple interface is a brilliant solution for managing shear stress, while the center support and trigger guard rivets act as integral structural reinforcements, adding critical rigidity to the receiver.
- Process-Dependent Integrity: The design’s success is inextricably linked to the correct installation methodology. Proper riveting is a precision process that requires specialized tooling and meticulous preparation. Deviations from this process directly compromise the mechanical integrity and safety of the firearm.
6.2 Final Assessment
The riveting system of the AKM is a testament to the Soviet design philosophy of elegant simplicity. It achieves maximum functional robustness with a minimum of manufacturing complexity and cost. By understanding the interplay between the stamped receiver, the machined trunnions, and the specialized rivets that join them, one can appreciate the AKM not just as a firearm, but as a masterclass in pragmatic and effective mechanical engineering. It is a system where every component, every dimension, and every step in the assembly process has a clear and logical purpose, resulting in one of the most successful and widely produced firearm designs in history.
Works cited
- AKM – Wikipedia, accessed June 20, 2025, https://en.wikipedia.org/wiki/AKM
- AK-47 vs AKM Performance: Insights from GunCreed® Experts, accessed June 20, 2025, https://guncreed.com/2025/03/12/how-does-the-ak47-compare-to-the-akm-in-terms-of-performance/
- AR & AK – Night Galaxy, accessed June 20, 2025, https://nightgalaxy.com/blog/ar-ak/
- How do I heat treat an AK receiver? [Archive] – The Firing Line Forums, accessed June 20, 2025, https://thefiringline.com/forums/archive/index.php?t-325374.html
- Ras47 Trunnion failure. : r/ak47 – Reddit, accessed June 20, 2025, https://www.reddit.com/r/ak47/comments/abjwaa/ras47_trunnion_failure/
- AKM Build Project: From Poland With Love | RECOIL, accessed June 20, 2025, https://www.recoilweb.com/preview-build-your-own-akm-rifle-101413.html
- New Technique for AK Builds – SKSBOARDS.COM, accessed June 20, 2025, https://www.sksboards.com/smf/index.php?topic=8335.20;wap2
- Rivet Tool Instructions – AK-Builder.com, accessed June 20, 2025, https://ak-builder.com/index1.php?dispatch=pages.view&page_id=10
- AK-Builder AK Rivet Set, accessed June 20, 2025, https://ak-builder.com/index1.php?dispatch=products.view&product_id=29975
- Trigger Guard Rivet (AKM, AKMS, AK-74) Layout Guide – Childers Guns, accessed June 20, 2025, https://www.childersguns.com/Trigger-Guard-Rivet-Layout-Guide
- FCG (AK, AKM, AK74) Layout Guide – Childers Guns, accessed June 20, 2025, https://www.childersguns.com/FCG-Layout-Guide-1
- Вкладыш тульских АКМ 65-г. : История оружия – Guns.ru, accessed June 20, 2025, https://forum.guns.ru/forummessage/36/2680758.html
- AK Krink Build Part 3: Trigger Guard Riveting and Front Trunion Drilling – ITS Tactical, accessed June 20, 2025, https://www.itstactical.com/warcom/firearms/ak-krink-build-part-3-trigger-guard-riveting-and-front-trunion-drilling/
- AK47 AKM FIXED STOCK RIVET SET – Carolina Shooters Supply, accessed June 20, 2025, https://www.carolinashooterssupply.com/AK47-AKM-FIXED-STOCK-RIVET-SET-p/rivets-ak47-fixed.htm
- Making Your Own Rivets – The AK Files Forums – Scribd, accessed June 20, 2025, https://www.scribd.com/document/248364164/Making-Your-Own-Rivets-The-AK-Files-Forums
- AK-Builder Rivet Tool: MGW, accessed June 20, 2025, https://www.midwestgunworks.com/page/mgwi/prod/akb-t5-11
- Power Custom Rivet Set AK-47 AKM, PM90 Side Folding Stock, Model 65 – MidwayUSA, accessed June 20, 2025, https://www.midwayusa.com/product/100469512
- Easy AK47 Build “Homemade”: Center Support long rivet install ~ Step 3 of 6 – YouTube, accessed June 20, 2025, https://www.youtube.com/watch?v=pSCmhLgB4rE
- Centrefire automatic rifle – Kalashnikov ‘AKM SU’ – about 1977 | Collection Object | Royal Armouries, accessed June 20, 2025, https://royalarmouries.org/collection/object/object-275685
- Заклепка с полукруглой головкой ГОСТ 10299-80 – купить по выгодным ценам от производителя – Первый завод крепежных изделий, accessed June 20, 2025, https://pzki54.ru/product/zaklepki/zaklepka-s-potaynoy-golovkoy-gost-10299/
- Заклепка стальная ГОСТ 10299-80, DIN 660 с полукруглой …, accessed June 20, 2025, https://metizorel.ru/zak10299.html
- Сталь 10 (ст10) конструкционная углеродистая качественная, Купить прокат из стали марки ст10 – Металлобаза ‘АКСВИЛ’, accessed June 20, 2025, https://aksvil.by/klientam/materialy-po-prokatu/stal-10.html
- расшифровка и характеристики | гост и применение марки стали 20 – ТД «Ареал, accessed June 20, 2025, https://areal-metal.ru/spravka/stal-marki-20
- Сталь 20 – применение, состав, характеристики, аналоги, расшифровка, accessed June 20, 2025, https://aksvil.by/klientam/materialy-po-prokatu/stal-20.html
- Power Custom AK-47 Gas Piston Rivet – MidwayUSA, accessed June 20, 2025, https://www.midwayusa.com/product/1004693281
- 7 Key 1020 Steel Properties You Must Know, accessed June 20, 2025, https://jiyuansteel.com/7-key-1020-steel-properties-you-must-know/
- Pre-heating rivets?! – Van’s Air Force, accessed June 20, 2025, https://vansairforce.net/threads/pre-heating-rivets.70515/
- How do I heat treat an AK receiver? – The Firing Line Forums, accessed June 20, 2025, https://thefiringline.com/forums/showthread.php?t=325374
- akm rivet set *original polish military imported rivets – Arms of America, accessed June 20, 2025, https://armsofamerica.com/akm-rivet-set-original-polish-military-imported-rivets/
- AK cast trunnion fail on RAS47 – Boom! – AK Operators Union, Local 47-74, accessed June 20, 2025, https://www.akoperatorsunionlocal4774.com/2015/10/ak-cast-trunnion-fail-on-ras47-boom/
- Palmetto AK [Archive] – Michigan Gun Owners Community Forum, accessed June 20, 2025, https://www.migunowners.org/forum/archive/index.php/t-464626.html
- Rivets – ak builder – Arms of America, accessed June 20, 2025, https://armsofamerica.com/tools-to-build-an-ak/rivets/
- Ak-Builder Rivet Tool, accessed June 20, 2025, https://ak-builder.com/index1.php?dispatch=products.view&product_id=29972
- AK Trigger Guard Rivet Set – AK-Builder.com, accessed June 20, 2025, https://ak-builder.com/index1.php?dispatch=products.view&product_id=30650
- AK Builder Rivet Tool Instructions | PDF – Scribd, accessed June 20, 2025, https://www.scribd.com/document/531377426/AK-Builder-Rivet-Tool-Instructions
- AK47 Kitchen build Rear trunnion rivet installation Tothtool.wmv – YouTube, accessed June 20, 2025, https://www.youtube.com/watch?v=U2uiGKwnsyI
- ak build tools – Arms of America, accessed June 20, 2025, https://armsofamerica.com/shop-by-category/gunsmithing-tools/
- Таблица размеров заклепок: диаметры, длины, параметры установки и расчет зазоров, accessed June 20, 2025, https://inner.su/articles/tablitsy-razmerov-zaklepok-i-parametrov-ustanovki/
- Things To Look For When Buying A New AK – Thinline Weapons Wiki, accessed June 20, 2025, https://thinlineweapons.com/wiki/index.php/Things_To_Look_For_When_Buying_A_New_AK
- Easy AK47 Build “Homemade”: Front trunnion riveting ~ Step 2 of 6 – YouTube, accessed June 20, 2025, https://www.youtube.com/watch?v=MegvQzASrr4&pp=0gcJCdgAo7VqN5tD
- AK-47 Loose Rivet Rebuild Part 1 – YouTube, accessed June 20, 2025, https://www.youtube.com/watch?v=f7qKa_yhEtw
- Комплект заклепок для боковых планок, Тула – Прицелы ПУ, accessed June 20, 2025, https://puscopes.ru/product/komplekt-zaklepok-dlya-bokovyh-planok-tula/
- Марка 10 – ТД «СпецСталь». Свойства, характеристики и применение, accessed June 20, 2025, https://tdspecstal.ru/assortment/spetsialnye-stali-i-splavy/10/
- Сталь 10 в России – характеристики, аналоги, свойства, accessed June 20, 2025, https://metatorg.ru/marki-stali-i-splavy/stal_konstruktcionnaya/stal_konstruktsionnaya_uglerodistaya_kachestvennaya/stal_konstruktsionnaya_uglerodistaya_kachestvennaya_10/
- Сталь 20: свойства, характеристики, аналоги – Метинвест-СМЦ, accessed June 20, 2025, https://metinvest-smc.com/ru/steel/stal-20/
AISI 1020 Low Carbon/Low Tensile Steel – AZoM, accessed June 20, 2025, https://www.azom.com/article.aspx?ArticleID=6114
If you find this post useful, please share the link on Facebook, with your friends, etc. Your support is much appreciated and if you have any feedback, please email me at in**@*********ps.com. Please note that for links to other websites, we are only paid if there is an affiliate program such as Avantlink, Impact, Amazon and eBay and only if you purchase something. If you’d like to directly contribute towards our continued reporting, please visit our funding page.