Tag Archives: Fridge

Fixing the Water Inlet Valve on a KitchenAid KRMF606ESS01 Refrigerator

Well, when I was little it seemed like fridges (“refrigerators” for people who prefer the full word) lasted an eternity. When we bought this KitchenAid KRMF606ESS01, I thought I was buying a top of the line quality fridge, but that’s no longer the case – appliance manufacturers don’t necessarily want them to laste forever because that means no more sales to a given customer.

A year after the warranty the ice maker stopped working and the service person whom I trust told me it would cost a considerable amount of money to replace the circuit board. So, strike #1 against the KitchenAid. Despite being “stainless”, the shell of the fridge rusts. Strike #2. Strike #3 is the topic of today’s blog post. The water inlet valve failed and leaked water all over our wood floor.

Let me set the stage – I went through the kitchen to my shop and when I came back in I saw wet footprints – my foot prints – from the floormat in front of the fridge to my shop door. ARGH! I was hoping maybe someone spilled water and didn’t clean things up so I removed the mat, mopped up the water with a towel and watched new water slowly emerge from under the fridge. Crap. I immediately wondered about the water lines on and in the fridge. The supply line was copper tube and it had looked great the last time I pulled out the fridge so I doubted it was that but I couldn’t ignore it either or it would ruin our real wood plank floor.

Turning off the water

Most fridge installers put a vampire tap on a water line to get the supply needed. In my case, I knew there was a tap under the house. We have a crawl space that isn’t bad compared to some that look like they are a scene from a horror movie but being a pretty big guy with a sore back I have to fold myself in half and do a crab shuffle over to where it is about 50-60 feet from the entrance. Short translation – it’s doable but I swore the whole way over to it.
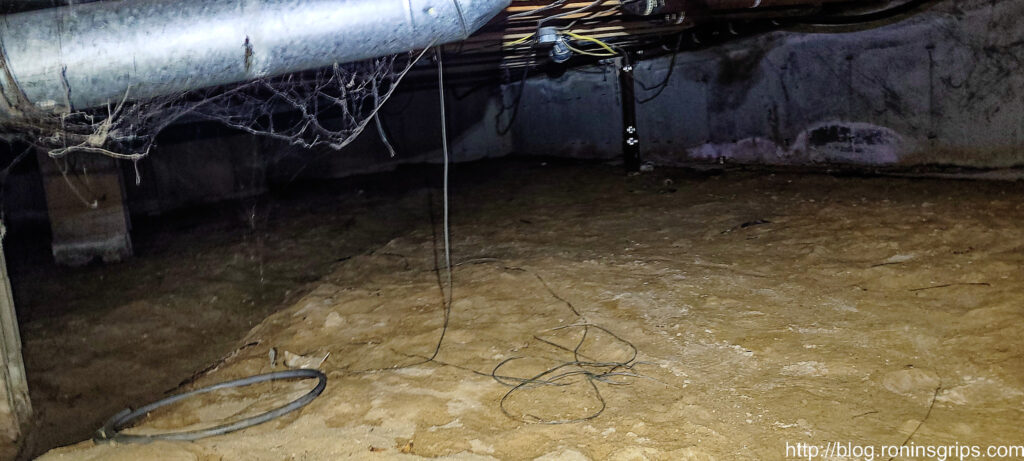
See that far center column in the dark? Yeah, I was heading just to the right of that and swearing the whole time. It was way easier getting under there 25 years ago.
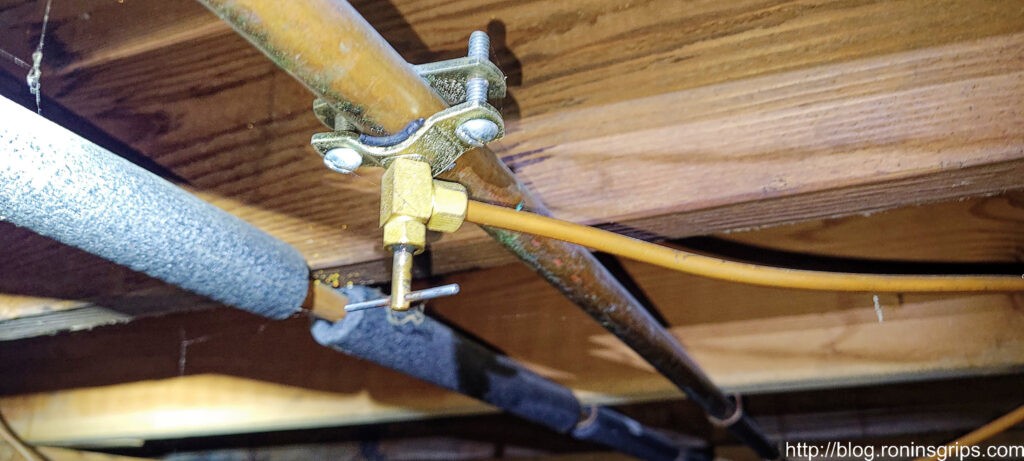
I don’t know if these things have a formal name – I’ve always heard them called “vampire taps”. They re put on copper supply like with a rubber gasket between the part of the saddle with the valve and the pipe. The two halves of the clamp are screwed together and then the handle is screwed down until the sharp end of the valve pierces the relatively soft copper. You then back the valve off (meaning turn it counter-clockwise) and water begins to flow through the supply line. So, with this in mind, I needed to close the valve which means turning the small handle you see clockwise until it stops thus closing the valve. I’ve needed pliers in the past to deal with hard turning valves and these things are also known to leak when you try to close them. I got lucky – it both turned easy and it shut the water off entirely just the way it should.

Confirming it was the inlet valve

In reading, there are a few ways these inlet valves fail – they can leak water on the floor but still work and dispense water, not leak but dispense water very slowly, or don’t work at all. I was 90% sure it was the valve given past experience with other fridges so the first thing I did was to pull out the unit.
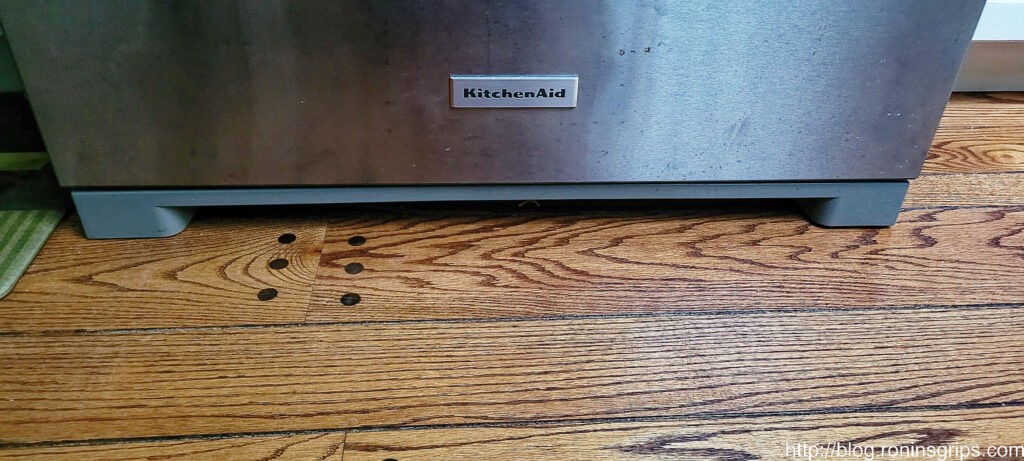
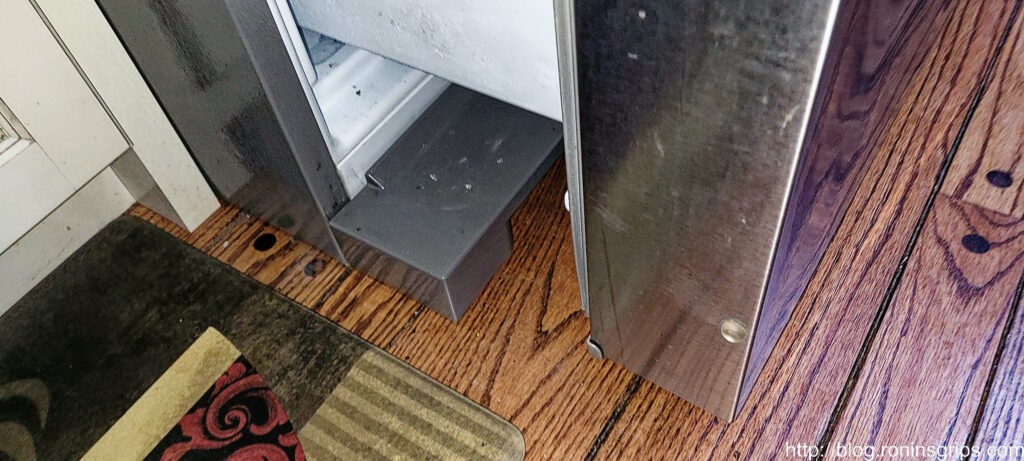
If you have never pulled your fridge out before, let’s start here. See the plastic facia/cover below the door? That is just for looks and pulls off but you need to open the lower freezer door to do so. Note the rust on the “stainless” steel skin above and to the right of the KitchenAid logo. “Stainless” is a generic term and really the resistance to corrosion is dependent on the alloy used. Whirlpool/KitchenAid went with a cheaper alloy to save money so it’s not very “stainless” over time.
By pulling the freezer door open, the entire plastic covering is exposed and it literally just pulls forward – no screws or freaky little clips to deal with. They know folks will need to pull this off periodically (or they should) to clean the condenser coils under the unit. So, pull it off and completely remove it.
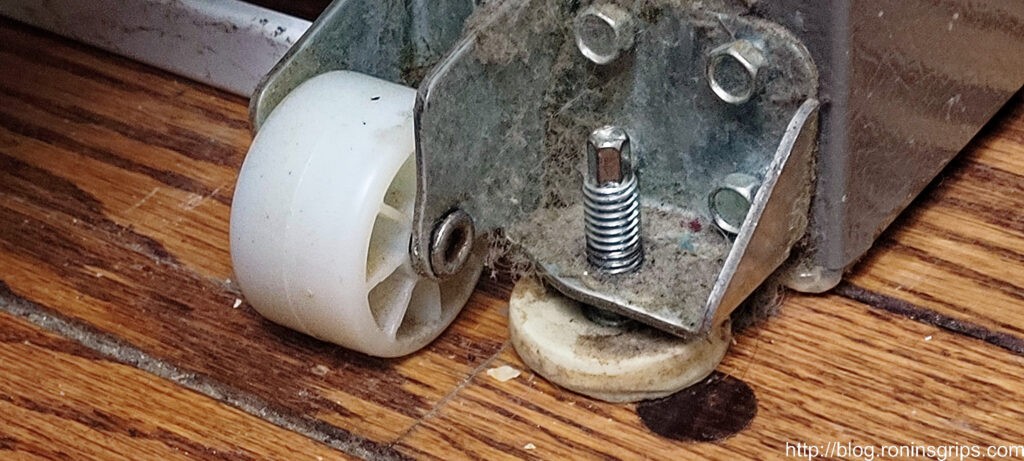
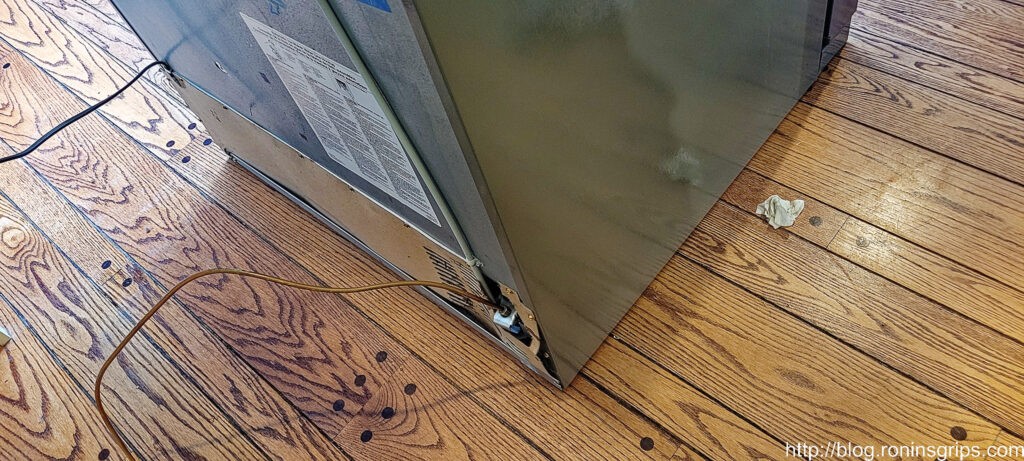
The fridge has four wheels to allow you to move it but if these small levelers are in use it will not want to move. Take a small wrench and turn the head of the bolt to retract the leveler on each side. The fridge will now pull forward. Peek in back to make sure you have enough water line to do so. The water supply line and the power cord will limit how far you can pull the unit out until you disconnect them – if you even need to. I never unplugged my fridge while working on it for example.
There was a real small chance that the supply line was loose so I tightened it just a tad and then hand my wife watch the valve for leaks as I went back under the house to turn the tap back on. It’s way easier and cleaner to do it with two people. So, I turned it on and she called down that water was going on the floor and I shut it off. The water started right under the valve and everything else was dry … my money was on the inlet valve was the culprit and it was.

Okay, the water inlet valve is a small electricslly controlled valve that is turned on and off by either the ice maker (that no longer works) or a person wanting cold water from the dispenser pushing their cup against the on-off switch. The valve body is made of plastic and that is what failed. The only saving grace is that the engineers put it at the back of the fridge and it is very easy to access and change – literally a 5-10 minute job. You can easily buy one online without spending a fortune.
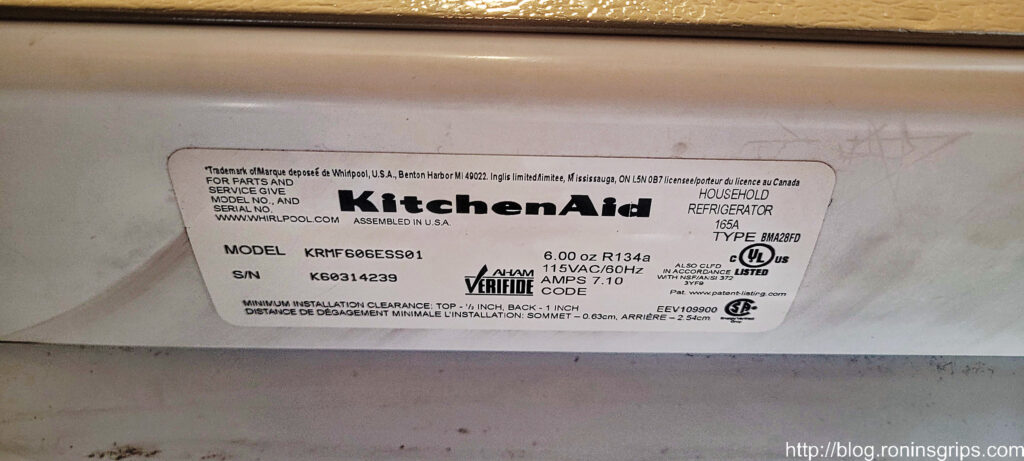
To order parts for your fridge, you need to know the exact model number – in my case it was a KRMF606ESS01. You can find this info inside your fridge – in my case this sticker was on the inside top left of the unit facing down hence the camera angle is looking up.

I spent some time searching on Kitchen aid KRMF606ES01 water valve and found out that my fridge has two – one at the inlet (that I needed) and one inside that I did not so make sure you order the right part. The valve part number I needed was W10394076.

Direct from KitchenAid I could get the part for over $95.49. No, Whirlpool, I didn’t feel like spending a fortune by ordering it direct. I kept on searching and found it in the $70s then the $50s and then hopped over to Amazon and found it for $27.99 with free Prime shipping. It got great reviews and I ordered it on Saturday with delivery on Monday. Guess what – it was the exact same valve. Strike #4 for KitchenAid by the way.
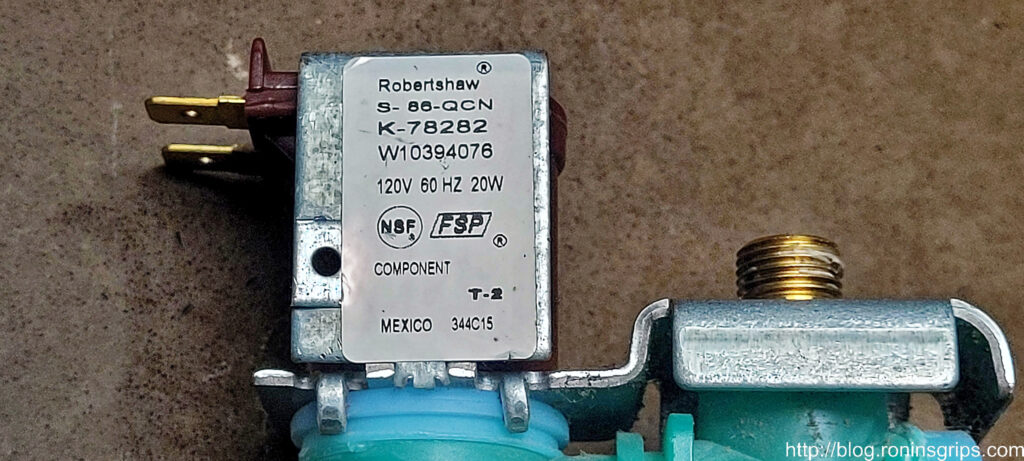
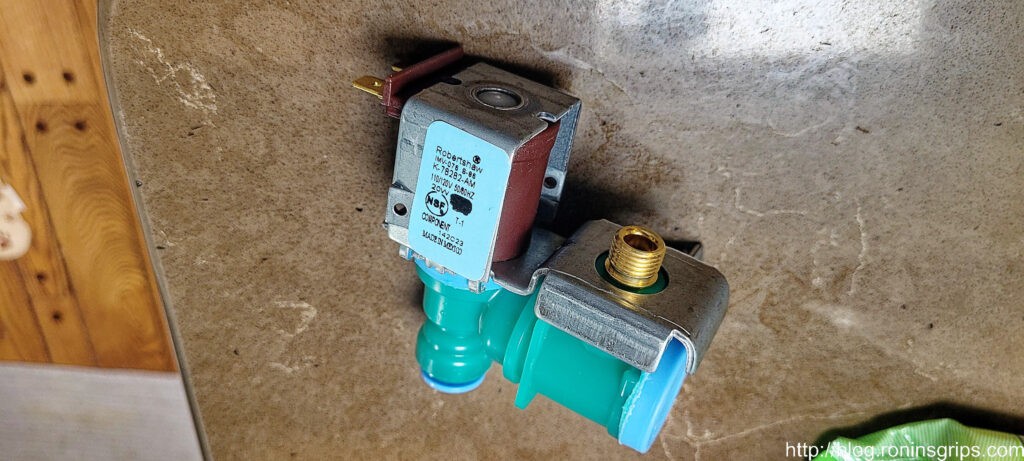
I’m jumping the gun a bit but this is the sticker on the original that I removed from the fridge. Note the maker is Robertshaw and their part number was K-78282 with Whirlpool’s W1039476 part number indicated.
Same maker – Robertshaw – slightly different part number K-78282-AM — the suffix probably denotes some relatively minor changes. No Whirlpool part number on and and no ghastly markup either. It is an exact match otherwise.

Replacing the valve

First, make sure the water supply is turned off and have a container you can set the supply line in just in case it drops. I’ll step through this with photos:
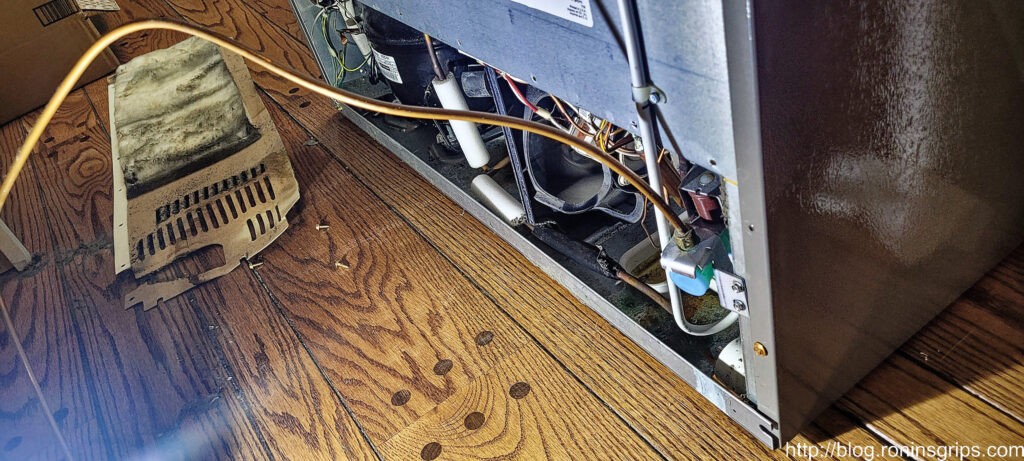
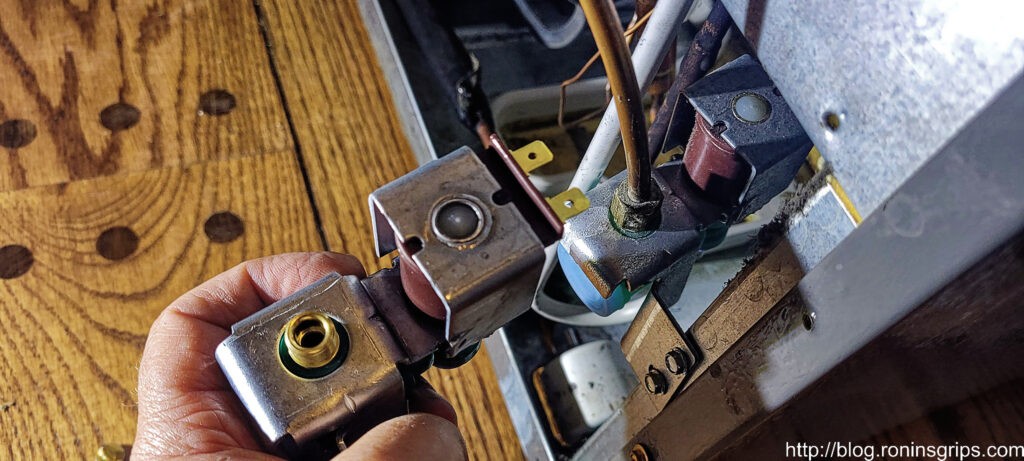
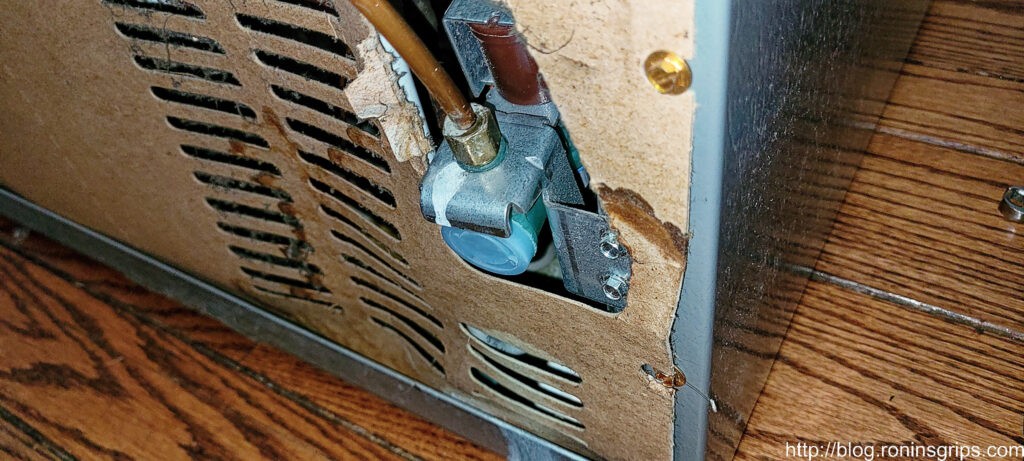
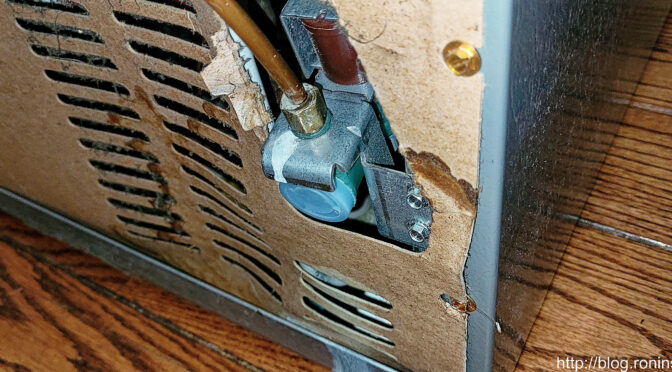
get the the fiberboard back cover out of the way by removing the screws around the edges. Doing this gives you easier access and you can make sure there are no drips when you are done.
Always compare new and old parts to make sure they match. I have been burned so many times over the years that this comparison is automatic for me now – don’t assume anything.
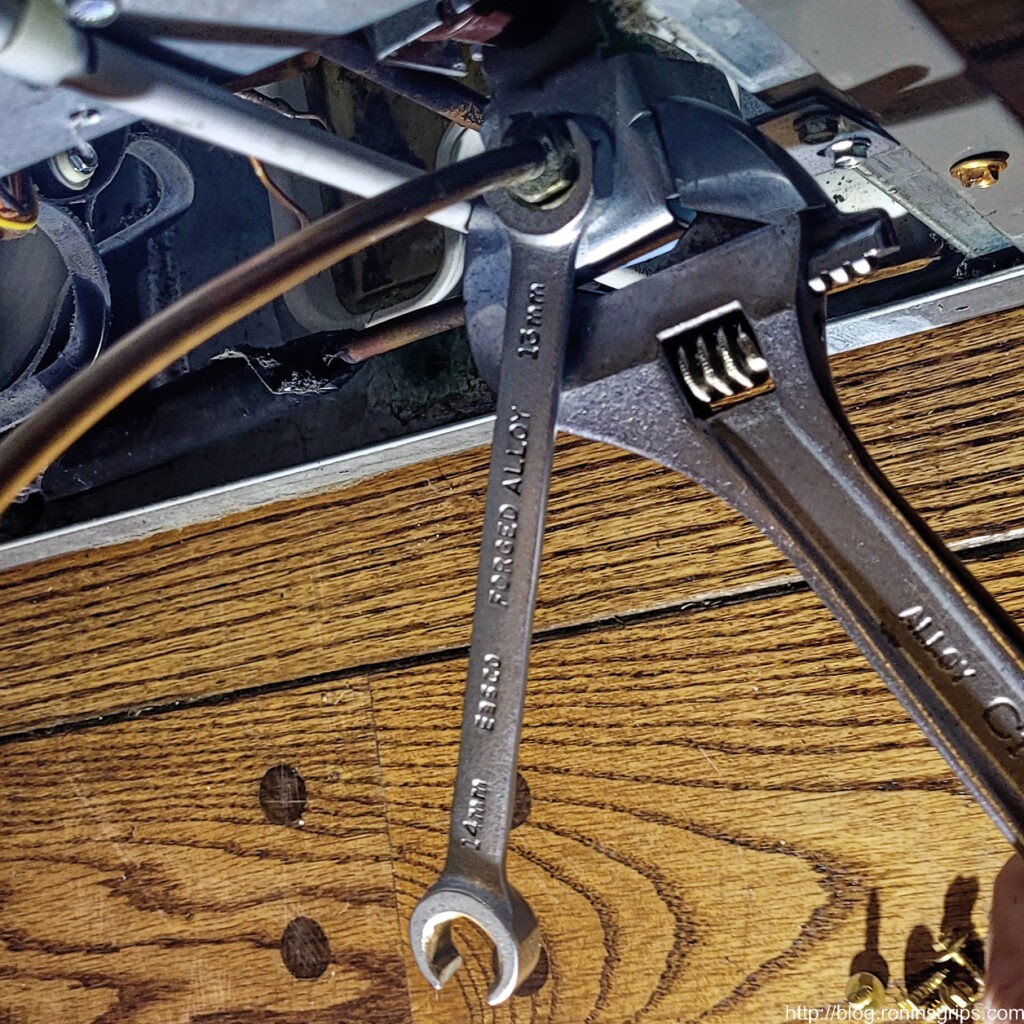
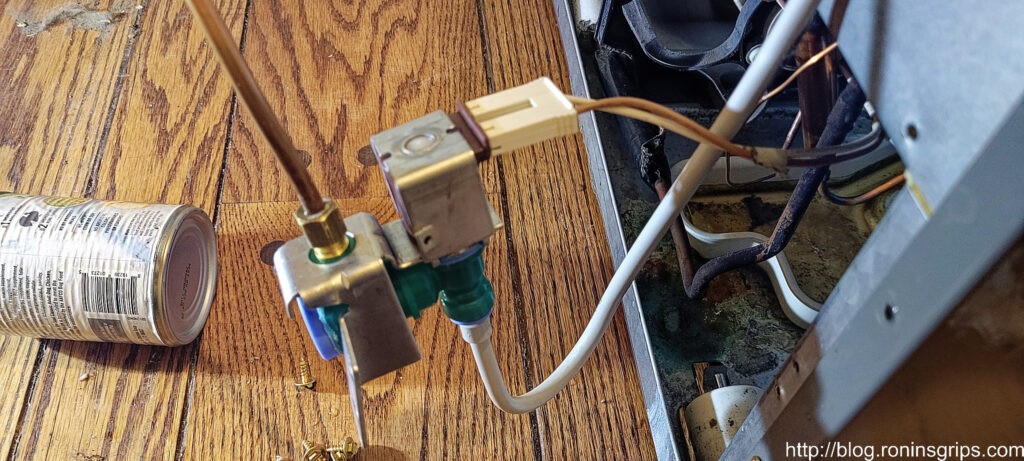
I’d recommend moving connections one by one. Take one off the old valve and put them on the new one. Then again, you have three very different connections so mixing them up would be next to impossible. Do note the orientation of the electric connection and keep it the same. In this case, I am using the adjustable wrench to hold the steel bracket and a flare nut wrench to loosen the water supply line. Never use an adjustable wrench on flare nuts – if the jaws give you can round over the nut so at least use a fixed wrench or better yet a flare nut wrench.
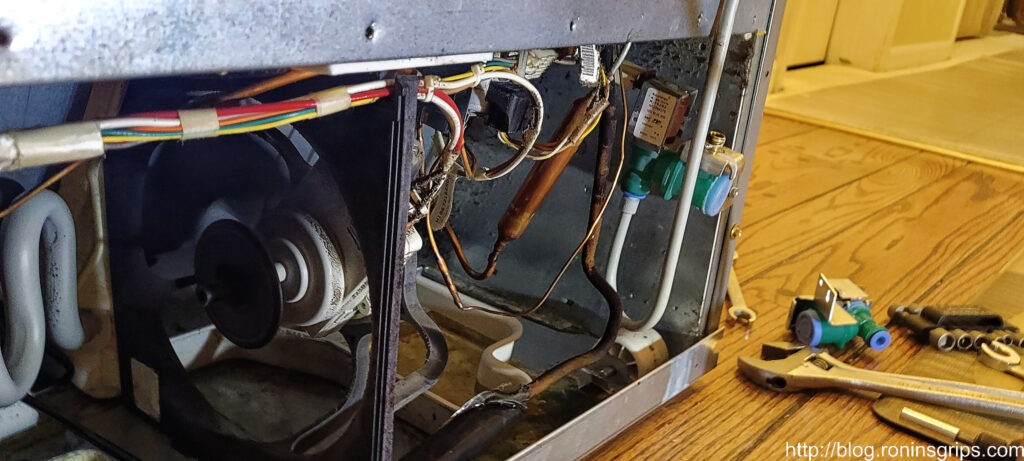
The waterline in the bottom is connected via a “push-to-connect” or “push connect” ,fitting. Push the blue collar in towards the valve body while pulling the outlet water line away and it will come right out. Note where the white electrical wire is for reference. Looking at the valve from the back, it is on the left side.
This is everything moved to the new valve. I then put it in place and secured it with the original screws. Again, note where the white wire is at. I didn’t want to find out if it mattered which side was connected so I just followed the same wiring orientation on the new valve, Also, use the adjustable wrench to hold the valve body while tightening the flare nut.

And with the new valve unit installed and my wife watching everything, I headed back down into the crawl space and turned the water on. No leaks. She tried the water dispenser and it was actually putting out a larger volume of water also – our jet had always been on the anemic side.

So, I waited while she filled a few big cups of water and threw them out to purge the lines. She also didn’t see any leaks so I headed back up after a few minutes hoping my crawl space work was done … and it was.
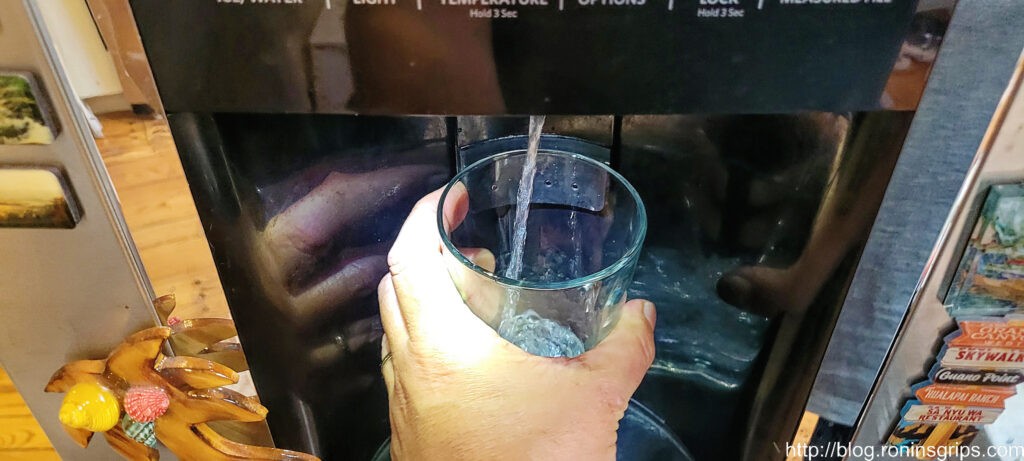
I looked for myself and it was definitely a much stronger jet of water – it had never moved that much water.
After a half hour of careful monitoring for leaks, I sealed it back up. I then waited a few hours and double checked by moving it forward a tad and checking around underneath with a flashlight and no leaks so I slid it back in place. When you slide it back, make sure the power cord and water supply line do not get caught on anything.

With the fridge back in place, use the levelers if you need to – I don’t actually.

I didn’t get photos but the last thing I did was to use a long brush made for cleaning condenser coils to do just that. As lint and dust build up on the condenser it becomes less efficient, the fridge runs more and your electric bill is higher. The lint and dust there by the way because of an electric fan that is running underneath to help cool things off.

The last step is to open the lower freezer door and push the plastic cover back on the bottom. Done.

Summary

A week later and it is still running great. I hoped that the ice maker might start working again but no luck there. We bought am Aglucky counter top ice maker a few years ago that we’ve been very happy with.

I paid a premium for a supposed top-of-the line KitchenAid fridge and I don’t think the same level of quality is there. We have a Samsung fridge downstairs that has been flawless for us. When we replace this main fridge in the kitchen it may very well be a Samsung but it will not be a KitchenAid.

In the mean time, if you are having problems with your water inlet valve, I hope this helps you solve your problems and save some money.

3/2/24 Update: The new valve is still working great. We noticed we have more flow also – glasses fill faster. So, if you want to save some money, it’s an easy DIY repair that valve is still only $27.99 off Amazon.


If you find this post useful, please share the link on Facebook, with your friends, etc. Your support is much appreciated and if you have any feedback, please email me at in**@ro*********.com. Please note that for links to other websites, I may be paid via an affiliate program such as Avantlink, Impact, Amazon and eBay.


Recharging The R134A Refrigerant In A Glacer Bay VWD5446BLS-2 Water Cooler

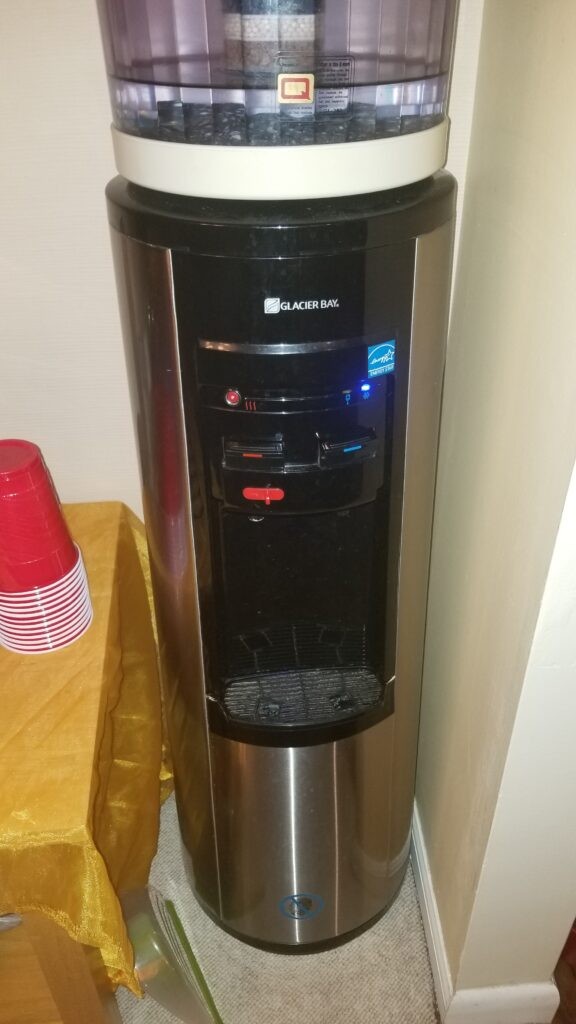
Years ago we invested in a water filter unit that sits on top of a regular water cooler. This lets us have clean good tasting cold water – at least it did until about a year ago. My wife was the first to notice that the water wasn’t getting as cold and finally it got to the point where it was only just a tad cool first thing in the morning. Because this thing was older, my first thought was that it was low on refrigerant because we’d had this happen before with old fridges.

Refrigeration systems are sealed but over time the seals age and slowly the refrigerant leaks out. At some point, there isn’t enough left to effectively cool whatever it is in questions – a fridge, freezer or a water cooler.

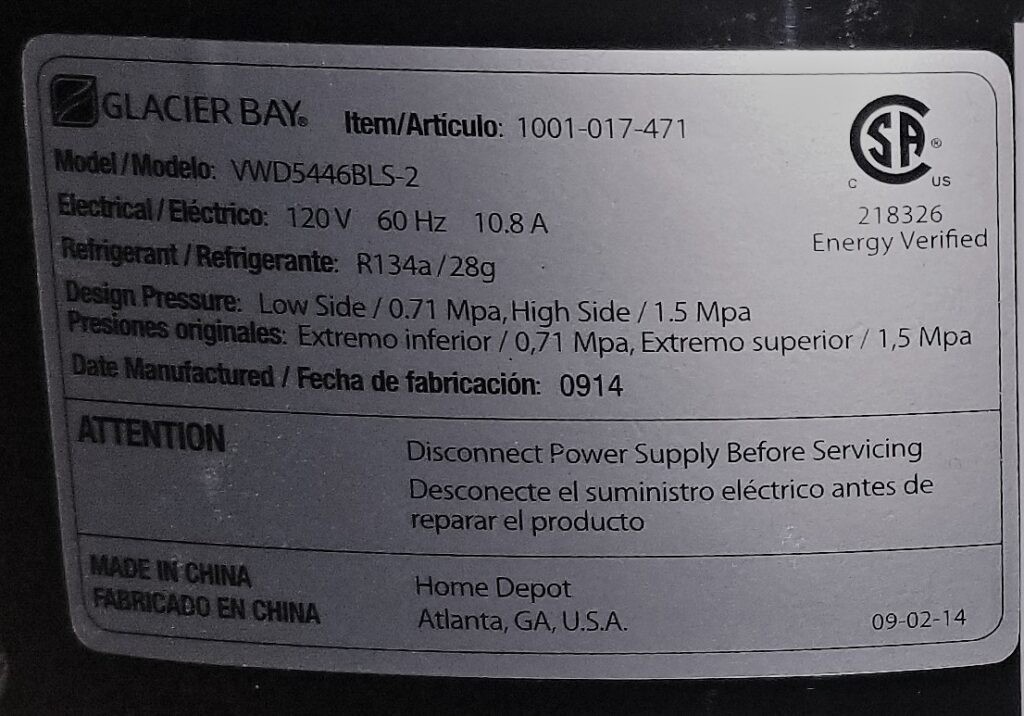
So, step one was to pull the cooler out and look at the manufacturer’s sticker on the back. Glacier Bay is a Home Depot house brand – no surprise there. The refrigerant used was R134A – definitely needed to know that, which was nice because I keep R134A around for use on cars. The sticker also told me the unit was made back in September of 2014 — yeah, this thing was just over six years old and we bought it new way back when.

This is the manufacturer’s sticker off the back of the unit.

Note: If you need R134A refrigerant, go to your local discount car parts store. Odds are you can get a can cheaper there than mail ordering one.

Now there’s one thing I have learned – do some research on things that need to be repaired before you make the wrong assumptions and really screw things up. Boy, I’m glad I did that in this case because these small refrigeration units work at way, way lower pressures than a car or truck.

Watch this great video

What helped me out the most was an amazing video that a fellow put together about how to recharge small fridges. It was exactly what I needed to know and I only made a few small adjustments to his recommendations:

What I did

The first thing I had to figure out was how to get to the low pressure line to attach the bullet valve. While you may think to come at it from the back, which was my first thought, it will be a nightmare. It turns out that you remove the water tray by pulling it straight out and you are then looking at the one screw you need to remove to then pull off the front lower cover – voila – you are looking right at the lines.

I got my bullet valves off Amazon and you definitely need to back off the valve or it will pierce the line when you clamp it on. The gentleman mentions it in the video and I just want to reinforce you better make sure it is backed off.

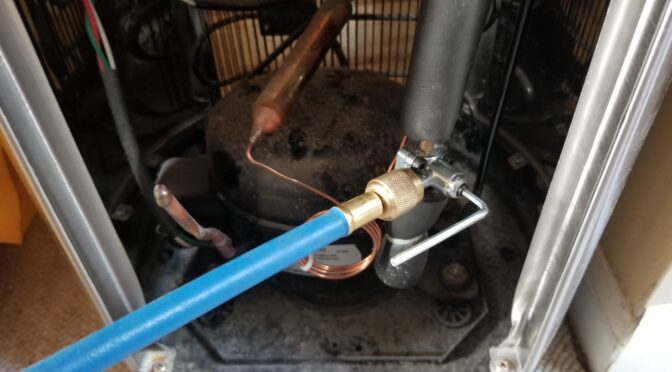
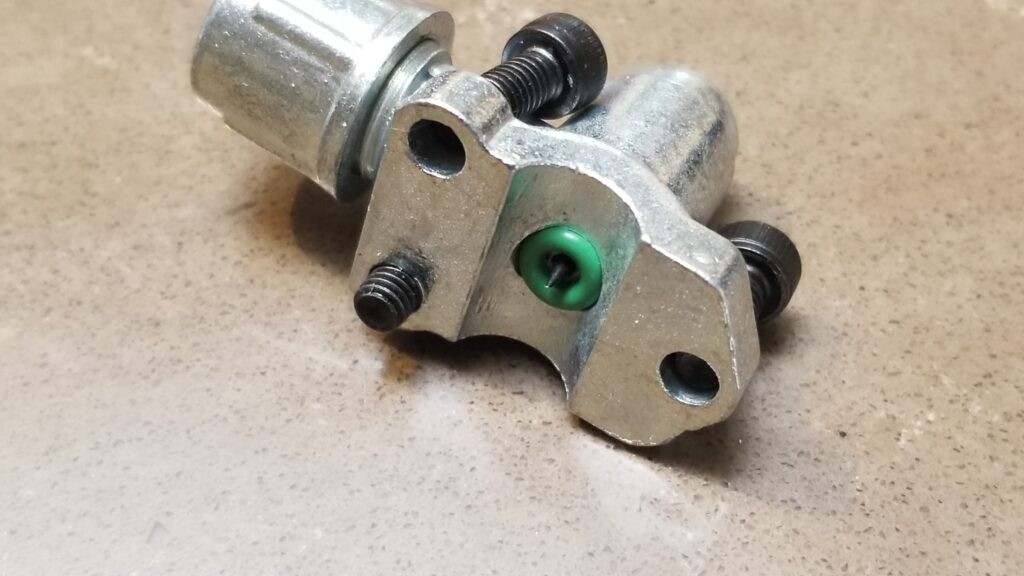
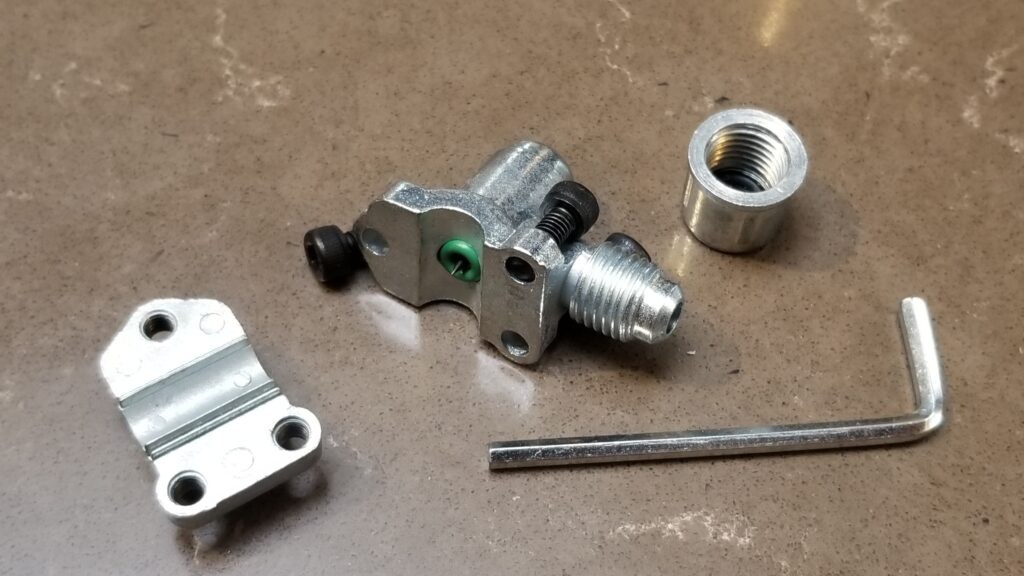
This is the way the tap looks when I first disassembled it for installation. You can see the hardened steel point is extended. If you don’t first use the supplied hex wrench to back the valve out, this point will pierce your copper line while you are trying to install the valve and you don’t want that.
Seriously, this is a wickedly simple elegant valve. Everything you need to tap into the line is there with the exception of using sand paper or a brillo pad to clean any oxidation off the copper line where the piercing tap and the green rubber o-ring seal will go.

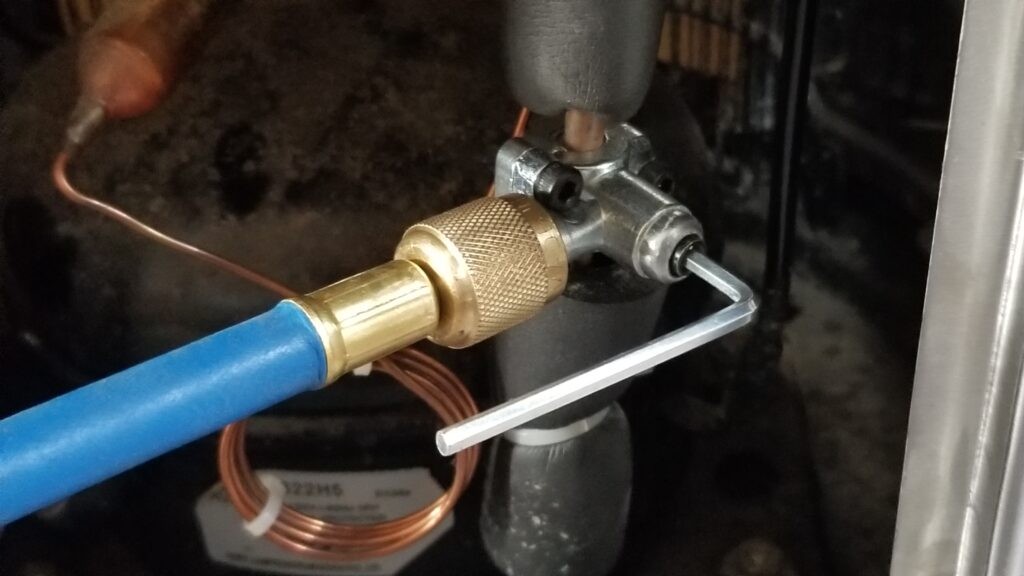
The line you need to attach the valve to has the insulation on it. I slid the insulation out the way, installed the valve assembly so it was just barely snug and then did the final positioning so I had easy access to the valve hex screw and could also attach the refrigerant line.

I moved the valve around until I found a good spot for it where I would have easy access to the valve screw where the hex head wrench is in the photo and also be able to easily get to the refrigerant line. Make sure your copper line is clean. I’d recommend using very fine sandpaper to make sure there’s no oxidation that will interfere with the seal.

The compressor was drawing a vacuum and it appeared to be working and holding the vacuum so I did not use a vaccum pump to draw down the whole system. For me, this worked.

The fellow mentioned these things run at 1-3 PSI on the suction side so I opted to slowly fill it until it was at 2 PSI. Note, I did purge my manifold line before I opened the valve so as to get rid of any air first.

Now when I say slowly fill, I would add a bit with the cooler’s compressor running and then wait a few minutes to see what happened. I did this over and over for almost 30 minutes until the pressure gauge read 2 PSI. Don’t try to do it all in one step.

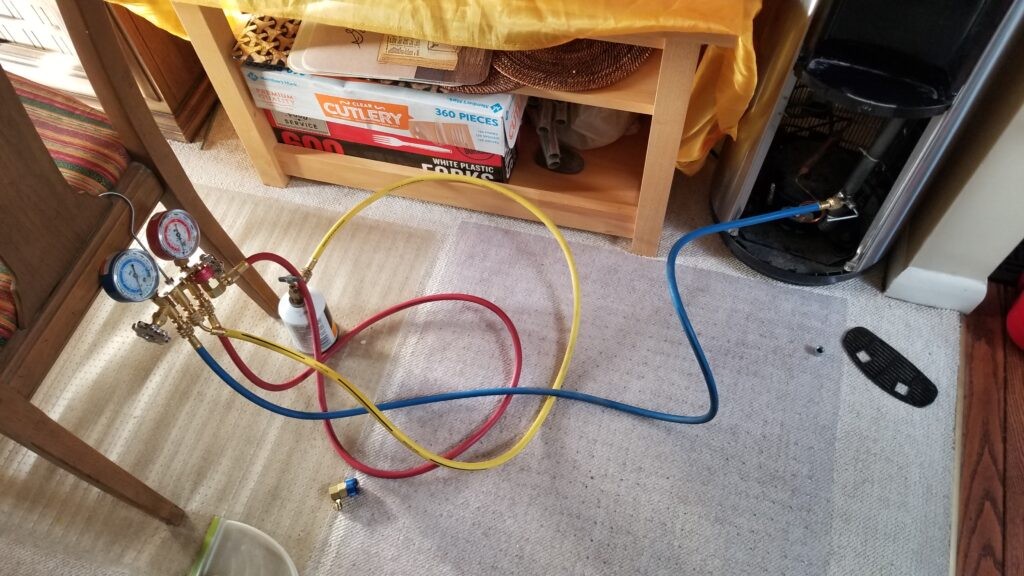
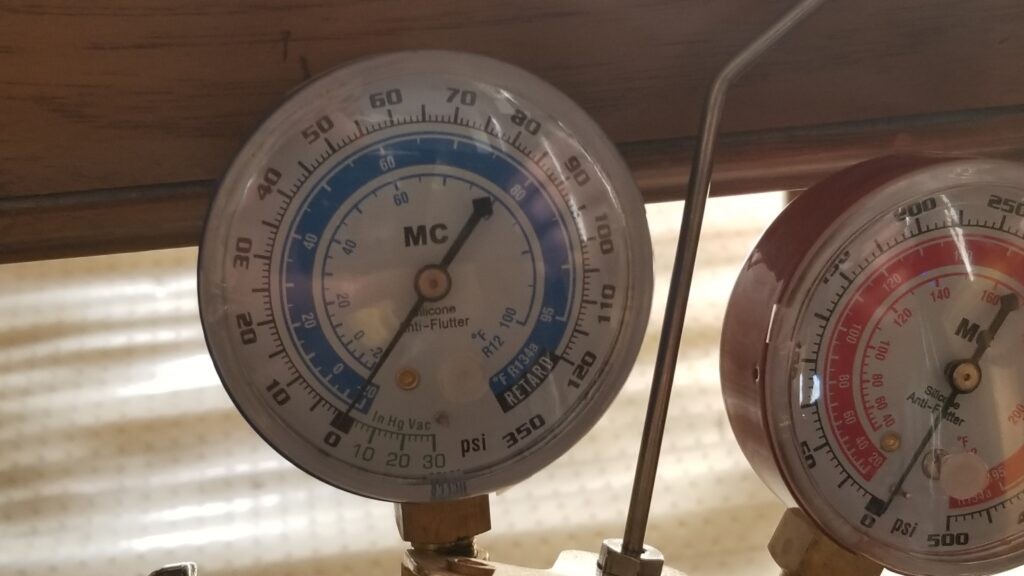
This is the Master Cool model 66661 air conditioning manifold gauge set that I use on cars and the low-pressure blue side started with a low enough marked increments on pressure and vacuum to work. You can definitely use what the fellow has in the video – I just used what I had. The red hose was not needed in this case.
The blue gauge shows vacuum in inches of mercury (In Hg) colored green down in the lower left and then it switches to pressure in PSI in black above the 0. Again, you just need 1-3 PSI and I stopped at 2.
If you don’t have air conditioning tools, there are tons of them for sale on Amazon. There are whole kits with everything you need to start – vacuum pump, manifold with gauges and more. Click here to see them.
The cooler is working great once again and it’ll be easy to add refrigerant again if needed.

In conclusion

It’s been two weeks and the water cooler is still working just great. I have a spare bullet valve should I need it but other than those, since I already had the gauge set and the R134A, the repair didn’t cost me anything. Even if I had gone with complete repair kit, it would have been cheaper than having a repair person visit.


Note, I have to buy all of my parts – nothing here was paid for by sponsors, etc. I do make a small amount if you click on an ad and buy something but that is it. You’re getting my real opinion on stuff.

If you find this post useful, please share the link on Facebook, with your friends, etc. Your support is much appreciated and if you have any feedback, please email me at in**@ro*********.com. Please note that for links to other websites, I may be paid via an affiliate program such as Avantlink, Impact, Amazon and eBay.