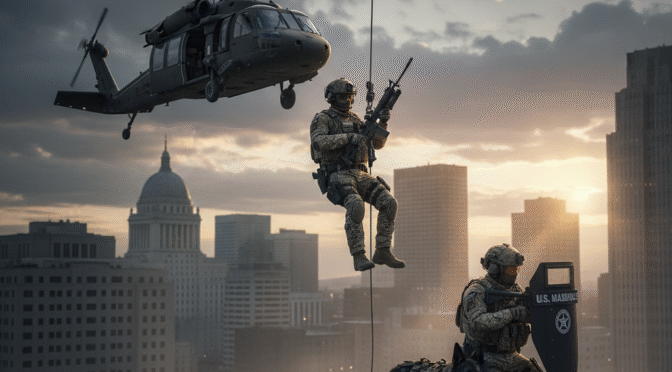
The United States Marshals Service (USMS) Special Operations Group (SOG) represents a unique and critical component within the federal law enforcement and national security framework. Established in 1971 as the nation’s first federal tactical unit, SOG was born from the crucible of widespread civil unrest and an identified need for a civilian-led, federally controlled force capable of responding to crises that exceeded the capacity of local and state authorities. This report provides a comprehensive analysis of the SOG, examining its historical origins, mission mandate, organizational structure, and evolution over more than five decades of service.
The analysis reveals that SOG’s creation was a deliberate policy decision to bridge the gap between conventional law enforcement and military intervention, providing the Department of Justice (DOJ) with a flexible and rapidly deployable tactical asset. Its mission, while fundamentally rooted in protecting the federal judicial process, is intentionally broad, encompassing national emergency response, homeland security operations, and international deployments. This operational scope is managed through a unique, decentralized staffing model, where most operators are full-time Deputy U.S. Marshals serving in districts across the country, supplemented by a full-time command and training cadre at the William F. Degan Tactical Operations Center in Louisiana.
This report details the unit’s rigorous selection and training regimen, its modern armament—highlighted by the recent adoption of the advanced STI Staccato-P pistol—and its adaptive tactical methodology. An examination of its operational history, from the 1973 siege at Wounded Knee to contemporary multi-agency fugitive operations in 2024, illustrates the unit’s consistent evolution in response to a changing threat landscape. The analysis concludes by assessing the strategic imperatives facing SOG, including the challenges of maintaining tactical standardization, securing adequate funding for modernization, and adapting to future threats posed by domestic terrorism and transnational crime. SOG remains an indispensable strategic tool for the enforcement of federal law and the protection of national security interests.
I. Genesis and Historical Imperative (1971)
The Crucible of Creation: Civil Unrest and the Need for a Federal Response
The formation of the U.S. Marshals Special Operations Group was a direct and necessary response to the tumultuous socio-political environment of the late 1960s and early 1970s. During this period, Deputy U.S. Marshals increasingly found themselves on the front lines of large-scale, and often violent, anti-government protests, confronting heavily armed criminals, and securing federal facilities against credible threats.1 These situations frequently overwhelmed the resources, training, and manpower of local law enforcement agencies, exposing a critical vulnerability in the nation’s ability to enforce federal law and maintain order.1
The institutional groundwork for such a unit was laid in 1969 when the U.S. Marshals Service (USMS) was formally established as an official, independent office within the Department of Justice (DOJ).2 This centralization provided the necessary command structure to create and manage a national-level tactical team. Amidst the challenges of the era, particularly those related to the enforcement of civil rights legislation, the federal government identified a clear need for a civilian, rather than military, police force to handle high-threat domestic crises.2 The creation of a specialized unit within the USMS was the logical solution to this strategic imperative.
The Vision of Director Wayne Colburn and the Mandate from the Attorney General
The architect of the SOG concept was Wayne Colburn, who served as the Director of the U.S. Marshals Service from 1970 to 1976.1 Recognizing the escalating dangers faced by his deputies, Colburn conceived of a specially trained, volunteer unit drawn from within the USMS ranks to serve as a dedicated tactical response element.1 He presented this forward-thinking proposal to then-Attorney General John Mitchell.
In January 1971, Attorney General Mitchell formally approved the proposal and ordered the USMS to form the new unit.1 This directive officially established the Special Operations Group, making it the nation’s oldest federal tactical unit.1 Its creation was not merely a tactical enhancement for the Marshals Service but a strategic policy decision by the DOJ. It was designed to bridge a critical response gap between the capabilities of conventional law enforcement and the politically and legally complex option of domestic military intervention, allowing the DOJ to project force and enforce federal law without the implications of using the armed forces.
Inaugural Deployment: The 1971 May Day Protests and the Unit’s Baptism by Fire
With the mandate secured, Director Colburn began hand-picking the initial cadre of 114 volunteers, placing a specific emphasis on recruiting individuals with the “maturity” and discipline forged by prior military combat experience.1 This preference for combat veterans was not incidental; it was a deliberate effort to import a military mindset of structured tactical operations, discipline under fire, and operational planning into a law enforcement context, providing a robust foundation upon which the unit could build.
The first SOG members graduated from their initial training course in April 1971, held at the former Border Patrol Training Academy in Los Fresno, Texas.1 Reflecting the most immediate threat perception of the time, this training focused primarily on techniques for managing civil unrest and large-scale crowd control.1 The unit’s value was proven almost immediately. SOG’s first operational deployment occurred in May 1971 during the anti-war “May Day” demonstrations in Washington, D.C., which rapidly escalated into riots. The newly formed unit was tasked with securing the perimeter around federal courthouses, immediately validating its core purpose of protecting the federal judicial process in high-threat environments.1
II. Mission Mandate and Operational Scope
The Official Charter: Protecting the Federal Judicial System
The foundational mandate of the Special Operations Group is inextricably linked to the broader mission of the U.S. Marshals Service. The SOG’s official mission statement defines it as a “specially-trained, rapidly-deployable law enforcement element… capable of conducting complex and sensitive operations throughout the globe to further the rule of law”.5 The statement clarifies that the unit’s purpose is to leverage its enhanced capabilities in direct support of the USMS mission to “protect, defend, and enforce the federal judicial system”.5 This charter provides the legal and operational justification for all of SOG’s activities, from domestic fugitive apprehension to international stability operations.
The Five Pillars of SOG Operations: Enforcement, Security, Seizures, Witness Protection, and Prisoner Transport
SOG’s broad mandate is executed across five distinct but interrelated operational pillars, which form the core of its tactical responsibilities 1:
- Enforcement Operations: This includes the planning and execution of high-threat arrest and search warrants against violent offenders, leading apprehension efforts for fugitives on the USMS “15 Most Wanted” list, and conducting high-threat extraditions of dangerous criminals.1
- Judicial Security: SOG provides an enhanced layer of security for the federal judicial process. This involves securing the perimeters of court facilities and the residences of judicial officials during high-threat trials, deploying on-site tactical operations teams, and operating as a mobile Counter Assault Team (CAT) to protect the movements of judges, jurors, and other court personnel.1
- Asset Seizures: The unit provides on-site perimeter security and initial tactical clearing of locations during the seizure of high-value assets forfeited by criminal organizations.1
- Witness Security: SOG provides tactical support to the federal Witness Security Program (WITSEC), including securing the perimeters of safe sites and providing CAT support for the high-threat movement of protected witnesses and their families.5
- Prisoner Transportation: The group serves as the tactical element for the most dangerous prisoner movements, providing CAT overwatch for vehicle and aircraft transfers and securing loading and unloading facilities.1
A National Crisis Response Force: Role in National Emergencies and Homeland Security
Beyond its duties directly related to the judiciary, SOG’s charter positions it as a national crisis response force for the Department of Justice. The unit is a specially trained and equipped tactical element designed for deployment in high-risk and sensitive law enforcement situations, national emergencies, civil disorder, and natural disasters.8 This operational mandate is intentionally broad, allowing SOG to function as a versatile tactical asset for the Attorney General. Phrases in its charter such as “national emergencies” and “complex and sensitive operations throughout the globe” provide the flexibility to deploy the unit to a wide range of contingencies without the jurisdictional or legal hurdles that might encumber other agencies.5
This expansive role includes unique and critical homeland security missions. A prime example is SOG’s responsibility for providing law enforcement protective services for the Strategic National Stockpile, the nation’s repository of emergency medicine and medical supplies, in partnership with the Department of Health and Human Services and the Centers for Disease Control and Prevention.6 This mission, while having little direct connection to the judiciary, underscores SOG’s utility as a national security asset. The unit’s scope is explicitly global, with the capability to conduct operations internationally when ordered by the Attorney General.5
III. Organizational Doctrine and Command Structure
Placement within the Tactical Operations Division (TOD)
The Special Operations Group is a primary component of the USMS Tactical Operations Division (TOD), which was established to consolidate the agency’s tactical and crisis response capabilities to meet 21st-century challenges.5 The TOD is situated within the USMS headquarters command structure, reporting to the Associate Director for Operations, who in turn reports through the Deputy Director to the Director of the U.S. Marshals Service.11 This organizational placement ensures that SOG’s tasking and deployments are aligned with the agency’s highest operational priorities. The TOD serves as the central nervous system for coordinating special law enforcement assignments, security missions, and crisis response, directly carrying out the orders of the USMS Director.5 Other key entities within the TOD include the Office of Emergency Management and the unit responsible for Strategic National Stockpile Security Operations.5
Command and Control: The William F. Degan Tactical Operations Center
SOG’s operational home and primary training facility is the William F. Degan Tactical Operations Center, located at Camp Beauregard near Alexandria, Louisiana.1 The center, established in 1983, serves as the hub for all SOG activities, from selection and training to mission planning and deployment.1 It is named in honor of Deputy U.S. Marshal William F. Degan, an SOG operator who was killed in the line of duty during the 1991 Ruby Ridge incident.1 A small, full-time cadre of SOG personnel is permanently assigned to the Degan Center, providing the core leadership, training expertise, and institutional continuity for the unit.1 A secondary cadre is also based in Springfield, Virginia, to support operations and training.5
The Operator Model: A Cadre of Part-Time Specialists
A defining characteristic of the Special Operations Group is its staffing model. The vast majority of its operators are volunteer Deputy U.S. Marshals who serve in their primary law enforcement capacity in one of the 94 USMS district offices located throughout the United States and its territories.13 These highly trained deputies perform their day-to-day duties while remaining on call 24 hours a day for SOG missions.1 When activated, they assemble for specialized training and deployment. The unit is reportedly comprised of approximately 62 Deputy Marshals in addition to the full-time training cadre, and is organized into four primary teams, which are further subdivided into twelve-man assault teams.1
This dual-hatted nature of SOG operators serves as a significant force multiplier and an intelligence conduit for the USMS. By embedding tactically proficient personnel with intimate local knowledge across its 94 districts, the agency maintains a nationwide network of experts. When a crisis arises, a local SOG operator can provide an immediate, on-the-ground assessment to the local U.S. Marshal and the national command at the Degan Center long before a full team can be deployed. This model facilitates seamless integration with local fugitive task forces and provides the central command with real-time intelligence from a trusted, tactically-vetted source. However, there is an inherent operational tension in this structure. The expectation for SOG to be a “rapidly-deployable” force for global crises contrasts with the logistical reality of assembling a team from disparate locations across the country, a challenge that can impact response times compared to a full-time, co-located unit.
IV. Personnel: Selection and Indoctrination
The Profile of an SOG Operator: Experience and Aptitude
The path to becoming a member of the Special Operations Group begins with service as a Deputy U.S. Marshal. All SOG candidates are volunteers from the ranks of sworn deputies.9 The initial requirements to become a Deputy are themselves stringent, requiring applicants to be U.S. citizens between the ages of 21 and 36, possess a bachelor’s degree or equivalent qualifying experience, and successfully pass an extensive background investigation to obtain a Top Secret security clearance.16 Candidates must also meet rigorous medical and physical fitness standards.16
Once serving as a Deputy, those who volunteer for SOG undergo an initial screening process. This includes a numerical scoring system to create a preliminary list of qualified candidates, followed by a formal interview with the SOG training cadre.1 This phase is designed to assess not only a candidate’s professional record but also their psychological suitability and aptitude for functioning within a high-stress, team-oriented tactical environment.19
The Gauntlet: The SOG Selection Course
Applicants who pass the initial screening are invited to attend the SOG Selection Course. This is a multi-month evaluation process, culminating in an exceptionally rigorous 27-day phase conducted at the Degan Tactical Operations Center.1 The course is designed to push candidates to their physical and mental limits, with training days often lasting 15 to 17 hours with minimal sleep.1 This high-stress environment serves as a crucial filter, revealing a candidate’s true character and their ability to remain a reliable team member when exhausted and under duress.
The selection process involves a battery of assessments. Physical tests include push-ups, sit-ups, a timed 1.5-mile run, pull-ups, swimming, and rucking with heavy gear, as well as a demanding 12-station obstacle course.1 Candidates are also subjected to advanced shooting assessments under stress and must pass written examinations covering topics from communications protocols to team tactics.19 A key component is the “leaders reaction course,” a series of problem-solving exercises designed to test teamwork, leadership, and decision-making under pressure.1 The process prioritizes psychological resilience and the ability to subordinate individual ego for the good of the team. The attrition rate is a testament to its difficulty; in a 2024 selection course, 51 candidates began, but only 27 successfully graduated.20
From Deputy to Operator: Indoctrination Training
The selection course serves a dual purpose: it is both a screening mechanism and the primary means of indoctrinating candidates into the unit’s unique culture and tactical doctrine. Rather than selecting first and then training, SOG’s process is an integrated pipeline of assessment and instruction. Throughout the course, candidates receive intensive training in the core SOG tactical skillsets. This curriculum includes high-risk entry techniques, close quarters battle (CQB), helicopter insertions and rappelling, precision shooting, the use of diversionary devices, and tactical field training.1 This integrated approach ensures that every graduate, regardless of their prior experience, has been forged with the same foundational tactical language and standard operating procedures, a critical element for a decentralized unit that must assemble and operate seamlessly on short notice.
V. Advanced Training and Skill Sustainment
The Curriculum: Core Competencies and Specialized Skills
Upon successful completion of the selection course, SOG operators possess a wide array of advanced tactical skills. The unit’s training curriculum is designed to produce operators proficient in a broad spectrum of specialties necessary to address their diverse mission set. These core competencies include high-risk dynamic entry, explosive and mechanical breaching, sniper/observer operations, advanced rural and woodland operations, evasive and tactical driving, the deployment of less-lethal weapons and munitions, waterborne operations, and tactical medical support.9
To support this advanced training, the William F. Degan Tactical Operations Center is equipped with extensive and specialized facilities. The infrastructure includes multiple state-of-the-art gun ranges for precision and tactical shooting, a large warehouse with movable walls to create varied layouts for close quarters battle (CQB) scenarios, multi-story rappel towers, and a 40-acre tactical training area that includes an urban center for realistic scenario-based exercises.1
Maintaining the Edge: The Continuous Training and Recertification Cycle
Because most SOG operators serve in a part-time capacity while assigned to their home districts, a rigorous and consistent skill sustainment program is essential to maintaining operational readiness. After graduating from selection, operators are required to participate in mandatory sustainment and recertification training sessions.1 These intensive training periods are conducted at the Degan Center at least every six months and typically last for three weeks.1 The focus of these sessions is to refresh and hone core skills, including advanced marksmanship, assault tactics, helicopter insertion techniques, and multi-day tactical field exercises that test the operators’ endurance and tactical acumen.15 This regular, centralized recalibration is paramount to ensuring every operator remains proficient in the unit’s standard operating procedures.
Challenges in Training Standardization and Lessons Learned
Despite the robust internal training program, the USMS as a whole has faced documented challenges in maintaining tactical standardization and incorporating lessons learned into its training doctrine, which presents an institutional risk for SOG. A 2019 Department of Justice Inspector General report identified significant issues within the agency’s Tactical Training Officer (TTO) Program, which is responsible for delivering High Risk Fugitive Apprehension (HRFA) training to all deputies.21 The report found that the USMS lacked a formal process to systematically update its officer safety training with lessons learned from critical incidents, including line-of-duty deaths. It also noted that the training curriculum had critical gaps, particularly concerning tactics for fugitive encounters in open spaces and for small-team operations—scenarios highly relevant to SOG missions.21
These findings were preceded by a 2017 U.S. Senate inquiry which revealed that SOG deputies had been certified as TTOs without proper vetting or the required level of fugitive operations experience. This led to a breakdown in the standardization of tactics being taught across the agency’s 94 districts.22 This failure in standardization was cited as a potential contributing factor in the tragic 2015 line-of-duty death of a Deputy U.S. Marshal during a high-risk operation in Louisiana.22 These external reports highlight the critical importance of SOG’s centralized sustainment training to counteract the potential for “tactical drift” and ensure a uniform standard of excellence.
VI. Armament and Tactical Equipment
Primary Sidearm: The STI Staccato-P DUO
In 2019, the Special Operations Group executed a significant modernization of its primary sidearm, adopting the STI Staccato-P DUO in 9mm.23 This advanced, double-stack 2011-style pistol replaced the venerable single-stack Springfield Armory 1911 in.45ACP, which had been the unit’s sidearm for the previous 16 years.24 The adoption was not merely a weapon upgrade but a reflection of a doctrinal shift towards a philosophy emphasizing speed, accuracy, and higher capacity.
The selection was the culmination of a meticulous four-year evaluation process that included extensive testing and direct feedback from SOG operators.24 Key features that drove the decision included the pistol’s 21-round magazine capacity, its reputation for exceptional accuracy, and its flat-shooting characteristics which allow for faster and more precise follow-up shots.23 The “DUO” (Dawson Universal Optic) system was a critical requirement, allowing for the direct mounting of the Leupold DeltaPoint Pro red dot sight, which is issued with the pistol, while still providing co-witnessing iron sights for redundancy.23 To meet SOG’s demanding operational needs, the pistol is customized with a full Diamond Like Carbon (DLC) finish for superior corrosion resistance—a specific request driven by the humid Louisiana environment where the unit is based—as well as ambidextrous safeties and a slim tactical mag well.23 A smaller, non-optic version of the pistol is also available for operators on concealed carry or protective security assignments.24
Long Guns and Specialized Weaponry
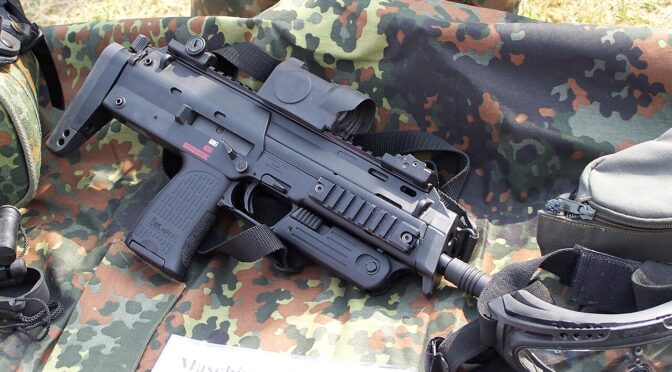
SOG operators are equipped with a range of long guns and specialized weapon systems to meet the demands of their varied missions.14 The primary long gun is a variant of the AR-15 platform, with general-issue Deputy Marshals recently receiving rifles built with Colt lowers and BCM (Bravo Company Manufacturing) uppers, indicating the high quality of components used.25 For close-quarters engagements, particularly in environments where projectile over-penetration is a major concern, the Heckler & Koch MP5 series of submachine guns remains a viable tool in their arsenal.1
For precision fire support and sniper/observer roles, the unit employs bolt-action Remington 700 rifles, a standard for law enforcement tactical teams.1 The versatile pump-action Remington 870 shotgun is used for a variety of roles, including ballistic breaching, close-range engagement, and the deployment of less-lethal munitions.1 The unit is also trained in the use of a wide array of specialty munitions, chemical agents, diversionary devices (“flash bangs”), and explosive breaching charges.12
Advanced Technology and Support Equipment
To maintain a tactical edge, SOG’s operations are augmented by advanced technology managed by the Tactical Operations Division. This includes sophisticated tactical communications suites, video surveillance equipment, and GPS tracking tools that enhance situational awareness and command and control.5 The USMS is increasingly integrating unmanned aerial systems (drones), ground robots, and tactical K-9 units into high-risk operations to gather intelligence and reduce risk to deputies.27 This was demonstrated in a July 2024 SOG deployment in Colorado, which included two UAS pilots to provide critical surveillance and communications relay in a rural environment.20 For large-scale or remote deployments, the unit can utilize Mobile Command Vehicles (MCVs) that serve as self-contained command and control centers.5
SOG Primary Weapon Systems
| Weapon System | Caliber | Manufacturer | Key Features | Strategic Rationale |
| Staccato-P DUO | 9mm | STI | 2011 Platform, 21-rd capacity, Leupold DPP optic, DLC finish | High capacity, speed, and accuracy for tactical operations; optics integration for faster target acquisition. Replaced aging single-stack 1911s. |
| AR-15 Platform | 5.56x45mm | Colt/BCM (likely) | M4 Carbine variant | Standard federal LE patrol rifle; modularity allows for mission-specific configurations (CQB, perimeter security). |
| MP5 | 9mm | Heckler & Koch | Compact, controllable for CQB | Classic submachine gun for close-quarters engagements, particularly in environments where over-penetration is a concern. |
| Remington 700 | .308 Win | Remington | Bolt-action | Standard platform for law enforcement precision marksmen/sniper teams, providing long-range observation and threat neutralization. |
| Remington 870 | 12 Gauge | Remington | Pump-action shotgun | Versatile tool for breaching, less-lethal munitions, and close-range engagements. |
VII. Tactical Methodology and Employment
High-Risk Fugitive Apprehension and Warrant Service
A primary application of the Special Operations Group’s advanced capabilities is in support of the USMS’s most dangerous fugitive investigations and warrant services.8 SOG is deployed as the tactical element when intelligence indicates that a target is heavily armed, has a documented history of violence against law enforcement, is associated with a heavily armed group, or is located in a fortified or barricaded position.13
The unit’s methodology for these operations is disciplined and systematic. It begins with meticulous operational planning that incorporates intelligence analysis, surveillance, and risk assessment.21 Execution can involve a range of tactics, from dynamic entry using speed and surprise to deliberate, methodical clearing techniques in close quarters battle (CQB) environments.12 The USMS and SOG constantly review and evolve these tactics, incorporating lessons from past operations and new technologies to enhance officer safety and operational effectiveness.27
Counter-Assault Team (CAT) and Protective Security Operations
A critical and specialized role for SOG is serving as a Counter-Assault Team (CAT) during high-threat protective security operations.1 In this capacity, SOG provides a heavily armed, mobile, and highly trained tactical element for the protection of federal judges, prosecutors, jurors, and witnesses involved in high-stakes trials, particularly those related to terrorism or organized crime. The CAT’s mission is to deter and, if necessary, decisively counter any potential ambush or attack on a protected individual, motorcade, or facility. This role was prominently demonstrated during the 1994 World Trade Center bombing trial and the 1995 trial of Sheik Omar Abdel-Rahman, where SOG provided continuous tactical overwatch and response capabilities.1
Integration of Technology and Specialized Teams
Modern SOG operations are characterized by the seamless integration of technology and specialized sub-teams to achieve mission objectives while mitigating risk. Tactical plans frequently incorporate advanced intelligence-gathering tools, including aerial surveillance from USMS aircraft, real-time video feeds from unmanned aerial systems (drones), and reconnaissance from ground robots.14 The July 2024 deployment to a rural area of Colorado to apprehend a violent fugitive specifically included UAS pilots to overcome challenging terrain and provide persistent overwatch, demonstrating the practical application of this technology.20
Within the unit, specialized teams are employed for specific tasks. Explosive breaching teams are trained to overcome fortified structures, providing assault teams with a point of entry when conventional methods are not feasible.9 Sniper/observer teams are a critical asset, deployed to provide overwatch of an objective, gather crucial intelligence on subject activities and defenses, and, if necessary, deliver precision long-range fire to neutralize a threat.9 This multi-layered and technologically-enhanced approach allows SOG to adapt its tactical methodology to a wide range of operational environments.
VIII. Operational History: A Legacy Forged in Crisis
Formative Engagements: The Siege at Wounded Knee (1973) and the Cuban Prison Riots (1987)
The early operational history of the Special Operations Group was defined by large-scale, high-stakes deployments that tested and solidified its role as a national crisis response unit.
- Wounded Knee (1973): Just two years after its formation, SOG faced its first major test during the 71-day armed siege at Wounded Knee, South Dakota, against militant members of the American Indian Movement.1 This prolonged deployment in a hostile environment was formative for the unit. It required the implementation of military-style tactics, including establishing roadblocks, engaging in firefights with armed opponents, and utilizing armored vehicles and helicopter support to repel attacks and contain the situation.2 The Wounded Knee operation established SOG as the federal government’s primary tactical response force for large-scale, armed civil disorders.2
- Cuban Prison Riots (1987): SOG’s status as a national-level tactical asset was cemented during the 1987 riots at federal prisons in Oakdale, Louisiana, and Atlanta, Georgia. When Cuban inmates took dozens of employees hostage, the FBI’s elite Hostage Rescue Team (HRT) was committed to the Oakdale crisis.1 The Department of Justice deployed SOG to the Atlanta penitentiary, demonstrating the unit’s capability to augment or act in place of other Tier 1 federal tactical teams. SOG operators conducted several high-risk contingency operations, including covert intelligence-gathering missions inside the facility and securing potential escape routes.1
Defining Moments: Ruby Ridge (1991), the L.A. Riots (1992), and Operation Just Cause (1989)
Throughout the late 1980s and 1990s, SOG was involved in several high-profile operations that further defined its capabilities and, in one case, brought intense scrutiny upon federal law enforcement.
- Operation Just Cause (1989): In an early demonstration of its global reach, an SOG team was dispatched to Panama during the U.S. invasion.1 Their specific mission was to take custody of Panamanian dictator General Manuel Noriega upon his capture and execute his high-threat transport back to the United States for trial on drug trafficking charges. This operation highlighted SOG’s unique role in the nexus of law enforcement and international military operations.1
- Ruby Ridge (1991): This event marks one of the most tragic and controversial moments in SOG’s history. During a surveillance operation targeting fugitive Randy Weaver in rural Idaho, a firefight erupted that resulted in the death of SOG operator Deputy U.S. Marshal William F. Degan.1 The incident escalated into a prolonged siege led by the FBI and ultimately led to significant public and governmental review of federal use-of-force policies and rules of engagement.
- Los Angeles Riots (1992): Following the state court verdict in the Rodney King beating trial, widespread rioting and civil unrest erupted across Los Angeles. SOG was activated and deployed to the city to assist federal, state, and local authorities in restoring order, reaffirming the unit’s foundational mission of responding to large-scale civil disturbances.1
Contemporary Deployments (2020-2024): Analysis of Operation Thunderstorm and Rapidly Advancing Manhunt (RAM) Operations
In the 21st century, SOG continues to serve as the tactical spearhead for the USMS’s most critical missions, adapting its capabilities to modern threats. In Fiscal Year 2024, the unit was deployed in support of several significant operations:
- Operation Thunderstorm (June 2024): SOG collaborated with multiple USMS task forces and divisions in a major initiative targeting organized crime and gang violence in Puerto Rico, the U.S. Virgin Islands, and Florida. The operation focused on apprehending fugitives wanted for violent felonies and resulted in the dismantling of a sophisticated arms trafficking ring.20
- Rapidly Advancing Manhunt (RAM) Operation (June 2024): SOG was deployed to Kentucky to provide quick-response force capabilities for a new operational concept the USMS is developing. The mission was the successful hunt for a violent fugitive wanted for extreme child cruelty, showcasing SOG’s role in pioneering more agile and proactive manhunt tactics.20
- Fremont County, CO Operation (July 2024): A SOG tactical team was deployed to a rural Colorado location to assist in the capture of a violent domestic abuse suspect. The mission highlighted the unit’s adaptability to challenging environments and its successful integration of UAS technology to overcome communications and surveillance hurdles.20
Key Historical SOG Deployments and Outcomes
| Year | Deployment / Operation | Mission Type | Strategic Significance / Outcome |
| 1971 | May Day Protests, DC | Civil Disturbance / Riot Control | First operational deployment; validated the unit’s core concept of protecting federal facilities. |
| 1973 | Wounded Knee, SD | Armed Siege / Civil Disorder | First large-scale, prolonged tactical operation; established SOG as the primary federal response for such events. |
| 1987 | Cuban Prison Riots, GA | Hostage Crisis / Prison Riot | Demonstrated SOG’s role as a national tactical asset, capable of augmenting other Tier 1 units like FBI HRT. |
| 1989 | Operation Just Cause, Panama | International Prisoner Transport | First major international deployment; confirmed the unit’s global reach and high-threat transport capabilities. |
| 1991 | Ruby Ridge, ID | Fugitive Surveillance / Apprehension | Tragic line-of-duty death of DUSM Degan; led to major reviews of federal use-of-force policies. |
| 1992 | Los Angeles Riots, CA | Civil Disturbance / Riot Control | Reaffirmed the unit’s foundational mission in responding to widespread civil unrest. |
| 2024 | Operation Thunderstorm, PR | Multi-Agency Fugitive Sweep | Showcased modern SOG’s role in large, pre-planned operations targeting organized crime. |
| 2024 | RAM Operation, KY | Rapid Fugitive Apprehension | Highlighted SOG’s role in developing and testing new, agile operational concepts for manhunts. |
IX. Funding and Resource Allocation
Budgetary Framework of the Tactical Operations Division
The Special Operations Group does not have a separate, distinct line-item in the Department of Justice budget. Instead, it is funded through the U.S. Marshals Service’s annual Salaries and Expenses appropriation, falling under the broader budget for the Tactical Operations Division (TOD).29 This structure means SOG’s funding for personnel, training, equipment, and operations is embedded within the larger TOD budget, making it difficult to assess the precise level of investment in the unit and placing it in potential competition for resources with other TOD components.
Budget justification documents provide a top-level view of this funding. For Fiscal Year 2023, the total budget request for the TOD was $81.3 million, which was allocated to support 202 positions.29 This request included a proposed program increase of $1.9 million and eight full-time equivalent positions specifically for “tactical operations” as part of a larger agency initiative to increase district staffing.29 Notably, the USMS’s FY 2022 President’s Budget Request successfully argued for program increases that would enhance key agency programs, explicitly naming the Special Operations Group as a beneficiary of these new resources.31
The Impact of Congressional Appropriations on Readiness and Modernization
The level of funding appropriated by Congress directly impacts SOG’s operational readiness, modernization efforts, and the safety of its operators. USMS budget requests consistently link increased funding for tactical operations to the agency’s ability to address high-priority threats, such as violent crime and domestic terrorism—mission sets that fall squarely within SOG’s purview.29 The procurement of advanced equipment, the frequency and realism of training exercises, and the ability to deploy rapidly are all contingent on a predictable and sufficient stream of funding. To manage these resources, the USMS has established detailed policy directives governing financial management and procurement to ensure all expenditures are in compliance with federal law and regulations.8
Case Study: The Unfunded Protective Equipment Program
A recent and stark example of how congressional budget decisions can directly affect tactical capabilities occurred in March 2024. The Department of Justice had submitted a $29 million funding request to establish a comprehensive protective equipment program for the USMS, but this request was not approved by Congress in the final spending bill.33
This funding was specifically intended to “innovate, evaluate, select, procure, distribute, and train on lifesaving equipment for DUSMs”.33 The program would have provided resources to ensure that deputies—including SOG operators who are consistently placed in the most dangerous situations—had access to the best available protective gear and could train with it regularly. The failure to secure this funding represents a tangible degradation of capability and a direct impact on the safety and readiness of the agency’s front-line personnel. It illustrates that no matter how elite a unit’s training or personnel are, its effectiveness and safety are ultimately constrained by the political realities of the federal budget process.
X. Future Outlook and Strategic Imperatives
Evolving Threat Landscape: Domestic Terrorism and Transnational Crime
The strategic environment in which the Special Operations Group operates is constantly evolving. The U.S. Marshals Service and the Department of Justice have clearly identified combating violent crime and countering domestic terrorism as paramount national security priorities.29 SOG stands as the agency’s most capable tool for responding to high-threat manifestations of these challenges. The unit’s official mission scope, which includes supporting terrorist trials and conducting actions against anti-government and militia groups, positions it at the forefront of the nation’s response to these complex threats.5 Future deployments will likely involve operations against heavily armed domestic extremist compounds, sophisticated transnational criminal organizations, and other actors who possess advanced weaponry and a willingness to confront law enforcement with extreme violence.
The future effectiveness of SOG will be contingent on its ability to navigate the inherent tension between its identity as a civilian law enforcement entity and the increasingly militarized nature of the threats it is tasked to defeat. The unit must continue to adopt the advanced tactics, training, and equipment necessary to overmatch these adversaries while operating strictly within the legal and constitutional framework that governs civilian law enforcement in the United States.
The Role of Emerging Technologies in Future SOG Operations
The USMS Strategic Plan for the coming years places a strong emphasis on modernizing the agency’s technological infrastructure and expanding its investigative capabilities through the adoption of new technologies.34 For SOG, this translates into a future where operations will be even more deeply integrated with cutting-edge systems. This will include the expanded use of unmanned systems—both aerial (drones) and ground-based robots—for intelligence, surveillance, reconnaissance, and potentially to initiate contact with dangerous subjects, thereby reducing risk to operators.27
Furthermore, the agency’s training and operational planning will need to adapt to incorporate the effects of machine learning and artificial intelligence, which can be used to analyze vast amounts of data to better predict threats, identify fugitive locations, and optimize mission planning.35 The development of new operational concepts, such as the “Rapidly Advancing Manhunt” (RAM) program tested by SOG in 2024, suggests a strategic shift towards a more proactive and intelligence-driven model of tactical deployment.20 This evolution from a traditional “SWAT” model (responding to a known, static threat) to a “manhunting” model (actively finding, fixing, and finishing a mobile target) will require new skillsets, technologies, and inter-agency intelligence sharing protocols.
SOG’s Enduring Strategic Importance to U.S. National Security
For over 50 years, the Special Operations Group has proven itself to be a durable, flexible, and indispensable national security asset. As the nation’s oldest federal tactical unit, SOG provides the Department of Justice and the U.S. government with a globally deployable tactical law enforcement capability that is unique in its scope and authority.5 Its ability to operate across the full spectrum of conflict—from providing security and order during natural disasters and civil unrest to executing high-risk fugitive apprehensions and supporting sensitive national security objectives—ensures its continued relevance. As threats to the federal judiciary and the nation continue to evolve, the Special Operations Group will remain a key component of the U.S. national security apparatus, tasked with confronting the most dangerous challenges to the rule of law.
If you find this post useful, please share the link on Facebook, with your friends, etc. Your support is much appreciated and if you have any feedback, please email me at in**@*********ps.com. Please note that for links to other websites, we are only paid if there is an affiliate program such as Avantlink, Impact, Amazon and eBay and only if you purchase something. If you’d like to directly contribute towards our continued reporting, please visit our funding page.
Sources Used
- US MARSHALS SERVICE Special Operations Group, accessed September 14, 2025, http://www.silverstarcollectables.com/silverstar_collectables-import_016.htm
- HIGH-PROFILE CASES OF THE U.S. MARSHALS SERVICE, accessed September 14, 2025, https://usmmuseum.org/wp-content/uploads/2020/10/2016-High-Profiles-Cases-Guide-Final.pdf
- United States Marshals Service – Department of Justice, accessed September 14, 2025, https://www.justice.gov/doj/organization-mission-and-functions-manual-united-states-marshals-service
- Directors and Organizational Leadership | U.S. Marshals Service, accessed September 14, 2025, https://www.usmarshals.gov/who-we-are/history/directors-and-organizational-leadership
- Tactical Operations | U.S. Marshals Service, accessed September 14, 2025, https://www.usmarshals.gov/what-we-do/tactical-operations
- Fact Sheet Tactical Operations Fiscal Year 2020 Accomplishments – U.S. Marshals Service, accessed September 14, 2025, https://www.usmarshals.gov/sites/default/files/media/document/tactical-operations-division-fact-sheet.pdf
- Special Operations Group – U.S. Marshals Service, accessed September 14, 2025, https://www.usmarshals.gov/who-we-are/history/historical-reading-room/historical-reading-room/special-operations-group
- United States Marshals Service Policy Directives – Management, accessed September 14, 2025, https://www.usmarshals.gov/sites/default/files/media/document/united-states-marshals-service-policy-directives-management.pdf
- U.S. Marshals Service Fact Sheet – Tactical Operations, accessed September 14, 2025, https://www.usmarshals.gov/sites/default/files/media/document/2020-Tactical-Operations.pdf
- How DEADLY is the U.S. Marshals Service Special Operations Group? – RealClearDefense, accessed September 14, 2025, https://www.realcleardefense.com/video/2024/09/30/how_deadly_is_the_us_marshals_service_special_operations_group_1061811.html
- United States Marshals Service Organization … – Department of Justice, accessed September 14, 2025, https://www.justice.gov/doj/united-states-marshals-service-org-chart
- U.S. Marshals Service Special Operations Group (SOG): Everything …, accessed September 14, 2025, https://gendischarge.com/blogs/news/us-marshals-sog
- Special Mission Units, accessed September 14, 2025, http://www.silverstarcollectables.com/specialmission.htm
- United States Marshals Service – Wikipedia, accessed September 14, 2025, https://en.wikipedia.org/wiki/United_States_Marshals_Service
- The U.S. Marshals Service Explained in 17 Minutes – YouTube, accessed September 14, 2025, https://www.youtube.com/watch?v=JXeVohj2v2M
- Qualifications | U.S. Marshals Service, accessed September 14, 2025, https://www.usmarshals.gov/careers/deputy-us-marshals/qualifications
- Careers | U.S. Marshals Service, accessed September 14, 2025, https://www.usmarshals.gov/careers
- Fitness Standards | U.S. Marshals Service, accessed September 14, 2025, https://www.usmarshals.gov/careers/deputy-us-marshals/fitness-standards
- Special Operations Group Selection. (O-Course) – YouTube, accessed September 14, 2025, https://www.youtube.com/watch?v=ghPPpa4h-xk
- FY 2024 Annual Report – U.S. Marshals Service, accessed September 14, 2025, https://www.usmarshals.gov/sites/default/files/media/document/Pub-2-2024-Annual-Report.pdf
- Review of the U.S. Marshals Service’s Tactical Training Officer Program, accessed September 14, 2025, https://oig.justice.gov/sites/default/files/reports/21-065.pdf
- July 5, 2017 VIA ELECTRONIC TRANSMISSION David Harlow Acting Director United States Marshals Service, accessed September 14, 2025, https://www.grassley.senate.gov/download/2017-07-05-ceg-to-usms-hrfa-training
- The STI Staccato-P is the USMS SOG’s newest adaptation – Precision Technic Defence, accessed September 14, 2025, https://ptdefence.com/the-sti-staccato-p-is-the-usms-sogs-newest-adaptation/
- Exclusive: U.S. Marshals Special Operations Group Adopts STI 2011 …, accessed September 14, 2025, https://www.guns.com/news/2019/07/24/exclusive-u-s-marshals-special-operations-group-adopts-sti-2011-pistols
- The 22 Guns Used By US Federal Agents – 24/7 Wall St., accessed September 14, 2025, https://247wallst.com/special-report/2023/05/23/the-22-guns-used-by-us-federal-agents/
- What firearms are Deputy United States Marshals allowed to carry : r/AskLE – Reddit, accessed September 14, 2025, https://www.reddit.com/r/AskLE/comments/1eztqv5/what_firearms_are_deputy_united_states_marshals/
- USMS Officer Safety Training – Structure Operations | U.S. Marshals Service, accessed September 14, 2025, https://www.usmarshals.gov/resources/video-gallery/usms-officer-safety-training-structure-operations
- The Essential Roles of US Marshals – Performance Protocol, accessed September 14, 2025, https://www.performance-protocol.com/post/the-essential-roles-of-us-marshals
- U.S. Marshals Service (USMS) – Department of Justice, accessed September 14, 2025, https://www.justice.gov/jmd/page/file/1489556/dl?inline=
- United States Marshals Service FY 2018 Performance Budget President’s Budget – Department of Justice, accessed September 14, 2025, https://www.justice.gov/d9/20-1_u.s._marshals_service_usms.pdf
- FY 2021 Annual Report – U.S. Marshals Service, accessed September 14, 2025, https://www.usmarshals.gov/sites/default/files/media/document/PUB-2-2021-Annual-Report.pdf
- Policy Directives | U.S. Marshals Service, accessed September 14, 2025, https://www.usmarshals.gov/resources/publications/policy-directives
- How a $29 million budget request would have improved US Marshal safety – YouTube, accessed September 14, 2025, https://www.youtube.com/watch?v=zqiQUyXGLgc
- Mission and Vision — About Us – U.S. Marshals Service, accessed September 14, 2025, https://www.usmarshals.gov/who-we-are/about-us
- United States Marshals Service Strategic Plan: 2020-2024, accessed September 14, 2025, https://www.usmarshals.gov/sites/default/files/media/document/PUB-1-2020-Strategic%20Plan.pdf
- Rocky’s Road to Recovery – U.S. Marshals Service, accessed September 14, 2025, https://www.usmarshals.gov/news/stories/rockys-road-recovery