When compressed air leaves a compressor, the the temperature drops as it expands, and moisture condenses on the wall of whatever surface is below the dew point of the air and then runs down to the lowest spot where it is collected and dispose of. Now the cooling part is critical – just putting an air filter immediately outside of a compressor tank will not accomplish much. Ideally you want the air to travel and cool for a bit in a metal pipe that is at least 20 feet long. You may wonder why I mention 20 feet – it’s because I was told 20 feet at a minimum – in other words, I have no basis in engineering, just what guys have told me over the years. I would just use that as a rule of thumb about how far the air needs to travel at a minimum before you do another round of moisture filtering. The further the better.
I looked at three simple options when I was considering how to remove the bulk of the moisture from my airlines:
Run your hard air lines at an upward angle and install traps
This is as simple as it sounds. I like to always install a ball valve and then a quick connect on the tank and run a rubber/flexible airline to the hardline to isolate vibrations. Plug into the airline above a moisture trap like so:
I investigated this approach but it was going to take up too much space. I needed to start accessing dry air much closer to my compressor so this was discounted right away. If I were to build this, I would still use the PneumaticPlus drains referenced in more detail in the next section.
Pros of this approach: Relatively cheap and easy to build
Cons: Takes a long distance / not very compact. It was going to be too long or my needs.
Build a compact moisture separator
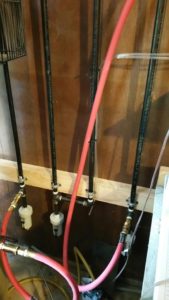
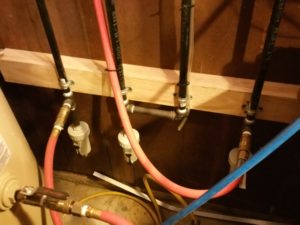
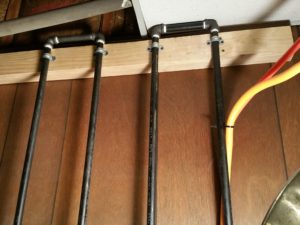
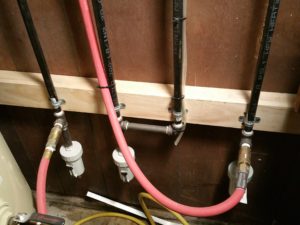
Now this is what I do in my shop and it works great. I use a series of vertical 1/2″ pipes with PneumaticPlus SAD402-N04D-MEP water traps with automatic drains at the bottom of each riser. Now this works very well. The vertical pieces are 6 feet tall and the cross sections are 6″. This is occupying an area about 24″ wide and 8 feet tall. It’s mounted on the shop wall and out of the way. Most of the condensation happens in the first pipe. A lesser amount in the second and very little in the third. It cost about $120 for the plumbing, $56 for each of the automatic drains and then maybe $50 for the short hoses and 1/2″ fittings. I installed this in August 2016 and am quite happy with it.
For me, one of the big benefits is with the automatic drains in the water traps. When the float rises to a certain level there is a quick “pffft” sound and the trap blows out the water and closes again. It’s not something you have to remember to drain, which is something I am not great at. Also, when I am doing a lot of work, I might hear the first trap drain twice in one day but that is rare.
Sorry I don’t have a photo of the whole system from top to bottom. I have equipment in front of it now and can’t get a good overall photo. It’s just too tall for my camera given the limited distance I have to get the photo.
For me, it is really intriguing to see how much condensate is caught in the first trap closest to the compressor. The second trap has much less and the third is dramatically less than either of the others. This is not perfect as I still catch moisture in my air filters but it has made a dramatic difference at the end of the line. When I blow air at a glass or mirror, there isn’t water all over it any more 🙂 I have wondered what would happen if I used 1″ pipe in that first vertical six foot section but have never had the need to spend the money and time to experiment. In theory, the greater the expansion, the greater the cooling and thus the greater the level of condensation all other things being equal.
By the way, I really like PneumaticPlus. I actually bought this gear off Amazon with my own money – this is a real review. Every time I have questions they actually answer their phones and help me. I had one defective part in one bowl and they immediately sent me a replacement. In short, not only is the hardware itself good but I like the company behind it too.
You can add 1/8″ tubing to drain the condensate away from the water traps. I feel it is a good idea to get the water away from the compressor as much as possible:
Pros to this approach: It actually works, does not need electricity, automatically drains, uses relatively little space
Cons: The floats could freeze in cold weather so I insulate and heat them in the winter. I did not have any problems during the 2016/2017 winter with that approach. It’s a little pricey but it really gets the job done.
By the way, if you can’t afford the automatic drains/traps, then put in ball valves with longer pipes to hold the accumulated condensate and drain them manually. It definitely works but you must remember to manually drain the traps.
Install a refrigerated air dryer
The last option is the most expensive and that is to install a refrigerated air dryer. Basically, the warm moist air enters a dryer that is a series of tubes that are refrigerated causing the moisture to condense and then drain out of the unit. There is a Harbor Freight unit that gets surprisingly good reviews plus many different industrial models to select from. I have not needed this yet, so I do not have first hand experience. I’ve read about guys using them to protect their plasma cutters. I use the above compact moisture separator described above, a two stage air filter system and then a very fine final filter from Hypertherm right before the inlet of my plasma cutter and have not had a problem.
Pros: You can definitely remove the moisture. Guys say they really like the low-cost Harbor Freight unit.
Cons: Expensive and you need electricity for it to work. It will get pretty dirty in a high dust environment like my shop and need routine cleaning to stay efficient.
If you are interested, here is the link to the HF dryer: http://www.harborfreight.com/compressed-air-dryer-40211.html
So the first stage of moisture defense in my shop is to keep the tank drained. Then it is this separator system to get the bulk of the moisture out of the compressed air. In the last part of the series, I’ll talk about fine air filters.
The three blog posts in the series are:
- Need Dryer Shop Compressed Air? – Step 1: Drain Your Tank Regularly
- Need Dryer Shop Compressed Air? – Step 2: Add a Moisture Separation System
- Need Dryer Shop Compressed Air? – Step 3: Add a particulate filters – this will be published on 4/22/2017 at 8am Eastern. You will get an error message before then if you click on it.
If you find this post useful, please share the link on Facebook, with your friends, etc. Your support is much appreciated and if you have any feedback, please email me at in**@*********ps.com. Please note that for links to other websites, I may be paid via an affiliate program such as Avantlink, Impact, Amazon and eBay.


