Tag Archives: HPA

Setting Up And Testing The GX CS3 PCP Air Compressor

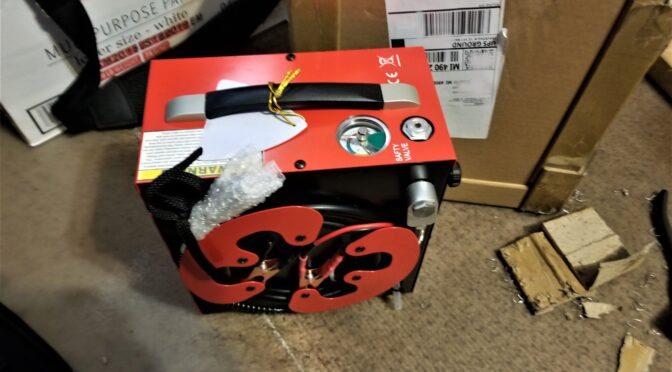
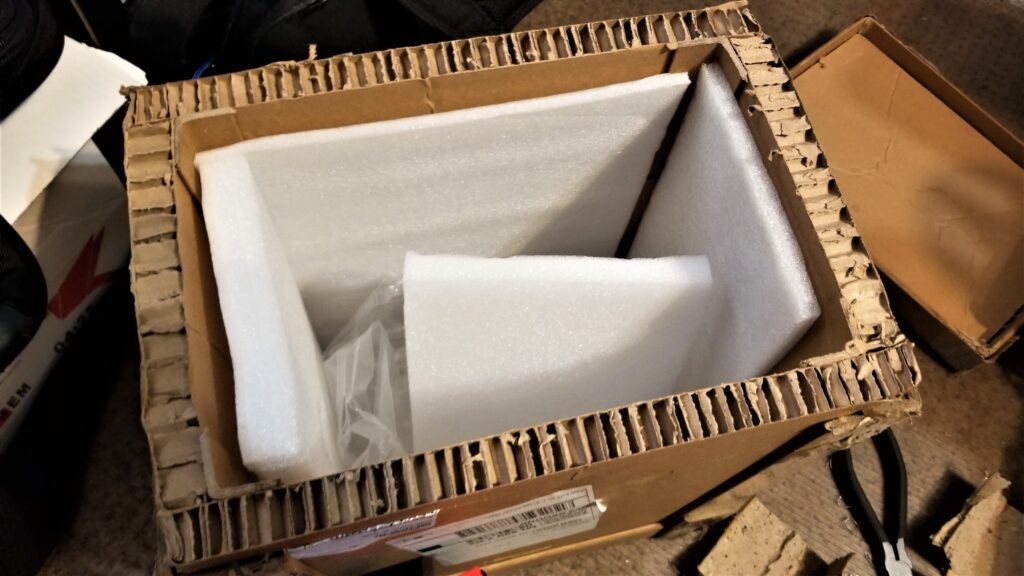
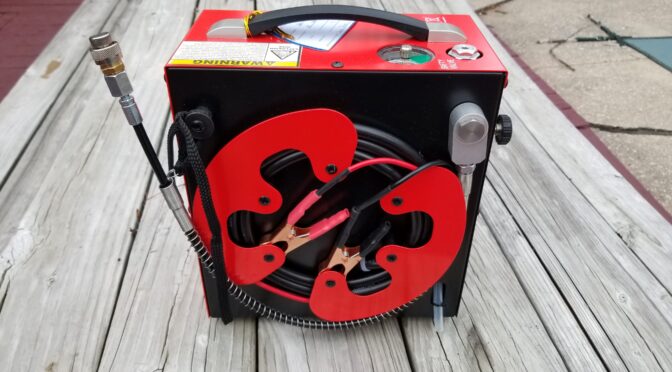
As I mentioned in my last post, IU ordered my GX CS3 air compressor off Amazon and it arrived in great shape. The next day, I reread the very terse instructions in the manual and decided I better follow some basic test procedures because you don’t want surprises with high pressure air (HPA) systems – think small explosion when they do. My intent was to bring the unit up in stages.

Current Version Does Not Require Additional Water or Grease

Unlike other pumps, you do not need to add water or oil/grease to this pump. You take it out of the box and run it. I even contacted the seller just to confirm because they still include the old instruction guide that says to add grease and the Amazon listing says you do not need to do so anymore. In short, it’s ready to go out of box.

Take the time to read the very brief owner’s guide/instructions. If the Amazon listing still says you do not need grease and there is no grease supplied, that part of the guide is outdated. You can still see what they say about testing, their exploded parts diagram, etc.

Set up and Testing

Here’s what I did and would recommend to a new owner:

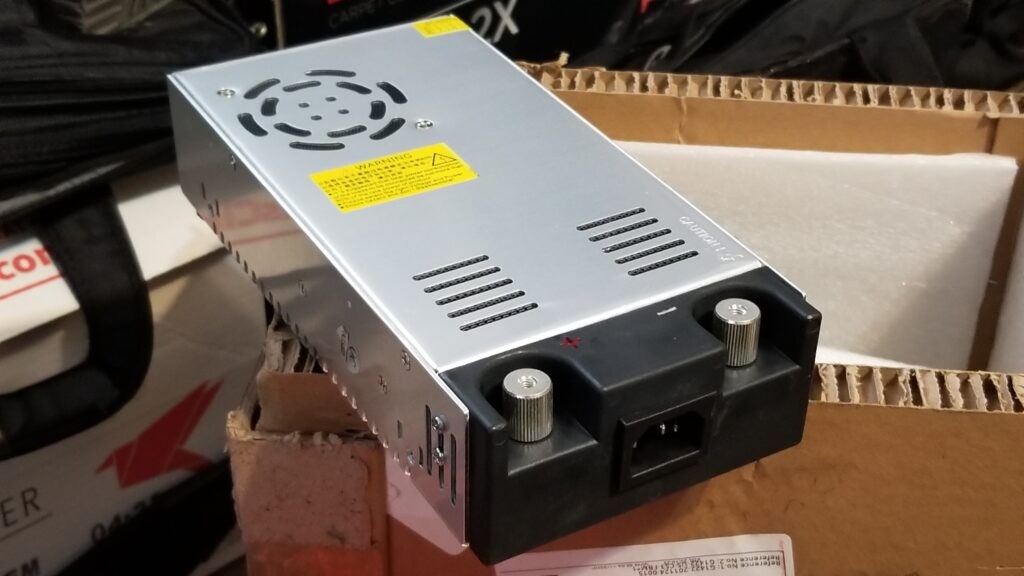
1. Make sure the AC power adapter’s input voltage switch is set accordingly.

If you are in the US, the switch should be on 110V. You only need to do this once.


Do not plug it into the AC power yet. You need to connect the pump first.

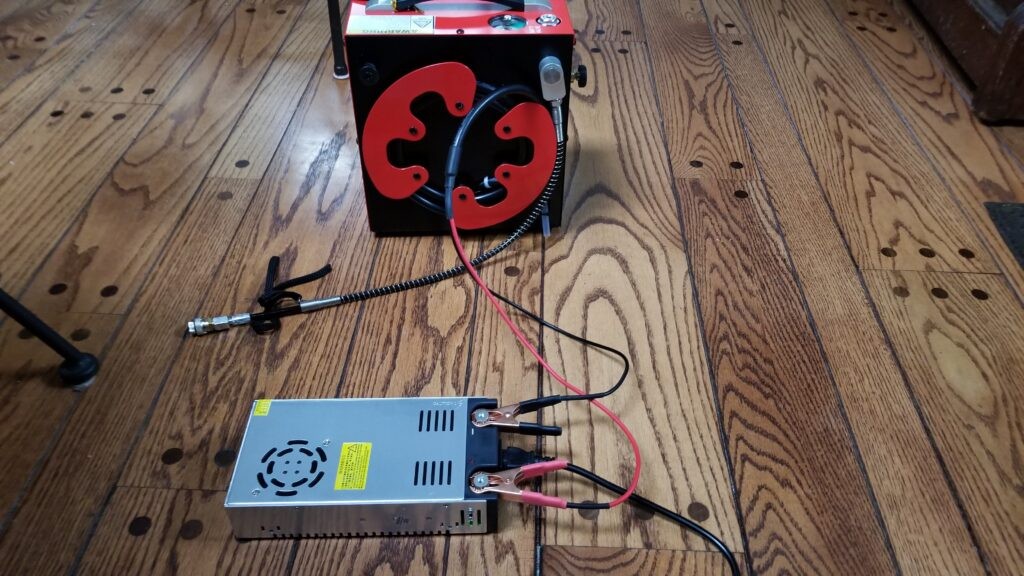
2. Connect the pump’s power cables to the adapter.

First, I connected the power clamps to the AC adapter and then plugged the AC adapter into the wall. I debated testing the power to see if I was getting 12-13 volts but decided to just run with it. Note, there is no power switch on the adapter so connect the clamps from the pump to the compressor and then plug the power adapter into the wall.

Important: Connect the pump’s power leads to the AC adapter first before you plug it in. Also, mke absolutely sure the red power line is clamped to the red “+” terminal and the black line is to the white “-” terminal. Do not reverse the polarities.
The power cord to the wall plugs into the bottom receptacles. The red clamp from the pump plugs to the red “+” and the black cord plugs to the white “-“.

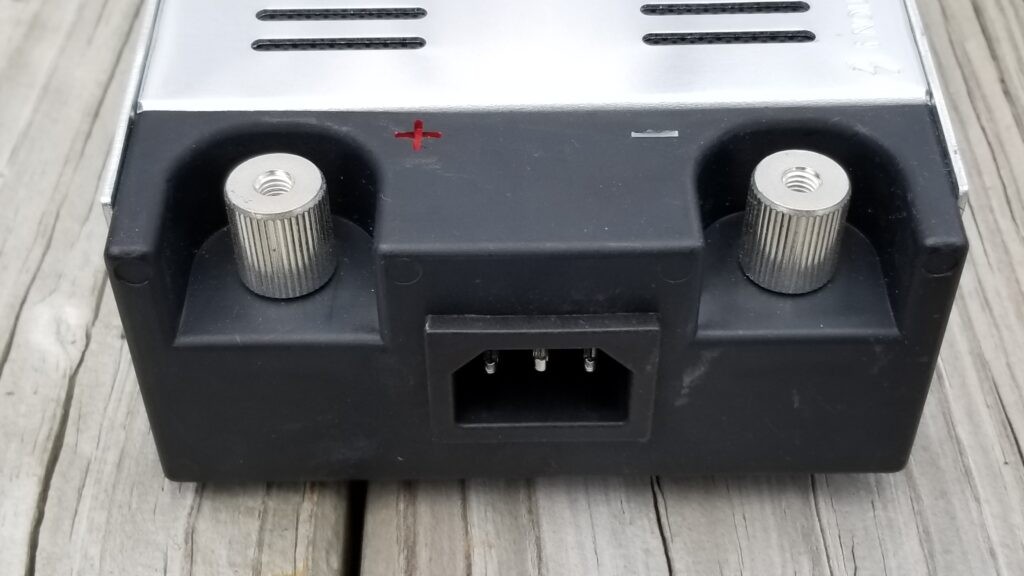
You can see the lower AC cord socket. This is your normal office plug so you have tons of cord options if you need to replace the cord down the road. There are also lots of AC adapters on the market with a very similar set up – just make sure they output 13V and and least 46.2 amps to support the compressor.

So your setup should look something like the above at this point.

With the power adapter plugged into the wall, the cooling fan on top should start right away and that is how you know it is running. If it does not, use a test meter to check the AC power cord for 110-120 volts. If the cord is good then see if you have 12-13 volts at the terminals. You will need to contact the vendor as the fan is critical for cooling even if you do have power. If there is no output power then the vendor needs to replace the power adapter.

If the fan is running, let’s go to the next step.

3. Testing the pump and line

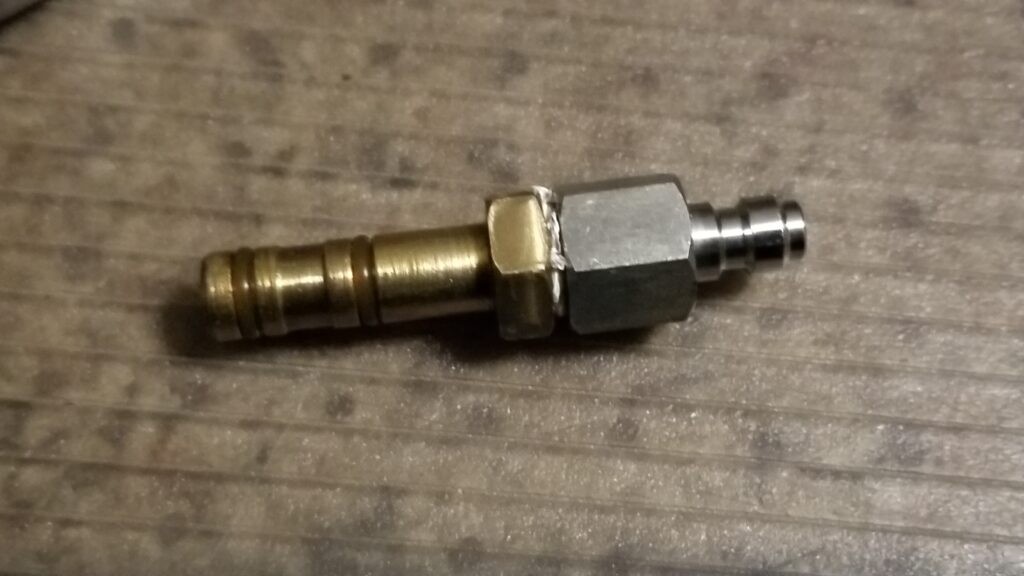
Set up really is that easy. At this point, it was time to turn on the pump and pressure test the line. To do this, the maker supplies a test Foster plug that goes into to supplied female Foster fitting.

The test plug, sometimes called a dead head plug or dead head fitting is to the left. The female Foster fitting that is pre-installed on the pump’s airline is to the right. Pulling that silver collar back from the end will release whatever is inserted into the coupling.

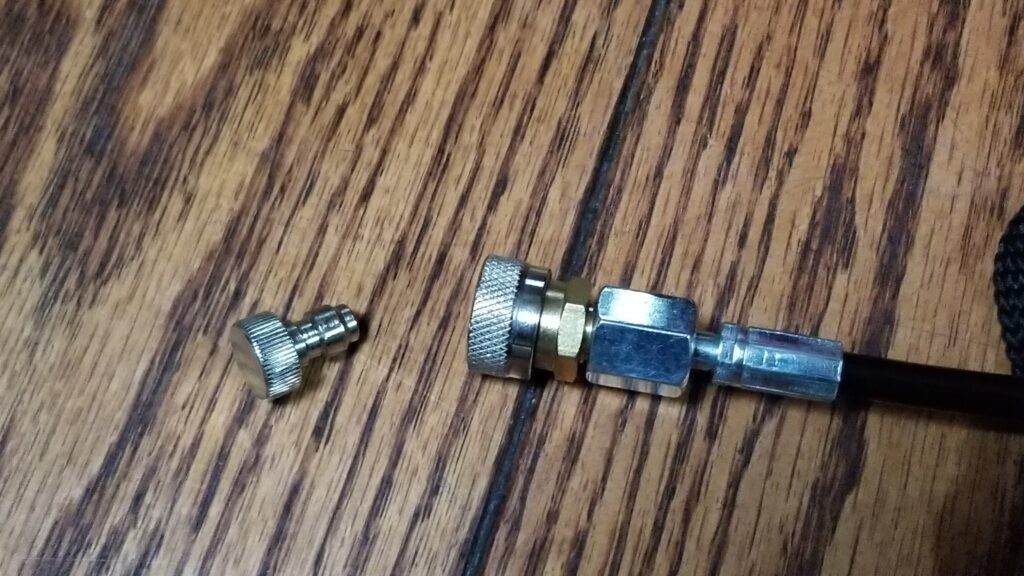
Note, my test plug came already installed in the end of those. In general, I like the idea of keeping the test plug inserted when the pump is not in use to help keep the fitting clean.

Two things, the quick connect fittings on HPA lines, tanks and guns is known as “Foster” fittings and you have the make plugs and female couplers with a locking ring you slide back to release the male plug. They are a really handy means to switch between filling different things – tanks, guns, certain types of fill probes, etc. Just make sure you get fittings that are rated for the pressure you need. For example, I’ll be filling tanks up to 4,500 PSI so my fittings are all rated for 5,000 PSI.

If you mix fittings between vendors, there’s a risk of a leak due to tolerances stacking the wrong way. In other words, vendor X and vendor Y might have slightly different allowances during machining and when you combine them, there is enough of a gap for air to leak out. With this in mind, I try to stick with Air Venturi brand fittings and if I have a problem, I swap out the fitting in question with one from that brand and I keep spares on hand just in case. Note, they can also wear out from repeated use as well – another good reason to have a few spares.

This is my Hatsan fill probe with an Air Venturi foster fitting on it. Note, the pipe thread on these fittings and air lines is 1/8″ BSPP – British Standard Parallel Pipe. It is not NPT. Use quality pipe tape or a Dowty washer to seal the threads. Here, I am using quality pipe tape.

My Testing Procedure

I am paranoid. If something is going to break, I want it to happen with the lowest air pressure and volume of air behind it that I can get. Right now, we need to test the pump itself, the air line and fittings that came with tank.

WARNING: Never run your hand over a charged high pressure air line and fittings in search of leaks. You run the risk of injecting high pressure air into your blood and having an embolism. Either spray soapy water on the suspect and look for bubbles or even dip the area in soapy water.
Please note that the gauge has a dial indicator you move around to the air pressure limit you want the pump to stop at. You can move this dial around by turning the silver knob at top. Here, my pump is set to turn off at 4,500 PSI. You would set your’s at the limit whatever you plan to fill. Note how the indicator has both PSI and bar settings. If your airgun has a limit of 200 bar, you would set it to 200 bar for example. You will likely find some difference between what the pump says the pressure is vs. your tank or airgun by the way. For safety, stick with whichever value is lower. If you set the pump to 200 bar and your airgun reports it is past 200 bar then stop the pump and bleed some air off. Adjust your dial so you do not exceed the maximum pressure of the device you are filling. When in doubt, play it safe.

Here is what I did to test my pump and fittings and if you are not comfortable with any of it, please do not do it (safety first):

  1. Ensure the test fitting is installed in the end of the Foster fitting of the pump’s air line.
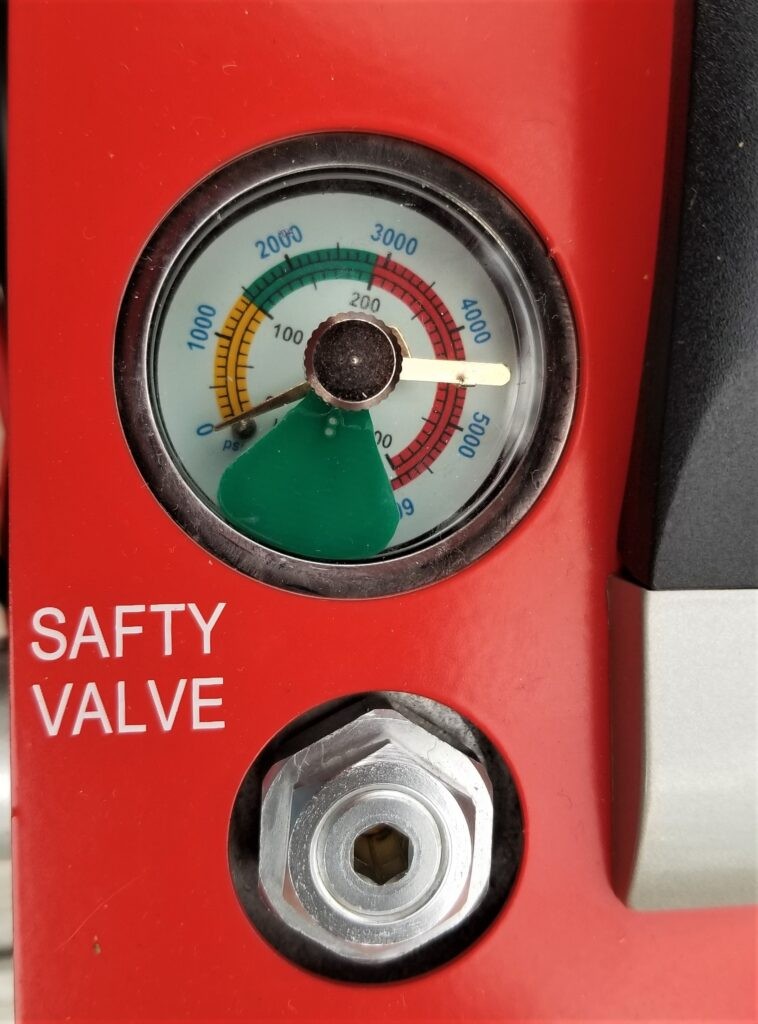
  2. Set the air pressure limit on top to 1,000 pounds.
  3. Flip the toggle switch as the base of the pump to On.
  4. Push the start button on the front of the pump. If it does not turn on, double check the power connections. You should also hear the relatively loud cooling fan turn on in the pump at the same time. If it will not turn on or you don’t hear the cooling fan once it does, you will need to contact your vendor. My fan turned on when I pushed the silver start button on the unit.
  5. The pump should start and in a few seconds pressurize the line to 1,000 PSI. If not, then contact the vendor.
  6. By the way, the pump better shut off at the assigned 1,000 PSI limit. If not then this is a serious safety concern and you should contact the vendor.
  7. With the pump off and the line charged, watch the pressure gauge for 30-60 seconds. If the pressure falls then that means there is a leak somewhere and you should contact the vendor. If it stays steady, go to the next step. If you want to wait for longer, you certainly can.
  8. Open the bleed valve and release the air pressure. Water from condensation may come out the drain tube on the side and that is fine. It may, it may not.
  9. Next, turn the dial up to 2,000 PSI and repeat the above test. We are increasing the pressure in steps testing the unit. You do not need to go higher than you plan to use the unit — stop where you want. For me, I am going up to 4,500 PSI for my carbon fiber tank so I drained and filled the line several times.
  10. Also, none of these incremental tests should take more than 10-15 seconds to complete.
  11. Do it again at 3,000 PSI.
  12. Do it again at 4,000 PSI.
  13. Do it one last time at 4,500 PSI.

I’m happy to say that my new pump system passed all the tests!

If you run into any problems with the above, contact the vendor. You do not want to void your warranty or get hurt so don’t go taking things apart – talk to the vendor first. I can’t stress that enough. HPA systems require knowledge to service safely and you will probably be far better off exchanging for a whole new pump vs. taking things apart.

That translucent tube is where condensation will blow out from when you open the bleed off valve.

Duty Cycle

Please note that this compressor has a duty cycle that you must keep in mind. It is designed to run for up to 30 minutes straight and then it needs to cool for 20 minutes. Leave the unit powered on so the fan can help cool it off. So, if you have a big tank to fill, keep this in mind. You can fill it but do so in however many steps you need to honor this duty cycle.

Video Of It Running

I’m going to put this video both here and in the introductory blog post. Today, I recorded a quick video as I topped off my tank today – January 7, 2022. It ran for about 20 minutes as I took that tank from about 3,000 to 4,500 PSI.

When done, I let the unit’s fan run for about 10 minutes until the air coming out was cool again. Since the unit is air cooled, give it time for the fan to do just that. I also bled off the unit to replace air pressure and get rid of any condensation.

Note the odd double filter rig I am running in the video – that’s just because the double-male Foster fitting will not seat all the way in the big filter’s female fitting. I need to replace it with an Air Venturi brand fitting some day when I have time.

Safety comment: Never try to force fittings apart after a fill. Most likely there is high pressure air that needs to be bled out of the lines. With that big inline filter, the output side from it to the tank stays under pressure so I need to bleed down both the compressor and tank sides before I can safely disconnect the various fittings. Just remember to think things through carefully before you force a fitting off – high pressure air dangerous.

Conclusion

Hopefully your system passed the tests and you are now ready to fill your tank or device. If you had problems, be sure to reach out to the vendor and ask questions. I found them both helpful and responsive.

In my next post I will extend testing to include setting up and filling my 4,500 PSI Omega 18 cubic foot tank.

I hope you found this post useful.

Here are the GX compressors from the CS4 down to the CS1


2/2/2021 Update: The compressor is still working great. No problems at all!


Note, I have to buy all of my parts – nothing here was paid for by sponsors, etc. I do make a small amount if you click on an ad and buy something but that is it. You’re getting my real opinion on stuff.

If you find this post useful, please share the link on Facebook, with your friends, etc. Your support is much appreciated and if you have any feedback, please email me at in**@ro*********.com. Please note that for links to other websites, I may be paid via an affiliate program such as Avantlink, Impact, Amazon and eBay.


Finally, An Affordable And Reliable 4500 PSI Air Compressor For PCP Airguns! The GX CS3

Folks, I think Pre-Charged Pneumatic (PCP) airguns are awesome. They have an onboard high-pressure cylinder that holds enough air to shoot a certain number of rounds before needing to be recharged. After years of having your basic pneumatic and spring-piston air rifles, I bought my first PCP, a Hatsan Gladius Long in .22, back in May of 2017 and a Hill Mk IV hand pump. In this post I want to recap what your options are and then talk about move into the world of having my own compressor.

You Have Three Options To Fill PCP Airguns

To fill a PCP airgun, you have three options: own a hand pump, have an air cylinder or own a compressor. For almost three and a half years, I’ve used a Hill Mk IV hand pump to top off the Gladius and it has worked well. These pumps are like an old fashioned bike tire pump on serious steroids as they can enable you to fill a cylinder with thousands of pounds of air pressure. By the way, the secret to longevity with a hand pump is to keep the shaft lubricated to protect the O-rings with silicone grease and to not overheat parts if you are doing a lot of pumping.

The second option is to have an air tank that you would take to your local dive shop and have them fill it to 3,000 to 4,500 pounds. You would then use this to top off your airgun until it too was low and you’d go back to the dive shop to get the tank refilled. We do have a dive shop in the area but this never appealed to me because I didn’t shoot enough to need a tank vs. the hand pump. I also figured that I could use the hand pump any time day or night as needed. You can only refill an air tank if the dive shop is open or you own your own compressor.

Now, this brings us to the third option and that is to own a high pressure air (HPA) compressor. These are not what you get for a garage and air tools – those only go to 175-200 pounds. With PCP airguns, you are talking 3,000-4,500 PSI depending on the rating of the tank or airgun you are filling. What stopped many people for years was that these HPA compressors were a fortune and then crossed below $1,000 a few years ago and now you can see inexpensive units from China that are below $400 but they require water cooling, lubrication, and don’t always get good reviews (some do though).

In many cases, you get what you pay for. The decent HPA compressors start at $800 and go up from there. In 2019, I ran across an HPA compressor on Amazon that I had not heard about before – the manufacturer was Ankul and the model was the GX CS3 compressor. The price was around $500 and it was getting good reviews. At the time, I didn’t really need it so I added it to be “Save For Later” list in Amazon just in case.

Maybe 3-4 times since then, I would open up the listing and read the reviews. You know what? The reviews stayed solid over time. Ankul released an updated model that was air cooled – no more water to deal with – and it was self-lubricated and didn’t need the user to add oil or grease. What’s more, the reviews stayed positive – it scores a 4.6 out of 5 with 196 reviews. That’s pretty good. So guess what? I bought one.

Please note that I paid full price for the compressor. This was not a paid review and I’ve never been contacted by the seller. This is my honest opinion based on my experience with the compressor – I will get a small commission if you actually order one of Amazon but that’s it.

Introducing the GX GS3 PCP Air Compressor

Okay, there are a bunch of reasons why I bought this compressor in addition to the reviews and $499.99 price on Amazon:

  • It can pressurize a cylinder to 4500 PSI
  • It can run off house current with the supplied inverter or it can clamp to a 12 volt vehicle battery
  • There is an automatic-off switch where you can set the pressure via a dial and when it reaches it, the unit shuts off. This gauge is labeled both with PSI and BAR increments.
  • It has an integral filter for oil and water
  • There are three over pressure safeties – the user sets the pressure on the dial plus there is both a safety valve and a burst disc to help prevent a catastrophe.
  • They claimed the unit ran fairly quietly at 75 decibels (this puts it somewhere between average street noise or being in a shower at 70 db and city traffic or a vacuum cleaner being at 80)
  • The unit is maintenance free – no water/antifreeze to deal with or oil or grease to add.
  • The design was elegant with a spool on the side to hold the power cable, the high pressure hose could rotate and there was a carry handle
  • The pump unit measures 10-3/4″ tall, 5-1/8″ wide and just under 9-1/2″ deep — it’s remarkably small – most of my laptop computer bags are bigger and these measures are based on my unit.
  • The duty cycle is 30 minutes run-time and then 20 minutes to cool
  • The unit only weighs 19 pounds 6 oz (I weighed my pump unit)
  • The AC adapter is separate and measures about 8.85″ long x 4.52″ wide x 2.36″ tall and weighs 1 pound 14 oz with the cord.

Click here to see the compressor on Amazon.

2/8/23 Update: GX is really taking the affordable PCP high pressure compressor market seriously. The CS3 model, that this blog post is about, is aimed at 1.5 Liter and smaller air cylinders. They now have a CS4 aimed at tanks up to 6.8 Liters (I now have a CS4 and really like it) and they even have smaller and larger capacity units. By doing this, they are giving you a bunch of selections that you can choose from given the air capacity you need and your budget. Click here for the GX lineup on Amazon.com.

Unboxing it

I ordered the unit on a Monday and it was delivered five days later on Saturday by UPS. The pump and power adapter were packed together in one amazingly well packed box. How often do you here somebody comment on a box? This thing was made from thick cardboard and was practically like opening a wood crate and inside was thick foam cushions protecting the air pump and power adapter from all angles.

I had removed the upper right corner reinforcement already when it dawned on me I better take a quick photo. Tip: Just remove the corner braces and the end cap will slide off. You do not need to disassemble the whole box.
I don’t know who the packaging engineer was but he needs some serious recognition, a beer or both. It was one of the best packed tools that I have seen in a long time. It’s no wonder that my unit arrived in great shape.
Here’s a quick photo of the unit out of the box. Everything was in great shape.
This is the 12 volt power adapter. It’s very straight forward – plug it in and it is running and the fan keeps it cool.

Video Of It Running

I’m going to put this video both here and in the set up blog post. Today, I recorded a quick video as I topped off my tank today – January 7, 2022. It ran for about 20 minutes as I took that tank from about 3,000 to 4,500 PSI.

When done, I let the unit’s fan run for about 10 minutes until the air coming out was cool again. Since the unit is air cooled, give it time for the fan to do just that. I also bled off the unit to replace air pressure and get rid of any condensation.

Note the odd double filter rig I am running in the video – that’s just because the double-male Foster fitting will not seat all the way in the big filter’s female fitting. I need to replace it with an Air Venturi brand fitting some day when I have time.

Safety comment: Never try to force fittings apart after a fill. Most likely there is high pressure air that needs to be bled out of the lines. With that big inline filter, the output side from it to the tank stays under pressure so I need to bleed down both the compressor and tank sides before I can safely disconnect the various fittings. Just remember to think things through carefully before you force a fitting off – high pressure air dangerous.


Conclusion

https://blog.roninsgrips.com/setting-up-and-testing-the-gx-cs3-pcp-air-compressor/The unit arrived in great shape and as described. In the next post, I’ll review how to set up, test and use the unit. Again, here’s the link on Amazon and I will jump ahead a bit and tell you that I recommend the unit based on my experience with it so far:

Here are the GX compressors from the CS4 down to the CS1

2/4/23 – GX has released the CS4. The CS3 is aimed at 1.5L and smaller cylinders. The CS4 can handle 6.8L cylinders as it is water cooled. You have two options now. Click here for a new blog post about the CS4.

9/15/2022 Update: They now also have a version of the compressor, the CS3-I, that includes the 120 volt AC power unit inside the compressor. It’s getting good reviews so far – the only thing that is different is there integrating the AC power into the unit.

01/07/2022 Update: Just topped off my tank. Still working just fine. Added a video above so folks can see and hear it run.

10/23/2021 Update: Still no problems. I’m very happy with this purchase. So you know, at this point I am using 1-2x per month to refill my Omega bottle. I’m not shooting as much as I was earlier this summer.

3/4/2021 Update: Still no problems at all. I use my Omega 18 cu ft air tank to top of the FX Compact Impact until it gets down and then I use the GX GS3 to top the bottle back off. I’m really pleased with how this has worked out.

2/2/2021 Update: The compressor is still working great. No problems at all!

2/4/2023 Update: Still working just fine!


Note, I have to buy all of my parts – nothing here was paid for by sponsors, etc. I do make a small amount if you click on an ad and buy something but that is it. You’re getting my real opinion on stuff.

If you find this post useful, please share the link on Facebook, with your friends, etc. Your support is much appreciated and if you have any feedback, please email me at in**@ro*********.com. Please note that for links to other websites, I may be paid via an affiliate program such as Avantlink, Impact, Amazon and eBay.


Here are some well rated hand pumps on Amazon. While I do not have personal experience with them, they do get good reviews: