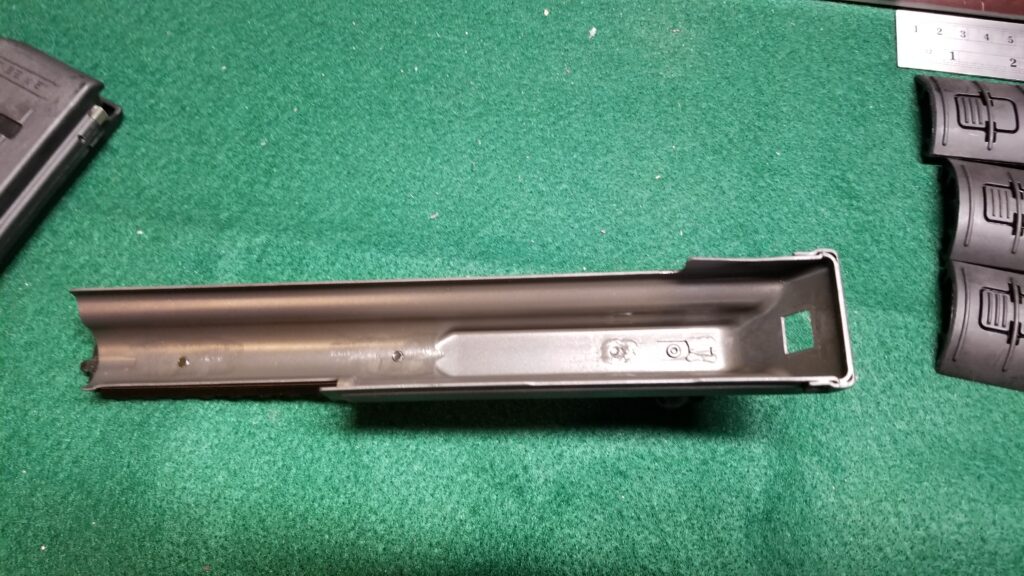
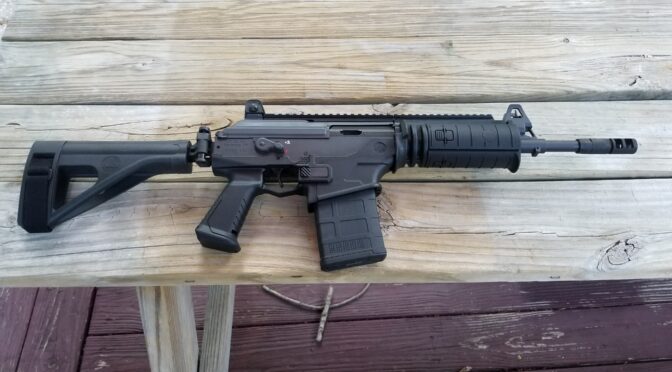
The Ace is definitely a modernized AK weapon. One look inside confirms that. The Colombian defense firm of Industria Militar (INDUMIL) began a commercial relationship with Israeli Military Industries (IMI) that would later carve out the small arms division to become Israeli Weapons Industries (IWI). Their collaboration was on the Galil Automatic Rifle (AR) and INDUMIL obtained exclusive rights to it.
What the two organizations accomplished is remarkable. The two collaborated and modified 43 of the 96 parts in a base Galil AR to reduce the weight by approximately 1 KG (about 2.2 pounds). 12 of the parts shifted from steel to plastic. The goal wasn’t just to reduce weight, they improved precision as well.
In my last blog post, I mentioned that I bought a Galil Ace pistol chambered in 7.62×51. It’s IWI model GAP51SB. [Click here to see what PSA current has for sale] Because there was a relationship between IWI and INDUMIL, I asked IWI USA to confirm where the Ace series is made and they told they are all made in Israel. I asked more out of curiosity than anything else.
I decided to see how many differences I could observe between it and a traditional AK. I wish I knew enough about Galil’s to compare a traditional Galil AR to the Ace but being an AK guy, I was very curious to see how the Ace compared.
I tried to be objective about things and started out that way but the more I took the pistol apart, the more genuinely impressed I became. So, let me try and catalog the differences with as many photos as I can.
Two Chamber Muzzle Brake
One thing that caught my eye was the two chamber muzzle brake and that it is held on by a jam nut, which is a nut that is tightened uo from the rear against the brake to lock it in place. The thread is 5/8-24 for the 7.62×51 Ace models.

In comparison, an AK-47 typically has a 14mm diameter by 1mm pitch left hand thread (14x1mm LH). They are held in place by a detent pin that protrudes from the front sight block (FSB) and engages a timing groove that secures the brake in the correct orientation. Now, 14×1 LH is typical for AK-47s but once you add in the variants, threads are all over the place with different style brakes and boosters.
Improved Sights

There are five things I noticed right away
- The Ace has a longer sight radius, which is a fancy term meaning the distance from the rear to the front sight is longer. In general, the longer the sight radius, the more accurately the weapon can be aimed.
- Aperture rear sight – The Ace sports an aperture (meaning a hole you look through) rear sight that has flips to show either a small circular hole for distance work (300-500 meters) or a larger circular hole for close quarters work (0 to 300 meters).
- Integral Front Sight and Gas Block – The Ace sports a combination gas block that combines the gas and front sight blocks. Note, AK folks use the term “blocks” to refer to the three sub-assemblies that sit on the top of the barrel – the front sight block (FSB), gas block (GB) and rear sight block (RSB).
- Both the front sight post and the larger rear aperture have Beta Lights – Tritium Gas – for low-light visibility. In general, tritium is radioactive and will last about 10 years. After that, the sights still work but you will not have the glowing effect.
- The height of sights enables co-witnessing with optics such as red dots.


Ok, this pistol is in 7.62×51 and has an 11.8″ barrel – I’m real curious to see what it can do within 100 yards. The sights are the same used on the full size 16.5″ barreled rifle so I really don’t think the smaller aperture would ever realistically be needed but we will see.
Railed Dust Cover
The dust cover of the Ace is pretty interesting. Most of the cheap aftermarket railed AK dust covers simply aren’t very stable or consistent when the dust cover is removed, installed and the weapon fired – in short, they don’t really work very well.
The Ace dust cover is beefy and installs very firmly with no travel it is a stable platform to build on. The top of the dust cover has a Picatinny rail section on the top that is welded in place. It aligns with the rail section on the gas tube via a small tab.

The rear of the dust cover has a second layer of sheet metal wrapping the bottom making for snug fit and reducing flexion.


In short, the dust cover is remarkably solid. I actually have to give it a knife hand chop on the rear to get it to seat down fully into the receiver. It needs to fit tight as the installation of the dust cover also locks the gas tube in place.
Milled Receiver
Speaking of the Ace’s receiver, it’s milled and built like a tank. I found it very well machined with nice touches like a funnel design to help guide the recoil rod assembly into position.

Note, while the modern AK (AKM ) uses a stamped receiver, the Type 2 and Type 3 AK-47s used milled receivers so it’s not entirely new but it does differ from the AKM. In fact, some countries continued to use milled receivers such as Bulgaria, Finland and Israel in at least some of their weapons.
Milled Recoil Assembly With Rubber Seal
The recoil rod and spring assembly is of a tubular style you typically see in RPKs. The benefit of this is a more consistent pressure being applied to the bolt carrier particularly when it comes to lock up. The thumb tab that locks the dust cover in place seems a tad longer than what I see in other AKs. Last comment is that they added a rubber seal at the rear of the assembly to seal out debris.


Forged Galatz Fire Control Group (FCG)
The Ace FCG is very nice. Let’s face it, most AK FCGs reflect and elegantly utilitarian design that isn’t very refined. I have always been impressed by the simplicity of the AK design and what the Ace designers decided to do was to take the enhanced FCG from the IWI Galatz designated marksman’s rifle (DMR) and used it in the Ace weapons.
Here are some differences I noted:
- A single large forged trigger hook for holding the hammer
- Engagement surfaces are polished such as where the disconnector grabs the hammer
- Hammer and trigger springs are separate whereas the AK has two wires spiral wound together that power the hammer and push down the rear of the trigger’s rear ears/bars.
- The top of the hammer is asymmetrical with only half of the normal bar that adds mass to the top rear of AK hammers. This is what normally gives an AK hammer the hammer-head shark hook.


Out of the box, it felt fair but once I used Superlube grease on the surfaces and Superlube oil on the rotating pins … wow. It is very smooth. [Click here for a blog post I did on Superlube – I use it on all of my firearms now]
Two Selector Levers
An AK has a single selector lever on the right side of the rifle that also serves to seal the receiver. It’s about as basic as you can get. On a semi-auto AK, the selector either physically blocks the trigger from actuating by moving a bar directly above the rear ears of the trigger or it moves out of the way allowing the trigger to move freely. On an automatic weapon it also allows the user to select full-auto or semi-automatic.
The Ace has a thumb control on the left side and more of a switch vs. the traditional long lever on the right side. Internally, the linkages do the same thing for semi-automatic in terms of moving the block bar into or out of position. The Ace has a separate plate for sealing the groove where the cocking handle reciprocates so the selector lever is not doing double-duty in that regard.


Note, the thumb selector connects to the safety bar via a linkage. The movement of the lever is an arc and not a horizontal slider. It is stiff and definitely needs lubrication when you get the weapon. I’ll comment more about that below when reviewing the pistol grip base.
Pistol Grip Base vs. Grip Nut
With AK’s, there tends to be a grip nut or in the case of Yugo-patterned AKs, a grip strap with an integral nut that the grip screw threads into. For the Ace, there is a “pistol grip base” that is uniquely shaped because it has a tube on top and my best guess is that it is to limit travel of the thumb selector and possibly to trap the pin so it can’t back out if it were ever to come loose.


Bolt Carrier and Bolt
The moment you open up a Galil Ace, you know you are looking at a rifle with an AK heritage and the bolt system clearly is AK inspired. When you look at the bolt and carrier, the refinements are interesting:
- Most obvious perhaps, the traditional right-hand side cocking left on the bolt carrier has been moved to the left side and is tubular to reduce mass.
- The bolt carrier has a lightening cut – that would lower mass and impact energy
- Bolt and carrier do not appear to have serial numbers. While I can’t find confirmation of what I am about to say, perhaps the manufacturing tolernces are so good that the traditional hand fitting and matched components are no longer required.
- At least for the 7.62×51 version the gas pistol is significantly shorter and has a collar on it.
- While an AK’s firing pin is free floating, the Ace has a spring loaded firing pin that is pushing it back away from the bolt face. Now some will argue whether this was really needed or not but it is a design difference.


Wrapping Up The First Post
There’s definitely more ground to cover and that will be in the next post. Click here to read it.
References
- Gun Digest IWI Galil Ace Review
- Guns America Digest IWI Galil Ace Review
- Guns.com History of the AK-47
- IWI US Galil Ace Product Page
- IWI How The Galil Became The Galil Ace
- IWI USA has all of their product manuals online
- Modern Firearms AK-47 By Maxim Popenker – Max is a weapons scholar and is well worth reading or watching if you have a chance
- Shooting Illustrated Galil Ace Rifle Review
- The Truth About Guns IWI Galil Ace Review
- Wikipedia article on AK-47 rifles
Note, I have to buy all of my parts – nothing here was paid for by sponsors, etc. I do make a small amount if you click on an ad and buy something but that is it. You’re getting my real opinion on stuff.
If you find this post useful, please share the link on Facebook, with your friends, etc. Your support is much appreciated and if you have any feedback, please email me at in**@*********ps.com. Please note that for links to other websites, we are only paid if there is an affiliate program such as Avantlink, Impact, Amazon and eBay and only if you purchase something. If you’d like to directly contribute towards our continued reporting, please visit our funding page.
