In my last post, I mentioned my disappointment that the Kinetic Research Group (KRG) Bravo chassis that Aero Precision sells with some of their Solus bolt rifle offerings is not truly bipod ready. In my opinion, Aero should either have discosed that the stock isn’t bipod ready and/or given an option during the purchase of the Solus to buy one of the models of spigots that KRG offers. Okay, that’s water under the bridge. I want to make this post about adding a spigot to a Bravo.
It’s time for me to explain what I am talking about – a spigot is an attachment point that extends forward past the front end of the stock where a bipod, and sometimes other accessories, can be attached.
In the case of the Bravo, a spigot will connect to the aluminum chassis and both move the bipod mounting point forward and provide an extremely secure mount directly to the chassis.
Nostalgia Time
The first time I encountered a spigot was with Versa-Pod bipods. It’s been so long, I can’t recall if I found out about Versa-Pods and then bought an Accuracy International Chassis System (AICS) for my Remington 700 XCR LR or it was the other way arround.
You can see the spigot sticking out of the front of the AICS – in this case it is an adapter to use a Versa-pod bipod.
I don’t really recall when but at some point I moved away from the Versa-Pods mainly because I didn’t like the rotation around the spigot unless you really cranked down the locking knob. These days, my go-to bipods are Atlas models.
Back to KRG Spigots
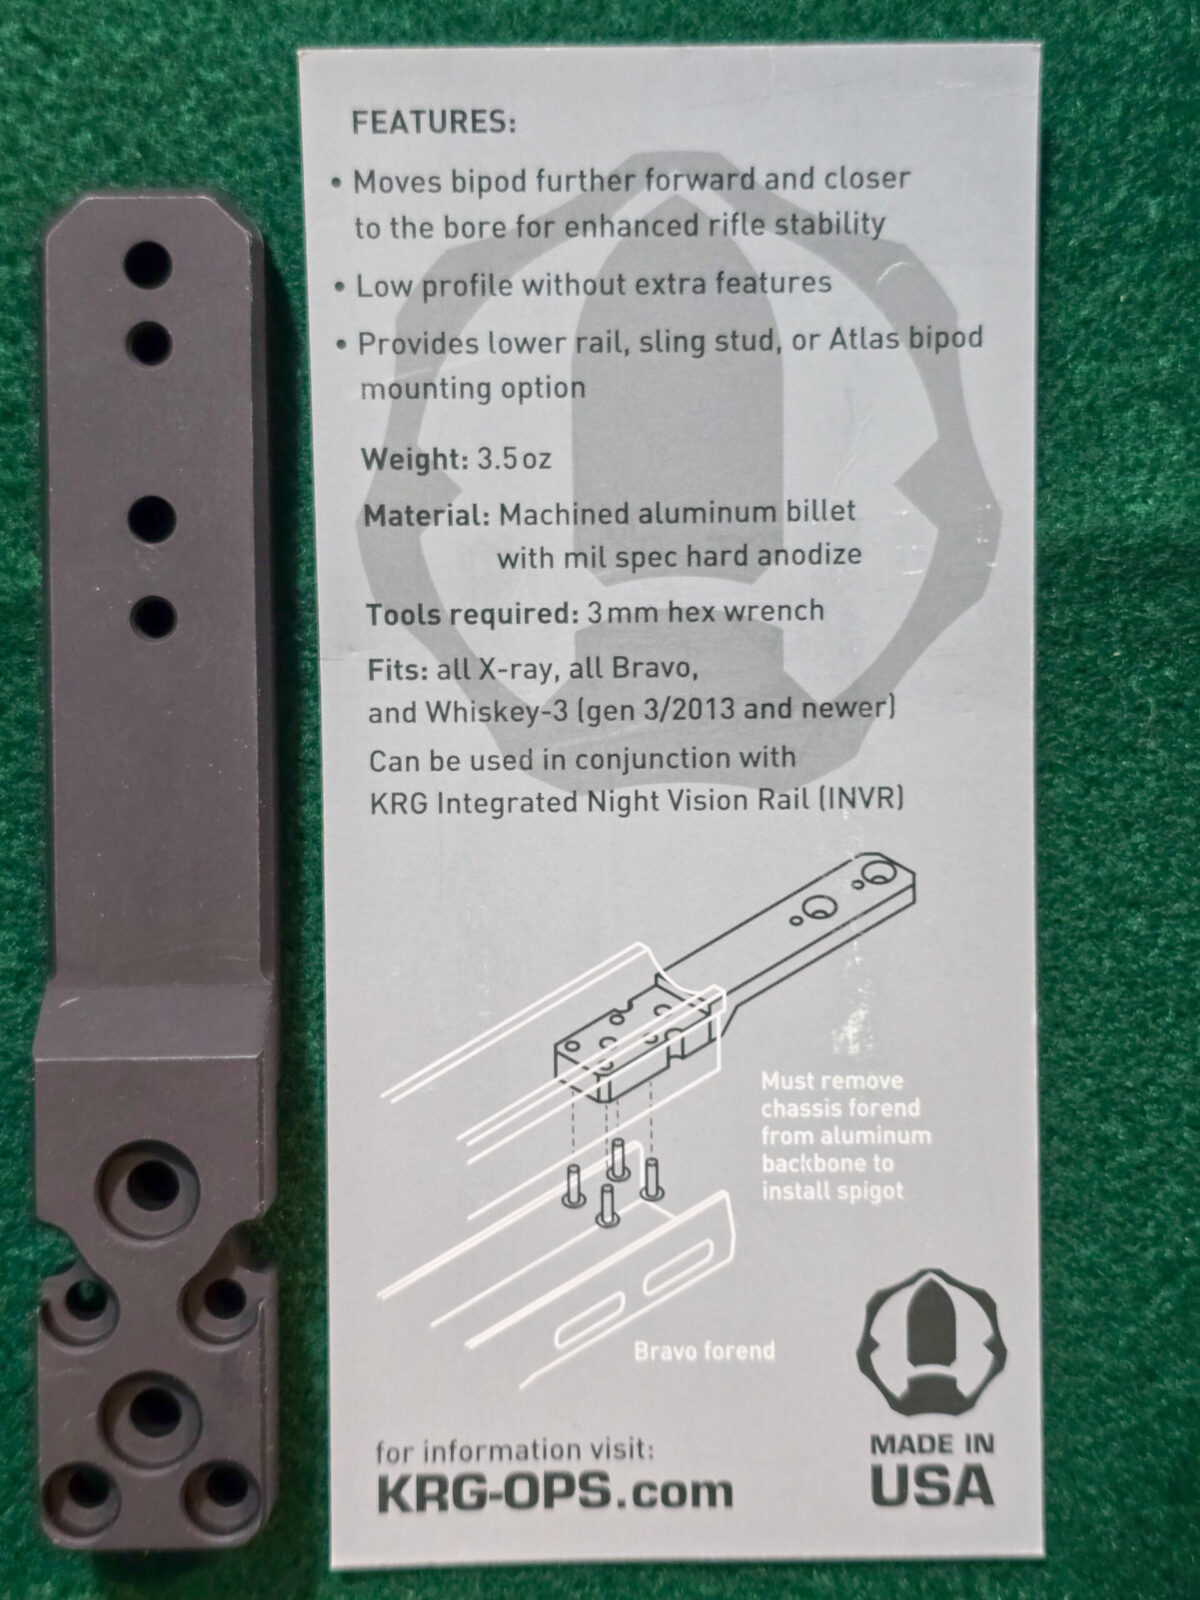
KRG literally has a whole page of different spigots. There really are three factors that distinguish them – whether it is an ARCA pattern, how far forward you want the mounting point and what all you want to attach.
I’ll be honest – I actually had to call KRG to figure out what I needed. The customer service person I talked to was great and patiently explained the pros and cons of each based on what I needed:
I did not need to connect an ARCA device, such as a tripod. Since I did not need ARCA this also ruled out their really long spigot.
I only needed a bipod mount. Their normal spigot provides all kinds of attachments for rails, QD studs, night vision, etc.
Ok, no ARCA and just a bipod. That pointed me to the Minimalist spigot. The Minimalist moves the mount closer to the bore – which means you can get lower all things being equal. It also moves the attachment about five inches forward.
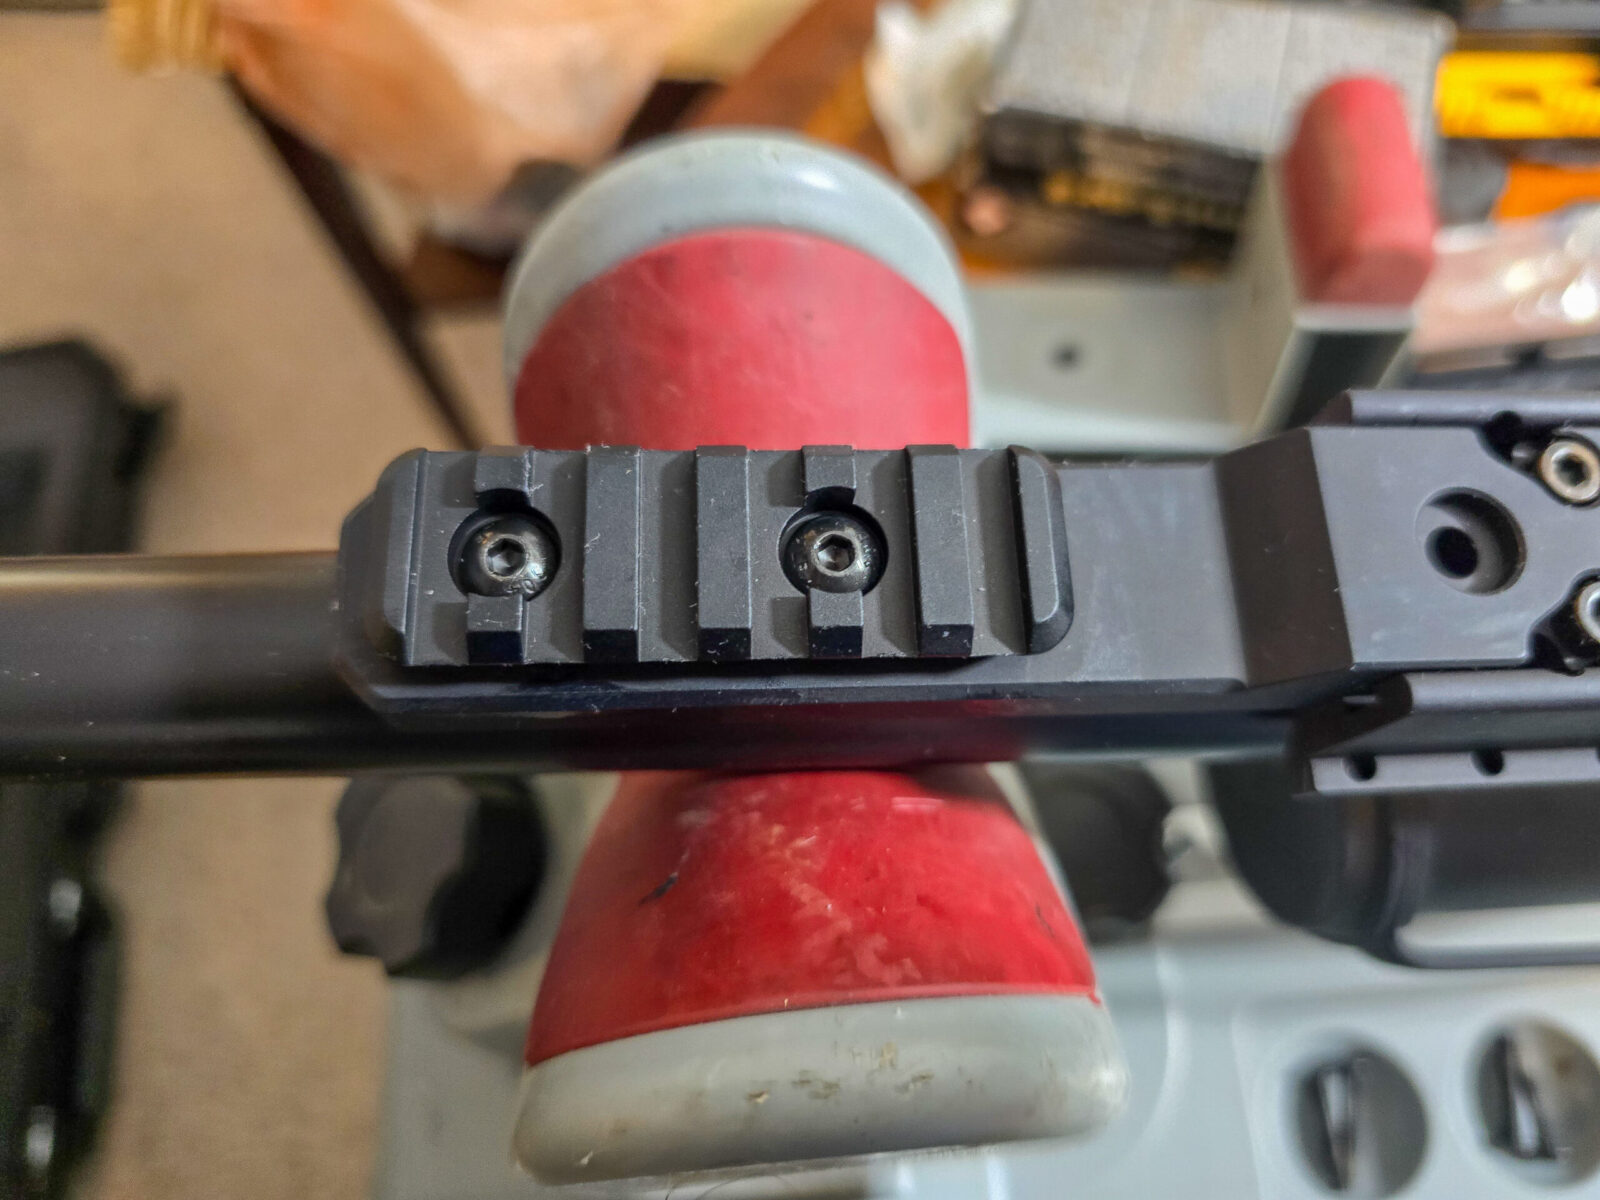
One thing with the Minimalist – it does not come with a rail section. You can either use the polymer one that came with your stock or buy an aluminum section from them. There rails sit flat as they not have the typical M-Lok boss on the back. This also means you can’t use a common M-Lok rail.
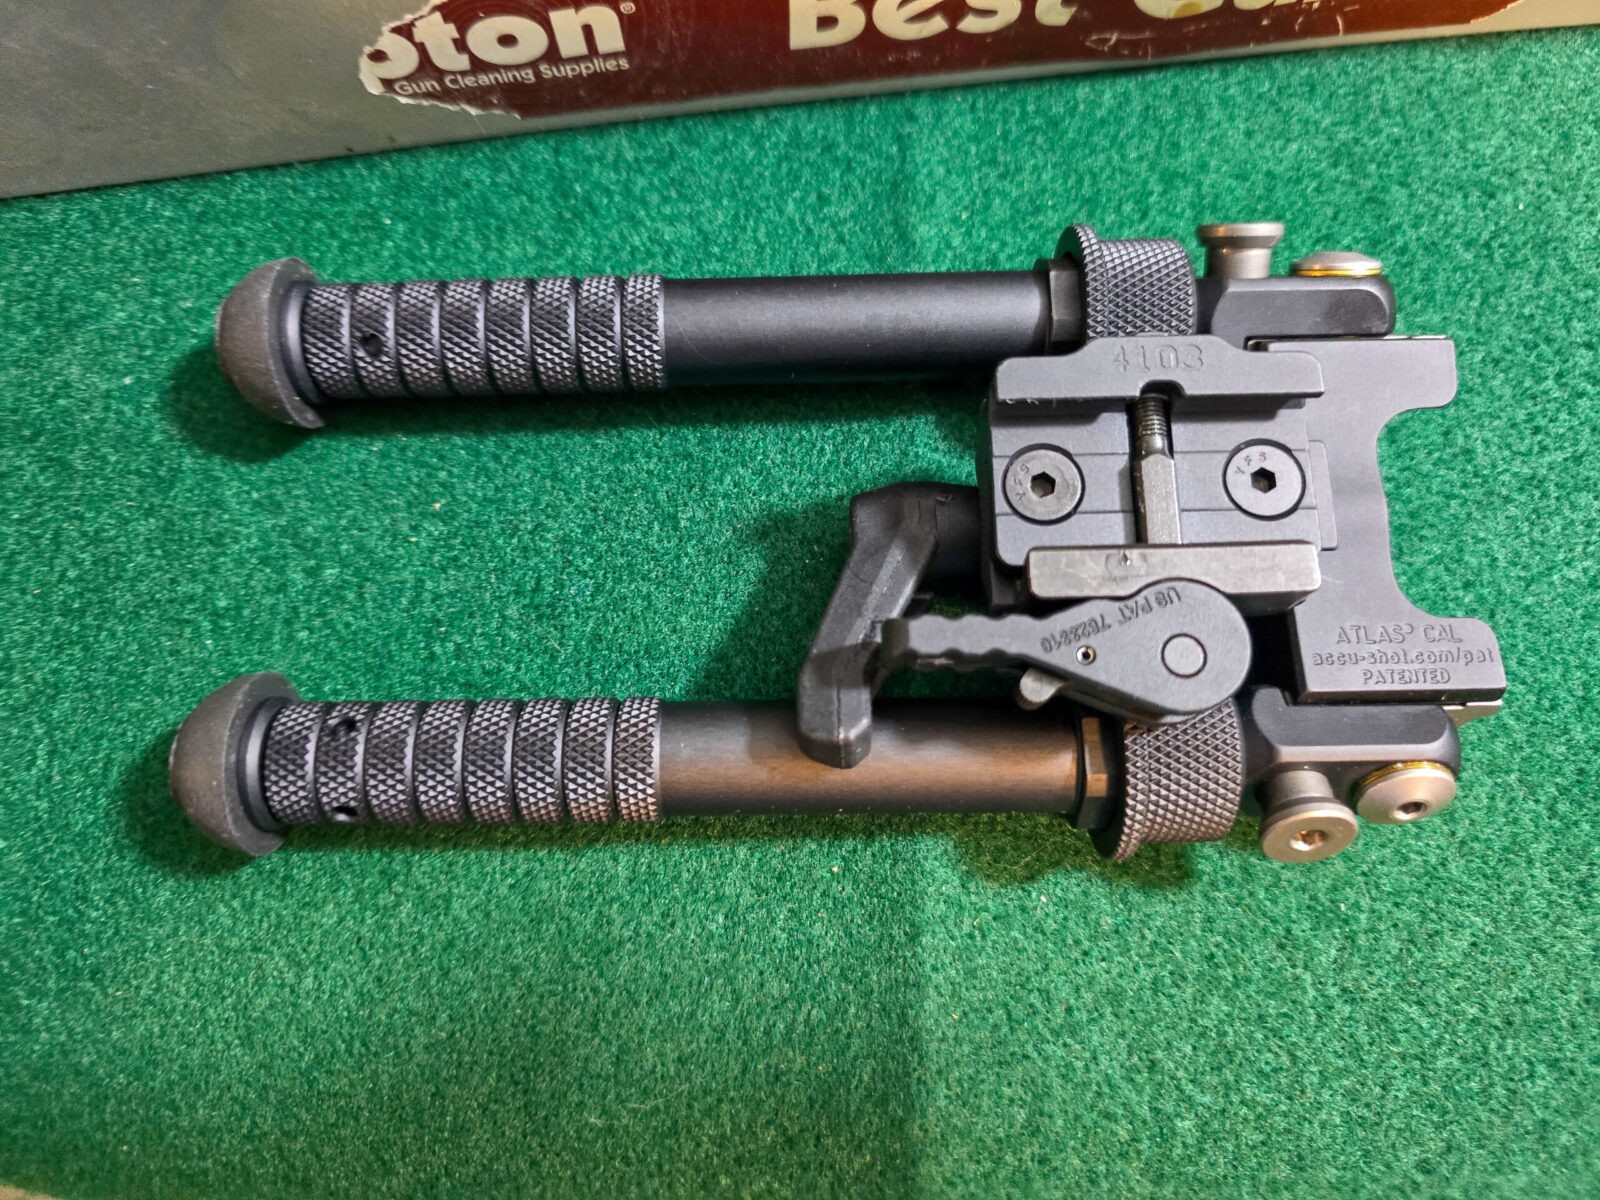
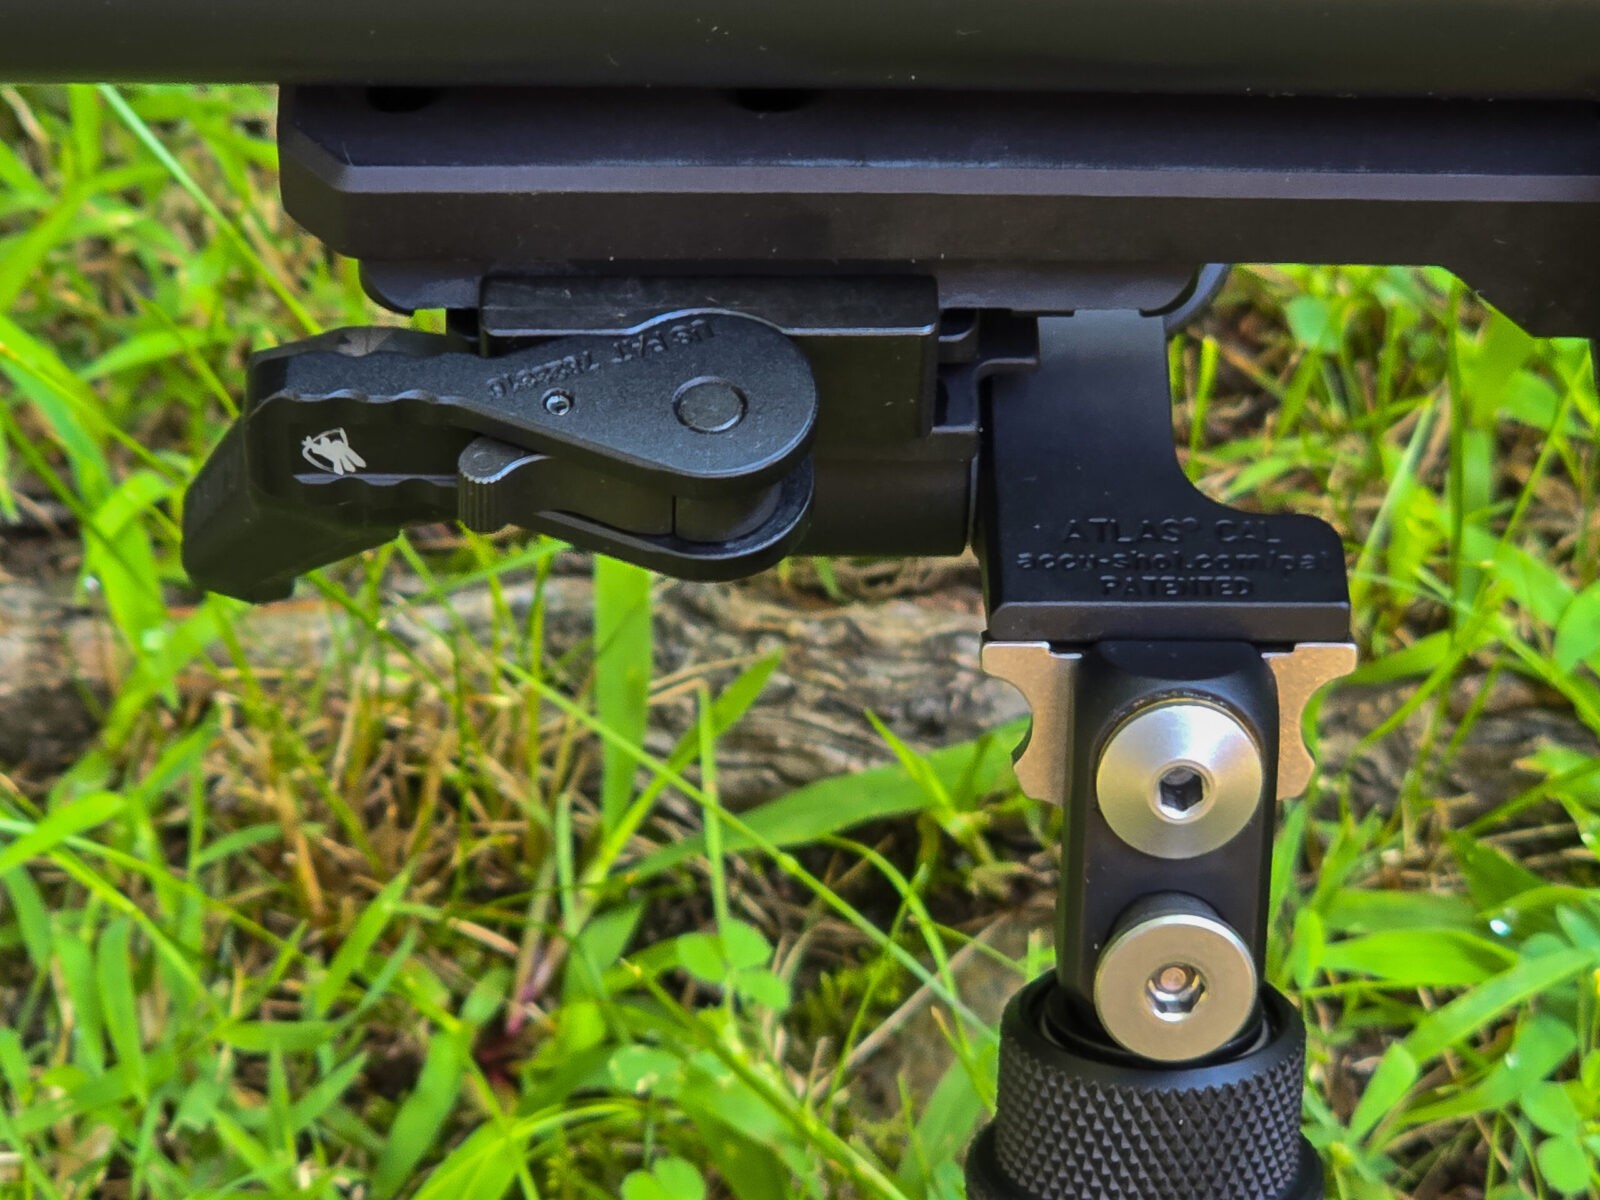
Your other option is to bolt an Atlas bipod or a Harris bipod they sell directly to the spigot. I like using a rail because I can pair it with an American Defense Manufacturing (ADM) quick release lever and have the ability to quickly take the bipod off if I don’t need it. For example, if I am shooting from a bench rest.
How to install the Minimalist spigot
If you can turn a screwdriver, you can install the spigot has there are just a few steps:
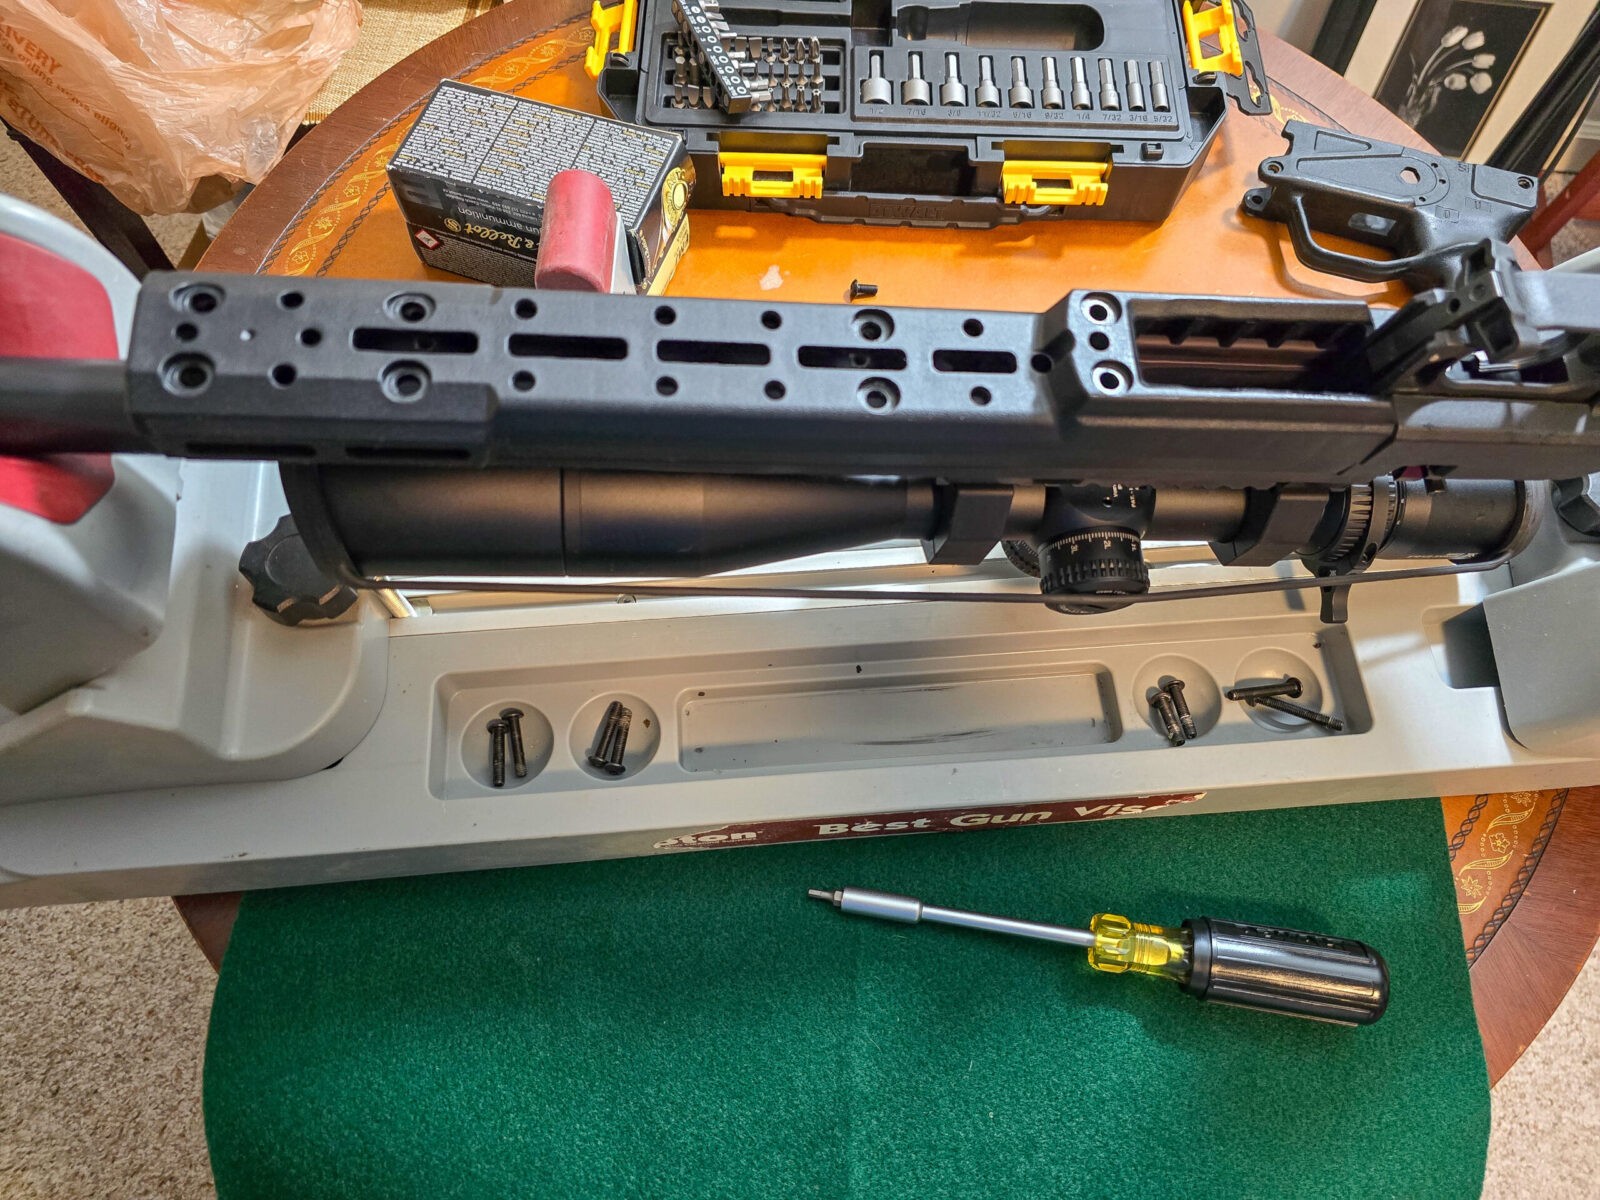
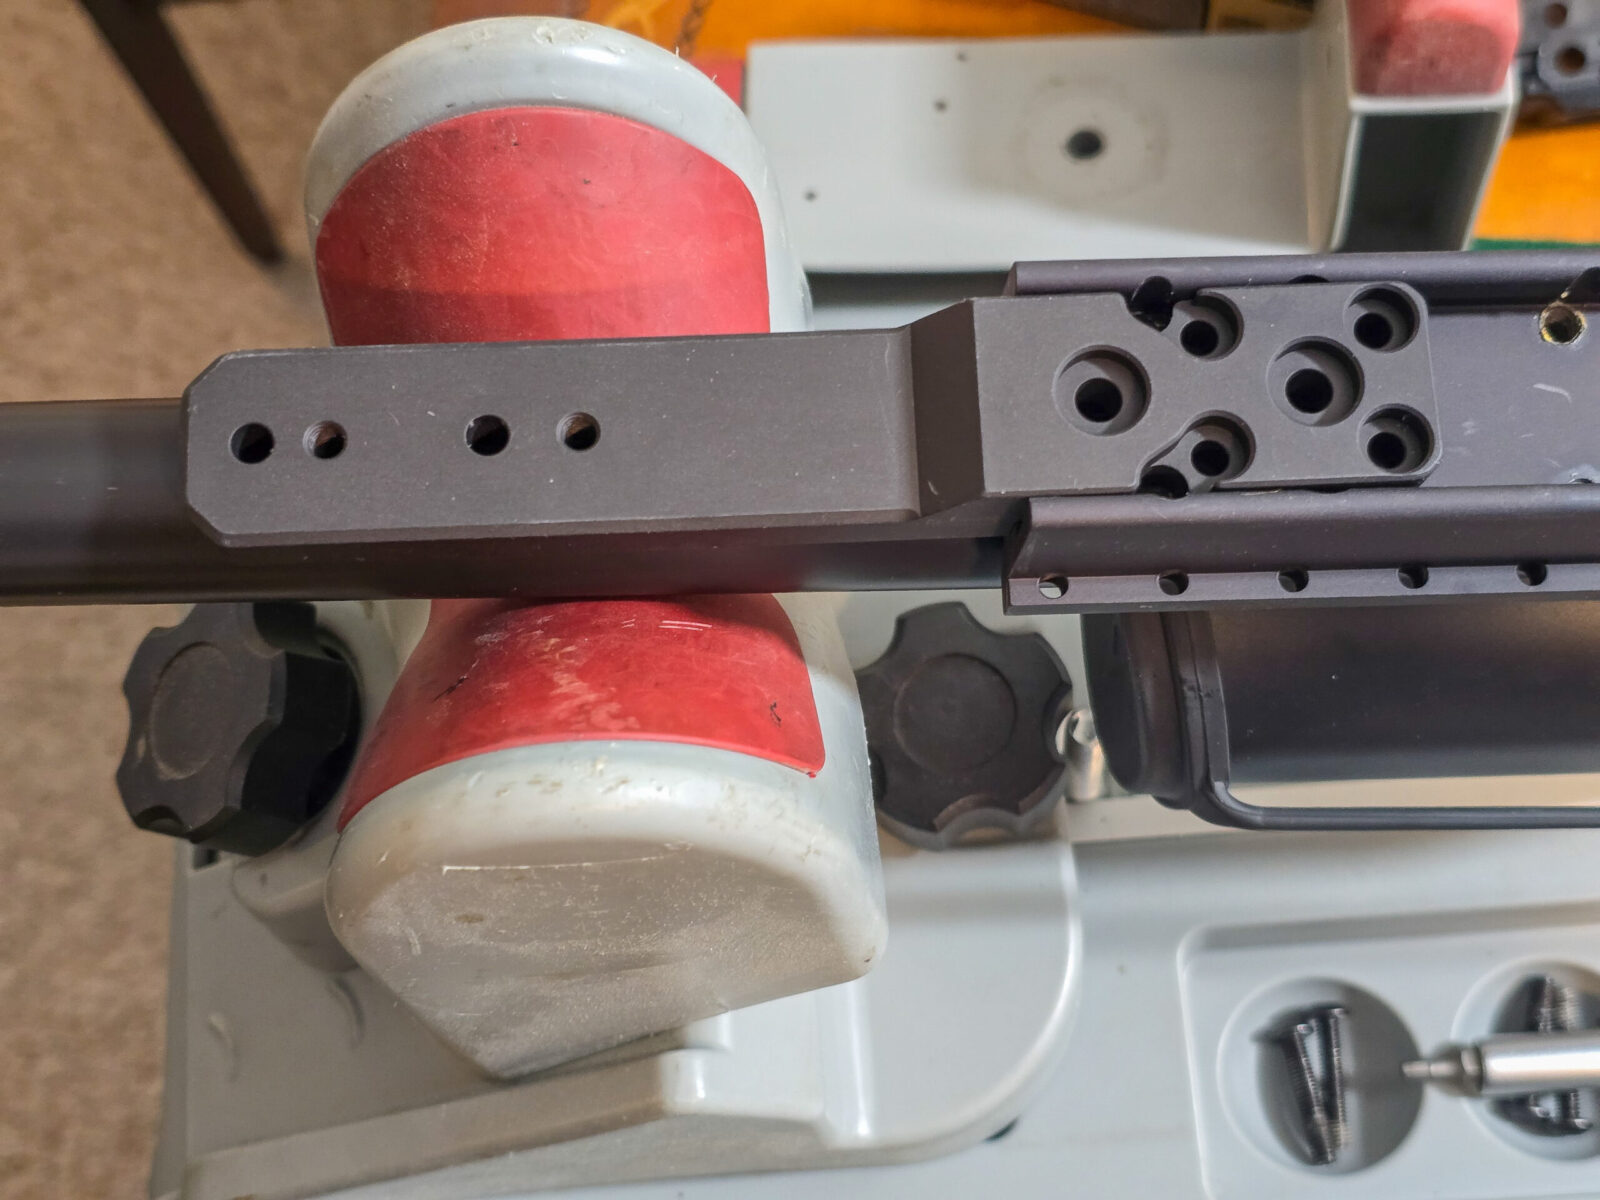
Remove the bottom chassis cover by removing eight bolts
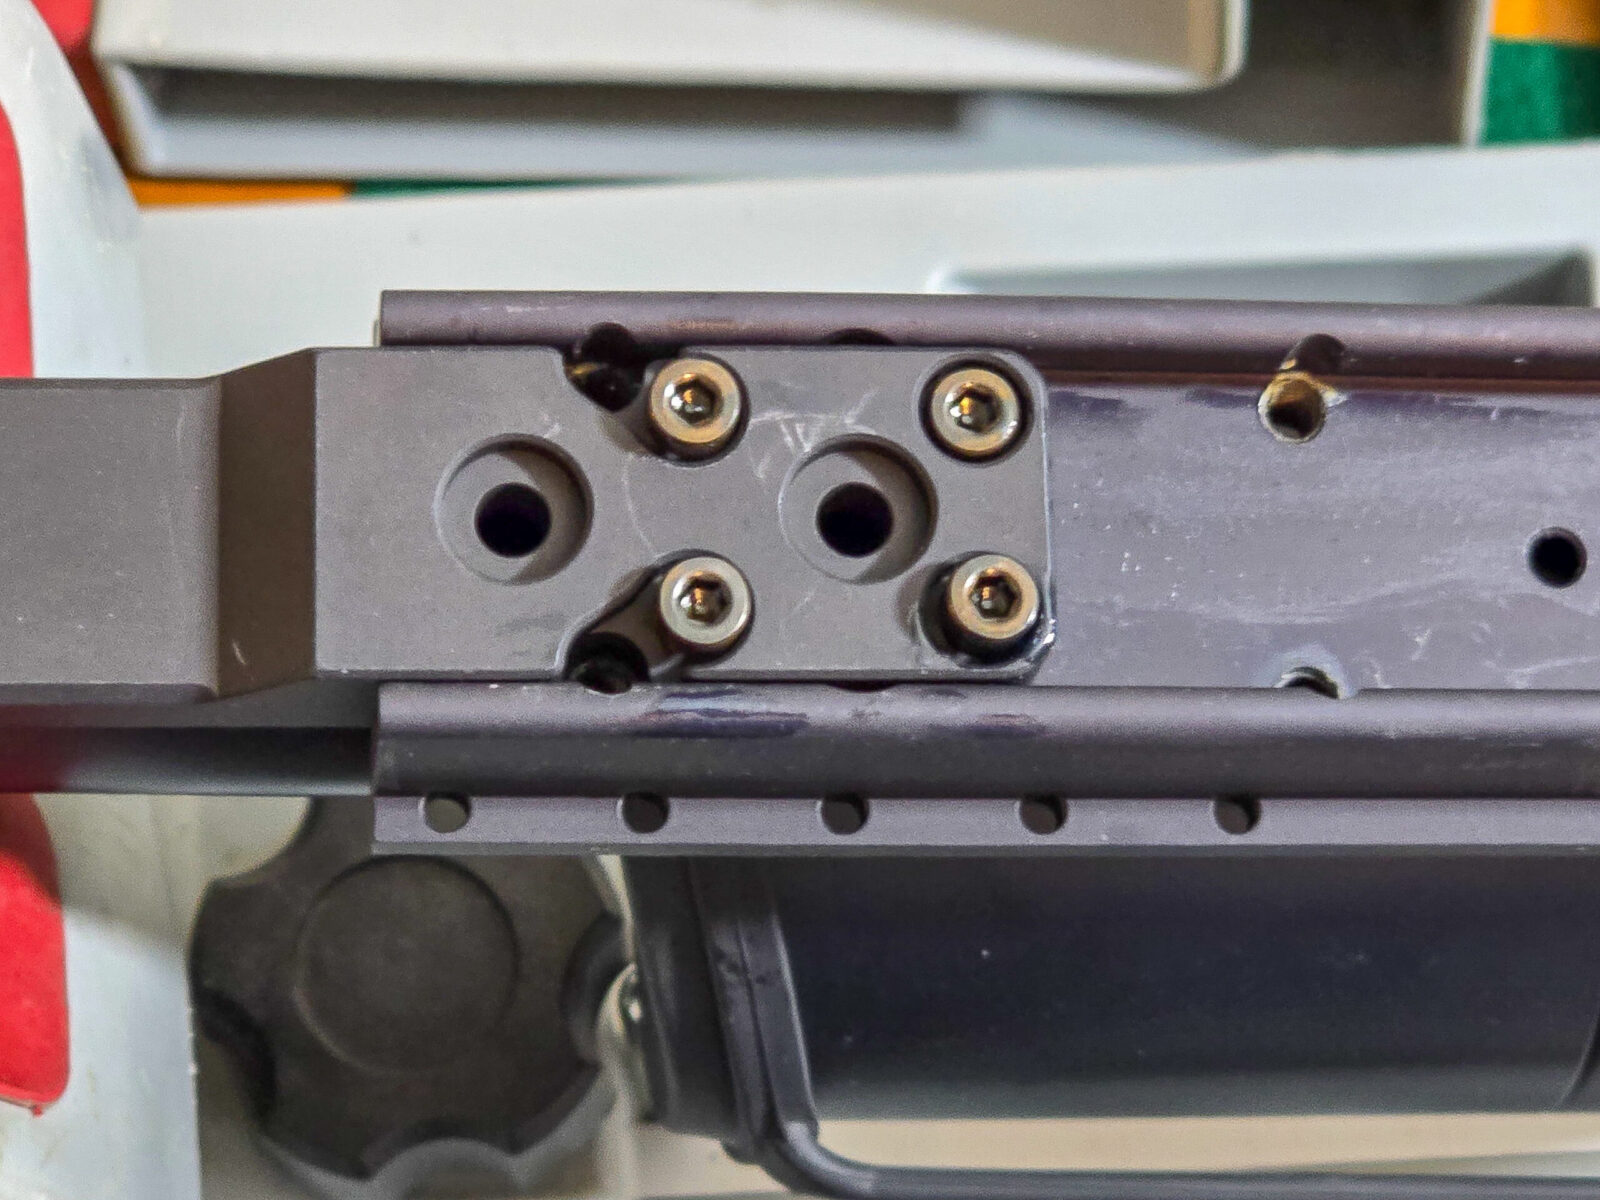
Screw the spigot into place – use blue/medium thread locker on the bolts
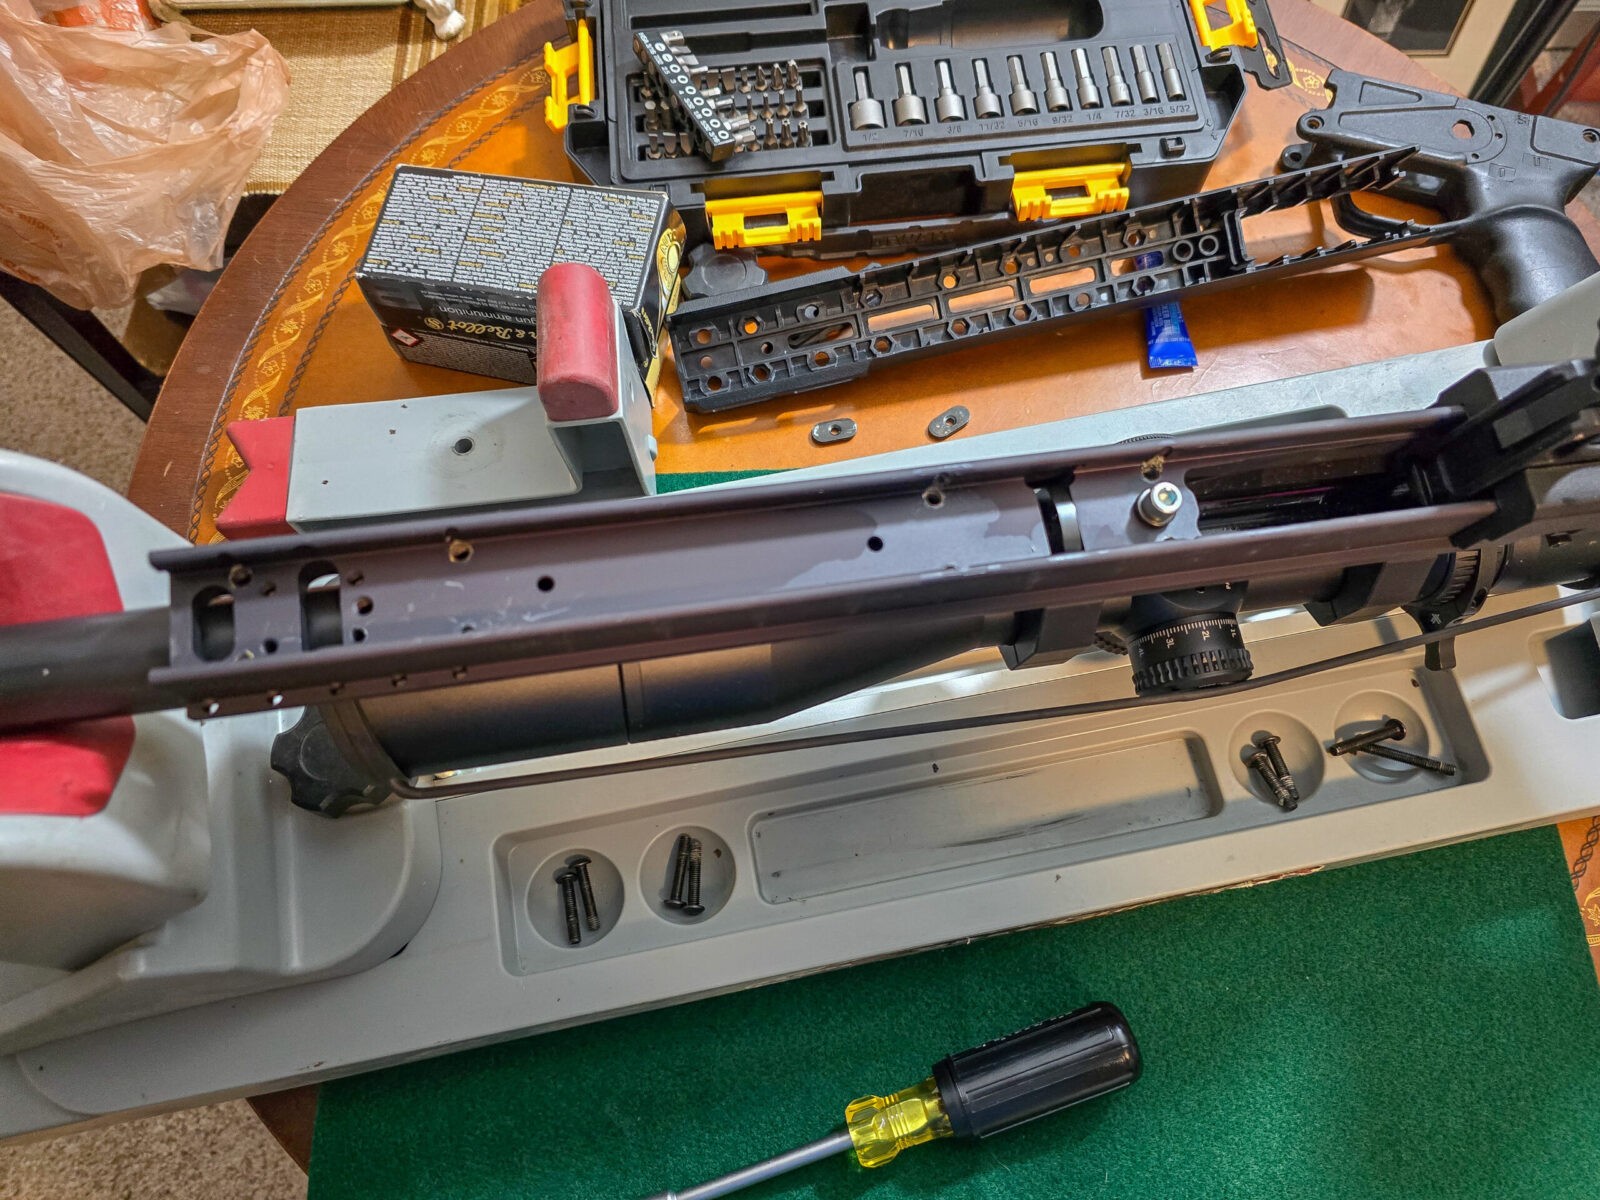
Apple blue/medium strength threadlocker to each bolt and screw the rail segment onto the spigot – assuming you go that route
Apply blue/medium strenth thread locker to each bolt and screw the bottom cover back on
It’s nice when something literally is that easy.
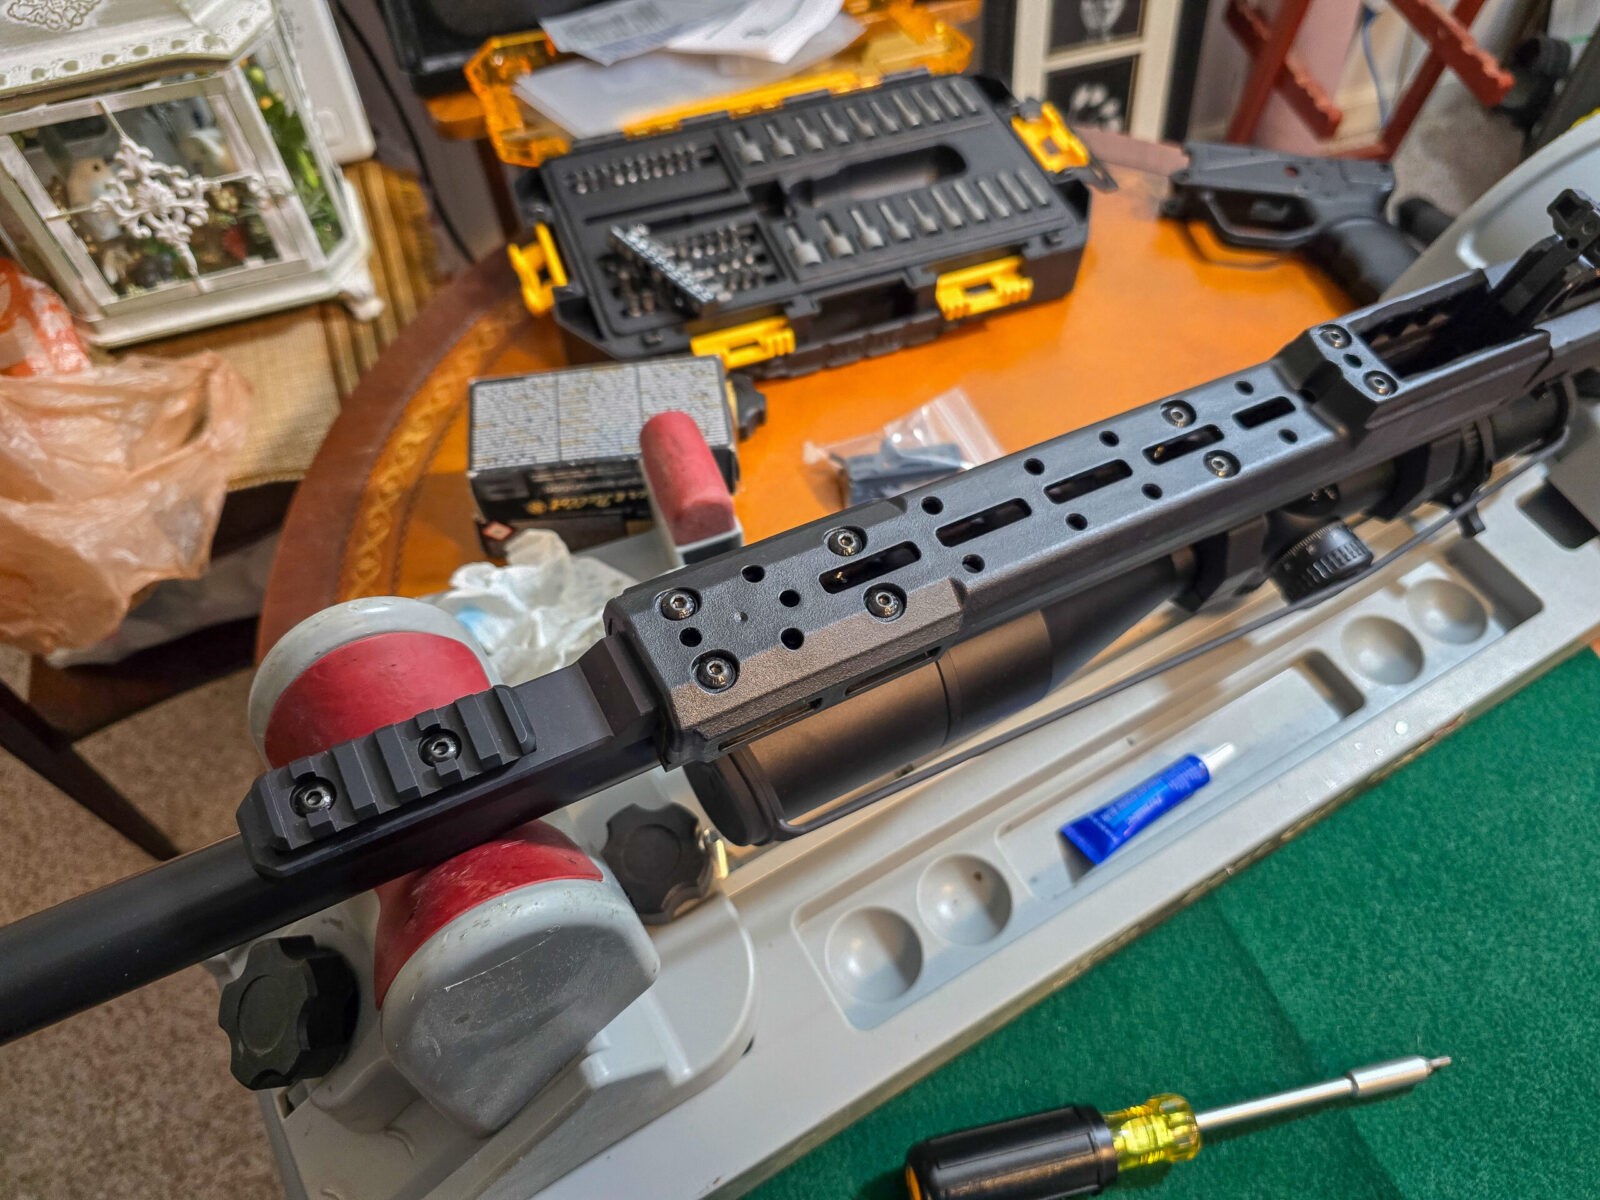
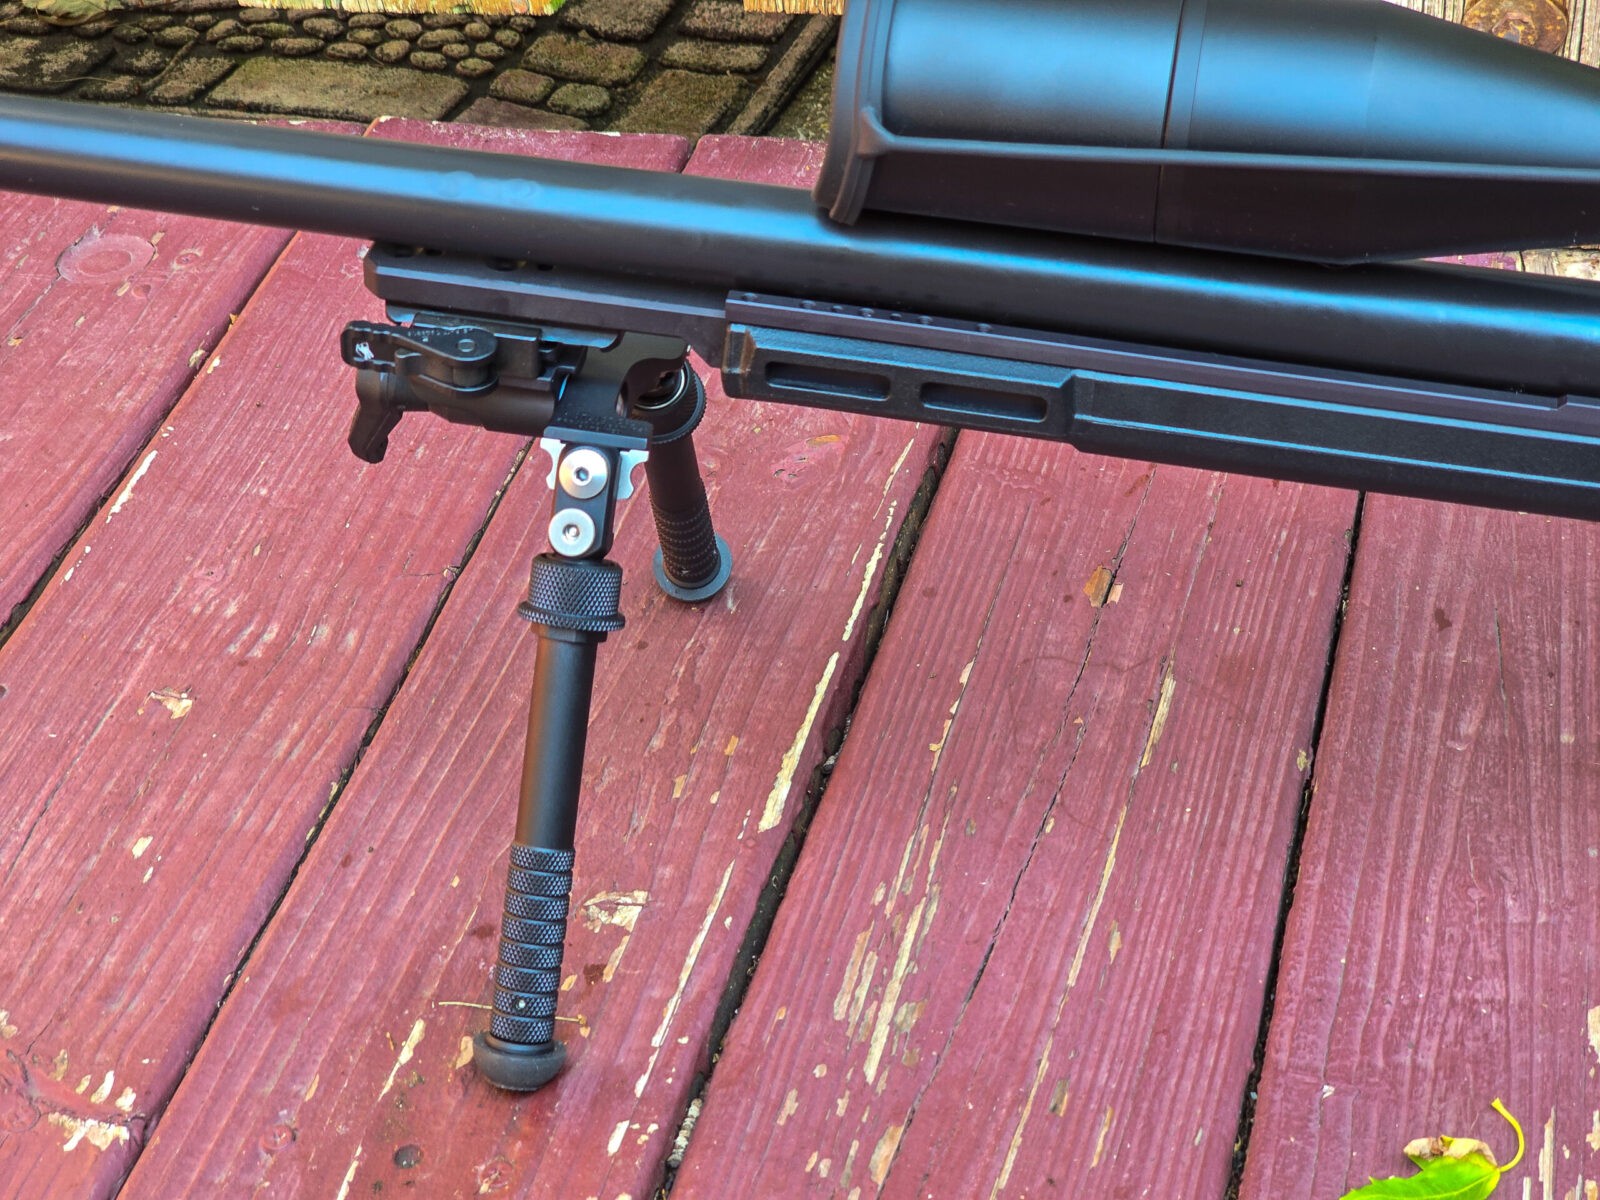
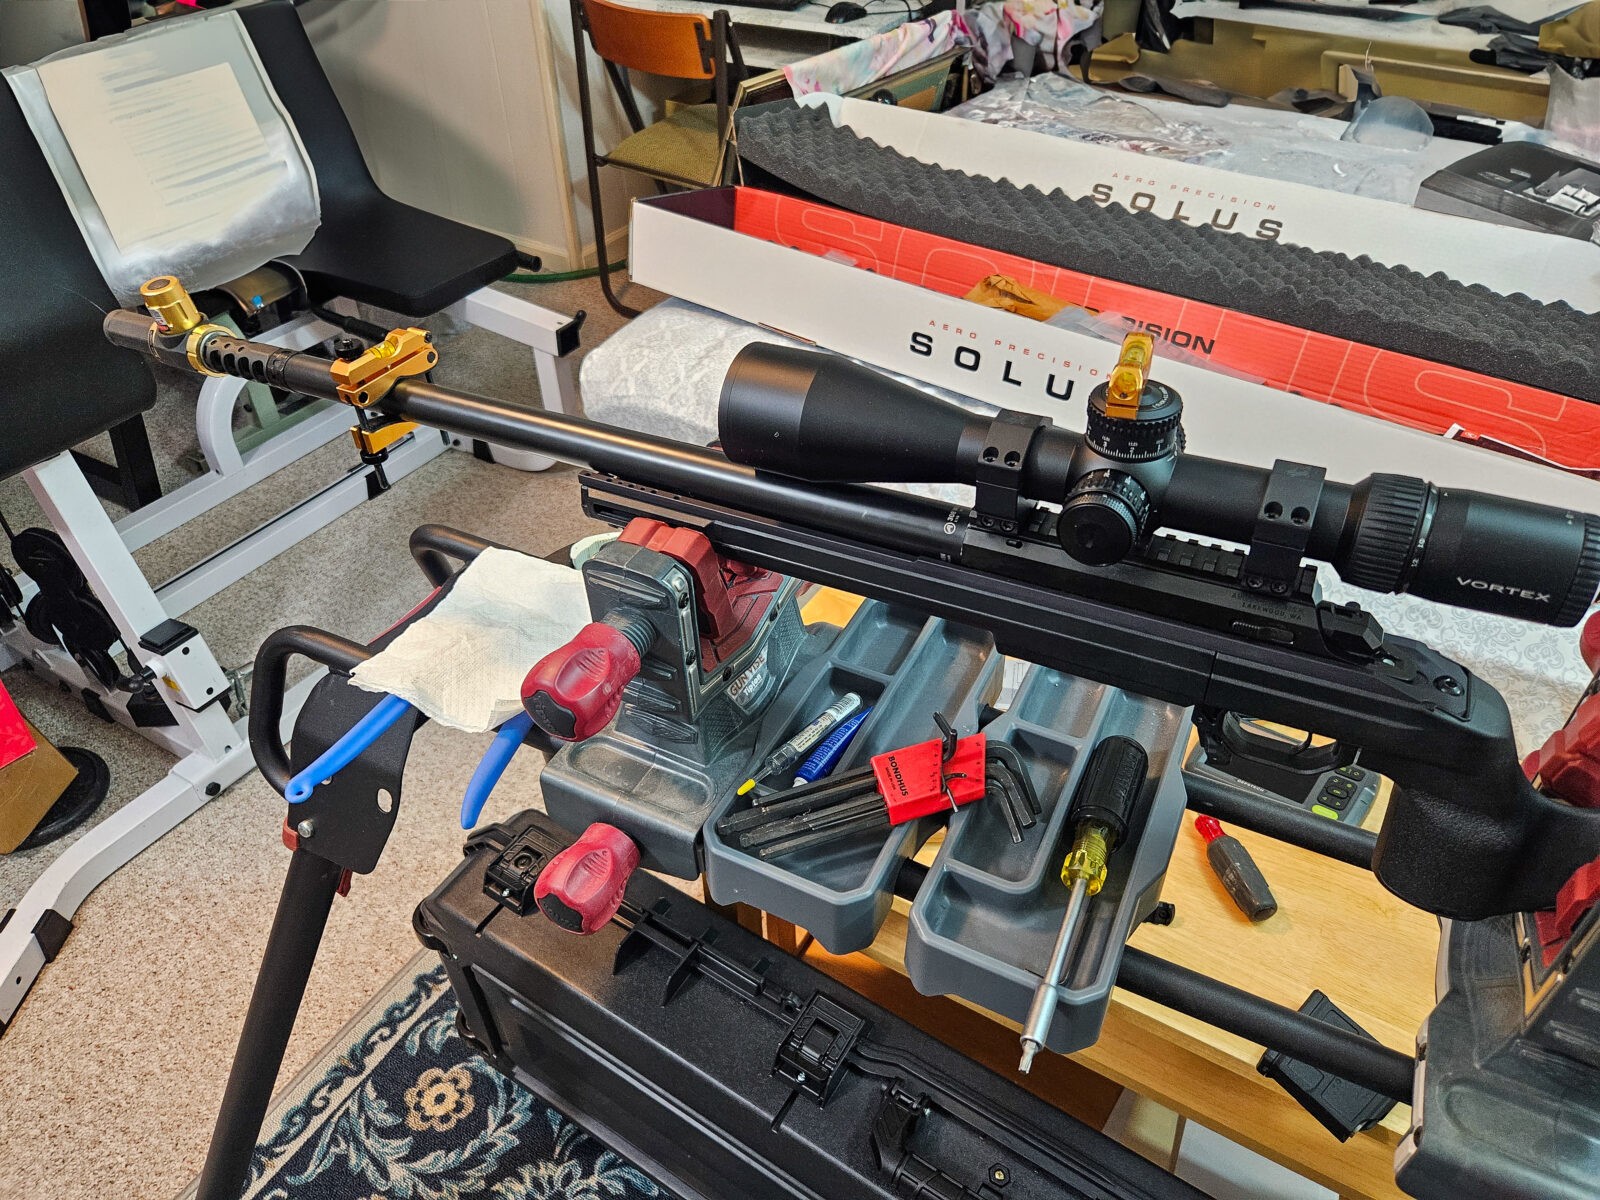
Remove the 8 screws that hold the cover on the chassis’ backbone. Note, the rear two are longer than the others.The spigot will screw on in the front.This is the Minimalist spigot that bolts right into place.The machining is very well done. The holes all line up and it’s just a matter of screwing it together.Apply medium strength thread locker to the screws they provide. Note the holes used above. The forward outermost holes in this photo are used to secure the cover.In my case, I screwed in the rail section after applying medium strength thread locker to the screws.Apply blue/medium strength threadlocker to the screws and install them. This is a polymer cover you are installing and do not need a lot of torque.. Bring it down snug/firm and let the threadlocker do its job.This is an Atlas BT65-LS17 bipod. The BT65s are great rigid bipods that don’t pan left and right. It uses an ADM LS17 quick release clamp to secure quickly to rails. If I had wanted it, I could have ordered the BT65 without the clamp and installed it directly to the spigot. Due to all of the counterfiet Atlas bipods that are out there, I buy mine directly from AccuShot. I’d recommend you do that or buy them from a reputable dealer. Avoid buying an Atlas model from eBay like the plague.The result is incredibly solid. If I had known how nice this setup was, I would have paid for it from the start.The ADM LS-17 quick release clamp does a great job holding the Atlas BT65 solidly in place.Here’s a view of the whole Solus Bravo .308 with the spigot and Atlas BT65-LS17 bipod.
Summary
Okay, I was starting to like the Bravo chasis more and more. The Minimalist spigot is absolutely worth it. You can then either mount your bipod directly or via a Picatinny rail section like I did.
Dear Aero – hint, hint – I would have paid for the spigot in a heartbeat had I known how solid it is and what a stable platform it can enable.
To anyone reading this who has a Bravo chasis – adding a spigot is very much worth it. I’m honestly glad I did.
I hope this helps you out.
Note, I have to buy all of my parts – nothing here was paid for by sponsors, etc. I do make a small amount if you click on an ad and buy something but that is it. You’re getting my real opinion on stuff.
If you find this post useful, please share the link on Facebook, with your friends, etc. Your support is much appreciated and if you have any feedback, please email me at in**@*********ps.com. Please note that for links to other websites, we are only paid if there is an affiliate program such as Avantlink, Impact, Amazon and eBay and only if you purchase something. If you’d like to directly contribute towards our continued reporting, please visit our funding page.
Most of my time is spent working on ARs, AKs, and various Pistol Caliber Carbines (PCCs). Once in a while, I get a hankering for a precision rifle and take the plunge … in this case two plunges, an Aero Solus .308 with a 20″ M24 profiled barrel plus a Bergara B14 HMR also in .308. This post will focus on the Solus.
I was customizing a Zastava M77 designated marksman’s rifle (DMR) and then a sales email showed up from Aero Precision with a really good sale on the Aero Solus Bravo. Well, I decided to do some more digging to learn about the features:
You can get it in .308, 6mm or 6.5 Creedmor – I opted for .308 as I have plenty of match ammo for that caliber. Everything below is about the .308 20″ Bravo just to be clear. The Creedmor chamberings have a few differences such as barrel length.
Aero Precision makes the receiver and bolt
The receiver is patterned after a Remington 700 short action and is made from 416 stainless
The bolt is a 3-locking lug design, has a 60 degree throw and dual ejectors. It also cocks on open.
A 20 MOA 1913 Picatinny scope rail is integral with the receiver – no need to buy something there
Ballistic Advantage, a sister company to Aero, makes the barrel
The barrel is a 20 inch heavy M24 profile with a 1:10 twist, honed and lapped
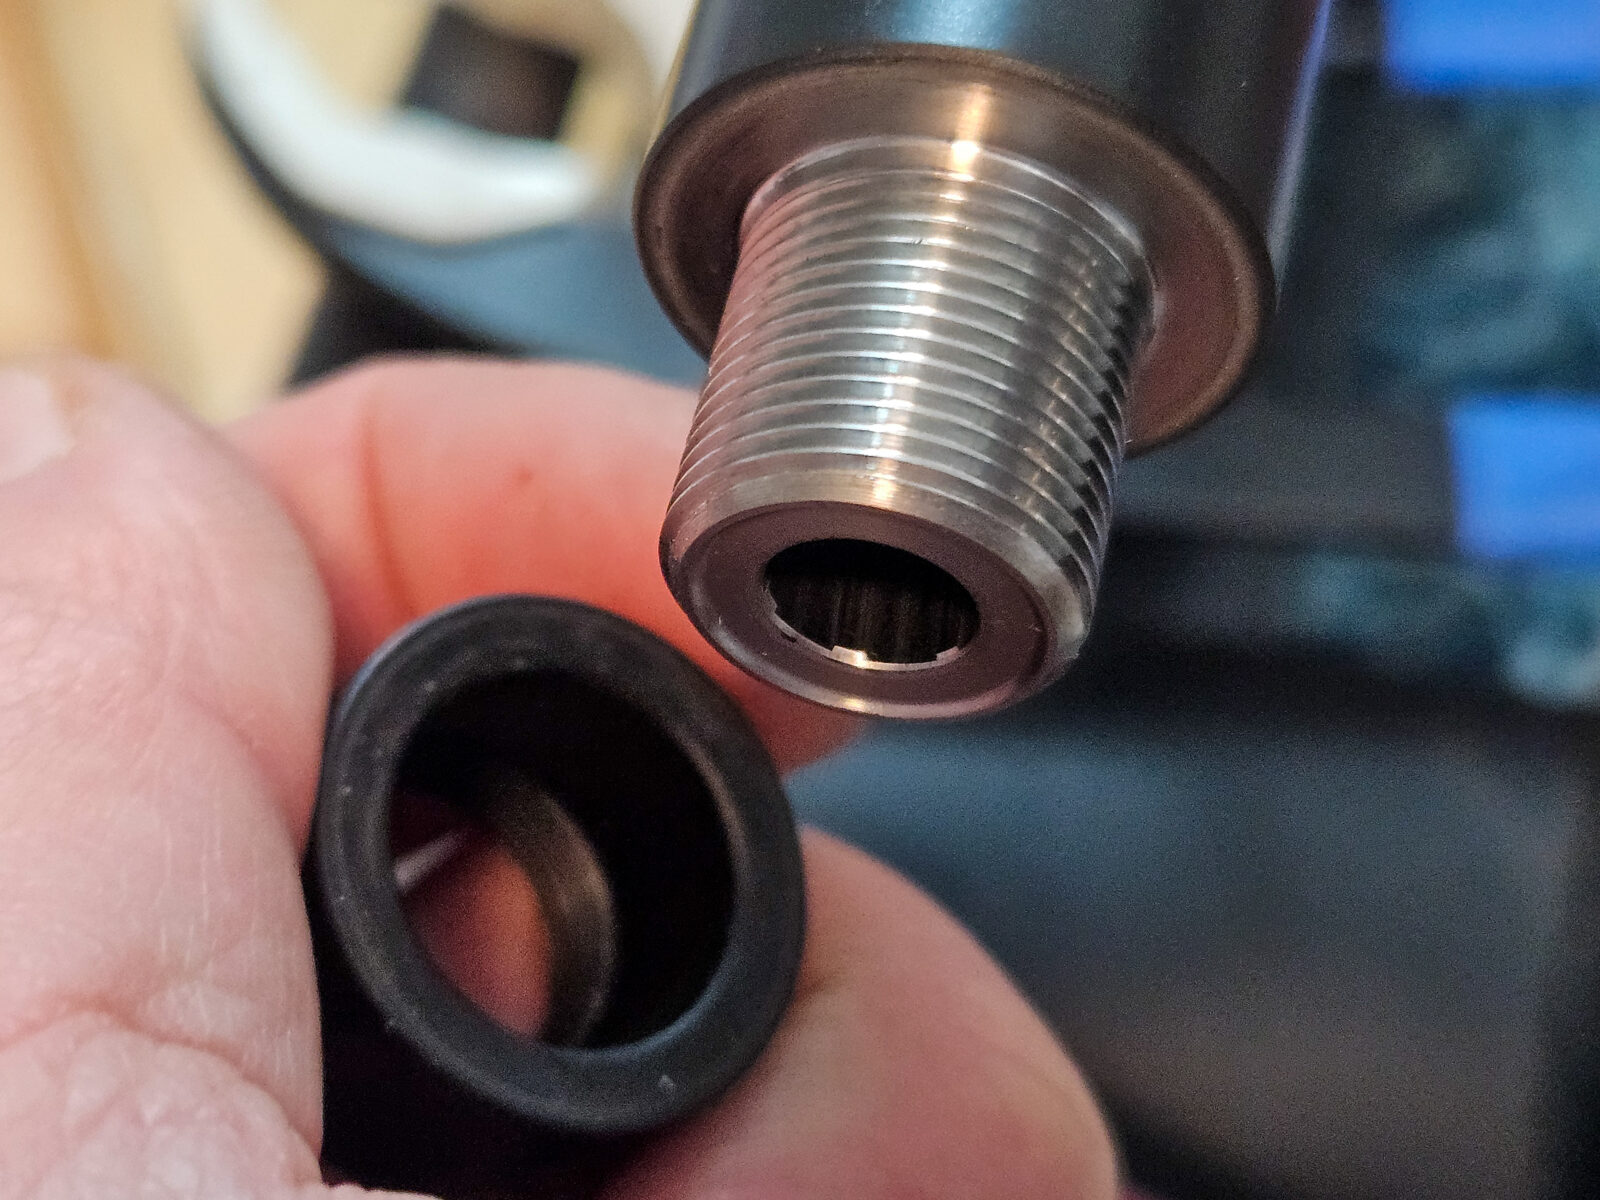
The barrel is threaded 5/8-24 and comes with a protective muzzle nut
The trigger is made by TriggerTech, who I really like
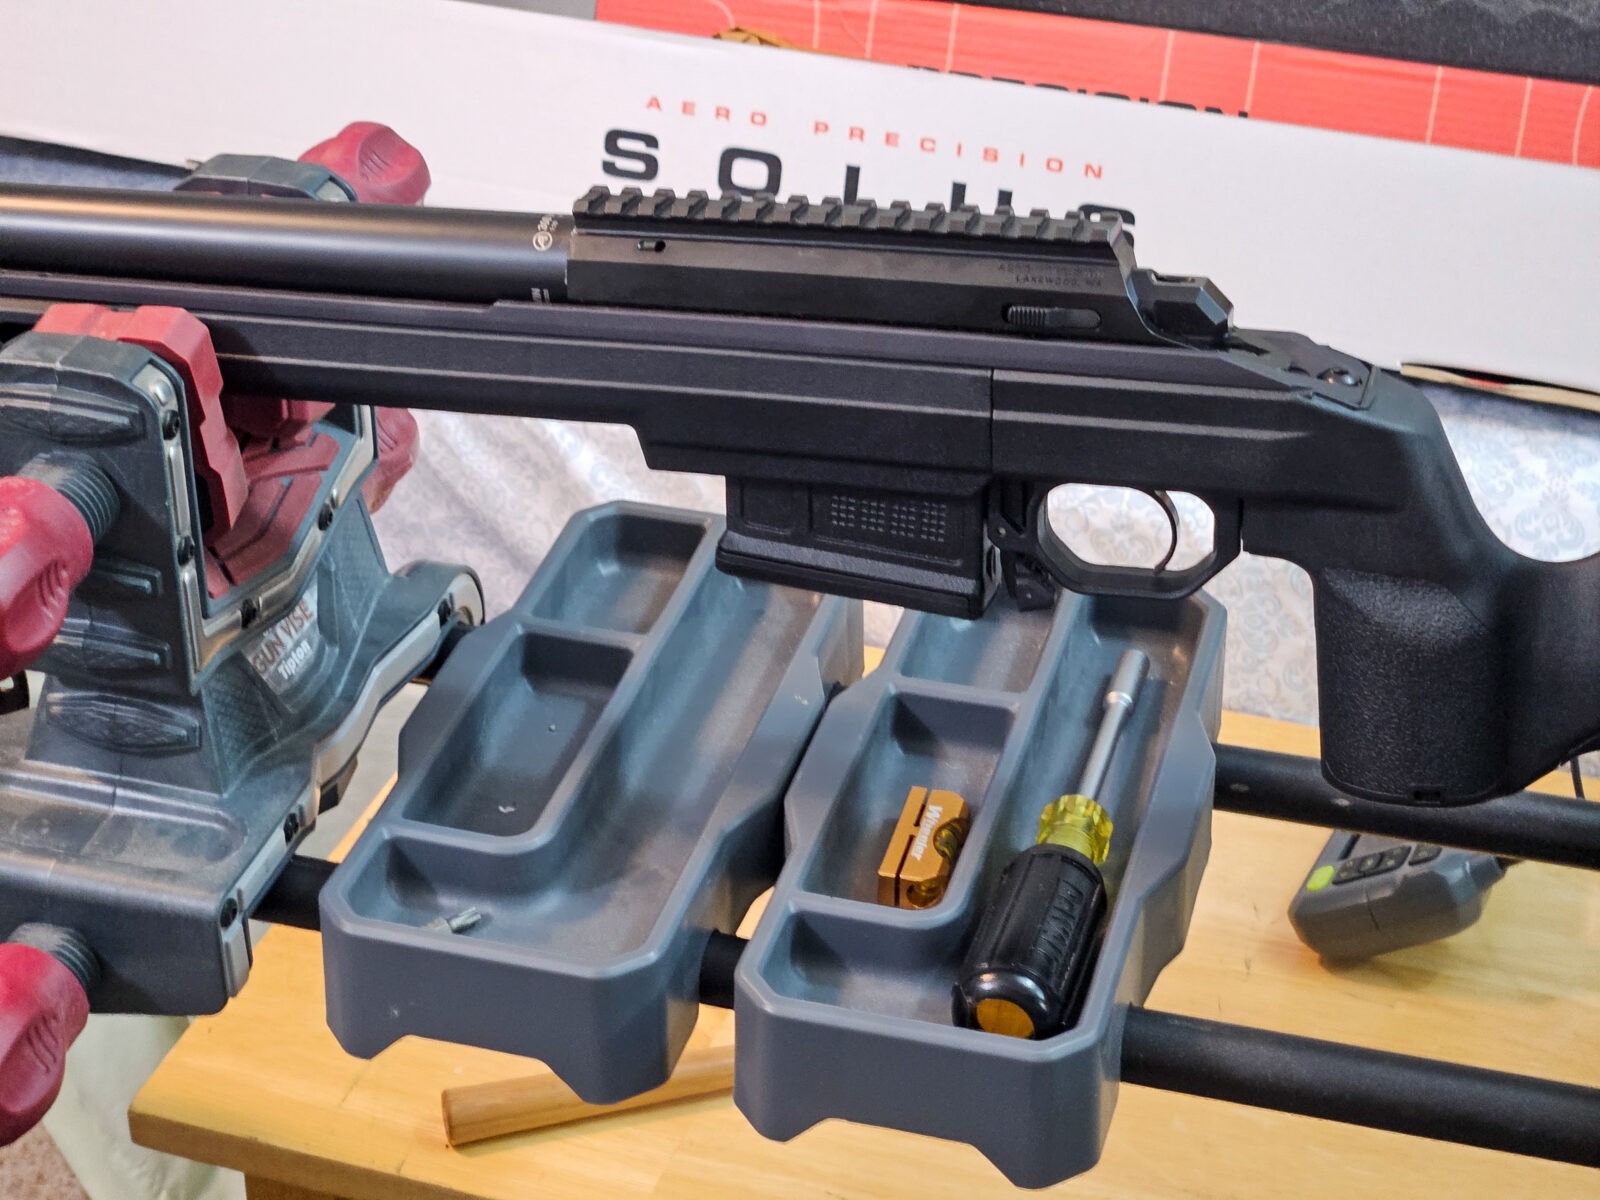
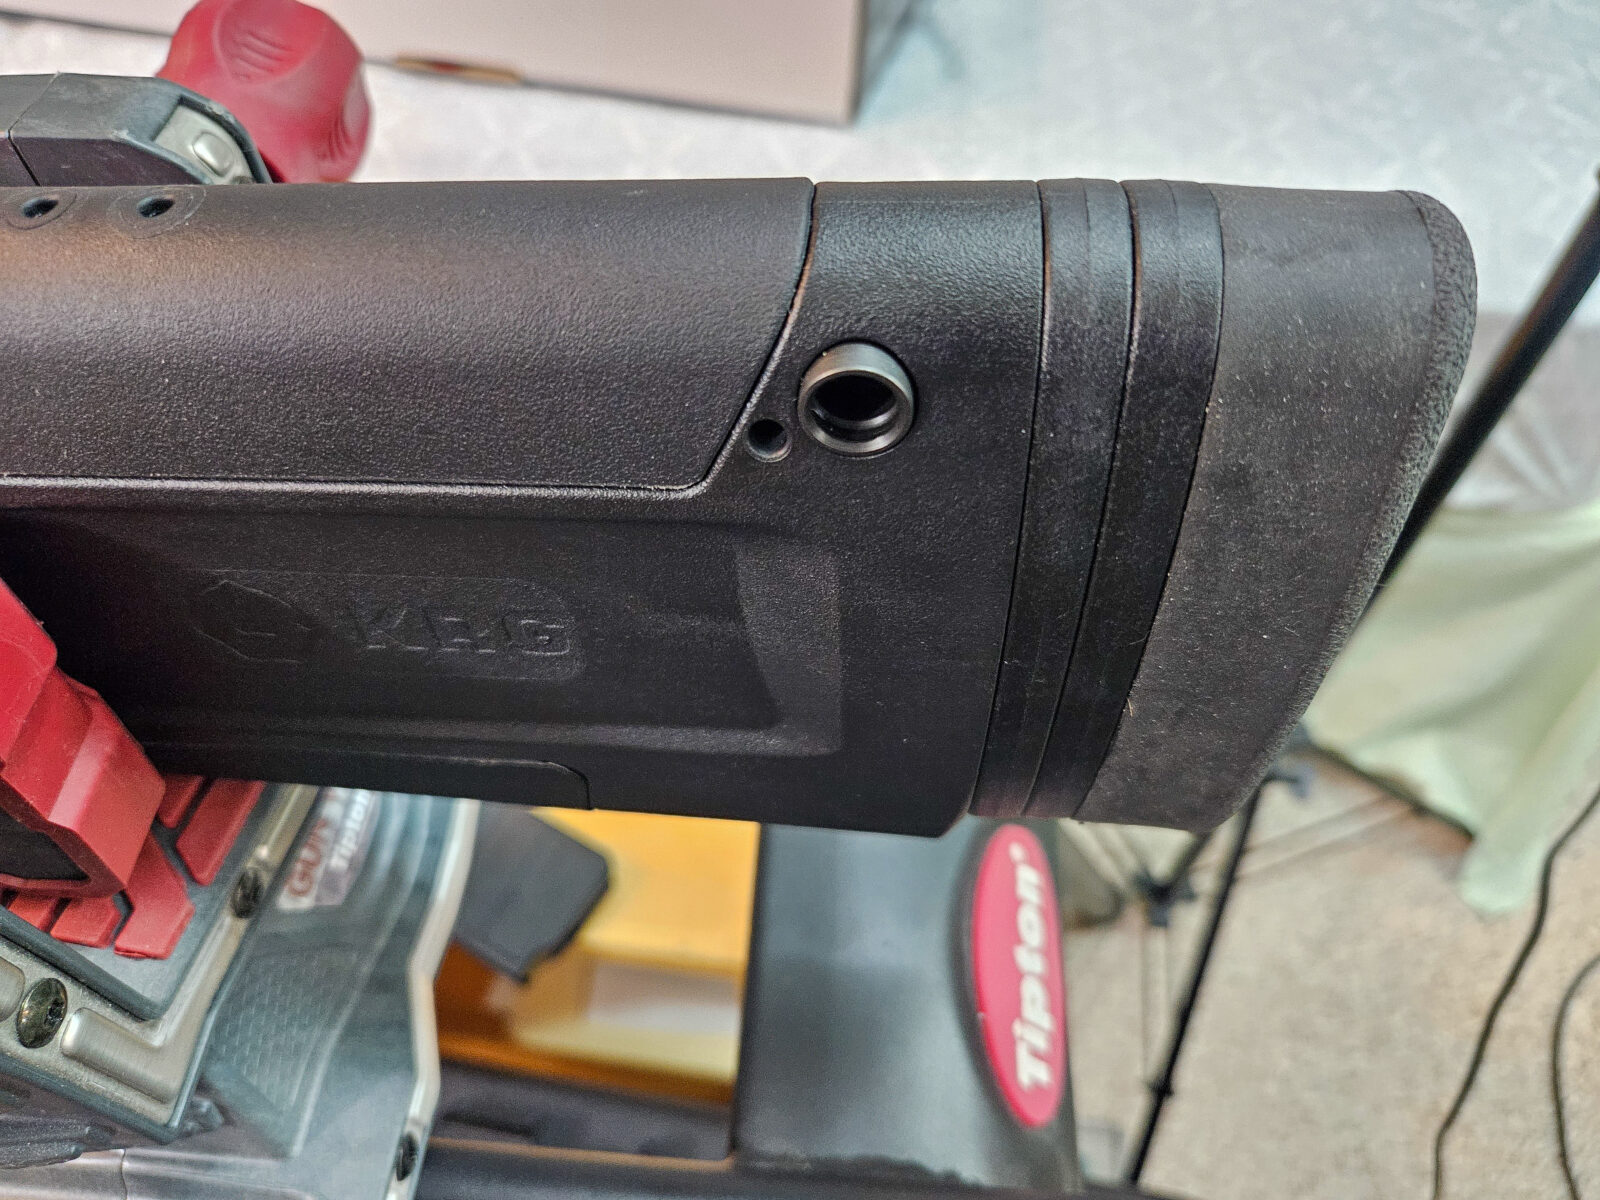
And the unit on sale that I bought has a stock is the Bravo chassis system from Kinetic Research Group (KRG). It looks like a stock but an aluminum chasis is under the skin.
The stock has M-Lok slots in it for accessores – but I do have an issue and will mention it below – it is honestly not bipod ready as delivered.
The stock accomodates AICS-pattern magazines and comes with a 5-round Magpul P-Mag.
The base weight is around 9.6-10 pounds depending on the specification sheet you read – there is a lot of substance to the rifle – especially given the M24 barrel profile
Each rifle has a sub-MOA guarantee
The Solus was designed to give the common man an affordable entry-level precision rifle. I’m just fine with that because the only Accuracy International product I could ever afford was a chasis system that I dropped a Remington .300 Win Mag LR XCR barreled action in.
In 2011, I dropped a .300 Win Mag Remington XCR LR barreled action in an AICS chassis. That’s the closest I ever got to an expensive precision rifle. I must say, I’ve had some great rifles since that did not break the bank from Bergara, Ruger, Sabatti and Savage. That is a Storm Case iM3300 before Pelican bought them.
At any rate, I read good reviews plus I’ve owned a few Aero Precision M4 and M5 rifles over the years and decided to give it a try. I certainly couldn’t buy the parts and assemble it myself for the price.
The Solus arrived in the fall of 2023 and only for a quick once over, I had to put it on hold while clearing other projects off the deck. In January 2024, I finally had time to work on it – although the temperature outside was in the teens and my unheated shop wasn’t much warmer. After careful negotiation with my wife – sounds better than I begged her – I set up lights, a table and my Tipton Ultra Standing Gun Vise.
In many respects, the Solus comes ready to go other than an optic plus needing the bore cleaned and then everything properly lubricated. A user manual is included with the rifle but click here if you need to get an online copy.
I did find four things I want to share with you that made a big difference for me:
Added a Precision Armament Hypertap Muzzle Brake
My L1-L5 vertabrae and I are no longer on speaking terms so recoil mitigation means a great deal to me now. On one hand the Solus weighs quite a bit by itself – let’s say 10# ballpark and then about about 2 pounds for the scope and rings — 12 pounds can absorb a fair amount of energy. The KRG Bravo recoil pad was decent but I still wanted more and knew a muzzle brake was the answer.
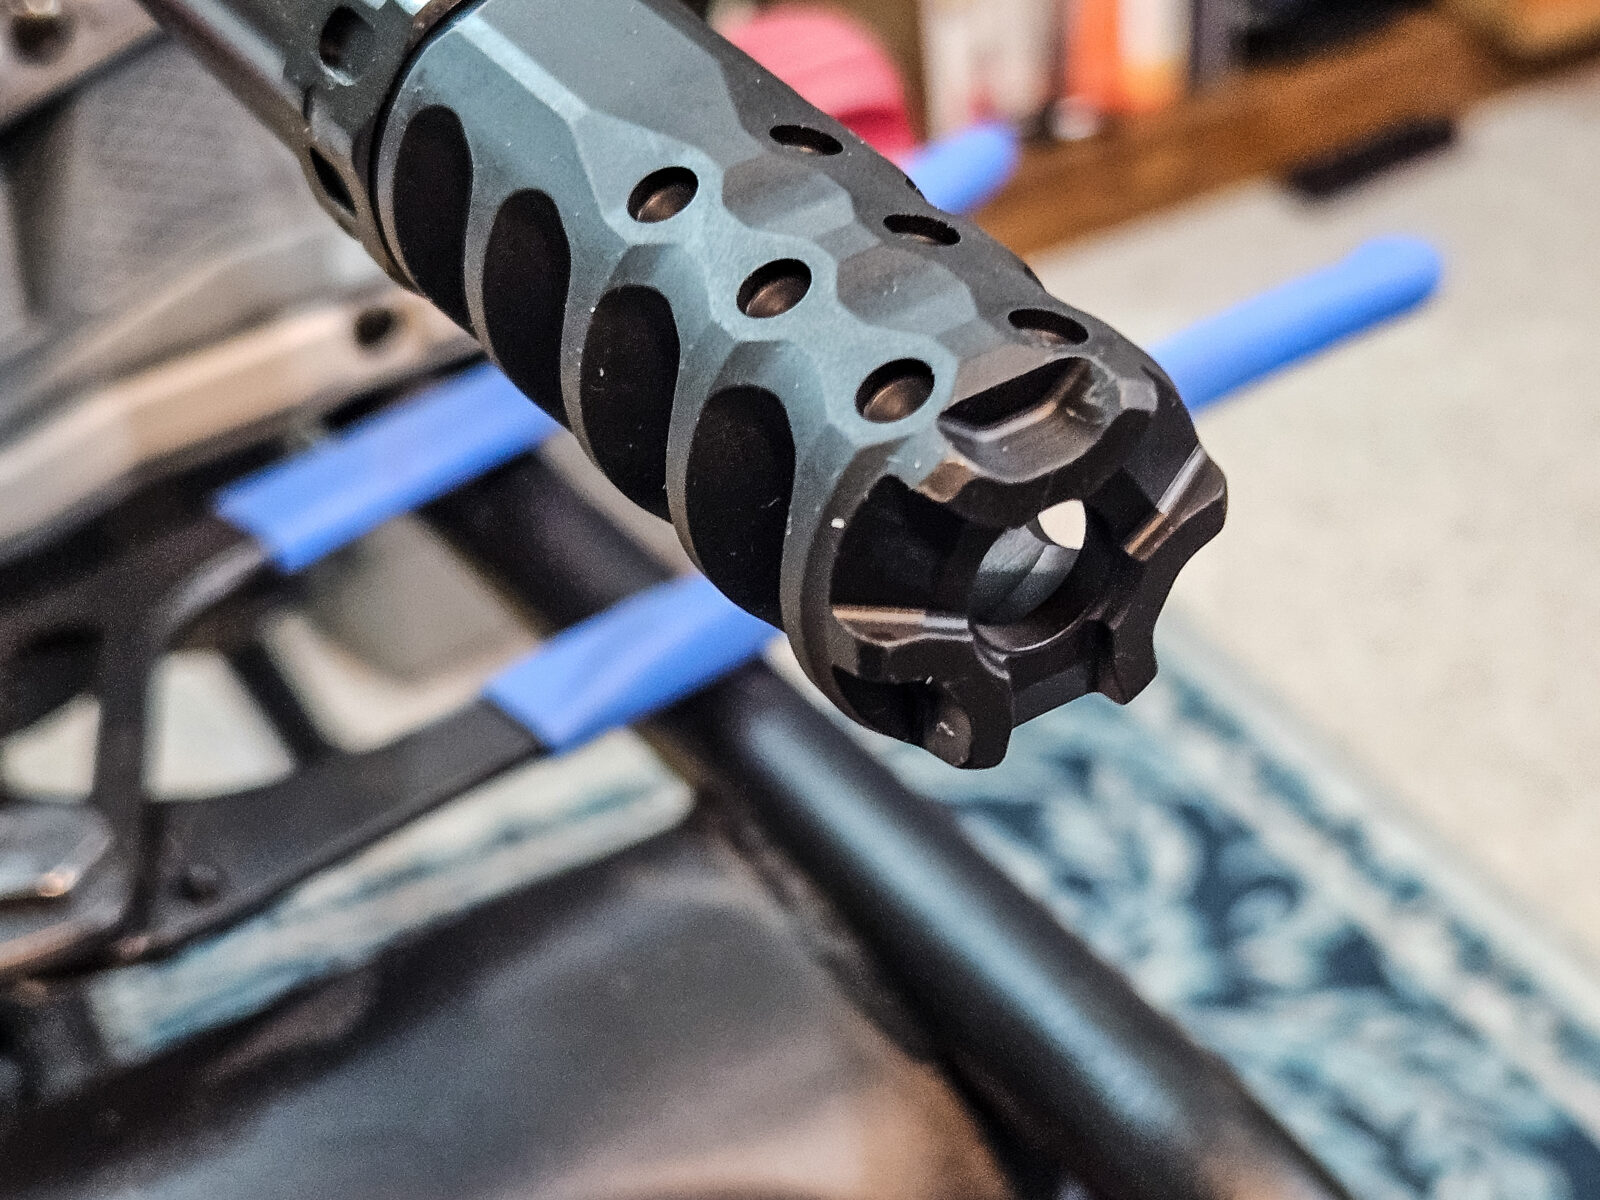
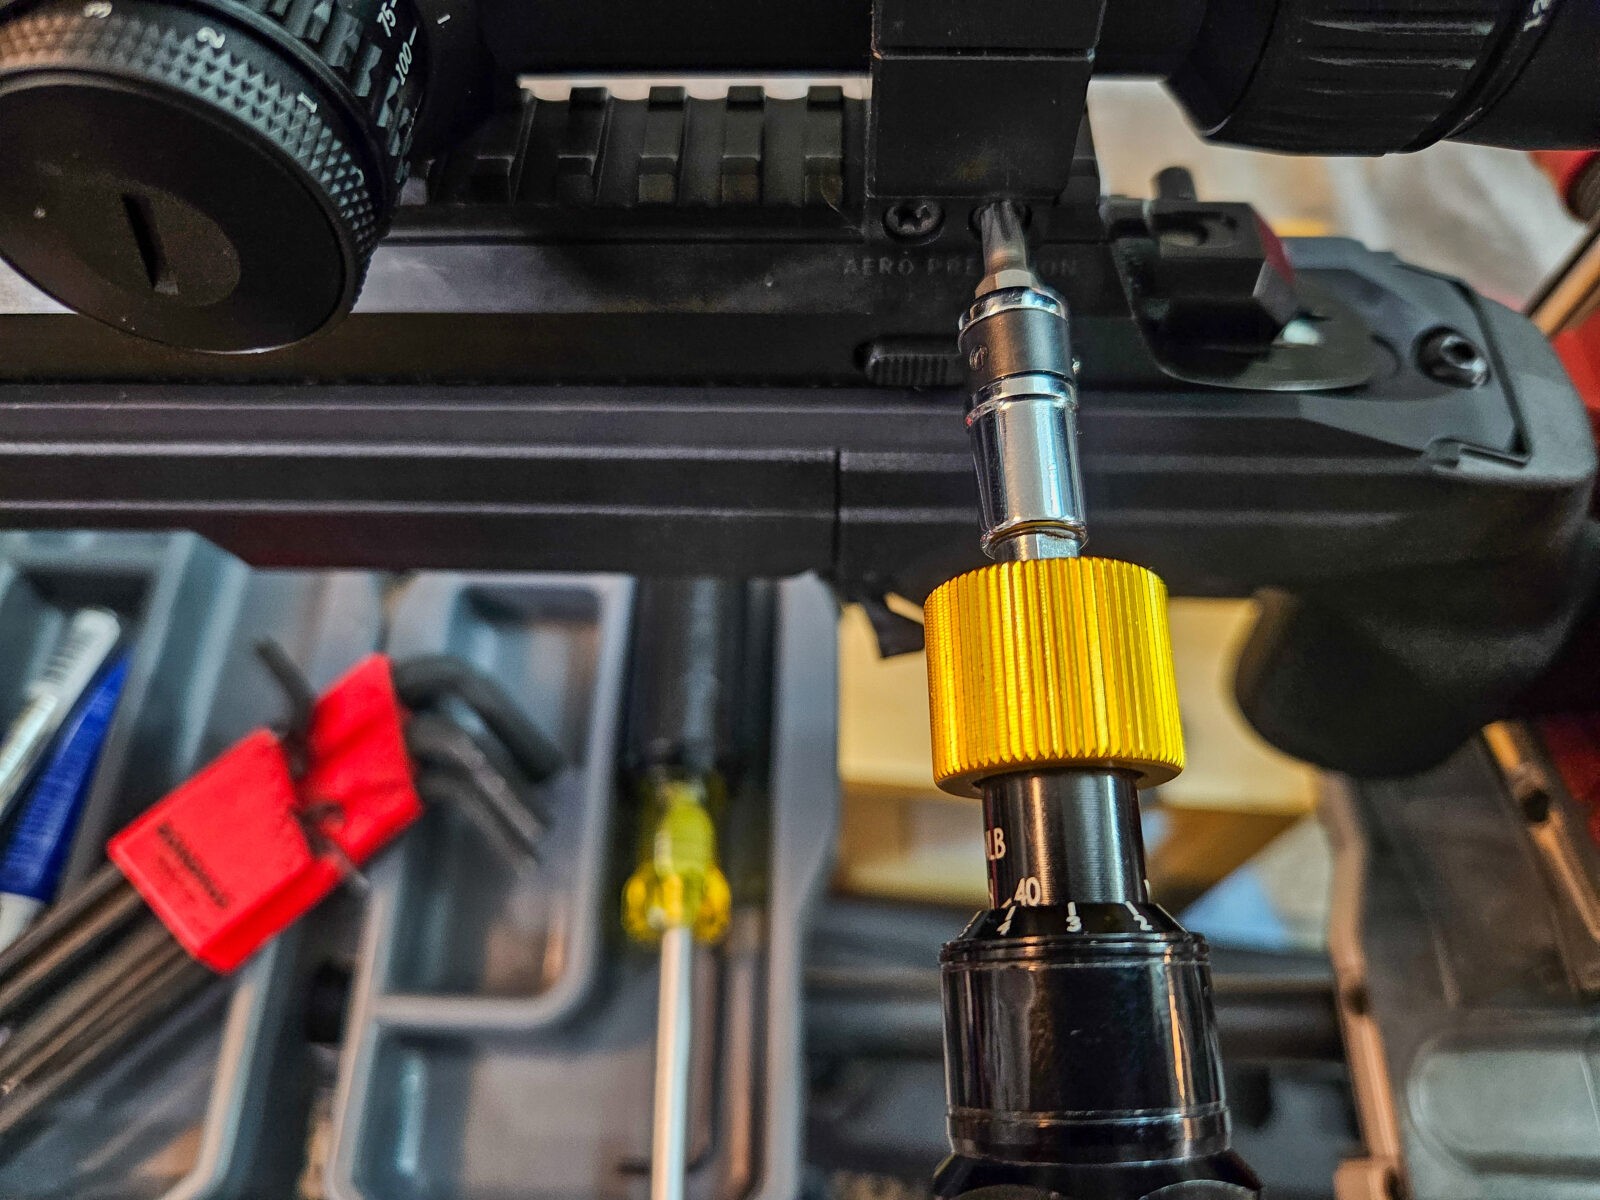
I did some reading and ordered in a Precision Armament Hypertap. It can cut felt recoil by up to 88% with little to no impacts on accuracy. Click here to visit their site.
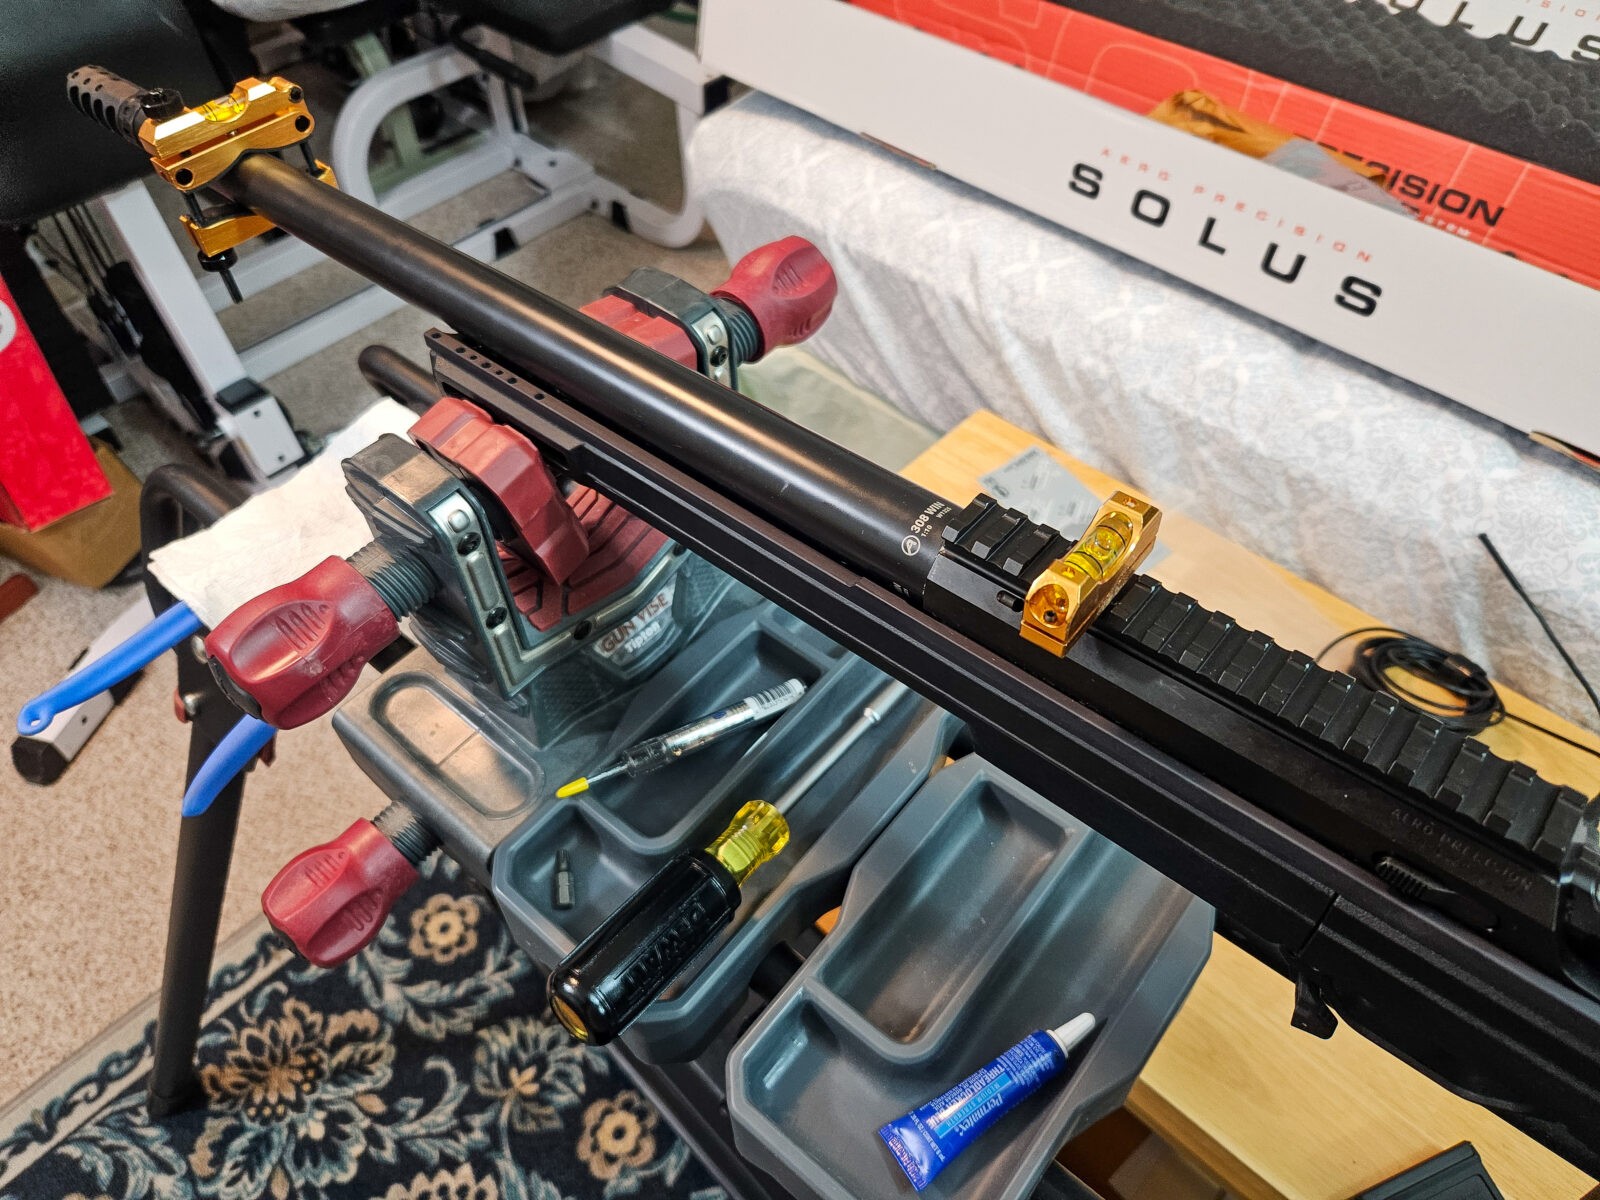
The Solus Bravo M24 is threaded. The size is 5/8-24 – meaning 5/8ths” diameter and 24 threads per inch (TPI).The Hypertap is a very interesting brake and reflects Precision Armament’s experience gathered over the years. If nothing else, visit their site to learn more. It uses two wrenches they include to get the timing right on the brake while tightening down the rear integral locking nut.On their site, read the installation instructions – there is a ton of flexibility if you want to use the identified divots to drill other holes to adjust lateral compensation. I left mine alone.
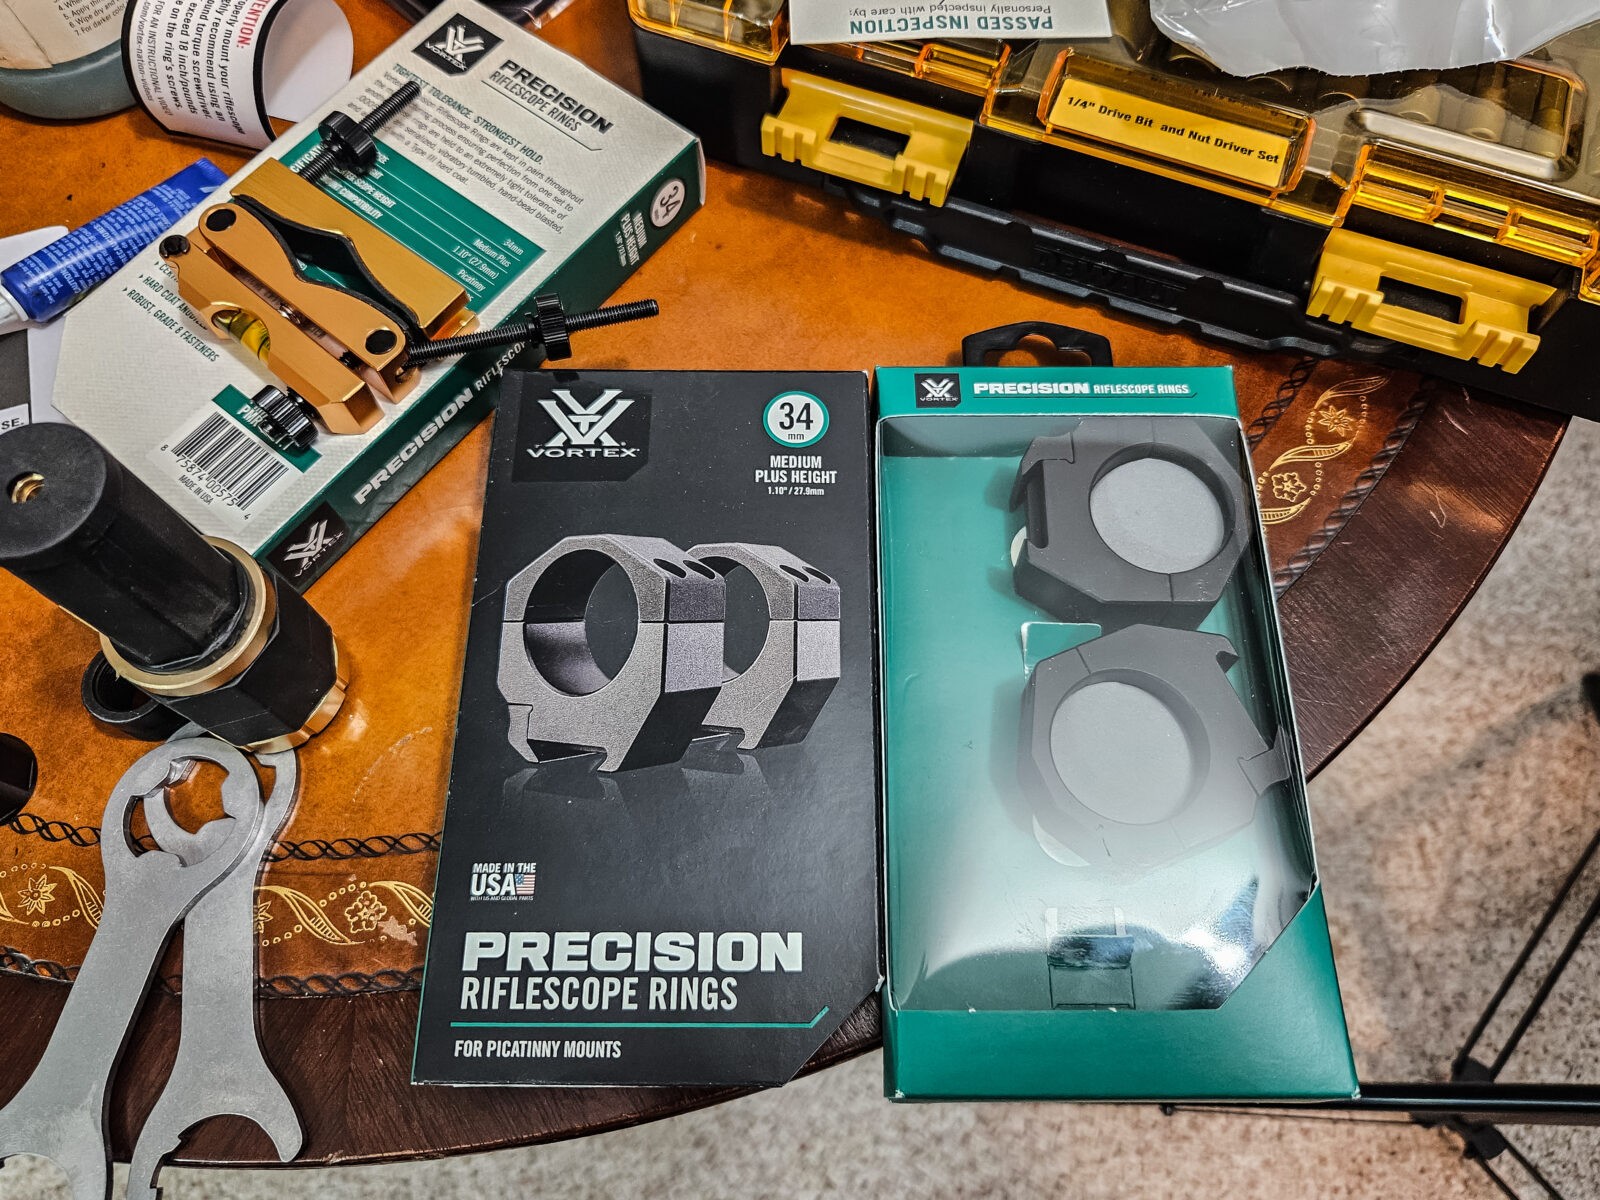
Added a Vortex Strike Eagle 5-25x56mm FFP Scope
I called up my friends at Vortex and talked about what I wanted to do with the Solus and they recommended I buy a Vortex Strike Eagle 5-25x56mm FFP scope and 34mm precision rings to go with it. With a 34mm tube and 56mm objective, a ton of light can be gathered No to mention this scope has their latest optics technology in it.
The Solus receiver has an integral 20 MOA Picatinny Rail scope mount. Look at that chunky pistol grip.A few key things for the scope – the Vortex medium height 34mm precission rings, my Wheeler scope level kit and a Wheeler green laser bore sight. The Dewalt bit screw driver set reflects my old Wheeler bits are starting to show their age and rounding over. What you don’t see is my Vortex torquing bit driver I use for optics work.I first use the Wheeler scope level set to level the rifle and barrel level. Once the barrel level is set, I can remove the level on the receiver and install the rings.I started installing the ring caps on the scope and realized I better get thee length of pull that I wanted before finalizing the scope position and level. The KRG Bravo comes with three recoil pad spacers of different thicknesses to get the length of pull I wanted.I then finalized my scope position and leveled the scope by putting a small level on the top turret and trued it to the level on the barrel. After that, I used the Wheeler green laser boresight outdoors to approximately zero the scope.Vortex recommended torque spects were set using a Vortex torquing screw driver. I always take care to reset it to zero when I am done so there isn’t a load on the limiting spring causing it to lose accuracy over time. Note the use of Torx screws. I so wish the industry would stop using hex heads that round over and move to Torx instead.
Not surprisingly the scope is incredibly bright and clear. Vortex ups their game on quality with each new generation of scope and they are all backed by their no-hassle warranty.
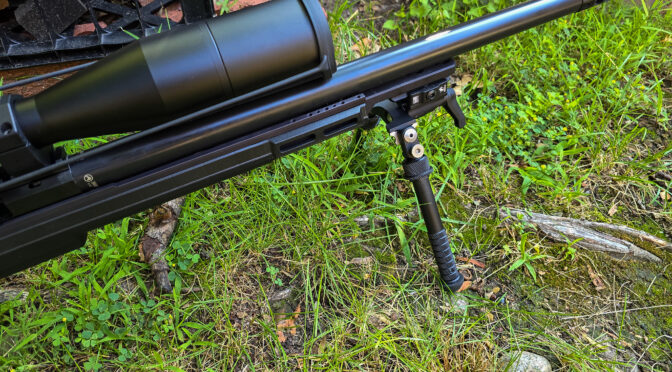
Added a Spigot To Run a Bipod
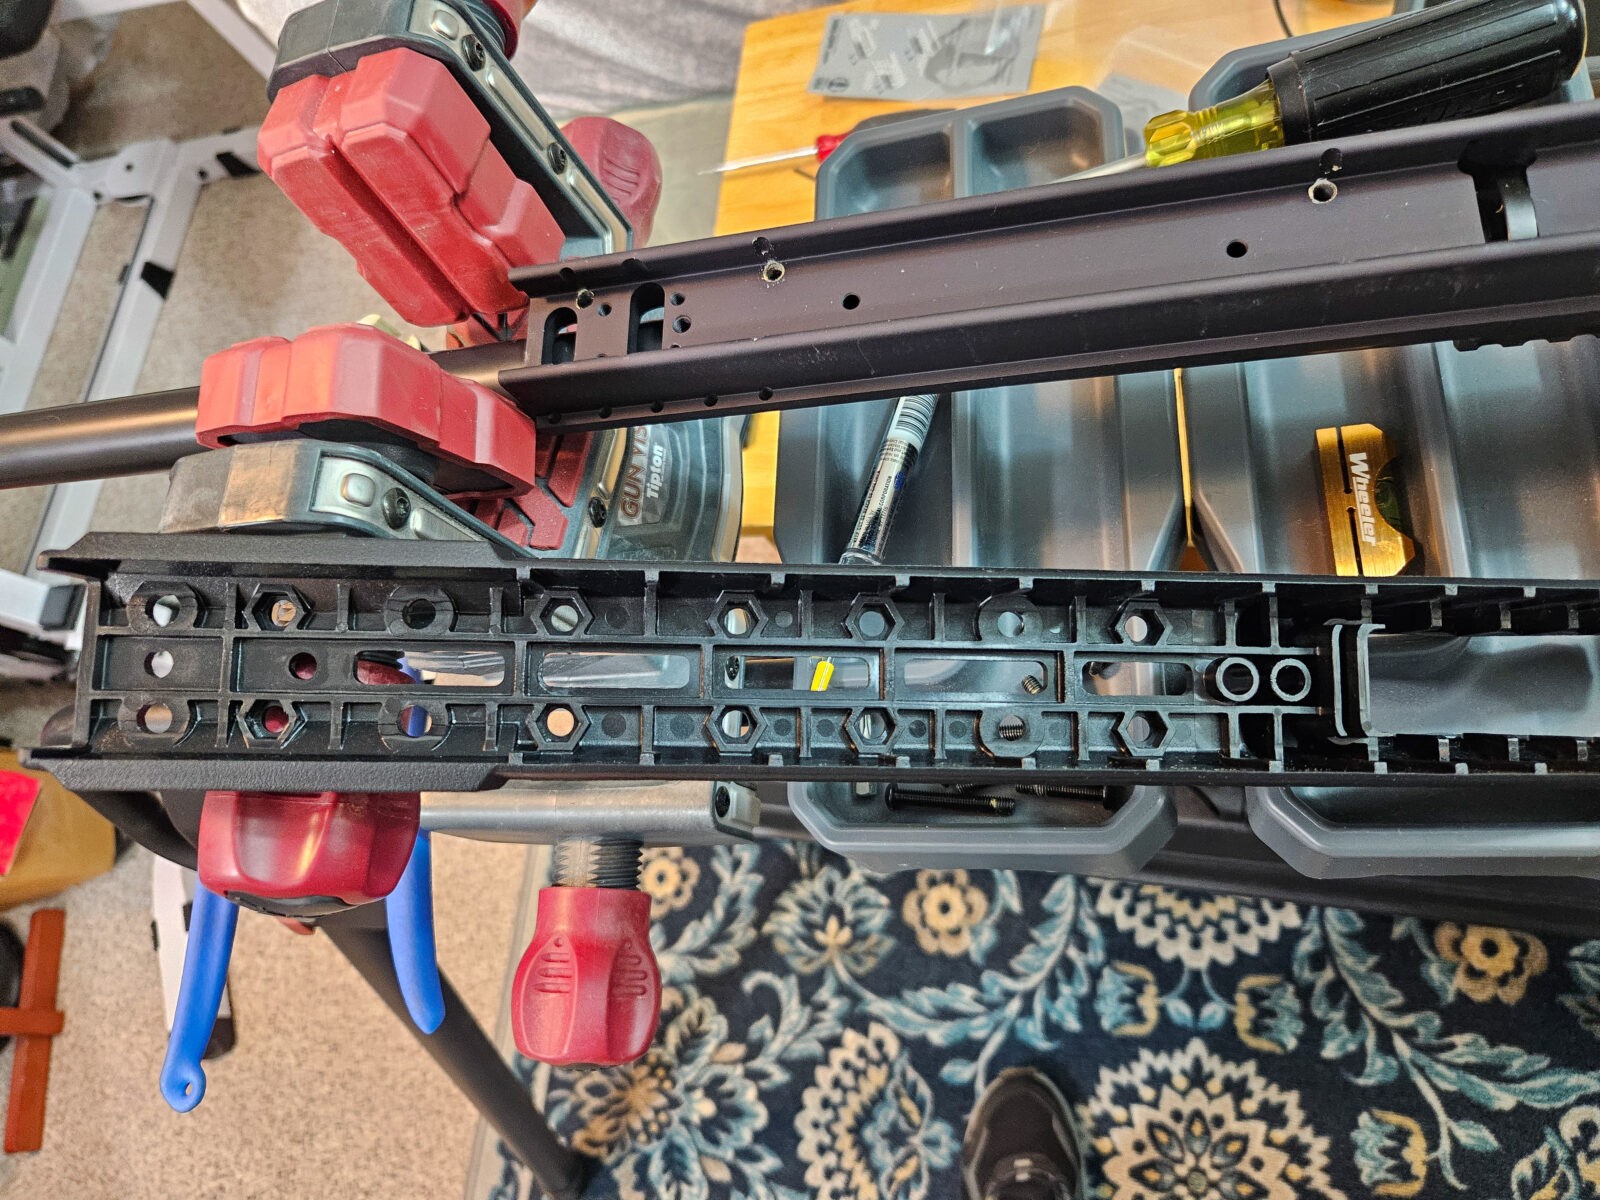
To be honest, the one thing that really surprised me is that the KRG Bravo is not truly hard-use bipod ready. Sure, there is a sling stud there or M-Lok slots where you can install a piece of rail section they provide. The problem is that the bottom of the rail system is just polymer and not even very thick. You’d be connecting a bipod to a polymer rail sitting on a polymer handguard that would be absorbing recoil, getting hit wen moving around, etc. It just didn’t sit well with me.
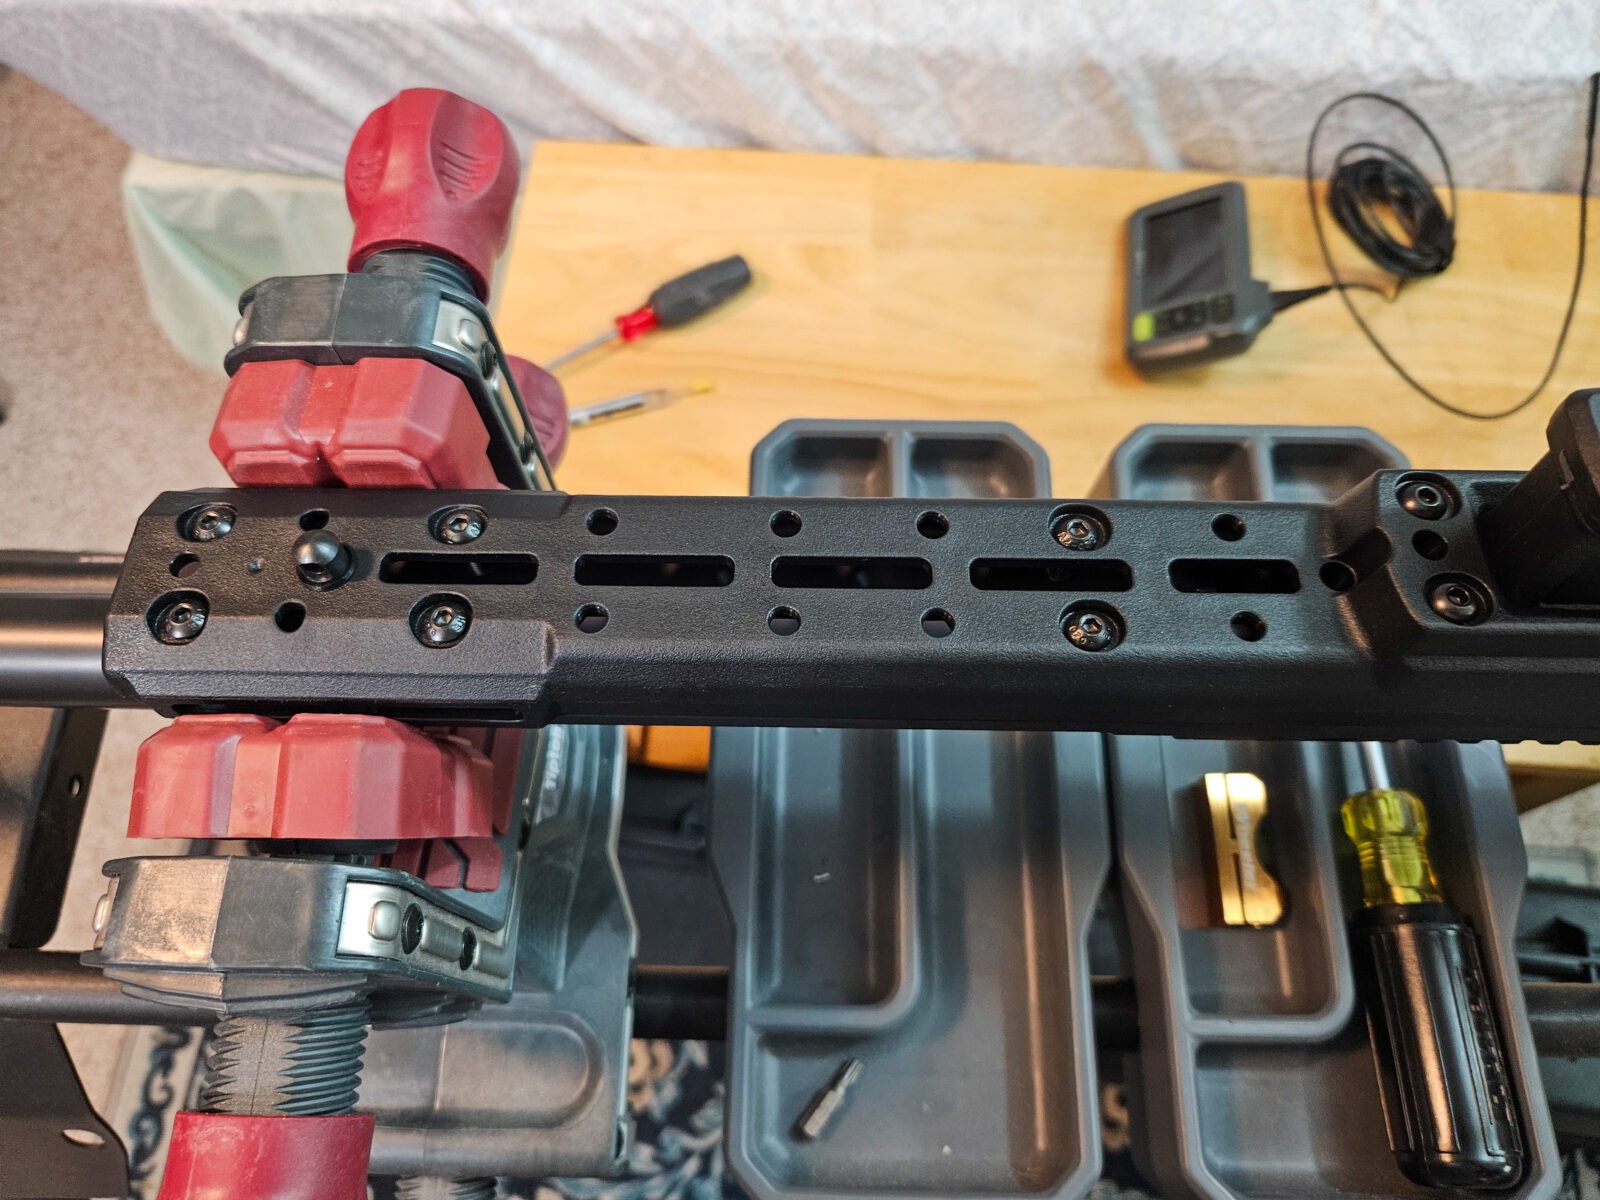
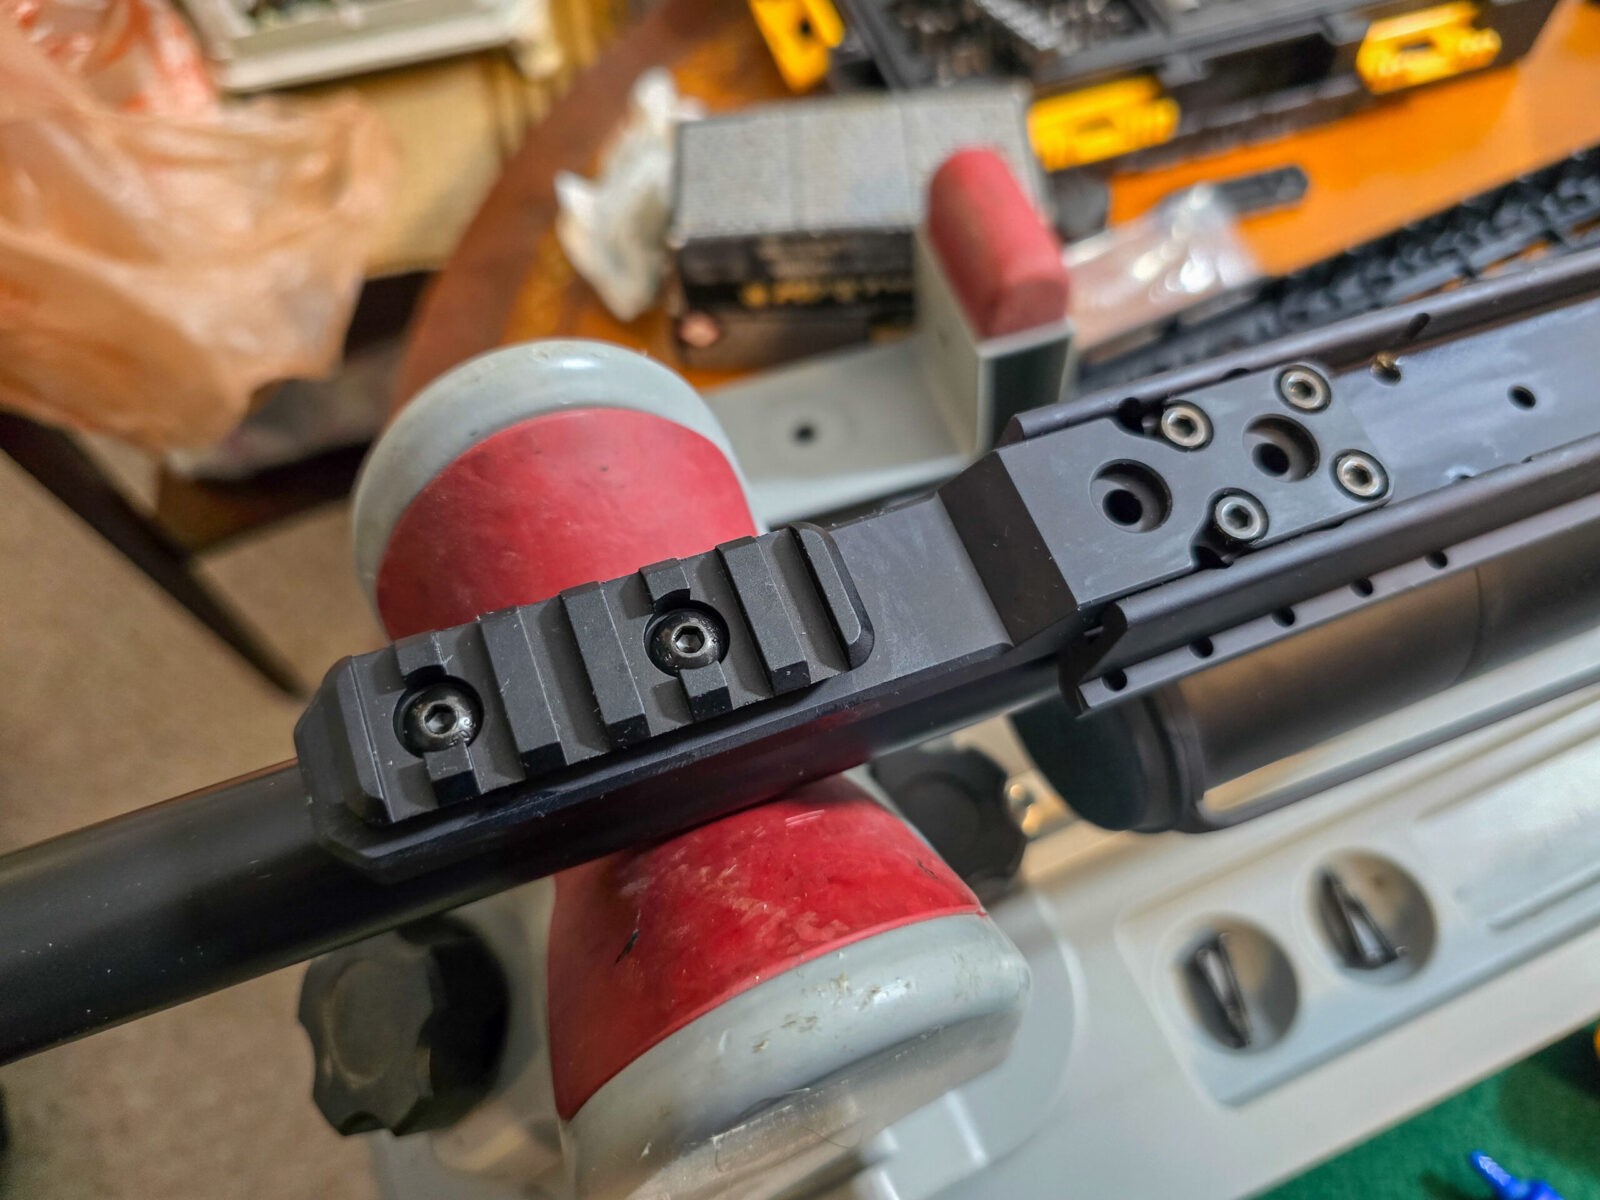
You’d think you could just mount a bipod using an M-Lok slot – right? I wouldn’t recommend it.The issue is that the polymer is a relatively thin skin that covers the actual aluminum chassis. Look at all of the holes in the chassis – they must be there for a reason.
What piqued my curiosity was seeing all of the extra holes in the bottom front of the chassis. Why were they there? Playing a hunch that there might be some kind of reinforcedd bipod connection, I visited the KRG website. Sure enough, there is.
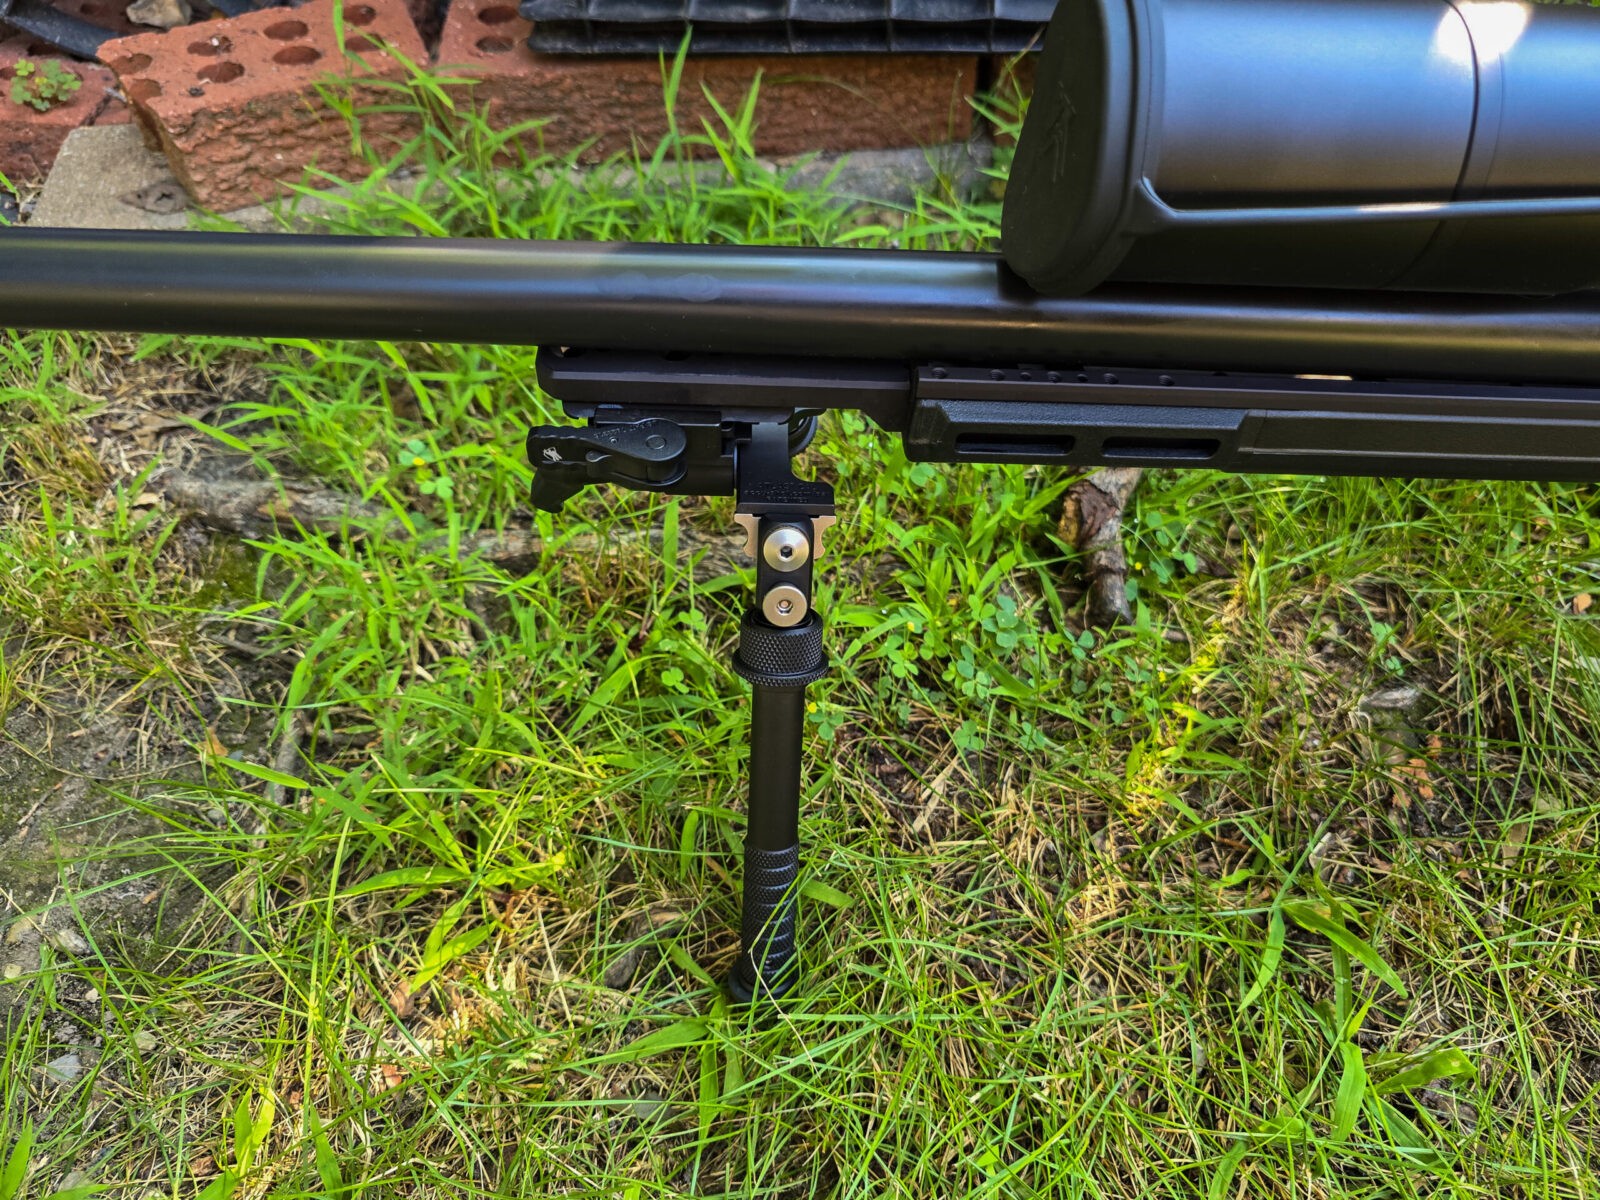
KRG refers to them as “spigots” and they have four different types. They vary in length, what can be attached to them, etc. I bought the “minamalist” model because all I wanted was basically an aluminum bar where I could mount a Picatinny rail section.
I also had to buy a piece of aluminum rail from them. I’m sorry, but I’m just not cool with attaching a bipod to a rifle with some recoil via polymer. I’m a die-hard Atlas bipod user at this point and I buy them with the American Defense Manufacturing (ADM) clamps on them.
This is the KRG “Minimalist” spigon with an aluminum rail section attached. It is absolutely rock solid. My opinion is that this should have been included with the stock at the time of the Solus Bravo purchase or at least be given an option to purchase it. It took digging on my part to question the bipod attachment method and then to find out about the Spigot. I had to call and find out that the Minamilist didn’t include a aluminum rail section – although I could have used the polymer rail that came with the rifle, I wanted aluminum. I actually place the responsibility with Aero Precision – KRG just gave them what they asked for.
I’ll write up another post on the actual installation of the spigot. It’s pretty straight forward and the result is a rock solid bipod mount.
Last comment on the matter – I really did not expect to need to buy more accessories for a solid bipod mount – it came to about $120. Granted plenty of guys don’t use bipods but also, a lot do – including myself. I think Aero should have disclosed that a spigot was recommended for bipod use if nothing else – an option to buy one would have been even better. This is no fault of KRG’s just to be clear. They sold Aero what they asked for.
If I had known this bipod issue, I would have moved to Aero’s full blown chassis system as it wasn’t much more at the time of purchase (about $200-300 more at the time). Buying the chassis by itself now though is prohibitively expensive – at least for me – at $729-ish list. In general though, that is a pretty good price for a chassis of that type.
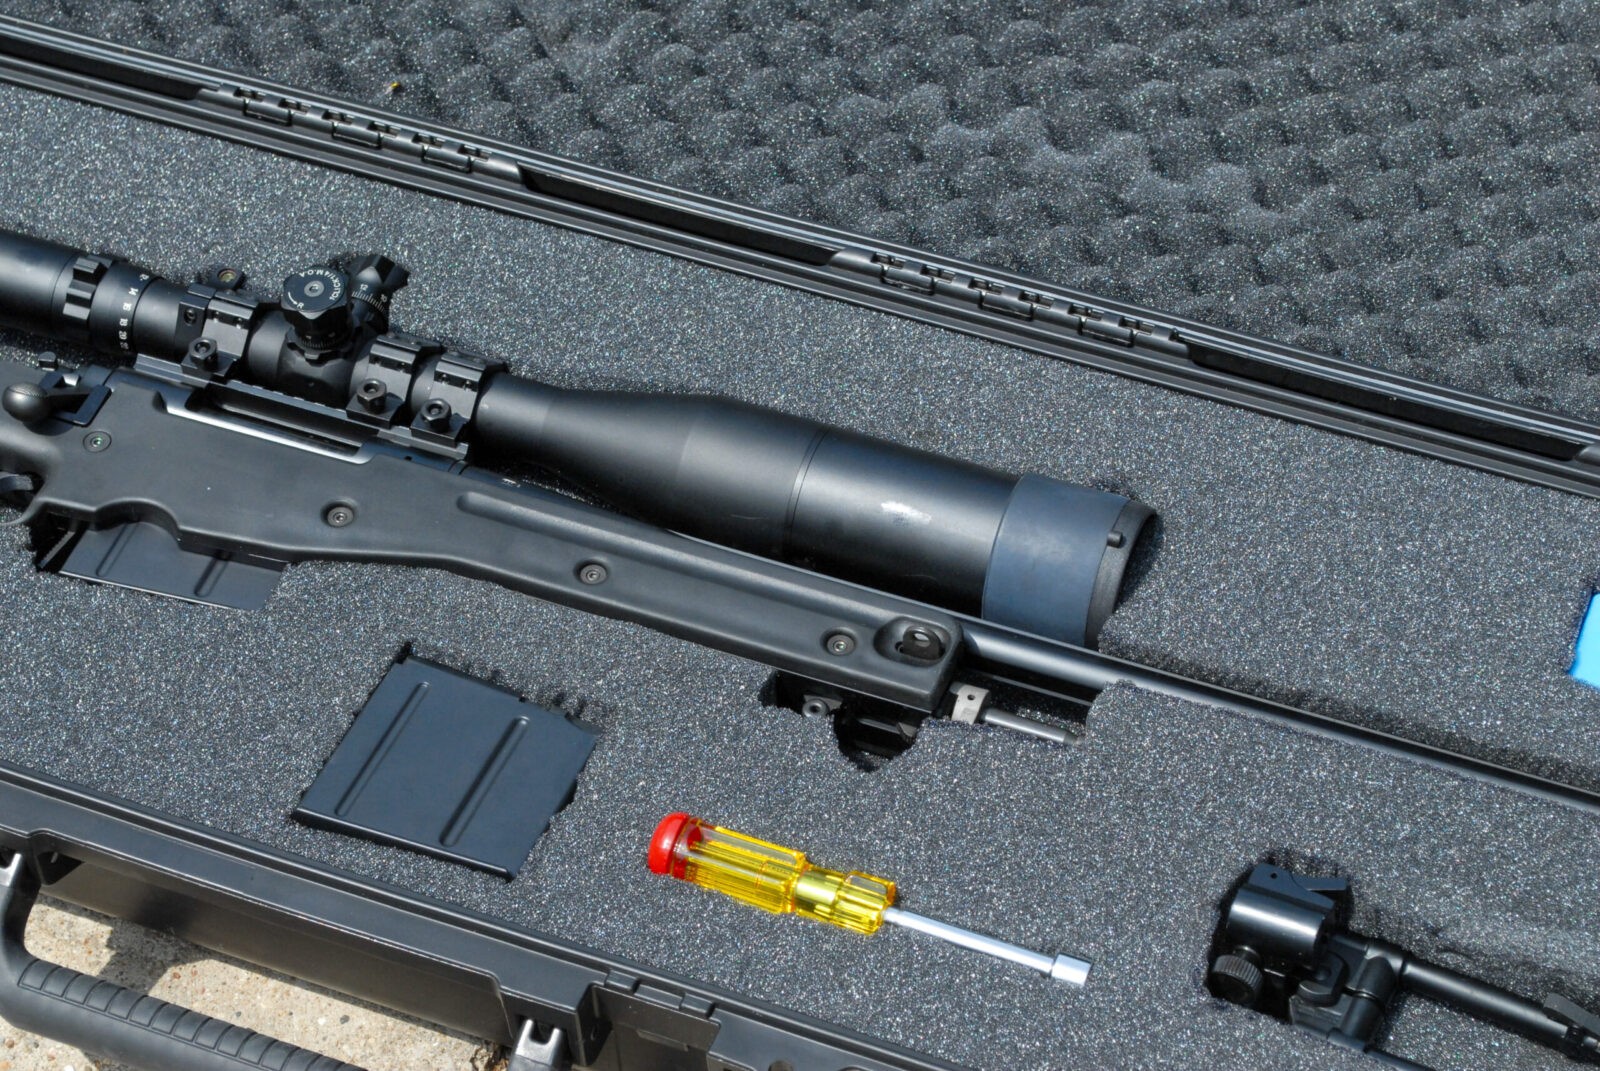
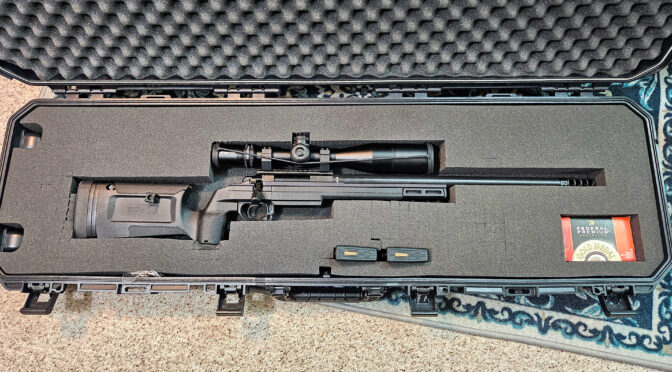
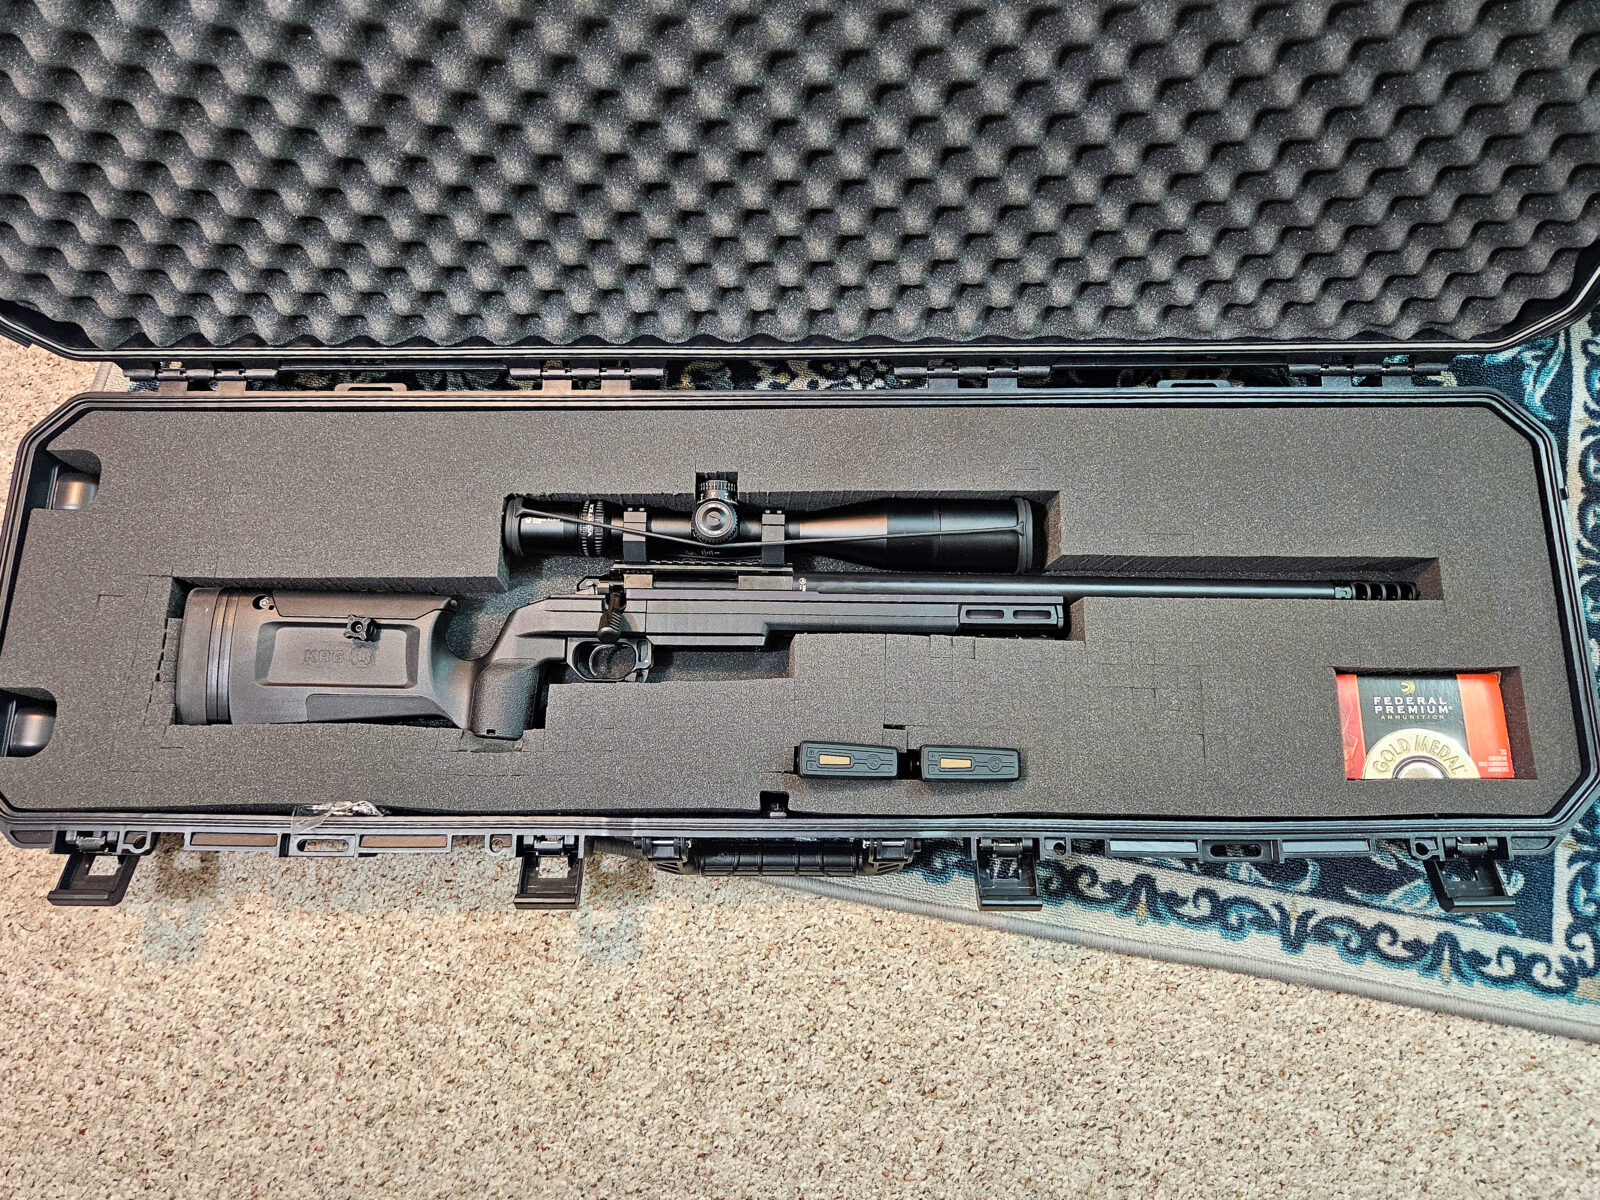
Call me paranoid but whenever I build something where I care about the accuracy, I want it protected in a hard case. I used to spend the money on Pelican and Storm cases (now owned by Pelican) but those things can get expensive.
I’ve been a fan of Plano All Weather cases for years now. I kid you not, I looked up in my Amazon purchase history and I bought my first one in 2014 (they were “AW2” cases back then and Plano has improved them since and now refers to them as the “All Weather Gun Cases”. I have bought quite a variety of sizes since. Why? I honestly don’t think you can buy a better case at their price. I’m not jumping out of planes but I do want my firearms protected from life’s drops, hits and whatnots. I had an overhead pipe start leaking one year and the rifles in Plano All Weather cases stayed dry.
Seriously heavy polypropylene case construction – I did receive one busted once. Amazon managed to put a fork truck tine completely throught the cardboard box, the case and out the other side. Their drivers still delivered it!! Amazon customer service sent a replacement after I showed them photos but still… Over the years, I have dropped my cases from cars, SUVs and pickups after loads shifted and then a door was opened — they held up just fine. No damage every to contents, loss of zero, etc.
The cases are water tight / dust tight with a full o-ring seal all the way around the cover
Really nice solid handes and latches
The latches are keyed and can be locked
Wheels on one end for easier transportation
Pluckable foam for fitting
Pressure valve to compensate for altitude and temperature changes – you really ought to care about this. Try taking a case from a hot range and opening it in a cold basement once it has cooled off and the air volume has shrunk – it is a bear to open without a valve. That exact example is why I always look for valves on watertight hard cases now.
TSA approved if you plan to travel with one.
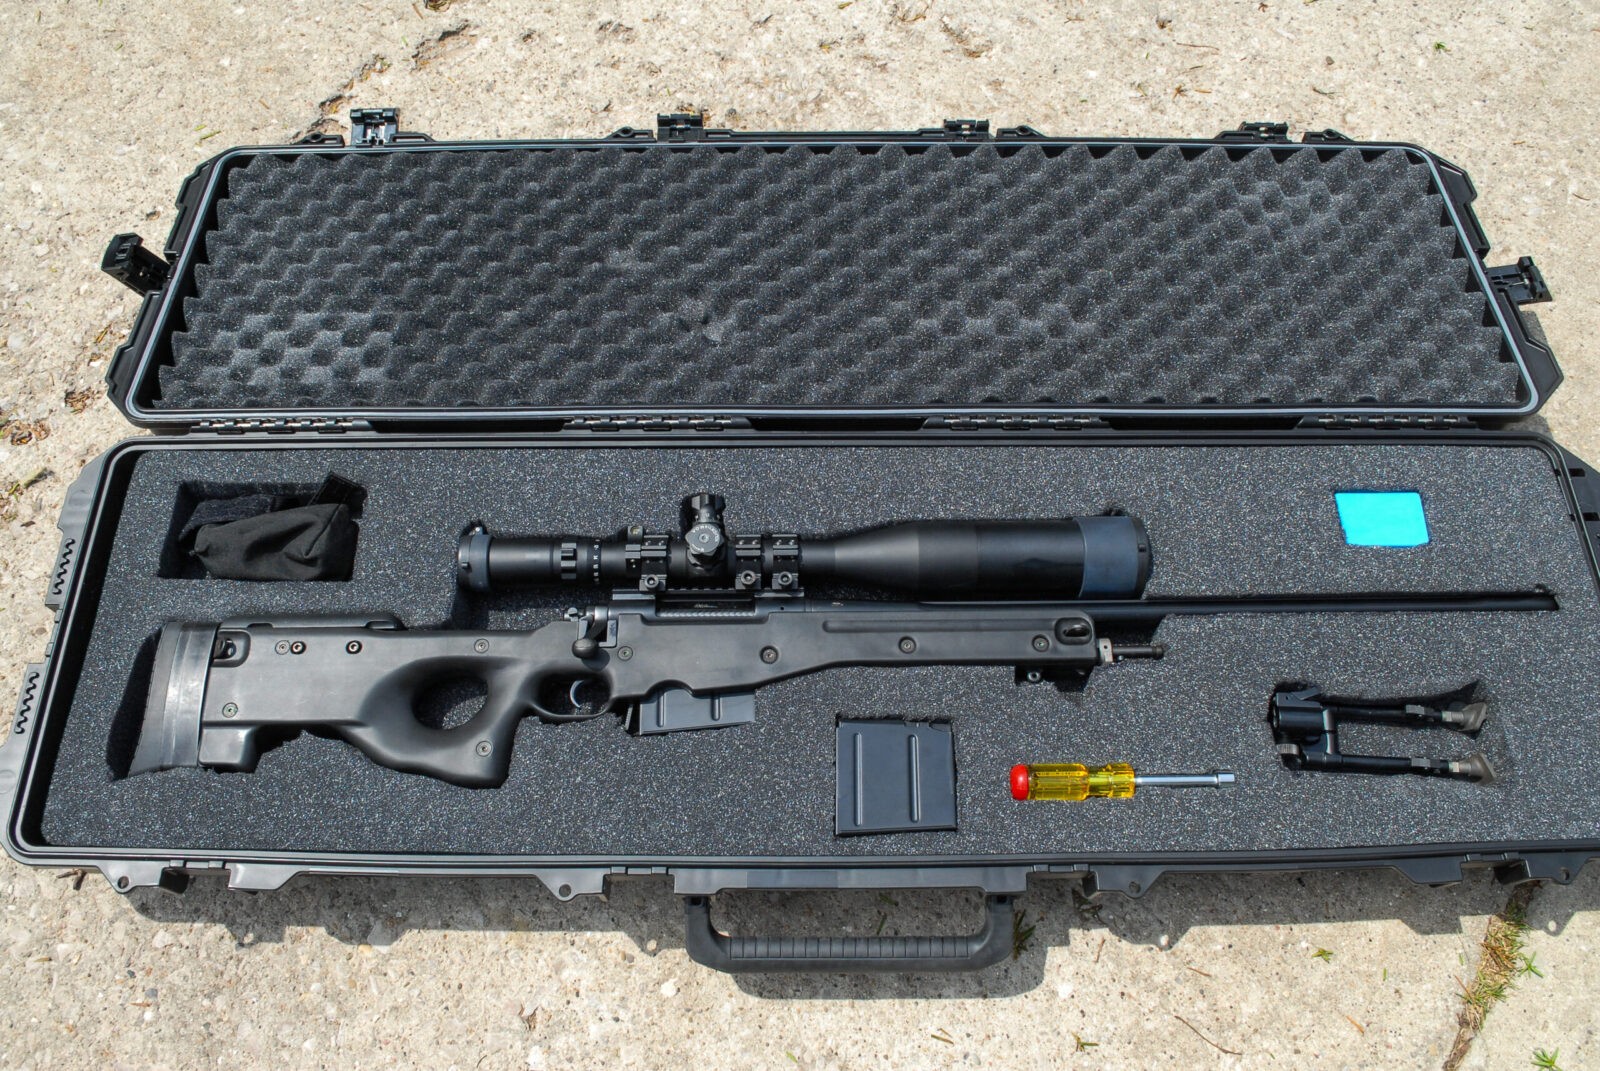
Internal dimensions are 51.5″ long x 14″ wide. Depth of the top is 1.75″ and depth of the bottom is 3.25″.
This is a 52″ Plano All Weather Gun Case. In general, I really like these cases and have used them for years. Their pluckable foam allows you to quickly and easily custom fit firearms and accessories. Once fitting is done, I will spray the back of the pluckable foam layer with 3M Super 77 spray adhesive, push it down on the bottom layer and then let it set up to keep everything in place.
Summary
The Solus arrived in great shape – fit, finish, etc. were all superb. There were no surprises in terms of adding the muzzle brake and optic. Adding a bipod, which should have been a no-brainer exercise in adding a rail section to an M-Lok slot, turned into more expense but it is really nice mount – I’ll give them that.
I’d recommend the Solus barreled action and Triggertech trigger – no reservations there at all. I need to spend some time shooting the Bravo chassis at this point. The fit of a stock or chassis is a very individual fit item.
I need more time behind the rifle at the range to make a final decision about the Bravo chassis. I may decide to go hunting for a more adjustable chassis with a bit less “chunky” pistol grip.
I hope this helps you out.
Note, I have to buy all of my parts – nothing here was paid for by sponsors, etc. I do make a small amount if you click on an ad and buy something but that is it. You’re getting my real opinion on stuff.
If you find this post useful, please share the link on Facebook, with your friends, etc. Your support is much appreciated and if you have any feedback, please email me at in**@*********ps.com. Please note that for links to other websites, we are only paid if there is an affiliate program such as Avantlink, Impact, Amazon and eBay and only if you purchase something. If you’d like to directly contribute towards our continued reporting, please visit our funding page.